Finishing the balcony inside - the choice of the right material. Do-it-yourself interior decoration of the balcony Step-by-step decoration of the balcony with your own hands
Most people use the balcony as a place to store old and unnecessary things that are simply a pity to throw away. Interior decoration a balcony will significantly expand the living space, equip a greenhouse, a small office, a recreation area or a gym. Below are some finishing ideas.
This is one of the easiest and cheapest ways to finish balconies. To carry out this operation, you will need the following tools and supplies:
- Perforator and chisel attachment, primer, hammer, vacuum cleaner - for surface preparation.
- Measuring containers, a large bucket and a drill with a mixer nozzle - for kneading.
- Roulette, marker and level - for marking.
- Reinforcing mesh, plaster, spatulas, as a rule - for basic work.
The interior decoration of the balcony begins with the preparation of surfaces. The first step is to remove everything unnecessary from the working area (furniture, things). After that, remove the old coating: the paints are removed with a solvent and scraped off with a spatula, the plaster is knocked down with a perforator, the hinged structures (various panels) are removed from the profiles, and the profiles are dismantled.
Then you need to tap the wall with a hammer to identify weak fragments. If any are found, then they are removed, and the potholes are closed cement-sand mortar. After that, the working surfaces are treated with sandpaper to remove bumps and roughness. At the end, the resulting dust is removed and a primer is applied in 2 layers.
 Step by step preparation walls for plastering
Plastering is carried out as follows:
- First of all, a reinforcing mesh is installed on the screws. For these purposes, you can use a special product, a chain-link mesh or a conventional welded structure. It is important to stretch the product well so that the plaster does not subsequently sag along with the mesh.
- Then prepare a solution for roughing. It is collected on a wide spatula and transferred to a meshed surface, after which it is leveled with narrow spatulas.
- A PVC mesh is applied to the still fresh material and left to harden. Next, a finishing layer is applied using the same technology.
- After it dries, the surfaces are treated with sandpaper.

Before finishing the walls on the balcony, it is important to decide what the decor will be. After plastering, you can use any options: paint, tile, stone. Also great solution will be decorative plaster on the balcony. The mixture is prepared according to the manufacturer's recommendations, after which it is applied to the surface in a thin layer. Until the mixture has dried, you need to take a brush, roller, sponge, in general, any thing that can leave a mark on fresh plaster, and process the coating with it to obtain a texture.

Plasterboard sheathing
Finishing the balcony with drywall is a fairly common option. Its popularity is due to the ease of installation and the relatively low cost of everything you need. For this operation, you will need the following tools and materials for the interior decoration of the balcony:
- Building level, tape measure, marker - for marking.
- Hydro and vapor barrier, insulation.
- Jigsaw or hacksaw for cutting boards.
- Profiles, fasteners, hacksaw, hammer
- Perforator or drill, screwdriver, wood scissors.
- Rule, drywall, polyurethane foam, putty.
Frame installation
Finishing balconies inside with gypsum boards begins with the installation of metal profiles on which the entire structure will rest.

First of all, old coatings are removed from the ceiling and walls and cleaned of dirt. The cracks are sealed with mounting foam, after which the surfaces are treated with an antiseptic primer. The ceiling must be drawn with two perpendicular lines with an intersection in the center. After that, step back 5 cm from the junction with the ceiling and draw 4 horizontal lines along the walls.
Marks equal to 1/3 of the length of the gypsum board are applied to the ceiling. Then the profiles are cut and installed with a puncher and dowels along the marked lines. As a result, a frame of profiles with an interval of 40 cm should be obtained on the ceiling.
 Metal construction for plasterboard ceiling sheathing
 After that, the walls are drawn with vertical lines every 60 cm. Similarly, with the ceiling, metal profiles are installed along the markings, after which the rolled insulation is laid.
Plasterboard installation
The interior decoration of balconies with drywall starts from the ceiling and ends with the walls. Material Installation Guide:
- They cut the sheets of the required sizes and shapes, make holes in them for lamps, if any. A chamfer is removed from the plate (the edge is cut off) so that later it will be easier to putty.
- The first sheet is set at the corner, after which they move to the center. Self-tapping screws are screwed at intervals of 15-20 cm, while the caps of the fasteners are sunk into the surface.
- At the end, the sheets are coated with a primer, the seams are pasted over with a sickle and putty.

After that, further decoration of the walls on the balcony is carried out with the help of paint, wallpaper, and so on.
Finishing balconies with decorative stone
Decorating a balcony with a decorative stone is a rather original procedure. The owner of such a room will be able to boast of a truly modern and unusual design.

Preparatory work includes the following steps:
- Removing the old coating, cleaning the surface, applying a deep penetration primer.
- Sealing potholes with cement-sand plaster.
- Installation of reinforcing mesh on self-tapping screws.
- Applying a thin layer of plaster to drown the mesh in it.
- Treatment of corners with sealing mastic.
stone laying
Finishing the balcony with artificial stone begins with grouting the surface with sandpaper and removing the resulting dust. Do-it-yourself interior decoration includes the following steps:
- Prepare a special glue for laying stone.
- Apply glue to a small area of \u200b\u200bthe surface near the corner.
- The first stone is pressed against the mortar and the correct installation is checked with a building level. This is how the first row of material is laid.
- The installation of the next row is carried out in a checkerboard pattern, installing plastic crosses to form seams.
- After installing all the decorative elements, you need to leave the wall to dry for a day.
- At the end, the seams are treated with a special grout, and a water repellent is applied to the surface. This is done to protect the material from the harmful effects of moisture.

Important! Before finishing the balcony inside, it is important to decide on the order of work. The floors are equipped either a few days before the walls are processed, or a day after.
Wall decoration with cork
Finishing the walls of the balcony with cork allows you to protect them from the occurrence of harmful microorganisms, as well as to insulate the room.
 Decorating a balcony with cork
 To sheathe surfaces with cork material, you will need the following tools:
- Plumb, level, marker and tape measure.
- Brush, roller, spatula.
- Rubber mallet, scissors, usually a hand press.
Preparatory work
Before finishing the balcony with a cork, the following operations are carried out:
- Remove old coatings, clean surfaces.
- Cracks are sealed with mounting foam and membrane vapor and water insulators are applied.
- The joints between the webs of the material are sealed with mounting foam.
- Drywall is mounted on the walls and ceiling, the installation instructions for which were given above. Plates of material are treated with a primer.

Important! This finishing material requires special conditions - the cork coating must be installed at a temperature of 17 to 29 above zero and a humidity of 65%.
Plug installation
Cork material for finishing is first cut into fragments of the required size and shape. Then, using a plumb line and a tape measure, the center of the wall to be processed is determined. The first piece of material is applied to this point, after which the entire wall is sheathed from the center to the corners, while each new row must be started either from half of the fragment, or from the whole, imitating brickwork.
After all the walls are lined, the interior decoration of the balcony with your own hands can be considered complete. No further action is required, although some masters prefer to further oil the coating.
Wooden lining
If the question arose, what is the best way to finish the walls on the balcony, it is recommended to pay attention to this option. The tree has been used to finish the balcony from the inside for a long time, as it has good sound and heat insulation, as well as an aesthetic appearance.
 Sheathing of the loggia with wooden clapboard
 Before you arrange a balcony with a clapboard, you need to prepare the following tools:
- Perforator, screwdriver, jigsaw and hacksaw.
- Level, tape measure, marker.
- Fasteners, hammer and square.

Preparatory operations
To finish the balcony inside with your own hands, you need to start preparatory activities:
- Cleaning the base and, if necessary, leveling.
- Sealing cracks and applying a primer.
After that, you can proceed to the installation of the crate. On the finished surface of the loggia, markings are applied to indicate the locations of wooden slats. They should be 0.5 m apart and 10 cm from the corners. After that, the rails are cut and installed on the marked surface. For installation, the products are applied to the lines, holes are drilled (two at the edges and one in the center), after which wooden or plastic spikes are hammered into them. Thus, it is necessary to finish the entire surface.
sheathing
Before finishing the balcony from the inside with clapboard, it is recommended to treat the material with water so that it gets a little soggy and does not crack during installation. The first element must be attached to the frame in the area of \u200b\u200bthe corner and nailed, the next one is first inserted into the groove of the previous one, and then also fixed with nails. Thus, sheathe the entire surface. Then move on to the corners. Here, most likely, you will have to work with a jigsaw to cut the lining to the desired size. At the very end, antifungal impregnation is applied to the walls.
Finishing the balcony with liquid wallpaper
It is quite rare to use this finishing material like liquid wallpaper for a balcony. The procedure for applying this composition is quite simple.

Step-by-step instructions for finishing a balcony with your own hands include the following steps:

On a note! The rest of the mixture should not be thrown away. It is better to lay them out on a film, let them dry, wrap and put them in a dry place. They can be used if restoration of the coating is required.
Another idea for decorating a balcony is to decorate everything except one wall with plaster or clapboard, and finish the last one with liquid wallpaper to create an accent.
Installation of various panels
Now we will talk about relatively inexpensive, but less aesthetic materials: PVC panels, siding ( plastic lining), MDF and sandwich panels.
 Sheathing the balcony with MDF panels
 To install these materials, you need to carry out the following preparatory work:
- Removal of coatings, cleaning of surfaces.
- Primer treatment, crate stuffing and insulation installation.
Siding and PVC panels are installed using the thorn-groove system and additional fastening with clamps that come with the material. The first panel is installed as close as possible to the corner and secured with a latch, after which the second product is taken and inserted into the groove of the previous one, and the free edge is also fixed. Thus, the entire wall is trimmed, and at the end the material is cut, corners are formed and plugs are put on the edges of the surface.
As for sandwich panels, they are not equipped with a tenon-groove system. The wide side is fastened with a latch, and the narrow side is wound behind the edge of the previous element.
MDF is installed in the same way as siding, but the panel and crate are additionally fastened with wood glue.
Bamboo in the interior of the balcony
The above options for finishing a balcony are the most common, but there is a rather interesting option for finishing a balcony with your own hands - this is the use of bamboo. In this case, we can talk about individual stems, panels or canvases. The last option is the simplest, installation includes standard preparatory procedures, after which the wallpaper is glued to wood glue, while you can finish both the walls and the ceiling.

Important! The use of bamboo-based materials requires perfectly even walls and good vapor, hydro and thermal insulation of the room.
The application of such canvases is even easier than working with ordinary wallpaper, since possible irregularities will not be noticeable behind the textured pattern. Installing the panels is a bit tricky. For these purposes, a special adhesive composition is prepared, which is applied to a small section of the wall. A panel is leaned against it and pressed, after which they immediately check the level. Thus, the entire wall is finished, and the edges, if any, are closed with plugs.
If stems were selected, then the following steps must be taken:
- Clean the material with fine grit sandpaper.
- Carefully cut the bamboo lengthwise into equal halves using a well-sharpened knife.
- Prepare the surface.
- Fill the bamboo cavity with mounting foam.
- After it hardens, cut off.
- Treat the resulting surface with glue and press it against the wall.

This option allows not only to paste over the wall with bamboo stem to stem, but also to create a relief pattern on the surface.
Requirements
Complex decoration of the loggia from the inside is quite expensive. Judging by the reviews, the minimum price is fifteen thousand rubles. That is why many people take self-finishing this part of the apartment or house. So, in order to finish the loggia inside with your own hands, you need to know some important points without which this would be impossible.

First you need to decide what kind of balcony you plan to make: open, closed, stained glass or panoramic loggia. There are many options, there are even balconies with a fire escape.

In addition, you need to choose the right finishing materials. You can decorate the balcony with interesting "bark beetle" plaster, you can put tiles on the loggia with brick imitation, you can arrange it in the French manner. A loggia with a cork for interior decoration looks very unusual.

It is considered that the maximum permissible load on a fully protruding balcony is approximately 1100 kilograms. The permissible weight for attached balconies that are not hung outside the facade of an apartment or house on the street is approximately 1800 kilograms. That is why it is very important to calculate the total weight of the building materials that you will use to glaze and insulate the balcony, as well as the weight of its interior decoration. If you prefer glazed varieties, keep in mind that this design is heavier.

Finishing the balcony from the inside is usually carried out last, so it is important to carry out very accurate calculations of the weight and density of other building materials in order to choose a more suitable material for finishing the loggia. When making calculations, please note that many building materials must be soaked in water before use, therefore, for example, when a substance is kept in a liquid for about four days, all mass calculations must be multiplied by a factor of 1.4.

photos
moisture resistance
The moisture resistance of the balcony directly depends on the moisture resistance of the materials used in the decoration. When arranging a balcony, it is necessary to take into account such an indicator as the dew point. This criterion is achieved when certain temperature one hundred percent humidity is created. And then condensation starts to form. Warm dew can not only spoil wood, which begins to rot, and iron, which begins to rust, but also adversely affects human health. In addition, such conditions contribute to the appearance of bark beetle.

The loggia, located on the sunny side, warms up very well, but it can overheat. Therefore, it is important to install ventilation devices on such glazed balconies, this is also true for an unheated room. Some owners neglect moisture-absorbing materials for the interior decoration of the balcony, as they are quite voluminous and “eat up” a large amount of space on the loggia. That is why on glazed balconies after cold winter so-called warm dew appears. Therefore, most experts advise using open unglazed balconies.

Moisture absorption is calculated as a percentage of the dry weight of the material. If you carry out all the necessary measurements and calculations, you can find out that substances whose moisture absorption level is more than two percent cannot be used categorically for warming and finishing the loggia. As a rule, a fairly high percentage of this indicator is typical for materials with low density, so it is better to use denser components. If you use materials with an excess of the maximum possible level of moisture absorption, you risk creating an atmosphere on the loggia conducive to the development of your various diseases respiratory tract.

That is why it is necessary to purchase materials for the interior decoration of the loggia with a moisture absorption level of no more than half a percent. Some manufacturers are trying to convey this criterion to consumers using another indicator - the level of water absorption. It shows the possibility of a particular material not to let moisture in. But it is believed that this criterion does not show the level of moisture absorption at all. These conditions and calculations apply only to balconies hung out from the interior of a house or apartment, and for options that are combined with a living room or kitchen, this is not relevant.

Heat resistance
This indicator characterizes how much the strength and reliability of the material can decrease from exposure to high temperatures. It is measured in percentage. It is best to choose materials for facing the balcony with a heat resistance level of no more than five percent. As a rule, manufacturers create materials with very high reliability for greater reliability. high level heat resistance, which in real conditions will never come in handy. Some experts believe that this is a marketing ploy, since this indicator is directly related to another more important criterion - frost resistance.

Frost resistance
This is an indicator that means the level of cyclicity of complete freezing and complete thawing of the constituent substances. In this case, these cycles are measured as follows. A freeze is considered to be a drop in temperature below zero in degrees Celsius. Full defrosting is considered to be the heating of materials to more than zero degrees.

With good frost resistance, the material will not lose more than five percent of its properties or density. For facing materials that are used for decorative purposes, this indicator will be characterized by the absence of visual damage or other changes. When calculating the frost resistance of materials, one should take into account how quickly it can warm up. For example, concrete thaws very slowly, while lighter facing materials, on the contrary, melt very quickly, and therefore will often thaw and freeze, especially during seasons that are characterized by temperature fluctuations.

Wall materials
To decorate the walls of the loggia, it is necessary, first of all, to level them with putty material. It is possible to decorate the walls of the balcony on a budget without insulation. If necessary, the side parts of the walls should be insulated with extruded polystyrene foam, foam plastic or other special material. After that, you can proceed to the decoration of the walls with facing materials.

An interesting option decoration is wall decoration decorative plaster. It looks very beautiful, especially if a skilled craftsman helps you in the design, besides, it is moisture resistant and reliable. Wall decoration in such a room with drywall is very popular. This method is very simple, drywall is easy to cut and can be covered on top with any material, such as liquid wallpaper. The only disadvantage of this building finishing material is that it is not frost-resistant, so it can only be mounted on insulated walls.

Another inexpensive and high-quality finishing material is Wall panels plastic or vinyl. They can be easily mounted with your own hands, they are very flexible and at the same time they are not at all afraid of moisture. Producers represent wide choose such panels, so you can find a variety of color and design solutions. But such material can easily fade in the sun, so it is better to use it for finishing loggias that are not located in the south.

For facing the walls of the balcony, you can also use chipboard or MDF boards. This is a very affordable material. Although its appearance is a little rustic, it can be varied simply by varnishing or laminating.

Moreover, such a film has many design options: it can have an image imitating laying with a beautiful brick, or a picture under a stone. This is a very stylish design solution, moreover, it is quite budgetary, but the MDF and chipboard boards themselves are not suitable for use in rooms with too low or too high temperatures, in addition, it is a very non-environmental material.

The most beautiful and practical material for decorating the walls of a loggia is a decorative stone. This material is very reliable and durable, because it is not afraid of high or low temperatures, as well as high humidity. In addition, it is perfect for finishing the railings of the loggia, they can also be used to decorate the arches that separate the balcony opening, combined with the kitchen. Decorative a natural stone looks very luxurious, but has a rather high cost. But there is an alternative to this material - fake diamond, which looks very much like a natural analogue, but has a lower price compared to it.

Main advantage decorative stone, in addition to his appearance it can be considered that it can be applied to any surface. It can hide the irregularities and imperfections of all surfaces, since it has a relief texture. That is why before laying such a stone, you will not need to level the surface of the walls.

Another popular material for decorating the walls of the loggia is lining. This is very reliable material because it is made of wood. The lining of coniferous trees is best suited for the balcony, as they are more resistant to frost. Such a finishing material has a beautiful appearance and high quality. For cladding the walls of the loggia, you can also use wallpaper for painting, tiles of absolutely any design, for example, marble or brick, terrace board, in addition, you can finish the walls of the loggia with profiled sheets, clinker tiles, block house and other materials.

Ceiling decoration
The design of the ceiling is carried out after its insulation, installation of the crate, as well as after laying the cable for lighting and installation lighting fixtures. The balcony ceiling can be finished with the same materials as the walls. As a rule, various decorative materials. Drywall is an excellent material for finishing the ceiling, as it ensures its smoothness and creates an absolutely flat surface. It can only be laid on an insulated ceiling.

A more stable material for finishing the ceiling is plywood. It is quite reliable, has the ability to withstand temperature changes and, moreover, has a low cost. You can also decorate the ceiling with polycarbonate or corrugated board. These are very reliable and high-quality materials that are ideal for finishing this part of the room.

A ceiling with hidden niches can be made by decorating it with tiles. Tiles with a decorative pattern or embossed stone will help hide such a niche or, on the contrary, make it a beautiful decorative element, a highlight of your balcony. In general, decorating the ceiling with tiles is a very economical solution, besides, it is very easy to tile the ceiling, so you can do it yourself. You can choose tiles that will be the same color as the floor, and make the walls a contrasting color. The only downside ceiling tiles is that it can crack in severe frosts.

Now many trim the entire room with clapboard, including the ceiling. The eurolining differs in beautiful appearance and environmental friendliness. Just keep in mind that all wood materials must be treated with special disinfectants so that fungus does not form on them. Another option for finishing the ceiling of the loggia is the design rack ceiling. Such a ceiling is made of metal elements and is very durable; it can be mounted both on glazed balconies and on open loggias.

Laying the floor
When choosing a material for finishing the floor on a loggia, it is necessary to focus on the quality of the material, as well as its resistance to external factors, such as weather. In addition, it is important that such material be easy to wash and clean from dust, which very easily penetrates the loggia from the street. Most often, the floors on the balconies are finished with linoleum, laminate, parquet or ceramic tiles. Also, some prefer more a budget option- ordinary painting or, conversely, one of the most expensive options - the creation of self-leveling floors.

Laminate and parquet are among the highest quality materials for flooring. They are quite durable and withstand temperature extremes very well. These floors look very elegant and do not require special care. Such floors are lighter in weight and warmer than, for example, floors covered with ceramic tiles, so they are perfect for a loggia. They can be used both for finishing the threshold between the room and the balcony, and for finishing the entire floor.

There are many other options for flooring. This can be carpet flooring, MDF or chipboard finishing, cork, marmoleum coating, as well as solid wood flooring. Each option should be selected based on what style in general you have chosen for finishing the loggia.

The interior design of the loggia depends, first of all, on its size. There are many types of interiors that are great for decorating this room. For small loggias, it is better to choose corner modern furniture in warm colors. Thus, you can create a corner for relaxation. An example of such a design is a small corner wardrobe on one side of the room and a corner sofa with a small table on the other side of the balcony.

In addition, you need to functionally occupy the entire area of \u200b\u200bthis small room to the maximum. So, you can install small wall cabinets that take up very little space or shelves on which you can place flower pots. Plants will bring comfort and freshness to your loggia. An unusual, but very good idea would be to install transformer model furniture, which, if desired, can be easily folded to free up space. You can make the space of a cramped loggia visually wider by lining the walls and floor with light building materials. The walls of the loggia can be decorated with framed pictures or family photos.

For more spacious loggias, you can come up with many interesting design solutions. So, you can install an artificial reservoir, a game table, or treadmill or other exercise machine for outdoor sports. An unusual option would be to divide a large loggia into different functional areas. You can set up a large table with ottomans or armchairs to relax with friends, you can put a sofa bed or hang a hammock. A hammock will look very interesting with wicker chairs and a table.

In this article, we will consider two types of finishes: clapboard and plastic. The photographs show step by step the entire repair process from start to finish.
Finishing the loggia with wooden clapboard
1. Replacement of double-glazed windows
First you need to replace the double-glazed windows on the loggias. Window installation should be carried out by professionals. It is better not to do this work on your own, during operation it will be difficult to correct the mistakes made during installation.
New double-glazed window Rehau 60 Blitz design. Each leaf of the two-chamber structure opens. This will make it easier to keep the windows clean, since there is a road next to the house and dust accumulates on the surface quickly enough.

Glazing estimate. The total cost of installing windows amounted to 18,220 rubles.

2. Purchase of material
Instruments:
- Construction knife and pencil;
- Concrete drill;
- BOSH bit;
- Yardstick;
- Jigsaw files;
- A set of drills for wood;
- Joiner's square made of stainless steel;
- Building level;
- Miter box with a saw for sawing at an angle.
Power tools needed for the job.

Lumber:
- Bars: 11x19x2200 (knotless jointed), 20x20x2000 (dry planed, category 1), 40x40x2000 (planed, category AB);
- Euro lining 12x95x2700 (category B);
- Furniture board 18x400x800 (grade BB);
- Plinth 12x40x2200 (1 grade);
- Corner 27x27x2500 (outer);
- Bead 10x10x500 (category 1).
Fasteners:
- Anchor bolts 8x80;
- Polypropylene dowels 12x70;
- Door hinges;
- Furniture hinges;
- Self-tapping screws for wood and drywall;
- Mounting corners;
- Doorhandle.
You will also need:
- Protective glasses;
- Mounting foam;
- Penoplex;
- Insulating material covered with a reflective film (porilex or penofol);
- Double-sided mounting tape (on a foam basis);
- Mineral wool;
- Metallized tape;
- Plywood.
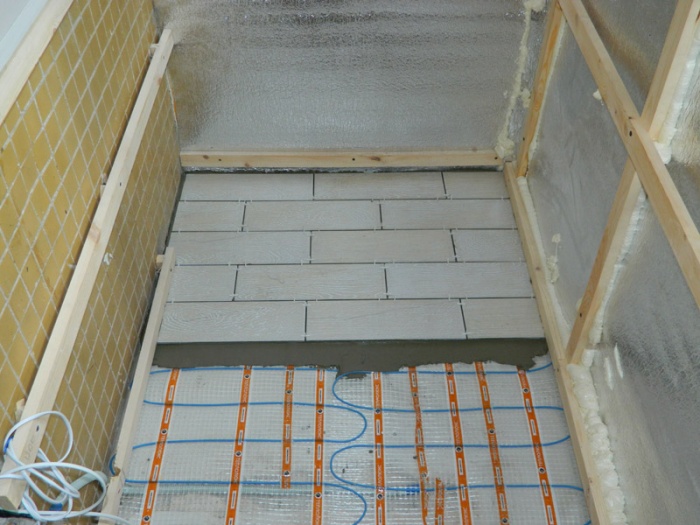
3. Instructions for floor insulation
- From wooden bars 40x40 we assemble the structure and fasten it with anchors to the base;
- In order for the frame to be stable, we mount the transverse bars and fasten them to self-tapping screws;
- For reliable thermal insulation, we lay mineral wool 75 mm thick;
- The next layer is penofol (thickness 5 mm). This material improves thermal insulation, creates the effect of a thermos;
- The final step in floor insulation is the laying of plywood 18 mm thick (along the bars). This action eliminates the squeak during operation.
The process of laying mineral wool between the bars of the crate.

Mineral wool is laid over the entire floor area of the loggia.

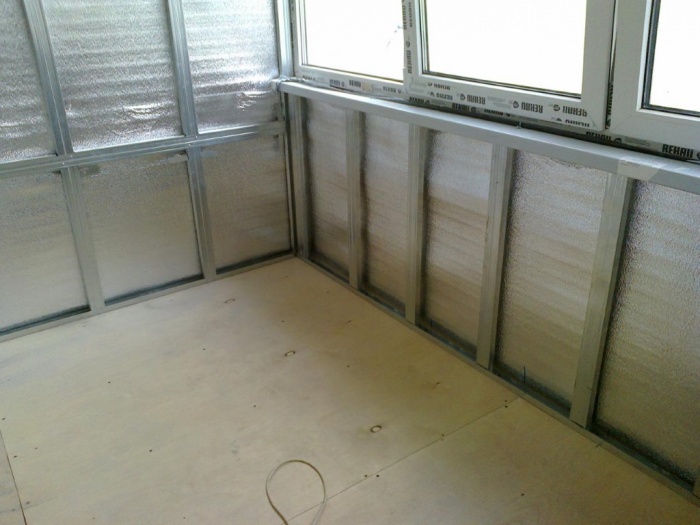
Penofol cover not only the floor, it is also used for walls.

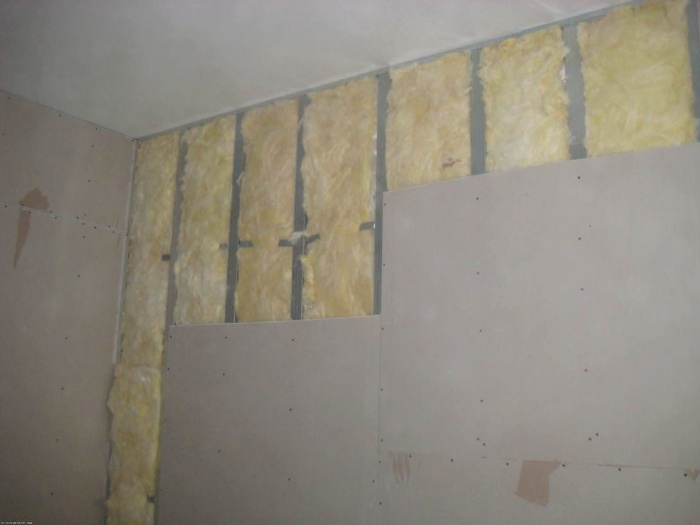
4. Thermal insulation of walls and ceiling
- Between the bars of the crate we lay foam boards, for fixing we use special glue, which is produced for this material;
- The joints between the foam slabs and the crate material are filled with mounting foam;
- Next, we mount a layer of penofol.

Laid foam boards.

The device of the crate for the installation of insulation boards is optional. Often, dowels-fungi are used for fixation.

Instructions for laying penofol:
- We glue double-sided tape on the bars of the crate;
- Next, we lay the heat insulator;
- From above we fix the rails with self-tapping screws (for the ventilation gap). Holes must be made in the rails in advance, otherwise cracks will form in the material;
- Connection with metalized adhesive tape.

5. Clapboard trim
Wardrobe built into the wall of the lining.


Furniture box.


Linoleum was used as the flooring. A wooden plinth is fixed along the perimeter of the base.


Cabinet doors are made of furniture board.


Finishing the balcony with plastic panels
In addition to clapboard cladding, there are also other options for decorating the loggia, for example.
Advantages of PVC panels:
- Minor weight;
- It is easy to take care of the material during operation;
- PVC panels are fireproof;
- Long service life;
- Large selection of shades;
- There is no need to level the surface of the walls before installing the panels.
In addition to the aesthetic component, the lining of the balcony and loggias will have a positive effect on reducing heat loss your apartment. So, when glazing and insulating a balcony or loggia, this indicator will improve by at least 8-10%.
During internal finishing works, much increased functionality balcony space (you can build a hidden niche with shelves, a window sill with a folding table for tea parties and much more).
Sheathing options
Ideas for decorating a balcony can be different. You need to choose based on the appropriateness of using a particular type of material in your particular case. In order to make the right choice, you need read in detail with each of them.
MDF
The positive properties of finishing MDF panels include increased environmental friendliness, which is close to that of solid wood.
MDF boards are created by pressing small and dry wood shavings under high pressure.
The binding element is urea resin, does not emit toxic formaldehyde, which is used in the manufacture of chipboard panels.
Siding
Great for both interior and exterior decoration. Material resistant to aggressive weather conditions, has increased frost resistance.
Thanks to the thoughtful design of the material, almost anyone can finish siding. Another significant advantage is that such panels will serve you for at least 25 years.
Plastic panels
Plastic panels are a cost-effective finishing material that has the property of increased sound insulation, which will be useful when arranging a secluded place on the balcony.

The color palette is so diverse that using PVC panels you can not only dilute the grayness with bright colors, but also imitate natural stone, wood, fabric and other textures.
Plastic unpretentious in care, In case of slight contamination, it is enough to wipe it with a damp cloth. However, this finishing material, like siding, is deformed during temperature changes.
Decorative plaster
Finishing with decorative plaster is a great option for a balcony in a romantic style. Through various finishing techniques you can create ornaments and patterns, which will make the balcony not only cozy, but also unique. The most popular finish is bark beetle, as in the photo.

Decorative plaster keeps heat well while not absorbing moisture. This property eliminates the appearance of dampness, which is the cause of unpleasant odors.
Read also about how to make decorative plaster with your own hands.
Block house
Block house - wooden decorative panel which has a flat surface on one side and a cylindrical surface on the other. Flat surface equipped with mounting grooves and spikes to facilitate installation and ensure necessary ventilation between the wall and the finishing layer.

With the help of sheathing, a block house creates imitation of natural log cabin however, such panels are much cheaper than natural wood. There is one drawback - the block house has a thickness of 2 cm or more, which excludes the possibility of its use for small balconies.
When creating these panels deciduous or coniferous wood is used. The second option has a much greater water resistance and resistance to decay, since such panels contain coniferous resins.
Decking
Decking is a multilayer sheet, consisting of a steel base, which is coated in layers with zinc and chrome coating, primer and a layer of polyester.

Thanks to several protective layers coatings, such sheet does not corrode.
Decorative rock
Decorative stone allows you to give the balcony walls the look of natural rock. Since this material is attached to the wall without implementation additional work on the crate, but simply “sits down” on the glue, this greatly simplifies the installation work.

The cost of this material much cheaper natural specimens, which also cannot but please the consumer.
Laminate
Laminate - decorative coating, the basis of which is a fiberboard increased strength.

Before choosing a laminate finish, please note that it can only be applied for insulated and glazed balconies, where the temperature does not fall below zero.
It is used not only for finishing floors, but also as a wall covering.
Cork
To finish the balcony usually sheets of agglomerated cork are used, the surface of which can be both natural color and painted.

There are options with a porous front side of the sheet, which additionally impregnated with wax.
Cork veneer is an excellent sound and heat insulator, does not absorb foreign odors, not subject to aging. Cork is not subject to fire, does not require additional care.
Material selection criteria
When choosing one or another option for interior decoration of a balcony or loggia, it is necessary to take into account the basic properties of materials, which are planned to be used. Let's take a closer look at what materials are best to use depending on the type of finish.
So, for a non-glazed balcony, choice finishing coatings will shrink significantly.
Finishing options for such premises:
- plastic panels;
- siding;
- clapboard;
- block house.
If you plan to glaze and insulate the balcony, then you can use any of the above options finishes.
For the exterior decoration of the balcony, you need to choose materials that will be resistant to constant exposure to ultraviolet radiation, wind, as well as frequent temperature changes.
Sheets of corrugated board or siding would be excellent options in this case. If you live on the first or second floor, then it is better to use corrugated board for facing, as it has increased impact resistance. In addition, mounting such panels is much easier than siding.
However, if the surface of the corrugated sheet is even slightly damaged, this will lead to corrosion.
How to decorate the balcony inside yourself?
In order for the overall composition of your balcony to look harmonious, you need to take care of its complex finishing: floor, ceiling, walls, as well as slopes. Let's take a closer look at the finish of each of the surfaces.
Ceiling
One of the most common options finishing the balcony ceiling is a single-level device false ceiling from MDF.
slopes
Plastic slopes are the most universal option. Preparatory measures include cleaning the slopes from the old finish, as well as treatment with antiseptics and cementing cracks.
In order for the future slopes to be perfectly even, you need along the side and top side of the opening fix wooden slats.
This is done with screws. 95 mm long. Next, the starting U-shaped PVC strip is fastened (using self-tapping screws) along the outer edge of the window.
Then the installation of the F-shaped profile is carried out so that its groove is opposite the groove of the U-shaped strip, and the upper part is overlapped. Now you can start installing the most accurately cut plastic slopes into the grooves of the profiles.
For additional thermal insulation you can use roll insulation, which keeps within together with PVC a strip of a slope.
Walls
If you want to decorate the walls MDF panels, then worth taking care of preparatory work Oh on the structure of the frame. Depending on the materials used, the crate is metal and wood.
If you plan to insulate the walls of the balcony, then you should give preference wooden version. For its construction bars 4x4 cm, 4x5 cm, 5x5 cm are used- for racks, and slats 2x4, 2x5 cm for transverse strips.

Racks are mounted in increments of no more than 1 meter, and horizontal - no more than 50 cm. If there is no need for uprights, then the horizontal ones are mounted directly on the surface of the wall. The main racks are attached to the walls with self-tapping screws and dowels.
horizontal rail must be installed at a distance of 10 mm from the floor, this space is filled with mounting foam. The correct installation of each subsequent row should be checked using the building level.

Warming made by laying slab insulation in between the frame space, with its subsequent fastening to the wall using dowels and self-tapping screws. Further, on the constructed crate, MDF panels are mounted using self-tapping screws, kleimers or nails.
Floor

In order to sheathe the floor with cork, you need pre-clean concrete from pollution. Logs are mounted on a clean base (using self-tapping screws and dowels). The distance between the elements should not exceed half a meter.
Between wooden elements foam is laid down with a foil layer down, for additional thermal insulation.
Next, the subfloor is installed, consisting of chipboard sheets, which are attached to wooden logs using self-tapping screws. On the subfloor cork material is laid, then they fix it around the perimeter with skirting boards.
External cladding
Outside, the balcony is finished with siding or corrugated sheets. Before installation a number of preparatory works are being carried out. First, the old cladding and railings are dismantled.
Then cleaned and painted Bottom part balcony railing. After preparation, the level checking the surface evenness around the perimeter. Next, a wooden crate is mounted and painted in two layers.
In order to close the balcony with corrugated board, you will need self-tapping screws with a rubber washer, which acts as a waterproofing of the mounting hole.
Installation is carried out from one corner to another, without changing the direction of movement.
The screws are screwed in two rows. For installation of internal and external corners, between the wall and adjoining sheets of corrugated board leave a gap of 5 mm.
The exterior finish is completed on this, you can enjoy the result.
In the next video, see how to properly finish the balcony:
Often people wonder about the expansion of living space or its competent use. Therefore, in this article we will analyze the question of how you can correctly use the area in the loggia.
In addition, we will consider how a loggia differs from a balcony, how to decorate this room from the inside, how to glaze it, and much more.
What is a loggia
Many people think that a loggia is the same as a balcony. It's true that they have quite a few similarities, but don't confuse them as they are quite different.
Among the external differences, it can be noted that the balcony is an ordinary plate that is attached to bearing wall and protrudes from the facade of the building. In addition, a parapet is fixed on the balcony, about a meter high. Unlike a balcony, a loggia is part of the house and has walls, windows and a ceiling. During the construction of a multi-storey building, this element is located one under the other.

The balcony is often used to store spins, inventory, tools, or anything else. But the loggia is used for completely different purposes. The word "loggia" means "gazebo", it helps to understand how this space can be used.
Glazing
The glazing of an ordinary balcony and the glazing of a loggia are significantly different. For example, a balcony needs a fairly light construction, it is desirable that the window frame be aluminum. In today's time plastic windows have fallen quite a bit in price, we recommend that you insert them, because they have very good energy-saving properties. Also for measuring window openings, we recommend calling an experienced specialist. He will not only pay attention to the little things that you may not have known about, but will also be held responsible in case of incorrect measurements of the loggia openings.
The owner of an apartment or cottage should carefully ensure that the windows of the loggia or balcony are installed perfectly even. If the windows are mounted with deviations horizontally or vertically, then through a skew, the sashes will stop opening and the structure will become faulty very quickly. The gaps under the loggia windows need to be foamed.

On the this moment, frameless glazing of the loggia has become very popular. As you can understand from the name, this is a rather complex structure, which is a profile guide into which armored glass is mounted. Thanks to such windows, a unique panoramic view is created. Of the minuses, it is worth noting poor thermal insulation and a very high cost. But, thanks to the unusual appearance on the loggia, many are ready to give a lot of money for such windows.
Insulation of a balcony or loggia
Insulation of a balcony or loggia can begin with waterproofing the base. First, dismantle the old flooring, such as tiles or boards. Completely remove dirt, dust and debris from the floor. cement mortar or polyurethane foam seal all cracks and openings. Coating the floor waterproofing material. For a better effect, you can additionally spread a waterproof film on the floor.
Floor finishing materials
There are not so many materials for finishing the floor. But, before we consider them, we recommend thinking about heating the loggia. Many experts categorically forbid transferring a radiator that is connected to a central heating system. They recommend installing an electric radiator or equipping a warm floor. Few people want to heat the loggia all winter with an electric heater, therefore the best option there will be a warm floor.
Consider some of the basic materials with which you can finish the floor of the loggia and balcony:

Insulation and decoration of the ceiling of the loggia
The first thing to think about when finishing the ceiling is its insulation. The most common materials for insulation are polystyrene foam, mineral wool, polystyrene foam, polystyrene foam. Let's consider each of them:
- Styrofoam is a versatile material that can be used both for a suspended ceiling of a loggia and for putty. Do-it-yourself installation will be easy. First you need to fix it on tile glue or foam glue, and then fix it on a special dowel fungus. There are five mushrooms per leaf. The gaps between the sheets must be blown out with mounting foam.
- Ceiling insulation mineral wool produced in a similar way. The materials differ in that cotton wool cannot be installed under putty, although it is ideal for a suspended ceiling. Working with cotton wool is quite difficult, so be sure to use eye and skin protection. People who suffer from asthma or other respiratory problems should wear a respirator, or better yet, hire a specialist.
- Installation of foam or polystyrene foam for the loggia is almost the same as the installation of foam. This material differs from polystyrene in that it has special grooves with which the plates are attached to each other. They have greater rigidity, so only two fungi are required.

After warming, you can proceed to finish the ceiling of the loggia. Below are some of the more common finishes:

As you saw above, there are many ways to beautifully and efficiently finish the ceiling and floor of a loggia or balcony. Finishing the loggia with your own hands is also quite possible. The following shows what materials can be used to finish the walls of a balcony or loggia.
Wall finishing materials
Drywall
This material is great for uneven loggia walls, as there will be no bumps or other defects visible under the sheet. Of the advantages, it is worth noting the ease of installation and low cost. In order to sheathe your balcony or loggia with drywall, you need to use only a moisture-resistant variation.
To carry out work inside with your own hands, you need to carefully prepare the surface. We close all cracks with mounting foam and treat the surface with a special antifungal mixture.
The next stage of work is the installation of the crate. For these works, mounting rails or metal profiles are used. cut off right size rails and fasten with dowels and suspensions. Drywall must be fixed with self-tapping screws, in increments of about 25 cm.
Important! Some "specialists" fix the drywall for the loggia in such a way that the head of the self-tapping screw breaks through the cardboard paper and is deeply recessed into the material. So, it is strictly forbidden to do this, the gypsum base will crumble and the work will be done very poorly. It needs to be drowned a little, but not with effort.
After installing drywall sheets, we seal the seams with a special mixture using a sickle mesh. The final part of the work is finishing the surface of drywall with paint, decorative plaster, stone or other material.
natural or artificial stone
A popular method was to finish the surface of the walls with stone. In addition to a very beautiful appearance, the material is quite strong and durable. Before starting work, it is necessary to level the surface. In addition, this work requires special skills, so a beautiful result can be obtained only if correct execution work. Also, pay attention to the quality of materials. It is worth buying glue and mixtures only from trusted sellers, otherwise the stones may simply fall off.

clapboard

When choosing this material for finishing the loggia, you will be offered lining and eurolining. Eurolining differs in that it is more resistant to moisture. This material is made from dried wood and has special grooves through which condensate flows. Therefore, eurolining is more suitable for wet rooms.
Conclusion
Based on this article, we can conclude that, if desired, and with properly selected materials, it can turn out to be very beautiful balcony or loggia. Do not neglect this place, making it just a pantry or a place to dry clothes. With some skills and imagination, you will get a very worthy result!