How to put slopes on plastic windows yourself. How to make plastic slopes with your own hands - recommendations
Plastic windows can be found today in almost every home. But the installation of the structure is half the battle, because you still need to make slopes. Without protection, mounting foam can quickly absorb moisture and deform with temperature fluctuations. Slopes prevent condensation on windows, hide opening defects, improve sound and heat insulation.
Advantages of plastic slopes
Plastic slopes are the most practical solution for finishing a window opening, because they have the following advantages:
- When installing slopes made of plastic, a lot of dust and dirt do not form, and the procedure itself does not take much time - only 2-3 hours.
- PVC panels do not fade in the sun, because they are resistant to ultraviolet radiation, do not rot, do not become damp and do not react to moisture.
- Since the material is anti-static, the surface will not collect dust and is easy to clean with a normal soapy solution.
- Plastic slopes are characterized high level absorption of street noise.
- The harmonious combination of plastic slopes with PVC windows gives the window opening a complete look.
- The low cost of slopes made of plastic, when compared with other finishing materials.
- Plastic is a durable material that will last you 15-20 years.
- When choosing plastic panels with insulation, it will be possible to give the slope additional thermal insulation, which will prevent heat loss.
Tools and materials
36 hours after the installation of the window and the hardening of the foam, we proceed to install the slopes without peeling off the protective films from the windows and window sills. As a rule, to create plastic slopes, plastic lining or sandwich panels. The recommended thickness of the plastic is at least 8 mm, the length of the panel must correspond to the size of the window opening, the depth of the slope should not exceed the width of the panel. For the installation of slopes, in addition to the plastic itself, prepare the following materials: mounting foam, starting strip, adhesive tape, heat-insulating material, F-shaped profile, silicone, cement mixture, self-tapping screws "bugs", paper clips. In the process, you will need a drill, a hammer, a trowel, a spatula, a screwdriver, a gun for applying foam and silicone, a tape measure, and rags.
Preparatory work
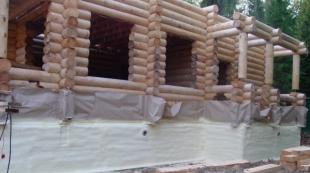
First, the gaps formed during the installation of the plastic window from the side of the street should be sealed in order to seal the external assembly seam and hide the foam from the damaging effects of sunlight. For this you can use any building mixture, intended for outdoor use - putty or a mixture made on the basis of cement. After the external slopes should be covered with paint - and proceed to work indoors.

Frame for panels
At the first stage, you should create a frame for attaching plastic panels in the following sequence:
- To stiffen the plastic along the perimeter of the slope, it is necessary to nail wooden slats, using self-tapping screws as fasteners. The rail should be fixed flush to the wall. She shouldn't be stuck.
- Fix in a strictly vertical position, using wooden blocks and a building level for leveling.
Installation of the starting strip
On the this stage you need to fix the starting strip around the perimeter of the window, which is required to install plastic panels. Self-tapping screws "bugs" are used for fastening. Be sure to carry out a preliminary markup to fill the strip evenly. In addition to the horizontal and vertical lines, it is worth controlling the fit of the strip to the inner edge of the window. After that, remove the protective film placed on the window and window sill, as there will be no more dusty work.


F-band attachment
Let's make a fringing from an F-shaped strip, which closes the defective area around the window opening, which is customarily glued with wallpaper. The strip must first be cut, taking into account the overlap that will form after its fastening. The joints of the profile are sawn at an angle of 45 degrees. It is removed after completion of work with metal scissors. Fasten the F-profile at one of the two parallel ribs to the wooden lath, starting from the top element. Use a stapler for this.


Installation of plastic panels
When installing plastic slopes, consider the following requirements:
- The gap that occurs between the panel and the base must be at least 20 mm.
- The angle of the side elements of the window slope should be the same on the right and left, use a square for measurements.
- Use a mounting knife and cut the panels if they protrude above the opening.
Now you can start fixing the plastic to the frame: first we will make the top panel, then 2 side panels. Plastic needs to be placed in the grooves starting strip at the far edge of the window opening, placing a layer of insulation behind it, which can be used as cotton wool. Fasten the panel in the F-profile. At all stages, it is recommended to control the work using a plumb line or level. If gaps have formed during installation, then they should be covered with white building silicone or sealant.


Ready! It remains only to clean the surface of the plastic slopes from debris.
Installation of slopes is not included in the scope of services of most companies that install plastic double-glazed windows. And if it does, it is often exorbitantly paid for their arrangement. However, if you have the appropriate materials and equipment, as well as basic knowledge, this task can be completed without the involvement of specialists. How to make slopes of plastic windows with your own hands will be discussed in this article. There are 3 main ways to install slopes: installation of PVC or drywall sheets, plastering. Thanks to the slopes, hydro and thermal insulation is provided.

Plastering slopes will take time. This slope finishing method is usually performed during overhaul. At the same time, in the process of in-line cosmetic repairs, as a rule, other methods of finishing slopes are chosen. This is due to the fact that in the process of plastering and puttying, the wallpaper around the opening will certainly be damaged, which will lead to the need to replace them. If, during the dismantling of the old surface of the slope, its edge crumbled, then it is necessary to install a metal corner.

The first beacon should be installed at the window block in such a way that the plaster lies on the frame by at least 50 mm. At the same time, it is installed strictly horizontally. The second beacon should be installed at the corners of the slope. Along the entire perimeter, the distance between the beacons should be the same.

Dry gypsum plaster quite suitable for finishing window slopes from the inside of the room. The easiest way to mix it is with a construction mixer. If you need to cover deep potholes in old slopes, then this type of plaster is just right for you better than a sand-cement mixture.
So, add sand to the mixture at the rate of ½. This is if you have to make a layer of more than 3 cm. In this case, the sand must be sifted. As for the outer window slopes, they must be treated with a cement mixture or with a starting facade putty. At the same time, it should contain a water-repellent composition.
To prevent the glass of plastic windows from sweating in the cold season, the slopes should be insulated before plastering. It is worth considering that single-chamber double-glazed windows will definitely “sweat”, and if the slopes are not insulated, then condensate will also collect on them and then bloom will appear.

The plaster should be applied in several layers. However, each of them requires pre-drying. First, spraying is done, then in 1-2 layers the primer and the finish layer. For the final leveling of the surface, the slopes should be puttied. In this case, the putty layer should be small. After drying, the fine putty is sanded with fine-grained sandpaper or a grinder. Cracks in the joints of putty and door block should be covered with sealant, which can later be painted. The joint should be cut with a clerical knife by 2–3 mm at an angle of 45º. Then the recess is primed. The resulting groove should be sealed. In this case, the strip should be as even as possible, which will help you masking tape. The sealant is leveled with a rubber spatula. You can then remove the tape.
Before painting the slope, it must be primed. The paint on the slope is applied in two layers. The next layer is applied after the previous one has dried. It will take you about a week to complete all stages of work on plastering the slope.

Drywall slopes are more practical than their plastic counterparts. If such a slope from the GKL (drywall) is damaged, then it can be repaired. To do this, you will need to putty the slope of the drywall, sand it and paint it. Installing slopes from GKL does not require special skills, but it will take a lot of time to install them.
All work consists of several successive stages:
- frame installation;
- drywall laying;
- primer before puttying;
- putty;
- primer before painting;
- painting.
A significant disadvantage of such slopes is that they absorb moisture. In view of this, they cannot be installed in rooms with high humidity and to perform exterior finish.

quality metal plastic windows equipped with a profile for mounting slopes made of moisture-resistant gypsum board. The presence / absence of a profile can be checked with the manufacturer before buying windows.
Immediately before the installation of the window, the profile is installed in a specially prepared groove. If there is no groove, then use a galvanized L-profile. This profile is screwed to the edge of the frame. You can insert cut strips of drywall into it. Drywall should have the most accurate dimensions. Apply acrylic sealant to the profile, and then insert drywall into it. Lay the distance from the side of the window to the slope mineral wool. At the end of the drywall, gently and evenly press it against the wall.

If you have to install the slopes of expensive wooden double-glazed windows, then the algorithm of actions will be a little different:
- Drywall is installed on the edge of the window profile. To have the same gap around the perimeter of the window, you can make a template.
- The fragment that adjoins the window must be filled with foam. For a tight fit to the wall, glue is used.
- On the window profile, which is located closer to the edge, adjacent to the drywall, adhesive tape should be glued so that the indent around the entire perimeter is 2-3 mm.
- Then the acrylic sealant should be applied with a gun. With a wet finger, smooth the sealant, and then remove its excess from the surface of the window. After that, remove the masking tape.

Installation of drywall without a frame is usually used when finishing old slopes. At the beginning of work, the surface is completely cleaned of the old finish. Prime the prepared surface.
Drywall is attached to the profile with self-tapping screws and pointwise apply the Perfilix adhesive mixture. Given that this mixture hardens very quickly, drywall should be measured and cut in advance.
In order for the drywall to be fixed and the glue to be evenly distributed, it should be pressed with a bar and gently tapped with a rubber mallet. To fix the upper slope, install a spacer to the windowsill. The upper slope is fixed with spacers to the window sill. In order for the surface to be fixed, it must be kept in this position for at least an hour. For complete drying of the glue, it is enough to wait up to three days.

During this time, the drywall joint and walls should not be sealed, due to this the adhesive mixture will dry faster. As for the edges of the slope, they can be covered with sealant. At the end, the surface is puttied with a finishing putty, sanded and painted.

Plastic slopes are the easiest to install. Their advantage is durability and resistance to moisture, and they do not need to be looked after in a special way. The tone of the plastic can be selected depending on the color of the window, as well as the style of the room. To carry out heat and sound insulation, you need to purchase penoizol / mineral wool in advance. Plastic slopes can also be installed on an old base or they can be installed from scratch.

The peculiarity of plastic slopes is that they can be used for finishing window openings inside and outside. It is possible to carry out their installation even on the day of installation of a double-glazed window. So, there are several types:
- Made of foamed plastic.
- Made of plastic-coated gypsum board.

Increasingly, sandwich panels have been used for finishing slopes. This is due to the low cost of the material, with high rates moisture resistance. So, sandwich panels can be glossy, matte or with a relief imitating wood. Their structure is similar to a sponge. This, in turn, improves the thermal insulation properties of slopes. In this case, panels with a thickness of 1 cm are used.
A wooden lath is fastened along the outer edge of the opening with self-tapping screws strictly according to the level. In this case, the load of the slope will be taken by the rail, which means that it needs to be fixed thoroughly.
The starting profile is installed in the groove. A slope is subsequently fixed to it, and then insulated. In this case, the insulation is placed under the plastic. The outer edge of the slopes should be fixed to the wall with self-tapping screws or dowels.

If the slopes are installed on the brackets, then the algorithm of actions will be as follows:
- The first bracket is attached to the wall. This will help you double-sided mounting tape, and the second - to the slope.
- Brackets must be connected to each other with self-tapping screws.
- The side slopes must be fixed to the window sill with glue, and then connected to the neighboring ones.
- Then the seams are sealed.

PVC foam slopes have a relatively smooth surface. They can be cut with a grinder. If you need to bend PVC, then make cuts at the folds. The shape of a semicircle for finishing the slope is easiest to make from foamed PVC. In this case, the furrows should not exceed one third of the thickness of the slope.
Cuts must be treated with adhesive.
Glue is applied to the grooves in the mounting foam, and then the panel is installed. As described above, in the subsection on the installation of gypsum slopes, you need to install a metal profile in the box. Then you can fix the foamed PVC into it. The space between the wall and the plastic must be sealed with foam, while leaving small gaps, as the foam will swell.
Then you need to fix the profile to the outer corner. Treat the joints with silicone. It is important to smooth its surface. This can be done with a damp cloth/rubber spatula. Installation of slopes made of plastic-coated gypsum is carried out in a similar way.
Self-installation of slopes is an opportunity to acquire new useful skills and at the same time save a lot. In addition, at proper conduct installation of slopes, you can hide defects in the construction repair work and some shortcomings that were made during the installation of PVC windows.
Video
To better understand the progress of this work, we suggest you watch the video.
As a rule, the replacement of any windows leads to the destruction of the adjacent section of the wall. The question arises: what to do to make the window structure look beautiful and reliably protect from noise, wind and other troubles of the street? The answer is simple: in this case, repair work is indispensable. Exist various options sealing slopes, but in order to choose the right option, you need to consider them in more detail.
About slopes
Sections of the wall adjacent to window block are called slopes. They are internal and external. Strict requirements apply to the internal areas.
The following functions are assigned to slopes:
- giving the window design an aesthetic and attractive look. Is it possible to imagine a high-quality window that is docked with a broken wall;
- improvement of sound and thermal insulation. Window structures that do not have high-quality slopes do not have sufficient tightness;
- protection mounting elements and seams from impact environment. A high-quality slope not only protects fasteners from corrosion, but also reduces the likelihood of fogging and freezing of windows.
Thus, the repair of slopes is a list of works aimed not only at restoring damaged sections of the wall, but also at creating additional insulation.
Basically, one of the following repair options is selected:
For any repair of slopes, first of all, high-quality surface preparation is necessary.
Window opening preparation
Restoration of slopes is started after their surface is prepared. Preparation is carried out in the following sequence:

In order not to destroy the restored slopes, the window sill is installed before the start of the repair.
To protect against contamination and knocked down elements, the window and window sill are protected with paper or polyethylene. And also the protection of the window handle and the battery under the windowsill will not interfere.

The protective film on the window is removed only after all work is completed.
- Slope surfaces are thoroughly cleaned. Large dangling fragments are attached to the solution.

Slope plastering
This option for repairing slopes is low cost. For sealing, it is enough to have: a finishing mixture, a set of simple tools and paint diluted with water.
The option also has disadvantages:
- to get very flat surface requires a lot of effort and a lot of time. An experienced installer performs such work much faster;
- cracks often appear after plastering. This may be due to the single-layer coating of the surface, when a thick layer slides down. In addition, cracks appear due to changes in humidity or poor quality of the mixture;
- low thermal insulation window designs;
- lack of adhesion to the plastic from which the window is made.
It is believed that plaster looks more aesthetically pleasing for internal slopes than plastic and drywall.
Plastering starts with right choice and preparation of the mixture. In this case, the location of the slope must be taken into account.
- External slopes - are in special conditions: precipitation, wind, temperature fluctuations. It is recommended to use cement and heat-insulating mixtures with a water-repellent effect. This may be a Knauf product or a conventional mixture of cement and sand.
- Internal slopes - must have an aesthetic appearance. To make the surface smooth, gypsum mixtures are suitable. Starting and finishing putties of the Ceresit company are very common.
In any case, the drying time of the solution is taken into account, since further decoration work continues after it dries.
1. Do not dilute a large amount of the solution. This is due to the economy - the undeveloped solution dries quickly.
2. The solution is applied in several layers. The next layer is laid after the previous one has dried.
The repair sequence is as follows:

Sheathing slopes with plastic
As noted earlier, plastic is in demand due to its easy installation and low cost. In addition, there are other advantages:
- the material goes well with the window profile. The slope and profile have the same expansion, so there is no tension between them;
- performance is maintained up to 20 years;
- withstand temperature fluctuations;
- eat protective layer, which does not burn and does not melt;
- simple care. Dust and dirt are removed with a damp cloth.
The following sequence is selected for work:

Sandwich paneling

When choosing this option, please note that the minimum panel thickness is 20 mm.
Without auxiliary profiles, the slope is sewn up within a few hours. The plating order is as follows:
- Panels are cut to size.
- "Liquid nails" are applied to the panel, and it is tightly pressed against the surface of the slope.
- The gaps between the frame and the panels are sealed.
- From the outside, corners are installed on the glue.
Lining and sandwich panels cannot be repaired. As a rule, when damaged, they change. In this case great importance has a choice of shade, as it differs in different batches of material.
Drywall installation
Drywall sheet is construction material, in which gypsum is placed between the layers of cardboard. The material is indispensable for hiding various wall defects, so it is recommended for slopes.
Its advantages include:
- wide range of use. Suitable for windows of all types;
- can be used for finishing slopes of any size;
- low price;
- fast installation;
- environmental Safety;
- dyed in different colors.
There are also disadvantages:
- low strength. Traces remain from any mechanical impact;
- destruction at high humidity;
- rapid wear, requiring additional painting;
- inconvenient installation. When cutting, use protective equipment because gypsum dust is harmful to health.
Important!
1. Drywall is the base that needs finishing.
2. It is better to choose a moisture-resistant version of the material that is not afraid of condensation on the windows.
There are several ways to sheathe slopes with drywall, but the simplest is the following installation on putty.
- The slope is measured from the wall to the frame. If the wall is uneven, then it is necessary to take measurements in several places.
- Measurements are transferred to drywall. For convenience, a pattern is made.
- The future slope is cut out of the sheet. The material is cut with a knife or sawn.
- Putty is applied along the edges and in the center of the workpiece.
- The workpiece is pressed tightly against the slope, and a spacer is installed. It takes a day to get a good grip.
- Very often, aluminum corners are installed to align the corners.
- The surface of the slope is puttied and, after drying, processed with sandpaper.
- The cladding is completed with a two-layer painting. At the same time, the window profile and the window sill are protected with masking tape.
In general, everyone independently chooses a method for repairing slopes. If the technology of work is not violated, then they will be beautiful and reliable.
On one PVC installation frames with double-glazed windows work with a window opening is not completed - for it you need to create a frame, both from the outside and from the inside. There are several ways to do this, differing in the materials used and working methods. Do you want to learn more about them and understand how to properly make slopes for plastic windows? Then here you will find enough detailed description these methods with step by step instructions for the performance of work.

But first, let's look at several reasons why it becomes necessary to mount slopes on plastic windows.
- First reason– protection of the edges of the frame and the mounting foam on which it rests from damage by dampness and temperature changes. Without slopes, the installation seam of the window will begin to gradually collapse and become unusable.
- The second reason- protection of the window opening from cold, rain and drafts, high-quality slopes made of metal, plastic or any other material will provide reliable thermal insulation at the assembly seam and will not allow water to penetrate inside. Also, the slopes partially play the role of sound insulation.
- Third reason- decorative. A plastic window in an opening without slopes does not look too beautiful both from the inside and from the outside. Therefore, it is framed with metal, plastic, drywall or plaster.

On a note! There are four main types of slopes for plastic windows: metal, plastic, plasterboard and plaster.

Among the many available ways of glazing balconies, frameless is considered the most elite. The design contains a minimum number of elements, but each of them is subject to the highest quality requirements. Read more in.

During the construction of private housing in villages, towns and suburbs, slopes made of metal have become very popular. This is largely due to their advantages over other materials.


Before proceeding to the description of the steps for installing metal slopes, consider the tools and materials necessary to complete this work. For your convenience, they are summarized in the table below.
Table. Installation of external metal slopes - tools and consumables.
| Name | Why is it necessary |
|---|---|
| Roulette | Taking measurements |
| self-tapping screws | Fasteners for a metal slope. It is desirable that the color of the hats match the color of the product. |
| screwdriver | Fixing and tightening screws |
| Long cue ball for self-tapping screws | Work with fasteners of a metal slope in hard-to-reach places during the installation of the starting profile |
| Set of drills for metal and concrete | Creating Holes in Slope and Wall Elements for Fasteners |
| Scissors for cutting metal | For fitting metal slopes to the dimensions of the window |
| Sealant and mounting gun | Processing joints between individual elements of the slope, as well as between the slope and the plastic window |
| Construction knife with retractable blade | Cutting the packaging of metal slopes for a window |

Important! Also, do not forget to prepare a sufficiently large desktop, on which it will be convenient to cut individual elements of the metal slope. In addition, if the upper boundary of the opening is high, take a stepladder.
Now let's move on to a direct description of the steps that must be performed to install external metal slopes on plastic windows.
Step 1. Unpack the set of slopes on plastic windows. Check if all its components are in stock and without marriage. In this case, the kit consists of fasteners, a lower ebb, one upper and two side slopes, starting profiles for them.

Step 2 Measure the width and height of the window opening. In this case, one must also take into account how correctly the window is installed - in some cases they are mounted in a plane that is not parallel outer wall home and decoration. A similar factor must be taken into account when adjusting the lower ebb and other slopes further.

Important! It will also be useful to “try on” the individual elements of the slopes on plastic windows by installing them in the opening without fixing.
Step 3 Transfer the measurements to the lower ebb, which, as a rule, is initially slightly larger than the width of the window opening. You will later cut this part under right size, formed side "ears" at the edges.

Step 4 Using scissors for metal, cut the lower ebb along the width of the window opening, while leaving the “ears” in the shape of a trapezoid at the ends. Then fold them up as shown in one of the photos below. Also leave in the process of trimming a triangle on outside low tide - it will cover the corner of the opening.

Prices for construction scissors for metal
Construction scissors for metal

Step 5 Check if the bottom flashing is now the right size for the window opening. If everything is in order, mark the holes for the fasteners and drill them (if they were not made in advance, as on the product from the example in the photo).

Step 6 Align the lower ebb in width and fix it in the opening with self-tapping screws.

Step 7 Try on the F-shaped starting profiles on the side surfaces of the window opening - do they fit in height. Mark with a pencil the place to which these products reach in height.

Step 8 Install the starting profile on the upper horizontal part of the window opening, which is necessary for fixing the upper bar of the metal slope.

Setting the start profile
Step 9 Insert the appropriate slope element into the upper starting profile and secure. If necessary, pre-cut the part with the formation of "lugs" necessary for reliable fixation of the side starting profiles in the opening.

Important! Factory-made metal slopes, as a rule, have a special polyethylene film that protects the product from scratches and other damage during storage and transportation. When installing, remove the film from those surfaces where it will be impossible to get rid of it later. Peel off the rest of the film from other places only after the installation of the slopes is completed - this way you will reduce the chance of accidentally damaging the elements during the work.
Step 10 Using the vertical "lugs" on the upper and lower elements of the metal slopes, fix the starting side profiles.


Step 11 Mount the left and right slopes on these starting profiles, fix them with self-tapping screws or metal rivets. Then, if desired, seal all joints and crevices with sealant to completely eliminate any possibility of water penetration to the window frame.

Video - Exterior window trim with metal slopes
Internal plaster slopes for a plastic window - step by step instructions
When finishing plastic windows indoors, the owners of houses and apartments have a desire not to resort to plastic or metal products - these stand out too much inside the room and are more suitable for the outside. In this situation, the slopes are made of plaster - it can later be painted either in a neutral White color, or to match the design of the living room or kitchen.
Important! Keep in mind that stucco slopes are inferior in terms of durability to plastic / metal flashings and trims and that they are not suitable for rooms with a high level of humidity.
Step 1. Protect glass and frames from plaster by temporarily sticking a plastic film on them. Also in some places it is desirable to use masking tape- so you free yourself from the need to subsequently clean the window from pieces of plaster that have fallen.

Step 2 Using a pencil, make initial measurements of how the plaster will be applied. The mixture should partially cover itself window frame made of plastic - this will minimize any possibility of a draft. In this case, plaster slopes are also made at dawn - the surfaces are located at an angle, expanding from the window into the depths of the room. In this way, the best illumination of the room is achieved.

Step 3 Complete the marks using a laser level or its usual bubble equivalent for drawing. In this case, it is necessary to indicate several points for screwing in the screws and drill holes there - the fasteners will become a kind of substrate for beacons installed in the middle of the opening planes.

Prices for popular models of rotary hammers
Perforators

Step 4 Treat the surfaces of the window opening with a primer, preferably in two layers. It will provide a better "seizure" of the plaster with the main wall.

Step 5 Prepare beacons for insertion into the opening. In this case, purchased factory-made products are used, which are quite cheap, but at the same time very convenient to use. Cut them to the appropriate height or width of the window opening.

Step 6 Prepare a sufficiently dense and good solution for attaching beacons to the surfaces of the window opening. On each of them, apply a few "cakes" of the mixture with a spatula. Then mount the beacon, using the caps of the self-tapping screws that were screwed in earlier as a substrate - the metal product will not go further than them. Slightly drown the beacon in the solution.

Step 7 By the same principle, install the beacon on the top of the window opening.

Step 8 Mount the “formwork” along the perimeter of the window opening, along which the edges of the surface with the “dawn” will be aligned. In this case, the master applied the old rule for these purposes, fixing it on self-tapping screws with dowels.

Step 9 Prepare the plaster mixture for the formation of slopes. Stir all its components in a bucket using a mixer or a drill with a special nozzle.

Step 10 Do an initial coat of plaster on the surface of the window opening, but without much leveling - just form the required amount of sweep on the top and sides.

Step 11 Take a wide spatula and, leaning it against the plaster, the lighthouse on one side and the rule on the other, even out the mixture and make it smooth. Repeat this operation with the other sides of the window opening.

Important! Before the mixture dries completely, craftsmen often remove metal beacons so that they do not remain rusting inside the slopes. The grooves remaining after this are rubbed with a mixture and smoothed out with a spatula in the same way as in the previous operation.
Step 12 Work small details and defects with narrow spatulas. After that, you can leave the plaster to dry. Then remove the protective plastic film from the window. The final touch is painting the new plaster slope in the desired color.

Video - How to make slopes yourself. Slope plaster
Prices for popular types of plaster
Plaster
Plastic slopes on a wooden window
One of the most commonly used ways to make internal or external slopes on a window is with plastic panels. Let's take a quick look at one of the most simple ways their installation - using the starting and other profiles. Such plastic slopes can be successfully used for both interior and exterior decoration of PVC windows.

Step 1. Cut off excess mounting foam in the opening, which will prevent the installation of slopes. Then determine the dimensions of each surface in order to prepare segments of starting profiles exactly according to the obtained values.

Step 2 Cut, according to the data obtained in the previous step, the segments of the starting profiles of the appropriate sizes.

Step 3 Fix the starting profiles on the screws along the entire perimeter of the window opening.

Step 4 Try on the corner profiles, joining their ends with the starting ones. Measure the desired length and cut the product. Then dock it with the starting profiles at the corners of the opening, but without fixing it with self-tapping screws.

Step 5 Mark points along the edge of the opening opposite the frame (in this case, the edge facing the room), drill holes in the wall in these places and insert dowels. Profiles framing the plastic slope from the inside will be fixed on the latter.

Step 6 Install profiles framing the inner edge of the window opening. Fix them to the dowels mounted earlier with self-tapping screws.

Step 7 Insert plastic panels between the start, corner and frame profiles. For better fastening on the wall before that, apply mounting foam in the form of a zigzag line. To seal the joints between the panel and the profiles, seal with sealant.

Slope of drywall sheets - step by step instructions
Another option for slopes on plastic windows is from drywall sheets. Similar design it comes out quite strong and durable, plus - suitable for painting. But at the same time, it has a considerable mass, and its installation requires some skills in working with this material. As a rule, such slopes are used if both the walls and the ceiling in the room are also finished with drywall.
Important! Slopes made of drywall grades resistant to temperature changes and high humidity, can also be suitable for exterior decoration of a window opening.
Step 1. Take the dimensions of the window opening and calculate the slopes of what height and width you will need. Cut drywall sheets so that their edges are at an angle - this is necessary for gluing the material into corners, which then act as slopes for the plastic window.

Step 2 Dust off the angled edges of the drywall strips and then connect them to each other to make a finished vertical or horizontal slope for the window opening. In order for the product to retain its shape during the curing of the foam, tie it with adhesive paper tape as shown in one of the images below.


Step 3 Near the edges of the window opening, install a frame made of metal profiles or wooden slats. Fix it well, because the design will take on the main load from the plasterboard slopes.

Step 4 Fill the space between the frame elements with mounting foam. It is also desirable to apply it to a narrow strip between the frame and one of the metal profiles.
![]()
Step 5 Install the drywall slope, level it in height/width and check the position with a spirit level.

Step 6 Finally fix the drywall slope in place with the appropriate self-tapping screws.

Step 7 Repeat the previous two operations a few more times and install drywall slopes on the remaining surfaces of the window opening. After that, they can be painted in a color that matches the finish of the rest of the room (or the facade, if we are talking about working on the outside of the house).

Now you are aware of how to install slopes on plastic windows from the outside and from the inside with your own hands, and with several different ways. Choose one of them based on both your own preferences and practical considerations.
Many are accustomed to the fact that the window slope needs to be puttied or plastered. This was done until plastic panels appeared, since then the installation of window slopes with their own hands has become much easier.
Do-it-yourself installation of window slopes - choose panels
After windows have been installed in your home, the main and main problem slopes remain. And no matter how neatly and efficiently the team of installers would work, there will always be chips and cracking on the slopes. In addition, a plastic window is much thinner in size than an old, wooden one. For this reason, after installation, a strip of unplastered wall remains, which in any case must be sealed. For these purposes, it is best to arrange plastic slopes.
It should be noted right away that the installation of panels is a very laborious process. If you have very weak ideas about this, it is best to turn to professionals for help. But if you have made a firm decision to do everything yourself, we will tell you about it in detail.
It is important to know that high-quality PVC slopes are thick enough. 8-10 millimeters of thickness is enough so that the slope does not bend and has a rigid fixation near the window frames. In addition, PVC slopes of this thickness have high thermal insulation properties, and if you use mineral wool during installation, then your home will not be afraid of the most severe frosts.
Plastic slopes are easy to wipe, for this reason they are recommended to be mounted in rooms with high humidity, for example, in kitchens, loggias, balconies, etc. Plastic products “do not collect” on themselves either mold or dampness. This is their undeniable advantage.
Plastic panels have other advantages:
- Ideal appearance. Plastic slopes have a flat, uniform surface.
- When using these products, there are no streaks or stains. And you can clean them with water and any detergent.
- The plastic panels are long term operation.
- Installation is carried out quickly, after installation there is a minimum of dust and debris, they do not need puttying and painting.
- Excellent moisture resistance of the material used.
- High vapor permeability.
How to install slopes - preparation for installation
Before starting to mount the window slope, it is necessary to check the evenness of the installation of the inserted window. This is necessary in order to immediately correct all inaccuracies (if any). If the window is installed incorrectly, then the plastic panels will clearly show all the flaws in the installation of the window unit. Before you start installing window slopes with your own hands, you need to carry out a whole range of preparatory work:
- cut off excess foam;
- if necessary, knock down the remains of the plastered slopes;
- check for strength brickwork in the area of \u200b\u200bthe window slope for integrity;
- drill a hole for the window sill;
- paste over the foam with vapor barrier material;
- seal through holes (if any) with foam or cement mortar;
- remove the protective film from the plastic windows.
The installation of plastic slopes must be approached with full responsibility and knowledge of the matter, otherwise the installation of window slopes will be done incorrectly, which will affect the heat transfer of the room and visual perception. Plastic panels are mounted only after the window sill is installed. It is important to understand that the installation of slopes and window sills are two interrelated processes.
Plastic slopes, as a rule, are installed using a U-shaped profile (starting profile). It is screwed to the edge of the window block with metal screws, the pitch of which is 1 cm. This operation is recommended to be performed along the marked line on the window profile. There is a variety of starting profiles that snap into place before the window is installed on the plastic frame. If you decide to use this species profile, then when buying it is recommended to clarify whether the start and window profiles are compatible.
How to mount slopes on windows - practical ways
There are several options that are most often found in the practice of builders. One of them is foaming. This method is good because the foam, which is in the body of the slope, significantly increases the strength plastic product for deflection. Also, mounting foam is both an adhesive and heat-insulating material. Installation is quite simple - foam is applied to the wrong side of the panels, and they are installed in their place. If you do the installation of slopes with your own hands, you must remember that the main task is to correctly set the slope along the plumb line.
There is one caveat - so that the expanding foam does not deform the panels, they must be pressed against the wall for a while with something heavy.
Another method of fastening plastic panels, which is strongly recommended by the manufacturers of this product, is screwing to the profile on the outer edge of the slope. By choosing this option, you should understand that you will need to close the corner of the butt. To do this, it is necessary to cut strips of the desired width from PVC panels. With the help of a specialized rail, which has a snap-in corner, plastic panel must be well fixed in the desired position. If you decide to use a conventional mounting rail, then in this case the panel is attached to the rail with a stapler.
After you have fixed all the panels, the top and sides of the ends between the wall and the slope must be closed with special ones. These corners will "extend the life" of your wallpaper in the window area.
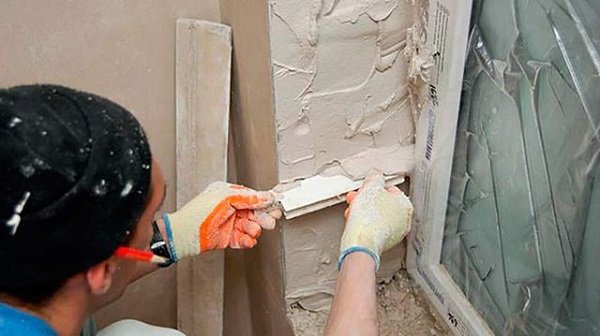
The method of simple plastering slopes
Initially, the surface is primed, then a layer of plaster is applied, the corners are leveled. Rules are used to level the surface. Every new layer can only be applied after the previous one has dried. This, by the way, is the main drawback of the method - time is spent not so much on work as on waiting.
A special flat rail is installed to the top of the panel. It serves as a beacon to make the slope perfectly even. On the sides of the slopes, the slats are installed vertically. To achieve the utmost accuracy during installation, a plumb line is used. The applied solution is best leveled with a special fine. After using the plaster mixture, the final step is the application of fine putty and its rubbing after drying.
I would like to note the fact that the installation of slopes is not the type of service for which the price is so high as to save. Therefore, many prefer to hire specialists who, in exchange for your money, will save you time. You will only have to enjoy the beautiful view and cleanliness at a minimum cost. However, even the masters need control, so this knowledge will certainly come in handy.