How to make pots and pots for petunias with your own hands: simple and original ideas for decorating the garden, step by step photos and videos. Outdoor hanging flower pots: making compositions with your own hands How to make metal flower pots
To decorate the garden and the house, gardeners often use hanging planters.
Baskets made of vines look very nice, which can be made in a wide variety of shapes, for example, in the form of a ball, cone or rectangular box.

Perhaps, flowerpots made of wire or forged metal will become a harmonious decoration of any landscape design. This option is especially attractive in that it creates the feeling of a certain complete "flight" of the flower bed.

In addition to the shape, material and design of the flowerpot itself, when choosing it, it is important to pay attention to the fastening. In addition, the fastening of containers for hanging flower beds must be very strong and reliable.

This is necessary so that when decorating a flower bed in the yard, you can rotate the plant from time to time to protect it from the sun's rays.


The specifics of planting suspended flower beds
Planting a hanging flower bed depends on the shape of the flowerpot. In simple flowerpots, reminiscent of potted plants, that is, those that have only one open surface, the plants are planted as usual.
It is a completely different matter if the flowerpot is designed to create a hanging ball. In this case, the walls of the frame are filled with moss, which is designed to retain moisture, and the entire basket is covered with a special film, which is most often sold complete with such flowerpots.

Then, in those places where the shoots should subsequently grow, it is necessary to make small holes. The seedlings should be carefully inserted into the holes made, and the soil should be poured into the flowerpot and the plants should be planted at the top.
Having planted flowers to create a hanging flower bed with your own hands, you should water the soil a little and hang the flowerpot in a cool place for several days.

Hanging flowers in the garden: which plants are suitable for hanging flower beds
To create hanging flower beds, it is better to choose plants that are unpretentious in care and do not have special requirements for the condition of the soil.
In addition, when choosing inhabitants for such flowerpots, it is important to consider the ratio of the size of their root system to the size of the pot.
For example, petunia roots grow very quickly, and if the flowerpot for this flower is less than 6-8 liters, then it root system will soon fill the entire volume of the container, due to which the plant may die.

Highly beautiful decoration will have a do-it-yourself hanging flower bed when planting luxuriantly blooming annuals in flowerpots, for example, pansies, petunias, vervain, marigolds, etc.
Almost all domestic plants, including Kalanchoe, nasturtiums, daisies, rejuvenated, stonecrops, etc., also get along well and grow in a hanging planter or flowerpot.

Of course, bright colorful flowers will always become a worthy decoration of any garden or interior, but you should not think that only flowering plants. For example, flowerpots with herbs - mint, rosemary, etc. look very beautiful and stylish.

And for those who love originality, we can advise you to make a very unusual, but very useful decoration - a hanging basket with small-fruited vegetables, for example, strawberries, which will bear fruit even on the veranda or balcony.
Specific care for hanging flower beds
Caring for plants planted in hanging pots depends on whether they have pallets.
Baskets without a pallet prevent stagnation of moisture in the soil, which, on the one hand, is good, since it slows down the decay of the root system of plants, and on the other hand, it can lead to a lack of moisture if the flower bed is located in a sunny area.

If the flowerpot is equipped with a tray, then you should not water the plant too often, and also install it in darkened areas.
In addition, the soil in hanging flower beds must be periodically fertilized, because. during watering, minerals in it are washed out.

In all other aspects, caring for plants in hanging garden beds is no different from caring for plants planted in open ground- They also need to be watered regularly, eliminate dried leaves and fight pests.

Hanging flower beds are exactly the addition that can give brightness and expressiveness to any suburban area They can be hung in arbors and pergolas, on fences and poles, on garden benches, in a recreation area, on a summer terrace, a balcony and even on the walls of a house - they will look beautiful and harmonious everywhere.

However, when designing suspended street flower beds, it is also important to take into account the peculiarities of the style of the backyard. You can beautifully emphasize the beauty of the landscape with the help of bright color solutions or unusual forms, or you can focus on the natural beauty of plants.

If such hanging flower beds "settle" in your garden, be sure that this decision will not disappoint you. Beautiful flowers and plants, neat and well-groomed, always delight the eye and create an atmosphere of comfort, and if they are also suspended in beautiful, original flowerpots, then such an arrangement of the site can only be envied.
Old enameled bowls, flower pots, buckets will be used to create planters. The containers are hung on chains and hung as high as possible so that any passer-by can see and appreciate this beauty.


It is such a pleasure to make simple things for the garden with your own hands. Please yourself with a hanging flower pot, it can perfectly decorate the porch of a private house or a balcony in a city apartment. And we will share with you a master class on its manufacture ...


What you will need:
- Wicker basket, you can use an old one or even weave it yourself
- Sphagnum is peat moss, it is used in gardening and construction, you can find and collect it in a marshy forest or purchase it in specialized stores
- Rubber gloves
- land for landing
- Small plastic trash bag
- Bucket of water (for soaking the moss
- Beautiful flowers and plants for planting

Soak the sphagnum fibers in a bucket of water, wring out a little and lay out the bottom of the basket.

Once you've laid out enough moss, place a piece of polyethylene on top and poke small holes in it to help trap some of the moisture.

Fill the remaining space with potting soil.

Start planting your flowers and plants. It seems to me that ampelous petunias or other ampelous flowers will look great in this pot.

We decorate the garden with our own hands. Enjoy)))

wooden planter
For the original hanging planter, you will need 24 bars 15-20 cm long. Laying them in a checkerboard pattern, they form a square box with through holes.
Connect the bars with nails or screws. Ropes are tied to the bars, at the corners of the upper edge of the planter and a homemade planter is hung on any tree in the garden.
Wooden planter with violas:

A wooden planter, similar to a hanging swing, will “hold” an entire flower bed with pansies (violas) on itself
burlap pots (tarpaulin, felt)
A heavy fabric, such as burlap, is great for making rustic planters. All that is needed for this is to cut two blanks from the fabric in the form of a semicircle or square, sew them like a pocket and hang them on the fence.
For hanging, you can use a fabric strip sewn to the upper edge of the planter or a wire threaded into the fabric.
Felt hanging planters for the garden

In a felt pot, you can put a pot with garden annuals.
New outfit for the watering can.
If you have old watering cans or buckets with basins lying around in your country house, do not throw them away, treat the surface with rust sandpaper and paint them in bright colors. Inside it is fashionable to put pots (or bags of soil) and flowers. And these items will turn into funny pots
You can hang them on racks, trees, fences

How to make a hanging flower pot from a plastic container
1. Materials and tools. Plafond itself. Galvanized wire with a diameter of 2 mm from the latest project. Key ring. Round nose and pliers.
2. We prepare three pieces of wire 25 cm long.
3. With the help of round-nose pliers at one end of each wire, we bend a round eye.
4. At the other end of each wire, we make a “P”-shaped bend. After all the modifications, the length of the three blanks should be the same.
5. Using an awl or the sharp end of scissors, we make three holes with our own hands in the area of \u200b\u200bthe neck of the ceiling.
6. Insert "P" -shaped hooks into the holes
7. We put wire blanks on the key ring. The pot is ready.
8. We plant plants. Plants can be varied, but it should be noted that the pot does not provide drainage and, if the plant requires frequent transplantation, it may be difficult to extract the plant in this pot design.
A cache-pot can be built not only from cans, but also from plastic bottles (the most common source material. which is always at hand).
Paint the surface of the pots

You can decorate the pots with twine
To do this, we need a plastic bucket of ice cream or other products:  and you will also need jute twine


Glue the beginning of the skein together to fasten the handle.
And we begin to wrap the twine around the bucket. Make sure that each circle fits snugly together, without gluing the twine. When you have reached the bottom of the bucket, you can glue the last few circles, and also glue the end of the twine well.


Then it remains to make 4 holes and hang a bucket-planter decorated with twine.
Wicker flower pot
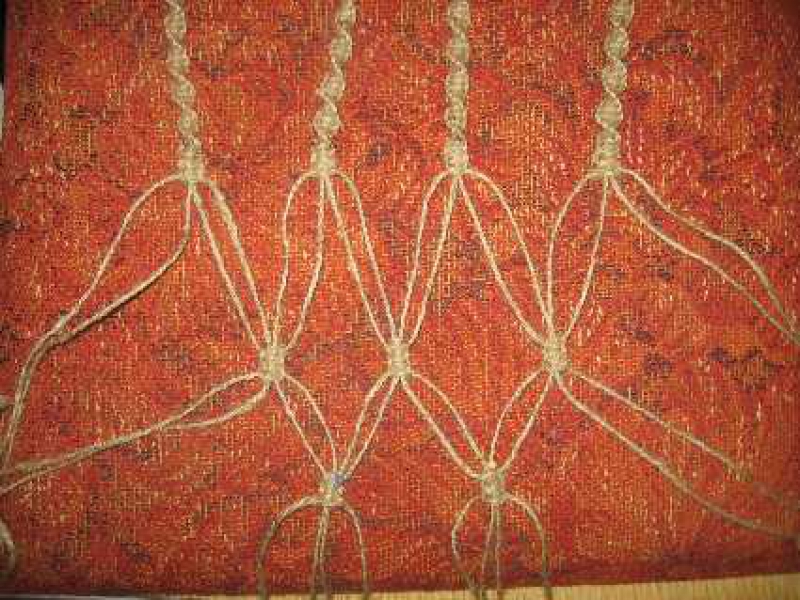
Braid a flower pot so you can hang it in a simple way imitating macrame.

In order to make a hanging planter, we need about 10 pieces of thick rope, about 90-120 cm long, several large buttons and a metal ring. And decide on the size yourself.

Instructions:
We fold our pieces of rope in half and fasten with a simple loop as shown in the figure:

Then select two loops located side by side and fasten their adjacent ends with a button, as shown in the figure. It is better to place buttons at a distance of 5-7 cm from the ring.
With the onset of spring, you really want to transform your apartment by placing fresh flowers on the windowsills, and ennoble household plot. Decorate nondescript pots with colorful DIY flower pots to complete your space.
Varieties of planters
To begin with, it is worth understanding what a flower pot is and how it differs from ordinary planting pots. From French, this word is translated as “hidden pot”, and indeed, this is the name of a container intended for planting and growing plants.
The difference between it and the pot is the presence of drainage holes - the pots do not have them. There are 4 main varieties: floor, desktop, hanging and outdoor.
The material for the future product must be selected depending on where it will be located. For example, porcelain, clay and iron vessels are more suitable for the street - they are the strongest and can withstand both sudden changes in temperature and weather changes.

If you want to decorate a house with a new little thing, the choice becomes much wider: wood, plastic, clay, foam, fabric and even glass - such planters will look like classic do-it-yourself vases.
DIY hanging planter
Hanging planter for flowers with your own hands - this is a great way out if you have a small apartment. They allow you to have many more flowers than the free space allows, without occupying it. Planters woven using macrame technique will refresh the interior.

During work, you will need thick threads, a pillow or a large soft tablet on which you can fix the workpiece, rings with a diameter of about 4.5 centimeters, small stationery rubber bands, a measuring tape and a small flower pot.
- Cut 8 thread blanks of 5 meters each. Fold the blanks in half so that one of their edges is 1.5 meters long and the other is 3.5 meters long.
- Pull loop 1 of the resulting blanks through the ring, fold over the edge and pull the ends through it, securing the thread on the ring.

- Fasten the next thread on the same ring so that the edges of different lengths go in the following sequence: 3.5 meters, 1.5 meters, 1.5 meters, 3.5 meters.
- The excess length can still be twisted and bandaged.

- Attach the ring to the pillow with needles. Next, follow the instructions in the image to weave the handle of the future flower pot with your own hands using the flat left knot technique:

During the working process, the resulting tape begins to twist. This is not scary, the main thing is not to confuse the left working side with the right one, they do not change during weaving.

- When the length of the tape reaches 50 centimeters, secure the work with a flat right knot, the execution diagram of which is shown in the photo:

- You need to complete 3 knots: right, left and right again - then work on the handle will be completed.
In the same way, you must weave 3 more handles of the future flower pots with your own hands, after which you can start creating a basket for a pot.
- Basket weaving is based on the same right and left knots. Remember the following sequence: left, right, left, right, left - it is also called a jumper.
- Lay out the pens in the order shown in the photo - pay attention to the position of the loose threads.

- Measure about 8 centimeters from the loose threads and leave them without knots.

- Weave 3 jumpers.

- Leave 6 knots free until the next jumpers - now you need to weave not 3, but 2 elements.
The most difficult thing in this master class is closing the basket canvas.
- In a row of 3 jumpers, you need to make the fourth so as to loop the macrame. You need to weave on weight, measuring the required 8 centimeters.

- In the same way, weave through 6 centimeters the third and fourth jumpers in the second row.
- Temporarily tie the bottom of the flower pot with an elastic band, insert a pot into it - you will understand whether the sizes of the products fit together.
- Remove the elastic and tightly tie the free ends in this place with a thin thread.
- Take 1 more piece of thread 50 centimeters long and attach it to the dressing with a loop up so that one end is 10 centimeters long and the other 40 centimeters long. Wind the cut with a thin thread to the weave, moving from top to bottom.

- Wrap the long end tightly around the braid 6-8 times, then thread it through the loop remaining at the top and tighten tightly.
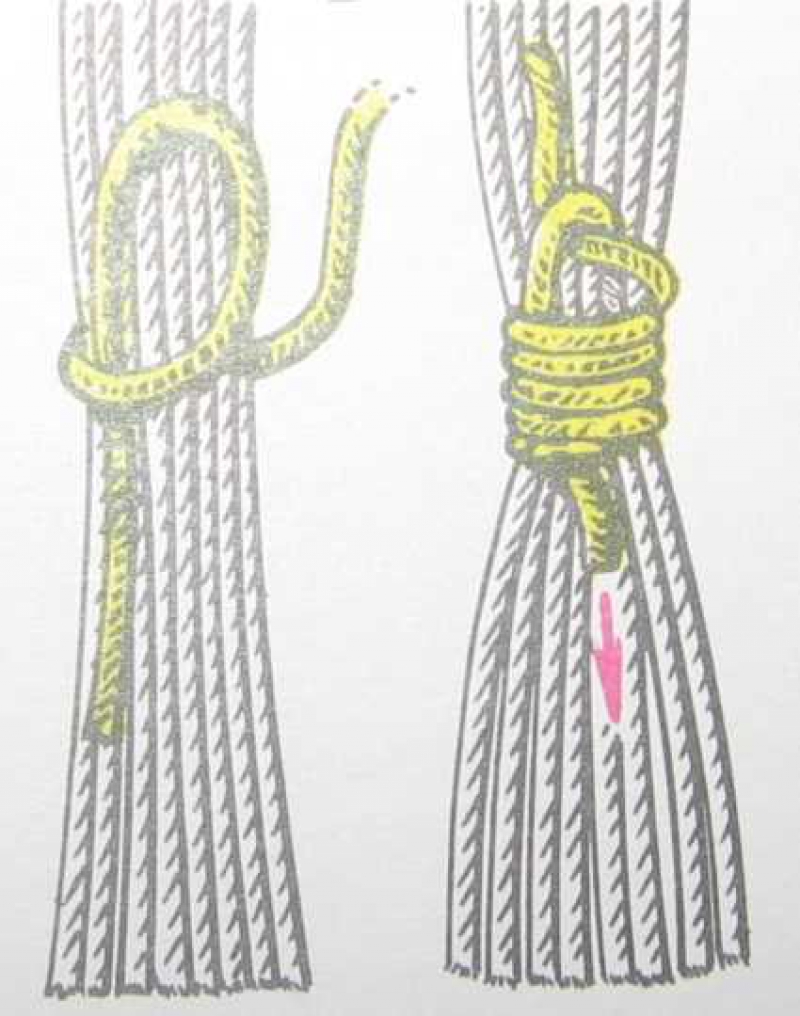
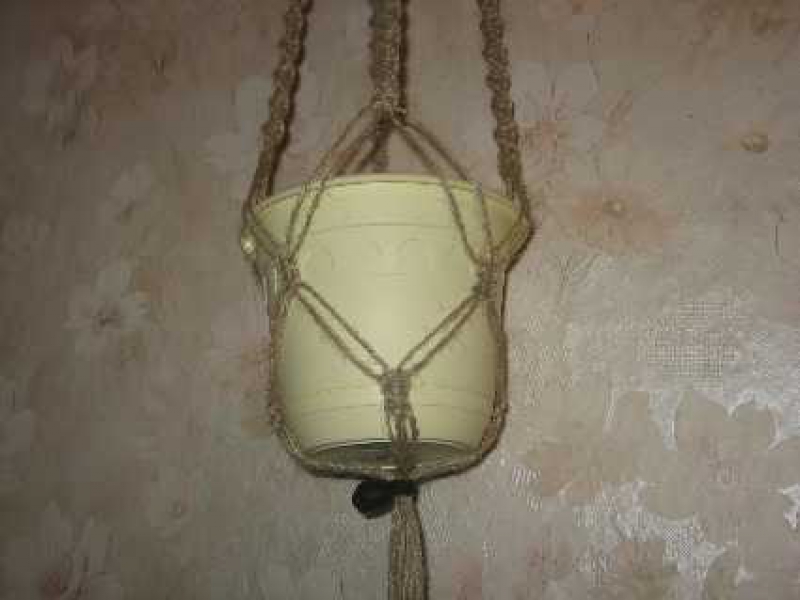
Trim off excess ends, leaving a neat and not very long tassel at the end of the weave. Your hanging flower pot is ready!
Floor planter for indoor and outdoor
Because the flower pots are not only suitable for home decoration, but also look great in the garden, below are 2 simple master class, with which you can easily get beautiful universal flowerpots.
fabric product
Do not be surprised - fabric can also be made into a very durable, waterproof large floor vase, you just need to slightly increase its rigidity and strength. Without these qualities, the material simply will not hold its shape.

So, you will need an old unnecessary piece of fabric of any size, cement mortar and an old bucket.
- Prepare a medium liquid cement mortar and soak a cloth liberally in it.
- Hang the blank to dry with the edges down on the bucket.

- When the flower pot is dry, just paint it the color you want.
You will get a unique home or outdoor planter, since it is impossible to give the same shape to the hardening fabric 2 times.
Vase of cement
Another use case cement mortar. You will also need 2 silicone molds for baking - one should be large and with carved edges, and the other - smaller and fit freely in the first.
Simply insert the smaller mold into the larger one and fill the space between them with grout. Remember to pre-lubricate the molds with something greasy, like petroleum jelly, so that they do not stick to the blanks. Enclose a large stone in a smaller form so that the cement does not distort its walls.

Leave the solution to harden for about two days. When the blank hardens, separate the silicone molds from it and paint them in the desired color.
5 original ideas for planters
Below are a few more flower pots that you can make yourself. They are based on the use of old things that you love, but regret throwing away.
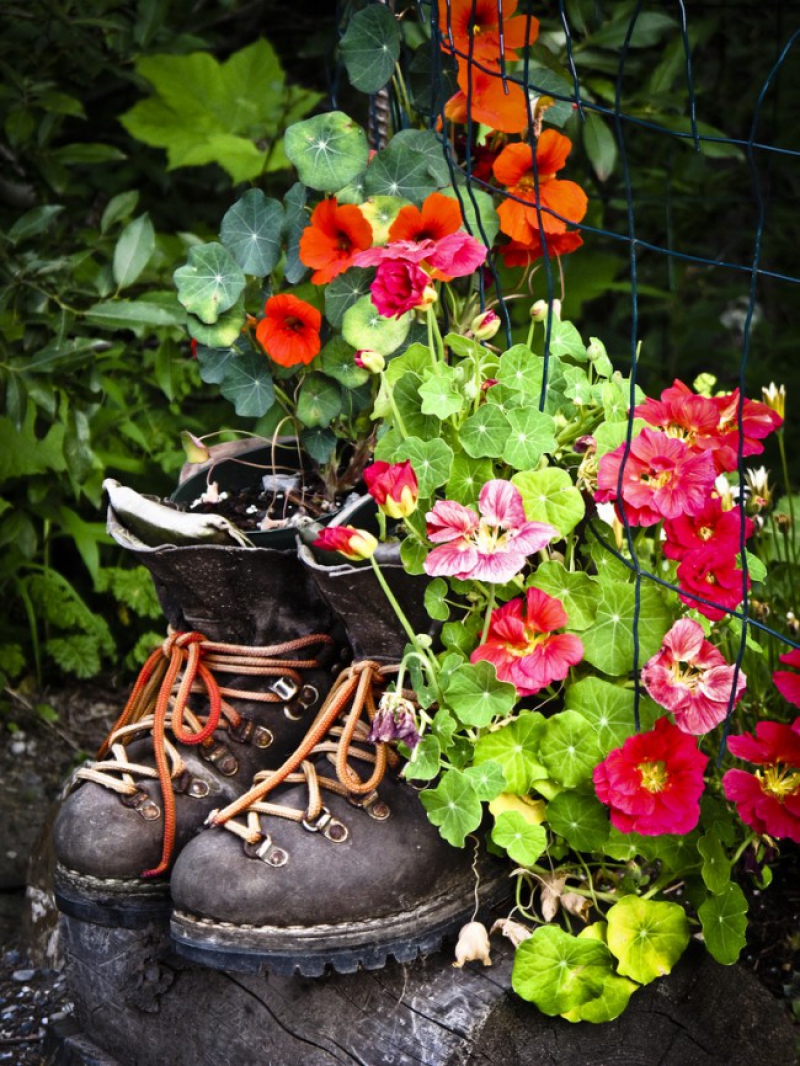
For example, such a wonderful pair of shoes can live in your garden, inside of which simple flower pots are hidden.
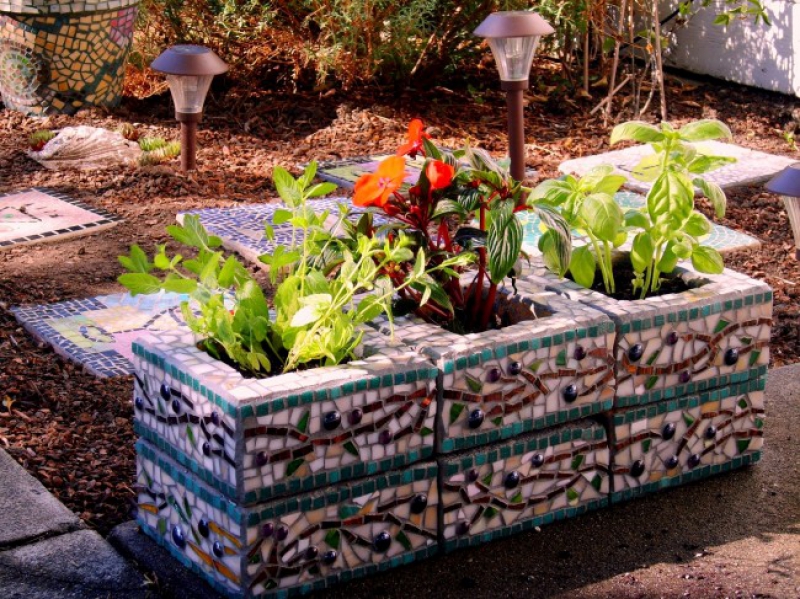
Even ordinary concrete blocks easily turn into ornate garden flowerpots - just decorate them with glass fusing mosaics if you own it, or ordinary plastic rhinestones.
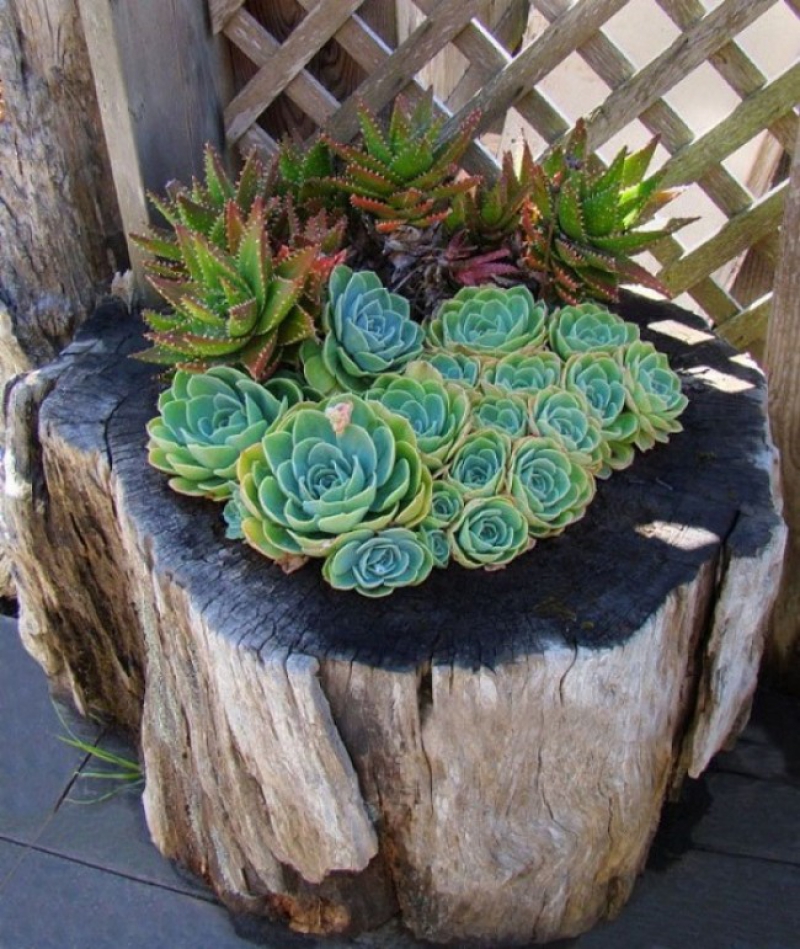
Try to combine fresh flowers with planters made of natural materials - it will turn out very beautiful! It is enough to be inspired by this photo - it seems that the flowers grow from an old stump.
Even an old chandelier with wide shades can become a planter - decorate each container with small flowers to turn the chandelier into a flower carousel.

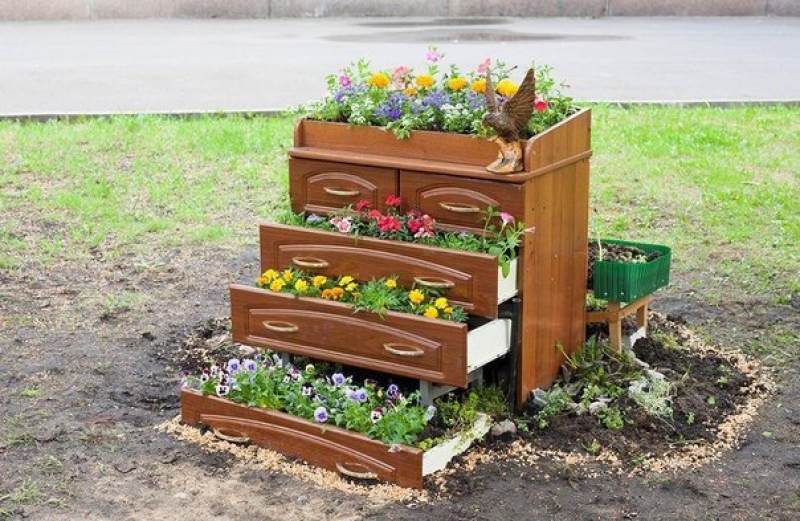
In addition, many have furniture at home or in the garage, which has long been written off, but it's so a pity to throw it away! You don’t need to throw it away: arrange the cabinet drawers in random order one above the other and insert flower pots into them - none of the neighbors will definitely have such an original planter!
Another option for an unusual flower pot that you can make from a used tetrapack is presented in the form of a video tutorial:
Take it, tell your friends!
Read also on our website:
show more
Potted and ampelous plants are now at the peak of popularity in landscape design. Vases, pots, hanging planters with armfuls of bright flowers adorn terraces, balconies, patios, paved paths. You want to decorate your site in the same way, but all the flowers are already planted in primitive plastic pots? Buying new, expensive flowerpots is not necessary. There is an alternative: you can make original pots for the garden with your own hands, and then install old plant pots there. And the garden composition will change!
Consider a few simple ideas for self-manufacturing pots.
A simple planter can be made from small mirror tiles that are sold in hardware stores. For one product you will need 5 tiles and a glue gun.
Mirror tiles are used for wall cladding, but can also be used to make planters.
The first tile is laid on flat surface(table) with the mirror side down - it will be the base of the planter. The remaining 4 tiles are applied perpendicularly to its sides and the joints are fastened with glue. After the glue has dried, a pot with a plant is placed in the pot.
The mirror planter does not need additional decorations. It looks stylish in itself, and, thanks to the ability to reflect the surrounding objects, it is not at all boring.

Mirror planters look stylish and expensive in any interior.
Option # 2 - wooden flower pots from a bar
This idea will surely appeal to home carpenters who know how to handle timber.
For the original hanging planter, you will need 24 bars 15-20 cm long. Laying them in a checkerboard pattern, they form a square box with through holes. Connect the bars with nails or screws. Ropes are tied to the bars, at the corners of the upper edge of the planter and a homemade planter is hung on any tree in the garden.

A wooden planter, similar to a hanging swing, will “hold” an entire flower bed with pansies (violas) on itself
Option # 3 - coconut planters
Exotic planters can be made from coconut shells. They will look especially harmonious blooming orchids.
First, cut the coconut. At one end of the nut, in the area of \u200b\u200bthree dark "eyes", holes are made with a knife. Juice is drained. Bulgarian cut the nut across. You can do this in the middle of the nut - then the output will be two pots. Or closer to the end, so that a deep pot is formed, which looks like a pot-bellied vase.
After the coconut dries, cut off all the inner flesh with a knife. Closer to the upper edge of the planter with a drill, make 3 holes for hanging. Ropes, wire, chains or special metal suspensions are threaded through the holes.

Coconut planters can be left as is or varnished for durability
Option # 4 - burlap pots (tarpaulin, felt)
A heavy fabric, such as burlap, is great for making rustic planters. All that is needed for this is to cut two blanks from the fabric in the form of a semicircle or square, sew them like a pocket and hang them on the fence. For hanging, you can use a fabric strip sewn to the upper edge of the planter or a wire threaded into the fabric.

Unpretentious garden annuals are planted in a flower pot made of felt: petunias, calibrachoa, lobelia, etc.
Option # 5 - vinyl planter from a record
Vinyl planters were very popular during the era of Soviet scarcity. Then they forgot about them - and in vain! It is impossible to find such unusual pots with curved edges on sale. Therefore, after spending literally half an hour, you will find a truly original little thing.

Planter made of phonograph record, decorated with acrylic paintings
- gramophone record;
- jar, pan - for molding;
- acrylic paints;
- thick household gloves - to prevent burns.
Stages of making a vinyl planter:
- The plate is placed on a plate.
- On top of the plate, a jar or pan of the same shape and diameter as the future planter is installed.
- Put the whole structure with the plate in a preheated oven for 1-2 minutes.
- The plate will begin to soften and melt very soon. As soon as this process becomes noticeable, the plate is taken out and manually (not forgetting to put on gloves!) They begin to form the edges of the pots around the jar installed in the center. If the workpiece begins to harden quickly, then it is again placed in the oven, softened and continue molding.
- While the plate is still soft, 3 holes are made in the walls of the pots with a screwdriver - to install the suspension. The most beautiful in this quality look special suspensions made of thin metal chains.
- The finished chilled planter is painted with acrylic paints on the outside and, if desired, inside. When painting, you can work on their own or take on board special templates for painting.
Option # 6 - pots of sticks or branches
This planter of the most natural look will harmoniously fit into the garden interior.

Cache-pot from branches - a spectacular design of any plastic pot
Materials used:
- branches or sticks;
- tight rope;
- sackcloth;
- glue;
- finished plastic pot.
Planter manufacturing technology:
1. Even sticks, twigs, bamboo stems are cut into pieces of the same length - about 20 cm. The number of branches used depends on the diameter of the planned planter.
2. Top and bottom branches are tied together to obtain a single canvas. They do it this way: they tie a knot on the first branch, lay the next branch - again a knot. This continues until all the branches are connected together.
When creating a wooden canvas, two knots are tied on each branch
3. A strip of burlap is wound onto a used plastic pot and fixed with a glue gun.
4. wooden canvas from branches they are wrapped around a pot with a plant, the ends of the ropes are tied along the edges of the canvas.
On a wooden planter, as a decor, you can tie two bow knots made of thick twine
Option # 7 - tin pots from a can
Spectacular hanging planters for the garden can be made from completely waste material– old tin cans, for example, from canned food or drinks.

A metal planter from a tin can can be used as a garden vase for cut flowers.
To make one of these pots you will need:
- can;
- tight rope - 10 m;
- white primer paint;
- acrylic colored paints.
Operating procedure:
1. Remove the label from the jar, peel off the glue.
2. Apply white primer paint to the surface of the can. It will cover the metallic color of the tin and will serve as protection against corrosion.

The jar is painted with a white primer
3. Cover the jar with several layers of colored paint, achieving a rich color. Each subsequent layer is applied after the previous one has completely dried.

Apply a layer of bright yellow paint
4. Perform a decorative pattern - first apply its contours with a marker. You can draw by hand or use paper stencils.

The stencil simplifies the execution of the planned pattern
5. The drawing is painted over with a bright color, preferably contrasting with the background. The contours can be additionally marked with a marker.

6. After the cache-pot is completely dry (1-2 days), a transparent varnish is applied to its surface.
7. The final touch is the manufacture of a rope suspension. To do this, the rope is cut into 10 segments of 1 m each. The entire heap of ropes at a distance of 15 cm from the edge is tied with one knot. This knot will be under the center of the bottom of the pot.
After that, nearby ropes are tied in pairs so that the knots fall on the border of the bottom. In other words, if the diameter of the bottom of the jar is 16 cm, then the knots are tied at a distance of 8 cm from its center. At the height of the middle of the pot, the adjacent ropes are again tied in pairs, and then again - along the upper edge of the pot.
From above, all the ropes are tied into one large knot - the mesh suspension is ready. A tin planter is placed in it and beauty is hung in the “hade made” style on a tree branch, a nail nailed to the wall, etc.
Option # 8 - a swan planter from a bottle and putty
Outdoor decorative planter for the garden, which is not inferior in beauty to expensive ceramic products, can be made in a couple of days from available materials.

Swans from putty - spectacular garden flower pots
For work it is necessary to prepare:
- plastic bottle - 5 l;
- small pieces reinforcing mesh;
- metal rod;
- putty starting (gypsum);
- water;
- bandage;
- oil paint;
- sand.
Step by step manufacturing instructions:
1. Cut off one side of a plastic bottle, twist the neck with a cap.
2. The bottle is placed on a flat surface, filled with wet sand. Trying to ram large quantity sand to expand the inner capacity of the bottle.

Sand is poured into the inside of the bottle to fix the convex shape of the planter
3. Bend the rod in the shape of a deuce (swan neck) and fix it in the cork.

The neck of the swan is made of a thick metal rod.
4. The putty is closed in water, a layer of a thick solution is laid out on a work surface (previously covered with a film). A bottle of sand is placed on the solution, the excess putty is pulled up with a spatula.
5. Form the beginning of the neck. To do this, a layer of putty is applied to the neck of the bottle and the beginning of the rod.

The beginning of the neck is formed with putty, smoothing the lines with a wet brush
6. A layer of solution is also laid on the walls of the bottle with a spatula, the surface is leveled with a wet brush.

Putty is applied over the entire outer surface of the bottle, applying a layer of up to 2 cm
7. For the wings, two grids 15x30 cm in size are used. They are slightly bent and fixed on the sides of the cache-pot with putty.

To fix the mesh, instead of putty, it is better to use gypsum - it will harden much faster, literally in 5-10 minutes
8. After the nets are glued, with wet hands apply a "plumage" of putty.

Plumage is formed with short strokes on the putty surface
9. With wet hands, spread the solution around the rod, forming a neck.

10. In the course of work, the rod is wrapped with a wet bandage.

The bandage serves to additionally fix and fix the putty on the rod
11. A tail is made from a small mesh, also covering it with putty.

To fix the tail, it is also better to use a small amount of gypsum.
12. Eliminate all the shortcomings: add putty where necessary, level the surfaces with a wet brush.

13. After the putty has dried (2-3 days), the surface is cleaned with sandpaper.
14. Apply a layer of primer on the pots for painting.
15. They cover the swan with white enamel, decorate the beak and eyes with bright colors.

Final decorative look planter acquires after coating putty surfaces with enamel
Option # 9 - using the decoupage technique
Any clay, plastic or metal pots can be changed beyond recognition by applying the decoupage technique on it. This technique involves decorating household items with applications made of thin paper, most often from napkins. After varnishing, the texture of the application visually merges with the surface of the product, becoming not like paper shreds, but like a beautiful hand-painted.

Decoupage technique allows the old pot to find new life
To make a planter using decoupage technique, you must have:
- flower pots - plastic, ceramic, metal;
- patterned napkins;
- PVA glue;
- clear nail polish;
- acrylic paints;
- brushes or foam rubber sponges.
Decorating process:
1. On a napkin, they find the fragment they like and carefully open it. It is necessary that the edges are as uneven as possible - then they will be invisible on the finished product.

Fragments of napkins must be torn off carefully so as not to damage the pattern
2. The topmost, thinnest layer is separated from the cut out fragment.
3. Dilute PVA glue in water in a ratio of 1:2.
4. A fragment is placed on the surface of the cache-pot and an adhesive solution is applied on top with a brush. Carefully spread the fragment with your hands or a sponge and press it to the surface.

Instead of PVA glue for gluing fragments, you can use special decoupage glue
5. All other fragments are glued in a similar way to create a common composition.

Floral motifs the most popular when decorating planters using decoupage technique
6. After the glue dries, you can add drawing elements to the composition. For example, paint an ornate pattern with paints, sign the “work” with your name, or add a bright border to the planter.
7. At the end of the work, when the paint and glue are completely dry, the surface of the pots is varnished in 2-3 layers.
People are very fond of beauty and aesthetics. Coming to visit, the first thing that catches your eye besides repair is the plants that the owner of the apartment grows.
And if you have private sector, then the basis of the aesthetics of the house are flowers and various decorative lamps, plaster gnomes, clay sculptures.
Buying the most ordinary pot is trite and not always very beautiful, and the phrase: “What wonderful flowers you have” often sounds like flattery, since the owner, who has the most ordinary pots, unfortunately, cannot show off originality.
Recently, do-it-yourself crafts are gaining more and more popularity, because a person first of all expresses his artistic abilities, and when they come to visit, instead of the usual compliments, such people hear: “Everything is so unusual, did you do it yourself?”.
There is more than enough pride after such words, but now let's get down to business and throw a couple of ideas for planters under your favorite petunias ( given flower standard, beautiful and available to almost most people, so examples will be provided specifically for this variety).
materials

Do you have an extra wheel, block, or any other extra material? Do not rush to throw it away, you can make a wonderful decoration for flowers out of it.
But before that, you need to look at the pros and cons of the material:
- Wood. There is no need to care for the material, but it is necessary to pre-process it.
- Ceramics. Ideal for creating decorative designs: You can give a wide variety of shapes, but the objects are very heavy and fragile.
- Plastic. Cheap, lightweight and requires virtually no processing. The downside is that with frequent watering, the roots of plants can rot.
- Glass. "Like" all plants, but heavy and fragile.
- Handy materials. You can’t list all the materials, so this includes absolutely “any garbage”, from broken drywall to a punctured wheel. It all depends on your imagination.
Editorial tip: looking for suitable materials take a look at the dacha in the utility shed or in the attic of the house.
From simple to complex
It is best to start from simple to complex. You can make, as mentioned above, from anything. Do you have extra bricks left over from building a house or a garage? So, don't throw them away, paint them, and plant flowers in them.

Since childhood, many readers remember the flowerbeds of tire wheels, which were practically not even painted. But now, when any Decoration Materials are commercially available, it will not be difficult to decorate any tin can, car tire or box.

plaster pots

To create a masterpiece, you need water, gypsum, two plastic containers. The algorithm for creating a pot is as follows:
- Mix gypsum with water in a ratio of 2:1.
- Lubricate a large container with oil inside, and the smaller one from the outside.
- Place the smaller container in the larger one, leaving a gap between them. lower part don't forget too.
- Pour the plaster gradually.
- Align the "vessels" inside to even out the walls of your pot.
- Wait 2 days.
- Once dry, peel off the plastic molds.
The result is the most ordinary white pots. Then it remains to paint, paste over with foil or make the finished product using the decoupage technique. Give free rein to your imagination!

Cache-pot from a piece of wood
From the most ordinary piece of sawn logs, you can also make an original flowerpot, which will look very nice on a stone path in front of your house. Alternatively, you can put it in pots and set it on stumps, or use the stumps as flower beds for growing petunias.


Hanging planter
So we got to the most complex and beautiful planter, whose appearance is able to arouse the admiration of neighbors in the country. First, you need to make the pot itself (we learned how to make it earlier). Later you will need the following materials:
- threads, twine or thin ropes;
- metal ring, eyelets with a diameter of 4-5 cm;
- wooden bead with a diameter of 2-3 cm;
- colored buttons (coat) 24 pcs.


And if you were fond of macrame as a child, you can perform it in this technique. 
The advantages of this type of pot are as follows:
- improvised materials are used for its manufacture, which means that the cost of the cache-pot is small;
- can be done even by a child;
- does not take up space on the windowsill;
- ampelous petunias will appreciate the new place of residence.
small bonus
If you have not found anything for yourself and you are missing any ideas, you are provided with a small photo bonus from various and unusual planters. 


We hope that now you have ideas for creating your own pot. To get started, dream up and create something similar, and in the course of creativity, ideas will appear by themselves.
See interesting video about how to make a planter and a pot of gypsum with your own hands:
Beauty and comfort in the house is not only perfect cleanliness and exquisite interior, consisting of expensive furniture and designer renovation. The harmonious design of the room consists of many details and decorative elements, which can often both attract attention and repel the lack of taste.
Indoor flowers are an invariable decoration of any home, giving the room a special aura of home and freshness. But sometimes, flower lovers do not have the opportunity to place the number of plants in the room that they would like. Or, due to a change in the style of the interior, indoor plants in simple pots do not harmonize with the rest of the details.
But do not be upset! After all, you can diversify the interior and place more flowers with the help of a cache-pot - a decorative item that will emphasize all the advantages of the situation and indoor plants. You can buy a flower pot, or you can create it yourself, which will give the interior individuality and originality.

Common types of planters
Before you start making flower pots with your own hands, it would not hurt to learn about its varieties. Indeed, today there is huge selection flower pots, which are conditionally divided depending on the purpose:
- table planters - it is customary to place them on cabinets, tables, racks, taking into account the stylistic decision;
- floor planters - located in spacious rooms and used for tall indoor plants;
- wall planters - suitable for small rooms where it is important to save space;
- hanging planters - in addition to originality, this species the cache-pot allows you to place indoor plants quite compactly;
- planters for the garden - perfectly enliven the space of the site and give the site a complete look.


What materials are used to make pots? A decorative floral item can be made from just about anything, especially when it comes to self made. During the creative process, all improvised means are used - from natural materials to old things or various small decorations.
- Wood. This is the most common material for creating decorative containers, when choosing which it is important to take into account its resistance to moisture, as well as the processing of the material itself.
- Glass. A planter made of this material is a versatile and practical item, thanks to which you can track the moisture level of a plant.
- Plastic. Inexpensive and easy-to-care containers have long been in demand by many housewives due to their availability and a variety of colors.
- Ceramics. A more expensive option for pots, but also more diverse. Moreover, ceramics are easily amenable to some changes, for example, drawing a picture or glazing.
- Metal. Very unusual containers for flowers made of stainless steel or forged elements will give the interior a special expressiveness and emphasize the sophistication of indoor flowers.


Cache-pot in home decor with your own hands
Flower and hardware stores have a huge selection of flower pots. Here you can choose by size, color, and also depending on the location of the container.
But it so happened that each person is individual, therefore, in his own house, he expects to see only exclusive items that will emphasize the taste of the owner of the house. Possessing some needlework skills, any hostess can create real masterpiece which will refresh the interior.
So, let's begin.
Planters with lace
To diversify plain plastic pots, you can use pieces of bright fabric or lace. In addition, for work you will need:
- scissors;
- glue;
- pot;
- glue brush;
- material for gluing (lace, braid, ribbon).
Operating procedure:
- To start outside the pot should be wiped with alcohol in order to degrease the surface.
- Apply the necessary contours, in place of which the decor will be located.
- Lubricate this area with glue, without going beyond the contours of the pattern.
- Press well and leave to dry completely.

For a more durable fixing of decorative elements, you can use glue gun, which will give the decor strength. If desired, you can decorate the pots with braid, bright buttons, beads and other interesting little things.

Planter from branches
Not less than interesting option creation flower pot- a planter made of wooden circles, the manufacturing principle of which is similar to the previous one. Only for this you need to use tree branches in the work, the diameter of which does not exceed 2 cm.
To prepare the material, you need garden scissors, with which we cut wooden mugs with a thickness of no more than 1 cm
Having previously degreased the surface, we attach the material to the pot one at a time, carefully applying a small amount of transparent Moment glue.
Having pressed it well, we leave it in a place inaccessible to children until it dries.
In order for the planter to serve for a long period, it is recommended to varnish the product for wood.
No less interesting options can be obtained by gluing river pebbles, shells, dry moss, cork, tree bark.

Wooden planter with twine
An old wooden pot will sparkle with new colors if it is decorated with twine. To do this, apply glue to the surface and slowly press the rope, wrapping it around the pot. It is very important to fasten the rope at the end so that the product does not lose its original shape.
Having previously drilled holes for the rope, you can build a hanging planter with your own hands. To do this, carefully thread the twine into the holes and secure it well.

Branches or bamboo planters
Natural materials are the best way to decorate the interior, as they are distinguished by their natural beauty and environmental friendliness. One of the options for creating a planter is a planter made from cane or bamboo branches.
For this you need to prepare:
- chopped straight branches or bamboo;
- twine;
- scissors;
- glue "Moment" transparent;
- dense coarse fabric (burlap, linen);
- plastic pot.
Operating procedure:
- Before you start tying the sticks together, they should be aligned so that the product looks aesthetically pleasing.
- Then we tie the branches together with twine along the edges (2-3 cm to the edge), tightly tightening so that the canvas does not crumble.
- Apply a layer of glue to the outer walls of the pot and evenly glue burlap or linen.
- We tie a cloth of sticks around the pot, and tightly tie the upper and lower parts.
- The cache-pot can be additionally decorated with flowers made of twine or burlap, which will give the product a special effect.

DIY hanging flower pots
Hanging planters are often used by those who need to free up more space in a house or apartment. This decor allows you to move around the house without obstacles, so this type of planter can be called the most popular.

In this way, you can perfectly decorate the garden with your own hands. But before that, it is worth remembering that the materials for hanging planters must be resistant to high temperature and adverse effects of precipitation. For such purposes, a planter from a plastic bottle will be suitable.

Cache-pot from a plastic bottle
There are many methods for making decorative containers from plastic bottles. One of them can be decorated using the decoupage technique.
Necessary materials:
- a plastic bottle with a volume of 1-1.5 liters and a flat bottom;
- scissors;
- basis for decoupage;
- napkins for decor;
- brushes;
- varnish.

Operating procedure:
- Prepare the bottle for work by thoroughly washing and wiping.
- Apply a thin layer of foundation, evenly distributing it with a brush.
- After the base dries, it usually takes 20-30 minutes, apply surfactant glue, also smoothing well.
- After separating the top layer of the napkin, apply it to the container and smooth it with a brush or fingertips.
- In order for the surface to dry well, it is better to leave the product overnight at room temperature.
- Then the pots are varnished and dried.
- We pierce holes on both sides of the pot with a hole punch and thread the rope with which the plant should be tied to the mount.

Features of vertical gardening
Fans of unusual plant decor will surely like “living walls”, or vertical gardening. Today it is a favorite technique of designers around the world, emphasizing exclusivity. expensive interiors. Professional "living walls" are not cheap, especially if everything is done with the latest technology, including automatic watering.
Vertical gardening has a number of advantages:
- air saturation with oxygen;
- space saving;
- improves appearance walls and complements the style of the interior;
- the abundance of plants on the wall are a source of additional air humidification;
- division of space into zones.

Despite the apparent difficulties in creating such walls, having become well informed with the necessary information, you can create an unusual structure on your own. It is worth recalling that this type of landscaping can be built both in the house and in the garden.

Planters for this type of landscaping can be wall-mounted and conventional, depending on the design and location of the plants. To create wall-mounted pots, containers from plastic bottles are suitable, which are easily attached to a vertical structure or wall with a rope. To make the container more aesthetically pleasing, you can decorate it with a braid to match the interior. This decor is a macrame or crocheted canvas.

No less interesting option - pockets from dense fabric in which you can plant climbing plants. This option is good for decorating the garden, in which you can build metal grills or special racks.
On special frames made of stepped wood, you can place flowers in flowerpots, the surface of which is decorated with natural materials.
A great option is a planter decorated with moss. All you need is dry moss and clear glue. The process of creating such a pot will not take much time, but the result will exceed all your expectations - an original and exclusive decor item will become an unusual decoration of a garden or home.

A cache-pot decorated with river pebbles is an interesting option for vertical decoration. The process of creating such an item will take a little longer than in the case of moss, but it's worth the effort. This decor is distinguished by a non-standard approach and originality.

No less success in creating a beautiful flowering wall in the garden are suitable plants. For this case, curly and ampelous flowers are ideal, which, when proper care, in addition to landscaping, they will create a whole riot of floral colors.
Decorating a home is a time-consuming and interesting activity that requires creativity and the desire to make the interior unique. To do this, they use all sorts of tricks and tricks, just to stand out with originality and non-standard solutions.
Making a planter with your own hands is one of the ways not only to refresh and diversify the interior, but also to prove yourself as a creator and artist who creates incredible masterpieces. After all, needlework has always been a part of art, which in turn contributed to the manifestation creativity person.
So, create with pleasure!