What to draw on the wall in the dining room. DIY wall painting photos, styles, stencils, technique
The content of the article:
Wall painting is a way of decorating a room, allowing not only to decorate it, but also to realize oneself as creative personality with aesthetic taste. Handwork has long been considered the ideal way to create a unique interior. A huge selection of styles and genres guarantees a realistic and mesmerizing result. Artistic painting, which in the old days covered the ceilings and walls of palaces and temples, is now available to most residents of houses and apartments, although it is difficult to call it a cheap pleasure.
Types of wall painting
The wall painting view includes many ways to create images. There are two main types of it: traditional painting technique and modern. Each of them is divided in turn into subspecies.
The traditional wall painting technique is handmade wall painting. There are several types of it:
- Fresco. This is one of the oldest wall painting techniques. It was originally mastered by masters Ancient Greece, but it gained its highest popularity during the Renaissance. The art of Hellas was a success with representatives of the wealthy classes and was considered the best way ceiling and wall decorations. The unique technology of those times preserved the works of ancient masters for posterity. It consisted in applying paints diluted with lime water to wet plaster. This method made it possible to create paintings that retain the brightness of their colors for centuries. Modern fresco masters perform this work, as before, only with artistic brushes. Paint brushes are not suitable for her. Drying plaster in the process of creating a picture is periodically moistened.
- Encaustic. One of the unusual and most interesting techniques. The paint here is melted wax with color pigments added to it. The special naturalness of this material allows them to paint walls even in a children's room. The composition is applied only to dried plaster. This technique recommends the use of non-porous hard brushes as the paint is very soft. For accurate drawing, it is better to display it in advance with a pencil. Very often, the image is initially applied to wood panel or canvas, and then the material is glued to the wall.
- Alsecco (a secco - “dry” in Italian). This technique of wall painting is similar to the creation of frescoes, only it is performed on dry plaster. The advantage of this method is the availability of more time for drawing a picture. To prepare the composition, acrylic paints need to be ground in a mixture of lime, raw eggs and vegetable glue. The result is something similar to tempera. Paints can be applied in several layers. Such a painting needs a frame to aesthetically fix its borders at the junctions with walls and ceilings.
- Sgraffito (sgraffito - "scratched" ital.). This is a very time-consuming wall painting technology that involves scratching the image. It was founded by the ancient Greeks, and received its mass distribution during the Renaissance. Artistic painting using the Sgraffito technique is performed using layers of colored plaster, and their number and scale depend only on the artist's imagination. However, in this technique, it is still not recommended to use more than 4 colors, so as not to greatly complicate the picture. Layers of plaster are applied to each other sequentially, each of them must dry. The top layer is the background of the picture. It is a sketch of the future image. After that, in the right places, scratch the coating to the depth of the desired color. This technique requires the utmost care, since in the event of an error, its correction will be impossible.
- Grisaille ("grey" in French). Drawings made using this technique strongly resemble black and white photographs or pencil sketches. Today, this design has become especially fashionable. The elegance and realism of the images is simply mesmerizing, but it is very difficult to do wall painting with your own hands using this method, especially for a beginner in this business. Grisaille is performed on a whitewashed wall. Paint - tempera, which should be applied with a hard thin brush with strokes like drawing with a pencil. Small details of the drawing can be done with ink.
- Aerography. This is a simple and modern wall painting technique that allows you to create realistic images and even 3D effects. It is done using cans of paint for the fine details of drawings and airbrushes for large images. Using airbrushing, it is not at all necessary to pre-prepare the surface of the wall. The paint easily falls on similar material, wallpaper and plaster. This opens up great opportunities for the implementation design ideas.
- Graffiti. This is another modern direction of artistic wall painting, which is full of many courtyards of our cities. Some consider it hooliganism, others skillfully use it in design. This painting is applied using spray paint cans. The surface can be any: plaster, wallpaper, etc. The only condition is that you should “draw” only on dry walls.
- screen painting. This is a well-known method of drawing drawings. It is simple, cheap and does not require practical skills. The main thing here is to choose the right stencil for wall painting and the color of the image, which should be successfully combined with the general background of the interior. You can make your own stencil out of vinyl or cardboard, buy it from a hardware store or art shop, or choose a design online, print it out, and cut it out. Then it is laid on the prepared wall and paint is applied on top with a brush, sponge or spray. After removing the stencil, a pattern remains on the surface.
The main styles of wall painting

In order to have an idea about your future interior, you should familiarize yourself with the most popular styles of wall painting:
- Classic style. It is always relevant, in demand and not subject to the whims of fashion. The pillars of classicism are simplicity, straightness of forms and symmetry, harmony and restraint. Classics are able to organically convey the national flavor, combine with non-standard modern materials and elements, without losing its "main line", aimed at the harmony of color and form.
- baroque style. He marked another round in the development of classicism and became the embodiment of his time. Ornate floral motifs are present in the ornaments of this style: large flowers, tree branches or large leaves. No less in demand are images of semi-naked bodies in physical effort, the tension of a struggle or strong movement. The baroque interior is dominated by a rich play of bright colors, light and shadow, which gives the room luxury and pomposity.
- Empire style. It harmoniously combines classical austerity with impressive decor. The perception of color here is built on a combination of Bonaparte symbolism tones: gold, purple and of blue color. Style ornaments are found in a combination of their conventional and naturalistic elements. When painting walls in the Empire style, flower garlands and triumphantly pompous wreaths are actively used. Some ornaments are taken from the culture of Egypt, so in the interior of the Empire style you can see sphinxes, winged lions or griffins.
- Modern style. It is easily recognizable by its growing, living and breathing abstract forms. characteristic feature style is a complex ornamental system with large flowers and curved wavy stems. Sometimes fabulous creatures are also depicted in Art Nouveau: mermaids, elves, as well as outlandish plants that form characteristic curved lines. IN color scheme style is dominated by natural shades. Everything in modernity strives for rationalization and simplification, but without sacrificing elegance. The interior in this style is not distinguished by excesses and manifestations of status, but implies the unobtrusive presence of nature. Art Nouveau is characterized by a harmonious combination of functionality and decor.
- Arabic style. This is not just an interior, but a whole worldview, formed under the influence of Islam. The main differences of wall painting in this style: richness of color, unusual solutions, originality, magical and mysterious atmosphere. The style whimsically combines Arabic stylized script, geometric figures and floral motifs, resulting in bright and sophisticated patterns that repeat on the walls in a certain rhythm. Due to the large number of complex patterns, the walls look like luxurious Arabic carpets. Rooms decorated in this style have a warm and cozy atmosphere.
- Anime style. It originated in Japan and quickly became popular not only in its own country, but also far beyond its borders. Heroes of Japanese animation began to be in demand among numerous fans of this genre. Anime-style wall painting looks harmoniously in Japanese room design. The combination of its functional and concise forms with bright images of "cartoon" characters can be a source of special pride for any owner. Interior design in this style is ideal for a child's room.
Technology for hand-painted walls
Before applying images to the wall, it should be properly leveled and treated with a primer. The resulting surface must be dried, and if necessary, painted, creating a background on it that will successfully set off the future drawing.
Preparatory work before painting the walls

For wall painting, water-based acrylic paints are most often used, which can be glossy and matte. They are sold in sets, which greatly simplifies their selection. Plots, for example, vegetable subjects require the presence of colors of yellow, brown and green. Mixing them gives all the necessary natural shades.
The set must contain white paint, as it is able to adjust the color saturation. Watercolor or gouache can also be used, but the finished images will have to be varnished.
Brushes for work should have artificial pile and differ in size - from No. 0 to No. 10. Foam brushes will also come in handy. They are great for decorating flowers and leaves.
In addition to wall paints and brushes, you may need a container for mixing paints, a pencil, double-sided tape, a can of aerosol varnish, a clean cloth, a table or a stepladder. Everything further actions are phased.
Initially, it is necessary to determine the places on the walls that need to be highlighted with the help of painting, and then select the images, and they must be in full accordance with functional purpose rooms.
If the experience of artistic painting is small or completely absent, you should not immediately plan complex plots or multifaceted landscapes on the walls - this can be done later. For now, you can limit yourself to simple drawings: for example, a tree or a sakura branch.
After printing the selected image and preparing brushes and paints, you can start making a sketch. First you need to apply a drawing on paper, previously repainted in the color of the wall. A mini copy or a small fragment made in full size is often used as a sketch.
The process of making a sketch will help you get your hand in this business and master the definition of proportions for mixing paints in order to obtain the desired shades.
Marking the wall before applying paint

At this stage of work, it is necessary to make a pencil sketch on the wall, which will allow you to create a clear and beautiful drawing in the future. In this case, one nuance should be taken into account: for a sketch, colored pencils should be used in accordance with the drawing, since traces of a simple pencil are difficult to wash off and can leave dirty stains on the coating.
The image should be placed within the predetermined boundaries of the wall section: left and right sides, top and bottom. The convenience of working with brushes will depend on how detailed the pencil sketch is.
When marking the image on the wall, you need to move away from it more often at a sufficient distance, since shortcomings can be overlooked near.
If there is no confidence in your own ability to correctly transfer the proportions of the picture to the wall, it is recommended to use the method of drawing an image by cells. Another option is to use a projector for this. Unnecessary marking lines are removed with a soft eraser.
Creating a composition on the walls

When the pencil sketch is ready, you can start creating the composition. To do this, in a container made of plastic, you need to slightly dilute it with water and mix the base color paint thoroughly to the consistency of lean sour cream. Such a composition will provide the material with sufficient density so that it does not flow or lie unevenly in case of excessive density.
Coloring the image should begin with a large brush. Then a lighter shade is added. The hand should make smooth movements. You need to control your work periodically at a distance from the wall, and after completing the main part of the drawing, it is recommended to give your eyes a rest.
In the process of artistic wall painting, you need to carefully work out all the details of the composition, connecting thin brushes for this and adding shades. The borders of the image should not stand out too much from the general background, so it makes sense to muffle them a little. This can be done with a foam brush-stamp: it should be dipped into the background paint and smooth out sharp border transitions.
After the work is completed and the paints have dried, it is recommended to cover the images with a colorless protective varnish.
How to make a wall painting - look at the video:
In general, wall painting is a very interesting activity that requires responsibility and special inspiration. If you put a piece of your soul into it, the result will please the eye for a long time, filling the homely atmosphere. festive mood. Good luck with your work!

May 15, 2018 Sergey Somov
Good afternoon everyone, maybe evenings or mornings. It's not that important. What matters is what I have step by step recipe"how to make wall painting with your own hands in the interior or apartment."
There is a common opinion that painting is a kind of miracle that is given only to the elect, that you either have it here or you don’t! It’s strange, because my teacher, who taught me everything that I can and know, said: “Close a monkey with me in the workshop for a week, and he WILL draw, and draw well!”
Why am I writing all this, and how can this be attributed to the topic of painting the wall with my own hands in the room? Yes, very easy! What I'm trying to tell you is that even art needs a system! And if we draw a parallel with sports, then you will not notice the difference, and here and there there must be a system, a competent sequence of actions that will facilitate the achievement of the goal and improve its quality.
And so, this was an introduction to the article “do-it-yourself wall painting in the interior”, which is important to comprehend and understand. And we're moving on to the first step.
Choosing a picture for painting a wall with your own hands
I decided to show simple example wall painting how to do it yourself, without special skills and achievements in the field of fine arts. To do this, I will take a picture with small color gradations, a picture that is built on large local spots, blah blah blah .... Yes, this one: 
I strongly advise you not to rush to pounce on the wall to paint it with a masterpiece that the world has never seen! Take something simpler, smaller. But you will do the most important thing on the way to the skill of painting a wall with your own hands, namely, you will understand the principle and approach in this work. Trust me! After all, you have already read to the next paragraph)!
Preparatory drawing for painting the wall with your own hands in the apartment
Now we're going to get tricky. In short, we will print this picture and transfer the drawing to the wall. But this is very brief, and here it is necessary to understand in more detail.


On this, we will put aside all thoughts about the preparatory drawing for painting the wall with our own hands in the apartment and talk about an equally important point of our undertaking.
Preparing the wall surface for do-it-yourself painting
I want to immediately note the fact that in this article about wall painting in the interior, everything I write about is of paramount importance! Otherwise, you run the risk of encountering a violation of technology, and this, in turn, will lead to a slowdown in the workflow, and in the future to the mechanical destruction of the paint layer of the painting.
So let's come up with full responsibility and finish correctly what we have already begun.
One of the many questions that we constantly hear from customers is how to prepare a wall for painting? The answer is simple: "Let's level the wall as if it were to be painted", that's all. And just at this stage of my repair, and my walls are aligned for painting, I will start painting with my own hands at a pre-planned place. But maybe your wall is already leveled and painted a long time ago - that's even better, because you don't have to read my moralizing about the primer and so on.
Important point! Preparing a wall for painting means:
- Give the wall the correct geometric shape by applying shiukaturka and putty
- Apply multiple coats of primer deep penetration
You can check the last, important point by swiping your palm along the wall: 
Please note that dust and whitewash remain on the palm, and this should not be in any case!
If we consider this point from a logical point of view, then when we apply paint to the wall, dust will remain between the paint and the wall, which will not give proper adhesion to one another, the consequences will be deplorable for our wall painting in the interior.
That's just the soil of deep penetration will help us to avoid this. Plus, it levels the absorbency of the wall, which is also important!
Choosing a soil
The best and highest quality for milestone species finishing works was and still is Knauf Tiefengrunt. But it is expensive, and it is possible for our training to take it is not entirely appropriate. Therefore, I can offer you an analogue, which is a fairly high-quality replacement - Dufa Tiefengrunt. Well, if you don’t find any, we will need a deep penetration soil of any company. Further, it is a matter of technology, we simply prime our wall, where there will be a painting with our own hands. And there are also tui important point worth considering! After priming, do not rush to pounce on the wall and paint on it! Let the soil dry well, at least an hour. 

Well, if you don’t find any, we will need a deep penetration soil of any company. Further, it is a matter of technology, we simply prime our wall, where there will be a painting with our own hands. 
And thuja also has an important point that is worth considering! After priming, do not rush to pounce on the wall and paint on it! Let the soil dry well, at least an hour.
We transfer the picture for painting on the wall
And so, the next step is to transfer our drawing to the already prepared wall for painting. My approach to work is simple: “In war, all means are good”! The main result, and if it is good, no one will care that we cheated a little!
Namely, we will not pick up a pencil, and like real artists to draw on the wall, we will simply transfer the existing printout to the wall using the technology that I will describe below:
We will need:
- Our printout
- molar ribbon
- Sanguine or any other soft material (charcoal, sepia sanguine, etc.) that is sold in an art store.
- And a sharpened pencil.
You and I turn over the printed picture and put it on flat surface. Then we take a piece of soft drawing material (sanguine, charcoal, sepia) and rub the reverse side of the drawing as I do in the picture below:

As a result, you should get the following:

I applied sepia to the back of the wall painting printout only where I got the painting.
Next, we place our printout directly on the wall, see where it will look best, and fix it with molar tape from several sides. 
Thus, a layer of soft material remained between the wall and the sheet.
We take a sharpened pencil in our hands, and outline each line of our drawing right on the wall, slightly pressing on the pencil. Try not to move the drawing, secure it with masking tape properly! 
When we have drawn everything with you (make sure of this for sure), we remove our sheet, because it will not be needed anymore, and look! 
The most accurate, perfect drawing was transferred without any problems.
So, the preparatory drawing for painting the wall with your own hands in the interior is ready. Let's explore further, shall we?
Do-it-yourself wall paints
I have already written several articles about DIY wall paints. Wrote about better and less expensive. In this wall painting, I will use the paints from this article. I hope you are not too lazy to look at this article, since I was not too lazy to write this)
Color system in painting
In our case, when painting a wall with our own hands in an apartment, we will use the color system. What does this mean and why is it needed?
I'll start from afar. Acrylic paint, on water based, when dried, it darkens significantly and changes color. To be honest, I don’t know exactly what this is connected with, but this has to be reckoned with and taken into account! And now, when you paint on the wall with paints, and mix the colors on the palette, then, in order to correct something, finish painting, you need to mix the same color, you mix it again on the palette, put a few strokes on the wall, on the old layer of paint, everything seems to be fine, but after 15 minutes, when the last strokes of paint dry, you will see that the result is a completely different color! You didn't hit the shade! How to be in this situation? How to do this wall painting with your own hands professionally? For this, there is a system of colors. It lies in the fact that we pre-mix the colors we need in separate containers, as many colors as needed, and then we use only them. And later, if you need to finish and fix something, we still have the same paint and the same color! I use food jars from the grocery store in my wall painting with my own hands, they are very convenient because the kit has a lid that you can always close, and the paint will not dry for many more weeks! 
And here, we smoothly approach the practice, even if it is still a technical part of it.
First of all, I will use light shades and colors, therefore, I will first pour white into the container, and then add paint that has color. I'll add a little. 
I will mix it thoroughly, and make a small color on the wall, because only on the wall can we understand whether this is the color that we need. 
As I wrote earlier, the paint changes color and becomes darker when it dries. Therefore, I suggest that you wait until it sets, about 5-10 minutes, and then decide whether this color suits us.
I will not be harmful, since this is a training painting, and I am doing it for informational purposes only. I'll just continue painting the wall. 
A small digression. We will have to paint over each layer several times, since the paint will lie unevenly the first time. Yes, this is not very convenient, but if you want a high-quality painting of your wall, you have to work here. And be sure to wait until the layer dries, and only then apply on top of a new one! Well, I'll continue.
I would like to hope that you understood the principle, and then I will give a few photos of the sequence of painting the wall with my own hands according to the above scheme:
We mix the color (the color we need).
Let's try it on the wall.
If everything suits, we paint the area we need.
If you need an even seam line, glue masking tape as in the photo. 
We continue the painting further according to the previously given principle. 

Important conclusion!
As you can see, in fact, there is nothing complicated in this. And absolutely anyone who knows the sequence in wall painting will be able to feel like a real artist and decorate his interior with an original solution.
If you have any questions, because I understand that it is impossible to describe everything in great detail, ask them in the comments under this article.
There is one more important question left unanswered: “What kind of varnish to cover the wall painting?” . I will answer it by mail to everyone who leaves it in the comments! Promise!
People have always believed that wall painting is a great way not only to decorate your home, but also to attract happiness, peace and good luck. This direction of design has not lost its relevance at all, rather the opposite - artistic wall painting is becoming more and more popular today. This is understandable - the original version of the design of the surrounding space is able to transform the room, fill it with warmth, beauty and comfort.
How it all began
Decorative wall painting is associated with the emergence frescoes. Translated from Italian, "fresco" means "fresh". The technique involved applying paints diluted with lime water to wet (fresh) plaster. This method made it possible to obtain durable paintings that did not lose the brightness of colors for centuries.
.
Fresco was widespread in Rome and Greece in 2000 BC. Aegean art was popular with the elite and was considered the best method of decorating walls and ceilings. The unique technology of work has preserved the creations of ancient masters to this day and told about the beliefs, customs and traditions of their ancestors.
The sequence of creating a pure fresco was first described Cennino Cennini(1447). The image was applied to the plaster with gunpowder, ocher or charcoal. Only rich people could afford such beauty: artistic painting is a laborious process that requires high skill and appropriate remuneration.

Today, wall painting in the interior has become more accessible, but you still can’t call it a cheap pleasure. Handmade is considered the best way creating an exclusive interior that has no analogues. The variety of styles and genres guarantees an amazing result - fascinating and realistic.
Application technique: varieties
The concept of "painting the walls of a room" incorporates many ways of applying images. It is customary to distinguish between 2 main varieties: traditional and modern technology, which in turn are divided into several subspecies.
Imperishable classic
Traditional wall painting is a monumental art made manually without the use of modern devices. In addition to the above-mentioned fresco, traditional techniques include:
- encaustic- the application of molten wax or oil paints to the plaster. Although another option is more often used - the image is applied to a canvas or wooden panel, and then glued to the wall;
- alsecco translated from Italian "dry". This wall painting technique involves applying a coloring mixture to dry plaster. Paints were rubbed on eggs with the addition of lime and vegetable glue mixed with tempera, acrylic and oil solutions;
- sgrafitto translates as "scratched". The procedure is technologically rather complicated - the wall is covered first with a black and then with a white primer. The drawing is scraped on white ground until a black background appears. The technique was invented by the ancient Greeks and became widespread in the Renaissance.
Achievements of the current century
Modern variations are no less interesting, but more diverse.
- grisaille translated from French "gray". The peculiarity is that the drawing is done in a palette of all shades of gray - this gives the composition a sculptural focus;
- drawing on decorative plaster. In this case, before starting work, the walls are finished in order to give the required volume. A picture on a wall treated in this way looks like a real one - “alive” and “breathing”;

- acrylic painting walls are extremely in demand due to the quick application and drying, the ability to convey the play of light and tones;
- visible and invisible colors glow in the dark and attract everyone's attention. The technique allows the use of coloring mixtures with the addition of mother-of-pearl and light-accumulative particles shining in the ultraviolet - a truly mesmerizing sight;
- graffiti- a technique familiar to many, involving the use of aerosol cans with paint;
- vinyl painting- one of the latest developments, loved by many for its ease of execution and economy. The ornament, which is applied to vinyl wallpaper, brings the desired breath of novelty into the familiar environment and, with the right approach, becomes the main decoration of the interior.

screen painting
Question how much does wall painting cost- the first thing that worries those who want to decorate the house with "live" paintings. The cost depends on many factors: the complexity of the drawing, the application technique, the size of the composition, the chosen plot.
On average, an ornament will cost from 2,000 to 15,000 thousand rubles. per sq.m, landscape sketches - from 6,000 to 30,000 thousand rubles. per square meter, compositions depicting animals and humans - from 20,000 to 60,000 thousand rubles. per sq.m.
If you want to create on your own, then wall painting stencils will help you. It's simple and affordable way decorate the room with borders, friezes, ornaments and flowers. There are a large number of ready-made templates for painting on sale, but if you want something unusual and always in a single copy, then you can make stencils yourself. It is enough to take a sheet of plastic or thick cardboard, draw the outlines of the desired pattern and cut it out.

It remains only to fix the stencil on the wall and paint over with a special stencil brush and water-dispersion or latex paints. To create one-color patterns, single templates are suitable, while the use of many shades suggests the presence of a multi-stencil consisting of several parts.
Wall painting with stencil pictures is especially in demand when decorating. children's rooms. Topics can be any depending on the age, gender and preferences of the child. It has been proven that the formation of taste begins in childhood- Surround your baby with bright, interesting and informative stories that stimulate the development of fantasy, and he will grow up kind, smart and talented.

DIY art painting
First of all, you need to decide on the location of the drawing and purchase materials for work. If the choice of an area for juicy experiments depends only on you, then paints and brushes must be purchased, taking into account the recommendations of professionals.
So optimal are acrylic paints, which are varnished and matte. They are non-toxic, dry quickly and resistant to mechanical stress (the created sketch can be washed, but without fanaticism - with special diligence, you can erase anything).
Acrylic brushes must be purchased with artificial bristles. Preferably different sizes to help you choose best option smear depending on the tasks
.
Next stage - surface preparation. The wall is puttied to perfect smoothness - there should be no bumps and depressions. Then it is painted with white paint, namely white, and not tinted - otherwise we will get a faded pattern with spots. Before applying the pattern directly to the wall, it will not be superfluous to work out the sequence of sketching the details on paper.
Draw a contour with colored pencils, if you use a simple pencil, then under the influence of acrylic paints it will blur and instead of a picturesque landscape, an artistic “daub” will appear in front of us. Make sketches from large to small details, i.e. designate the main elements first, and then supplement them with secondary ones
.
It is also necessary to paint over the drawing in stages - let's take a break. Intervals will help not only to keep the thirst for creativity, but also to see small mistakes and shortcomings. The paint is applied from large parts to small ones, from light tones to darker ones.
final step- varnishing. Although the procedure is not mandatory for acrylic paints, it is better to play it safe and securely fix the created masterpiece, but when using watercolors and gouache, varnish is essential! Lacquer is applied carefully with a spray gun in several thin layers. Now your efforts are reliably protected from the influence of dust and time, you just have to wipe the created splendor with a damp cloth from time to time.

Art wall painting is an interesting activity that requires inspiration and special responsibility. Try to put a piece of your soul into the work, and then the result will please the eye and fill the space with a special, festive mood.
The art of wall painting has been around for centuries. The frescoes of the Middle Ages and the painting of ancient times have been transformed into modern art painting, which is also popular.
There are many benefits to this type of design. The main thing is that you can create a masterpiece without being an artist and with minimal investment. Consider all the nuances.
You can draw a beautiful picture without drawing skills
Fresh original decor
Artistic painting of the walls decor is unusual for the modern design of the room. However, it has become more and more popular lately. Suitable for both connoisseurs of painting and for lovers of original decor. He can bring a touch of elegance and pomposity to the apartment, especially if there are columns in the design project. And also create an extravagant image invented by you. Anything the owner's heart desires.
Depending on the expected result, you can find a professional artist and order a painting in accordance with any requirements. In this case, you can give free rein to your imagination by depicting any, even the most unusual ideas. But if it is not possible to resort to the help of a master, you can do the wall painting with your own hands. This is one of the important advantages of this decor: it will not cause difficulties, it will reduce repair costs. In addition, you can bring all your ideas to life with a brush and paint.
 If there are no drawing skills, you can use the services of a professional
 This option is suitable not only for a large room with a huge blank wall. You can decorate a small bedroom, a nursery, a kitchen, and even a bathroom. It will be convenient to decorate and a wall with a window painting will only add originality. Another proof of the usefulness of this design, you can "disguise" the cord hanging from the wall from the air conditioner or TV, and also turn children's wall doodles into real masterpiece.
 This decor option is suitable for any room.
 Choosing a paint
Modern technologies for creating paints offer you a wide range. You can use:
- oil;
- acrylic;
- tempera;
- fluorescent paint.
They differ mainly in properties, drying speed and saturation. Fluorescent paint is known for its ability to glow when exposed to ultraviolet rays.
Here are the main types of paint used for artistic painting. You can also use an aerosol look. But after working indoors in this way, long-term ventilation will be necessary. It can also negatively affect the artist's well-being: cause nausea, dizziness and headaches, an allergic reaction is possible. It is recommended to deal with aerosol paints in an open area, with access to a large number of fresh air.
 You can choose the color of your choice. There are paints that will glow
 The choice of basis depends on the expected result. Watercolor will create a delicate drawing with blurry outlines. To highlight the necessary zones, you can combine it with other types. Please note that watercolor painting must be varnished for better preservation of the drawing. Fluorescent can bring some elements, or draw heavenly bodies in the nursery. Often, an oil base is used for artistic painting of residential premises.
 Paint can be combined with other types
 Placement of the picture
A factor that is also worth paying attention to. If you do not plan to cover the drawing with varnish, you need to carefully choose the location of its location. The main criteria for placement are temperature and humidity. Do not place the painting on the wall above the radiator and in a place where condensation can accumulate. In these places, the paint may leak or crack. For reliability, it is better to protect the drawing from the effects of negative environmental factors with the help of varnish.
 So that the drawing is not damaged or cracked, it is worth treating it with varnish
 Stages of creation
Let's move on to detailed description how to paint a wall. Start creating with preparatory work. Need to prepare the right materials: brushes, paints, thinner (if necessary), rags, stencils (depending on technique), stepladder, palette (for mixing colors). Preparing the wall. Pay attention to the surface. The painting can be applied to plaster and wallpaper intended for this kind of exploitation. The surface must be degreased and free from dust, deposits and previous paint. For oil material, the wall needs to be covered with a primer, for watercolor, it should be slightly damp.
After completing the preparatory stage, we proceed to drawing a sketch. The contours can be applied by attaching a stencil to the wall, or drawn "by hand" in accordance with the sketch. Next, fill in the resulting shell. Let the drawing dry well. After that, cover it with a layer of varnish.
Remember! After work, be sure to ventilate the room well.
 After sketching, you can start drawing. After completion, the drawing is recommended to be varnished
 Application features
For better preservation of the picture, pay attention to some features when working:
- it is better to apply the material in a thin layer;
- before coating, be sure to treat the wall with a primer (for oil) or leave wet plaster (for watercolor);
- drawing sketches is an obligatory part for a small and for a large room;
- be careful when applying the image to the ceiling or high surfaces;
- Make sure the pattern is dry before varnishing. Be sure to check for heavy paint buildup.
Important! Take precautions when working with caustic substances
 Before applying varnish, make sure that the drawing is completely dry.
 Various techniques
Modern painting is moving away from medieval frescoes, the technique of painting walls on wet plaster. On the this moment there are various options.
To begin with, the type of painting depends on the chosen paint, which we discussed above. If in doubt about the choice, consult a specialist. He will make a project, showing how the creation will look like when completed. He will also create a sketch and help in choosing the base.
The second criterion is the type of application. To transfer the pattern to the surface, use the following methods:
- stencil
To do this, print the pattern you like, transfer it to a hard surface, then circle the outline by attaching the stencil to the wall. Also, this device can be bought ready-made, or resort to the help of a designer. This technique is mainly applied to simple patterns, or simple drawings. Here you can use both a brush and a roller to speed up the process.
- hand painted
All presented species are generally hand-painted. But this technique involves drawing a contour sketch, and then filling the resulting shell. This type considered the most difficult. Although it all depends on the chosen pattern.
- Through projection
A technique that does not require a sketch. It is enough to find the picture you like, use the projector to transfer it to the wall, and draw on this projection. This method helps to accurately reproduce the nuances of the picture, while not being an artist.
 Hand painting is the most complex view drawing
 Let's get down to business
Having decided on the choice of drawing, colors and technique, we proceed to create an image. We offer several options for different rooms.
Shall we arrange the rooms?
 Landscapes in the apartment will look very beautiful
 Living room
The choice of scale and theme depends on the overall style of the room. For any color, black silhouettes of any kind you like are well suited. They harmoniously fit into the cold and warm shades without looking gloomy.
For a large living room, a watercolor painting on the entire wall would be an excellent option. Do it in cool light colors to create a feeling of freedom and space, or use warm colors to create coziness.
An example is a flower painting in purple or shades of blue with the addition of green on a white background. In this room, it is better to use hand-painted.
 For large rooms, you can make a large painting on the entire wall.
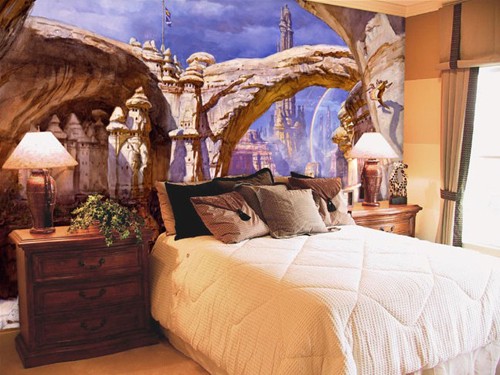
 Bedroom
The help of stencils will be appropriate here. They can create original patterns by making a photo frame that will be a great addition and a reminder to the couple of the wonderful moments spent together.
 In the bedroom it is better to use calm colors.
 Children's
In this room, creative thoughts are allowed to be fully realized. You can create an original and fashionable design by inviting a master. Then get an abundance of bright colors, and an accurate display of the chosen theme. Possessing artistic talent, you will be able to independently portray your baby’s favorite characters by decorating the entire wall.
If talents do not allow you to create on a large scale, you have a chance to paint a wall with your child. To do this, use stencils or projector technology. This choice will be a good opportunity to have fun together and let the child show their artistic abilities.
 The children's room should be bright colors
 Care rules
Despite the fact that the materials and the method of their application differ from those used in the Middle Ages, some care will be required for the product.
- To begin with, do not forget to cover the picture with varnish. This will simplify care and allow her to stay fresh for a long time.
- If the coating is not included in the plans, use a dry cloth to remove dust.
- Monitor the temperature and humidity of the room.
- If the drawing runs, make small corrections with a brush.
- Periodically update the brightness of the image, or change it completely.
In general, when using a protective coating, maintenance will be reduced to removing dust from the wall with a damp cloth. The rules of care are quite simple, so you can safely make your dreams come true, creating unrealistic images to your delight and your friends to envy.
Video: Volumetric 3D wall painting - an orchid.
Video: Wall painting. Lace 3D flower
One of the popular ways to decorate a house or apartment is to paint the walls in the interior: photos of exquisite paintings that turn typical rooms into stylish corners can be found in fashion magazines and on the net.
Decorating your home with such images is becoming fashionable, but often in a desperate desire to make their home more attractive, the townsfolk forget about style and relevance. It is wall painting that is considered the very technique that can both spoil and decorate the interior.


Wall painting: exquisite decor for all rooms
Interior painting, according to the designer, is appropriate in almost any room and in any style. The similar versatility of this decorative technique, as well as its originality, make such images popular in modern design. Artistic painting can change the mood of the room and make it more aristocratic and sophisticated. A high-quality drawing on the wall will remain unshakable for for long years, because the techniques used make it possible to create extremely durable coatings.

ADVICE! An image for wall painting should be selected based on the style of the room: pastoral paintings for Provence, pop art for modern or abstract art in a minimalist interior.


Artistic wall painting in the interior of an apartment is a great way to create a unique design. choice of subjects, color solution and features of the decoration of the picture will help to bring to each room its own unique feature. This decoration technique is appropriate in all rooms of the house:
- To decorate the living room, a neutral plot is suitable, which will appeal to all family members. At the same time, it is important to select plots and motifs that set you up for positive: for example, a seascape or a garden view. In addition, it is for the living room that plots are often used that can visually expand the space.

- Wall painting in the bedroom is used as often as photo wallpaper. Peaceful sea and mountain landscapes, images of flowers or the starry sky, as well as all kinds of romantic paintings are considered traditional. You should not abuse the abundance of details in the picture in the bedroom - this can be annoying for the inhabitants of the room.

- No less popular is the painting of the walls in the children's room. Instead of typical photo wallpapers with long-familiar cartoon characters for the children's room, they use individually designed stories that take into account the hobbies and passions of the child. The standard color scheme for a children's bedroom is delicate pastel colors, calm and expressive. Flashy and bright colors are appropriate only in the interior of a teenager's room.

- To finish the kitchen, painting is used a little less often because, as a rule, the small size of this room, which does not allow using the wall plane as competently as possible. Most often, they paint a wall in the dining area, applying an image of an urban or summer landscape.


All options for wall painting ideas should be selected only with an experienced designer, since a seemingly attractive picture in a large format on the wall may not look very good. In addition, a specific plot should be selected according to the style of the room, its layout and the furniture that is planned to be placed in the room. Since such a wall inevitably becomes the semantic center of the interior, it should not dominate or overwhelm.


Types and techniques of wall painting
Work in wall painting is carried out by specialists in wet or dried plaster. These techniques differ as radically as watercolor and oil painting.
Experts distinguish the following technologies for painting walls in a room:
- Fresco is the application of an image on wet plaster, involving the use of water-soluble paints. This way of working with wall paintings is considered quite complicated and requires the maximum professionalism of the master, which is associated with the instant drying of paints and the difficulty of making adjustments to the picture.

- Alsecco is a slightly different wall painting technique, which consists in applying an image to a layer of dry plaster. This method is considered not so durable and reliable, but working with a dry surface is more suitable for an insecure artist.

- Modern airbrushing is suitable for creating voluminous and lively images. It is this type of painting that is considered the most realistic, since the features of the tools with which the master works make it possible to apply the smallest images and details to the wall.

F ACT! Graffiti, as an outdoor variety of airbrushing, can also be used as a home painting: abstractions and rough technique are ideal for decorating modern interiors.
- The classic version of painting is the application of an image with acrylic paints on a pre-prepared flat surface. Quick-drying and human-safe, the paint is ideal for indoor use without any problems. In addition, this option is easy to combine with others: for example, to complement an acrylic drawing with a special phosphor paint that will glow in the dark.

Graffiti "Lucas"


Features of applying the image and caring for the painting on the wall
A specialist who is professionally engaged in wall painting usually works according to the following scheme: creating a project, preparing a wall, drawing a sketch and painting with paints, fixing an image. Strict adherence to the given scheme allows you to achieve maximum results, since there are no unimportant details in this work.
- The sketch is selected according to the size and style of the room. The opinion of a specialist will help to avoid problems with the inappropriateness of the plot in the interior.
- A smooth plastered and sanded surface is covered with a special primer, which not only fixes the wall, but also makes the brush movement softer.
- A sketch is a prerequisite for working on large areas, since the slightest distortion of the lines threatens to spoil the whole impression of the picture.
- Paints are applied based on the chosen technique. Preference is given to the maximum safe materials without a strong smell, quickly drying and keeping brightness for a long time.
- To fix the image, a matte or glossy varnish is usually used, which allows you to wipe the wall with a damp cloth to remove dust.

Wall painting should be taken care of carefully and carefully: the most gentle compositions, soft rags and brushes are used to clean the surface. The lacquer layer practically does not wear out, which allows you to maintain the brightness and clarity of the image for many years.