Master class: how to cut a bottle with a thread - it's simple! Master class: how to cut a bottle with a thread Cut a bottle with a thread.
Video channel Pavel Cherepnin. The internet is full of videos on how to cut a glass bottle. Most of the methods really work. The article shows The best way even at home. The only trouble is that the authors show only good moments, but do not give details. Perhaps you watched a video about a steam engine, the idea came up to make it out of glass, and most best material are glass bottles. All you need to do is cut it in half and you will have a great transparent cylinder.
See what machine the master made.

The master scientifically approached the problem. First, he checked all the main methods, and only after that he began to develop his method.
The very first way I wanted to try was to make a wooden corner. At one end, which is equipped with a glass cutter, at the other end is a bolt on which the bottle is held when we twist. The assembly of the structure is not technically complex and can be implemented in any way, but on the screen in this moment you can see how the master did. The design did not justify itself, and in the end I had to do it differently.
The logic behind the operation of this device at home is clear. Insert the bottle into the bolt. A glass cutter is inserted under the bottle. In the future, press the bottle on it and scroll. In theory, a smooth line should appear on the bottle, which we will later split using temperature. That is, first we heat the bottle, and then cool it sharply, or vice versa. As a rule, glass breaks from a large difference in temperature. Well, the line outlined by the glass cutter will allow you to direct the split in the right direction. I decided to limit the area of the bottle with plasticine. We set fire to the teapot and wait until the water boils. Meanwhile, cool the bottle under cold water from the tap. Messed up the order, did not split.
There is another way to cut it on the Internet - wrap a bottle with a string, pour it with acetone, set it on fire, wait until it warms up and lower it into cold water. Acetone quickly burned out and did not heat anything. I decided to wind more threads and set fire to it, but this did not help either. The problem is actually in the nylon threads. They do not absorb acetone, which is why burning does not last long. There is not much heating, and the bottle does not prick.
I decided to try using regular sewing threads. And they don't roll either. They burn a little longer, but this is also not enough. Thoughts have already begun to appear that organic material such as cotton or linen is needed. I took the threads, which are called floss. Used for various embroidery, decorative sewing and everything else. As you can see, it burns better. The acetone is absorbed and heats up the glass. The bottle broke off evenly, but with a surprise. The split did not go along the line cut with a glass cutter, but 1 centimeter higher. At first, I did not notice this, because of the relative evenness of the chip and the fact that the threads hid the line that I marked with the glass cutter. But you can see, the outlined line is completely intact. Apparently, the two actions of cutting bottles have nothing to do with each other.
I decided to carry out the procedure again to chip off exactly along the line. But the second time the procedure no longer rolls. This method works well only on a whole bottle. No matter how hard I tried, nothing good came of it. Each subsequent chip became more and more uneven, if at all. I repeated all the steps for chipping a few more times in the hope of getting an even glass. I broke about a dozen vessels, but I couldn’t get a smooth edge using the method. You can get containers for household purposes in this way, but, unfortunately, you cannot make any high-quality contraption. Aligning on a grinding wheel will not work either, because it just breaks the glass and you get split nonsense. Of course, the hope was still glimmering that maybe some of the next bottles would break off more evenly, and after working a little with sandpaper, we would make a tolerable cup. The method is generally not suitable for such purposes. Something had to be changed.
6 ways to cut a glass bottle straight
sdelaysam-svoimirukami.ru
There are several easy ways to cut the neck of a glass bottle. Why is this necessary, you ask? From a beautiful cropped bottle, you can make a cool glass, a flower vase or a stand for various little things. But, before you start cutting beautiful bottles, I still recommend practicing at ordinary beer houses, since this business requires experience and some skill: it doesn’t always work out exactly the first time.

So, I'll tell you the most simple ways cut off the neck of a glass bottle.
This will require a glass cutter. You can use the factory model or make your own. Design homemade device can be different: the main thing is that the bottle and the cutting element are securely fixed, but the bottle rotates freely.


Important! When cutting, you need to make one pass: this will provide the most even edge.
Next, you need to prepare hot (boiling water) and cold (possible with ice) water. We spill along the cut line first hot water to warm up the glass.

After that, immediately pour the bottle with cold water.

From the temperature contraction, the glass should break off along the line of the preliminary cut. If this does not happen, the procedure must be repeated (pouring first with hot and then cold water).

Method 2 - candle flame
This method will require a candle and a piece of ice (you can use a container of very cold water). To break off the neck, a straight line is drawn on the bottle with a marker, along which the glass warms up well over the candle.


Then the cut line is cooled with ice, after which the glass breaks with a light tap.

Method 3 - narg from friction
Another way to break off a bottleneck is to use frictional heating of the glass. To do this, two plastic ties are put on the bottle, which serve as limiters. Three turns of twine are wound between them, after which the twine begins to move forward / backward by the free ends.


After 2–3 minutes, when the glass is sufficiently heated, the bottle is placed in cold water, and with light tapping, a break occurs along the heating line.

If you make a small incision with a glass cutter before rubbing the twine on the bottle, then you do not need to use cold water: the glass will crack when heated on its own.

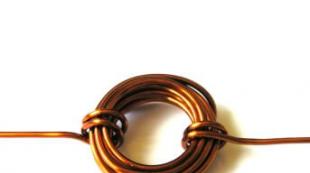
Method 4 - Filament Installation
This method will require a transformer, for example, from a microwave oven with the secondary winding removed, instead of which three turns of a powerful power cable are installed.
The free ends of the wire are closed through a thick wire. The stand (base) must be heat-resistant and dielectric.

The next step is to connect the transformer to the electrical network. When the transformer is turned on, the thread will heat up: a bottle is applied to it and gradually rotates. When the glass is heated, the neck will detach along the heating line, so you need to ensure that the heating is uniform and along one line.


Method 5 - burning rope
This method will require natural twine and some refined gasoline for lighters. A piece of twine is cut off to the length necessary to wrap around the bottle at least 3 times. Then this piece of twine is soaked in gasoline so that it is completely soaked.

The twine soaked in gasoline is wound around the bottle in the place where it is necessary to chip and set on fire.

When the gasoline almost burns out, the bottle is lowered into cold water, where the glass bursts along the heating line due to the temperature difference.

Method 6 - use specialized equipment
This method is to use an electric tile cutting machine. The diamond blade cuts thick glass well and evenly. It is recommended to work with gloves, a protective mask and goggles, as glass dust is very dangerous. The advantage of using a cutter is the ability to cut the bottle into small washers, which is not available with other methods.


You can also use an electric multitool with a rotating working head for cutting. But when working with this tool, you need to securely fix the bottle so that the cut is even.


In conclusion, I would like to add that not all of the considered methods are safe. When trying to repeat, follow safety precautions and use protective equipment(gloves and goggles).
The decor of glass bottles has been quite popular lately, and since many are interested in the question of how to cut a glass bottle at home, without using a glass cutter, I want to dedicate today's master class to a simple but interesting way to cut a bottle with a thread ...
In this connection, the topic of this master class is “How to cut a bottle with a thread - nothing complicated!”.
For work we need:
1. Glass bottle;
2. Woolen threads;
3. Solvent (can be kerosene, alcohol, cologne, acetone);
4. Scissors or stationery knife;
5. Gloves (will protect the skin of the hands from exposure to the solvent);
6. Lighter or matches;
7. To protect the eyes, just in case, goggles (in fact, there are no fragments, but caution is never superfluous);
8. Deep basin filled with cold water. 

So, how to cut a bottle with a thread? We take a woolen thread, measure and cut it in such a way that it is enough for 3-4 turns of the bottle.
We immerse the measured and cut thread in the solvent, and immediately wrap the bottle in the place where it is planned to make an “incision”. You can simply wrap the thread or tie it in a knot, in this master class I just wrapped it. 

After that, we set fire to this thread with matches or a lighter, and it is better to keep the bottle in an inclined position - strictly horizontally (parallel to the ground), gently scrolling around the axis. 

The fire will burn for about 30-40 seconds, as soon as the lit thread goes out - quickly lower the bottle into the prepared basin filled with cold water. 

Next, the characteristic sound of cracked glass will be heard, and the bottle will instantly split into two parts. This type glass cutting is based on a rapid change in temperature, we all know from the lessons of physics that glass expands when heated, and narrows when cooled, respectively, with a sharp change in temperature, a kind of glass destruction occurs and it simply cracks! 


We figured out how to cut a bottle with a thread, but how to process sharp glass edges? You can use sandpaper or stone to sharpen knives. Last, you should process the edges of the bottle, previously immersed in water, so the processing is easier and faster (it is better to protect your hands with rubber gloves). Friends, I ask you not to forget about the notorious safety precautions, after all you will work with fire and glass, goggles on your eyes, gloves on your hands and a basin with plenty of water are a must!
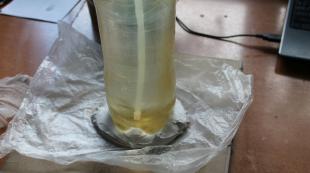
In this publication, you will learn how to neatly and evenly or a jar using motor or vegetable oil.
We fill the dishes with cold water to the level where we want to make a cut. We place it in some container, which also needs to be filled with water to the level of water from the vessel. Now add oil to the bowl until a thin oil crust forms on the surface of the water, which will completely envelop the glass container.
Most importantly, you should not pour oil straight from the bottle, because the film will turn out to be uneven and thus nothing will come of it.

Next, to carry out the procedure for cutting a bottle or jar, we will select a piece of metal. The thicker the glass we want to cut, the thicker the metal must be. The glass is quite thin, so the blade of a clerical knife fit perfectly. We heat it red-hot with a burner or gas stove.

Now we lower the hot blade into the bowl only to the oil level.
Remember to protect your skin and eyes from hot splashes!

Due to the rapidly incandescent film, the glass heats up, and due to the temperature difference it cracks. So we can carefully cut the glass bottle.

As you can see, the chip turned out perfectly even.
Workshop on cutting a bottle with a thread
Everyone is well aware that many useful and original things can be made from unnecessary glass bottles with your own hands. However, not everyone knows how easy it is, because many have no idea how to cut off part of the bottle without a glass cutter. We offer you a master class on how to cut a glass bottle with a regular thread quickly and easily at home without using a special tool.
In order to cut a glass bottle we need:
- A piece of ordinary cotton thread.
- Acetone or alcohol.
- Cold water container.
- Matches or lighter.
Thread cutting order
Step 1

Cotton thread soaked in acetone
We mark with a marker the line along which you want to cut the bottle. Wet the thread in acetone and wind it several times along the intended line. We tie the rope and cut off its ends.

Tie the thread tightly

Trim the ends of the thread
Step 2
Holding the bottle in a horizontal position over a container of water, set fire to the thread. In this case, the bottle must be rotated to ensure uniform heating.

We set fire to the thread
Step 3
As soon as the thread burns out, immediately dip the bottle into a container of cold water. From a sharp temperature drop, the glass itself will crack along the line where the rope was.

Dip the bottle in very cold water
Step 4

Separate the two parts of the bottle with your hands
At the last stage, it remains only to process the edge with an emery or file. Further, from the resulting glass, you can make an original candlestick or a flower vase, decorating the product to your own taste, in general, experiment!

Sanding the cut with sandpaper
Hello dear readers! The decor of glass bottles has been quite popular lately, by the way, we have already considered this topic in the review "", and since many are interested in the question of how to cut a glass bottle at home, without using a glass cutter, I want to dedicate today's master class in a simple but interesting way, cutting bottles with a thread ...
In this connection, the topic of this master class is “How to cut a bottle with a thread - nothing complicated!”.
For work we need:
- Glass bottle;
- Woolen threads;
- Solvent (you can kerosene, alcohol, cologne, acetone);
- Scissors or stationery knife;
- Gloves (will protect the skin of the hands from exposure to the solvent);
- Lighter or matches;
- To protect the eyes, just in case, goggles (in fact, there are no fragments, but caution is never superfluous);
- Deep basin filled with cold water.


So, how to cut a bottle with a thread? We take a woolen thread, measure and cut it in such a way that it is enough for 3-4 turns of the bottle.
We immerse the measured and cut thread in the solvent, and immediately wrap the bottle in the place where it is planned to make an “incision”. You can simply wrap the thread or tie it in a knot, in this master class I just wrapped it.


After that, we set fire to this thread with matches or a lighter, and it is better to keep the bottle in an inclined position - strictly horizontally (parallel to the ground), gently scrolling around the axis. 

The fire will burn for about 30-40 seconds, as soon as the lit thread goes out - quickly lower the bottle into the prepared basin filled with cold water.


Next, the characteristic sound of cracked glass will be heard, and the bottle will instantly split into two parts. This type of glass cutting is based on a rapid change in temperature, we all know from the lessons of physics that glass expands when heated, and narrows when cooled, respectively, with a sharp change in temperature, a kind of destruction of glass occurs and it simply cracks!