Stages of building a house from a bar: step-by-step construction, materials and tools. Basic rules for the implementation of projects: how to build a house from a bar with your own hands, so that it turns out cheap and beautiful
A full-fledged log house made of solid wood has always been not only considered a symbol of prosperity and good taste, but also demonstrated the owner’s desire to take care of the well-being and health of his household. Construction wooden house from a bar can be considered the most justified from the point of view of ecology, maintaining a healthy atmosphere in the room and providing good thermal insulation. The wide use of lumber materials has always been hindered by the high price of lumber and the rather complicated technology for building a wooden house.
Features of the construction of premises and buildings from timber
When using building technology wooden houses from a bar, it must be borne in mind that wood has always been a capricious material that requires careful observance of all technological operations:
- Properties wooden beam depend on the moisture content of the wood, therefore, during the construction process, it is necessary to make allowances for possible shrinkage and deformation of the timber beams;
- The technology for the construction of wooden houses and buildings provides for a large number of manual operations for sawing, cutting grooves and joints, so the quality of construction depends on the carpentry skills of the builders;
- The construction of any wooden buildings from a simple profiled beam is carried out in two stages, initially the building box, frame and roof are assembled, and only after six months or a year they begin finishing operations.
Important! After laying the walls, the house made of timber material gradually gains moisture, because of this, the wood becomes softer and more pliable, which invariably leads to the building box settling under its own weight.
Even glued timber grades, the wood of which is impregnated with resins and adhesives, can change their rigidity, which leads to the formation of cracks and divergence of joints.
The main points of the construction technology of wooden log houses
In addition to being highly sensitive to the conditions and method of storage, wood also has such an unpleasant drawback as different strength and rigidity of the wooden material in different directions of applying force to the timber. Therefore, during the construction of a building, in order to obtain maximum adhesion strength of individual beams by side surfaces, special methods of joining timber are used:

To seal the joints at the joints, especially if the construction is carried out from an ordinary beam, linen fiber tow must be used; grated dry moss was laid in the old days. Moss is considered by many builders to be more resistant to moisture and rot and is often used in construction. wooden baths, dachas or country cottages from a bar.

Important! Immediately after the purchase of the material and at least two weeks before the start of construction, the timber must be treated with a high-quality antiseptic and flame retardant in an organic solvent.
How houses are built from timber
A simple construction technology and a relatively low weight of the material make it possible to assemble wooden buildings of almost any complexity, provided that the project of a log house is preliminarily calculated and worked out in detail with the layout of all key elements wooden building.
The process of building the main box of the house consists of the following steps:
- Foundation laying;
- Assembly of walls, inter-wall bulkheads and ceilings;
- Assembly roof structure roofs, roofing and gables;
- Finishing operations.
The construction technology does not require the use of heavy handling equipment. Moreover, small wooden house ik can be built almost alone, but it is better to work with a team of two or three people, especially since the installation of a roof truss frame, 4x5 m in size, cannot be mastered alone.
How to make a foundation when building a timber box
It is generally accepted that wooden structure building boxes made of timber has high rigidity, so it can be installed on almost any known type of foundation. In practice, a newly built structure, until the completion of the settlement and the final strengthening of the walls, has only 50% rigidity. After the construction is completed, there are considerable cracks and gaps in the joints and joints, clogged with tow or moss. As the required moisture is gained, the timber of the timber swells and seizes into a hard wooden box.

The most difficult time for a “fresh” log house is winter with severe frosts. At that time wooden material walls dries up and partially loses rigidity at the joints. If the construction of a house from a bar was carried out on insufficiently deeply twisted piles with a weak lower crown or an insufficiently rigid grillage, there is a danger of opening the crowns of the walls with the formation of cracks under the pressure of heaving soils.
Most often, a pile or pile-grillage foundation is used for the construction of a wooden building, less often for small frame houses you can use a tape, shallow version of the foundation. Beams, like any wooden structural element, are especially sensitive to moisture and dampness, therefore the best choice there will be the use of pile-grillage types of foundation. In addition, proper arrangement of ventilation and ventilation of the basement parts of the building will provide good protection timber and long term operation.
Timber wall laying
After arranging the waterproofing, the first crown row of beams is laid on the grillage or foundation tape. During the construction of the foundation tape in a concrete surface with a step of 60-70 cm, anchor bolts, with the help of which the first row of timber is attached.

When laying out the first crown, you will need to make every effort to accurately level the concrete base under the timber along the horizon. If it was not possible to make the horizon, you will need to cut the surface of the beam, otherwise the next rows wooden beams lie unevenly, and the walls will turn out to be crooked. The trimming procedure sometimes has to be used, especially if the beams themselves have small deviations. All cuts and washed down planes must be treated with antiseptics and preservatives. At the next stage, with a step of 40-50 cm, logs are laid under the future floor.
Usually, before starting construction, the wooden material is sorted and discarded in order to get rid of the most defective and crooked timber. Rejected parts go to short inserts and tie-ins.
The connection and docking of the beam is performed in the classical way, the corners and side joints are connected “half-tree” with the obligatory dressing with a solid beam of the next row, as in the photo.
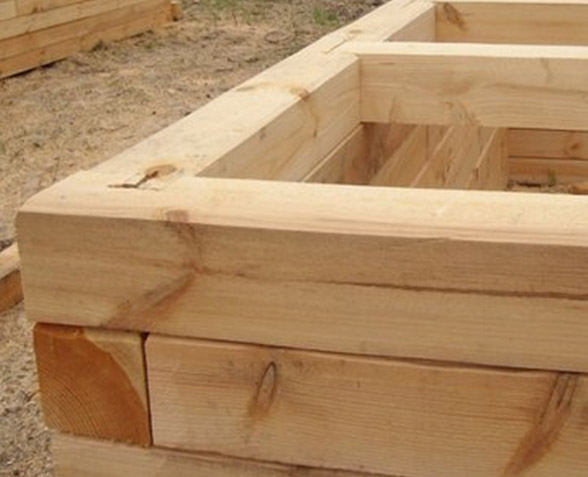
In the corners and at the tie-in points of the ceiling beams, the log and the internal bulkheads, a dowel must be hammered, connecting at least three rows of beams. In this case, you can use not only metal, but also a two-wedge version made of the same wood as the material of the walls.
Sometimes corner connections performed in the form of a dovetail lock or dressing with a T-joint cut.
In the course of laying the timber on the walls, tie-ins are simultaneously performed cross beams on which internal partitions and ceilings will be mounted. But until the construction and erection of the wooden box of the building is completed, partitions cannot be installed. Even temporary work platforms for moving along the walls are reduced to two or three boards.

During the construction of the walls, the frame and vertical panels of the outer parts, the porch, the hallway, and outbuildings are assembled. They are also left uncovered.
Only after the ceiling beams are laid and the truss system with the crate is installed, you can proceed to flooring, installing partitions and bulkheads.
Finishing and finishing operations
If the construction of a wooden house from a bar is made of dry or high-quality glued material, the roof can be mounted in six months. Otherwise, put a draft version. Roof installation usually involves the use of a sliding joint at the fulcrum of the rafter on the top row of timber used as a mauerlat. On the ridge run, pairs of rafters are connected using a steel lining and bolts. Thus, in the process of settling and settling the walls, the truss beams have the ability to change the slope, thereby compensating for the formation of a gap between the roof and the upper beam. Immediately after the assembly of the rafters, the crate is stuffed, vapor barrier and waterproofing material are laid.
The gables of the roof are temporarily sewn up with a vertical clapboard and covered with plastic wrap until the end of the shrinkage processes. Finishing operations are carried out after a year of building standing. Finishing comes down to re-treatment with an antiseptic, chasing cracks, installing bulkheads and door shells, windows. The inner surfaces of wooden walls after thermal insulation are most often sheathed with drywall.
Conclusion
The construction of a log house requires at least skills in working with wood and a good knowledge of the ways and methods of joining the beam. Having built a bathhouse or a small barn with your own hands, you can proceed to the construction of a summer house, and only after the successful construction of a wooden country house is it worth trying to work in a team of professional carpenters in order to fully master the intricacies of building a house from a bar.
- planed timber (inexpensive, easy to use, has standard parameters; but, at the same time, it always requires thorough drying, does not differ in a perfectly even surface and geometrically exact same dimensions);
- profiled timber (it has its own fastening system “thorn-groove” or wavy “comb”; but for perfect laying, it is better to buy this type of timber with a margin - this will make it more likely that fasteners from different batches will fit together);
- glued laminated timber (ideal for building a house without construction experience, due to its small shrinkage, working with it allows you to simultaneously perform other construction tasks; but when purchasing this raw material, you need to monitor its quality, density and uniformity of the lamellas).
General tips for self-building a house from a bar.
1. The “gold standard” for timber is considered to be a section of 100x150 or 150x150 mm.
2. Tree annual rings should be evenly spaced along the entire length of the timber, preferably in its center.
3. Coniferous trees are the undisputed leaders among the suppliers of raw materials for future beams.
4. All beams used must be the same in length, width, curves, thickness, and so on.
First, we make drawings of the future home, make measurements on the ground and the corresponding calculations. You can sketch a project of a house from a bar yourself or turn to specialists. After creating the project, we determine the amount of the required material, purchase it, and we can begin direct work on the house.

Before choosing what type of foundation you will lay under the base of the house, you will need to answer questions such as:
- what features of the structure can affect the foundation?
- what type of soil prevails in your area and how far from the surface is groundwater?
It will also be necessary to take into account a number of desirable recommendations for arranging the foundation:
- if piles are involved in the process of work, then it is also recommended to use a grillage so that there are no gaps between the ground and the house;
- the lower crown should be located above the ground at a distance of at least 50 cm;
- if reinforcement is used for the construction of the foundation, then its knitting in places of strong bends is permissible only with the help of metal fasteners manually, but it is better not to use welding - this can destroy the very structure of the material.
The most popular options for the foundation for a house made of timber are tape, shallow and pile. Tape is good for buildings with cellars and basements, shallow - for sandy soil, pile - for loose and all other types of soil.

The first crown is usually laid on additional boards to avoid possible moisture on the timber. These boards are impregnated with antiseptics and act as a kind of link between the foundation and the lower crown. Under them, you can also lay waterproofing - this will provide decent protection from moisture from the surface of the earth.
Also, the first crown can be placed on the cross rails, immediately leaving small gaps between them for proper ventilation of the base. Because of this, this option is considered more rational.
An important point - when laying the crowns, you should constantly monitor the correct height of the structure, and using the building level - monitor the evenness of the laying of the timber and the entire surface as a whole.
The crowns are fastened together with special dowels, grooves or ridges, and corner joints are made in half a beam / in a bowl / paw / warm corner (optional). In addition, construction logs are cut into the first or second crown for laying the future floor. A sealant (for example, jute) must be laid between all the crowns.
At the same time, during the laying of the crowns, all seams and joints must be sealed, and the walls must be impregnated with fire protection solutions.

To create openings, you can try the following option - in the places of the planned doors and windows, the bars can be laid out shorter at the distance from each other into which your window or future door will fit. When using this technology, dowels should be mounted on both sides of the opening.
If this method seems too laborious to you, then cutting out suitable holes in a solid wall structure from a bar is another option, however, in this case, you will have extra building material that could initially be used with greater benefit. Although, on the other hand, the use of this method will make it possible to more accurately calculate the parameters of windows and doors, since sawing can be done at the stage of complete drying of the beam and acquiring the final appearance after shrinkage.

It is customary to make floors in houses made of timber in the same way as in any wooden building - in the form of flooring on logs or special beams that serve as ceilings. We put a draft and finishing floor with additional thermal insulation and insulation. Flooring remains at the discretion and imagination of the owner, and the ceiling is already done at the finish line, in the complex for finishing work - it can be sheathed with siding, clapboard, and so on, or you can leave hanging beams and additional ceilings as decoration.
We take care of the roof.
If you don’t be smart, then it’s probably better not to find an ordinary gable roof option. This type of roof involves the rigid fastening of the rafters and the arrangement of additional frame gables. The roof itself can also be made of wood - it is assembled from bars on the ground, then lifted up and fixed in the form of a single bar. On top of such a rafter system, a crate is mounted, on which the direct material for the construction of the roof is attached - tiles, slate, ondulin, metal tiles.

During the final drying of the timber from which the house is built, the formation of cracks in the structure is almost inevitable, through which valuable heat will be lost. In this regard, it is better to caulk all seams, joints and alleged weak spots with jute.
It will also be useful to paint the walls of a house made of timber - in addition to external beauty, varnishes and paint will protect the tree from UV rays and precipitation. Before painting, of course, it would be useful to grind the entire surface of the walls.
But as for such popular finishing options as the use of siding, sandwich panels and the like, then it is undoubtedly worth considering - log houses are mostly good on their own (see photo) and do not require additional decoration. The maximum that is allowed here is the use of varnishes and paints. However, this side of the issue always remains at the discretion of the owner of such a facility.
The minimum set of tools that you should have at hand:
- an ax and a hammer;
- nails, self-tapping screws, screws, dowels;
- jute or other heat-insulating material;
- electric screwdriver;
- perforator;
- building level and tape measure;
- electric drill and power saw.
About what else will be useful to know for building a house from a bar, we look at the video.
Increasingly, owners land plots focus their choice on the construction of houses from timber. The main advantage of this solution is the fact that you can build a house from a bar with your own hands. Such a building has exceptional qualities of reliability, durability and environmental friendliness. Directly, the technology of erecting buildings from a bar is extremely simple and understandable. Even with basic construction skills, all work can be done independently, without the need to contact construction companies.
What kind of wood can be used to build a house from a bar with your own hands? A photo
Before starting construction, it is necessary to choose the most suitable and high-quality material for work. The main qualities of wood are density and strength. In some breeds, these indicators reach the level of most metals, therefore, rather high requirements are imposed on buildings made of timber. The walls of the house must be strong and durable. In addition, they must provide good sound and heat insulation.
However, the tree has a number of disadvantages, the main of which is the low level of fire resistance and the tendency to sedimentary deformation, which is especially often manifested during the first 2-4 years after the completion of the construction process.
Conifers are the most optimal choice for the construction of a building from a bar. This material is durable and resistant to decay processes, it does not crack and does not exert a significant load on the foundation. For self-construction of a house, it is extremely important to remember that not only competent construction technology, but also material selected in accordance with all the rules will make it possible to build a good wooden house. Therefore, the wood must be dense and wear-resistant.
Profiled or solid timber?The bar can be profiled or solid. For construction, you can use both the first and second option. To choose a particular type of material, you should consider the advantages and disadvantages of each of them.
Build a house from a profile bar with your own hands. Video
Profiled timber provides for the presence of a profile. It has crown grooves and spikes. Such connections are mounted along the entire length of the material, and then the surface is ground. Timber for building a house is delivered ready-made. The owner only needs to assemble a building from them. Among all the advantages of houses made of profiled timber, the following stand out:
- Relatively low construction costs.
- High resistance to deformation.
- Low complexity of work.
The building material has an exact shape, which allows you to carry out all the required activities in the shortest possible time. Houses made of this material have a more attractive appearance and high thermal insulation characteristics.
The advantages of profiled timber include almost perfect flat surface walls. They do not need to be additionally sheathed with any facing material because they look great anyway. Timber walls are protected from rotting, since rain and melt water will not collect in them. The profile is calculated in such a way that precipitation cannot penetrate the interventional seams.
After the house shrinks, there is no need to waste time and effort on caulking. The wood provides excellent wind protection and high level thermal insulation, since the crowns have connections of sufficient density.
However, profiled timber also has disadvantages. Firstly, it does not tolerate many atmospheric influences well enough. Secondly, the timber supports combustion. Therefore, in order to increase the bio- and fire-retardant properties, wood must be treated with antiseptics and impregnations.
The natural moisture content of the material can cause cracks to appear on the timber during the warm season. For this reason, the material must have a moisture content of no higher than 20%. If necessary, chamber drying is required.The initial thickness of the walls of a building made of profiled timber will not be enough for optimal use. One way or another, you will have to carry out additional external insulation. However, after construction is completed, it will not be possible to change the layout or carry out an add-on.
Build a house from a solid bar with your own hands. Video
Despite the fact that a solid timber does not have the most presentable appearance, the material is still widely used in construction. The main advantage is the relatively low price. When preparing wood, its standard moisture content is preserved, which makes it possible to get rid of the need for additional procedures and shortens the preparatory stage.
Suitable solid timber can be purchased at any specialized market. Another big advantage of using this material for building a house with your own hands is the absence of the need to use special equipment or special tools.
However, there are also disadvantages, which include:
- When choosing a bar, you must be extremely careful, since unscrupulous sellers provide a bar of poor quality.
- More high costs for finishing work. To obtain a complete and beautiful appearance of the building, it must be sheathed with clapboard or siding.
- A fungus may begin to form on the timber. The reason lies in the natural humidity, since the material does not pass special technology drying. Naturally, it is possible to treat the timber with an antiseptic and special impregnations to prevent the formation of fungus, but this will require additional money and time.
- After shrinkage, the material cracks. To prevent such damage, wooden walls must be stitched on both sides.
- Interventsovy seams are strongly blown. A building made of solid timber is characterized by a significantly lower level of thermal insulation.
Preparation of tools, materials and a project for building a house from a bar with your own hands. A photo
After choosing the right type of timber, you can proceed to the purchase of materials, collection necessary tools and drafting a project plan. If desired, you can purchase materials in finished form. In this case, all the bars are cut to the required dimensions of the tools. There will already be grooves in the material, and all that remains is to lay out the building.
If you wish, you can save on the material if you prepare it yourself. To do this, pay attention to the following factors:
- Large and through cracks are strictly unacceptable.
- Wood must be absolutely “healthy”.
- The material must not show signs of insect infestation.
- Before use, the timber must be treated with special antiseptic compounds.
The work of building a house from a bar with your own hands will require the use of a certain set of tools, which include:
- gasoline or electric saw;
- yardstick;
- a hammer;
- electric drill;
- level;
- axe;
- electric screwdriver;
- nails, self-tapping screws, jute;
- perforator.
After preparing all necessary materials and tools, you can start drafting a future house from a bar. To do this, you need to accurately calculate all the required calculations and parameters. The project can be compiled by yourself, since there is nothing complicated in this. Or contact a specialized construction organization.
Building a house from a bar with your own hands: foundation, photo, video
Having prepared on your own or having received a project in your hands, you can begin the arrangement of the foundation. A house made of timber must be built on a reliable solid foundation.
When choosing the type of foundation, you should consider parameters such as:- The main characteristics of the soil on the site.
- Design features.
A wooden house can be built on a wooden or concrete base. Most often, a concrete foundation is used, on which a brick base is laid out, and only on top of this structure are walls made of timber, and then a roof. If an exclusively wooden structure is assumed, the base is made of wood.
A house from a bar can be built on:
- shallow base;
- deep foundation;
- columnar base;
- belt type support.
As a rule, a strip or shallow foundation is prepared for a house from a bar. 50-70 cm depth will be enough.
Step-by-step instructions for building the walls of a house from a bar with your own hands. Video, photo
After arranging the foundation, you can proceed to laying the walls from the timber. At this stage, the most important thing is to choose the optimal assembly technology. The walls are laid out in rows. New layer falls on the previous one until the required height of the wall is obtained.
The bars have special grooves that provide a snug fit to each other logs. The grooves are insulated with thermal insulation. To increase the strength of the walls, it is necessary to use spikes to connect the beams.
A simplified version involves the use of raw pine timber. The bars weigh a little, so there is no need to call for special lifting equipment for construction.
In the process of erecting walls from a bar on your own, it is important to take into account a number of main requirements. Firstly, all seams should be caulked, which will exclude the possible occurrence of wind blowing through the walls. Secondly, finished walls are treated with special impregnations that increase fire resistance and strength.
Roof and floor installation. Do-it-yourself finishing in a house made of timber, photo
Very often, developers who build wooden block houses try to save money and do it in the process of building a roof, using cheap materials, such as ondulin. But this is wrong - it is categorically not recommended to save on material when finishing the roof for a wooden building.
This element of the house can have different variants performance: it all depends on the roofing and truss systems. It is better to equip each site with the use of boards of various sizes. For example, rafters are assembled from boards with a section of 150x40 mm, and to create braces and racks - 100x40 mm.
When it comes to the arrangement of the floor and the choice of coverage, you need to focus on personal preferences. The only obligatory moment is a competent waterproofing of the floor and ceiling. Particular attention should be paid to the issue of waterproofing basement and basements. Moisture protection is carried out before screeding or leveling. In a cobbled house, you can use:
- coating materials;
- roll waterproofing;
- filling compositions;
- penetrating moisture protection.
Plinths and basements are waterproofed with their own hands without any problems. This process is easy. It is necessary to choose the most suitable and liked material and proceed with its installation in accordance with the technology. 
For a wooden floor, wood-based coatings are better suited: laminate and parquet are the best option, since the material is convenient and easy to install.
More modern materials, then there should be no problems with their installation.
Do-it-yourself finishing of a house from a bar, photo
Finally, installation work is underway. interior doors, window frames and partitions. The subfloor is laid, after which the selected insulation, the finishing floor and the finish coat are installed. The ceiling is finished with any selected material. On the this stage it is necessary to equip water supply, sewerage, heating and energy supply systems.
Exterior decoration is chosen by the owner of the house independently. If desired, the building can be left without external decoration, unless, of course, appearance and the quality of the material allow similar. If you want to get some other look, the house can be painted, sheathed with clapboard, siding or finished with other materials.
In this sequence, the construction of a house from a bar with your own hands is carried out. Following the technology, you can get a reliable, comfortable and durable building without resorting to third-party specialists.
One of the most interesting, popular and widely used materials for the construction of private houses and cottages today is timber. The construction of a residential building from a bar requires much more modest financial investments and time costs than building a house from more familiar materials. In this case, in the case of a bar, you can do all the construction activities with your own hands.


Before starting any work, you need to draw up a plan for the future home. In the absence of design skills, entrust this work to some third-party organization, or select suitable drawings from open sources.

Before you start designing, you need to install optimal dimensions future building. When choosing the optimal dimensions, be guided, first of all, by the available area, as well as by your personal needs.
If you have a small family and a little free space, you can give preference to a small log house measuring 3x4 m. With proper arrangement, even in such a small building there will be enough usable space. The lack of space can be compensated for by a terrace or attic space.
If there are no particular problems with the place, but you still don’t want to build a huge building, build a house measuring 5x4 m.

The standard dimensions of summer and country log houses are indicators at the level of 6x6 m, 6x8 m, etc. Such a house can already be made two-story without any fear.

For the rest, be guided by the conditions of your particular situation. The larger your family, the larger the area should have a house. In most cases, everything is limited solely by the size of the site and the available budget.

Buy a bar, the section of which corresponds to the size of the future house as much as possible. The thicker the timber, the less money you will have to spend on heat-insulating material and sound insulation.

Usually for building bearing walls use a bar 200x200 mm. For construction small house in a region with a mild climate, you can use a material with a section of 150x150 mm or even 100x100 mm.


In the process of assembling the walls between the rows, it is imperative to lay a sealant made of flax or jute. Such a seal allows you to get rid of all the cracks and additionally insulate the walls.

Before starting construction work, be sure to study the properties of the soil on your site. It is quite difficult to cope with such work on your own - it is better to immediately contact a specialist. Additionally, you need to know the level of passage of groundwater.
Select the length of the timber in accordance with the size of the house. The standard length of the elements is 600 cm. If the walls of your future home will be long, try to find a company that can make a beam according to your size. This will require additional financial investments, however, a solid beam is superior in all respects to prefabricated elements.

The beam needs a mandatory finishing treatment with a water-repellent compound. Without such impregnation, the material will very soon begin to become moldy and rot, and as a result it will completely collapse.

If necessary, insulation finished house thermal insulation materials are best placed from the inside. Mineral wool heat insulators are excellent for insulation with the obligatory laying of waterproofing material between the thermal insulation and the walls.
If possible, it is better not to do the outer skin of a log house - such a finish will hide all the aesthetic beauty of the building material.

Pre-calculate the required amount of materials in order to avoid problems with the sale of excess timber or the purchase of missing elements in the future.

First step. Determine the height of the house and calculate the perimeter of the walls of the building. Take the height of the ceilings, taking into account the thickness of the floors and the floor. Calculate the area of the interior and external walls taking into account the thickness of the beam section.
Second step. Calculate the total number of bars. To do this, you need to divide the height of the house wall by the height of one element. This will tell you how many beams you will need to build each wall. Calculate the length based on the length of the walls. Sum the number of beams needed to build all the walls of the house.
Third step. Add to the calculated value a 5-15% margin for marriage or unforeseen damage during the construction process.
Initially, the walls of your house will have a height slightly higher than the design figure. Such an increase will occur due to the use of an insulating gasket between the crowns. Over time, the wood will shrink, and the height of the walls will be restored to the design.
House Building Guide

Buy the right amount of finished timber and start building. Start by preparing the site and arranging the foundation.
Foundation
First step. Remove from construction site garbage and all interfering objects. Mark the site with stakes driven into the ground and a rope stretched between them.
Second step. Dig a trench for the foundation. Timber houses are traditionally built on strip foundations up to 80-100 cm deep. Select the specific depth taking into account the conditions of your specific situation.

Third step. Fill the bottom of the trench with a layer of sand and gravel. Thoroughly tamp the backfill. For better tamping, spill the backfill with water.
Fourth step. Fasten the formwork to the walls of the trench.
Fifth step. Lay a reinforcing mesh over the backfill.
Sixth step. Fill the trench with concrete. Leave the foundation until fully cured (3-5 weeks).


In warm weather, the foundation will need to be watered for the first few days after pouring to keep it from cracking. It is better to leave the formwork until the foundation has completely solidified. If necessary, it can be dismantled earlier, but not less than 10 days after the last moistening of the base.
First crown
First step. Lubricate the frozen foundation with molten bitumen and lay a layer of roofing material on it for waterproofing.
Second step. Start laying the first crown. Pre-soak all wooden elements with an antiseptic. Traditionally, the first row of timber is laid using the “half-tree” method. To make such a connection, one beam needs to be sawn off lower part, the other has the top.


Third step. Lay out the bottom crown. Adjust the bars as carefully as possible.
At the same stage, prepare wooden dowels. With the help of these elements you will connect the rows of timber. Nagels are preferably made from wood of the same species that was used to make the main building elements. Make holes for dowels in advance. Optimal step between fasteners - 1.2-1.5 m.


Form the first row of walls and proceed to further work.
Walls
Continue laying out the walls in even horizontal rows. Insert directly into the lower crown using the dovetail method. Place the floor beams in increments of no more than 40 cm, otherwise the floor will sag.

The walls are laid out according to an extremely simple principle: you lay the beams, connect them to each other in the corners using the “on the root spike” method, connect the top row to the underlying row using dowels. Drive in the dowels to about a third of the depth of the beam of the lower row, i.e. with the help of one dowel, you can connect 2-3 rows at once. Be sure to lay insulation between the rows. You can use jute or moss.


Check each row with a building level. Use a sledgehammer to straighten rows.

Lay out the walls of the house of the desired height in the same way. All rows laid above the lower crown are arranged according to the same principle.

The top two crowns do not need to be fixed. You will remove them before the roof work begins and install the ceiling beams.
Proceed to the arrangement of the roof. If you are planning to build a residential attic space, for ceiling beams, use a timber with dimensions of 15x20 cm. Fix the beams themselves in increments of about 1-1.1 m.
Proceed to the construction of the frame of the roof structure. The framework includes the following elements:

Install the Mauerlat, rafters and other items listed. Attach the batten boards to the rafters. For the crate, use boards about 150 mm wide and 15-20 mm thick. The greatest reliability is characterized by a continuous crate. For the rest, be guided by the features of your situation, taking into account the slope of the slope, the type and weight of the finish, etc.

In conclusion, it remains to lay the finishing roofing with the preliminary installation of steam, heat and moisture insulating layers.
After that, you can, if necessary, insulate the house and complete the finishing Finishing work. Laying communications, installing doors and window structures, lighting, furniture and other points - all this remains at your discretion.


In the case of a chamber-drying beam, finishing can be started almost immediately after completion. construction works. When using another material, you will have to wait until the wood shrinks. This takes at least 6 months.
Log house built in accordance with all building codes and recommendations, will serve you well for many decades. Follow the instructions, and very soon you will be able to enjoy comfortable living in a reliable home built by yourself.

Successful work!
Video - Do-it-yourself timber house
Natural wood is environmentally friendly and incredibly noble, so it is valued at all times, despite the fact that the construction market has been occupied by innovative materials. The construction of log houses for year-round or seasonal living has reached a qualitatively new level due to the huge number of advantages of the material, as well as improved methods of its processing and installation.
Such a dwelling has an attractive appearance, which is important, especially for people who value aesthetics in everything. What kind of material is this and what is needed to build a house from a bar, this instruction will tell.
Choice of wood type
Before you get acquainted with the design itself and find out the features of its installation, we suggest considering the characteristics of the types of wood used for these purposes. Currently, manufacturers prefer softwood:
- pine;
- fir;
- larch.
Very rarely, but still, in this segment there are also deciduous trees, for example, birch. It may mistakenly seem that coniferous materials are identical, but they have significant differences, and we cannot but mention them:
- spruce and fir are considered the most affordable;
- spruce allows you to achieve a uniform color, since such material is characterized by ideal uniformity;
- fir has very beautiful fibers, but unfortunately it is less short-lived. 2 years after the log house is ready, you will find that some of the fibers will begin to darken;
- country houses made of larch are the most practical, because such material is absolutely not afraid of a humid environment, it is durable, and this is precisely its advantages;
- birch timber is popular for a reason affordable price, but the quality here is also not high, which is not suitable for the construction of suburban dwellings, therefore, experts categorically advise against considering such wood, as well as fir, as a raw material, since here the cons clearly outweigh the pros.
 Wood Moisture Meter - Needle Moisture Meter
 Before proceeding with the assembly of the log house, you need to pay attention to the moisture content of the timber. Without checking its level, which should be within 23%, the material cannot be used. If you neglect this rule, after some time you may encounter severe cracking of the structure. Therefore, at the acceptance stage, we recommend purchasing or renting a moisture meter, with which you can easily measure the moisture content of the incoming timber.

Now the blanks are dried either naturally or with the help of drying chambers. In the first case, we are faced with a long process, so modern manufacturers prefer chamber drying. Such a process occurs quickly, but here the cost of paying for the energy carrier increases, the material becomes more expensive and this affects the final cost for the buyer.
Description and characteristics
A beam is a log with beveled edges, mostly square in section, which can have various section sizes. This configuration is full of advantages, and above all, it is the correspondence of the thickness along the entire length, which simplifies the finishing process of suburban buildings. Also here you can save on insulation. Wood acquires special properties after it has been treated with special impregnations that protect against moisture, combustion, and putrefactive processes.
Connection of elements
The connection of the bars can be carried out in various ways:
- thorn-groove;
- in half;
- butt;
- on dowels, etc.

The simplest bunch can be called “butt”, and it is with such a system that the products from which economy-class country log cabins are built are equipped. You can assemble it yourself easily and quickly, but you need to remember about the “cold” lock, which needs to be additionally insulated to prevent drafts and cold air masses from entering the living quarters.
 Butt joint is the coldest, therefore requires additional insulation. Try to use a different type of joint.
 Profiled timber
It has a special comb geometry of the joint, which makes the connection very tight and windproof. Now very often for year-round living they build structures from just such a material, because it has undeniable advantages in front of the usual bar.

Profiled timber is made from solid logs that are planed on all sides, have an ideal moisture level, and are of the same thickness along the entire length.
Pros and cons of profiled material
The advantages of this technology include:
- simple installation scheme;
- strictly verified dimensions of lumber, set by professional equipment;
- joints in the form of planting bowls and grooves prevent cracking of wood during year-round operation
glued construction
The production of products of this type consists in the use of lamellas glued together. To finished product modern industry, was durable and served for a long time, carefully control the process of its drying. The technological instruction for gluing individual segments involves the placement the best varieties wood in the outer part of the glued beam.

Between themselves, the bars are fastened with spikes and grooves, which is very practical and easy to implement. The technology for the construction of such houses is available even for inexperienced developers, so that everyone can do most of the work with their own hands. The finished structure is lightweight, the frame is resistant to decay, its elements do not crack and are not afraid of aggressive environmental manifestations.
Construction technology
Now the most popular are single-story log cabins, but you can choose any project for yourself, including several levels, it all depends on the wishes and capabilities of the developers. Consider step by step diagram construction of a country log house.
Foundation
First of all, you need to choose the type of foundation. It must be strong enough to reliably support the weight of the house with the roof. You can opt for - this is the most common and universal option.
 Strip foundation- the most popular type for a house made of timber
 But if the soil on the site is loose, give preference, and the scheme for laying it looks like this:
- the marking of the site is carried out with the allocation of the boundaries of the future house;
- a trench is dug with a depth below the freezing point of the soil (at least 60 cm);
- the trench is supplied with a sand and gravel cushion, while each layer is rammed to squeeze air out of loose rocks;
- concrete mortar is poured.
The device of house structures
The first crown is laid on top. Its function can be performed by an ordinary roofing material laid on a foundation screed. Make sure that the roofing material is 35 - 40 cm wider than the finished base.

It is very important that all wooden elements are pre-treated with antiseptic agents, because even if you mount country houses made of heavy-duty wood, it may eventually lose its properties under the influence of external factors, which will lead to rotting of the material and, as a result, to deformation of the structure.
Features of the connection of the crowns
The strength of the timber walls is ensured by a special fastening method. The frame is assembled using the tenon-groove method. The starting board must be firmly fixed to the foundation, and it is laid both on the insulation and on the frame (crate) knocked down from the rails. The crowns are connected with each other by wooden or metal dowels.

 Sealing of rows and insulation of joints with jute cloth and plait
 All subsequent crowns are mounted on a seal that prevents condensation and mold infection. Thanks to the interventional sealant, the log house acquires additional strength and tightness.
Corner connections

Beam extension

Due to inexperience, it may seem that the disadvantage of a log cabin is the mismatch between the length of their walls and the length of the log, but this is absolutely not a problem if you ensure high-quality joining of the seams. All that is needed in this case is to slightly shift each next joint, which will avoid the formation of a long continuous seam. This method is vaguely reminiscent of the dressing of brickwork and it is quite simple to implement.
Roof and floors
Floor laying is also carried out according to the standard.
Flooring can be installed in several ways, but the most the best option are "floating" floors, because they do not create noise and vice versa, thanks to a special design they absorb extraneous sounds. We recommend that you read the article about.
Comparing the pros and cons of technology and the construction process itself, it is safe to say that the advantages here outweigh by a huge margin. If you do not have a ready-made cottage, but have a plot and a strong desire to have your own house, we advise you to opt for a log house.


