We build a gazebo with our own hands - calculation of materials and step-by-step instructions. Arbor in the country: ideas for construction and design How to make a small gazebo with your own hands
There is no such owner of a land plot who would not dream of equipping it in the best possible way, equipping cozy places for recreation on fresh air. A gazebo is a traditional element of landscape design, but there are a lot of varieties of these light buildings, and therefore it can be difficult to decide on the choice of the desired model, as well as decide on its independent construction without at least theoretical training.
The question of how to build with your own hands has always been and remains relevant, as more and more urban residents move out of town for permanent residence or acquire summer cottages. Starting the construction of any building, first you need to decide how it should look, which is why it makes sense to consider several design options for gazebos, which you can easily raise yourself.
Popular types of gazebos
These summer buildings may differ in style and design, size, and material of manufacture. And the optimal model is selected depending on the size and design of the site, as well as the personal preferences of its owners.
Lattice gazebos

Gazebos sheathed with bars along the diagonal of the walls are quite popular for summer cottages and private territories, as they give good shade, and at the same time do not interfere with the flow of fresh air. An important condition for choosing the installation site of such a building is an enclosed space where there is no draft, otherwise the gazebo will be built in vain, since it will not be very comfortable to be in it. If the summer cottage has not yet been planted with trees and there is no area that is not blown by the winds, then it is recommended that the lee side of such a gazebo be made “deaf”.

Such gazebos are most often built so that over time, stems of climbing trees can climb along the lattice walls. perennials, which will create protection from the wind and fill the space under the roof with constant freshness. If planted around the building flowering plants, then, relaxing in it on a hot day or a cool evening, you can enjoy your favorite aromas.
The disadvantage of such an arbor, until it is entwined with vegetation, lies in its openness and exposure to jets of oblique heavy rain, so it will not work to hide in it from such bad weather.

Another version of an already larger gazebo with two rear "deaf" walls that completely cover it inner space from the eyes of neighbors, also has a lattice lining - in the lower panel part and under the roof itself. After climbing plants planted around the building climb along the lower crate, you can stretch the ropes from it to the finish under the roof at the right distance from each other, thereby forming “windows” framed with greenery and flowers.
The roof of the gazebo shown is covered with transparent polycarbonate, which has a green tint, which gives a calm, pleasing to the eye lighting inside. This factor will certainly contribute, in combination with fresh air, to the most comfortable rest.
Due to the fact that the gazebo is quite large, it is raised above the ground by about 200 mm on a columnar foundation. This will help keep the floor boards from the harmful effects of moisture, as the space under the building will be constantly ventilated.
Small original gazebo

This original design summer place rest will not leave guests indifferent, and the residents of the house will be convinced more than once of the comfort of such an arbor. The building has a simple design with, but it is quite roomy, and it may well accommodate a seating area and a table. If desired, the size of the gazebo can be calculated for a specific set of furniture. The blank rear walls of the building will close the space from the wind, and the round entrances in the other two walls will contribute to the ventilation of the room. If desired, round openings can be equipped with waterproof or mosquito-proof curtains, which will allow you to stay in the gazebo in any weather or even stay in it at night when the house gets too stuffy.
Arbor - summer house

This arbor well deserves the name " summer house”, which can be used for living in the warm season. For example, if you plan to build suburban area economy version of the house, then this design is perfect for this purpose.
You can build such a structure on the site of a private house, since in the summer you want to spend more time outdoors, and thanks to big windows and a door that opens wide, there will be plenty of it in the room.
To build a similar version of the gazebo, more costs will be required, since the design includes windows and glazed doors. But it is thanks to these elements that you can achieve complete comfort for relaxation, both in the daytime and at night, and in any weather.
Arbor - pergola

Pergola came to Russian landscape design from the Italian style of garden design, where, in accordance with the features of its design, it could play the role of a canopy, arch or extension. Thanks to domestic improvements, this kind of garden structures has become a real decoration of many summer cottages and territories of private houses.
The pergola is installed in order to create a support for climbing plants, as protection from the hot sun for a certain place on the site, a gazebo for relaxation, or simply as a decorative element of the garden. Therefore, the model of this building must be chosen depending on what tasks will be assigned to it, but most often it is used for several purposes at once.
The first photo shows a covered pergola installed as a canopy over a recreation area. In fact, she created an open gazebo, under which a massive table fits, just enough for a large family to gather around it, as well as a grill built into the back wall. The convenience of the design lies in the fact that under the covered space you can not make a foundation - it will be enough to lay or lay garden soil on top plastic panels. The basis will have to be done only for the supporting pillars.

In this case, the pergola performs three functions at once - a passage arch, supports for a rose bush and gazebos, which successfully complement each other. The benches in this recreation area are located at such a distance that a table can easily fit between them, so it will be great to spend evenings with family tea drinking in such a cozy place. In addition, a gazebo entwined with greenery is a great place to relax on a hot day, where you can hide from the sun, sitting comfortably with a book.

This version of the pergola is designed as a support for climbing plants that will cover a small gazebo, which is sure to become a favorite place for some family members who love privacy. For this version of the gazebo, it is also not necessary to arrange a foundation, due to its low weight, which significantly reduces the overall amount of work. The roof can be left open, as is the case with classic pergola construction, or it can be covered with lightweight roofing material such as plastic slate.
Construction of garden arbors
Having prepared everything necessary tools, you can purchase building materials for the selected gazebo model and proceed to construction work.
jigsaw
Required Tools

When building any model of a gazebo, you cannot do without special tools and fixtures, so you will need to prepare for work:
- Circular saw, electric jigsaw and hacksaw.
- Miter box for sawing structural elements at an angle.
- Electric drill and a set of drills.
- Screwdriver.
- Hammer, tape measure, folding rule, construction square, pencil for marking.
- Building level, plumb.
- Pincers and cutters.
- Drill for making holes in the ground for the installation of foundation pipes.
- Staircase.
Rectangular gazebo

A rectangular gazebo can be called a traditional version of a summer building, since quite often such a design is chosen for installation on a site. It should be noted that such a gazebo is quite comfortable to use and aesthetic in appearance. In addition, if desired, you can make your own adjustments to the design, for example, close one of the walls completely or raise the fence to a higher level.
The building does not have too much mass, so it is installed on or even just on well-compacted soil, reinforced with a layer of rubble, which also provides good drainage.
The depth of laying the foundation, if provided, depends on the characteristics of the soil in a particular area.
Since wood in outdoor conditions will constantly be negatively affected: ultraviolet rays, moisture, wind, etc., it is recommended that the finished parts be carefully treated with water-repellent compounds. Such protection will protect the material from decay, from insects, and maximize the durability of the building.
The diagram below shows a drawing of a gazebo. All its details are assigned letter designations - they are painted in the table necessary materials. Further, in the course of the description of the assembly process, drawings will come across in which the dimensions are in inches. To convert to metric: 1 inch = 2.54 cm or 25.4 mm.
For the construction of this gazebo, the following materials will be required, which have letter designations on the diagram, the dimensions on the diagrams are given in inches: 1 inch \u003d 2.54 cm or 254 mm.
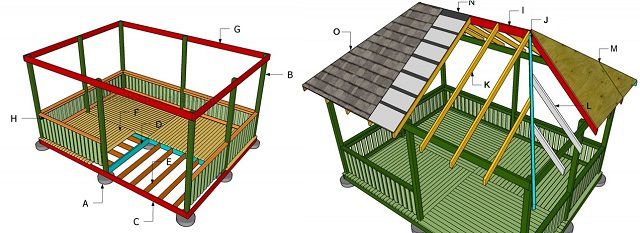
| Necessary materials | Dimensions of parts, mm | Quantity, pcs. | |
|---|---|---|---|
| Pillar foundation (A) | Asbestos concrete pipes | Ø 200÷250, length 1200÷1500 | 9 |
| Racks (B) | wooden beam | 100×200×3250 | 8 |
| Bottom rail of the structure (C) | bar | 100×150×3600 | 2 |
| 100×150×4725 | 2 | ||
| Intermediate beams of the floor frame (D) | bar | 100×150×1655 | 4 |
| 100×150×4550 | 1 | ||
| 100×150×2240 | 2 | ||
| Floor joists (E) | bar | 50×150×1750 | 10 |
| 50×150×2325 | 8 | ||
| Floor decking (F) | Boards | 50×100×2400 | 40 |
| 50×100×1800 | 52 | ||
| Upper harness (G) | bar | 50×150×3600 | 2 |
| 50×100×4725 | 2 | ||
| Gazebo fence (H) | Boards | 20×100×675 | 92 |
| Beam (tying) | 50×100×2230 | 9 | |
| 50×100×1630 | 12 | ||
| Roof ridge (I) | bar | 50×150×2445 | 1 |
| 50×100×1930 | 2 | ||
| Diagonal rafter legs with a 60 degree cut at the ends (J) | bar | 50×100×2760 | 4 |
| Ordinary rafters (K) | bar | 50×100×2450 | 10 |
| Rafter legs with ends cut at an angle of 34 degrees (L) | bar | 50×100×1375 | 4 |
| Rafter legs with ends cut at an angle of 45 degrees (L) | bar | 50×100×800 | 4 |
| 50×100×1360 | 4 | ||
| Base for roofing material (M) | Plywood | 15×120×2400 | 11 |
| Roof waterproofing material (N) | Ruberoid or membrane | based on 27 m² of roofing, with the necessary margin | |
| Roofing material (O) | bituminous tiles | ||
| Expendable materials | Nails, screws and screws. |
Work on the construction of this gazebo occurs in the following order:
| Illustration | |
|---|---|
 | The first step is marking the territory at the site chosen for construction. To do this, pegs are installed along the perimeter of the future building, on which the rope is stretched and fixed. The corners of the marked area must be measured very accurately, they must be perfectly straight. To make sure that the markup is correct, it is necessary to measure the diagonals of the rectangle and, if necessary, make adjustments. The diagonals must be equal to each other. The presented illustration shows an example of calculating and marking a place for construction, however, with different sizes, but the principle does not change from this. |
 | Next, holes are drilled for installing the pipes of the columnar foundation. Their depth should be 150 mm more than the freezing level of the soil. The height of the pipes above the ground can be different, depending on the desire of the master to raise the gazebo to a certain level. If necessary, the excess of their height can be cut off with the help of a grinder. On average, for the base for the gazebo, the pillars go deep into the ground by 500 ÷ 700 mm. Having installed the pipes in the drilled "nests", they are set exactly vertically in level and the soil around them is strengthened with crushed stone and soil, which is well tamped. Then, the pipes are filled with cement-gravel mortar for ⅔ of their volume. |
 | The next step is to install rack bars into the foundation pipes. It is recommended to pre-treat the lower part of the beam with bituminous mastic. The beam is set according to the level (plumb). Inside the foundation pipe, it can be supported with fragments of rubble or wooden supports can be installed, securing them to stakes driven into the ground. Then the pipes are supplemented with concrete mortar to the top, and this structure is left until completely solidified. |
 | After the mortar has hardened, before fixing the lower trim beam, it is recommended to lay a waterproofing material around the vertically installed beams, for example, roofing material. Further, the beam prepared in size for the lower strapping is fixed in the lower part on the vertical posts with self-tapping screws 90 mm in size. To avoid splitting the timber, before screwing in the fasteners, holes are drilled for them 2 mm smaller than the diameter of the self-tapping screw. When fixing the strapping, you should carefully control the horizontal installation of the timber using the building level, since this will depend on correct location other building elements. |
 | After the strapping beam is fixed, intermediate beams are installed and fixed, which will divide the area of \u200b\u200bthe floor of the gazebo into four parts and give the necessary rigidity to its structure. |
 | The next step is to install logs on the strapping and intermediate timber. To increase the strength of the floor, the logs are fixed in such a way as shown in the diagram. Logs are installed in 400 mm increments, ideally horizontally, according to pre-made markings. |
 | Fixing the log is carried out on special metal supporting elements, which are screwed with self-tapping screws 50 mm long to inside strapping beams and floor beams. Moreover, they must be fixed strictly at the same level, otherwise the floor will turn out to be uneven. |
 | Supporting element for the installation of a beam-crossbar. Such parts are available in different sizes in height and width. |
 | Further, flooring is made from floorboards on the logs. If the prepared base is reliable and even, then laying the boards will not be difficult at all. The boards are fastened to the logs with nails or galvanized self-tapping screws 60 millimeters long. The heads of fasteners should be flush with the main surface of the board or recessed into the wood by 1.5 ÷ 2 mm. Since the building will be located on the street under the influence of moisture, the wood may well swell, therefore it is recommended to leave a gap of 3 ÷ 5 mm between the boards. Such slots will also contribute to the timely removal of water and moisture from the boards and their rapid ventilation. |
 | When the floors of the gazebo are ready, the upper trim of the structure is fixed on top of the racks. It is also fixed with self-tapping screws 90 mm long, with outside timber. To check the horizontalness, a building level is used. |
 | Having a ready-made, well-mounted frame of the gazebo box, you can proceed to install the fence. The first step in the installation of this part of the building is the installation of horizontal bars, fixed between the racks. They are installed in two rows, one of which runs along the bottom edge of the racks, and the other rises to the level planned by the project. The crossbars are set according to the level and fixed on the racks with self-tapping screws. Additionally, they can be reinforced with metal corners, which are attached to the crossbars from below, and then screwed to the uprights. |
 | Further, balusters are mounted between the rungs. These can be ordinary sanded boards, as presented in this project, or round classic balusters can be carved from a bar, which, if desired, is given its own configuration. Flat balusters are fixed on the lower transverse beams with nails or self-tapping screws screwed from the inside of the gazebo from top to bottom. In the upper part of the balusters are fixed through the crossbars. If round balusters, machined from a bar, are chosen, then they are mainly mounted, both from above and from below, on the dowels to be glued. After completing their installation, railings are fixed to the upper rungs. They are first glued with wood glue, and then fixed with self-tapping screws, sinking their hats into the wood. |
 | Any roof for the gazebo can be chosen: - shed, for which it will be necessary to raise the front part of the building, fixing short racks of 200 ÷ 250 mm on the upper trim; - gable or, as presented in this project - four-slope hip. You need to start installing such a roof from creating truss system, consisting of diagonal and middle rafters and a ridge beam. The rafters can be prepared at the bottom, and then raised to the top harness. To simplify your task, you can temporarily fix the rafter legs and the ridge beam in the desired position until the final fastening by installing supports from the floor of the gazebo to the ridge. |
 | The fixed initial frame of the truss system begins to be strengthened from the hip sides - rafters (spiders) are installed and screwed on them at a distance of 600 mm from each other. Jocks on the hips begin to be fixed from the center of the triangle. |
 | The next step is to fix the rafters on large, trapezoidal slopes, starting from the middle of the ridge beam, and then moving to the diagonal rafters. The upper side of the rafters is fixed on the ridge beam, and the lower side - on the beam of the upper trim of the gazebo structure. |
 | If a light material is used to cover the roof, for example, bituminous or plastic wave slate or polycarbonate, then it is fixed immediately to the crate, which is made of boards (for example, 100 × 25 mm), installed with the desired step on the rafters, perpendicular to them. |
 | In the event that the work will be carried out strictly according to the project being demonstrated, using bituminous tiles to cover, then a solid crate of plywood 15 mm thick, pre-cut with a circular saw, is first fixed to the rafters. The fixing of this material is carried out with self-tapping screws 30 mm long with a step between fasteners of 150 mm. A gap of 1 ÷ 1.5 mm must be left between the sheets for the thermal expansion of the material, in order to avoid its warpage. |
 | A waterproofing material is laid on top of the plywood - it can be roofing material or one of the types of modern membrane materials. Waterproofing sheets are mounted from the eaves in horizontal strips, overlapping each top sheet on the one below. The waterproofing is fixed with staples and a stapler. On top of the waterproofing, starting from the cornice, bituminous tiles are mounted. It should be installed according to the manufacturer's instructions. This diagram shows the installation of bituminous shingles - it will also require the creation of a crate. Sheet shingles can be laid directly on plywood prepared for this operation. |
 | Upon completion of the installation of the roofing material and fixing the ridge element, a decorative strip is fixed along the eaves. |
After the gazebo is ready, small details are adjusted, such as sealing holes and recesses with wood putty or a composition of epoxy glue mixed with fine sawdust. The putty should dry well, after which all irregularities and roughness should be sanded with fine-grained sandpaper.
In the next step, all wooden structural elements are covered with stain and yacht varnish or paint, which will additionally protect the wood from external influences and give the gazebo a finished aesthetic appearance.
Pergola construction

A pergola can be a great place to relax around the pool, in the garden or as an extension to the house. This type of light building is sure to add a "zest" to the overall design of the site.
classic pergola

To build a pergola, fewer materials will be required than for a traditional gazebo, but if desired, the list can be supplemented with roofing and slats for diagonal cladding, as well as other elements.
The diagrams below show dimensions in feet and inches. In the table of materials, they are already converted to millimeters.
| The main structural elements of the pergola | Necessary materials | Dimensions of parts, mm | Quantity, pcs. |
|---|---|---|---|
| Column Foundation | Asbestos concrete pipes | Ø 200÷250, length 1200÷1500 | 4 |
| Cement, sand, gravel or crushed stone for filling pipes. | Depending on depth | ||
| Racks | bar | 100×100×2400 or 150×150×2700 | 4 |
| Embedded anchors (if needed) | 4 | ||
| support beam | Board | 50×150×3600 | 4 |
| Cross beams | Board | 50×150×3600 | 13 |
| crossbeams | Board | 50×150×3250 | 5 |
| Fixing support beams | screws | M6×175 | |
| Fastening for cross beams | self-tapping screws | 150 | |
| Crossbar fastening | self-tapping screws | 75 |
Work on the construction of a classic pergola is carried out in the following order.
| Illustration | Brief description of the operation to be performed |
|---|---|
 | The construction of a pergola begins in the same way as any building - with the marking of the territory, after which holes are drilled in the ground for a columnar foundation. Hole diameter 250÷300 mm, depth 900÷1000 mm. At the bottom of the prepared pit, crushed stone is poured with a layer of 80 ÷ 100 mm thick and thoroughly compacted. |
 | Asbestos-concrete pipes are installed in the pits, leveled, and then soil mixed with crushed stone is compacted around them. After that, the solution is kneaded, which fills the inside of the columnar foundation supports. |
 | Pergola posts can be fixed to foundation piles in two ways. The first of them is their installation in poured concrete and fixation with spacers - until the solution has completely set. |
 | Another option for fixing the racks on the foundation are embedded anchor metal holders with a leg, which are embedded in the concrete that has not yet hardened. |
 | The holder embedded in the pole looks like this. |
 | Concrete poured into asbestos-cement pipes should set well, it needs to be given at least three to four days for this. This time can be used to decorate the space that will be covered by the pergola elements installed in the form of a roof. |
 | This area can be cleared of the upper fertile layer, covered with sand and cultivated with paving slabs. In addition to this option, there are other modern garden coverings that do not require time-consuming preparation of the base, but simply fit into the place chosen for them. |
 | After the concrete has hardened, the pergola racks are installed and leveled to the building level. The racks are fixed in the holders using M6 screws with wide washers. |
 | The support beams are given a classical shape in advance - it may differ somewhat in the shape of the sections. Further, they are fixed on racks in pairs. |
 | Having fastened together two racks, the support beams give the structure the necessary rigidity. Their installation is carried out according to the scheme using bolts or self-tapping screws. They are installed in such a way that they protrude beyond the perimeter indicated by the racks by 250 ÷ 400 mm - the value of such an overhang will depend on the preference of the master or the owner of the site. |
 | If you imagine this process schematically, it will look something like the one shown in this picture. |
 | Having fixed the support beams, they are perpendicularly blocked by transverse beams, of which 13 pieces are provided in this project, and they are installed in increments of 300 mm. However, it should be noted that there may be more or less of them, and how much the space under the pergola will be shaded depends on their number. Boards for beams must be perfectly even, as their curvature will immediately catch the eye. |
 | In order to make the structure strong and rigid with the help of transverse beams, two grooves are cut in these elements on each side at ⅓ of the height of the beam, on which it is installed on the support beams, as shown in this figure. After they are installed, they are fixed from above to the support boards with self-tapping screws 150 mm long. |
 | To make the installation of transverse boards less complicated, you need to accurately measure all the distances and depth of the grooves. If the markup is carried out correctly, the installation will go smoothly. To make the grooves neat and even, cuts are made in the boards to a marked depth, and then the cut piece of wood is selected with a chisel and a hammer. The best option is to make one template beam, fit it exactly, and then cut out the required number of “clones” on it. It is immediately necessary to drill vertical holes for self-tapping screws, which should fall exactly in the center of the selected grooves. |
 | After the installation of the cross beams is completed, five crossbeams are installed perpendicular to them and parallel to the supporting boards. They are also fixed on measured and cut grooves - according to the same technology, which was mentioned a little higher. |
 | If there are 13 cross beams, then the same number of grooves should be cut. Moreover, the crossbars should be put on with grooves on the crossbars freely, so the grooves are made slightly larger than the thickness of the boards on which they are installed. After that, the assembly of the pergola can be considered complete. |
As you can see, the assembly of such a pergola is quite simple. The main thing is to prepare high-quality material and be very careful about the manufacture of parts.
Miniature pergola gazebo

This is the most compact version of the pergola, which at the same time will serve as the basis for liana plants, will decorate the site and create a secluded place for privacy lovers.

To make such a mini-pergola gazebo, you will need the following materials:
| The main elements of the design of the gazebo | Necessary materials | Dimensions of parts, mm | Quantity, pcs. |
|---|---|---|---|
| Pillar foundation (if needed) | Asbestos concrete pipes | Ø 200÷250, length 1200÷1500 | 4 |
| Cement, sand, gravel or crushed stone for filling pipes. | Depending on depth. | ||
| Racks (A) | wooden beam | 50×100×1800 | 4 |
| Seat frame (B) | bar | 50×100×1625 | 2 |
| 50×100×460 | 3 | ||
| Bench back (C) | bar | 50×100×1625 | 2 |
| 25×100×275 | 13 | ||
| Cross beams (D) | Board | 50×200×1800 | 2 |
| bar | 50×50×840 | 9 | |
| Seat (E) | Board | 20×100×1625 | 6 |
| Lattice cladding (F) | bar | 50×50×1350 | 4 |
| 50×100×410 | 4 | ||
| Expendable materials | Nails, screws and screws. |
In order not to repeat ourselves, it must be said right away that for this gazebo, as well as for previous buildings, a foundation is being laid. Since this version of the structure has a very small weight, it is most likely not necessary to make a deep foundation. If the site has a cemented or tiled platform, then this small pergola can be installed on it by inserting the racks into special stands that are fixed to the base. In addition, it is recommended to cement the lower part of the stand so as not to accidentally injure your leg on a sharp metal corner.
screwdriver

Further installation operations are carried out as follows:
| Illustration | Brief description of the operation to be performed |
|---|---|
 | The racks on which all other structural elements will be fixed must be prepared by making cuts in their upper part - they will be needed to install the cross beams. |
 | The next step, in order to ensure the rigidity of the structure, is to assemble the seat frame and attach it to the uprights. The fastening must be reliable, so it is advisable to use metal corners for it, which are installed on the underside of the frame frame. Installation height is indicated on the assembly diagram. |
 | Further, the back of the bench is assembled from the timber and boards, which will strengthen the rear pillars of the structure. It is recommended to assemble this element separately and fix the backrest on the rear pillars of the structure in finished form. Since the back will also have a large load, it may also be worth using metal fasteners, which must be installed from the back of the backrest, linking it to the support posts. |
 | When the racks are securely fastened at the bottom with the seat and back frames, you can proceed to fastening them at the top. In this model, curved parts are made for the longitudinal beams - a 50 × 200 mm board is used for them. A curved beam is cut according to a pre-drawn pattern using an electric jigsaw. After that, the beams are cleaned and polished with sandpaper of different grain sizes. The finished parts are installed in the cuts, equipped in the upper part of the support posts, and then fixed in them with the help of self-tapping screws. |
 | Further, longitudinal cladding boards are screwed onto the frame frame of the seat in three places with self-tapping screws 30 mm long. They are distributed evenly on the frame bars, and between them it is necessary to leave gaps of 5 mm wide for good water drainage and ventilation of the wood. |
 | For the manufacture of side lattice panels, a beam of 50 × 50 mm is taken, from which a frame is made, on which a finished lattice ordered from professionals is fixed. The grate can also be made independently, for example, by spreading the beam with a circular saw into slats 5-7 mm thick. The grille is mounted on a frame made of timber between two wide glazing beads, which will ennoble the grille and make it neat by closing its edges. |
 | The next step is to mark the installation step on the curved crossbars, and then fix the perpendicular boards with cuts and self-tapping screws, which are installed on the edge. If desired, the roof can be covered with roofing material. |
 | To protect the wood from moisture and transform the appearance of the pergola, it is covered with paint or stain and varnish. The color is chosen depending on the general design of the landscape of the site. |
After getting acquainted with the manufacturing technologies of gazebos of various designs, it is possible to choose the one suitable for your own site, objectively evaluating your capabilities in carpentry. After that, you can safely get to work - the main thing is not to rush and make all the parts and their connections as accurately as possible.
And at the end of the publication - an interesting video in which the master shares his secrets of the quick construction of a garden gazebo.
Video: a master class on the quick construction of a gazebo
What could be more comfortable than a warm family circle, when after a working day everyone dine at the same table or have tea on a day off, and even in the fresh air? What could be more carefree than a friendly party with wine and barbecue in the depths of the cottage, under the dense crowns of trees? Where can you be alone with yourself, relax in seclusion and enjoy the silence? Nothing will create such a variety of scenarios for relaxation as a garden gazebo, the very name of which contains the most joyful moments of life - conversations - communication with family and friends, unity with nature. It will be especially pleasant to spend time in a place lovingly built with your own hands.
Stage # 3 - roofing and roofing work
The easiest way is to cover the gazebo with shingles, as shown in this video example:
The technologies for building a shed roof - and a gable roof - are also very well described.
Extraordinary design ideas for garden gazebos
You might be interested in how to build a gazebo from the most simple materials literally lying under your feet. Take a closer look at ordinary plastic bottles, which, it would seem, cannot be used anywhere, but it’s a pity to throw them away - it always seems that they will come in handy somewhere. You can easily use plastic bottles as a building material, and you can easily build a structure yourself.
Here, of course, one cannot do without the mandatory stages of arranging the foundation, frame and roof, which will require both financial and labor costs. The walls of such a gazebo, made of plastic bottles, not only cost free, but also serve as a good option for protection from the sun and precipitation.

The contrasting combination of transparent and brown plastic bottles emphasizes the unusualness of a colorful country-style gazebo
Simplify the task of building the creation of a foundation of ready-made metal screw piles, which can be screwed into the ground on their own, equipping the base for the gazebo in just one day. The frame will be easiest to make from a metal profile - a corner, a square or a pipe, by welding structural elements with a welding machine.
Plastic bottles are strung on metal rods, which are then placed between the lower and upper frames of the frame. An important condition for the formation of a harmonious structure is the selection of bottles of the same shape and size, while the color can be varied - this will give the gazebo a unique flavor.
The material on creating decorations and crafts for the garden from plastic bottles will also be useful:
Option # 2 - glass bottle gazebo
In addition to plastic bottles, another non-traditional material for construction can be glass containers, which can be purchased for almost nothing at recycling centers.

Art Nouveau garden arbor with flowing forms and plenty of glass, vividly reminiscent of the famous Gaudí gardens
So, we are building a gazebo from glass bottles. The principle of building a building is the same as that of a brick - the bottles are stacked in rows, which are fastened together with cement mortar.

Having splashed out your imagination, combining glass bottles of various shapes and colors, you can build an unusual gazebo both outside and inside.
The bottles are located with the bottoms outward, and the necks - inside the structure. Given that the bottles are difficult to dock at the corners of the building, they can be used to lay out individual fragments of the walls, giving the structure an unusual sound - iridescent glass surfaces will sparkle in the sun like a crystal.
Option # 3 - construction from old tree trunks
An interesting and fairly economical option for a gazebo for a summer residence can be a building using the trunks and branches of old trees.
In the garden there are always obsolete trees that have already ceased to bear fruit and require sawing. Removing logs is often difficult and expensive, but don't be in a hurry to get rid of fruit wood - it has beautiful trunk curves and texture, which makes it an excellent building material.
The trunk and branches can be cleaned of bark, which, when crushed, is also useful on the farm - it can be sprinkled with bushes of plants prone to freezing in winter. The trunk of the tree will be used to create support columns, and large branches - for fencing, railings and balusters. Most likely, one tree will not be enough, you will need two, or maybe three trunks to form four columns with a height of 2.5 m or more.

The twisted trunks of old trees with knots and a raw surface, used to build a gazebo, give it the appearance of a forest hut.

For the construction of this colorful gazebo, not only the trunk of the tree was used, but also the stumps used to create the columnar foundation
Wooden columns are fixed at the corner points of the columnar foundation and fixed with the help of the lower and upper trim of the timber. It is desirable to treat old wood with moisture-resistant primers, as well as open it with varnish to give the desired color and protect it from further drying out. logical continuation style decision the forest “hut on chicken legs” will be a roof made of plant materials - shingles or reed mats.
Option # 4 - from cement mortar
An unusual solution for a garden can be the construction of a gazebo using ordinary cement mortar. The most difficult thing in this variant of the arrangement is the creation of a rigid frame from reinforcement, chain-link mesh or ready-made reinforcing structures that need to be bent and welded. At the stage of preparing the frame, you can turn to specialized specialists, and then give free rein to your imagination.

An unusual tented gazebo made of stone and cement mortar resembles a bizarre piece of rock that blends seamlessly into the forest landscape
Having prepared the solution closer to thick, you need to gradually, in small portions, throw it on the reinforcing structure, and after drying, form the bizarre shapes of the columns and walls of the gazebo. With the help of the solution, you can imitate the trunks of intertwined trees, lianas, fantastic plant forms, creating the image of an exotic plant, as if invented by nature itself.

On hot summer days, a gazebo in the depths of the garden near a murmuring waterfall will give you the long-awaited coolness and solitude.
Such a design can also take on fantastic unearthly forms, resembling a spaceship, if metal parts are used or the reinforcing cage is fragmentarily exposed. The roof in this case should be made of metal or plastic - corrugated board or transparent polycarbonate will do.
Option # 5 - from reed mats and vines
A wonderful decoration of a pond, lake or artificial swamp on your site will be garden structures made of reeds, reeds, vines.

A great solution for a gazebo is the use of natural materials such as reeds and vines.
From these plant materials, both walls in the form of wicker weaving and the roof, which is a plane made of ready-made reed or reed mats, can be made. Such a building will naturally merge with the natural environment, especially with water, because reeds and reeds are traditional inhabitants of this environment.

A gazebo on the shore of a reservoir with a reed roof is an example of a harmonious combination of landscape design with the environment
The use of such plants with a hollow stem for construction is the key to a comfortable microclimate in the gazebo - balanced humidity, protection from heat and effective ventilation.
Option # 6 - "live" gazebo for the garden
Looking around your garden plot, you may ask yourself how to make a gazebo without introducing any other elements into the landscape of the garden, except for plants. The most affordable, but at the same time, the most time-consuming solution would be to create a structure only with the help of plants - trees or shrubs.

Specially shaped and trimmed crowns of trees create original roofs for garden arbors
Such an interesting design does not require complex construction training in the form of a foundation, frame and roof, as it consists only of specially grown species of dwarf, undersized or weeping tree-like plants. Various types of willow, mountain ash, willow are planted, most often, in a circle. The trunks and crowns of such plants are formed and directed, as they grow, in the right direction - to the center, creating a vegetative roof of the gazebo.

Openwork frames of arbors in combination with climbing plants give garden landscapes completeness and harmony
Such a gazebo will naturally fit into the landscape design of the site and will be a shady place to relax on a sunny open lawn in front of the house. The only thing is that the creation of such a plant composition will require a lot of patience and time. A simpler option for a “living” structure can be planting - grapes, ivy, roses along the outer perimeter of its frame, formed from wooden beam, metal profile or trusses. In this case, it is important to achieve complete concealment of the structure in the thickets, so that the impression of its absence is created.

A bright accent that adorned the garden gazebo on a solemn day can be “clusters” of balloons imitating grapes
Option # 7 - from wooden pallets
An extraordinary solution is the use of euro-pallets made of wood for arranging walls. Such wooden pallets, painted in bright colors, will create not only an original flavor, but will also become good decision for walls - environmentally friendly, contributing to good air access to the interior of the gazebo.
If you buy ready-made - how not to be mistaken?
An analysis of 10 popular mistakes when choosing a finished gazebo can be viewed in the video above.
The gazebo on the estate is an integral part of modern landscape design. The beauty is that a gazebo with your own hands can be made in absolutely any style. Many people ask the main question after they decide to build a gazebo with their own hands - where to start? We will give a clear answer to this question in today's material, and we will also analyze at least important points regarding the construction of a wooden gazebo with his own hands.
Before starting work, you need to realize that the gazebo is a fairly simple structure that does not require special skills and knowledge in the field of construction. If you understand the simple technology and sequence, which will be discussed below, then the gazebo can be erected in a couple of days, with a minimum of effort, because in the end, you don’t Vacation home set out to build.
Moreover, by studying the detailed manual for building a gazebo with your own hands from wood, you will save not only time and effort, but also money. If you don’t like the gazebo design below, you can choose a slightly different shape, because you will now be familiar with the main stages and principles of construction. Who knows, maybe you will be able to make yourself such a masterpiece, shown in the photo below. The main thing is to believe in yourself.
Gazebo with their own hands. What to do?
We will immediately decide on the material for the future design. Most experienced builders assure that the best gazebos are made of wood. This choice brings many advantages:
natural look;
Ease of construction
Simple woodworking
Can be made in any style.
In addition, during the construction process, you will need the most common tool that lies in the garage of each owner. Materials for the design will take just as little, which will save significant funds. Do not forget that if you wish, you can build such a gazebo from wood, at the sight of which guests will not want to leave your site. This is sarcasm, of course, but there is some truth in it.
What about the foundation?
A wooden gazebo is quite plastic, elastic and weighs little. Thanks to these qualities, you can start its construction without a pre-prepared foundation. It is enough to treat the wood with special chemicals to protect it from contact with the ground. This will protect it from the effect of decay. Moreover, there are such types of gazebos, for example, wicker ones, which would be simply stupid to put on the foundation.
Initial stage of work
The first thing to do is to work out in detail the plan for future construction. If you can't find your bearings regarding design, then today there are a lot of magazines and websites dedicated to construction topics. There you can see examples of the most unusual, and at the same time, the simplest arbors for the estate. Making a plan includes:
The purpose of the building
shape of the gazebo
The shape of the structure can be square, round, rectangular, octagonal, hexagonal, and so on. The owners of the site with creative thinking and wild imagination can experiment by building a gazebo in the form of Baba Yaga's house, a fairy-tale palace or a spaceship. Below is a very creative and unusual example of a gazebo.

Or you can prefer more classic style which will look simple and tasteful.

Arbors also differ in their purpose. It is necessary to decide from the very beginning whether you just want to relax in the shade in the fresh air or a large company will have fun in the gazebo.
If the first option, in this case, you can start building an ordinary gazebo with your own hands with several benches.

If you plan to build for a fun pastime of the company, give preference to a large platform and a canopy.

For those people who cannot imagine a vacation without a barbecue in nature and a field kitchen, a gazebo with a Russian stove or will be an ideal option.

Advice! Before choosing the shape of the future structure, you should pay attention to the existing buildings on the site, as well as landscape design in general. The chosen style of gazebo should be in harmony with the surroundings.
Deciding on a place
Once you've made your final design decision, it's time to choose the right location. Regarding the proximity of the location of the gazebo from the house, this question remains at the discretion of the owner. Proceed from the following - whether you want to take a break from the hustle and bustle of your home or want to spend time sitting outside with your family.
Do not place the building in a lowland, this cannot be done for obvious reasons - it is in the lowland that water will accumulate over time, which will lead to rotting of the wood.
Advice! Position the gazebo near trees, flower beds, or other vegetation. So you will achieve the maximum aesthetic effect, because it's nice when you have a view of the wonderful plants from the gazebo.
Gazebo with their own hands. Photos, drawings
After the above preparatory activities, we proceed to the design. The drawing will take into account:
· height;
· size;
· components;
fastening methods, etc.
The drawing should also take into account the amount of necessary building materials that will need to be pre-purchased.

For example, we settled on the standard square shape of a structure with a roof. It is about such a design that will be discussed in today's practical guide. We remind you, taking into account the information and examples below, you can choose any other gazebo design you like.
Necessary tools and materials
To start building, you need the following materials:
concrete for the process of mounting racks;
timber 15x15 cm for making the base and racks;
timber 10x10 cm for roofing elements and upper lathing;
bars for log 5x15 cm;
board for flooring;
plywood or boards for roofing;
Roofing materials, depending on your choice, it can be metal tiles, slate or corrugated board;
boards for railings and others decorative designs;
lining for side cladding;
frames with glasses (if these elements are provided for in the plan);
· paint, varnish;
Self-tapping screws, screws, nails.
It is worth recalling that changing the project will also affect the list of materials, it can either decrease or increase, keep this in mind.
Also take care of the availability of the tools that you will need during the construction process:
hatchet;
shovel
hacksaw for wood;
Electric or chainsaw
a hammer with a nail puller;
planer
· chisel;
roulette;
· ladder.
Armed with the above tools, you can build almost any wooden gazebo on your site.
How to build a gazebo with your own hands
After all the above recommendations are fulfilled, it's time to start the main thing - building a gazebo with your own hands. To begin with, it is necessary to treat the wood used with moisture-proof and antiseptic agents. This must be done to keep the tree from rotting.
The next step is to install the supports. Mark the location of the future building with pegs and ropes.

Advice! In order to get a perfectly even rectangle or square, it is necessary to observe the symmetry of the diagonals.
We will focus on the option when the foundation is not poured, but. This option is much easier to implement. Dig holes for the posts about a meter deep.
Pack the bottom of the pits with gravel, approximately 5 cm, after which, pour a 10 cm layer of concrete. Wait for the moment when the concrete hardens a little, and place the anchors in it. It is on them that the racks will subsequently be attached.
You can do it a little easier. Place a post upright in the hole and fill with concrete. It is important to ensure that the rack is installed exactly, strictly vertically. Racks should be dug into the ground in such a way that their strapping is a perfect square.

After installing the racks, it's time to start building the frame. This action must begin with the bottom strapping. For the floor, you can use a regular beam, which must be laid every 50 cm. This design is guaranteed to withstand the weight of the flooring.
Next, install the remaining frame structures - racks. They are responsible for supporting the roof and the top trim. The location of the racks should be strictly symmetrical, the number of which depends on the dimensions of the gazebo.

After the construction of the frame, we are engaged in flooring. The floorboard is fastened with ordinary screws or nails.
Roof installation is a critical stage of construction. First of all, the upper strapping of the entire structure is carried out from the bars, which must be attached to the supports with nails. Subsequent construction depends on what form of roof you have chosen for your future gazebo. More often, four or gable roof, due to its practicality, reliability and ease of execution.
The hipped roof looks very original, we will focus on it as an example. To make the structure stronger, it is necessary to install additional rafters fixed to the upper and main harnesses. You should follow the symmetry of the rafters, this is very important.
Important! It is necessary to fasten the material to each other every 20 cm along the entire length of the rafters.

It is worth paying your attention to the fact that you should follow the safety rules for working at heights. Make sure that the stepladder does not wobble and that there are sharp and dangerous tools under you.
The final stage is decoration. It's time to show your imagination and decorate the walls, roof and railings of the gazebo. Usually they use a standard beam for the railing, then sheathing the structure with clapboard.
If you get a little confused, you can apply carvings to the wooden surface of the railings and walls. This adds color and originality to the finished design. However, for wood carving to look really spectacular, there must be certain skills in this matter.
After, you can open the wooden surfaces with varnish or paint them.

The next steps depend on your preferences. You can fill the gazebo with comfortable and spacious sofas, install a deck chair in it, or give preference to ordinary benches and a table.
By the way, you can also arrange tables, benches and chairs for a gazebo with your own hands. This will complement general design. Provide light, install mosquito nets, take care of the path from the gazebo to the house and enjoy outdoor recreation with close friends and family.
Weaving from rods - we simplify the process
If you like simple but tasteful, then you will definitely love our next idea. Moreover, it will greatly simplify the construction process. Arbor made of rods is very popular today. It not only looks spectacular, but is also quite practical.

The process of building a gazebo from rods with your own hands is quite simple. It is necessary to drive rods into the ground to a depth of 35 cm. The main thing is that the rods form a symmetrical square or rectangle, although it is possible to make a design in the form of a hexagon or octagon.
You can also sheathe the installed wooden racks of an ordinary gazebo with wattle. This also looks spectacular. If your gazebo is located near the sea or river, you can use ordinary ropes for weaving, it will look quite appropriate.

It is worth emphasizing that weaving is a very painstaking process, although not expensive. According to the principle of the above weaving patterns, you can choose the most acceptable pattern for your gazebo.
Do-it-yourself gazebo made of wood step by step video
Surely, you have seen from your own experience that it is not difficult to build a gazebo with your own hands from wood on your site. We figured out how to build a gazebo with our own hands. Choose your favorite gazebo design and decide on the place of construction. The main thing is to follow the above recommendations and use our methodology. Don't worry, you will definitely succeed. We recommend that you watch the following video of the gazebo construction process on your own, for a better understanding of the construction process.
Good afternoon, I am starting a series of articles on the construction of wooden gazebos for summer cottages. We will do with our brains. This article sets itself two goals - to turn on your brain, and to awaken the desire to CONNECT your hands to it.
In short, I have a goal fall in love with an idea make a gazebo with your own hands and give you faith that it is easy and simple. And I will succeed. Anyone who reaches the end of the article will become infected with a construction itch and will not calm down until a new wooden arbor appears in his dacha .
Since this topic is quite extensive, it would be prudent not to shove all types of wooden arbors into one article, but to divide the lessons into parts. This will give us the opportunity to understand in detail each type of gazebo, study its design and learn how to make such a gazebo ourselves - from the first to the last step.
- Today we will build wooden arbors CUBIC - with FLAT roof.
- In the second article - we will learn how to make a gazebo
- In the third article - we will figure out how to do it yourself
- In the fourth article - we will deal in detail and slowly with the principle of construction arbors with a FOUR-STROKE roof (with a roof in the form of a pyramid).
- And in the fifth article - we will make rounded HEXAGONAL gazebos with a complex device of a CONE roof.
So, let's not pull the cat by the rubber. Let's start to delve into.
What is a gazebo?
- This is, firstly, LEGS (pillars)
- Secondly, the ROOF, which is supported by these legs.
- Thirdly, the WALLS, which are nailed to the legs (sometimes the walls are absent, sometimes they are replaced by a holey crate).
The named parts are absolutely any gazebo and wooden and metal.
Look, below we see different gazebos - with flat roof, and with gable roof, And hipped roof, and a gazebo in the shape of a hexagon.
Any gazebo has pillars, a roof and walls. And the constructive difference of all arbors from each other is their roof.

Today we will build gazebos with our own hands with a flat roof. That is, let's start with the simplest design.
And you will find the rest of the articles-lessons on making arbors for every taste in the form of a list of links below under this article.
2 TYPES of arbors with a flat roof.
The designs of all wooden arbors WITH A FLAT ROOF can be divided into 2 TYPES.
FRAME GUNS - based on a cubic frame made of timber.
PERGOLA GUNS - based on the classic Italian pergola.

In this article we will consider the first type of arbors. And I took out the pergola designs of arbors in the second article of our series of lessons on the construction of arbors -
Model #1
Flat roof gazebo
on a FRAME BASIS
Let's look at a rectangular gazebo made of timber with a FLAT ROOF. And then I'll MAKE IT step by step.

Below you see three different designs country gazebo with a CUBIC frame. Visually, the gazebos seem to be different, but their construction scheme is the SAME. because they all have the same frame in the form of a cube.
We can make a gazebo as a simple hollow cube of timber, without walls (as in the photo below) - such gazebos simply enclose the recreation area from the rest of the wild countryside nature.
Such hollow gazebos even the roof is not covered with roofing material- they simply fill the slats between the beams of the upper frame (so that they cast a light shadow on the vacationers).
However, later you can make a roof from the rain for such an arbor (from polycarbonate sheets or awning fabric) - later in the same article there will be a chapter on roofs.
But you are right cover the roof with boards, put slate sheets or other roofing material on top (as in the photo below).
And also sheathe this cubic arbor with wooden slats- from one windy side, or from several sides. Wall sheathing can be continuous, or at intervals (according to the principle of blinds).
Such work is easy and simple to do with your own hands.

If we want to isolate ourselves from curious neighbors in our country gazebo, we can sew up all the walls - but not completely, but to a certain height, so that light enters the gazebo, as well as a fresh summer breeze (as in the photo below).

And yet ... the walls can not be sewn up with boards, but hung with a TENT CLOTH (awning fabric can be bought at hardware stores or directly from the supplier company (look in online stores). A suitable awning fabric must be cut into pieces of the desired size and fixed on the frames - spans of your gazebo.
And if you use your brains and Google search, then you can create a simple mechanism with your own hands that allows the canvas to fold like a roman blind(in wide folds), if you pull the rope. It's simple - you need rings and a rope there, and spend several evenings slowly sewing the rings to the back of the fabric.
Either you can wind the awning onto a metal pin - with a roll, like toilet paper on a sleeve. Drive the pins-sleeves into the fasteners between the piers of the gazebo. The steel pin will spin freely in the fastener and unwind the awning canvas - it will be like roller blind made by hand.

We can make a very small wooden gazebo - for one sun lounger (if you love yourself and do not like guests). And we can increase the footage of the building, so that it fits a table and chairs, a sofa and something else. That is, our country gazebo does not have to be a CUBE - it can be an EXTENDED RECTANGLE of any size you need.

We can further increase the footage of the future building so that comfortable lockers fit in a cozy gazebo, where you can store dishes in the summer, conveniently put frying pans, electric barbecues and other useful things. kitchen utensils(as in the photo below). You can make furniture for the gazebo with your own hands from scraps of timber and boards.

And at the same time, pay attention to how beautifully the wooden flooring on the floor is decorated here - with boards on squares of the transverse direction. I also like the idea of decorating a country gazebo with tall potted flowers and a lantern with a candle hanging from the roof eaves.
HOW TO MAKE A FRAME
for such a FRAME gazebo.
You can start building a frame for a cubic FRAME GARGO in different ways ...
Don't rush, choose the best convenient way creating a framework. The one that you clearly imagined and you can definitely do it with your own hands without difficulty - thoughtfully and slowly.
Let's look at the types of frame, and decide which is right for your country gazebo
THE FRAME of the gazebo is ON DIGGED PILLARS.
We can start by saying we dig the SUPPORT PILLARS directly into the ground, filling them with cement(step 1), then put on these pillars CROSS BEAMS (step 2), strengthen cross beams short props with STICKS (step 3).
HERE IS THE MAIN FRAME AND READY. If you want, put slate on top, if you want, make a crate with roofing boards on top, or pull an awning canvas over the top frame of the summerhouse.
Below I will show what roof options for a gazebo you can do with your own hands.

DISADVANTAGES OF THIS METHOD - these are difficulties with wood processing - before pouring wooden beams with cement, you need to tar them, wrap them with roofing material (to protect them from rotting underground).
Although there is a way out - simple and fast. Here he is in the photo below. You can deepen into the ground not the pillars themselves - but metal thrust bearings with a long and sharp bottom. And already put wooden support bars on them (as in the photo below).

And you can also install a country gazebo on a reliable and strong foundation - ON THE FOUNDATION. Let's see what types of foundations are suitable for such a frame gazebo and how to make them yourself.
THE FRAME of the gazebo is ON CONCRETE.
You can install poles on pre-prepared CONCRETE SCREED. And then it's better to put them on steel thrust bearings(as in the photo below). See, the pillars stand on metal heels?

To do this, you need to fix the thrust bearings directly into the concrete screed. This can be done in two ways - in already dry hardened concrete, or in still wet.
Installation of thrust bearings in dry hardened concrete.
you can buy anchor thrust bearings . They are installed on an already dry concrete substrate. A hole is drilled in concrete to match the size of the anchor. Excess drilling debris is blown out of it. A thrust bearing with an anchor is inserted into the hole. Next, a bolt is screwed into the anchor, due to which the anchor expands in the concrete and firmly holds the thrust bearing in place.

Or you can do cheaper to buy simple thrust bearings with fittings , and concrete them in still damp concrete. The photo below shows how the crooked legs of the thrust bearing circle into a round formwork filled with raw concrete, and freeze in it.

Such thrust bearings in raw concrete can have a different design. The main thing is that they all have the lower part of the reinforcement, which is buried in the concrete solution and firmly adheres the thrust bearing to the base.

As you can see, a country gazebo can be put even on the blind area from paving slabs. Everything is simple, if you figure it out, mentally imagine all the steps in the correct sequence, make sure that they are reasonable, and then take it and do everything with your own hands already in reality.
The design of your future country gazebo can be supplemented with interesting stone buildings. And then you can install support posts directly on these high stone sides. And here, too, it is better to use thrust bearings. So you will be sure that even with the passage of time your support column will not lead to the side, as it is securely fixed. And such a support column will not rot - there is nowhere to accumulate moisture.

THE FRAME of the country gazebo is ON THE WOODEN PLATFORM.
And you can do it yourself in advance make a wooden platform- under the future gazebo. And then the pillars on such a wooden base are attached on conventional square bearings.
And if there is no suitable bearing under your support beams. Then you can use any perforated fasteners in the shape of the letter L (that is, corners) as on the very right of the drawings below.


Of course, for this method, you first need to arrange such wooden base. That is, level the ground, make boards from boards, fill the boards with rubble, optionally put reinforcing mesh on rubble, pour concrete. And then put draft thick beams on a frozen concrete screed. And already on them to fill the floor boards.
And then anchor points for poles gazebos should coincide with the place where a thick draft beam lies under the floorboard. So that the gazebo stands on a solid foundation, and not on a hollow place on a wooden platform.


Here is another photo below, where the country gazebo stands on a wooden platform - and is attached to it with metal thrust bearings.

FRAME of the gazebo - ON SCREW PILES.
And you can also assemble the frame of the gazebo starting not from the pillars, but from the bottom frame, which you put on screw piles. Here in the photo below, we see that the frame of the country gazebo lies on black legs sticking out of the ground. This is the screw pile foundation.

Below is a picture of what it looks like foundation quick fix under the gazebo in the country. You can search Google for ways to build such a pile foundation in your area. And come to the conclusion whether it will be convenient and affordable for you.

NOTE. On these high legs screwed into the ground, we do not put vertical pillars of support - but a ready-made knocked down the lower frame of the gazebo (i.e. horizontal beams).
And already on the very bottom frame we fasten support bars. Attach them here on such steel plates in the form of CORNERS. Plus, you can add more metal plates along the other edges of the support bar.

THE FRAME of the gazebo is ON BRICK LEGS.
Or you can cast the same high legs but out of concrete, or lay out the supporting columns of brick in pre-dug holes.

Here in the photo above we see the frame frame of the gazebo, which rests just on such brick pillars support- a cheap point foundation is located in those places where support is needed for a frame made of timber. This is an economical version of the foundation for an inexpensive summerhouse. And everything is done simply and easily with your own hands.
Then such a gazebo frame can be sheathed with a floorboard, the roof can be covered with a transparent polycarbonate sheet, and the walls can be sewn up with slats or hung with an awning. It's beautiful and elegant. You see how interesting it is to beat the simplest frame of bars.

So ... we figured out the types of base for our frame. Now let's see how we can FASTEN THE PARTS OF THE FRAME to each other.
We assemble a cubic arbor.
We fix the upper transverse beams.
Now let's see how to do top of the frame our frame gazebo. That is, let's say we already have a foundation. Let's say we have already placed the vertical pillars of the support. And now our final task is to put on these pillars and FIX the transverse horizontal beams.
Here in the photo below we see the most easy way fix the cross beam. It's just to put it on the poles and secure on perforated steel PLATES. For this purpose, G-about plates are suitable. different shapes, or straight lines (then you will need two of them on each side).
On sale there is a variety of perforated fasteners. Google it and find out exactly which plates are just perfect for the size of your timber.

Here is the second way to lay the top bars of the roof. When a notch is cut at the end of each wooden beam - and then the notch is placed in the notch (as in the drawing below). This method is called "in the paw" - like putting the ends of the bars into the paw.

So that the top beam does not sag under the weight of itself, or if you are planning a heavy roof decking, you can add SUPPORTS - BRACKETS. That is, small diagonal cuts of beams that need to be placed at the corners of our frame, as in the photo below.

Next, if on the roof additional wooden crate from narrower beams, then they fit into specially stuffed metal fasteners - “supports for beams”. We see such supports in the photo below.

Support fasteners for beams can be of different shapes. Open supports - with ears to the sides. Closed - with ears turned inward. And a support with a hidden bracket - with an inner plate.

And if we want to increase the FRAME GARGO.
Below we see a model of a wooden gazebo, made by hand, which is mounted not on four, but on six support pillars. Six pillars allow you to make an elongated summerhouse, under which to fit a long dinner table, and you can also put a barbecue oven (by the way, I will have a separate article about this).

If you choose such an enlarged gazebo, then here is a photo of how to lay the upper beams on the middle pole. We see that the beams with their ends are laid on a pole and each is held by an additional jib (short beam obliquely).

The foundation for such long arbors can be any (choose options from those proposed above). Below in the photo we see a country gazebo on a pile foundation (a frame made of timber is placed on the piles, support bars are installed on the frames, and on top there are transverse beams with jibs, and only then a plank flooring and lath roof lathing).

Types of wall cladding for FRAME GUNS.
And now let's look at the ways of cladding the walls of our country gazebo. Here are a few options for sheathing the walls of the gazebo with your own hands.
The easiest way is to fill horizontal slats - like blinds.
And if you are not afraid of painstaking work, then you can stuff the slats diagonally - cross to cross - to get such a crate in a box, as in the photo below.

You can fill a solid mesh wall. Or you can fill low frame sides with such a crate on the sides of the gazebo, and put a climbing plant along the square.

Part of the wall of the dacha gazebo can be covered with a solid stuffing of boards (as we see in the photo below, just the sectors of the walls below are covered with a board).

And here is a sample of the walls, where the wooden mesh occupies only the upper part of the solid plank wall of the gazebo.

At the same gazebo, you can combine the height and shape of the batten walls, as well as the lattice pattern itself.

HOW TO COVER THE ROOF for the gazebo.
You yourself can easily and simply make a roof for a gazebo with your own hands - from any roofing material.
The roof can be sewn up with boards and covered with roofing felt (it's cheap), you can put slate on the roof.
And best of all, transparent sheets of POLYCARBONATE - this is how the light of the sun will penetrate through the roof (see photo below).

And at the same time: pay attention to how the roof slope is arranged in the photo below (to allow water and snow to drain) - the SUPPORT PILLARS of the front wall of the gazebo are 15 cm higher than the SUPPORT PILLARS of the rear wall of the gazebo. And so the roofing boards lie on a slope.
Also you can do tarpaulin roof. The photo below shows a great way to simply attach the awning to the edges of the gazebo roof. Along the edge of the awning make holes(better in the workshop, such special metal rivets with a hole). We put a rope in the holes. On the longitudinal beam at the side of the roof we fill fasteners with large caps. And then we hook the rope threaded into the holes of our tent fabric by the caps of the clogged hardware products.

And also the awning canvas can be stretched between the densely packed laths of the crate. As in the photo of the gazebo below. This is an Italian version of the roof.

I mean, I want you to understand one thing. Roof - you can make ANY. Wall cladding (boards, awning or wooden lath) - you can do ANY ALSO. And it's very simple. Even a woman cope.
The main thing is to put the FRAME of the gazebo. The backbone to which we can nail all this even with female hands.
The frame is the basis from which you can fashion any design of a summerhouse. Knocking down a frame from a bar is 80% of all work. And that's what a man needs. It's time to call him.
Good luck with your home building.
Olga Klishevskaya, specially for the site
In the country, it is not customary to sit in a house when it is sunny and warm outside. Only during bad weather can a summer resident hide under a roof. However, you can resort to another option. You can stock up on excellent impressions in the open air if you build your own gazebo.
Such a building will become an ornament garden plot as well as a place for pleasant communication with family and friends. There are many ready-made schemes of light arbors. If you assemble the structure yourself, its cost will be 50% lower than that of the finished building. The simplest do-it-yourself gazebo is assembled quickly enough. With unhurried work, it can be built in 2-3 days.
Materials and designs
Cheap and practical option- a gazebo made of wood. Such material looks beautiful and is easily processed. If wooden elements are impregnated with special solutions, they can serve for a long time. In addition, the construction of a country gazebo will not take more than 3 days, even if the work is done slowly.

Another material that is used for the construction of such structures is metal. When making a frame from profile pipe and steel corners gazebo can serve for many decades. It can be built with your own hands. The work is done quickly enough, and the materials are quite cheap.
DIY gazebo
How to build a simple gazebo with a minimum of cost and effort? For the construction of such a structure, it will be necessary to create a frame and a floor. If it is wooden, the bases are made of bars. Flooring built from boards. As a base, it is better to pour a concrete screed. This version of the foundation will be simple affordable. Before work, it is necessary to choose the right place for installing the gazebo. The area for concreting should also be leveled.

Important! For a simple gazebo, you should not combine wooden and metal frame elements.
Practice has shown that even when protecting wooden supports with roofing material or bitumen, when placed in concrete, the elements begin to rot. Subsequently, this can lead to their destruction. For this reason, it is better to immediately exclude the contact of wood and concrete.

For this purpose, you should:
- Concrete round metal pipes.
- Then fasten wooden posts to them. Metal rods should come out of concrete base by 30 cm.
- Holes are made in them for fastenings.
On such supports, the gazebo can stand for more than a dozen years. Any roof can be mounted on the obtained supports. Building a wooden structure with your own hands is quite simple.
For an ordinary light gazebo, it is not necessary to erect brick fences. You can limit yourself to a simple fence from eurolining. Its height usually does not exceed 90 cm. Such a fence is attached to longitudinal bars. The gazebo will help to hide from the scorching sun, and will also avoid blowing your back with a strong wind. The fence for the walls of the structure is fixed to wooden supports using self-tapping screws.
Eurolining can be replaced with cellular polycarbonate. This material looks great and does not obscure the gazebo space too much. It is also easy to install. The material is not afraid of sudden changes in temperature and high humidity.

Roof
For the roof frame, it is better to find a beam of 50x50 mm. It is necessary to create a frame from it, on which the crate will be installed, and then the roofing material. The frame is installed on the top harness. The roof is covered with such materials:
- ondulin;
- metal tile;
- slate.

When choosing the optimal width of the roof, it is worth calculating it in such a way that you do not have to cut the sheets when installing the roofing. To do this, you first need to measure the dimensions of the panels used, and then subtract the sheets overlapping each other, which will be performed during installation. The result will be taken into account when calculating the length and width of the roof. It is also worth considering the side overhangs and end overlap. You can make a gazebo with your own hands quite quickly. The main thing is to choose the right materials, including for roofing.

For example, for a slate with 8 waves in each panel, the length of the gazebo is chosen as a multiple of 1 meter. In this case, the length of the slopes can be equal to 1.75 m. If several panels are laid along the slope, the estimated length of each of them is reduced by 15 cm - this is necessary to create an overlap.
Choosing the best option for roofing, you should pay special attention to polycarbonate.
Distinctive features of the material:
- It is an excellent option for the construction of lightweight structures.
- It also makes a fence.
- Polycarbonate is a transparent plastic with a small mass.
- In combination with it, a metal profile is often used.

Such gazebos are especially attractive and practical if they are located in the shade of trees. In the presence of a translucent roof and the shadow created by dense foliage, the atmosphere in the gazebo will be as comfortable as possible for relaxation.
Garden gazebos made of polycarbonate are simple and affordable. To create them, you need to have several tens of meters of steel angle, as well as polycarbonate panels and a steel strip. Also, before erecting such a structure, it is worth preparing planed boards, which will be needed for the manufacture of benches and a table. original photo gazebos can be seen below.

Manufacturing steps
To understand how to make a gazebo with your own hands, you should get acquainted with the main stages of work. It is better to choose an easier option. First you need to equip the foundation. In it, the support posts of the gazebo are concreted. After that, they should be scalded with a corner of 25x25 mm. After that, 2 belts of corners are welded to the racks. One of them is placed in the middle of the supports. The second should be put on top - the roof will rest on it.
Polycarbonate sheets have the ability to bend perfectly. For this reason, they can be used as an arched roof. For this purpose, steel strips must be welded to the racks, which have a width of 50 mm. They are mounted on support stands. And then holes are made in them to fix the polycarbonate. You can assemble a simple gazebo for a summer house with your own hands (as in the photo) quickly enough.

Also, roofing is often made of tiles. For the basis for it, OSB sheets should be prepared. The material does an excellent job of holding shingles on the roof. The thickness of such sheets can be 10-12 mm. It has a fairly high strength and rigidity. That is why it does not have to assemble a spatial frame from wooden elements. It is only necessary to firmly attach it to the harness.
Features of simple gazebos
A simple gazebo for a summer residence does not have to be done with a frame frame. Its foundation is concrete screed which was reinforced with steel bars. On such a surface, you can put a barbecue. The safety of such a design is quite high, because concrete floor not afraid of hot coals. In case of winter option it is better to equip the floor with planed boards, and sheathe the area around the barbecue with steel sheets. This winter design looks simple and beautiful.

Inexpensive to build and easy to install columnar foundation. In order not to overpay when building a gazebo for a summer residence with your own hands, you can prepare a red brick. To install the foundation, it is necessary to dig holes for the supporting pillars, and then lay them in brickwork, place reinforcement and pour concrete. Anchor bolts of 20 cm are laid in the masonry. There should be a thread at their free end.
Supports are placed on the pillars. The frame is best made from a bar 50x100 mm. If you put antiseptic boards on it, you can get an excellent warm floor. Subsequently, the gazebo can be equipped with an open hearth. With such a finish in the room, it will be possible to rest comfortably even during severe frosts.
To figure out how to build a gazebo, you should get acquainted with the main features of simple structures, as well as learn more about popular materials. You should also understand the sequence of erecting simple arbors.

Conclusion
As you can see, build simple design you can do it yourself, without resorting to the help of professional builders. First, an exact drawing is made, and then, in accordance with it, all the necessary work is carried out. It is important to consider the capacity of the gazebo, its location and materials. In order to avoid mistakes in the process of work, it is worth performing the correct calculations.