How to glue baguettes to wallpaper. How to use a baguette in interior design? Molding in the room: how to decorate the space with decorative skirting boards
Baguettes visually look like skirting boards and are used to decorate the joints of walls and ceilings. They can have different shapes, colors, finishes and are glued end-to-end or on wallpaper. They are easy to paint water-based paint depending on design needs. Various creation options style decisions a lot, you just need to choose the right baguette, as well as pick up good glue and carefully fix the products on the ceiling and wall.
How to glue baguettes on the ceiling
Work begins with leveling the surface. Walls and ceilings with defects are carefully puttied, after which a primer is applied.
Start gluing the baguette from the corner. The end of the baguette is cut at an angle of 45 degrees to get a smooth, neat joint.
Glue is applied in an even layer along the entire length, as well as on cut corners. Next, the product is applied to the surface and pressed tightly.
How to glue baguettes on the ceiling?
The cut corners must match exactly to form an angle. The joints are also carefully glued.
Question: glue baguettes in the corners
The masters answer - when connecting the parts of the plinth end-to-end, it is necessary to add glue and carefully press it against the wall in order to squeeze out the remnants of the adhesive. It is better to press down with the edge of the palm so that there are no dents from the fingers. Residual glue is removed with a damp cloth.
How to glue baguettes on putty
How to glue baguettes on putty
The option of gluing a baguette to putty is often used, especially by professionals. Work begins with a thorough preparation of the ceiling and walls, which are leveled with putty. Next, with the help of a miter box, the ends are cut.
The baguette is fixed with glue, for example, it can be Cosmofen plastic glue, or the same putty, it rubs all the cracks between the wall, ceiling and baguettes. Excess material is removed with a clean cloth. You need to finish the work until the putty is completely dry.
The next step is priming the surface, painting in desired color. It is worth remembering that painting in the same color as the ceiling will help create a visually unified design.
After that, you can begin to glue the wallpaper, the remnants of the overlap of the upper part of the wallpaper on the baguette are pressed with a spatula and cut off with a clerical knife.
The advantage of this method is that you can safely carry out staining without fear of damaging the wallpaper.
How to glue baguettes on wallpaper
We glue baguettes on wallpaper
This method is used when wallpaper is already pasted and baguettes need to be fixed on top. In this case, the workflow is as follows:
- first, the ends must be cut with a miter box,
- then apply a thin layer of glue to the surfaces of the wall and ceiling,
- attach a baguette to the wall,
- press it down and hold for the time specified in the instructions,
- remove excess glue with a napkin,
- seal the joints with sealant,
- the surface is painted with acrylic or water-based paint.
It is very important to be careful when staining. so as not to hurt the wallpaper, or even better, paint the baguette even before starting its installation.
For those who are interested in how to glue a baguette on wallpaper. you should know that using this method, you do not have to adjust the wallpaper, and if there were distortions or burrs, they will be hidden under the baguette.
Glue for baguettes
Modern baguettes are most often made not from gypsum, which is difficult to glue, but from foam. It is lightweight, easy to cut, transport and stick. Masters use acrylic, putty, as well as special adhesives for polystyrene.
The most common choice of glue for baguettes is liquid nails. They perfectly fasten with concrete, quickly seize and over time, the baguette does not move away from the ceiling. Produced in cans. It is applied using a special mounting gun, which allows you to carefully apply glue in inconvenient places with minimal excess.
Acrylic glue - is water-soluble, well fastens not only polystyrene, but also parquet, cork, parquet board, drywall.
If putty remains after finishing the walls, you can use it. A fine-grained finishing putty is best suited, which is easily removed with a damp cloth, resulting in a smooth seam.
Also used are transparent adhesives for polyurethane, produced in tubes. They glue baguettes very securely, but you need to work quickly and accurately.
If the choice was made in favor of silicone sealants, you should know that after drying, painting them with water-based paints will not work.
If you are in doubt about what to choose, you can ask for help from the sales assistant in the store building materials. He will select the composition based on the baguette material and your goals and objectives. A lot will depend on the quality of the glue, but you also need to work with it correctly, so do not forget to read the instructions before starting work.
1.Materials and tools
2. Gluing baguettes
The ceiling molding serves not only to hide the gaps between the ceiling and walls, it is also a decorative element that can give the repair a finished look. You can see how the surface of the ceiling with a ceiling plinth looks like in the photo. Many do not even think about how to glue baguettes to the ceiling.
How to stick a ceiling molding with your own hands
It seems to them such an easy task that they do not think about any of the nuances that exist in this work. But in order for the result to please for a long time, you should follow some rules.
Materials and tools
Before moving on to how to glue baguettes on the ceiling, you need to prepare the following materials and tools:
- hacksaw for metal;
- pencil;
- sponge;
- miter box;
- soap solution;
- sandpaper;
- level;
- tassel;
- glue or liquid nails.
As for how to glue baguettes to the ceiling, this can be done with both glue and liquid nails.
How to glue baguettes on the ceiling, in detail on the video:
Gluing baguettes
How to glue baguettes on the ceiling - secrets and subtleties
Very often, many of those who decide to carry out repairs at home with their own hands do not even realize that in the process of gluing baguettes there are important rules and requirements to be met. However, do not think that only professionals will cope with this work. We will try to tell you about all the most important points so that you can manage on your own.
A baguette or ceiling plinth is not only an accessory that hides irregularities and gaps formed at the junction of the wall and ceiling. It is also a decorative element that adds a finishing touch to your space.
Baguette for wallpaper: how to glue correctly
Plinth can be made in different colors and shapes, have different textures and finishes. They are easily painted with a water-based emulsion, it all depends on the tasks. There are a huge number of style decisions that you can bring to life with the help of baguettes. All you need is to choose a ceiling plinth that matches the style, good glue and carefully glue this decor element.
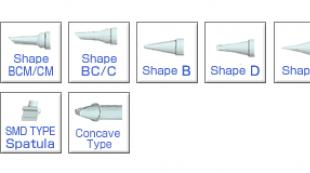
Types of baguettes

Types of ceiling moldings
All these products can be divided into two types:
The difference between them is as follows: the wall is glued in one plane, it is installed both on the walls and on the ceilings, they can also decorate the outer corners, make a frame for the panel, etc.; and the ceiling is glued in two planes, it is often used only when finishing the junction of the wall and ceiling.
Tip: if you decide to glue the plinth yourself, you should not choose products with intricate patterns. They are difficult to join and putty. Believe me, a simple baguette, neatly glued, will look much better. And also we advise you to choose a ceiling plinth not less than 5 cm wide. Its installation will be much easier.
Gluing process
What you need to stock up before work:
- liquid nails or glue;
- tassel;
- construction knife;
- pencil;
- miter box;
- clean rag or sponge;
- finishing putty;
- putty knife.

The process of gluing a ceiling baguette
So, how to glue baguettes on the ceiling? Professionals advise the following course of action:
- The whole process should start with leveling the surface. If the ceiling and walls have irregularities, they must be puttied. After that, apply a primer.
- Gluing baguettes starts from the corner. The ending ceiling plinth must be cut at a 45 degree angle. Thus, you will get a smooth and neat joint.
- Apply glue along the entire length of the product in an even layer. Don't forget to glue the cut corners.
- Attach the product to the surface to be glued, press firmly. If you made the cuts correctly, then the corners will clearly match and form an angle.
- The installation is over, and the glue has dried, you can start painting.
Many people have difficulties in decorating corners, so here we would like to dwell in more detail. Experts say that when joining two parts of the ceiling plinth end-to-end, it is necessary to carefully work out the edges with glue and press the parts tightly to squeeze out the remaining glue, which should be removed with a napkin. Press down not with your fingers, but with the edge of your palm, so you do not leave dents from your fingers.
Sticker baguettes on putty

Gluing baguettes on putty
Specialists have to perform such work as installing a baseboard on putty. Work should begin by leveling the surface of the walls and ceiling. Then cut the ends with a miter box.
The baguette is put on glue and putty, and all unwanted cracks are covered with putty. If excess material appears, they must be removed with a napkin or a clean cloth. Naturally, the work must be completed before the putty dries.
After the baguette is glued, you can start wallpapering. If there is an overlap of wallpaper on the ceiling plinth, then the wallpaper is pressed with a spatula to the joint with the baguette and carefully cut off with a clerical knife. The advantage of gluing wallpaper after installing the baguettes is that you can safely paint the ceiling plinth without fear of staining the wallpaper.
How to glue baguettes over wallpaper

Ceiling baguette over wallpaper
Specialists also have to deal with this method when the wallpaper is already pasted and there is no need to change them. In this case, the work plan looks like this:
- Trim the ends with a miter box.
- Apply a thin layer of glue to the ceiling and walls.
- We attach the ceiling plinth to the wall.
- We press it down and hold it for the time specified in the instructions for the glue.
- We remove excess glue with a napkin, cover the joints with sealant.
- We carefully paint the baguette with paint, in some cases the baguette is painted before work begins so as not to stain the wallpaper.
Those who decide to use this method should know that in this case you will not need to adjust the wallpaper to fit the baguette.
In addition, if distortions occur during the wallpapering process, they will be hidden by the plinth.
We hope that we were able to answer most of the questions related to the ceiling cornice, and its installation will be easy and effortless for you!
How to stick a ceiling plinth
The most enjoyable stage repair work- pasting the walls with wallpaper and installing a ceiling plinth, as the room is already gaining comfort and the cherished moment of finishing the repair is approaching. In order for the molding to fully fulfill its practical (disguising the flaws of the ceiling-wall joint) and decorative (giving the room sophistication and special charm) functions, it must be properly glued.
Skirting board fixing methods
Before gluing the ceiling plinth, you need to decide on the method:
- Installation over wallpaper. The advantage is the ability to pick up a molding when you can already see a complete picture of the room, without being afraid to make a mistake with the design.
- Installation on walls, only prepared for wallpapering. Dignity - the absence of the likelihood of spoiling the fine finish in the process of attaching the curbs.

Fixing the ceiling plinth
Preparation for installation work
It is possible to glue the ceiling plinth only after it has been unpacked for a day. Therefore, after buying a baguette, there is at least a day to fully prepare for the installation process.
First of all, you need to purchase all the materials and tools that you may need:
- Glue or putty, depending on the chosen installation method.
- A miter box, a saw with a fine tooth and a construction knife, they will help to carefully make a gash at the junction of two baguettes with the desired external or internal angle.
- Spatula, rags and sponges, in order to remove excess glue and putty.
- Paint and brushes for painting the border.

Tools for mounting the ceiling plinth
If there is little or no experience in gluing a ceiling plinth, you need to practice sawing corners. Therefore, it is better to purchase an additional baguette and perform on it all types of corners that are available in the room.
The ceiling plinth should always be glued to a dry and clean surface, so the attachment point must be wiped with a dust cloth. If the baguette is attached to a plastic surface, it must be degreased and wiped dry.
Choosing glue for fixing a baguette

Adhesive for ceiling molding
If you are going to glue the ceiling plinth before finishing, it is better to use a finishing putty or drywall adhesive mortar.
If the installation will be done on top of the wallpaper, you need a special glue. Here the choice becomes between 2 types: acrylic and polymer. Glue on water based(acrylic) is used in nurseries, bedrooms, halls and other rooms where safety and the absence of a pronounced smell are important. Polymer adhesives, such as "Moment" and "Titan", are recommended for use in rooms with high humidity.
Installation of skirting board before finishing

Installation of skirting board before finishing
- The process of mounting the molding must begin with washing down the edges at the right angle. In order not to get confused, prepared baguettes can be laid out near the walls around the perimeter in those places where they will be attached under the ceiling. The connection points of the skirting board on a straight wall are already adjusted in place so that there are no large gaps. Therefore, you do not need to cut them immediately to size.
- To make the corners perfect, it is better to adjust them without adhesive. We take two baguettes, sawn down under the desired degree and join in the corner. If the gap turns out to be large, we correct the joint by cutting off the excess with a knife. If the quality of the joint is satisfactory, we take a pencil and outline the places where the baguette fits to the wall and ceiling.
- After everything corner connections prepared, it is necessary to dilute the mixture. There are 2 ways to prepare it:
- Stir the finishing putty with water until a homogeneous soft mass is formed, the excess of which will be squeezed out from under the baseboard. It is important that the mixture is like thick sour cream, but does not flow;
- Add putty and PVA glue to the water (proportion 1: 1: 1) and knead until a homogeneous mass is formed and leave for 2-3 minutes. The adhesive mixture is ready, you can get to work.
Installation of plinth on wallpaper

Installation of plinth on wallpaper
The algorithm for attaching a baguette to wallpaper is the same as in the previous case. But there are some nuances:
- Glue is also applied to both surfaces of the baguette, but not evenly, but pointwise with a step of 3-4 cm or a narrow strip. There should be such an amount of glue that it holds the glued product well, but does not protrude when pressing on the molding. If it nevertheless appeared on the wallpaper, you should immediately wipe it with a dry sponge or cloth.
- After applying glue to the baseboard, you need to wait a little time (so that it grabs) and then stick it on the walls. If this is not done, you will have to stand for a long time, pressing the molding against the wall and ceiling, which is very inconvenient.
- It is more convenient to paint the skirting board before installing it, this eliminates the risk of paint getting on the wallpaper.
How to glue baguettes on the ceiling
If the walls are uneven
Often you have to stick a baguette on uneven walls with wallpaper, which causes large cracks and gaps. At the same time, wallpaper does not allow you to putty the joints and improve the look. To fix the situation, you need to take the sealant in the color of the molding (usually white) and carefully mask the joints. This should be done after the glue has completely dried.
Nothing makes the transition from the wall to the ceiling of a building more aesthetic than an exquisite frame made of aesthetically pleasing and practical plastic. The question of how to glue a plastic baguette is relevant and, if necessary, hide small imperfections after repair. The presence of such an interior detail opens up additional opportunities for improving the appearance of the room.
A plastic baguette is more practical than a wooden baguette. This material is easier to clean and keeps presentable longer. appearance without additional care. Plastic edging is much lighter in weight, so the installation of its design is technically easier. In addition, the price of plastic as a baguette material is significantly lower. This is especially important if you are buying ceiling frames for finishing office or public premises, and it is desirable to save on materials.
Stages and features of gluing plastic baguettes
The traditional technology for gluing a baguette frame for a ceiling includes several steps. This is:
- Preparing the surface for gluing.
- Carrying out the necessary calculations.
- Cut the desired length of the baguette blank.
- Direct installation.
The technical nuances of baguette gluing may vary depending on the type of surface. If the baguette frame is glued to the wallpaper, it is necessary to apply a smaller amount of adhesive to avoid spots and softening of the wallpaper. When gluing under a stretch ceiling, it is best to attach the interior frame to the wall so as not to damage the delicate surface of the ceiling. Most practical option a baguette for most of these structures is a ceiling plinth.
In order for the baguette edging to hold securely and look flawless, installation must be performed correctly at all stages of work.

Surface preparation
The first step in gluing the baguette edging is to prepare the work surface. Before gluing the decorative panel, the surface must be well cleaned of dust, remnants of the old coating (paint, wallpaper, whitewash) and any gaps should be leveled with priming. In many cases, additional puttying is required.
The main task of the preparatory stage is to increase bearing capacity the surface on which the baguette panel will be held. Applying a coat of primer will greatly improve the adhesiveness, or adhesion. If you properly prepare the wall before gluing plastic baguettes, this will save a lot of adhesive consumption with excellent fixation of the frame.
Calculations and markup
If each corner of the working room is exactly 900, a standard cut with a miter box is sufficient.
How to stick baguettes on the ceiling yourself (video)
Markup work becomes more complicated if the task of the baguette panel is to hide the flaws of the room at the junction of the ceiling and walls. To calculate the required amount of material and markup in a room with non-standard angles, you need to attach a piece of baguette to the corner between the ceiling and the wall, and then draw lines along the bottom and top of the piece.
The main value to be guided by in this case is the intersection of solid lines on different sides of the corner. These places are indicated by marks on the baguette opposite the straight lines. The accuracy and aesthetics of the joints are important indicators of the quality of gluing.
Cut piece of baguette
To separate the desired part of the material for decorative panel, you can use a hacksaw for plastic or a knife with special blades.
After the necessary pieces are cut off, it is necessary to check the accuracy of the angle by folding two parts according to the marks drawn earlier (inner and outer corners). The slightest inaccuracy should be “smoothed out” with sandpaper or a knife, otherwise a gap may form. An electric jigsaw is also suitable for this purpose, especially when working with “curly”, volumetric panels.
It is also possible to cut baguette blanks when fastening, but it is much more difficult, time-consuming and effort-consuming. Therefore, it is better to glue pieces that fit perfectly to each other, and not to engage in correction during installation.
Installation nuances
It is best to start gluing the baguette edging from the corners of the room - this is the basic and most painstaking work. Straight parts of the required size are glued much easier. When applying glue to the edges of the blanks, it is necessary to ensure that its excess protrudes outward. The more uniform the layer of applied adhesive, the better the plastic will “grab”. The surplus that comes out is evenly distributed along the edges with a brush, and the remnants are washed off with warm water and soap or solvent.
When the panels are already glued, you need to pay attention to the processing of the joints. They are lightly puttied and polished with sandpaper. After grinding and drying of the glue, if necessary, you can paint the mounted baguette.

The choice of glue for the baguette panel
How to glue a plastic baguette selected from the rich collection of the ART-BAGET online store? Many experts recommend using "liquid nails" for this purpose - a special construction adhesive that is designed for any weight of parts. "Liquid nails" are made on a neoprene or water basis. This adhesive is universally compatible with different surfaces. It is preferable to apply it with a gun.
Other options are glue "Dragon", "Moment", Bostik Vinycol 1520, "Khimkontakt-Desmokol" based on organic resin, specially designed for soft plastic "Second Vinyl". Regardless of which adhesive you prefer, you need to avoid getting it on outer surface baguette.
Easy sticking and excellent results!
Which photo frame is better to buy →
Finishing the ceiling surface almost always ends with the installation of a decorative plinth, which gives the room a finished and harmonious look. However, this part of the work requires compliance with a certain sequence and technology, especially in terms of the design of corners. In the article, we will look at how to glue baguettes on ceilings so that the repair turns out to be of high quality.
Features of using baguettes
In addition to the fact that baguettes on the ceiling allow you to harmoniously arrange the transition from the wall to the ceiling surface, they have a number of advantages, including:
- budget price;
- a wide range of sizes, shapes, configurations;
- the ability to use a decorative plinth with any type of ceiling finish;
- flexibility allows you to bypass irregularities on the walls and hide them;
- ease of installation.
Depending on the material from which they are made, you can choose the following types of products:
- foam and polyurethane;
- plastic;
- aluminum;
- gypsum
- wooden.
Ceiling plinths can be smooth or embossed, narrow and wide.

Before you start gluing ceiling baguette, it is necessary to decide on what the installation of products will be carried out. Most often, compositions for polystyrene foam materials are used. But there are other alternatives on the market:
- putty is often used to glue two surfaces together. The main advantage is that it not only securely fixes the baseboard, but also allows you to immediately seal visible seams and transitions;
- liquid nails qualitatively fix the skirting board under the ceiling, providing instant adhesion of two surfaces;
- acrylic glue is used for mounting wooden skirting boards and foam baguette;
- silicone sealants are also used to fasten the baguette, but they have a significant drawback - after installation, the exposed areas of silicone cannot be painted.
In order to make sure that you have chosen the correct composition, read the information on the instructions for the adhesive. Typically, manufacturers indicate the type of material that a certain type of adhesive is suitable for.

To correctly install the skirting board, it is necessary to make markings on the wall surface. You can skip this step if all corners in your room are strictly 90°. For a large room, work is better to start from the corners. Prepare a solution of water and soap, a small sponge and a spatula in advance.
The algorithm of actions will be as follows:
- apply a small amount of glue to the edge of the plinth with a spatula, carefully coat the joints of the elements;
- work carefully so that the glue does not get on the front side of the plinth;
- attach the baguette to the surface, press it firmly;
- immediately remove the adhesive that has come out with a sponge dipped in soapy water;
- after you paste over the entire perimeter of the ceiling with a plinth, seal the seams between the individual parts with putty.

We are talking about when the walls have already been finished with wallpaper, and on top of them you need to stick a baguette on the ceilings. In this case, the order would be:
- the ends of the plinth are cut with a miter box;
- the reverse side of the plank is smeared with glue;
- apply the product to the wall and, slightly pressing down, hold for as long as indicated on the package to the glue;
- excess glue is removed with a sponge;
- joints are sealed with a silicone-based sealant;
- if necessary, the plinth is painted with paint.
With this method, care must be taken not to damage the wallpaper. If it is planned to paint the baguette, it is better to do this before starting its installation.

In this case, the peculiarity of the work lies in the fact that first they glue the baguettes to the ceiling, with the help of a putty mixture they close up cracks and gaps, and after that they proceed to the finishing of wall surfaces. In this case, it is necessary to bypass the baguette gluing line very efficiently. Even the slightest flaws in the subsequent repair that were made in this place will become noticeable. If you are not confident in your abilities, then stick the baguettes on the ceilings after decorative finishes walls.

Docking the plinth in the corners is the most difficult stage of work associated with their installation.
Important! In order not to spoil the material, adjust the last straight bar to size after you stick the corner.
If all the corners in your room are strictly 90 °, the following recommendations will help you cut the baguette correctly:
- place the baguette in the miter box exactly as it will be located on the wall surface;
- lower part press the plinth firmly against the wall of the tool;
- miter box up the right sizes cut the parts of the fillets that will be joined at the corners;
- using a construction blade, finish the extreme sides of the parts to the end;
- check the evenness of the joints by applying the elements to each other at right angles so that no burrs remain. Otherwise, gaps will occur at the installation site.

To glue baguettes in the corners of the room, proceed in the following sequence:
- cutting off the end of the products, attach the fillets to each other, check the place of their joining for gaps;
- cut the interfering areas with a knife;
- smear the skirting boards with glue, attach them to the wall surface. If the adhesive requires curing, wait the specified amount of time.

Ceiling polyurethane or plastic plinths usually have White color, so many people want to give a different shade to the baguettes, which will fit the style and design of the room. There are several other reasons why it becomes necessary to stain the glued skirting board:
- often on the surface of the baguette there are small defects in the form of scratches, dents, especially manifested in bright light;
- the loose structure of the material does not always look aesthetically pleasing. Skirting boards are easily painted, so this drawback can be successfully masked;
- over time, white fillets lose their original shade and turn yellow. Painting and decorating will easily eliminate this defect;
- applying a layer of paint will help hide the joints formed during the installation process;
- wooden baguettes are recommended to be coated with varnish or special impregnations. This will not only make them more attractive, but also extend their service life.
Before you start painting, you need to choose the right paint. For foam products, water-based emulsion and acrylic formulations are best suited.

If you want to make an original interior, use glazes - these are special paints with which you can get a different texture on the surface of the baguette - natural wood or stone, patina, gold, etc.
It is better to paint ceiling plinths before they are pasted. In this case, you can use not only conventional paints, which are applied with a brush, but also sprayers.
The paint is usually applied in two layers to obtain best result. In this case, before applying the next layer, the previous one should dry well.

- measure the perimeter of the room:
- divide the resulting value by the standard length of one baguette (2 m);
- round the result up;
- add two or three more elements in case of an unforeseen event (damage during installation or transportation).
The variety of shapes and types of ceiling fillets often poses difficulties for buyers, then you need to choose the right product. After all, personal preferences do not always correspond to the chosen direction in the interior. In order not to make a mistake, pay attention to the following tips:
- for narrow and long rooms choose wider fillets;
- in a low room, a thin plinth under the ceiling will look better;
- minimalism will be emphasized by a modest white plinth; for lush interiors, pompous baguettes imitating stucco molding should be chosen;
- if the color of the plinth matches the shade of the walls, this will visually lengthen the room, match the color of the ceiling - the walls will become noticeably higher;
- As for the material, it all depends on your financial capabilities. The cheapest are foam and polyurethane skirting boards, the most expensive are wooden and aluminum baguettes. In any case, you can always paint the product in the desired color.
Correctly gluing a baguette to the ceiling is not difficult. The main thing is to study the features of the products before starting the installation and choose a reliable adhesive.
Related videos
Thinking through the features of the updated interior design of their home, everyone imagines a beautiful room, decorated with modern, fashionable design ideas. And it is completely optional to spend on creating stylish design interior a lot of money. To design a beautiful room, it is enough to use simple, but original in appearance materials.

For example, to decorate the perimeter of the ceiling, it is recommended to use an interior baguette. This method is not new. But its use allows you to create a great interior design.

In any hardware store or online boutique, interior moldings are presented in the widest range. Buyers have the opportunity to purchase:
- Plastic.
- Polyurethane.
- Ceramic.
- Gypsum.
- wooden elements.

Each of these types of interior baguettes can be different shapes, thickness, have a different color. These artistic elements can be used not only for decorative ceiling decoration, but also for framing paintings, mirrors, niches, and furniture items. In order not to make a mistake in choosing, you need to know what features each of these species has.

More about some types
The plastic interior baguette in the interior in the photo is the cheapest, but quite a good finishing material. The advantages of plastic molding include moisture resistance, durability, lack of shrinkage and drying out, regardless of the conditions of use. Since plastic is an unpretentious material that is excellently workable, modding manufacturers offer decorative elements that imitate various natural materials to the buyer's choice.

In the catalogs you can find an interior frame in the photo, under a tree, gold, copper and other materials. A wide selection of decorative elements allows you to decorate any interior in an original way.

Polyurethane products have the ability to bend. Because of this, they are used to decorate radius and oval surfaces. If the room has a semicircular wall, polyurethane moldings will effectively emphasize the beauty of the design of the ceiling surface. What you need to know when choosing a polyurethane interior molding in the interior? It must be remembered that these products are made on the basis of rubber. They do not absorb odors, are easy to clean, and last a long time. Polyurethane is an excellent material that allows you to produce products of different widths, shapes and configurations. Therefore, polyurethane molding can be different in appearance and color.

Cosca products
In the market of trendy elements for decorating interiors, Cosca products are very popular. Through the use modern technologies and environmentally clean materials such as charcoal and polystyrene, interior frame Cosca, can be used in any room. These elements look great in the form of a frame on mirrors, paintings, as a frame for cabinets and other furniture items. Koska designers offer in catalogs wide selection decorative products to decorate any interior.

Installation rules
What you need to know in order to properly install the interior molding molding? First, you need to clean the surface on which the decorative element will be glued from dust and dirt. Then, the surface is leveled and primed. The primer will allow you to securely fix the frame on the wall. Before gluing baguettes, you need to make an accurate markup. This is especially important in rooms where there are no perfectly even corners. Marking is easier to carry out by attaching a baguette to the attachment point and marking it with a pencil. According to the markup, we prepare the required number of baguettes. After all the elements are docked and adjusted, you can proceed with the installation.

It is better to glue baguettes on liquid nails, carefully applying the required amount of adhesive to the decorative element. After the glue dries, the joints can be puttied and treated with fine-grained sandpaper. To achieve the best artistic effect, baguettes can be coated with acrylic or water-based paint. The result is a beautiful original decoration interior as shown in the photo.

Summing up
Wanting to effectively decorate a room, pay attention to the interior baguette. These products, presented in the Cosca catalog, allow you to decorate the joints between the ceiling and the wall in an original way. From baguettes, you can make a beautiful frame for a mirror, a picture or update old wardrobe, decorating the product with an artistic element. Among the numerous types of interior moldings, special attention should be paid to polyurethane products that bend perfectly, which allows you to decorate oval walls and interior design details.
When creating interiors modern houses and apartment designers are always looking for new ideas, and often use traditional materials in a new, non-standard role for them. The baguette was no exception, the main purpose of which is to frame works of art.
Baguette for us, first of all, is associated with frames for pictures and mirrors. And many do not know what creative potential and the possibilities are hidden in this amazing material! In this article, we will share with you a new look at the use of baguette in room decor.
Using a baguette in wall decor
The solution to using a baguette that is closest to the original, in essence, is the use of a baguette to decorate niches. In classic interiors, framing niches with a baguette can be an exquisite solution for decorating a room. A baguette can be framed with decorative niches, niches with sconces or mirrors. Where the use of a standard molding is not enough, and a more precise, individual stylistic approach and the use of certain decorative ornaments are required, the baguette serves great solution.
Using a baguette in ceiling decoration
Sophisticated and demanding customers will certainly appreciate such a solution as a ceiling decor using a baguette. You can use a baguette to decorate the ceiling around the perimeter or to accentuate the lighting zone, as well as to create complex decorative compositions from one or more types of baguette.


Finishing touch - framing lamps and fittings
If it is necessary to achieve complete stylistic unity and fit modern details into a classic interior, for example, large flat or recessed lamps, the use of a baguette again acts as an excellent solution to the problem. Sometimes even such details as sockets and switches are made out (see photo below).

Framing deep niches with a baguette
You can also decorate deep niches with a baguette, in which there may be objects of art and collectibles. Such a decision will make your interior more refined and draw the attention of guests to your collection. An effective and at the same time functional solution is the design of niches for placing plasma panels. Not only do you "put together" a TV, DVD player and stereo system, but you also get a convenient and aesthetically appealing storage system where you can place, for example, a collection of discs.


Headboard design using a baguette
The framing of the headboard for the bed with a baguette looks very elegant. At the same time, you can decorate both a wall headboard and a regular one. The right combination of baguette and headboard fabric will allow you to achieve a truly luxurious look for your bedroom.


Also, sometimes it is not the headboard itself that is formed, but the whole area of the wall behind it:

Unexpected solutions in the use of baguette frames
By creating modern interiors, designers tend to use new ideas, but sometimes they happen to apply traditional Decoration Materials in a new way for them. A simpler, but less obvious and unexpected way to use a baguette as photo frames, but in a very unusual way! A frame is created from a baguette, on reverse side which the hinges are installed. A cable is attached to the loops, and photographs are attached to the cable using ordinary, stationery or decorative clothespins:

Baguette frames as storage systems
A similar option is applicable for storing jewelry, in this case, cables, as well as a perforated sheet of metal, plastic, or mesh can serve as the basis. All jewelry will always be visible, and you will not have to go through them in a box for a long time, in search of what you need.

Another unusual solution with the use of a baguette for jewelry is the use of a baguette as the basis for creating drawers. This extremely luxurious and spectacular reception will be a great solution for storing jewelry at home, as well as for salons selling costume jewelry and accessories.

A few more non-standard ways to use a baguette
Unusual was the decision to use a baguette to frame shelves for cosmetics, as well as the use of baguette corners in the dressing room decor, in the shoe storage area. The idea of such a non-standard use of a baguette in interior design can be safely gleaned by shoe boutiques and nail salons, because with the help of this technique you can increase the focus on products and create stylish interior solutions.

So, the baguette known to all of us now appears in a completely different light, gaining new opportunities in decorating the interior of a house, apartment, salons and offices, and can become a real highlight of the interior, give it a unique charm and sophistication.
In the Gioconda Frame Design Studios network, we look at the frame not only in terms of using it to create frames or framing mirrors, but also as a material that has great opportunities for self-expression through creativity.
We will be glad to see you in our salons!
Baguettes on the ceiling are decorative plinths of different widths and appearance, which are used to aesthetically decorate the room and give it a harmonious look.
It is advisable to complete any repairs in the room with the installation of such skirting boards, because without them the ceiling joint with the wall will be ugly. The method of gluing baguettes is simple, but requires strict adherence to the instructions.
Properties and features of baguettes
Baguettes (other names: moldings, skirting boards, friezes, fillets) perform a number of practical and aesthetic functions. First of all, they are designed to elegantly design the transition from the wall surface to the ceiling. Also, baguettes perfectly mask small defects in walls and ceilings: drops, bumps, roughness. You can use baguettes with any type of finish: they are perfectly attached to concrete, putty, paint, wallpaper. The advantages of using skirting boards are obvious:
- a large assortment in shape, color, size;
- flexibility, the ability to bypass wall irregularities;
- ease and speed of installation;
- low price of most models;
- used in all interior styles.
Calculating the required number of baguettes is very simple. It is necessary to measure the perimeter of the room and divide the figure by the length of one product (usually it is equal to two meters). The result should be rounded up and a couple of skirting boards added for an unforeseen event, damage.
Types of baguettes
Depending on the material of execution, ceiling plinths are divided into the following types:
- Foam. Polystyrene (polystyrene) is the cheapest and lightest material. Baguettes from it are attached to glue, putty and are securely held on the surface. Due to low moisture resistance, it is not recommended to use them in rooms with high humidity.
- Polyurethane. These are expensive and high-quality baguettes. Polyurethane can be used in any operating conditions, it has a smooth surface, density, it can not be painted.
- Gypsum. They are characterized by low moisture resistance and can be damaged by physical impact, but they are very beautiful, give the overall picture of the room an expensive look. Most often they are mounted in public places, hotels, restaurants. For rooms with ceilings below 3 meters, the use of gypsum moldings is impractical.
- Wooden. Lightweight baguettes can be attached with glue, heavier ones - only with self-tapping screws, screws. Wood products are allowed to be painted, they are resistant to mechanical damage, but are not suitable for the bathroom.
- Plastic. This type of baguettes is not subject to staining, but practically does not react to humidity and can be installed in any room. Primarily plastic skirting boards used in conjunction with stretch ceilings.
For long narrow rooms a good option- wide baguettes. In a room with low ceilings, it is worth sticking thin skirting boards. For lush classic interiors large, pompous-looking stucco products are perfect, while for hi-tech and minimalism they buy modest white baguettes without relief and patterns. To make the walls taller, the baguette should match the color of the ceiling, and to visually lengthen the room, it is matched to the shade of the walls.
The choice of glue for a baguette
All compositions suitable for gluing can be divided into silicone, acrylic and polymer. First you need to purchase the skirting board itself and only then buy glue for it, because the composition should ideally match the finishing material. The cost of adhesives is varied, but there is no need to save too much: with low adhesion, the baguette will quickly come off, often this happens even during painting. Heavy fillets are additionally attached to self-tapping screws, the caps of which are then carefully covered and painted over.
Adhesive putty for plinth
The easiest way to use for gluing baguettes is the usual finishing putty or drywall finishing compounds, which often remain from the main repair. Acrylic mix, which is sold as a dry powder in bags, is best suited. This mounting method has a number of advantages:
- quick adhesion to the base;
- reliability, good adhesion;
- savings (if putty was purchased for other work);
- environmental friendliness of the composition;
- no smell, the ability to apply without airing the room.
There are also disadvantages to using putty as an adhesive. Applying it in a very thin layer is quite inconvenient, because the baguette is narrow and long. Before use, each batch of dry mix will have to be diluted and the floor covered. The last point is related to the difficulty of removing dried material from any surface. With inaccurate application, pieces of putty can stick out from under the plinth, so you need to work carefully, without rushing.
Adhesives for special purposes: "Moment", "Titan"
Professional adhesives have a high viscosity and a sufficient degree of adhesion, do not spread and can hold heavy types of baguette. They are widely used by experienced craftsmen because they are easy to use, economical and dry very quickly.
Special adhesives also have disadvantages. Most of them contain solvents in the composition, so after gluing the baguettes there will be bad smell and the room should be regularly ventilated. For fragile, thin foam that does not have a polymer coating, such products may not be suitable: they will spoil the inside of the baseboard, dissolve it.
Liquid Nails
Glue of this type is perfectly combined with all types of ceiling baguettes. Due to the high adhesion and adhesion, liquid nails hold even heavy products on the ceiling without losing strength for many years. The skirting boards glued by them can be washed, repeatedly painted, the adhesion quality will not be disturbed.
For work with ceiling fillets, the following types of liquid nails are used:
- Neoprene. Differ in moisture resistance therefore are recommended for work in wet rooms. The composition contains organic solvents, therefore they are harmful to health until completely dry and require regular airing of the room.
- Acrylic. They are used only in dry rooms, because they are diluted with water and do not contain solvents. They are less resistant to the action of damaging factors, but they are considered environmentally friendly, they can be used even in children's institutions.
How to fix baguettes on the ceiling
There are two the right way gluing ceiling moldings. The first is attachment before wallpapering, the second is gluing directly to the surface of the wallpaper. The technology of carrying out the work, depending on the chosen method, will be different. In any case, before starting the installation of the baguette, you must wash your hands clean so as not to stain the snow-white products, and also take care of safety (put on a respirator, ensure the room is ventilated).
Surface preparation
If the base is clearly uneven, before gluing the fillets, it will have to be leveled with plaster, putty, which is especially important when working with gypsum and wooden skirting boards (they are less flexible). The closest attention is paid to the ceiling and walls in the corners: there all the irregularities after attaching the baguettes will become most noticeable. Minor defects can be left unchanged, but then it is better to use polyurethane or polystyrene foam baguettes, which easily hide such defects.
For puttying, a suitable dry mortar is purchased, a portion is diluted with water according to the instructions. Fill with a mass of recess. To give the wall a perfect evenness, a thin layer of putty is then applied over the entire area. The last layer is made the finishing one, using a fine-grained snow-white mixture and leveling the mass with a wide spatula. The ceiling is prepared in the same way (at least in the place where the baguette will come into contact with it). If the ceiling is even and painted, its preparation is not required.
It happens that the wallpaper is already pasted, and only the baguette needs to be changed. In this case, it is necessary to prime the areas that will be pasted over with a plinth, let the primer dry. After the installation of the plinth, before painting, the part of the wallpaper in contact with it must be closed masking tape not to get dirty.
For laying the LED strip, it is recommended to make markings in advance, ensuring that the baguette does not fit tightly to the ceiling. Usually a line is drawn with a pencil 3 cm from the ceiling - the upper border of the baguette will pass along it. There is another marking option: drive in cloves at the right distance, pull a thread that you can navigate when installing the plinth.
Baguette preparation
Professionals immediately cut baguettes for convenience, then you do not have to be distracted by this process in the midst of work. But beginners should not do this, it is better to take all measurements and cuts directly during installation. If possible, baguettes are glued without joints, making them whole. Details in the corners (external and internal) are cut with a miter box, although experts often do this by eye.
Materials and tools
To work, you will need the required number of baguettes and glue, as well as some fixtures and tools:
- brush or spatula for applying glue;
- glue gun for liquid nails;
- stationery knife;
- miter box;
- masking tape;
- rags or wet wipes.
How to glue a polyurethane baguette
- apply glue to the fillet (on a thin, light one - pointwise, on a heavier one - in several continuous lines);
- wait the time specified in the instructions until some drying of the glue;
- attach the part to the wall, press firmly with your palms, hold for a few seconds or minutes (depending on the type of glue);
- moving further along the perimeter, each time accurately measuring the length of the next part, glue the plinth throughout the room.
After finishing the installation of the baguette, you need to let the glue dry completely, then putty the joints. Finished seams should be wiped with fine sandpaper, baguettes should be painted along the entire length.
Installation of wooden skirting boards
Usually wooden baguettes are used for interior design in classic, eco and country styles. Such products look best with a wooden ceiling. They have a lot of advantages: environmental friendliness, attractiveness, resistance to mechanical damage. Usually, liquid nails are used to attach light wood baguettes, and work in this case is carried out in the same way as described above. Heavier products are fixed in a different way:
- make a careful marking of the walls;
- prepare the first baguette - cut it for a quality fit of the next one, measuring the angle in the miter box;
- lubricate the wrong side with liquid nails for convenience;
- apply a baguette to the wall;
- securely holding the product, attach it with self-tapping screws, driving the hats as deep as possible;
- fill the entire perimeter of the room with baguettes;
- seal the caps of the self-tapping screws with putty on wood, after drying, clean it with sandpaper;
- the joints are also puttied, treated with sandpaper, varnished in the color of the baguette.
How to fix a pvc skirting board
Most often, such baguettes are used when decorating walls, ceilings. plastic panels in the kitchen, bathroom, veranda. Often they even come with panels in the kit, have a special groove inside for fastening and are installed only at the moment of attaching the panels.
First, mount the frame under plastic trim, whose rail on the ceiling or wall will become the basis for baguettes. The latter are attached with staples or self-tapping screws directly to the frame, pre-measured to size and sawed with a hacksaw.
For the design of joints, corners, special connectors are used, which are put on glue for reliability. If the installation turned out to be inaccurate, and there are gaps between the skirting boards, they are smeared with transparent or white silicone sealant.
Fixing the ceiling plinth to the stretch ceiling
In this case, the baguette will close the junction of the wall and ceiling without being attached to the canvas. A small gap is left between the baseboard and the ceiling, or it is made larger for ease of installation of the backlight. The easiest way is to glue baguettes made of PVC, polyurethane or expanded polystyrene with a wide vertical side to the stretch ceiling. The only difference in the work will be that the glue is applied only to the vertical of the baguette, and the end in contact with the canvas remains clean. Otherwise, the technology is similar to that for attaching other types of baguettes.
The process of gluing the ceiling plinth
In each method of installing skirting boards, there are certain nuances and features that the master needs to take into account.
Skirting sticker over wallpaper
This method has to be applied if there is already wallpaper in the room, and only baguettes are to be replaced. The advantage is that they hide burrs, uneven edges of the wallpaper: all defects will be securely sealed. The technique also has a minus: if necessary, change the wallpaper, you will also have to tear off the ceiling plinth.
The order of work is as follows:
- cut the ends of the baguettes with a miter box;
- coat the back of the plinth with glue;
- attach the product to the wall, adjusting to the ceiling;
- press, hold as much as indicated in the instructions;
- remove excess glue with a damp cloth;
- glue the top of the wallpaper with masking tape;
- seal the joints of the skirting boards with sealant, putty, completely paint the products.
Fixing the skirting board before wallpapering
The difference between this technique is that at first the baguettes are glued to the ceiling, then all seams, gaps are sealed with putty, sealant, and only after that they proceed to the final decoration of the walls with wallpaper. In order for the wallpaper line to be perfectly even, they are glued with a margin, and then carefully cut off with a sharp knife strictly under the baguettes.
Installation of skirting boards in corner joints
Docking baguettes in the corners is the most difficult stage of work. The overall appearance of the room, especially the ceiling, will depend on the quality of the trimming of the products. To cut the skirting boards, you will need a miter box, which you should practice with in advance on small unnecessary pieces. The plinth must be placed in the miter box as it will be located on the ceiling, the lower part should be pressed against the side of the tool. Make a cut to make a 45 degree angle. This is true for a room with even right angles (90 degrees). If the angle is not straight, it is adjusted to the desired value using sharp knife manually. Do not allow the appearance of burrs or immediately carefully cut them with a knife.
You need to glue the fillets in the corners like this:
- lay the products together on the floor, check the accuracy of the joints;
- cut with a knife interfering areas, if necessary;
- grease the skirting boards with glue, attach them in turn to the wall surface;
- press, withstand the prescribed time until the glue dries.
Baguette mounting technology
Depending on the type of skirting boards, there are a number of nuances that must be taken into account during installation.
Lightweight foam models
If there is concern that the skirting board will not hold between the wall and the surface, and the base is defective, it is recommended to use models made of expanded polystyrene. They are so easy to use that when gluing on the wallpaper, the base does not require any preliminary preparation at all.
Instructions for using light skirting boards:
- mark the wall with a pencil, marking the bottom edge of the fillet;
- take the details, cut them according to the size of the walls;
- for cutting at the corners, use a miter box, a sharp knife, a special file for polystyrene;
- in the absence of experience, you can draw the required angle on cardboard, and then apply it to the end of the product before cutting;
- grease the back of the baguette with glue, let it dry a little;
- attach the part to the wallpaper, aligning it along the drawn line;
- immediately remove excess adhesive with a rag;
- press well, fix the fillet;
- glue all the remaining parts.
Heavy polymer products
Sometimes relief baguettes made of gypsum, polyurethane are attached between the wall and the ceiling. It is undesirable to glue them on the wallpaper, because the latter may not withstand such a heavy "burden". Therefore, the order of work will be somewhat different:
- cut parts, including corners;
- draw a line on the wall along which the lower edge of the plinth will pass;
- slightly above this line (by 1-1.5 mm), with a sharp knife, cut through the wallpaper to the full thickness;
- if the wallpaper is wound under a stretch ceiling, also make a cut 0.5 cm below its level;
- pry off the cut-out strip of wallpaper with a spatula, remove it (if necessary, additionally sprinkle the wallpaper with water);
- it is good to clean the wall of paper residues and other contaminants, prime it;
- stick the plinth in the standard way.
wooden structures
Wood products are even heavier, so they need to be fixed much more reliably. Fragments of skirting boards are cut with a hacksaw according to the size of the walls, in the corners - by 45 degrees. The ends are sanded with sandpaper so that the joints are neat. Next, they make markings according to the width of the plinth around the entire perimeter of the room and drill the details with self-tapping screws, deeply sinking the hats.
Additionally, you can use gluing on liquid nails so that the baguettes are held on the wall and do not change position during drilling. After the skirting boards are sanded, puttied, varnished or painted.
How to glue gypsum baguettes on the ceiling
The procedure for working with such skirting boards will be similar to the previous options. The only difference is that the gypsum fillets are placed on a thick layer of gypsum-based finishing putty. The rest of the mass is removed with a spatula. It is important to cut the corners and ends very evenly, avoiding the appearance of notches, they will greatly spoil the appearance of the finish.
Over time, any skirting boards, even the most expensive ones, can turn yellow. Therefore, it is recommended to paint them in order to give a more aesthetic appearance, and also to hide all joints and defects for sure. So baguettes will look beautiful and last longer without requiring replacement during each repair.