How to make a staircase with your own hands. DIY wooden ladder How to make a wooden ladder yourself
Modern suburban or country houses they rarely build one-story buildings, mainly two-story, three-story or one-story buildings with an attic floor. In this case, there is always a need to somehow make high-quality movement between floors possible. A good solution would be to manufacture wooden stairs that could provide a comfortable entry and carry of heavy furniture or equipment. Let's just say that this is not an easy task. And if it is possible to order at least a project or even finished staircase elements from the manufacturer, then it is better to do so. Well, if you are confident in your abilities, have carpentry skills and free time, you can try to make a staircase yourself. Within the framework of this article, we will briefly talk about what design stairs are, how to perform the calculation and how to make a staircase.
Construction of a wooden staircase
It is necessary to choose the design of the stairs based on the space that can be used, the convenience of location, configuration and lifting, as well as for aesthetic reasons.
Conventionally, all wooden stairs can be divided into spiral and mid-flight.

Spiral stairs are used quite rarely. Mostly in extremely tight spaces. The second reason may be the desire of the owner - for aesthetic reasons. It is worth noting that the spiral staircases are not very functional. For example, it is extremely difficult to bring heavy furniture along it. In other words, it can serve only for the descent - ascent of one person. For its manufacture, complex calculations will be required, since it will rely on one pillar - a support. The slightest mistake in the calculation of strength can lead to sad consequences.
Marching stairs- the most common. They consist of their marches, they are also called "flight of stairs", i.e. directly the steps and platforms that separate the marches. Marches can be either one or several. And there may be no platforms at all if the stairs are single-flight.
Marching stairs can have a different design, you can see them in detail in the diagram below.

There are straight marching stairs. At the same time, they can be single-march and two-march, separated by a platform for ease of movement. Such stairs can be located against the wall or not lean against the wall at all. characteristic feature straight stairs is that they take up a lot of space.
Most often, to save space and ease of use between floors inside the house, two-flight turning stairs are made. The rotation can be right angle (90°) or any other angle up to 180°.
The march can have a curved design with a convenient angle for entering the stairs. In this case, all steps can also be rotary.
Also, two-flight and three-flight stairs may not have platforms, but only turning steps.
In order to choose the right staircase design for a particular situation, it is necessary to measure the free space that can be used under the stairs, make small calculations and draw a drawing. The drawing should show how the staircase is located, whether its elements interfere and how comfortable it will be.
Elements of wooden stairs

The above photo shows the elements that make up the stairs, and their names are indicated.
Kosour is a load-bearing beam that supports steps and risers from below. It bears all the loads.
bowstring also performs a support-bearing function. At the same time, there are recesses in it, into which the steps are inserted with the butt. This design is used on the one hand, if the staircase is adjacent to the wall, and on both sides - if the march is sandwiched between two walls. The bowstring is less preferable than the kosour due to the fact that it is not able to withstand heavy loads. Therefore, even if the stairs adjoin the wall, they still try to complete it on the stringers.
steps for stairs - wooden beams, consist of a tread (horizontal) and a riser (vertical). We step on the surface of the tread with our feet. And the riser is a vertical beam under the step, which encloses the tread space and performs a supporting function. It is possible to make stairs without a riser, in which case the step space will be free, the leg will not rest, but the structure will be less durable and reliable.
Steps can be rectangular, radius for a beautiful entrance to the stairs, turning at a certain angle to replace the dividing platform and running - the first step of a non-standard shape.
railing for stairs - wooden balusters and handrails. Their shape and size may vary. Basically, railings are made to order, in the form that the customer wishes.
If the staircase is more than one-flight, its design includes support post or pillars at the turning points of the stairs.
Before proceeding with the manufacture of stairs, it is imperative to make calculations and complete a drawing. Wooden drawings for stairs are made both independently and with the help of special architectural programs. In the latter, you can also perform calculations. A good solution would be to contact companies specializing in wooden stairs. So you can be sure of the quality and accuracy of the calculations.
Calculation of a wooden staircase
Number of steps and riser height
To determine the height of the stairs, we measure the distance from the base of the finished floor of the first floor to the finished floor of the second floor. If the finishing floor is not yet equipped, then its dimensions must be laid on the basis of "by eye". Because the wooden staircase becomes only on the final floor. In this case, we assume that the height from floor to ceiling is 250 cm, the thickness interfloor overlap together with the floor - 35 cm. Total 285 cm.
We make a calculation, starting from the height of the riser. The fact is that most often this size is standard and ranges from 15.2 to 19.7 cm. It is believed that this height is the most optimal for ease of use. Smaller - will knock down the step. Large - too heavy to climb and difficult to descend. From this interval we take the average value (you can take any) - 17 cm.
Number of steps = ladder height / riser height;
Since the number of steps cannot be uneven, we round up - 17 pieces.
In doing so, we have two options. We can make the first winder step small, and the rest with a riser of 17 cm. Or we can recalculate and get a more accurate, but uneven result.
To do this, we divide the height of the stairs by the number of steps: 285/17 \u003d 16.76 cm.
So we can complete 17 identical steps with riser height 16.7 cm.

It is believed that the minimum tread width for convenience should be 22 cm, and the maximum 37 - 40 cm. If less, it will be difficult to descend, if more, the step will go astray.
For a more accurate calculation, there is a dependence:
- 2a + b = 64 cm;
- a + b = 47 cm;
a - riser height;
b - tread width.
Let's try the second formula: 47 cm - 16.7 cm = 30.3 cm. This width is quite acceptable, we can round it up to 30 cm.
For the sake of interest, we calculate according to the second formula: 2a + 16.7 = 64; a = 23.65 cm. This width is too small, so we will use the data obtained from the previous formula.
The width of the march of the wooden stairs
In principle, the width of the march is not strictly regulated in any way, but the number of marches will depend on the place that can be used for the stairs.
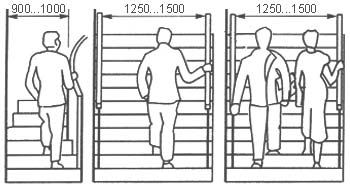
It is believed that the minimum comfortable width of the march is 80 cm. If the stairs are narrower, there will be difficulties with the passage of full people or with the passage of furniture. Options from 100 to 140 cm will be successful.
In order for the whole structure of the stairs to look organic, you can use the following hint: the width of the march should be a multiple of the width of the tread. In our case, these are 60 cm, 90 cm, 120 cm and 160 cm.
Ladder length
To calculate the length of the stairs, we need only two values that we have already calculated, this is the width of the tread and the number of steps.
Stair length = tread width * number of steps(without the last one - it will be the floor of the second floor);
30 * 16 = 480 cm.
4 meters and 80 cm- a rather large length, which "eats" a lot of space.
Therefore, if it is not possible to equip such a staircase in one flight and straight, you will have to change the design and make it two-flight with a turn of 180 °. In this case, you can make a dividing platform, or you can make turning steps. It is most convenient to make such calculations in special programs, where the location of the elements of the stairs will also be clearly visible.
Clearance height above steps

An important parameter. The beginning of the flight of stairs almost always falls under the ceiling, thus reducing the free space above the head of the person walking up the stairs.
Even at the stage of creating a drawing, it is necessary to calculate the height from the highest step, located under the ceiling, to the ceiling. The minimum allowable value that can provide a comfortable entry to the stairs, even the most tall people, is 195 - 200 cm.
Stringer length
Calculated using the Pythagorean theorem.
Ladder length2 + ladder height2 = kosour length2;
4802+2852= stringer length2;
230400 + 81225 = stringer length2;
Stringer length = 558,23 cm. We take with a margin of 560 or 580 cm.
How to make a wooden staircase

by the most simple solution will order from the company a project and ready-made elements of the stairs, with all the necessary cutouts. All elements will be numbered. After the unassembled stairs are delivered to the construction site, wooden stairs are assembled according to the attached drawing and diagram. So you do not have to buy a special tool for trimming and dusting around the house.
We buy material for a wooden staircase
If you decide to do self-assembly wooden stairs, start by buying building materials.
For bowstrings or stringers, a beam of 50 * 250 mm is required. Its minimum width can be 150 mm, if the design of the stairs allows.
For risers, we purchase beams with a minimum thickness of 25 mm, you can take thicker ones.
For beam treads, it is better to take from 30 to 40 mm. And you can the same as for the risers.
We order handrails and balusters from the manufacturer or buy ready-made ones, since in order to make them yourself and beautifully, you need to have considerable experience, knowledge and skills.
Install stringers or bowstrings

We cut the beam, which we bought for the stringers, from above and below so that we get the required length of the stairs. Then from below we cut off another thickness of one tread, i.e. 5 cm
Important! The fact is that when we did the calculation of the number of treads, we did not take into account the thickness of the steps. It is really not important for the whole structure, except for the first step - its height does not increase by the thickness of the tread.


We cut off the excess. It is better to use a jigsaw or a saw. But for lack of it, you can use a hand saw.
Then we attach the kosour to the place where the ladder will stand. Its upper edge should rest against the ceiling, and the lower one should rest firmly against the floor of the first floor. We check the horizontalness of the cuts for the steps.
Important! We need two such stringers, but depending on the loads that the staircase must withstand, there may be more stringers. In this case, we cut out all the others, using the first one as a template.

Thoroughly sand all surfaces. If necessary, we mill the outer edges, making roundings (for beauty).

At the bottom and at the top of the stringers must be connected to each other by a beam. To do this, cut them a quarter from the bottom and top. We fix to a thick beam with anchor bolts. If it is possible to fix the stringers to the walls, then we also use anchors.
If we use one bowstring, then it must be cut to the required length. Then cut out holes inside with a cutter - recesses for steps. The bowstring is fixed to the wall with anchors.
Important! Checking correct location bowstrings and kosour on the other hand, they should be located on the same level so that the steps do not have a slope.
Install steps and risers
After the stringers are tightly fixed, we begin to put the risers.
To do this, we cut the beam into the required number of risers of a certain length. We level them relative to each other and sand them.

We fix it to the kosour with self-tapping screws on the front side. Then we putty them or hide them under decorative elements. You can also use special glue.
When all the risers are installed, proceed to the steps - treads.
To do this, we also saw the beam into the number of steps minus one. Then we skin their surface and mill the protruding outer edge with an angle.

Then we put them on top of the risers and fix them with self-tapping screws or screws.
Important! If we use the bowstring on one side, then we insert the step into the groove cut out in the bowstring, having previously glued the edge of the step and the hole in the bowstring.

We install the balusters on the steps and fix them with studs 100 mm long and 8 mm thick.
From above we install and fix the railing with self-tapping screws.
At this point, the work is completed, only the painting of the wooden stairs remains. For better preservation of wood, while preserving its natural beauty, you can use special transparent varnish coatings.
In this article, we examined the manufacture of a single-flight straight wooden staircase with our own hands. If the project involves a staircase of a different design, then the installation will be different. For example, for a two-flight staircase, the platform and the supporting column are first installed and fixed, and then the stringers, risers and steps are already installed. Some steps in this case may not be straight, but rotary and rounded.
If you have already built two-storey house or you are the owner of a two-level apartment, then the topic of building a staircase on the second floor will be of interest to you.
In order to acquire a comfortable and high-quality ladder system, you have only three ways: buy a ready-made structure in a specialized store, order the necessary model from a carpenter, or make a ladder with your own hands.
For those who chose the third option, this article is devoted. In it you will learn a lot useful information about the staircase design, as well as get acquainted with step-by-step detailed instructions for making stairs in photos and videos.
For owners of a two-level dwelling, the staircase of the second floor is a necessary attribute of the interior
What are the stairs - a little theory
Before you start building stairs with your own hands, you need to decide on the type of construction that will be most suitable for your home.
Types of stairs by design type
We will choose a system from three types:
- Marching.
- Screw.
- Combined.
Let's take a look at each of them a little.
Marching
This type is the easiest to manufacture and therefore, if you decide to make a staircase with your own hands, then this option will be the most suitable for you.
 Single-march designs, despite their apparent simplicity, can be beautiful and spectacular.
 Marching stairs, in turn, are divided into types:
- single-march;
- two-march;
- multi-march.

Both the first and second types are considered not difficult to manufacture and are in the greatest demand.
screw
Such stairs are a spiral going up to the second floor. This type saves a lot of room space, but it is labor-intensive in production.
 The spiral staircase is original and beautiful, but it is better to entrust its production to professionals.
 Combined
These systems combine the two previous types. Their manufacture is the most difficult and therefore not suitable for independent construction.
 Combined systems are more complex in production and it will be quite difficult for a beginner to mount them.
 We make a ladder with our own hands - instructions for making
First, we will determine the material of manufacture and prepare the tool necessary for the job.
Material selection
For the production of a ladder structure, you can choose:
- wood;
- stone;
- concrete;
- metal;
- plastic.
 For the manufacture of stairs, you can use the most various materials
 by the most suitable material for self-manufacturing stairs is, of course, natural wood. Its advantages are obvious:
- environmental friendliness and safety;
- non-toxicity;
- ease of processing;
- relatively economical price;
- long service life.
Therefore, for the construction of our stairs, we will choose natural wood. It is best if it is pine wood - spruce, pine. You can also use ash, beech, maple, oak, birch and other species.
 Natural wood is the most the best choice for the production of stairs with their own hands
 So, we have decided on the type of construction being erected - this is a mid-flight staircase. They also chose the easiest to process and environmentally friendly material - natural wood. The next step is to prepare the necessary tool.
Cooking tool
To make a wooden staircase with your own hands, we need:
- Measuring devices - tape measure, ruler, level.
- Electric drill of manual type.
- Hacksaw for woodworking.
- Screwdriver.
- A hammer.
- Electroplaner.
- Sandpaper.
 Optimal set necessary tools
 Preparing the basic elements
Before installing the ladder system, it is necessary to prepare the following details:
- Processed boards of the required dimensions (according to the drawing).
- Bars for the production of steps.
- Step boards.
- Bowstrings or stringers (depending on the type of construction).
- Railings, balusters, handrails - these parts can be bought ready-made.
- Fasteners - screws, screws, bolts.
 This figure shows in detail all the components of the structure.
 The main stages of installation
In order to make a high-quality staircase with your own hands, use the following manufacturing instructions in photos and videos.
Stage 1. Schematic drawing
Let's draw a drawing on which we denote the main elements of the future design.

Stage 2. We perform the necessary calculations
Performing design calculations is probably the most exhausting process, but it still needs to be done. You can do this in a few steps:
- determine the height of the structure - to calculate it, measure the distance from the floor plane of the first level to the floor of the 2nd floor. This will be the length of the march;
- we determine the height of the steps - usually the most optimal height for a person of average height is 17 centimeters;
- we calculate how many steps and risers are needed - for this, we divide the height of the stairs, which we have already measured, by the height of the steps (17 cm);
 Before making a ladder, it must be calculated
 - step width - for convenience when walking, the smallest value of this parameter should be 22 cm, and the largest - 40 cm.

Stage 3. Making a kosour
We cut the beam prepared for this part to the desired size and cut out the notches right size to install steps.

Stage 4. Checking the kosour
To do this, we attach it to the place where the stairs will be located, if necessary, we make adjustments to the part.
 This diagram shows detailed calculations of the kosour
 Stage 5. We fasten the stringers
We attach the stringers and fasten them together to the upper beam using anchor bolts.
 We securely fasten the stringers with anchor bolts
 Stage 6. Installation of risers
Attaching the risers to the stringer is carried out using self-tapping screws.
Modern a private house must be equipped with a ladder for movement on upper floors or attic space and the usual stepladder is unlikely to fit here. It is necessary to build something more reliable and durable. For example, a staircase made of solid wood. A wooden staircase with your own hands will require special care at all stages of its manufacture.
Advantages
Wood is the most environmentally friendly and easiest to process material that does not require special processing skills. It can be used both for intra-apartment structures and for the porch of a house. Stairs on metal frame are considered much more reliable, but now we are not talking about them.
Fully wooden structures, which can be assembled as a constructor, have the following advantages:
- acceptable price;
- the availability of the material;
- easy processing.
The most common material is pine. This is an inexpensive soft wood, well suited for beginners. The disadvantage of pine is the softness of the texture, due to which, during operation, the structure may begin to darken, and the steps creak, if the necessary wood processing is not carried out before the start of construction or a porch made of similar material.
When building a more reliable, beautiful and durable staircase, it is better to use expensive varieties. Stairs made of solid beech, oak or larch have an inimitable structure and increased wear resistance due to the density of this material. The only drawback of these breeds is the high price.
Design
How to do wooden stairs for a porch or for a house made of solid oak, pine, ash and larch? Before studying the manufacturing instructions, talking about the frame and components, you need to figure out what types of wooden structures you can assemble with your own hands. Conventionally, marching and spiral staircases can be distinguished.
Screw structures are used in rooms with limited space. These structures are not suitable for moving large objects and can only be used for human movement. Such a staircase will never be completely wooden, since the support (rod, pipe) is made of metal.
Marching stairs are the simplest in execution. This kind of wooden structures on stringers or bowstrings are mounted both indoors and outdoors (mainly for the porch, which, as a rule, is located on a metal frame). Ergonomics is the main criterion for interior installation. That is why it is not so important which staircase will be built in your room - one-flight, two-flight with a platform, or a design with winder steps. It is worth noting that it is not much more difficult than a straight line.
The main thing is that it fits perfectly into the space allotted to it and harmonizes in style with the engineering elements surrounding it. A wooden staircase inside the house is, first of all, warmth and comfort. These are not unpretentious stairs for the porch and not welded structures on a metal frame. To choose the right type of staircase design, you need to measure the area on which the staircase will be located. Then make initial calculations and draw drawings. A detailed drawing will show the location of the structure in the room and how ergonomic it will be.
Elements
Making wooden stairs from solid wood will require some knowledge about the elements of stair structures. Let's understand the terminology.
- Bowstring - a supporting beam and an element of additional fasteners for steps, located at the end of the latter.
- Stringers are the most common way of manufacturing wooden staircases. In the bearing parallel beams, cuts are made, on which the treads are laid.
- Treads - the surface of the step.
- Riser - the vertical part of the step, mounted (if necessary) between the steps, closing the visible space.
- Balusters - an element of the fence, gives the structure additional rigidity and strength. Attaches to stairs and railings.
- Poles (or support rod) - are installed mainly during the installation of screw structures as the main (central) bearing element.
- Railing - part of the enclosing structure of the stairs, mounted on top of balusters or fastening spokes.
- Decorative elements - decorative overlays, plugs.
On bowstrings or stringers?
Stairs for the house on bowstrings and stringers are equally simple when self-manufacturing. You should understand the difference between them. The bowstrings are fastened from the end of the tread with the help of corners, grooves and wood glue or with the help of bars. All this is fastened with self-tapping screws or bolted connections.
Stringers are located under the steps and are fastened with special fastening fittings.
For the production of bowstrings and stringers, blanks from solid oak, ash, pine and larch are most often used. These tree species are most common in the vastness of our country. For the manufacture of load-bearing elements at woodworking enterprises, machines are used that dissolve logs onto an unedged board of the required thickness (and the load-bearing parts are at least 50 mm), when trimmed, a finished beam is formed (50x50, 50x100, etc.). If you decide to assemble the design on bowstrings with your own hands, we recommend that you familiarize yourself with.
Milling bowstring under the steps
Making a kosour
Calculation
To make accurate calculations and draw up a drawing.
- The angle of inclination of the stairs should not exceed 45 degrees.
- The depth of the tread should not be less than 250mm.
- The height of the riser is in the range of 160-200mm.
- The minimum opening width is 1000mm.
- The height of the railings (handrails) should not exceed 1000mm. For children, additional handrails are installed at a height of 600mm.
- The vertical opening should not be lower than 2000mm.
Applying these simple rules you can build a correct and convenient staircase for the house or for the porch.
Important!
It should be remembered that the topmost step should be flush with the floor of the second floor, this applies to both concrete and wooden floors.
Marking and manufacturing of elements
Consider detailed instructions about how to do wooden stairs for home. After detailed calculations and analysis of the drawing, you can proceed to the layout and manufacture of structural elements.
- We apply markings on bowstrings or stringers. To do this, it is convenient to use a right-angled triangle or a special corner with marked legs (riser height and tread width).
- We measure the length of steps and risers, as well as other elements that we will cut out ourselves.
- We cut out all the elements of the staircase structure using an electric saw.
- We sand all the wooden blanks of the stairs.
- If there is no opening for passage to the second floor, it must be organized by dismantling part of the floor.
Assembly and installation instructions
The assembly of stairs for a house on wooden stringers or bowstrings begins with the installation of load-bearing elements. Rigid fixation at the upper and lower points is carried out using angles, threaded connections, or anchors (depending on the material of the ceiling and floor). Before the final fixing of the supporting structures, it would be nice to once again check the coincidence of the horizons. To do this, use the level laid on the horizontal "cuts" (the place of attachment of the future tread). If the stringers were cut according to one pattern, then you should not worry too much. So do not be lazy during the assembly process once again look into the drawing and keep a measuring tool at hand.
Log ladder
Quite often the question arises: “Is it possible to make a ladder out of a log?”. Yes, you certainly may. It cannot be made from just one log. Let's look at the options.
The logs are sawn in half. Steps and load-bearing parts will subsequently be made from these blanks (one might say massive “bowstrings”). For convenience, let's turn to simple project- straight stairs. After processing the front side with an electric planer and an emery wheel, we proceed to marking inside. Steps and fasteners will be fixed to it (the steel corner is the most suitable option for such a massive structure, it is fastened with a threaded connection or anchor).
We install our bowstrings, fixing them on the ceiling and on the floor. In accordance with the markup, we attach bars to the bowstrings with self-tapping screws that will support our steps from half-logs (choose the width yourself). Immediately before fixing, we check the level of the horizon of each step. We drill a hole through the bowstring to the end of the step, while not allowing it to move. We lay the anchor and tighten it until it stops. There are four anchors per step. A little secret of fasteners - for greater reliability, drop inside the drilled hole silicone sealant, and then already lay the anchor. head anchor bolt can be hidden away.
For the installation of such a ladder, threaded connections can also be used with the organization of hidden “windows” in the steps for tightening elements, but this requires serious skills in working with wood. Such a construction from a log is much more reliable. You can also make steps for a porch staircase from a log, which is also very interesting.
Some manage to create something remotely resembling a ladder from one solid log, laying it at the right angle, and cutting into it, like steps. It would be more correct to lay two logs in parallel as load-bearing stringers, make cuts in them for steps and attach the latter to the load-bearing parts. So you can make a ladder out of a log. It remains to add that similar design, if it is done correctly, it will be no worse than concrete in terms of reliability. As you can see, marching structures are quite simple to install. If we talk about screw, then everything is somewhat more complicated. However, you can install.
Do-it-yourself log ladder
Finished product processing
All elements of the ladder structure are securely fixed and sanded. It remains only to process the surface of the porch or stairs for the house by special means protection from insects, from decay and to give a beautiful appearance.
Intra-house stairs should harmoniously fit into the interior of the room. Therefore, a varnish coating is used to process these structures. If necessary, the stairs can be tinted in suitable shades with colored varnish, stain, or bleached (this technique is now very popular).
The whole processing process can be divided into three main processes:
- grinding;
- primer;
- varnish protection.
Advice!
When choosing materials for processing, it is better to give preference to alkyd and urethane varnishes.
It is very good to process the porch of a wooden house with drying oil applied in several layers. This will prevent the structure from rotting, and extend its life.
For a beginner without certain skills in working with a tool, it will not be easy to build a staircase on your own. However, it is possible. The main thing is to correctly calculate and accurately mark the structural elements. Installing precisely calibrated parts will not be a big hassle.
Professional manufacturing and installation of wooden stairs
About Tom, with your own hands for the stairs and for the porch.
Make a ladder with your own hands.
You can do everything with your own hands if you have the right hands, a set of tools, and most importantly, you want to make wooden stairs with your own hands. In this case, this article will allow you to try making stairs with your own hands and make a simple staircase to the veranda, which will cost as much as a budget staircase when you make a simple staircase, spiral staircase with your own hands, too, will be within your power. In the course of the “ladders with your own hands” process, you will have to solve a number of questions: the technical calculation of the stairs, it would be nice to sketch a simple diagram of a ladder with your own hands, a drawing of what you will do when you decide to make wooden stairs with your own hands. To make the stairs yourself, you will need tools: a wood saw, a building level, a planer, sandpaper, a metal ruler, a pencil, a hammer, paint brushes, a drill, a screwdriver. From the materials for the process "ladder in the house with your own hands" you will need: wooden planks 100x20x2.5cm, timber 150x25x5cm, timber 100x5x5cm, to make balusters with your own hands, nails 10cm, 7cm, screws L=10.15cm, drying oil, stain, varnish, impregnation against decay, impregnation against woodworms. In the course of work, some more tools may be required, but a very complex and special tool is not used in the construction of stairs, so there will be no particular problems with finding it (not provided). If you cannot make a drawing for the construction of a concrete staircase yourself and a concrete staircase is “too tough for you”, use the projects of wooden stairs cues, with their help you can make wooden stairs with your own hands, including you can get a wonderful modular staircase.
Stairs photo.  So, we build a staircase with our own hands. First of all, you need to make a calculation of the stairs, think over the size of the stairs, the design of the stairs and decide on the terms. Calculation of stairs for a wooden house is needed in order to make it convenient to climb, in addition, the stairs must meet very specific safety requirements, which are prescribed in normative documents. We will not bother you with the study of these documents, and we will give the main requirements in the course of the story as make a staircase with your own hands. Now about terms. Here are the main components that any staircase has: degrees, under steps, stringers, handrails. The kosour is the main load-bearing part of the stairs, it is on it that the main load occurs when people walk up the stairs, there are options for stairs without under steps, but this greatly weakens the structure, so we will consider the option stairs in the house with their own hands (photo) under the steps. More clearly about the elements of the wooden stairs of the photo below, you can immediately see the approximate design of the stairs.
Stairs photo.
We have defined terms. Now we need to size stairs made of wood hands (photo): stair width, step width, angle of inclination and height under the steps. If we talk about the width of the stairs, then they usually take a width of at least a meter, this is necessary so that furniture can be brought into the house, household appliances and so on. In our case, the width is set by the overhang of the terrace or veranda. We recommend reading an article about bathroom design.
Calculation of the angle of inclination of the stairs, the width and height of the steps do-it-yourself wooden staircase (photo).
Determine the height of the stairs. To do this, we fix a straight board on the terrace, as the beginning of the stairs, the photos are shown below, check the horizontal, adjust the horizontal if necessary and measure the height of our stairs. To prevent the level from falling, it is fixed with adhesive tape on the board. In our example, the height of the stairs is 145 centimeters.
Making stairs with your own hands 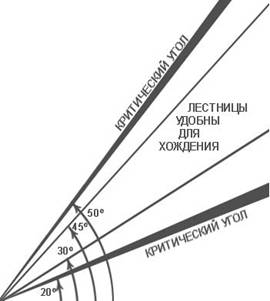 About the angle of the stairs. The angle of inclination of any staircase is regulated by the norms and has a range of angles from 30 to 45 degrees. If you start to deviate from these rules, then when you make a ladder, you will notice that the angle is less than 30 degrees, it is dangerous to walk, the angle is more than 45 degrees, the ladder will take up a lot of space. The angle of inclination of a particular staircase is determined individually, depending on the number of steps and their height. The approximate ratio is summarized in the ladder table for the house.
Go and explore the gatherings.
As practice shows, stairs with a step height in the range of 140/170 mm with a tread width of 300/370 mm are the most convenient and safe for movement. This is explained by this. The width of the step is taken along the length of the foot of the average person, and the height of the step corresponds to the step height of the average person. The higher you make steps, the greater its width will be and vice versa. But there is a rule - the width  steps minimum corresponds to its height.
If you end up with very narrow standard round steps, then this is not very good for safety, but you can add another 20/40 mm to their width due to the protrusions. Do not forget that we said at the beginning of this article about the width of the entire staircase, the most comfortable width is 1 meter, but if your conditions do not allow, you can reduce it to 70 centimeters, this is usually done for house projects in a narrow area, do not make the width smaller recommended. Our staircase has seven steps, the eighth step of the staircase in DIY cottages is the terrace surface.
Ladder do-it-yourself photo schemes and drawings.
We make a kosour stairs in wooden house do it yourself.
 It is necessary to see how you will attach the kosuor to the terrace. Mono lean it on the beams of the terrace, or make the beams fly out from under the platform. It must be done locally. In addition, the best option for a platform on which a wooden staircase will rest is concrete. Need to take wooden beam, mark it as shown in the first photo, and cut out the grooves for the steps, in no case cutting them, the places of the cut will be stress concentrators, the staircase may collapse along them. First, make one braid and then, using it as a template, mark the rest, in our example, four braids. As you can see from the photo, the more stringers, the stronger the structure will be. seat angles
 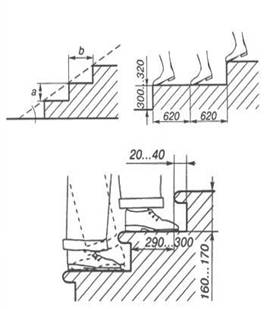 knock down with a planer 4/5 mm under the steps. This is necessary for a good fit of steps and under steps to the stringer. Having installed the stringers in place, you can mount the steps into the house, not forgetting about the departures of the steps if they are narrow.
Stairs clip art.
Installation of balusters.
Wooden balusters drawings are the dimensions of the options, of which there are a lot and mount the handrail last, you can make metal balusters, but that's another topic. How do-it-yourself bolusters are very clearly visible in the second photo of the article, there is also a diagram of the installation of balusters.  Finally, I note that it is necessary to impregnate all wooden parts with impregnation from wood borers, rotting, process with a planer and sand the surfaces, soak them with drying oil and, after installation, open with varnish. Tree under the kosuor, under the steps, handrails - pine. Under the steps and balusters and pillars, the best option- oak board and beams. The scope of our article cannot include various options wooden stairs in the interior of the photo can be viewed online.
Hello everybody!
How to get to an object that is at an unattainable height for you? How to collect fruit from the very top of a tree or paint a house? Such questions, most likely, have visited you more than once, it was for these purposes that a special device was invented, which is called Step Ladder.
Stepladders are perhaps the most popular and necessary ladders, they are used in everyday life and in other areas of activity.
This article will describe a method for manufacturing a ladder, with detailed photo report.
For the manufacture of stairs we need:
Materials:
Two beams 60 * 40 mm;
- timber 50 * 35 mm;
- self-tapping screws;
- dye.
Tool:
Hacksaw for wood, or other available cutting tool;
- Sander;
- drill;
- a hammer;
- axe;
- mounting.

Let's start with the fact that we take two vertical bowstrings with a beam section of 60 * 40 mm, we take its length at our discretion, in this case the length was 3.6 m.

In order to make the ladder strong and the upper edge of the steps was horizontal when tilted, we make special notches, mark in those places where we plan to install the steps, take the distance between the rungs 30 cm. We use a beam for steps with a section of 50 mm, according to these dimensions we make markings, we apply it on both sides of the bowstring. Next, we note the depth of the notch - 15-20 mm. We connect the received marks with each other with an oblique line, as shown in the photo.

Then, using a sharp ax and a hammer, we remove a piece of wood at an angle, but before that, we need to make a recess along the marked line with a hacksaw, this is so that the beam does not split in an unnecessary place for us.

We use the ax as a planer, leveling the notch angle.

In a similar way, we make notches on both bowstrings.

Next, using a grinder, we process the surface of the beam.

We need to carefully align the notches we made.

Now with the help of paint we paint the inside of the notches. Set them aside until completely dry.

Next, we take a bar with a section of 50 * 35 mm for steps, it needs to be slightly modified. We take a planer and use it to remove the chamfer. We do the same operation on each bar.

Then you need to make one of the sides of the bars base, for this we take an angular ruler and use a pencil to mark.

When everything is ready, with the help of a cutting tool we saw off all the uneven edges, after that we process the surface grinder, smooth the ends.

Now you can proceed to the manufacture of the upper and lower rungs of the stairs. In order to distinguish the top and bottom of the stairs, it must be made with a slight narrowing. The top should be shorter than the bottom. We take the width of the stairs 65 cm from the bottom and 55 from the top. Other sizes can be taken at your discretion. Using a tape measure, mark the length.

With the help of a square, we mark the place where the future step will be cut.

We start cutting.

When the steps are ready, we process the ends with a grinder.

Next, at the edges of the beam we find the center, for this you need to step back from each of the edges by half the thickness of the bowstring (20 mm).

Then, on the marked centers, we make holes for the screws. The self-tapping screw should pass freely into this hole.

We make a countersink using a larger diameter drill for this.

Now install the top and bottom rails by placing and aligning them in the notch. We make the ends of the steps flush with the side parts of the bowstrings. After that, through the existing holes in the steps, we make a mark of the place where it will be necessary to drill a hole. They are needed so that the screws do not split the wood when twisting. The holes were made with a drill 0.2-0.3 less than the thickness of the self-tapping screws.


Now you can fix the step in its place, but before that you should paint the pressure side of the crossbar.


When the required dimensions are set for the stairs, we add the missing steps, for this we lay out the prepared bars in the notches, exposing the base ends flush with the side parts of the bowstrings.