Instructions on how to make a staircase to the second floor with your own hands. Drawing stairs to the second floor made of wood Simple stairs to the second
The construction of a private house often involves the presence of a second floor or an insulated attic. This design allows you to expand the living area of \u200b\u200bthe structure and significantly save on the construction of an expensive foundation. And also in two-story house much easier to organize a suitable layout. However, the presence of several floors involves the construction of stairs, which stops many novice builders. In fact, a high-quality staircase design is easy to manufacture. with my own hands knowing certain features.


Design features
Before choosing a ready-made staircase from famous manufacturers or starting to purchase materials for a home-made design, you need to figure out what any staircase consists of. The basics of construction are so elementary that the differences between the stairs various kinds Hardly ever.
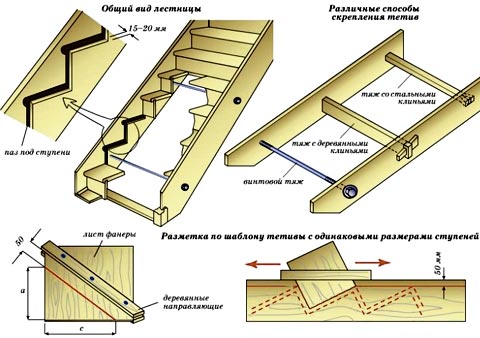
- Every staircase is made up of steps., be it a small porch ladder or a spiral passage to the second floor. It is the steps that take the main load. In almost any design, together with steps, risers act as the main element. Their main function is to hide or decorate the attachment points and internal organization the whole structure. But both of these elements do not hang in space, but rely on the next one - a kosour or a bowstring.

- Kosoura are two sawtooth boards. The step itself is laid on the horizontal part of the cut, and the riser is attached to the vertical part. In some cases, for example, when the stairs are located near the wall, only one stringer can be used, and the second side of the riser can be attached directly to the wall.
- bowstring, unlike the kosour, is two straight thick boards in which grooves are cut. Steps with risers are inserted into such grooves, made according to one template. For greater reliability of such a ladder, the bowstring is pulled together with wooden or metal cords.
- And also one of the important, albeit optional, elements are railing, which reduce the risk of stumbling and falling from a height. In some cases, a platform and a support step are mounted.


Kinds
The most used interfloor stairs in modern houses can be divided into three types: spiral, mid-flight and stairs on the bolts.
Marching
A simpler and more common is the device of a mid-flight ladder. Depending on the height of the floor, it can be single-march or multi-march. Marches are segments with different number steps. Usually their number does not exceed fifteen, but marches of nine steps are the most convenient. And also the mid-flight stairs can be open (without risers) and closed (with risers). The choice most often depends only on personal preferences, since there are no differences other than appearance in these types.
Open flight stairs are often used as a temporary solution and later replaced by more complex structures.


Marching ladders can be supported both on a kosour and on a bowstring, there are no advantages of one or another support. It is more convenient to use a single kosour near the wall, but if you wish, you can also make a bowstring, this will simply increase the material consumption somewhat. With all its advantages, the mid-flight design has one significant drawback - it takes up a fairly large space.
To save it, such stairs are made with corner turns, otherwise its construction in a small private house is simply unjustified. The steps of such a staircase are called cross-country and are made in a trapezoidal shape. The most common turns of the march are 90 degrees (quarter-turn march) and 180 degrees (half-turn march). If the degree of rotation is 360, then such a staircase turns into a spiral staircase.

On the Bolts
With the increasing popularity of high-tech style in interior design, the popularity of such stairs has also grown. Their main structural element is a bolt fastening, due to which they received such a name (“bolz” is a “bolt” in German). Due to the absence of a frame on which the steps would rest, the staircase turns out to be “floating” in the air.
The role of the frame is assumed by the bolts, which are mounted to the handrails. Although in some cases the design involves the use of one kosour or one bowstring attached to the wall.
The main advantage of such a ladder is that for the repair and dismantling of one element there is no need to dismantle or replace the entire structure.


screw
Often a spiral staircase is placed to save space and beauty of design. It is really great for small houses with high ceilings. At the same time, such stairs are narrow and steep, and also much more difficult to manufacture and assemble than conventional mid-flight structures. They cannot be used by two people at the same time, and it is practically impossible to lift any large-sized furniture or equipment on them.
Spiral staircases are divided into two subspecies. In the first case, the structure is a central support, to which steps are attached, and one bent handrail. In the second case, there is no central support, and bent handrails are attached on both sides. This subspecies is more difficult to manufacture and imposes certain requirements on the quality of the materials used.
In some cases, a spiral staircase can be located near the wall and some steps can be additionally fixed in the recesses created in the wall. The classic helical design is round, but the stairs can also be made in polygonal or complex arbitrary shapes.


Which one to choose?
The staircase project is created simultaneously with the design of the house itself. To select the correct design, consider the following:
- where the staircase will be located: against the wall or in the center of the room;
- how many people will go up and down the stairs, what age they will be. It can be difficult for older people to climb high steps, and if there are small children in the house, the presence of a railing is simply a must;
- Is it planned to lift weights to the second floor. The minimum load on the steps is 200 kilograms per cubic meter, and on the railings - 100 kilograms per cubic meter;
- the angle of inclination must be constant along the entire length of the stairs and must not exceed 40 degrees;
- the width of the span must be at least 80 centimeters, and the height of the railing must be at least 90 centimeters;
- the gap between the balusters should not exceed 15 cm, they should not be too rare.

Materials used
Most often, for the manufacture of stairs, planed wood is used without bumps, spikes and other defects. Before work, such material is dried and treated with stain. After that, the tree can be covered with one or two layers of special varnish. High-quality wood for the construction of stairs is only the first grade wood with a moisture content not exceeding 10 percent.
If the moisture content of the material during assembly is higher, it is likely that the structure will deform quite strongly after drying. You can use both budget types of wood, and elite expensive materials.
Pine wood is light gray, high strength, but easy to process. The low cost is one of the biggest advantages. And also birch wood has a low cost. The absence of a pronounced woody pattern allows you to realize interesting design ideas. Ash, on the contrary, has a pronounced woody pattern due to the special structure of the fibers. Despite the high pliability during processing, ash is more durable than birch or pine.


Oak hardwood has a light yellow hue and is highly valued due to its high strength. Classic oak staircases will last a very long time and bring a little luxury even to the simplest interior. Oak can compete with maple, which, due to the lack of pores, has even higher strength and durability. However, in addition to the high price, such material has another significant drawback: it is very difficult to process.
In addition to wood, stairs are made of materials such as glass, plastic, concrete and metal. Nevertheless, such stairs are rarely made independently, since special tools will be required to fasten their elements. For example, for a welded metal structure, except for the welding machine, you need a grinder, a special vice, a metal table, metal drills and much more. It is better to order such complex staircases from professionals.


How to make your own?
Since the easiest to make with your own hands is a wooden marching structure with a stringer, it makes sense to dwell on it in more detail. It is also the safest if there is a railing of the correct height.
Calculations
First you need to correctly calculate all the dimensions, the number of steps and the width of the span. The height of the room and the length of the wall or space reserved for the stairs are taken as the basis. Having scaled down these dimensions, it is necessary to build a drawing of a right-angled triangle: the height and length will be the legs, and the hypotenuse is the staircase itself.
Such a scheme is considered ideal, where the angle of inclination of the stairs will not exceed 40-45 degrees. The width of the tread should not be less than 200 mm, so we divide the natural length of the lower leg by the size of the tread and get the finished number of steps.


Then we divide the natural height of the second leg by the number of steps and get the average height of the riser. Their height should not exceed 120 millimeters, and if this happens, then either you will have to increase the length of the stairs, or choose another design, for example, a screw one. All the dimensions obtained are applied to the drawing, a ready-made sketch is obtained, according to which it is easy to make the kosour and steps yourself.
The width of the span depends on personal preferences and the free space of the room, but cannot be less than 80 cm. The calculation of the stairs on the beams is done in a similar way. For a screw structure, more complex drawings will be needed in the form of a circle of a certain diameter, dissected into sectors - steps.


Construction
In order for the manufacture of parts with your own hands not to bring unexpected unpleasant surprises, it is necessary to very accurately transfer all dimensions from the drawing to the material and follow detailed instructions. The choice of quality material will greatly simplify the construction process: good dry wood is easy to saw and fasten. The most difficult thing is to make an even stringer, since the strength and aesthetics of the finished structure depend on it. For him, a solid board is selected without knots and cracks. The thickness of such a board can vary between 45-50 millimeters.
The treads themselves are made of boards with a thickness of 30–35 millimeters and should be 1.5–2 centimeters in width greater than the place made for them on the stringer. The edges of the treads must be made rounded and carefully polished so as not to accidentally injure yourself on a small chip and plant a splinter. If a closed staircase was planned, then for it it is necessary to make, in addition to the treads themselves, also risers. Even a thin board 1.5–2 centimeters thick is suitable for them, because the entire load will fall on the stringers, and they will only slightly support the step and close the interior space.


Handrails or balusters are best purchased ready-made immediately with fasteners. Wooden elements will only be fastened with self-tapping screws, and metal elements will be welded using a special apparatus. If there are elderly and small children in the house, then two balusters must be placed on each step at once, if not, then one is enough. For stairs on bolts with one stringer, the manufacture of parts follows a similar pattern, only without risers and with the purchase of metal bolts instead of wooden railings.
Making a round spiral staircase with your own hands is incredibly difficult. Starting from the impossibility of making bent parts at home without special equipment, and ending with the specifics of the design, patterns and fasteners, which are almost impossible to buy in a regular hardware store. The way out of the situation can be the installation of a conventional rotary flight staircase with an angle of 360 degrees or ordering a finished product from professionals.


Installation
Installation is the most difficult and crucial stage after all the elements are made or purchased. During installation, it is necessary to constantly check the parts for level or plumb, so that the entire structure is properly fixed and does not pose a hazard. First of all, you need to install stringers according to the marks that are pre-installed on the floor of the first and second floors.
On the floor of the first floor there is a special support beam, to which you need to fix the bottom of the stringers. And at the top of the stairs, you can use metal supports connected to the ceiling beam anchor bolts. The risers are screwed to the installed stringers, treads are attached to them from above with the help of self-tapping screws.
You can mount both of these elements at once, starting from the bottom up and connecting one step after another.


Then you can mount the balusters. Support posts are placed on the lower and upper edges of the stairs, which limit the structure of the railing and support it. The balusters themselves can be different types and fasteners: some are screwed with self-tapping screws, for others holes are drilled or special grooves are sawn. Installed items covered with handrails on top, which are mounted on support posts along the edges of the stairs.
If the railing is quite heavy, you can put a few additional racks. In such cases, instead of balusters, you can use long wooden planks installed parallel to the staircase.


After assembling the entire structure, you can process the surface of the resulting stairs grinder and sandpaper of various grits. After that, various antiseptic compounds are applied to the tree to protect against insects, mold, fungus and rot. After applying all the necessary solutions, you need to let the tree dry completely, and then varnish it in several layers.
If the tree needs to be darkened, then a stain can be applied before the varnish and also allowed to dry completely. After all applied coatings have dried, the ladder is ready for use.


Stairs are not only building construction, but also a source of danger of injury in a private home. This design should be made as safe as possible: low comfortable steps, reliable material and, of course, strong railings. You should not make a staircase from slippery tiles or wood varnished in several layers. If it is necessary to varnish the wood, then at each step on the dried varnish you need to make several scratches with sandpaper - they will not be evident, but they can save you from falling. And also a wooden staircase can be upholstered with a heavy carpet - this will also prevent slipping.
The main thing in such a finish is to carefully fix the carpet on each step with small screws so that it does not come off at the most inopportune moment. You should not upholster the stairs with linoleum - this will only increase the risk of falling, since linoleum is quite slippery even on a flat surface.
When private house built of two floors, then the stairs to the second floor are a must. But, in addition to the fact that it should connect them, special attention should be paid to the interior of the stairs, since such a design is part of the design of the room. Many have been created different options stairs, and these structures can not only be ordered, but also made by hand. Which project to choose, construction features, detailed instructions on installing this design - all this will be discussed below in the article.
There are several types of stairs, each with its own characteristics. When choosing such a structure, it is necessary to take into account not only its rational location, but also provide for safe and convenient movement to the second floor. Among such structures, marching and spiral types of stairs enjoy a special reputation. Their difference from each other is not only in appearance, but also in installation methods.
Important! It is recommended to install stairs thoroughly only after shrinkage of the house. Otherwise, due to mechanical shifts in the floor of the building, the integrity of the flight of stairs may change.
If we consider the design, then between the floors there are three types:
- Marching.
- Screw.
- Boltsevye.
Marching. They are the most popular type and they look like one or two march structures. When installing two marches between them, intermediate platforms are made with a turn of 90˚ or 45˚. In this case, the angle depends on the dimensions of the room and the choice suitable option the owner of the house. A turn of the platform by 180˚ means that this is a screw structure. 
Marching stairs to the second floor are divided into two types:
- On strings.
- On stringers.
In addition, there are stages of closed and open arrangement. At the first placement of steps, only their horizontal treads are made, and at the second, vertical elements are also installed - risers.
Screw. Such structures take up little space, they have good view, but they are not very convenient for movement and are often used as additional structures for design.
Depending on the material, stair structures can be:
- Metal.
- Wooden.
- concreted.
- Combined.

Most often, in a private house, the stairs to the second floor are made of wood with their own hands, less often. There are also stairs for external and internal execution, while their main difference is in the base and material of manufacture.
Design codes
In the case of installing stairs in a private house, the following standards will suffice, namely: GOST 23120-78; SNiP IV-14-84. If the work is carried out by a specialized team, the dimensions of all mating elements at the structure must be agreed with both the customer and the organizations that give permission for the installation of stairs. When building a house, you need to keep in mind which stairs will be mounted and how they will be located. The project must be calculated in such a way that it is based on an optimized arrangement of mating structural elements, which allows convenient and safe movement between floors.
Requirements according to GOST and SNiP
When designing a staircase, you need to take into account all the standards for structures of this kind in private homes. In this case, the calculation procedure consists of several stages.
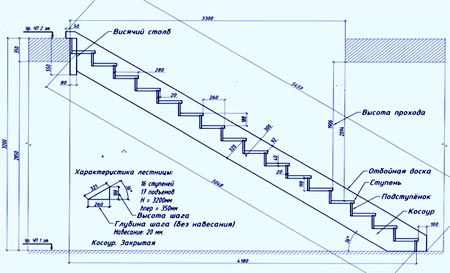
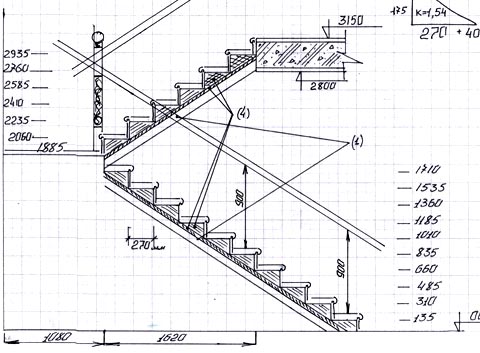
- The slope of the stairs. In residential buildings, where it has to be climbed many times, the angle of inclination of the march should not exceed 30-40 degrees. With an increased angle, it is permissible to mount structures only in non-residential premises, since they are used much less frequently. In order to place two mid-flight spans in rooms with standard ceilings of 2.7 or 3 m, the number of steps is set to 17 and 19, respectively, the level of the room. In this case, the height of the steps will be 1710 and 1667 mm, and the width - 286 and 298 mm. Due to the different angle, the dimensions may differ, but the following procedure must be observed: with an increase in the level of the riser by 1 mm, the width of the step decreases by 2 mm.

- March width. It is generally recognized that if a march has a span of less than 70 cm, then it is inconvenient for a person to move. Therefore, the accepted norm is a flight of stairs between the railings ranging in size from 0.9 to 2 m.
- The size of the platform for the stairs of two flights. When designing it, the width of the flight is usually taken into account, but it needs to be done a little more. This is due to the fact that many housewives like to hang flowers in flowerpots on the site, and a heating radiator is usually installed in this place to circulate warm air. This device and hanging flowers will take away part of the site, and if it is smaller, then it will be inconvenient to move around it.
- Height under the landing. For comfortable passage under the stairs, the distance to the landing should be at least 180 cm.
- Railings. Based on the SNiP standards, flights of stairs with more than three steps must be fenced with railings. In private houses on the stairs, the height of the balusters is from 90 cm.
- Steps. The number of these elements is calculated by dividing the height of the planned structure by the selected riser level. If during the calculations the number turned out to be even, then you need to slightly adjust the size so that the value changes to an odd number. To check the correctness of the calculation of the dimensions of the steps, it is necessary to add up the double height of the riser and the width of the tread and the result should be in the range of 60-64 cm.

Spiral staircase
A design of this type is well suited in rooms with a small area or to highlight some kind of architectural style.
Calculation features
When carrying out this work, you need to know all the nuances of calculations. Let us designate the most significant of these aspects:
- The width of the steps in the center should not be less than 20 cm, while 17 cm is allowed near the support.
- The most practical are considered to be designs with a diameter of 2 meters.
- The width of the span is allowed for convenient use of more than 90 cm.
- Calculate the number of steps, for which the size of the stairs must be divided by the height of a person's step (20-23 cm).
- To make the ascent and descent the most comfortable, the distance between the turns must be at least 190 cm.
The main feature of such structures is that the steps have different widths, on the one hand, narrower than on the other. With their narrowed part, they are fixed to the support, and with the enlarged side - to the balusters or the surface of the wall. For the calculation, the average size is taken, which should not exceed 40 cm.
Construction on a prefabricated column
Such a structure can be made independently without much difficulty. On the installed pipe (support), gradually put on fragments of the future staircase - intermediate cylinders, steps, balusters, etc.


In addition to the listed elements, wooden segments machined on the machine are also installed on the pipe, which maintain the size between the steps on one side. On the reverse side of the treads, the distance between them is kept at the expense of the grooves on the balusters. These structural elements are sequentially inserted into them and fastened with glue and dowels (cylindrical wooden rods).

erection of stairs
Consider the installation of this design in more detail:
- Installation of a spiral staircase to the second floor begins with the installation of a pillar. Why holes are made in the floor of the lower and ceiling of the upper floor according to the diameter of the pipe.
- Then two flanges are put on the pipe, and it is inserted into the prepared holes. The flanges are fixed to the floor and ceiling, respectively.
- Next, the staircase itself is assembled: fragments of the structure are sequentially installed on the support.
After installing the steps, on the one hand, to the cylinder inserted on the pipe, and on the other hand, to the balusters, the installation of the spiral staircase is considered complete.
Spiral staircase to the second floor: a gallery of interesting photos
Staircase to the second floor
Marching stairs are the most popular among structures of this kind. Firstly, they are convenient to use, and secondly, the technology of their construction has long been worked out. There are few features of the calculation. To decide how to make a staircase to the second floor, the number of marches will be of no small importance.
Kinds
Today, flight stairs enjoy a great reputation because they are inexpensive and good quality. They also have other features that attract consumers: comfortable movement, functionality and long term services. Currently, it is customary to designate two types of mid-flight stairs:
- Kosoura.
- Rectangular configuration.
Stringers are a type of inclined beam as a load-bearing element. The essence of such structures is that steps are installed on them. Therefore, these stairs can have any configuration, due to which they are divided into the following types:
- Rectilinear.
- Rounded.
- Cutout.
- Serrated.

Ladders on bowstrings are one of the types of stringers. Bowstrings, in fact, are the same bearing beams, but their difference from stringers is that the steps are attached with inside and they are always installed in pairs.
Rectangular staircase design. These structures are distinguished by the fact that they have one or two marches, and such structures are either straight, curved or broken. The main thing with such a combination of spans is that the angle of elevation does not exceed 40˚, and the opening at the stairs is at least 0.9 m, and it is best to use such mid-flight stairs when its width is two meters.
Installation of a marching staircase
Do-it-yourself installation of stairs to the second floor is a lengthy and costly procedure, but quite doable. To simplify it as much as possible, you need to carefully prepare and conditionally divide it into three stages:
- Data calculation (project creation).
- Acquisition of the necessary materials.
- Tool preparation.
At the initial stage, you need to draw a drawing with all the necessary dimensions applied.
On a note! To facilitate the task when designing the stairs you need, you can use free programs from the Internet, which can be found on the corresponding construction sites.
Further, on the basis of the project, the right materials in the required quantity. Moreover, in order to "block" a possible marriage during the manufacture of stairs, it is better not to skimp and buy materials with a margin. And also for the construction of the structure on the second floor you will need a certain tool:
- Level.
- Pencil.
- Carpentry corner.
- Plane.
- Hammer.
- Wood saw.
- Drill and drill bits for dowels.
- Chisel.
- Hardware (wood screws).
Installation order
After the material has been purchased, essential tool prepared, you can proceed with the installation of the mid-flight stairs to the second floor, and this should be done in a certain order.
Capital beams (string)
First you need to prepare the recesses for the steps, for this, mark according to the drawing and on the inner surface of the beams it is necessary to hollow out grooves with a depth of 30-40 mm. In this case, they should be mirrored relative to each other. After the grooves are hollowed out and fitted, the risers (vertical elements) must first be mounted. Then steps are inserted into the grooves, set relative to the vertical elements by 2-3 cm, while the seats must first be lubricated with glue. After assembly, all parts are fastened with dowels, for which holes of 6-8 mm are drilled and dowels (a small cylindrical pin made of wood) are hammered with a wooden hammer.
This procedure must be done carefully, fit tightly mating elements, otherwise finished staircase will wobble and creak. The beams themselves are interconnected by couplers through 4-6 steps. It remains to move the assembled structure to the prepared hole on the ceiling and fix it with support bars. On kosoura, the manufacture of seats under the steps is prepared differently.
The simplest option is:
- Drawing markings along the entire length of the beams, for which it must be divided in half.
- Sawing along the outlined contours.
- Installation of stringers. To do this, you need to fix the support beam near the hole in the ceiling, then move it to it and connect the supporting beams. Install the bottom rail for support and also fix it with stringers.
- Drilling steps to the size of the width of the supporting beams.
- Fastening them to the prepared recesses in the stringers through powerful self-tapping screws.
All holes are made in potai or then closed with decorative plugs.
railing
When moving up stairs, people often use handrails. And also in connection with safe movement, this fence must be thoroughly fixed, while maintaining a certain load.
Railings are installed after preparatory work, such as:
- Marking for balusters at the junction of the step with the carrier beam (string or stringer) so that the side of the support coincides with the end of the tread. Hole markings on railings.
- Drilling for support posts in marked places.
- Installing balusters at the extreme points of the supporting beams and aligning them vertically, after which the installation of all supports in the lower part.
- The imposition of handrails and their connection with the posts. All installation operations should be carried out after processing the parts to be joined with glue.
Drill holes for dowels at the joints of the products and hammer in the dowels prepared in advance, thereby unfastening all the elements of the stairs.
Photos of interesting mid-flight stairs to the 2nd floor
Bolts stairs
Such designs are relatively new in our country, but already enjoy a great reputation among consumers. Just like modern furniture is selected in an exquisite style, such stairs are mainly decoration in rich houses, apartments and offices. This is due to the fact that structurally they are made elegantly, using hidden connecting elements - bolts.

And in general, such stairs to the second floor correspond to an ultra-modern and concise design. With the help of bolts, steps are connected into one whole with load-bearing beams and railings, as well as the entire structure - with ceiling and floor ceilings. Such a structure is convenient not only during operation, but also during repairs: it will not be necessary to completely disassemble the structure. It is enough to remove the damaged elements.

Stairs to the second floor on stringers - subscriber's story
When our house was built, we did not pay attention to many important things. There was not enough experience, time to observe the construction site, money for expensive materials. We were young and believed in the best. And they completely took care of the convenience of such an important element - the stairs to the second floor.

A slope of 68 ° and 35 cm between the steps - even an adult had to use serious skill, let alone a two-year-old child. And the bowstring from the unplaned timber at the first heating of the house was covered with cracks.
We suffered and decided to demolish this wonderful structure. I, as the main designer and generator of ideas in our family, immediately began to storm the Internet. I read disputes on construction forums, shoveled all available calculators.

Staircase that had to be demolished.
We could no longer enlarge the opening in the ceiling. And the heating pipes laid under the stairs limited the choice of support. There is a two-year-old child in the house, so all the work on dismantling the old and assembling the new staircase had to be done in two days, while maintaining the ability to climb up without risk to life.


The output was found:
- L shape
- 3 turning steps instead of a platform
- narrowing of the first span from 90 to 70 cm.
We decided not to cut the tread into the bowstring, but to lean on the stringers. It seems to me that for non-professionals this option is easier. And such designs look easier. Only the upper stage was planned to be mortise so as not to increase the angle of elevation, which, according to my calculations, turned out to be 43 °. Just a dream!

We bought materials from glued coniferous wood, as the most inexpensive:
- two bowstrings 60*3000 mm;
- 8 straight steps 900*300 mm;
- 3 winder steps;
- 1 support post 1200 mm.
Turning steps for sale standard sizes, I had to change it up a bit. For the frame, the remains of the old staircase were used.
![]()
In the absence of a milling cutter, all the grooves for connecting parts were cut out with a parquet circular, choosing excess wood with chisels. The depth of all grooves - 2 cm - optimal tie-in, holds tightly, while not giving a break. Worked with my husband. A well-coordinated team of us rarely turns out, this time was no exception either. Divorce did not come, but lexicon expanded perfectly.

In the process, I had to make adjustments on the spot, as the floor and walls turned out to be uneven. Everything was adjusted, assembled, then dismantled back, covered with two layers of antiseptic and parquet varnish, dried and reassembled everything, thoroughly securing it.

The support post was put on a plumbing stud, fixed on the inside with a corner to ensure immobility.

The stringers were pulled to the ceiling with capercaillie and galvanized supports for the rafters. Instead of wooden dowels, steps were placed on liquid nails and self-tapping screws. We have been actively climbing for a year already - not a single step creaks.
![]()
For fencing, tubes of kitchen rails were used. The three extreme ones are removable in order to easily lift, for example, a sofa, or a wide sheet of plywood. They decided not to do the railing yet, the tubular barrier does an excellent job with this function.
Not without jambs:


I am satisfied with the result. Going up and down became much more convenient. And they saved money. If you are also facing the problem of building stairs with your own hands, feel free to proceed. Use as much information as possible when preparing - and everything will work out!

Conclusion
Thus, by making such detailed overview stairs between the first and second floors, you can make right choice and define your desires. Moreover, if all the recommendations for manufacturing are followed during the construction of the stairs, then such a structure with a guarantee will provide safe and convenient movement for your family for many years to come.
Two-story houses or cottages should be equipped with reliable stairs. Wood is most often chosen as the material for the manufacture of these structures. Wooden stairs to the second floor can be purchased ready-made or made independently. By choosing the second option, you will reduce your material costs and do exactly what you really need.
Types of structures
To build a ladder structure, you must be able to use the tool, know the rules for constructing sketches and drawings. This will allow:
- design all the constituent elements of the structure;
- consider potentially weak spots and correct deficiencies at the design stage;
- calculate the dimensions of the steps so that it is convenient to climb and descend.
For the manufacture of stairs, it is best to use wood. This building material is environmentally friendly, practical, malleable in work, which is especially important for novice craftsmen. With the help of a special tool, you can make a staircase of such a shape that would ideally fit your interior:
- straight or rounded;
- simple or decorative;
- heavy or light.
There are the following popular types of designs of wooden stairs:
Choosing a Stair Pattern
For a private house or a village cottage, both marching and spiral stairs are suitable. However, one should not forget that spiral structures require very precise installation, as well as special elements (for example, rounded railings). To make them, you need to master the technology of professional installation.
This is especially true for more complex staircase structures, which are initial stage can only be used as a model for inspiration, not imitation. Do not rely on ready-made schemes, as they do not take into account all the features of your situation.
As for mid-flight stairs, it is much easier to make and install them with your own hands. They come in various configurations:


- U-shaped two-march;


When placing stairs to the 2nd floor, with more than 10 steps, it is recommended to divide it with a platform with a turn, after which it can go up along the wall at an angle of 90 or 180 degrees.
The choice of one or another model depends on your taste and features of the layout of the house.
Preparation of materials
Before you make a wooden staircase to the second floor yourself, you need to decide on the choice of building material. The most popular types of wood are pine and larch. In terms of performance, larch products are better, as they are less susceptible to decay.
Larch is not afraid of moisture; moreover, when liquid is absorbed, the structure becomes stronger. This is a fairly significant advantage, since there will always be a little humidity in the house. For the construction of stairs, oak, cedar, beech and other types of wood are also suitable, but at a cost this is not the cheapest pleasure.
The life of a tree largely depends on how the lumber is dried. The limiting degree of wood moisture should be no more than 12%.
Well-dried boards are more expensive, but this is more than offset by the durability of the stairs.
If the lumber is wet enough, you will have to dry the wood yourself. To do this, it is placed in a well-ventilated room with constant temperature regime for a period of at least 3 months.
Calculation of the main parameters of the stairs
Width
Standard staircase width - from 90 to 150 cm. But when calculating this indicator, the following points should be taken into account:
- how convenient it will be for two people to walk towards each other at the same time;
- whether the width you have chosen allows you to carry large items (furniture, appliances) up the stairs.
 The comfortable range of staircase width for a private house is 1100-1300 mm. Less - difficulties in carrying furniture; more - an excess of occupied space.
 Length
To calculate this indicator, you will need to take the size of the steps and count their number. Experience shows that when drawing on paper on your own, mistakes are made. As a result, the staircase in reality becomes longer than in the picture. You can get out of this situation as follows: include several winder steps in the staircase structure.
Height
Determining the overall height, inexperienced craftsmen often make mistakes. They take into account only the distance from the subfloor to the ceiling of the upper floor room. This is not entirely correct. When drawing up a drawing, it is necessary to take into account the finishing mark of the 1st floor and the thickness of the floor on the top floor, along with the finish.
Floor opening parameters
It is important to leave enough space between the steps and the ceiling of the upper floor. As a rule, it is equal to the growth of the most tall man and is approximately 190 - 200 cm.

Stair slope
To build a wooden staircase to the second floor with your own hands, it is recommended to observe the slope of the staircase structure of 40-45 degrees. If this indicator is exceeded, then it will be difficult for elderly people, small children to climb on it.
 The optimal angle of inclination of the stairs is in the range of 30 - 37 °
 When choosing a flat design, consumption increases building materials and the useful area of the room is reduced. Therefore, when calculating this indicator, one should proceed from the available space.
steps
Their constituent elements are the tread and the riser. When determining the size of the tread, it is necessary to focus on the 45 foot size. Therefore, the optimal width of the steps is 30 cm.
The size of the riser, depending on the slope of the stairs, is from 15 to 20 cm.
When constructing drawings, it is important to consider the following:
- All steps must be the same size.
- If there are more than 18 steps in the design, then it is advisable to include 2 marches in the project and provide for a platform. It is called viewing, turning or intermediate. Its location can be the center of the span or an area near the beginning of the stairs.
Online calculator for calculation
For your convenience, you can perform all calculations using a convenient. As a result, you will receive ready-made drawings and bill of materials.
Installation of a marching wooden staircase
The installation of a wooden interfloor staircase begins with the manufacture of stringers (or bowstrings), treads and risers.
 Development of stairs along the wall with dimensions
 Treads are cut out of the board according to a previously prepared template. Their standard thickness varies from 30 to 40 cm. If you do more, then this will be an unjustified consumption of materials and a heavier structure. The risers perform a decorative function in the building. Therefore, you can save on them by using a board of 10-15 mm.
Stringers are made from a solid board, on which there are no defects. Both stringers must be identical so that the staircase does not turn out to be asymmetrical and skewed.
 Kosour markup
 Assembling a bowstring with stiffeners
 Frame assembly
The installation of stringers begins with making cuts on the floor beam located at the top of the flight of stairs. Sometimes the cuts are replaced by metal stops, which should be attached to the vertical of the ceiling with anchors. Regardless of which method you choose, the stringers must be firmly fixed to the ceiling.

On the lower floor, along the line of the very first step, a support beam is installed in the floor. Anchors are used as fasteners.
 Attaching the kosour to the floor
 Assembly of components
Installing the steps will not be difficult. The cutouts of the stringers are coated with glue and risers are attached to them, which then need to be aligned and fixed with screws.
 Fastening risers to stringers
 Treads are laid on top and fixed to the risers, stringers. Under them, it is recommended to put polymer gaskets in the form of tapes. This will prevent squeaking as a result of rubbing against each other. wooden parts.


The function of the fence is performed by balusters, when mounting which it is important to properly maintain evenness. For this purpose, the upper and lower columns are installed and connected to each other with a stretched thread. It serves as a guide when installing the rest of the elements. Balusters can be attached with screws or self-tapping screws, which are masked with grout or plugs.

The handrail is installed and fixed on the balusters. It can be wood, iron or other material.
Finishing
After installation, all surfaces must be sanded, including hard-to-reach places, ends, joints. The design is then processed protective equipment, or paint.
Features of the manufacture of a spiral staircase
The manufacture and installation of wooden spiral staircases to the second floor is much more difficult than marching ones. But, on the other hand, they allow you to save usable space and are placed where there would not be enough space for a marching structure.
 Screw structures save living space
 Most best option- This is a spiral structure installation with a central support. In this case, steps in the form of a triangle or a trapezoid are attached directly to it. To give the structure reliability, the support column with a specially attached heel is placed vertically and concreted at the base.

Holes are made in the steps from a narrower edge, with the help of which they are strung on a support pipe. Inserts in the form of a cylinder are installed between the steps, which determine the height of the structural elements. The last step on the upper tier is installed flush with the opening in the ceiling on the second floor and acts as an additional supporting element.
To make it convenient to go down and up, the vertical interval between the rows of steps should be at least two meters. And the width of the flight of stairs in cleanliness is at least 90 cm.
Often resort to more compact models spiral staircases. This is permissible only when they do not plan to use it often. This applies, for example, to country stairs or to climb to the attic.
The most convenient tread depth is considered to be from 15 cm at the central pillar and from 35 cm from the outer edge. The height of the riser is on average about 20 cm. However, sometimes you can completely refuse them. This will make the structure more convenient, reduce its weight, and also reduce the cost of building materials.
Or the completion of a full-fledged additional tier. In this case, you will definitely need steps leading to top floor, will help to qualitatively and safely install this item of necessity.
Details and names of elements of a wooden staircase to the second floor of the house
Become the choice of many. No wonder, because they have an aesthetically attractive appearance and beneficial in terms of pricing policy.
What are the benefits
Such structures have a number of advantages that open up wide opportunities to the owners of private houses.

What are the disadvantages
It is worth considering the shortcomings of the material, which can be encountered through negligence and with insufficient preparation.

These are the most popular negative aspects of wood products. Nevertheless, knowing them, you can warn yourself and get only benefit from the implementation of your plan.
How to independently draw a diagram of a staircase for a house
If you want to draw a diagram with your own hands, you should know some features that you should definitely pay attention to. On hand you need to have:
- Roulette;
- A felt-tip pen or chalk, with which marks will be made on the surface of the wall, floor;
- Pen or pencil;
- Paper;
- ruler;
- Compass.
These accessories will be enough to make the necessary drawings for a wooden staircase in the house.
Step by step drawing drawing
When hands reached and a person begins to draw drawings of wooden stairs to the second floor on a sheet of paper, one should proceed step by step:
Performing the steps step by step, following the order, it will not be difficult to make a drawing of a wooden staircase.
What to look out for
When taking measurements, be sure to pay attention to the following factors:
Given these details, it is possible to draw up the most accurate drawing of the staircase leading to the upper floor.
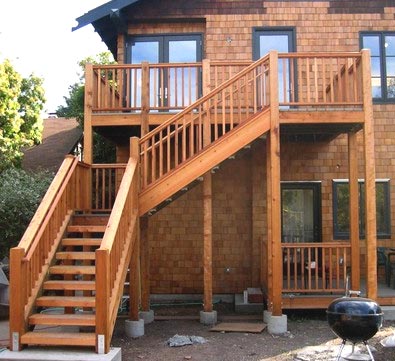
Outdoor wooden stairs
Of course, to climb to the upper tier of the building, you can use ladders fixed on the base of the house. But this is unsafe and inconvenient. Therefore, if the entrance to the level of the second floor is planned to be organized not inside the space, but outside, then you should choose the design of the street staircase made of wood that best suits your preferences.
In this case, you need to follow some rules, since being in an open space, a wooden staircase is very susceptible to impacts. natural factors. That's why:
Advantages
Those who decide to place a wooden staircase on the street can note a number of advantages for themselves:
In this case, small errors are allowed, because the fact that the staircase turns out to be a little wider or longer plays a role in the house, and not outside it. Therefore, it is worth, of course, to carry out measurements, but in some indicators there is no need. For example, for the street there is no need to measure the space from the step to the ceiling, which must be done in the house.
This is not a complete list of benefits, each homeowner will note his own. However, along with the positive aspects, there are also negative ones.
 The design of the street stairs to the second floor
 disadvantages
- Exposure to natural factors;
- A wooden staircase outdoors requires careful maintenance.
Knowing the pros and cons, each owner of the house will be able to determine for himself whether to rely on the installation of stairs on the street or not.
Some people don't want to build cottage and they are building a multi-story building, and it will be impossible to move around the house without stairs. Stairs are different forms and made from different materials. Stairs that are between floors are made of metal and.
 The design and calculations for stairs between floors made of any materials are no different.
They have the usual requirements:
- In a private house, the smallest width of the stairs is 900 centimeters.
- The normal height of steps is 160 - 180 millimeters.
- The minimum allowable depth of steps is 270 millimeters.
- The railing on the stairs must withstand a side pressure of about one hundred kilograms.
- The distance between the railing posts should be 150 millimeters and, if there are children in the family, this distance should be 120 millimeters.
- Ladders are made forged and welded.
there are the following types:

There are stairs:
If you do not have special skills in building stairs, then start with a simple option, that is, with a single-flight design.
Necessary calculations
 In organizations that are engaged in the development of projects, they use special ones, with the help of these programs they design 3D models of structures. In the model, it is very easy to change the parameters of different parts.
After the approval of the final version, the computer program prepares the specification and drawings of the metal staircase.
 But in our case, the calculations will have to be done without the help of a computer program. We will consider a simple version of a direct single-march design.
The basic requirements for the depth and height of the steps are already known. It is necessary to make measurements between points, that is, from the beginning to the end of the stairs from the floor of the first floor and the height between the floor of the first and second floors. Now we determine the length of the stairs, you need to remember that the average angle of inclination is from thirty to forty-five degrees.
We calculate the available parameters and extract the square root and get the length of the stairs.
Materials and tools required for work
For the construction of an interfloor metal staircase, we need to build an interfloor metal ladder You will need the following tools and materials.
Instruments:

Materials:

Carrying out work
Stages of work:

First of all, corners are made from the corners for fixing steps, that is, fillies.
You can’t make a mistake so that there are no various distortions and flaws that will ruin the stairs.
 Also, fillies should be the same and should be exactly opposite each other. Fillies are made from a corner by cutting out a sample and joining the corners to each other.
As a result, L-shaped nodes are obtained with shelves down and inward. For our design, fourteen pairs of these nodes are needed, and in each of the pairs one support will be left, and the second right. Then we weld the brackets to connect the steps and the horizontal bar between each of the pairs of corners.
 We also make a horizontal crossbar from a corner. They reinforce the structure with the help of kerchiefs, we weld them from the bottom of the steps towards each of the stringers.
Edgewise square pipe we make markings from the profile and, according to the markings, weld the fillies to the rib of the kosour, the second kosour is attached to the first kosour with fillies and transfer the markings.
 We make and then weld the stringers with the lower end to the support platform. If the houses have a concrete foundation, then the supporting platform is installed in concrete. We attach the upper end to the support post, the support post is fixed to the ceiling between floors with steel anchors. Then once again the fillies must be checked for level.
In the event that the staircase is made near the wall, then to give the structure rigidity, one stringer is welded to the brackets that are fixed to the wall.
They consist in welding the steps to the filly, you can also fix them with bolts, but in this case it is necessary to sheathe the steps with wood. The steps can also be installed wooden, on the filly with the help of screw connections.
In the article, we told how to make a metal staircase to the second floor.
Of course, it is up to you and no one else to decide what material to make a staircase from, but a metal staircase turns out to be visually light, so we recommend this design.
We hope that this information was useful to you. We wish you good luck, patience and inspiration!