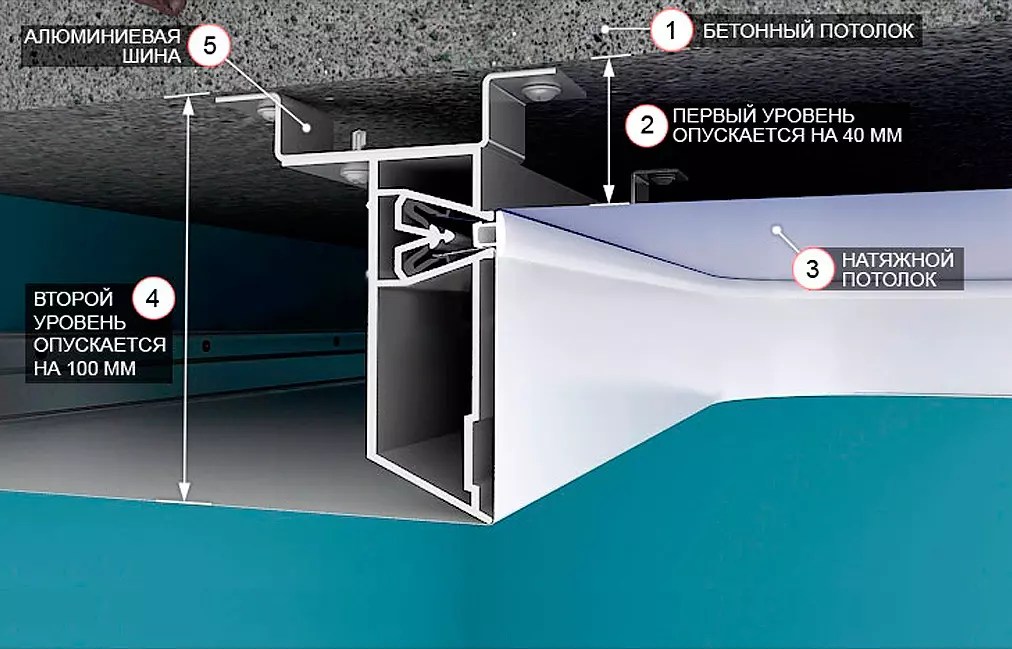
Scheme of the design of a two-level stretch ceiling. Two-level stretch ceilings: design, lighting, installation
Time does not stand still, technology and science too. The engineering fraternity is inventing something. With the advent of polyvinyl chloride films, designers found themselves in the hands of a material that provides a wide field of activity and allows all developments to be translated into reality. In principle, such an effect in the design of ceilings with other materials cannot be achieved. The installation technology of a two-level stretch ceiling is not so complicated. Everything will take about 3-4 hours. In addition, you will be pleased with the absence of putties, mortars, paints and construction debris.
Features of two-level stretch ceilings
A modern stretch ceiling is a sheet of PVC film, which is attached to the profile for the frame. After installation, the canvas acquires a smooth and even surface without the formation of any seams. Although the cloth actually consists of several canvases firmly connected by welding.
Installation of stretch ceilings, single-level and even two-level, is the most aesthetic and convenient type of finish. Such ceilings look especially beautiful in large rooms with high walls. As a panel, a fabric material or a vinyl film is used, and the surface of the ceiling can have a different structure - glossy or matte.

There are such advantages of this type of finish:
- Receipt flat surface ceiling with little effort. The ceiling in the apartments is often uneven, has large differences in height. To get rid of this drawback in the traditional way, that is, with the help of a plaster mortar, it will take a lot of time and effort. Labor costs for obtaining a flat surface when using stretch ceiling technology will be negligible. In addition, stretch ceilings have such undeniable advantage like installation speed.
- external attraction. It is unlikely that you can dispute the fact that this finish looks very beautiful. In addition, the range of stretch ceiling panels is quite wide and varied and you can choose a variety of options.
- Water protection. Unfortunately, sometimes it happens apartment buildings accidents, as a result of which the apartments, which are located on the riser below, are flooded. But when installing two-level stretch ceilings with your own hands, you can not worry about the safety of your repair. Cloths simply will not let water through. To eliminate the accident, it will only be necessary to release the water, and eliminate the sagging of the panel with a heat gun.

Of course, the stretch ceiling has its drawbacks:
- The relative fragility of the cloth. If you touch the coating with some sharp object, damage will occur on its surface - a scratch or a puncture.
- PVC film panels should not be installed in suburban buildings of seasonal residence that are not heated in the winter, as the film will be destroyed under the influence of low temperatures. However, in this case, you can use fabric panels that perfectly withstand low temperatures, so this option must be chosen for finishing unheated buildings.
- High price. Stretch ceilings will cost you dearly, especially two-level ones. But the high price of two-level stretch ceilings is more than offset by their long useful life. And in order not to pay installers for installing the canvas, you can do all the work yourself.
Sketch of a two-level stretch ceiling
It is stretch ceilings that are most suitable for complex two-level ceilings that have an unusual configuration. Since PVC film is plastic and flexible, it makes it easy to realize any design idea.
When developing a project for a two-level stretch ceiling, several points should be taken into account: the desired aesthetic result and functional feasibility. With the help of a two-level design, you can hide any irregularities in the ceiling and effectively arrange lighting. Do not discount the possibility of zoning space. For this, a combination of different textures, colors and shapes of the stretch fabric is used, which not only divides the room into separate zones, but also optically enlarges it.

Choice color combinations and forms in the arrangement of a two-level stretch ceiling must be determined by the general concept of the interior. So, in rooms with laconic color solution and planning the interior, it will be superfluous to arrange a ceiling structure of complex shape with bizarre curls, much brighter than other interior elements in terms of color combination.
Regarding two-level stretch ceilings with photo printing, the following must be said. Undoubtedly, such effects look spectacular and unusual in their essence. But too much emphasis on the ceiling surface (an unusual shape, and even a bright pattern) is justified only in spacious rooms with high ceilings.
But if you decide to take this step, you need to take into account the property of the glossy panel to “glare” and reflect the surface. Images with starry sky effects, patterns and optical fibers are usually built into the lower level of the stretch panel.
Technical requirements for the installation of a two-level structure
The main elements of a two-level system are: a plastic or aluminum baguette of a wall, ceiling or connecting type, which is required to attach the film directly to the ceiling or box; canvas, which consists of several pieces of film that are soldered to each other, and bordered with a flexible harpoon around the perimeter; decorative insert that closes the mounting gap of 4 mm between the wall and the canvas.

As a rule, the installation of two-level stretch ceilings is carried out at the very last stage of repair, when all dusty work is completed. The following requirements are put forward for the installation procedure:
- It is customary to install the profile on concrete, brick, drywall, wood, aluminum, tile or plaster. The coating of the old ceiling must not be allowed to crumble - it must first be cleaned and primed.
- Installation of a two-level stretch ceiling can be done in a room with furniture sets, household appliances and other interior items. But remember that the distance to the new ceiling from the top of the cabinet near the wall should be more than 70 centimeters.
- Before starting work, it is recommended to develop a wiring diagram and communications in places where the tension fabric will be installed.
- A high-quality installation of a two-level stretch ceiling is possible only with a certain thermal regime of electrical equipment that is built into the new ceiling: the devices should heat up slightly. The same goes for ventilation. spotlights, climatic equipment, alarm and fire extinguishing systems.
Installation of a frame for a two-level ceiling
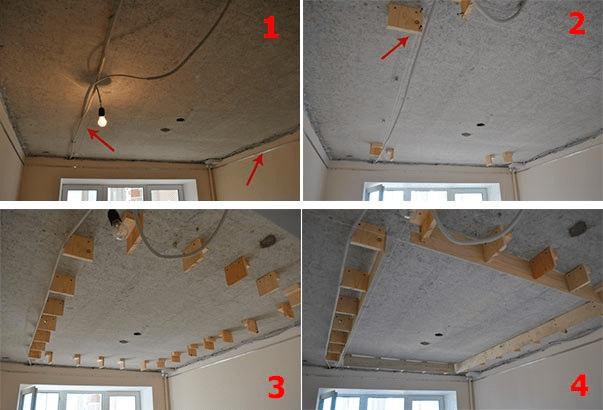
Before you make a two-level stretch ceiling, you need to make a frame of metal profiles, which are intended for plasterboard structures. The plane of the structure must be strictly horizontal. Using a laser or water level, you need to mark marks in each corner of the room. From these marks, a continuous line is drawn with a chopping cord around the perimeter of the room.
Attach the U-profile along the marked line with a puncher and dowels. The same profile must be installed on the ceiling according to the previously laid markings. The shape of the box is straight and curvilinear. To fix the profile along a curved line, you need to cut it with metal scissors, keeping an interval of 3-4 centimeters, in such a way that you can bend it to the required curvature.
To the profile fixed to the ceiling, attach drops made from profile sections. The lower edge of the drops must be at the same horizontal level with the wall profile. Together they will form the lower plane of the entire two-level structure. The fastening interval is 25-30 centimeters.

From two sections of the profile and U-shaped profiles, assemble the box, twisting it with metal screws so that you get a structure that looks like a rectangular pipe. This design must be attached to pre-installed omissions. Carry out all fastening work on the profile with self-tapping screws of the “klopik” type using a screwdriver.
Attach the installed box to the wall profile with a wide supporting profile. Strict correspondence of horizontals and verticals is mandatory, you can check the angles using a level. In this way, assemble the entire frame around the perimeter of the room. Subsequently screw the baguette for the stretch fabric to the box. When cooling, the stretch ceiling film will be strongly stretched, so the design of the box must be of high strength, designed for the load and withstand the tension of the PVC film.
The next step in the installation of two-level stretch ceilings with your own hands is the laying of the electrical wiring necessary for arranging the backlight and lining the frame with drywall. Cut sheets of the required size and install on the box, fixing on drywall with self-tapping screws. After installing all the elements, it is necessary to strengthen the corners with the help of a perforated corner, which is usually fixed to the gypsum putty.

All recesses from self-tapping screws and seams must also be puttied. After the putty has hardened, the box must be sanded with a special grinding grater. Mark the locations of the built-in lights and drill holes using the appropriate “crown” nozzle, then prime the surface of the box and paste over with wallpaper, or apply paint. In this way, the ceiling of the lower level is performed. Installing a stretch ceiling in execution is much easier.
Ways of fastening the stretch fabric
So, the installation of stretch fabrics requires the following equipment and tools: a puncher for fixing the guide profiles to the walls, a heat gun with gas cylinder for heating the panel and its installation, a screwdriver, a level for creating markings (it is best to use a laser, but if this is not possible, then you can use a hydraulic one), a stepladder for convenient work at height, spatulas and special blades for stretching and fixing PVC film.
The tension web itself must be attached to the installed profiles with a glazing bead, harpoon or wedge method. The most common mounting method is harpoon: a harpoon is welded on the machine along the edges of the film - a special hook that is needed to fasten the profile and stretch the web.
The ceiling, equipped with this technology, can be easily dismantled and re-installed during repairs or flooding, unlike bead and wedge. In this case, the canvas is recommended to be cut out in a special way and very accurately: optimal solution, if it is less than 7% of the area of the covered ceiling, as shown in the video on the installation of a two-level stretch ceiling.

The wedge method involves fastening the web, which has a larger ceiling area, so the film is carefully measured and, after stretching, excess material is cut off. The bead method is similar to the wedge method. However, the film must be attached to the profile using a special tape that provides excellent tension.
An improved technology for installing a two-level stretch ceiling requires a mandatory accurate drawing with dimensions. The canvas is cut out and sewn up only after measuring the room! When fixing a stretch ceiling to a plasterboard box or frame, it is necessary to ensure the reliability of fixing the baguette and the high density of the profile to the mounted two-level system. The type and duration of operation of the new ceiling will depend on this.
Before installing a two-level stretch ceiling, it is recommended to heat the canvas with a hair dryer or heat gun to plus 60 degrees to make it more elastic. When installing such a design, the air temperature in the room should be at least plus 40 degrees Celsius. The film is attached first in one corner, fixed in the opposite, and only then - in the remaining corners. The last corner is attached the longest and most difficult.

After that, the canvas must be fixed in profiles with a step of 8 centimeters: fix the film with a spatula throughout the baguette, evenly pulling it. Cut off the remnants of the canvas if you have chosen wedge or bead technology. Smooth out any streaks and creases by heating the film with a blow dryer. When the room is cooled to normal temperature, it will smooth out, and the ceiling surface will become perfectly flat and smooth.
Use a flexible masking tape to cover the technological gap. Cut holes in the canvas for lamps. To protect it from warm lamps, glue the edges with a heat-insulating ring. If the light is behind the stretch fabric, it will evenly illuminate the entire area. But the lamps do not touch the film.
As you can see, tension mounting technology two-level ceiling available to everyone in their home. In addition, it is these ceilings that are functional, voluminous and elite. With a little time and effort, you will get a magnificent overhead arch that will cover all the defects and irregularities of the old ceiling. In addition, no water is afraid of such a design if you are accidentally flooded by neighbors from above.
Stretch ceilings from several tiers have not surprised anyone for a long time. Such a finish not only looks spectacular, but also allows you to hide structural elements or communications. Thanks to the appearance of special profiles for level transition, it is easy to make a two-level stretch ceiling with your own hands. Most of the work is done by the manufacturer. Based on the provided sketch, the calculation and cutting of the material is carried out, as well as the preparation of structural elements. It remains only to assemble the frame and stretch the canvas. This will result in significant savings in installation costs. We have prepared step-by-step instructions in which we will consider in detail which profile to choose to create two levels, how to properly prepare a drawing for the manufacturer and perform installation.
Types of two-level structures
According to the device, there are three main options for bunk stretch ceilings. They differ in the materials used and the complexity of manufacturing.
Ordinary
The canvas is stretched in two levels, the design is a simple transition without a niche and hidden lighting. Mostly PVC film is used. First, a frame of special profiles is installed, then the canvas is stretched over both levels. Often tiers are made from materials that differ in color and texture. The contrast emphasizes the difference.


Combined
In such a ceiling for tiers use different materials. The second level (closest to the floor) is assembled from drywall. To do this, mount the frame and sheathe the GKL. Then the structure is puttied or painted.
As the upper level (located closer to the base floor), a film or fabric web is pulled. The baguette is attached to the vertical part of the plasterboard structure. So that it does not move away under the action of tension, the junction is pre-strengthened. To do this, put an additional aluminum profile or wooden beam, since drywall does not have sufficient strength.


The main disadvantage of this option is a longer installation time. For a stretch ceiling, it is enough to put the frame and stretch the film or fabric. And in the case of drywall, you have to additionally finish it and wait for the putty, paint, etc. to dry. This takes time.
backlit
The general principle is the same as for a conventional two-level ceiling. But additional lighting is mounted. To do this, take a special frame, which then fits the LED strip. There are such baguettes for installation both near walls and between levels. The backlight can be located around the entire perimeter, only on one tier or in a niche between them.


Minimum room height for installation
During the installation of any tension structure, the ceiling is lowered. If the room is too low as a result, it will be inconvenient and uncomfortable to be in it.
- for living rooms and kitchens in a temperate climate - 2.5 m;
- in hot or cold areas - 2.7 m;
- for corridors and hallways - 2.1 m.

The smallest distance that the ceiling will drop is determined by the width of the profile. For baguettes of the first level, this is 3-4 cm, the second - 8-10 cm. That is, the height will decrease by at least 11 cm. The calculations are valid for rooms with a slight vertical overlap.
It turns out that a height of 2.7-2.8 m is enough for a two-level stretch ceiling. Hallways and hallways may be lower.
Material selection
A thin polyvinyl chloride film (PVC) or synthetic polyester fabric impregnated with polyurethane is used as a web.
From the point of view of two-level designs, the most important differences between the options are:
- The film is more elastic, so you can make any forms of levels with it.
- PVC fabric has more color options (about 200) and textures (glossy, matte, satin and various textures). Polyester is only matte and has only 20 colors.
- For fabric and film, baguettes are made with different type fasteners. Special profiles for the level transition are produced only with a harpoon mount for a PVC sheet.


The film is cut out in production exactly in size. A harpoon is welded to the edges (a strip of thicker PVC in the form of a hook). During installation, the canvas is simply tucked into a baguette using special spatulas. The harpoon is inserted into the profile groove, snaps into place and securely fixes the material. Installation is quick and easy as the blade dimensions and tension are factory designed.


For these reasons, fabric is rarely used in such designs. It is pulled only with combined ones (that is, in combination with drywall). The most common version of the ceiling in two levels is a PVC sheet with a harpoon. It’s easier to pick up a baguette and create a complex design.
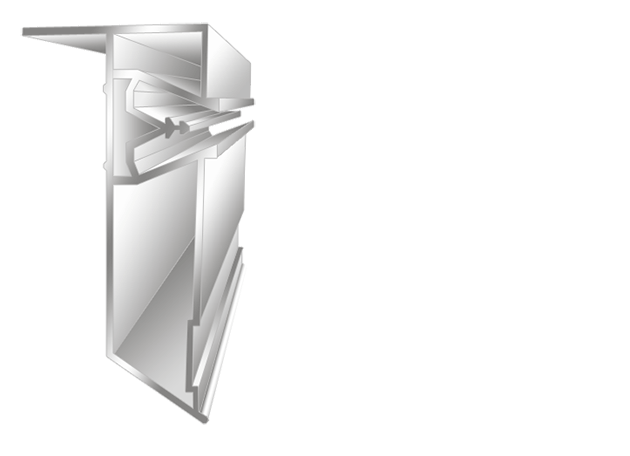
Choosing a profile for a two-level ceiling
There are also several options here. You can take a separating baguette, which is used to connect the canvases at the same level (marked with the letter combination SP) and a chipper. This is a profile resembling the letter "Y" or "Z" in cross section.


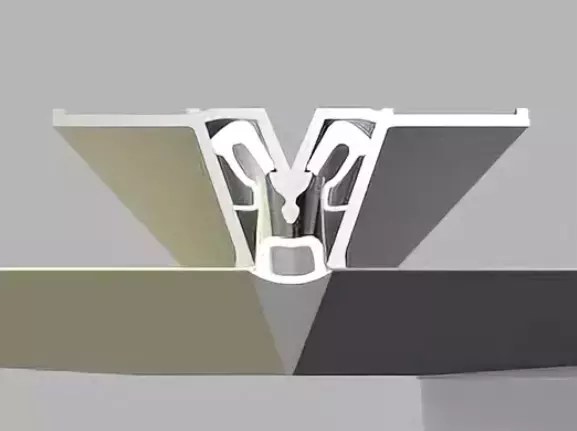

With this method of mounting the frame of the second level, the separating baguette is placed not horizontally, but vertically. It is fixed to the top of a beam or a solid plank. And a bump stop is screwed to the bottom. One piece of the film is inserted into the upper part of the separating profile and stretched at the same level. And the other one is filled into the lower slot and carried out vertically to the chipper, where the film changes direction to horizontal.

But this method is relatively difficult to implement. More often they take baguettes specially designed for bunk ceilings. They are divided into several varieties, each with its own marking and purpose:
- PP- for easy transition between levels (tier height can be 5, 6.5 or 7.5 cm).
- NP- to create a niche with inter-level illumination (the transition height is 5 cm).
- KP- used together with the previous profile, performs a supporting function (height 9 cm);
- PL- for a level transition with illumination, the baguette has a niche for installing an LED strip, which is closed with a light-diffusing insert (height 7.5 cm).


All types of profiles are used to create both straight and curved structures (circles, ovals, waves or spirals). To make the frame bend, the baguette is filed every 15 mm. And then, for strength, they are fastened with aluminum tape and self-tapping screws (approximately one strip for three files or 2-4 cm).


Let us consider in detail the installation technology of a simple two-level stretch ceiling. The material of both tiers will be PVC film. As a frame, we use the ceiling profile PP 75 for a stepped level transition. In the lower tier we will build in spotlights. This is the simplest design of a two-level stretch ceiling for self-installation.

Required Tools
For installation you will need:
- stepladder (can be replaced with a stable table or stool);
- tape measure and pencil;
- laser level or hydraulic level;
- marking cord (chocline);
- perforator with a drill with a diameter of 6 mm;
- screwdriver or screwdriver;
- grinder or hacksaw and file;
- gas heat gun (can be rented);
- a set of spatulas for filling the film;
- sharp knife.


Preparatory work
Before starting the installation of a two-level stretch ceiling, you need to take the dimensions of the room, draw a diagram and transfer it to production. Then the base floor is prepared for installation.
Measurement of the room and construction of the ceiling scheme
It is necessary to accurately determine the length of each of the walls and calculate the value of all angles. Even in a rectangular room, these dimensions may vary slightly. It is also important to determine where the electrical wiring and other communications, if any, are located.

Given these data, you need to schematically draw the room and build a sketch of the future ceiling. It notes:
- room dimensions;
- which of the tiers will be the top, and which - the bottom;
- distance from the border of the 2nd level to the walls.

The scheme of the stretch ceiling, together with the dimensions, is transferred to production. Specialists will create a frame and cut out the film (if the ceiling is wider than the roll, the segments are soldered on a HDTV machine).
Attention! It is better to order everything in one organization. So the frame and canvas will fit exactly to each other.
Preparing the base
While waiting for the materials, you can do the draft ceiling. The remnants of the previous finish are removed from it: paint, plaster, wallpaper or tiles. To do this, use a spatula and water, sometimes with the addition special means. If you do not remove the old coating, it may fall on the film after installation. Then the ceiling will sag ugly under the weight, and if the corners are sharp, then it will break. It is easier to prevent such problems than to repair or completely change the canvas later.

The surface is carefully inspected for cracks and joints of concrete slabs. They need to be repaired, otherwise in the future the ceiling may inflate or stick to the base when opening a window or door. To seal the cracks, mounting foam, sealant or plaster is used, which is sometimes laid in several layers. Before applying the next, wait until the previous one dries.
Careful leveling of the base is not required as it will be hidden. But you need to prime the ceiling with an antiseptic. This treatment serves two purposes: it strengthens the surface and prevents mold from developing. This is important, since under the film a humid microclimate is created that is favorable for the fungus.


Ceiling markings
The drawing must be transferred to the ceiling and walls. First, measure the height in the corners and places of the level transition. From the lowest point, the required distance is set aside (by which the ceiling will fall). Then a chopping cord is pulled between the marks, pulled back a little and released. Thus, with the help of a chokeline, horizontal lines are applied to all walls.


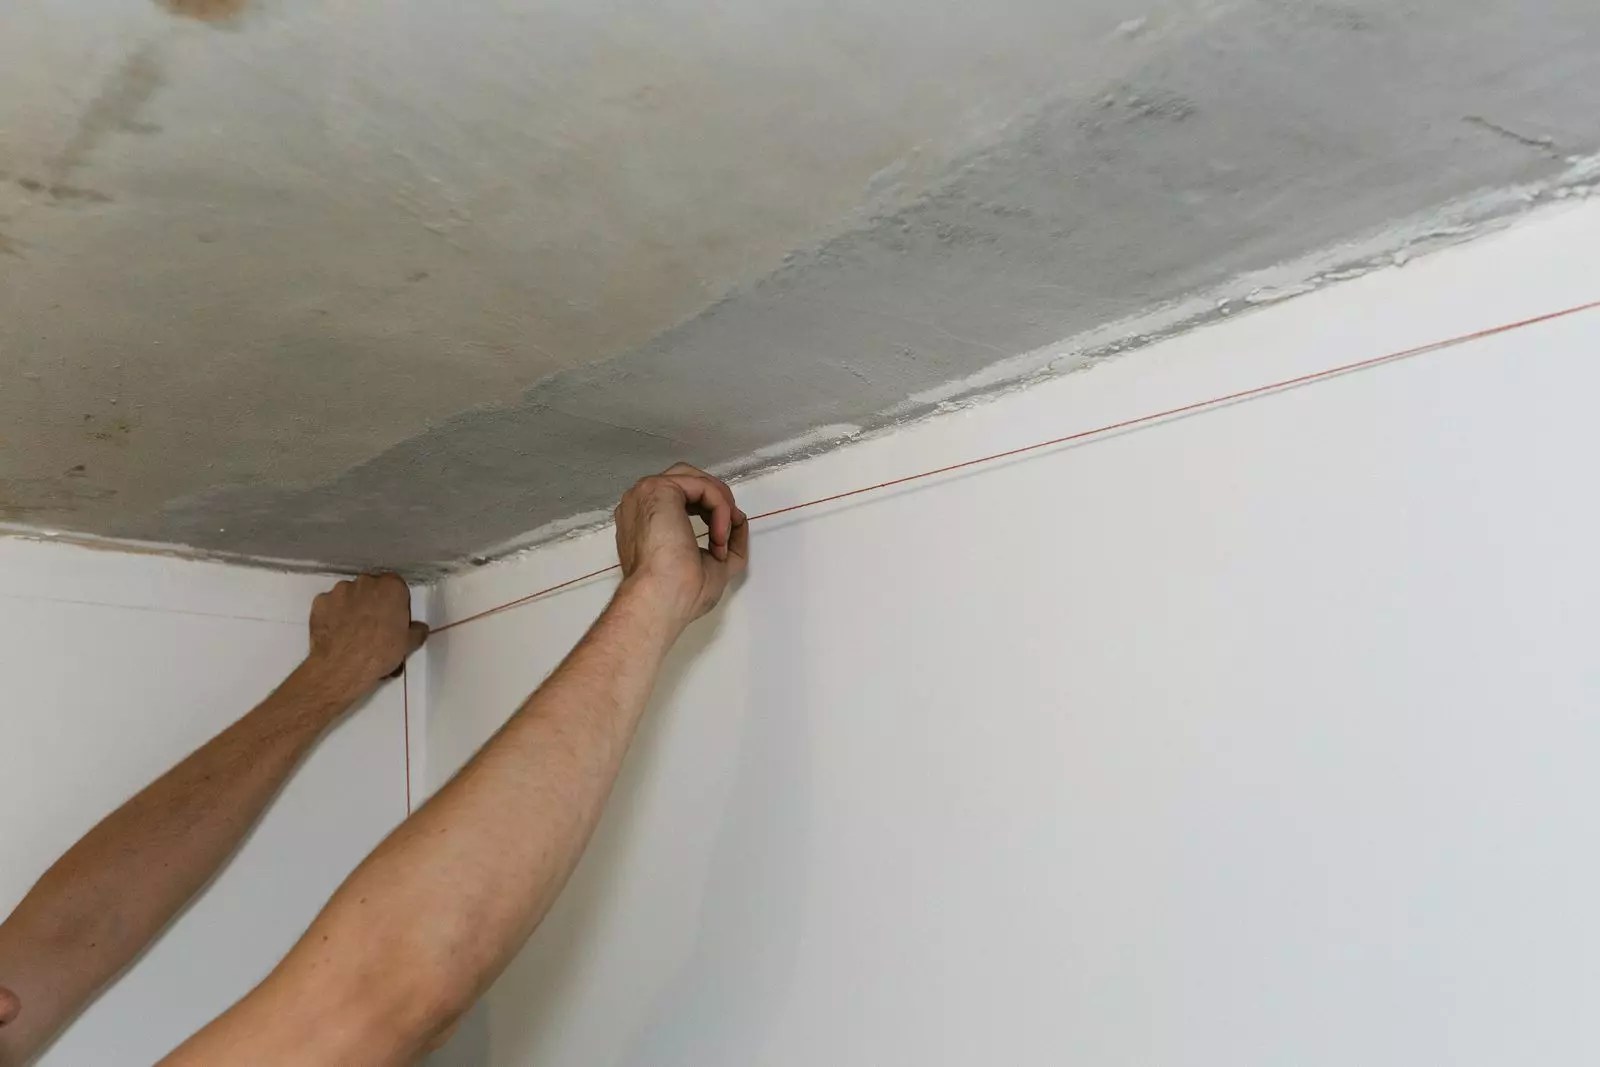
The second level is marked similarly. The boundary between the tiers is marked on the ceiling. For straight lines, use a marking cord. Curved ones are marked with the help of different devices: templates in the form geometric shapes, a thread fixed at one point with a pencil at the second end, etc. In the case of finished structures, simply apply the workpiece to the ceiling.

Also note the location of the lamps. Check that the required distances (between them, to the walls or to the level transition) are the same.
Advice! It is better to note the location of the light bulbs on the floor. Then they will be easier to find after installation.
Frame installation
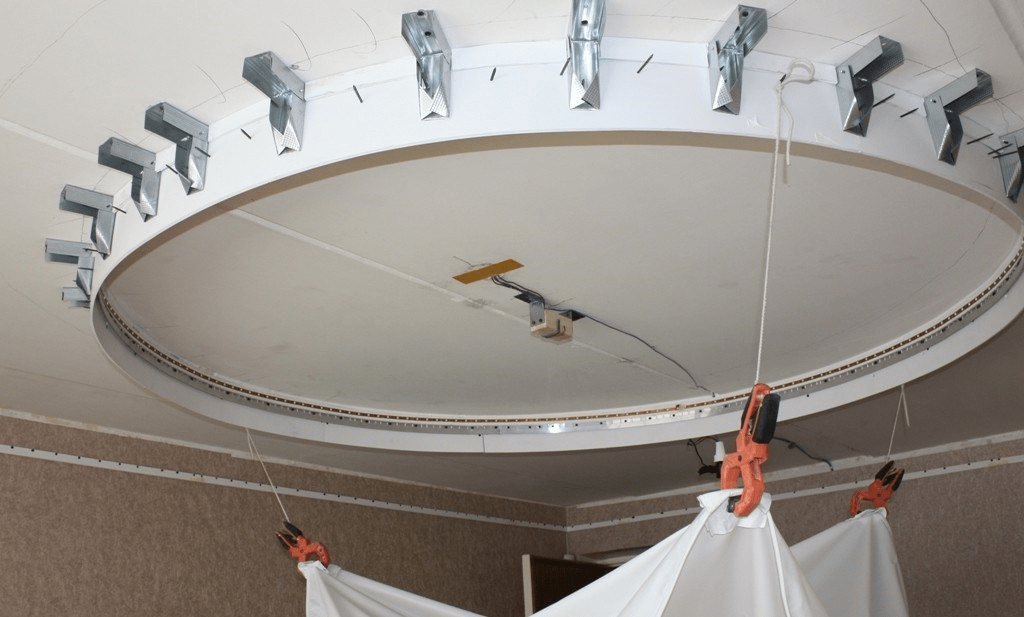
If the dimensions of the 2-level ceiling structure are too large, it is delivered in separate parts. Then you have to collect on the spot.


Then the profiles are attached to the walls and ceiling. If you screw the baguette PP 75 directly to the slab, the height will decrease by 9.5 cm. Sometimes more is required, then the frame for a two-level stretch ceiling is installed on metal corners or wooden beams. To maintain a horizontal plane, use a level or a thread stretched between points on the walls.
Then a wall baguette is mounted. The fastening step is 10-15 cm. On loose and fragile partitions, as well as closer to the joints, it is better to reduce it to 5, and sometimes even to 2-3 cm, or to strengthen it with spacers.


The adjunction of baguettes is done closely without gaps and level differences. In order not to damage the web at the junction during installation, the edges of the profile are processed with a file, and the junction is sealed with aluminum tape.
Installing mortgages for lamps and laying electrical wiring
You will need platforms, flexible steel suspensions for fastening and self-tapping screws "bugs" 3.5x9.5 mm. For spotlights they produce (fixed of different diameters and universal).

Given the distance from the base floor to the film, determine the height of the suspension. The excess is cut off, the plate is bent with an "accordion" and attached to the site. So it will be possible to further adjust the height of the structure, and the strength will not suffer. Holes are drilled in the floor slab, then mortgages are fixed in them with self-tapping screws.


After that, proceed to the laying of the electrical cable. The lamps are connected to the network in parallel. If one of them burns out, the rest will work.
The wire is pulled to the first platform, a loop is made about 10 cm long, and then to the next one, etc. So that in the future the cable does not touch the stretch ceiling, it is fixed to the suspensions. To do this, it is convenient to use small cuts of perforated tape or plastic clamps.

Important! The wire must not be pulled, there should be a slight sag.
The ends of the loops are cut, cleaned and inserted into the terminal blocks. Such connection of fixtures is safer and more convenient than twisting. So that the wires do not interfere during installation, they are bent up and removed by the mortgages.
In order for the film to stretch and become more elastic, it is heated with a heat gun. Before starting this stage, close the doors and windows so that there are no drafts.

The canvas is carefully unfolded on the floor, and then hung to the corners with crocodile clips. The film is heated and gradually filled with a spatula into a baguette. The sequence is:
- first one of the corners;
- then the opposite and the rest;
- the middle of the walls;
- between these points;
- and further around the perimeter.

Thus, a smooth canvas without wrinkles and folds is obtained.
Note! First pull the lower tier, and then the upper.


Installation of spotlights
According to the marks on the floor, they determine where the mortgages are located. Thermal rings are glued to the ceiling, which are needed to protect the PVC film from overheating. During operation, the material will not melt when the light is on and will not disperse from the cut.
The protector is smeared with mounting glue (preferably Cosmofen CA-12) over the entire surface so that voids do not form. Then the ring is applied to the ceiling and pressed for 2-3 seconds, without moving or smoothing.


When the protection is stuck, the film inside is cut out with a construction knife. Trim the mortgage so that it is flush with the ceiling. Pull out the wire, connect the lamp and put it in place. Built-in models have locking springs on the body that need to be pressed and inserted into the hole on the ceiling.

Seam masking
Due to the design features of the baguette, after installing the stretch fabric, gaps remain: between the ceiling and the wall, as well as the upper and lower tiers. To close the gap, use a decorative plug. This is a PVC insert, which is chosen according to the color and texture of the film.
Masking tapes are available in several varieties. Along the perimeter of the room with a harpoon mount, insert:
- T-shaped plug - for flat walls;
- SL - wide insert, allows you to hide gaps on curved sections;
- L-shaped (corner) - more elastic, suitable for hard-to-reach places or curved baguettes.


To mask the level transition, other models are used, since the size and shape of the gap in the dividing profile is different:
- oval (looks most aesthetically pleasing);
- "fungus";
- tube (round section).


Just ten years ago, almost no one knew about stretch ceilings. Installed in apartments and private houses drywall constructions equipped with backlight. Now stretch ceilings are gradually replacing drywall, which is not very durable. After a while, the drywall will begin to crack, and the entire repair will have to be redone. Previously, the stretch ceiling was made single-level, but building technologies do not stand still. Now two-level stretch ceilings for the hall have become popular. Photos, features and installation - further in our article.
pros
These options are acceptable if it is necessary to hide from the eyes the defects and shortcomings of the base ceiling and communications. At the same time, not much time is allotted to resolve this issue. You can also stop at the installation of stretch fabrics when an additional layer of insulation materials is planned. The thickness of this layer does not really matter.
Tension covers will also good choice if you are tired of frequently maintaining and repairing the ceiling surface. Even if the house is subject to shrinkage, and cracks begin to form on the surface, this will not be noticeable. The canvas, which is used in the process of installing ceilings, is very elastic. It easily compensates for even significant movements of the structure.
Flaws
But do not give preference to these ceilings, if the room is not possible to maintain a constant temperature regime. With insufficient and irregular heating, PVC films can suffer. As a result of exposure to cold, the quality of the film or fabric deteriorates significantly. These materials gradually lose their unique properties up to complete destruction.
Small children can also be a limitation for the installation of two-level stretch ceilings, and indeed any stretch structures - they are easy to pierce with sharp objects. Also, the material can be easily torn as a result of children's games.
Another downside is the cost. At first glance, it is acceptable, but if you include installation costs, as well as equipment, in the price, then it is possible that it will turn out to be too expensive.
Features of two-level structures
Two-level stretch ceilings (photos of examples are in our article) are no different from single-level ones. Modern designs are a PVC or fabric material fixed on a special frame. After installation work, the canvas is stretched and becomes perfectly smooth without seams. Although at the same time the canvas actually has very strong welding seams.
Design options for two-level products
Designs can have a different handicap, color and material. Today, PVC films and matte fabrics are widely used.
One of the types decorative finishes ceiling space is a two-level stretch ceiling. Moreover, such designs are very popular in the implementation of various design projects. Wide selection textures and colors allows you to use stretch ceilings when decorating a room in almost any style and create a unique interior, filling the room with warmth and comfort.
It is quite possible to install two-level stretch ceiling structures with your own hands, for this you need to choose the right materials and tools, as well as understand what two-level stretch ceilings are, and learn a few lessons about installation rules.
Design features
At the heart of a two-level stretch ceiling is a canvas made of polyvinyl chloride film. To fix it, the frame is pre-assembled, after which the surface is brought to an ideal state by stretching the main canvas. Stretch ceiling structure increases the aesthetic characteristics of the surface, and in some cases visually increases the main parameters of the room. The canvas can have a glossy or matte surface, the choice in this case depends on the height of the ceiling and the final result.

The design of a two-level stretch ceiling is characterized by some features that you should familiarize yourself with before proceeding with the installation of the structure:
- The place where it is planned to install a stretch ceiling. This factor should be taken into account for one reason, if the structure will be installed in a room with high level humidity, then sheets of moisture-resistant drywall will be required to create the frame. In rooms with normal humidity, it is quite possible to use ordinary material.
- Stretch ceiling shape. Before proceeding with the installation of the structure, it is necessary to draw its diagram and calculate the parameters. With all the correspondences of the base ceiling and the future design, you can safely begin installation work.
- Frame material. You can assemble the basis of the tension structure from wooden bars or a metal profile. It should be noted that using a profile for two-level stretch ceilings, you can create structures of almost any shape, thanks to their ability to easily bend. Various types of profiles for stretch ceilings make it quite easy to do.

A two-tier stretch ceiling has the following advantages over other similar structures:
- Fast assembly and installation.
- Perfectly flat finished surface.
- Aesthetically attractive appearance.
- Protection of the premises from water ingress in case of flooding from neighbors from the upper floor.
However, there is one, but a serious drawback of stretch ceiling structures. In particular, we are talking about the fragility of the canvas. In this case, it is important to remember that the stretched canvas requires careful handling during installation and operation. In addition, you should know the temperature regime for stretch ceiling structures. As for the high cost of this type decorative design ceiling space, it should be noted that the practicality and durability of the design make it possible to recoup all the costs of installation and purchase of materials.
Types of two-level ceilings
The design of a two-tier stretch ceiling involves the installation of two steps, each of which can have different shape. Tiers can be made from any fabric, combine several textures and colors. The first step in the installation of a two-level structure is the creation of a frame with a base coat. The main material of this process is plywood, wooden bars, metal profile and tires.

All ceiling structures, consisting of several tiers, are divided into several types:
- An ordinary ceiling is a surface that consists of two tiers of tension material.
- Combined ceilings are a plasterboard box and stretch fabric.
- In the backlit design, one stretch fabric can be installed or with the addition of a plasterboard insert.

Before stretching a two-level ceiling, it is recommended to draw a diagram, take accurate measurements and calculate the components.
To create a conventional design, a simple frame is assembled from plywood, wooden bars or an aluminum profile. A combined stretch ceiling requires a different base, so steel profiles are used in this situation.
If we are talking about a backlit ceiling, then for the manufacture of their base it is best to use metal tires and corners. In this case, the calculation of the frame is carried out taking into account the implementation of hidden lighting and the corresponding wires. Therefore, it is recommended to entrust the installation of a backlit ceiling to experienced craftsmen who perform all actions in accordance with specific instructions.
Features of the installation process
You can install a multi-level stretch ceiling in the room with your own hands, the main condition is compliance with the requirements and rules. All activities must be carried out in a certain sequence. Moreover, for beginner home craftsmen, the first step in installing a two-level stretch ceiling should be drawing up a sketch of the future design.


In general, the assembly and installation of a stretch ceiling involves the following steps:
- Frame assembly. At this stage, they determine what shape the structure will be, make rough sketches and fix the main structural elements on the base surface. For the correct imposition of tiers on each other, it is necessary to take accurate measurements and alternately connect the tiers. It should be borne in mind that the multi-level structure must be strong enough, so it is best to use an aluminum profile. Such elements are fastened using a simple technology, which involves fixing the guides and attaching profiles to them using self-tapping screws.
- Installation of the upper tier. At this stage, the contours of the structure around the perimeter of the room are marked, due to which the location of the first level becomes visible. For more accurate marking, professional craftsmen recommend using a laser level. Adjusting hangers should be placed in increments of 50-60 cm, while also checking the location using a level. Profiles are installed at a distance of about 30 cm from each other. Plasterboard sheets are applied to the finished structure and fixed with self-tapping screws.
- Installation of the ceiling of the second level. Installation of the second tier is carried out taking into account the location of the ceiling of the first level. In the case of rectilinear structures, there are no particular difficulties. As for curvilinear figures, it requires fitting the profile to the appropriate shape. For this purpose, make several cuts in the profile and bend it. The profile fastening starts from the wall, and the guides are placed in the central part. In this case, the frame is more durable. The completion of the work is the sheathing of the frame with plasterboard sheets and the tension of the main canvas.


To facilitate the work with drywall sheets, first cut out the strips in accordance with the sketch of the future design, then moisten them and give the desired shape. Wet drywall bends better, which simplifies the installation process. After drying, the drywall strip acquires strength and can be fixed to the frame using self-tapping screws. After assembling the structure, it is imperative to seal the joints of the plasterboard strips. Next, a lighting system is installed, the surface is covered with a primer layer and a finishing material is applied.
Two-level stretch ceiling structures can decorate any interior, but for this you need to understand the question of what a two-level stretch ceiling is, and take the installation process very responsibly. Particular attention should be paid self installation individual structural elements. To create an aesthetically attractive stretch ceiling structure that will perfectly fit into the overall design of the room, it is necessary to correctly determine the shape and color of the future stretch ceiling, choose the material depending on the design style.

Masters who are engaged in the installation of stretch ceilings on professional level are advised to adhere to the following rules:
- To emphasize the shape of the structure, several shades should be combined.
- For a combined type ceiling, it is recommended to combine canvases with a glossy and matte surface.
- In addition to the tiers, you can use fragments of drywall sheets.
- You should not refuse original patterns, drawings, ornaments and photo printing.
- A multi-tiered structure should have an unusual shape in the form of a wave, circle, cone or oval.
- To separate the ceilings, it is recommended to use various inserts and colored lamps.
Installation of a stretch ceiling structure is carried out using harpoon or wedge technology. The first option is distinguished by its simplicity, therefore it is more suitable for beginner home craftsmen. For correct installation it is required to correctly measure the edging of the ceiling and connect all structural elements tightly enough.

To resolve the issue of how to stretch a two-level stretch ceiling with a large difference in levels, it is recommended to use the wedge method. It involves uniform heating of the main canvas and its clamping under the baguette in accordance with the markings. It is recommended to warm up the air in the working room to 40-45 degrees before stretching the canvas. In this case, the material becomes softer, which simplifies the installation process several times.
For a more even tension, experts use a building hair dryer. With its help, the material is smoothed and acquires perfect smoothness.
Two-level stretch ceilings in the interior
Multi-tiered stretch ceiling structures are suitable for any design, with their help they make out the ceiling space in rooms of different sizes. When decorating small rooms, it is better to give preference to white, which visually increases the size of the room and makes it more comfortable. To create a romantic atmosphere in the bedroom, light shades should be selected, and the multi-tiered structure on the ceiling should be supplemented with hidden lighting.

Some feature can give a small room a ceiling with a glossy surface. However, if bright light irritates the body, then you can use matte canvases. Also in small rooms it is not recommended to use structures of complex shape, which in turn tend to visually reduce the size of the room.
The two-level stretch ceiling is the best option decoration of the ceiling space in the children's room. A wide variety of colors and the ability to create almost any form of plasterboard sheets allow the designer to realize the most daring and unusual ideas. As for lighting, the ceiling in the children's room can combine various chandeliers and spotlights. The illumination of each tier individually fills the entire room with light as much as possible and, if necessary, highlights separate zones.

With the help of a two-tier stretch ceiling, it can be divided into appropriate zones small apartment, where most often the kitchen is combined with the living room. In such situations, the ceiling structure is complemented by the installation of various geometric details or delimits space through straight lines.
To give such a room a festive look, a two-tiered composition is created on the ceiling. white color, which is complemented by lighting in the form of a chandelier and several lamps, including spotlights.
The idea to turn the ceiling space into a masterpiece of multi-level design with the help of a stretch film always rests on the need to build a rather complex frame. Installation of a stretch two-level ceiling requires special care in the performance of work. Any negligence can affect the supporting structure in the most unexpected way. It often becomes clear how correctly the work was done only after the completion of installation work on a two-level decor.
Stretch decor in two levels looks much nicer
The design of a two-level stretch ceiling
The main idea in the construction of the decor is to install several film canvases on the ceiling base, creating the effect of a three-dimensional structure. It is clear that such an idea can be realized only with the use of a special frame and fasteners.
The essence of the design is as follows:
- A two-level ceiling is always built using a central supporting frame, which accounts for the bulk of the load that occurs when installing a stretch fabric;
- Most of the baguettes and profiles are attached to the main part of the frame, with the help of which the PVC decor is stretched at different levels;
- With the help of additional overlays, it is possible to mask the lines of the slot and the lines of joints, to close the supporting profile of a two-level ceiling at the inflection lines.
Important! All baguettes and profiles used to install a two-level stretch fabric must be reinforced with embedded strips and slats.

The frame under the film has to be seriously strengthened
The main difficulty in building two-level structures is that the tension fabric stops on the frame with a force of at least 5-7 kg per meter of PVC film. This ensures uniform and high-quality tension of the entire panel. But, on the other hand, it is necessary to install additional ribs and strips that reinforce the frame in order to prevent deformation and displacement of the support frame.
Installation options for two-level stretch ceilings
The number and variety of lines and transitions in the design of the ceiling decor, which consists of several levels of decorative film, is limited only by the imagination of the customer and the capabilities of the craftsmen.
If the task is to build two-level stretch ceilings with your own hands, then it is best to limit yourself to one of the most popular and at the same time affordable and easy-to-arrange schemes:


- Variant of a soaring two-level stretch ceiling.
Of course, the project of the future film decor is chosen based on the characteristics of the interior of the room, the experience and capabilities of the master. But even the simplest designs can look quite spectacular, especially if you make them yourself.

A successful combination of a dark upper level and light boxes and a chandelier
Two-level stretch ceiling on a box
The ceiling structure with a second level installed along the perimeter of the surface can be made in several versions. In the simplest case, the second level is assembled in the form of a box installed in the area where the ceiling adjoins the wall, photo.

The basis of the ceiling decor from the profile
In this case, to build the base of the upper part of the two-level stretch decor, a double profile or a special design is used, in which two edges of the upper and lower panels can be fixed simultaneously.
In order to securely hold two stretched film decors at the same time, the frame of a two-level stretch ceiling must be sufficiently rigid, therefore, aluminum corners and galvanized steel profiles, sometimes timber and even plywood, are used for fastening.

Prefabricated frame option
In such a design, an unusual method of fixing the tension web is used, when the lower level film is installed on the ceiling frame with a bend at an angle of 90 °.

Scheme for a box of timber
If the frame is made of lumber and plywood, then an additional profile with a rounded edge, also called a chipper, is used to bend the panel.
Advice! Instead of a chipper, you can put any wall baguette, in which the bearing part is made with a tide along the edge.
It is clear that the edge or outer corner of the supporting frame does not have to be straight, very often the upper level of a two-level ceiling is made in the form of a complex curve, rounded arched frames can also be used.
Soaring two-level ceilings with lighting
Stretch decor can be built according to a more complex scheme. In this case, top-level lighting is used, which creates the effect of a floating ceiling.

A more sophisticated version with backlight
Structurally, such a ceiling is assembled on a frame made of aluminum and steel profiles. The upper level is mounted on a conventional wall baguette, fixed on the main frame in a horizontal position.
The lower level is more complex. Firstly, the place of attachment of the tension web is shifted relative to the supporting console by 60 mm; an aluminum corner 40x60 mm is used to remove the system from two baguettes.
The upper level is raised above the second canvas to a height of only 40-50 mm, a niche of 60x60 mm is formed between the frame parts, into which the backlight will be laid in the future.
The lower web of a two-level ceiling is stretched onto an h-profile installed upward with a lock, tension material bypasses the second fastener element and is fixed on the wall using a standard wall baguette.
A similar scheme is widely used for arranging suspended two-level ceilings with an insert or niche located in the center of the room. Technologically, the assembly of such structures is no different from conventional box-shaped schemes, the only condition is the use of split embedded rails, to which the stretch ceiling profiles are attached.
How to make a two-level stretch ceiling with your own hands
Installing a ceiling decor with two levels of vinyl film is not a particular problem, but first you will need to decide how to assemble the supporting frame.
There are two options for frame frames used for two-level ceilings, which are easy enough to assemble at home with your own hands:
- The wooden frame is assembled from timber and lining, to install the canvas in the corner and the lower tier, baguettes for the film are mounted;
- They use a ready-made aluminum alloy ceiling profile with already built-in locks.

The simplest option on an aluminum frame
To independently make a complex structure for a two-level canvas with rounded edges and curvilinear transitions is only possible for an experienced craftsman, in an amateur version similar designs are rarely obtained. According to reviews, even experts prefer to use standard profiles, resorting to home-made frames only in the case of arranging non-standard stretch ceilings in shape and size.
How to make a frame of two-level stretch ceilings
If the schema is selected simplest design with the arrangement of the box around the perimeter of the ceiling, it is easiest and fastest to use a standard profile of the PL75 type.

Under the installation of the profile you need a bar
The use of prefabricated aluminum frame parts greatly simplifies the installation process, especially since the range of fasteners is large enough to produce the most complex multi-level structures. You only need to choose required view profile and prepare the base for mounting under stretch ceilings.
Box under the stretch ceiling made of plywood
If a two-level ceiling decor needs to be installed at minimal cost, then the frame for the canvas can be assembled with your own hands from pieces of plywood and boards 20 cm wide and 25 mm thick, and in addition, you will need a beam, which ensures the longitudinal rigidity of the entire structure.
Preparation for installation of a two-level stretch ceiling
Before proceeding to installation work, it is necessary to clean the ceiling from the old finish, remove dust, debris, treat the surface with a reinforcing compound. It will be useful to coat the concrete surface once with a disinfectant solution that blocks the formation and spread of fungal growths.
It will also be necessary to repair all the cracks and joints between the plates with a repair mortar. This is done in order to avoid possible sagging of the fasteners, if suddenly the installation site of the dowel or self-tapping screw falls on the defective part of the concrete ceiling.
Necessary tools and materials
To make a two-level ceiling, the following tools are required:
- Perforator with a set of impact drills with a diameter of 6-12 mm;
- Screwdriver with a set of bits and drills;
- A marking tool, a laser level, a construction cord or a bubble device for drawing the horizon over a long overlap;
- Scissors for metal, electric jigsaw with a set of saws.
In addition, you will need dowels with self-tapping screws and plugs with a diameter of 8 mm, “bugs” fasteners, corners, an aluminum carrier profile if the frame for a two-level decor is made from a standard baguette. If the frame structure is planned to be assembled with wood, it will be necessary to prepare a board or pieces of plywood 20 cm wide and 15-20 mm thick.
It is clear that you will need the stretch fabric itself, a glazing bead or a harpoon, as well as glue and decorative overlays that will close the slots and joints in the junction areas. Depending on the scheme of the frame structure, you will need a wall and ceiling baguette, you may need to purchase a double W-shaped profile for joining several stretch ceiling sheets.
Installation of structures of two-level stretch ceilings
The simplest is the installation of a standard profile PL75 or any of its analogues. Before installation, markings are applied to the ceiling. First of all, a lining beam is mounted on a concrete slab, its task is to level the horizon of the base of the future frame, otherwise the two-level ceiling will turn out to be not quite even.

The frame is reinforced either with wooden bars or triangles from the profile
For cutting and fastening wood detail it takes a lot of time and effort, so the craftsmen try to replace the bar with washers or short fiberboard linings. In this case, PL75 is mounted directly on the floor slabs using standard fasteners and embedded plugs.
Upon completion of the installation of the carrier profile, you can determine the height at which the lower plane of the two-level ceiling will be located. Only after transferring the markings to the walls, you can install “n” or “h” - baguettes for fixing the stretch fabric on the wall surface.
If the frame of the future two-level ceiling is supposed to be built of wood, then first of all it is necessary to apply the markings and contours of the future decor to the ceiling. The next step is to attach vertical plywood partitions using aluminum corners.
The next step is the installation of horizontal crossbars from a bar, they are fixed with ordinary carpentry screws. After you managed to align all the details of the frame, you can install baguettes to stretch the decorative canvas.

Top level first
If the design of a two-level ceiling decor consists of curvilinear arcs and lines, for example, the frame is made in the form of an oval or in the form of a complex rounding, then the profile for the film has to be reinforced with additional supports and corners.
For example, you can use a standard profile for fixing the frame of plasterboard ceilings, just cut the material into segments, make an incision and bend it into a mounting bracket.
The technology of mounting the canvas of a two-level stretch ceiling
The main problem encountered at the final stage is related to the correct distribution of the tensile force of the PVC film during installation.
Important! If a two-level ceiling consists of several sections, then the installation of the tension material must be carried out sequentially, mounting sections located at opposite ends of the ceiling.
This is done in order to compensate for the tensile force on the frame.
For the simplest structures in the form of a box, the installation of a stretch fabric begins with the upper tier. After heating and sealing the edges of the first level panel, you need to proceed to the installation of a decorative film in the center of the frame.
How to make backlighting in two-level stretch ceilings
PVC film does not tolerate heat well, so LED lamps are the only acceptable option for organizing backlighting. They are laid directly in the grooves of the baguettes, or mounted in frame niches specially equipped for lighting a two-level ceiling.
In the latter case, instead of a strip of LEDs, you can use recessed lights fixed on jumpers laid on the frame even during the assembly of the box. In this case, the wiring and fasteners are hidden on a wooden or aluminum frame, bearing ceiling panels.


Rings under the lanterns must be installed before the installation of the stretch fabric
Conclusion
Installation of a two-level stretch ceiling for the simplest structures does not require special knowledge and skills, it is enough just to choose the right ceiling profile and conscientiously fix the carrier bar and tension material. For complex curved PVC structures, experience and the ability to correctly assess the reliability of the assembled frame are needed. Therefore, multi-level and exclusive projects are best left to professionals.