How to install a split system indoor unit. Installing a split system: step-by-step instructions for self-installation
More and more people have recently been thinking about purchasing and installing devices for controlling the microclimate in their homes. In urban areas, especially if the apartment is entirely on the sunny side, air conditioning is the only option to create comfort during the hot summer months. The considerable cost of this useful device makes you want to save money by installing a split system with your own hands. Is this procedure as complicated as air conditioning installation companies assure? And how to install the air conditioner yourself according to all the rules to ensure its uninterrupted operation for the longest possible time?
Types of air conditioners
To create comfortable conditions in apartments, the following types of air conditioners are used:
Monoblock systems
All blocks of the conditioner are located in one case. This reduces the cost of the device, but also leads to certain inconveniences: the bulkiness of the system and the rather high noise from the compressor, not even at full power. They, in turn, are divided into two types:
- Window air conditioners. Pioneers among apartment systems. The main disadvantage: the device block occupies a significant part of the window opening. This prevents sunlight from entering the room, and it is extremely difficult to harmoniously fit its interior. Therefore, air conditioners of this type are becoming rarer.
- . Much more attractive in design than windowed ones. In addition to the tempting possibility of movement, they have one more indisputable advantage: the block practically does not require installation. It is enough just to equip with your own hands the hood from the room to the outside, to which the system is connected. But the cost of such air conditioners is quite high.
Two-block systems
In devices of this type, the refrigerant circulates between the outdoor and indoor units of the air conditioner. The main advantage of such systems is noiselessness. The main "troublemaker" - the compressor, is located behind the wall. Indoor units have different designs and can be placed in the most convenient place. They are divided into 3 varieties:
- Wall split systems. The most affordable and common at present, have a power of 2 to 7 kW. Perfectly suited for maintaining the desired microclimate: in the summer they create coolness, but it is also possible to operate the air conditioner for heating in the winter. It is for such systems that the most relevant question is: how to install an air conditioner without resorting to the help of professionals?
- Channel conditioners. They are installed under the false ceiling structure and have a high power - 12–25 kW. This is enough for a fairly spacious apartment. Complicating the task is the need to correctly calculate the air exchange in the room. When installing thermostats and special electric valves You can set the system to your own temperature for each room in the apartment. Naturally, this complicates the installation of system blocks and significantly increases its cost.
- Cassette air conditioners. The main system is also hidden false ceiling. Cassette split systems are made so as not to stand out. As a rule, the dimensions of the grille of the cassette air conditioner coincide with the dimensions ceiling tiles: 600 by 600 mm, and with more power - 600 by 1200 mm. The dimensions of the indoor unit allow you to easily place it and all the necessary communications inside a standard metal profile grate used in the installation of suspended structures.
Preparing to install an air conditioner with your own hands: choosing a place
Since wall-mounted split systems are the most popular, we will describe how to install an air conditioner with our own hands in relation to them.
Selecting the location of the outdoor unit of the air conditioner in apartment building can cause some problems:
- The outdoor unit of the system cools the refrigerant, so it should be located so as to avoid solar heating as much as possible. The north or east side of the house or balcony is well suited.
- Massive outdoor unit the air conditioner should be placed so as not to disturb the neighbors.
- It is unacceptable for condensate from the drainage pipe to flow down the wall of the house. It must be taken out as far as possible.
- Like any device, the outdoor unit of the air conditioner needs periodic maintenance. Therefore, it should be located so that it can be approached without much effort and risk.
When choosing a place for the internal part of the system, there are also a number of conditions:
- It can not be placed near the elements of the heating system.
- It is unacceptable that the inside of the split system is closed by curtains or other objects that prevent the free movement of air.
- The A/C unit processor may be damaged if placed in an area of intense electrical noise generated by household appliances. Therefore, for example, it cannot be placed in the kitchen.
Instruments
Selection necessary tool it won't be easy either. For work you will need:
- Pumps: vacuum and bicycle.
- Pipe flaring kit. Better with a pipe cutter. Copper tubes cannot be cut with another tool - sawdust will surely get inside them, which will disable Vacuum pump.
- Reamer for finishing expanded pipes.
- Pressure gauge for measuring pressure in the air conditioning system.
- Indicator screwdriver and tester for mounting the electrical wiring of the units.
- Perforator.
- Bay of copper pipe.
It is better to take a whole bay of tubes, with the ends rolled at the factory. You can never guess with what tool the tube was cut if you buy only a part of the coil. Copper pipes should not have dents, cracks or other defects.
Installation of the external unit of the air conditioner
It should immediately be noted that the outdoor unit of the air conditioner should be located below the indoor one.
- After marking the mounting points of the brackets, a hole is drilled for communications. Of course, in this case, it is necessary to avoid getting the drill into other communications or fittings, so the place for the hole must be chosen carefully. AT brick wall it is better to lay it along the seam of the masonry. If the concrete slab has frequent reinforcement, then the only way out is to drill a separate small hole for each wire or tube of the system.
- Brackets are attached to the wall with anchor bolts. You can fix the outdoor unit of the air conditioner directly on the balcony by slightly changing the mounting scheme. But in any case, it is important to maintain the level: at the slightest distortion of the system, there will be problems with the condensate drain.
- The most difficult stage of the operation is the direct installation of the external unit with your own hands. It weighs at least 60 kg, which is why this work must be done by at least two people. It may be necessary to use the help of industrial climbers or special equipment to securely fix the air conditioner to the brackets.
For normal operation of the system, it is necessary to leave a gap of at least 100 mm between the air conditioner case and the wall.
Installation of the indoor unit and necessary communications
Work progress:
- The indoor unit is mounted with your own hands on mounting plate using a latching system. The plate is securely attached to the wall at a distance of at least 10 cm from the ceiling and at least 5 cm from the corner of the room. Having lifted the inner part together, it is fixed with latches.
- The copper pipes of the air conditioner for the refrigerant supply are cut off with a margin of a meter for the expected bends. The minimum length of these communications is at least 1.5 meters. Carefully bending them, put on the nuts and flare the ends. The nuts are tightened tightly on the fittings, but without much effort.
- The drain tube is attached to the block with a threaded flange or with a piece of heat-shrinkable hose.
- The power supply of the air conditioner must be done through the machine. For a split system, its own wiring is laid with a cross section of at least 1.5 square meters. mm. A yellow wire with a green stripe is usually zero. This is where an indicator and a tester come in handy.
- Both parts of the air conditioner are connected by stranded wires according to the scheme from the instructions. At the slightest doubt, it is better to consult a specialist, repairing the system in case of incorrect connection will cost more.
Leak test and system filling
It is performed in the following sequence:
- A bicycle pump is attached to the nipple, and all joints and tubes are covered with soapy water. If bubbles appear during the air supply, then tighten the nuts on the fittings.
- After checking the tightness, air is pumped out of the air conditioner. A vacuum pump is attached to the nipple and runs for at least an hour. This is necessary to completely remove moisture from the system.
- By attaching a freon cylinder to the unit using an adapter with a pressure gauge, the system is filled until the pressure specified in the instructions is reached. Then turn on the power supply through the machine.
If the air conditioner independently switched to the system test mode, then everything worked out. If not, then starting from the remote might help. Otherwise, you will have to call the wizard.
With a positive result, it remains only to insulate the wiring harness between the blocks with foil and waterproof electrical tape, after which the hole in the wall is blown with foam. Everything, you can enjoy the operation of the air conditioner.
Installing a split system (or, simply put, an air conditioner) is a laborious procedure, but not as complicated as you might think. In principle, even someone who has never done anything like this before can cope with such a task. This will require some theoretical knowledge that you can learn from this article, patience and desire. Let's talk about how to install an air conditioner with your own hands.
Some general information
Our main goal is to install the air conditioner without damaging it. But, in addition, it is necessary to properly install both the indoor and outdoor units. Otherwise, the performance will be much lower, if the device will function at all.
To get started, you will need a special tool: a puncher and a vacuum pump, a manometric pump, a building level. As for consumables, the installation of a split system is carried out with a standard kit, which should come with the kit. This is a heater, a drainage hose, dowels, brackets, etc. If this is not there, then you need to buy it, and only after that start installing the air conditioner.

Mounting the panel of the indoor unit
In this case, you must follow one simple rule that applies to all air conditioners, regardless of brand and manufacturer. It consists in the fact that at least 10 centimeters must be retreated from the ceiling. If this rule is not observed, then the air conditioner will constantly become clogged with dust. In addition, degraded air intake will contribute to a decrease in performance, and this may affect the longevity of the device as a whole.
It is also necessary to retreat a little from the corner of the wall. The distance from the panel to the curtain must be at least 10 cm. This is necessary so that the curtain does not sway during the operation of the air conditioner. Further, with the help of dowels and a level, the panel is fixed. It must be placed strictly horizontally. This is necessary so that there is no leakage of condensate. Then we temporarily hang indoor unit.

Cable channel installation
Cable laying must be carried out with at least a slight slope. This is done to prevent condensation. Be sure to take this into account when installing. First you need to drill a hole with a minimum diameter of 55 millimeters. Do not forget about the slope, which will prevent the appearance of an air lock in the drain hose. After the through hole is made, we stretch the box, cut the ends, and we customize the whole thing.
The next step is to cut the track. It is extremely important to understand here that the use of a conventional hacksaw is simply unacceptable. This is due to the fact that small chips, dirt, etc., will remain in the copper tube. If all this gets into the compressor, it will soon fail. Therefore, use special pipe cutters, which today can be found in any specialty store or rented from a neighbor. Despite the fact that the climatic equipment is different, the installation of air conditioners is approximately the same. Split systems are currently a large number, but the principle of operation is the same, and installation is carried out according to general rules.

Laying the track in the box and mounting the brackets
On the this stage you choose the sequence of actions. You can first hang the block on the panel, and only then start laying the track in the box. You can, and vice versa, lay the track, then attach the block. The main requirement is not to bend the copper tubes. If this happens, the compressor will soon break down.
Next, you need to get insurance and go outside, since the next stage is performed there. Whether it is the installation of a multi-split system or the most common one, it is necessary to fix the brackets on the wall. They must be located in the same horizontal plane, so use It is advisable that two people do the work, since the outdoor unit has an impressive weight. After fixing the brackets, the external unit is put on them and additionally fixed with bolts.

Rolling and vacuuming of the track
The essence of rolling is to expand the copper tubes at their junctions. For this, a special rolling machine and nozzles are used. Before rolling the tube, put a nut on it, because after expanding it you will not be able to do this. It is extremely important to provide a reliable connection through which freon would not flow. To do this, tighten the nuts at the joints as much as possible, but do not overdo it.
Vacuuming is necessary to remove residual dust and moisture from the track. To do this, you will need equipment for installing split systems, such as a vacuum pump. It turns on, and at the same time, the port on the pressure gauge opens. When the arrow goes into vacuum, turn off the pump and close the port. If the arrow does not go down, then this means that one of the connections allows air to pass through, tighten the nuts more tightly. If this does not help, then it is worth checking the quality of rolling. If this is not done, then there is a high probability that the compressor will burn out after one winter.

Installation of a split system: instructions for starting freon
After you have successfully completed the vacuum, it's time to fill the system with freon. To do this, use a hex wrench to unscrew the supply hose (this is a thin tube). It is important not to confuse with a thick suction tube, as it can deteriorate which is not good. The sequence is important here, so the supply opens first, and then the suction. At this stage, fix the freon pressure in the system and check all electrical connections. If everything is in order, then you can carry out a test run.
If the compressor does not immediately turn on, do not be alarmed, this is quite normal, there is nothing to worry about. Record pressure and tension. If everything is in order, then the air conditioner to the maximum. So he should work for 10-15 minutes. During this time, freon will go through the system, and the oil will have time to return.
Do-it-yourself installation of a split system: important points
It must be understood that there should be no air in the system, which is why evacuation is a mandatory procedure. As noted above, all connections must be reliable and durable. It is advisable to make several checks using a vacuum pump. Only after you make sure that everything is in order, you can carry out a test run.
It is safe to say that the installation of the interblock route and its sealing are the most complex and time-consuming stages. As you can see, you can not do without an assistant. This is due to the fact that it is very difficult and unsafe to install the outdoor unit on your own. In general, there are no overwhelming tasks here. We observe the horizontal, seal the connections, do not use an ordinary hacksaw - and everything will be fine.

Conclusion
So we figured out how split systems are installed. Dismantling / installation in priority should be carried out by specialists with experience and high qualifications. So the equipment will last for years. But it is extremely important not to forget to service it periodically.
By the way, during the time there is a risk of stumbling upon fittings or wiring. Therefore, first check for hidden communications, and only after that get to work. The event is quite noisy and dusty, so prepare the room in advance. In general, there is nothing complicated here, the main thing is to follow all the above rules. But one way or another, self-installation should be carried out only if you are confident in your abilities. But it's better to call the experts. If the installation is carried out incorrectly, then at least there will be someone to make a claim. That's all that can be said about the installation work.
Installation tips. Where is the best place to install an air conditioner?
Before you buy a split system in Krasnodar, it is advisable to determine the place where you will hang it.
It is technically possible to install an air conditioner in a room absolutely anywhere, however, for its high-quality work, without the risk of failure, there are certain rules and some nuances that must be observed during installation.
In this article, we will try to describe in as much detail as possible the most common errors during the installation process, as well as give recommendations on how to correct installation air conditioner, in order to avoid unforeseen problems in the future.
1. Install the indoor unit of the split system at a distance of at least 10 cm from the ceiling. Because the air conditioner takes its cooling/heating air from inside (not outside), the short distance from the ceiling to the top of the ceiling (where the air intake grille is) can make it difficult to recirculate the air. In this case, firstly, the air conditioner will not be able to produce enough cold / heat, and secondly, it will work for wear, which will lead to a quick failure of its compressor. That is why it is forbidden to put on air conditioning various items and cover the top. If you are installing an air conditioner at the stage of repair, take into account the possible lowering of the ceiling level (stretch ceilings, plaster ceilings, etc.).
2. Do not mount the indoor unit of the split system above cabinets, shelves, chests of drawers if the distance from them to the lower edge of the indoor unit is less than 70-100 cm. Firstly, this causes dust accumulated on the top surface of the cabinet to be blown off every time the air conditioner is turned on. Moreover, the close location of horizontal surfaces leads to the creation of a circulation of the air flow, which leads to a decrease in the efficiency of the air conditioning system. The flow from the air conditioner is drawn back into the air intake, the air exchange in the room deteriorates, the air conditioner, taking in cold air, begins to "think" that it is time to stop its work, because the temperature sensor is located at the flow inlet.
3. The air flow must not be directed directly at people. When working in the cold, the temperature of the air stream from the air conditioner is 7-15 ° C lower than the ambient air temperature in the room. If such a stream blows on a person for at least a few tens of minutes, poor health is subsequently ensured. As a rule, air is directed so that it passes between workplaces or where people are least likely to be. In the bedroom, you often have to make a choice on which wall in relation to the bed to hang the air conditioner. Most often, people are afraid to place the indoor unit over their heads and mount the unit on the wall to which their feet are facing. If it is not possible to remove the unit from the bed as much as possible and direct the air in the other direction, it is better to mount it overhead. In this case, cold air will not blow on the head, but on the legs, which are usually covered with a blanket.
4. Do not install the air conditioner indoor unit above a heat source (such as a radiator). Due to the flow of warm air rising from the heat source, the air conditioner will think that it is not cooling the room enough, and will work for wear, as a result of which it will quickly fail. In addition, excessive heat may cause the plastic casing of the indoor unit to be deformed.
5. Do not install the air conditioner in a place where air circulation will be difficult (for example, behind curtains, etc.). The distance to the obstacle should not be less than 3 meters. The cooled (or heated) air flow from the air conditioner will be reflected from the obstacle and will return back with the same temperature with which it "came out". The air conditioner will decide that the work has been done, the desired climate is set and turn off.
6. The indoor unit of the split system must be installed strictly according to the level. This is necessary so that the moisture condensed on the heat exchanger can be freely removed to the outside through the drainage system. If the indoor unit is installed with a significant skew (±3-4 mm is allowed), there is a possibility that water will accumulate in the drain pan and periodically flow out of it directly onto your floor.
7. It is not recommended to install the air conditioner in rooms where devices with high-frequency electromagnetic oscillations are constantly operating.(e.g. drill, drilling machine). High-frequency vibrations can knock down the chip (processor) installed inside the air conditioner.
8. Try to install the indoor unit so that the length of the refrigerant pipe is as short as possible. Firstly, a long route increases the cost of installation, and secondly, it reduces work efficiency. Moreover, if you decide to lay the track in a box, then a long box through the entire wall greatly spoils the interior.
9. If possible, run a separate power cable to the air conditioner. To any, even a low-power air conditioner, it is necessary to conduct a separate electrical wiring and install separate machine in the electrical box. Because the old wiring may not withstand the load and it will ignite. Be especially vigilant if your house is older than 1990. In old houses, the wiring is not designed for the loads from the use of powerful electrical equipment.
1. Do not install the outdoor unit on a glazed balcony or loggia because heat dissipation will be very difficult. Installation is only possible if the windows can be opened wide. In this case, it is necessary to pay attention to the operating range of outdoor air temperatures. The upper temperature limit for different air conditioners is not the same and ranges from 40 to 46 C.
2. The outdoor unit should not cause inconvenience to your neighbors(noise, dripping condensate).
3. Try to place the outdoor unit in such a way that the sun's rays fall on it as little as possible. Direct sunlight can cause protective shutdown appliance due to overheating.
4. Locate the outdoor unit in such a way that during operation, the heat removed from the room can be freely discharged into environment (For example, do not install the outdoor unit where the prevailing wind is directed towards the air conditioner, otherwise the normal operation of the fan will be disturbed).
5. Do not place the outdoor unit in close proximity to the canopy of trees. Leaves and fluff from poplars clog the heat exchanger, moreover, during gusts of wind, branches can get into the equipment, damage the fan or heat exchanger fins. If, nevertheless, your house is all buried in greenery, then you need to cut down some of the branches located next to the air conditioner.
6. It is forbidden to install outdoor units on the ground and in those places where they can be soiled with mud, covered with snow, flooded with rain or sewage. Blocks must be installed on a special stand.
7. It is forbidden to install outdoor units in places where there is a possibility of leakage of explosive gases. In particular, this applies to the air conditioning of the first and second floors, where gas pipes gasified buildings.
8. When placing the outdoor unit on the ground floor, install it in a special protective grid. This will prevent theft and acts of vandalism.
9. Take care of the condensate drain. Most often, condensate is discharged to the street. In this case, the flowing water should not fall on the wall of the building. Condensate discharge to the sewer is preferable, but expensive. If you plan to install a block above the sidewalk, then this is the only acceptable option.
10. Do not install the outdoor unit on a weak base, for example, on a wall made of hollow bricks or thin metal. The fragility of the supporting structure almost always causes excessive noise, the elimination of which takes a lot of effort and money. Yes, and the air conditioner can simply fall.
If you need a high-quality installation (installation) of split systems in Krasnodar, the company's specialists will help you with this website
Compared to other air conditioning devices, the split system has a more complex two-block design. This system consists of an external compressor and condenser module and an internal evaporator module with an appropriate number of communications through which freon and electricity are supplied, and condensate is removed. This scheme complicates the installation, but does not exclude self installation. To install such an air conditioner yourself, it is enough to read the instructions, fill in the lack of knowledge and experience through Internet resources, and consult with specialists.
Installation features depend on the design of the indoor module, which can be wall-mounted or floor-mounted. To save space in small apartments, a wall-mounted air conditioner is usually used. Such a split is somewhat more difficult to install due to the need for a strong wall mount. But regardless of the details, the work is carried out in the following sequence:
- installation of separate wiring;
- installation of an external condenser unit;
- fastening of the evaporator (internal block);
- connection of communications with vacuuming;
- test inclusion.
Instruments
You will need a tool to install the split yourself. The set is recommended to include:
- a drill with a puncher and an appropriate set of drills that can break through a solid concrete wall;
- pipe cutter for neat cutting of pipes without the threat of clogging with copper chips;
- a set for flaring the edges of the tubes, which will ensure the tightness of the connections;
- An example that can be used to clean the ends of connections;
- a pump, possibly a bicycle pump, to assess tightness;
- vacuum cleaner, to remove moisture from the system by evacuation;
- indicator screwdriver and tester for laying electrical wiring;
- pressure gauge.
How to choose a seat
Before installing the split system modules, it is necessary to correctly determine their location. For the outdoor unit, the place must:
- protect the device from direct sunlight and dust;
- guarantee the stability of the structure;
- provide free space sufficient for the normal operation of the device.
Here, such a situation is excluded, and the visor provides the necessary protection for the unit. Ease of maintenance is an added bonus. When choosing a place for the compressor you need:
- provide protection from heating by the sun or heating;
- eliminate the risk of ignition of various fumes and gas leaks;
- provide the necessary free space according to the instructions and the distance from the floor along the perimeter of the block;
- prevent pickups from constantly operating electrical appliances (at least a meter distance);
- guarantee the strength of the wall, which does not allow the collapse of the structure.
Installation of separate wiring
Split system, even in the most low-power version, requires at least 1.5 kW. Such power requires a separate line, unloaded by other consumers, especially in houses earlier than the 90th year.
For her you need:
- two-core wire with a cross section of 1.5 to 2 mm, necessarily copper;
- 16A cut off switch.
If you plan to hide the wiring in a strobe, then you should take care of this during the repair so as not to spoil the expensive interior of the renovated apartment. When the idea to install a split came after the repair, the solution could be to install additional wiring in the box. Either way, this will:
- avoid overload;
- prevent device failure.
- eliminate the risk of fire as a result of a short circuit.

Installing an external condensing unit
The complexity of this stage depends on the place where it is decided to place the air conditioner. Three options can be used:
- on the open balcony;
- on the loggia;
- on the wall.
On the balcony, it is enough to install short brackets and place the module on them. The function of protection will be performed by a regular visor of the balcony.
When choosing a loggia, you can limit yourself to the same brackets, but remember that a closed space does not provide the necessary air circulation, which will disable the air conditioner.
Open doors will help to avoid this, which reduces the value of the loggia, especially in winter time. It is impossible to mount the module on the wall without reinforced brackets, which must confidently support the weight several times greater than the mass of the unit itself. For their fastening it is better to use long anchors with a diameter of 20 mm.
Mounting the evaporator and installing communications
Before installing it, it is necessary to mark the mounting points. Check them horizontally and vertically with a level. After that, the work is performed in the following order:
- Holes are drilled according to the markup and anchors are inserted.
- The mounting plate is fastened with screws;
- In accordance with the position of the block, a hole is punched for communications (50 - 80 mm) with a slight slope outward for drainage.
- A waterproofing glass with a tube is mounted in the holes.
- a check is made for the correct connection of the wire to the terminals in accordance with the diagram.
- Pipes with thermal insulation made of flex and drainage are connected to the corresponding nozzles.
- If it is necessary to lengthen the edges of the tubes with the nuts put on, they are pre-flared.
- A compact bundle (route) is formed from tubes, drainage and wires with the help of electrical tape, which is passed through the hole to the outside.
- The indoor unit is hung on the mounting plate.
After completing the above work, you can install the outdoor unit on the previously fixed brackets and bring the route to it. Excessive efforts should be avoided when bending the tubes, in order to avoid deformation and wrinkles (permissible bending radius of at least 100 mm). If the air conditioner hangs over the pavement, then you need to take care of alternative options for removing condensate indoors.

Sealing and evacuation
It is impossible to correctly install the split without sealing and evacuating communications. The joints are sealed with a soapy solution and a conventional bicycle pump. The solution is applied to the connections and the tubes are pumped using a pump. When bubbles appear, the nuts are carefully tightened 1/8. The procedure is performed until the bubbling stops.
Then vacuuming is carried out, which removes air, dust and moisture residues. For this:
- open several running ports;
- connect the vacuum pump through the service port;
- turn it on and wait for a pressure of 10 mm Hg;
- close the low pressure lever;
- turn off the pump, return the plugs to all open ports.
Testing
Before checking, we fill the split with freon or refrigerant, depending on the requirements of the instructions, to the specified pressure. Testing is switched on by means of a disconnector. At correct execution mounting air conditioner automatically enter test mode. Its result should be:
- normal flow of cold air;
- the correct position of the blinds;
- condensate outflow through the drain.
If you have all the signs of a split, you can operate it on a daily basis. Otherwise, you will need to contact a specialist. This will void your air conditioner warranty.
So it is not recommended to install such an air conditioner yourself. It is better to immediately weigh your strength and think about inviting a specialist.
The word split actually means "gap", but in technical English it has several meanings. In this case, we are talking about an air conditioning system using an air conditioner with spaced blocks. We will tell you how to install a split system with your own hands in a city apartment and a private house.
How air conditioner works
Installing an air conditioner is a tricky business. In order not to screw up, you need to know exactly what is being done for what. Therefore, we briefly recall the principle of operation of the air conditioner:
- A refrigerant enters the evaporator through a narrow opening - a die or nozzle - under pressure: a low-boiling liquid with a high heat of evaporation. In the evaporator chamber, the refrigerant expands, boils, evaporates and absorbs a lot of heat.
- At the same time, water condensate forms on the evaporator radiator (dew falls). The condensate flows into the tank, and from it through the drain tube - out.
- The compressor, arranged on the principle of a vacuum pump, continuously pumps out refrigerant vapor from the evaporator chamber. From the increase in pressure behind the pump, the refrigerant heats up and goes into a supercritical state: neither gas nor liquid, something like a very dense fog.
- Next, the refrigerant enters the condensation chamber, also equipped with a radiator, which is blown by a fan. Its temperature drops below the critical one and the refrigerant condenses into a liquid.
- The liquid refrigerant is blown through the die into the evaporator; the work cycle is repeated.
Do's and Don'ts of Air Conditioning
From the principle of operation of the air conditioner, it is clear that for its successful operation and economical consumption of electricity during installation, the following must be taken into account:
- Any thermal contact between the cold and hot zones dramatically increases the power consumption: the compressor, in addition to pumping the agent, now has to drive heat inside the system - at the expense of the owner.
- Dust and debris in the system are unacceptable: the vacuum pump is a high-precision device; one piece of metal can destroy it.
- The system must be completely sealed: low-boiling liquids strive to evaporate even through a micron gap.
- The outdoor unit must be located lower than the indoor unit: in this case, the thermosyphon effect (the heated liquid tends to rise) facilitates the operation of the compressor. Otherwise, the compressor, in addition to the additional consumption of electricity to lift the agent, will also have to overcome the thermosyphon effect.
- The outdoor unit should be located in the coolest place possible. Any additional heating is paid by the owner.
- The drain tube must not have an upward bend anywhere. Any "U" quickly becomes a source of infection: condensate - pure water, in which microbes and fungi are free and at ease, and their spores are always in the air.
What is an air split
Air conditioners for split systems are made with separate units: evaporative (internal) and compressor-condensing (outdoor). The names, however, are conditional, because. most modern air conditioners can both cool and heat the room; During heating, the refrigerant condenses in the indoor unit and evaporates in the outdoor unit. Therefore, they often say simply: outdoor and indoor unit.
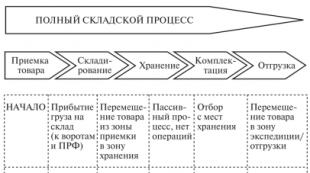
In some (rather expensive) models of air conditioners, several indoor units are connected to one outdoor unit, which can work separately for cooling and heating. Such a split system, with the initial high cost of operation, turns out to be more economical: in this case, interroom heat exchange does not interfere, but helps the air conditioner. How a split system is installed in an apartment is shown in the figure:

When is the best time to split
It is better to time the installation of a split system in an apartment for repairs. The work ahead is serious: for the installation of electricians, you will have to walk along more than one wall. If the walls are already tiled - lay the new cladding in advance in expenses.
Tool
In order for the split to work and not break in a day or a week, you need to purchase or rent the following tool:
- Perforator with a set of chisels - you will have to make a hole under 100 mm in diameter in the main wall.
- Reinforcement detector, if the wall is concrete - hitting the rebar during grooving, you will have to punch a new hole.
- Pipe cutter. Never cut the refrigerant pipes with a hacksaw! Copper chips will definitely remain in the gap, which will quickly kill the compressor.
- Tube flaring kit. When expanding with improvised means, tightness cannot be achieved. About flaring tubes will be discussed separately. Included good sets for flaring, a pipe cutter with a scraper is also included.
- Scraper (reamer) - a tool for stripping the ends of pipes. A needle file or file is not suitable because of the same sawdust.
- Bicycle hand pump - to check the tightness of the system.
- Vacuum pump - to evacuate the system before filling. Flushing with refrigerant, which is often recommended, does not remove moisture, which ruins the compressor no worse than metal filings.
- Phase indicator and tester for electrical work.
- Pressure gauge.
About pipelines
Buying pipes
It is better to buy a copper tube in a whole bay: it is better to spend money on some stock, which will then go somewhere else, than to risk the compressor: sawdust may remain in the tube from which it was cut off. Also make sure that the ends of the tube in the bay are factory-rolled, and the tube itself does not have dents or cracks. Long piping will allow the outdoor unit to be lowered, so that some overspending when buying is then offset by a good thermosyphon.
Cutting, scraping and expanding tubes
Before embarking on installation, you need to practice flaring the tubes: for an air conditioner, this is a vital issue. Flaring is done with a special tool; how it is arranged, looks, what defects are possible, and how it should be final result- can be seen in the figure:

For training, you need to immediately buy some kind of scrap of the same with a tube bay; do not touch the bay before installation. At the same time, we will practice cutting and scraping: the tube is cut in a circular motion, and when scraping, the tube must be held with the end down so that the scraped burrs do not fall into its lumen.
Outdoor unit installation
 It is strongly not recommended to install the outdoor unit on the wall by yourself, starting from the second floor. Why? See the statistics of the Ministry of Emergency Situations and the Ministry of Health in the sections: "Resuscitation" and "Urgent surgery". Fortunately, upper floors have balconies or loggias.
On a balcony, the outdoor unit mounts very well on self-made shallow (i.e. shallow) brackets, see fig. On any balcony, no matter how you turn it, there is always a north or east side, just right for the air conditioner. But even when installed in the loggia "facing" to the south, the visor will protect the outdoor unit from the direct rays of the sun during the hottest time of the day, when the air conditioner is just running.
With this installation method, the installation and maintenance of the air conditioner is easy and does not pose a risk. The only inconvenient operation is fixing the block to the brackets; it will have to be done by leaning over the railing.
To install the brackets, the glazing will have to be temporarily removed, and the root parts of the brackets should be cut into the lower frame frame. If the “roots” of the brackets are bent down in the form of horizontally arranged “U”, then you can do without struts and not touch the balcony skin.
Split system installation
Installation of a split system in an apartment is carried out in the following order:

And now we will describe some features of each stage of work. Allowable distances from walls and ceiling for indoor and outdoor units are shown in the figure on the right.
Places for indoor units
Indoor units cannot be installed:
- Above radiators and other heat sources.
- Behind curtains, curtains, screens and other airflow obstructions.
- In rooms with sources of electrical interference: workshops with power tools, induction and microwave ovens, electric ovens - pickups can damage the unit's processor.
The question immediately arises: what about the kitchen? In it, it turns out, the air conditioner cannot be installed at all. Right. The supply of conditioned air to the kitchen is provided.
Wiring
The smallest air conditioner consumes 1.5 kW of electricity. Therefore, for it it is necessary to lay a separate wiring with a cross section of at least 1.5 square meters. mm and put the automatic shutdown - as for a boiler or washing machine.
When connecting the wires to the input shield, we connect the yellow wire with a longitudinal green stripe to the neutral (neutral wire). Phase and zero are determined by the phase indicator. If the wiring is made from wires in non-standard colors, zero and phase must be marked at both ends.

outdoor unit
Installation of the outdoor unit has already been described above.
Hole in the wall
Firstly, if the house is block, you need to determine in advance the locations of the reinforcement. It is impossible to cut off the reinforcement in the hole: outer wall always bearing, and reinforcement violation is unacceptable.
Secondly, a second person is needed: he must stand below and warn passers-by. An accidentally dropped piece of concrete or brick can cost the owner a long prison sentence.
The diameter of the hole must be at least 80 mm. Recommendations about 60 and even 50 mm clearly do not take into account thermal insulation.
Pipelines
We cut the tubes to size with a margin of 1 m, for bends. Bending the tubes must be done carefully to prevent kinks or wrinkles. Wrinkles create resistance to the flow of the agent, and this entails an increased consumption of electricity. Permissible bending radius of tubes is not less than 100 mm.
Then we put threaded flanges (“nuts”) on the tubes and flare the ends of the tubes. Make sure that the flanges are put on correctly - threaded towards the end of the tube.
Finally, we connect the pipelines to the fittings. This must be done alternately so that the cold fitting of the indoor unit is not connected to the hot outdoor unit. The matter is facilitated by the fact that in most air conditioners hot and cold fittings of different diameters.
We tighten the flanges on the fittings tightly, but not tightly: copper can be easily pinched. We will tighten the threaded connections later, when sealing.
For drainage, you need a piece of reinforced plastic tubing. We connect it to the drain pipe either with a threaded flange, if provided, or with a piece of heat-shrinkable tube. You can heat the heat shrink with a soldering iron with light circular movements, slightly touching the tube with a sting.

Electrical connections
Stranded wires in insulation with a cross section of at least 1.5 sq. mm we connect the terminals of the same name of the indoor and outdoor units. If the names of some terminals do not match, we understand the instructions, consult with a specialist. Of course, both pipelines and wires are passed through a hole in the wall.
Sealing
When sealing, we use a method proven by generations of gas workers: a soap solution. We buy 0.5 liters of distilled water at the pharmacy, heat it “to steam” and, stirring gently, dissolve a spoonful of laundry soap shavings in it.