Step-by-step instructions for installing a steel bath, expert advice. How to fix a steel bath: we give practical advice Install a steel bath without legs
The bathroom is the face of every home, appearance which speaks of prosperity, housekeeping and style of homeowners. The central place in the bathroom is occupied by a bath, which is used for taking hygiene procedures or washing. The selection and installation of a washing container is the most important stage of repair in this room. To save money on calling a professional craftsman, you can install the tank yourself. In this article, we will tell you how to fix the bath so that it does not swing, but stands steadily.
Bath selection
A bathroom is a large-capacity sanitary container that is used for washing, washing and other household needs. Some time ago, they tried to replace this device with showers, however, they were defeated due to their lesser functionality. Bathtubs are made from such materials to support the weight of water and the person using it, so that it retains heat for a long time, and retains its appearance and tightness when in contact with water.

They produce 3 types of sanitary containers:
- Cast iron. Cast iron bath classic version, perfectly retains heat and has high strength. The disadvantage of cast iron models is big weight, a bathtub made of this metal weighs 80-150 kg. High weight complicates transportation and installation. In addition, cast iron containers have a high price and a limited set of standard shapes and sizes.


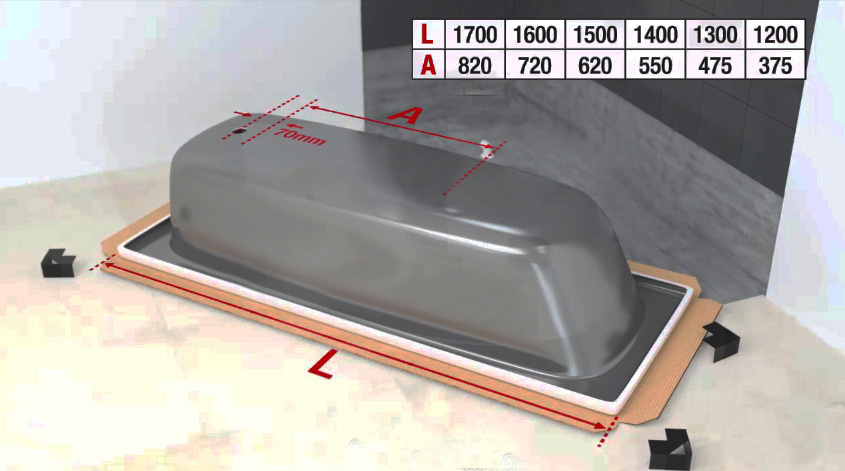
Note! In order for the bathtub to stand level and not sway after installation, it is necessary to choose the right size of the container. The length of the bathtub should correspond to the distance between the walls minus 3-5 cm. When deciding which bathtub to choose, give preference to models that are as close as possible to the calculated dimensions so that after installation is completed there are no gaps between it and the walls through which water penetrates. Right choice the size of the container will greatly facilitate the attachment of the bath to the wall and floor of the room.
Mounting Features
The question of how to fix the bath so that it does not play or sway worries most homeowners if they do their own bathroom renovation. The process of installing a sanitary washing container has its own nuances and tricks, but you can cope with this task on your own, taking into account the features of fastening various kinds baths:
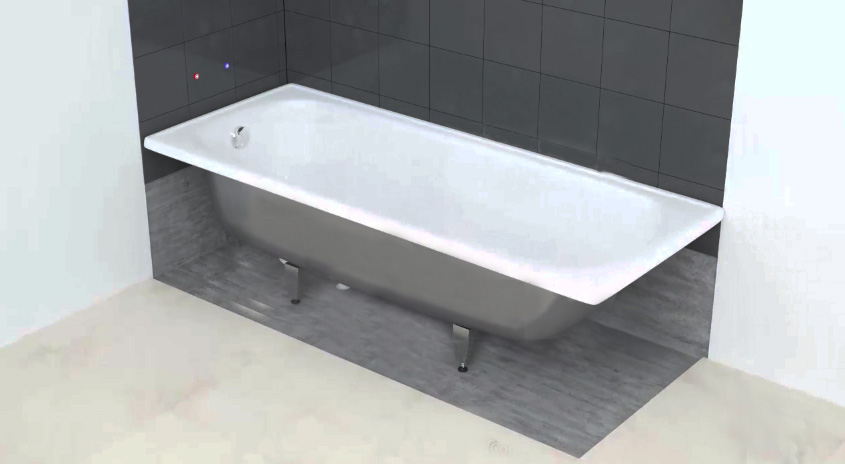
- The most difficult moment of installing a cast-iron bath is to bring this container weighing more than 100 kg into the room and install it on the floor. For installation, 4 supports are required, which are supplied with the selected model. The cast-iron bath is installed on the bathroom floor with the help of legs fixed to the bottom of the tank with special wedges or bolts. To distribute the load from the weight of the bathroom, a metal sheet is laid on the floor.


Important! During the renovation process in the bathroom, the bathtub is installed in place only after finishing the floor with ceramic tiles. To provide access to the floor under the bathroom, the container is lifted and then placed on bricks or wooden blocks.
Installation rules
When purchasing a bath, be sure to pay attention to the mounting system with which it is completed. After purchasing a sanitary container, carefully read the instructions, familiarize yourself with the installation method recommended by the manufacturer for this model.

In most cases, the bathroom installation process is as follows:
- Before fixing steel bath, it is necessary to prepare the site for installation. If used as decoration ceramic tile, then you need to lay the tiles on the floor and walls where the container is located.
- The bath is turned over on its side, and then carefully placed on the floor, since in this position it is much more convenient to connect the drain and overflow pipe.
- Without changing the position of the sanitary container, the floor siphon is connected to plastic pipes using sealant or sealant.
- The legs are screwed or glued to the bottom of the bathroom, adjusting the supports in height.
- The bath is placed in such a way that the siphon can be connected to the sewer system.
- If necessary, a podium of bricks or other moisture-resistant materials is built under the bottom of the bathroom. They make a frame in order to hide the pipes behind a decorative screen.
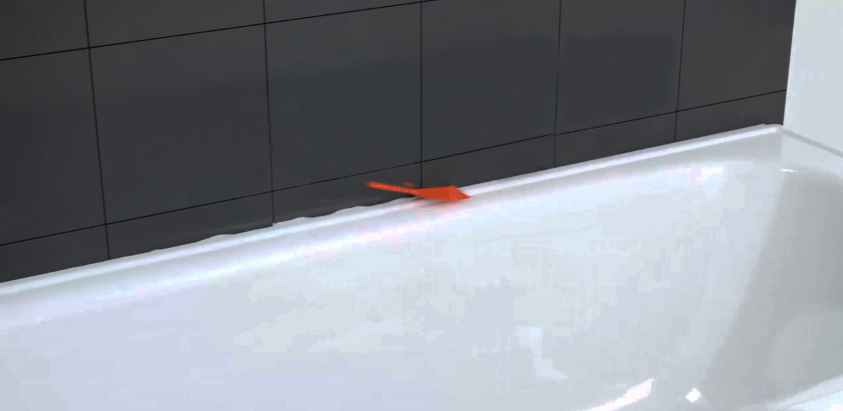
- Lastly, you need to hermetically seal the joints between the walls and the sanitary container using a sealant, a moisture-resistant solution or a plastic corner.
After the installation is completed, experienced craftsmen check the quality and reliability of fastening. To do this, the sanitary container is completely filled with water in order to check whether the drain works correctly, does not swing or flow.
Video instruction

Old-style cast iron baths are quite difficult to budge. But modern steel and acrylic models, due to their low weight, are rather unstable. If installed incorrectly, they will wobble with use or move with the slightest push, spoiling the finish of walls and floors. Let's talk about how to fix the bath - steel or acrylic - to avoid such troubles.
Choose the right plumbing
The stability of the bath depends not only on the procedure for its installation, but also on the dimensions of the bowl of this plumbing. In order for the bath to stand securely, its dimensions must correspond to the distance between the walls at the installation site, minus 2.5–3 centimeters on each side. Under such conditions, the bowl will be easier to fix to the walls and floor. In addition, in this case there will be no gap between the bathtub and the walls, into which water will inevitably enter during use.
Features of the device of steel baths
Among all types of bathtubs, steel models are the most difficult to install motionless. This is due to two features of their design:
- low weight of the bowl;
- lack of mounts for legs.
 On cast iron and acrylic models, special fasteners are usually located on the outside of the bowl, to which the legs can be securely screwed. Manufacturers of steel baths have abandoned these details. Since steel is a rather soft material, there is a high risk that when using the bath, the weight of the water collected in it, plus the body immersed in it, may bend. In this case, the fasteners will inevitably damage the enamel coating of the bowl.
Read: what wallpaper can be glued in the bathroom.
Legs for steel plumbing are usually a kind of goats or props. The tub is supposed to just rest on them. Some models of legs can be supplemented with an adhesive layer for a more secure fixation with the bottom of the bowl. But that doesn't improve the situation much. Therefore, it is recommended to use more reliable structural elements in addition to the legs.
How to fix a steel bath so that it does not swing
 There are several ways to install a steel bath in a stable position. Most often, it is recommended to make a brick stand under the plumbing bowl. But this option is not suitable for everyone. Firstly, the implementation of brickwork requires certain skills and abilities. Not every homeowner will be able to build a reliable stand with their own hands. And in this case, rather high requirements are imposed on the quality of the masonry, since moisture and serious weight will constantly affect it.
Secondly, in many houses, especially those related to the old fund, the floors may simply not support the weight of the brick substrate. As a result, installing a bathtub can turn into a utility accident for you and the neighbors downstairs. Plus, not everyone wants to wait a few days until the masonry mortar dries and acquires the strength necessary for installing plumbing. Therefore, it is better to use simpler options for fixing the bath.
Tip: if you still want to install a steel bath on a stand, make it not from brick, but from a gas block. This material weighs much less, and it is more convenient to mount it.
To the simplest and most reliable installation methods steel bath relate:
- fastening to walls on metal corners;
- installation on a frame made of a metal profile;
- use of special fasteners.
Where does the installation of the bath begin
 Whatever installation method you choose, remember the main thing - the installation of the bath begins with a fitting. First, the bowl is placed in the right place on the legs, its position is leveled and connected to the water supply and sewerage. After that, you should check the performance of the product and especially the quality of the water drain. As you know, the bath should be at a slight angle: only in this case the drain will work correctly.
Having found out the optimal angle of inclination of the bowl by adjusting its height, mark the position of the sides on the wall. According to these marks, in the future you will install fasteners for the bath: steel or acrylic. After marking, disconnect the plumbing device from communications and take it out of the room.
Important! The final installation of a steel bath, regardless of the methods of its fastening, should be carried out after the floor of the room is completely finished with tiles or other material.
Mounting the steel bowl on the corners
A fairly reliable option for attaching a bathtub is to, in addition to the legs, rest it with its sides on wide metal corners screwed to the walls. This method is suitable for you if the walls of the room are made of sufficiently durable material and were leveled with plaster or tile adhesive. To drywall constructions it is better not to fix the bath: they will not withstand such a weight.
Important! Installation of corners should be done after the finishing of the walls of the room is completed.
You can hang the corners only on two walls, against which the short edges of the bowl will then abut, or on all three vertical surfaces with which it will come into contact. In order not to damage the finish, first use a special drill to make holes for fasteners in the tile. After that, you can drill through them directly into the wall, using, depending on its material, a drill with a victorious solder or a puncher.
The place of attachment of the corners should be determined by pre-made marks. At the same time, keep in mind that the bath will rest on them with sides, but part of its weight should also fall on the legs. Don't forget to adjust for the thickness of the corner.
We advise you to learn about the features of toilets with a vertical outlet to the floor.
Installing the bathtub on the frame
If you plan to cover the space under the bowl with a decorative screen, The best way how to strengthen a steel bath so that it does not stagger is to put it on a metal frame. The structure is made of UD and CD wall profiles. The first is fixed to the floor with dowels as a base for the frame. From the second, the upper frame and supports for it are assembled. You can also make a welded support structure from:
- metal corner;
- steel pipes of suitable diameter.
Important! The size of the frame is selected in such a way that the profile of the upper frame fits snugly against the walls of the bowl, while the bath itself stands firmly on its legs.
Corner racks from the profile are fastened to the upper and lower frame, and also, for greater reliability, are attached to the walls of the room. The erection of the frame should be carried out after the walls have been finished, or at least after the tiling of that part of them that will be located above the bowl. Upon completion of installation, the frame can be sheathed plastic panels or drywall, which is then tiled.
Important! When sheathing, do not forget to leave an inspection hatch for access to communications located under the bathroom.
Using special fasteners
If the bath bowl rests firmly enough on the legs, you can restrict yourself to fixing it to the wall using special fasteners. They are sold in a wide variety in construction and plumbing supermarkets. This operation should be carried out before finishing walls. In the future, the fastener is hidden under tiles, which contributes not only to improving the aesthetics of the room, but also to increasing the reliability of fastening.
Reliable ways to attach the bath to the wall
The bath kit for sale includes legs or a more or less complex frame designed for its reliable installation on the base. The design of any manufacturer is designed so that stability is not lost under the most unfavorable combination of loads - in the form of a full volume of water and a person - sitting, standing on the bottom or climbing over the side.
With the advent of steel, and later - acrylic baths, many users of such plumbing equipment began to have doubts about the sufficient stability of a light structure. People reacted simply - instead of regular legs or a frame supporting structure, they began to erect a brick bed or several supports, on which they installed the bath body of any shape. There was a need to fix a light bath to the wall.

Bath stability
The stability of the bathtub in the vertical direction does not cause any doubts with any design of regular legs - all of them will withstand the weight of water and this is felt by users. Understandable concerns are caused only by the stability of the hull in the horizontal direction - in fact, light steel and acrylic bathtubs can be thrown out of balance in this direction.
One of the typical products is a bracket adapted for fixing the bathtub to the wall. It can be seen how reliably the hooking of the curved edge of the acrylic bathtub edge to this bracket is ensured.
User concerns are not unfounded. Even the smallest degree of freedom of movement in any direction is dangerous by violating the integrity of the sewer connection. In some cases - a violation of the tightness of the sealing of the junction of the housing to the wall.
That is why, in order to ensure complete stability, it is necessary to ensure that the bathtub is fixed to the wall. In this case, the possibility of horizontal oscillations disappears. The bath becomes completely stable regardless of the efforts applied to it.
Fixing the bath body to the walls
In the bathroom, the bath can be located in four planning positions:
- Island position - in the middle of the room.
- Near one wall.
- In a corner, in contact with two walls.
- In a niche, close to the walls on three sides.
It is important to fasten to the wall when placing the bathtub with only one side to the wall, sometimes in an angular position. The case, pinched on three sides, is completely unshakable.
The only technical possibility to strengthen the bath to the wall is based on the fact that its sides of any design have a downward bend. For this bend and you need to keep the bath from shifting. The complexity of this operation lies in the fact that the natural place where you need to fix the board to the wall is not available - it is closed by the body.
Any way to fix the bathtub to a vertical plane is to pre-install on this plane such fasteners that will engage securely with the rim bent down - when this rim is lowered into place.

As such fasteners, you can use branded factory-made brackets, with the possibility of adjustment and rubber gaskets. House master can install a home-made profile from a steel corner - such a mount can be much more reliable than a branded one. You can even use L-shaped dowel fasteners. Rubber gaskets can be made independently - the mount will be more reliable.
The height of the bathtub from the floor, the standard for this parameter also exists - read about it in our material.
How to choose and install a hot tub, you can read in this article.
Wall mount technology
Any fastener must provide several important conditions for reliable and durable operation:
- strong retention in the wall;
- the main upwardly bent retaining element of the fastener should have a slight downward approach to the wall. This is necessary so that the side of the bath, put on such fasteners, falling down during installation, is pressed against the wall;
- should be provided high accuracy marking and installation of all components of such a system.
After determining the level of the lower edge of the bath rim, it is marked on the wall with a line. Fasteners - brackets, dowels or a corner must be fixed so that the side of the bath engages with them and the canvas is pressed against the wall. It is necessary to attach the side so that it cannot be moved by hand with the strongest impact.
Here is an approximate sequence of steps for installing a bath with fixing it to the wall:
- You must first completely assemble the entire structure of the bathtub including the legs and the support frame. The adjusting screws of the legs must be placed in the middle position.
- By assembled bath the level of the side on the wall is marked and the selected fasteners are installed. Before such a markup, you need to put the bath in place and find out the features of its horizontal adjustment.
- The bath complex with the supporting part is carefully lowered from top to bottom so that the rim engages with the fasteners.
- Adjusting screws finally level the body of the bath.
When the bath has taken its position, you can connect engineering networks, and after that - lay out brick supports that will ensure the complete inviolability of this structure.

The difficulty of arranging brick supports when installed bath it is compensated by the fact that the master will not be able to arrange these supports where it will interfere with the connection of the bath - all connections have already been made and are in plain sight. Brick supports are not brought up to the bath body by 10-20 m and this gap is filled with mounting foam, having previously collected water in the bath.
However, you can fix the bath in another sequence of actions. The main thing is to make sure that the invisible downward edge of the bathtub rim is securely hooked with fasteners.
The practice of installing bathtubs has shown that homemade devices fasteners and supports made of brick, concrete, custom steel structures most often outperform standard structures of the most famous manufacturers in reliability. Thoughtful rationalizations of this type make it possible to consider the bath absolutely reliable, not worry about its stability and even operate it in any mode.
How to strengthen the bath so as not to stagger

- 1 Methods for attaching bathtubs
- 2 Mounting foam
- 3 Application of a brick frame
- 4 Installation on a metal frame
- 5 Inserting a bathtub into a niche
- 6 Videos
When carrying out repairs in an apartment with a complete replacement of plumbing, its owners quite often have to deal with the problem of securely fixing the equipment installed in the bathroom. This is especially true for the work procedures for installing a new bathroom, the installation specifics of which are determined by many factors, including the material of the product and its texture. Thus, a traditional cast-iron bathtub, which is notable for its significant weight, is best installed according to a long-established technique, which assumes its reliable support on the legs included in the kit and adjustable in height.
For lighter acrylic bathtubs, for example, an additional mount will be required to ensure its secure fixation and even distribution of loads throughout the body. In our article, we will consider in detail the features of the installation of each of the samples of this sanitary ware.
Bath fixing methods
 Steel bath legs
To everyone who wants to figure out how to strengthen the bath so that it does not stagger - we advise, first of all, to decide on the material from which it is made, since this is largely the determining method of its installation.
When choosing a product, most often you have to deal with the following options:
For each of the samples of these products, a special, only suitable method of fastening should be used, taking into account the features of the relief of the walls of the bathroom itself.
 Acrylic bath legs
Cast iron bathtubs have sufficient stability due to their considerable mass, so that their installation is permissible anywhere in the room. Typically, these bathtubs are installed on standard legs that are included in the delivery of the product and are securely fixed to its body using special steel wedges or bolts. As an additional fastener, a pre-laid brick base or corners fixed to the wall can be used (in the case of a brick base, its body may not be located close to the walls).
A steel bath is best placed on several points of support, so that it should be located directly against the wall. Since the legs included in its kit do not provide the required reliability of fixation, a special brick podium is often used to increase the stability of the product.
To fix the steel bath, the following techniques can be used:
- the use of mounting foam, which seals the junction with the wall and at the same time strengthens the contact zone;
- installation on the walls of special metal profiles that provide additional support;
- and, finally, the usual tie-in to the wall.
To securely fasten and ensure even distribution of loads, it is best to install an acrylic bath on the same brick podium or use a special metal frame for this purpose.
Let's consider each of the methods of fixing bathtubs discussed in this chapter in more detail.
Mounting foam
 With mounting foam
Using mounting foam to fix the bathtub is the simplest and most affordable method of simultaneously fixing it to the floor and walls. When implementing this method, the bathroom product is first set in place and in height using adjustable legs so that there is a gap of about 0.75–1.5 cm near the walls, and then it is filled to the brim with water.
After that, it will be possible to start sealing the gaps between the body of the bathtub and the adjacent walls of the room, as well as between its legs and the floor using mounting foam.
Sealing foam tends to expand when it dries, so its use must be strictly dosed. Otherwise, undesirable deformations of the structure are possible, reducing the reliability of its fixation. Despite the fact that the “setting” time of the mounting foam is about 12–35 hours, it will be possible to start wall finishing work after about 6 hours.
The use of a brick frame
 With a brick frame
The brick frame is most often used in cases where you decide to fix the bath without the help of legs and ensure even distribution of loads around the entire perimeter of the support. With this installation method, it is possible to lay out the frame both along the bathroom and across it.
In the case of a transverse arrangement, the bath should rest directly on the brick, which will require additional fastening of the frame to the walls using metal corners (steel or aluminum). At the same time, pre-prepared corners are fixed with dowels on the wall in such a way that the free edges of the bath have additional support, and it does not sway when pressed.
 Installing a bathtub on bricks
With longitudinal laying, something like a trough is formed, into which the mounted bathroom product is placed. The gap or cavity formed between the walls of such a base and the bath itself must be sealed with mounting foam, which also helps to increase the reliability of its fastening. In the case of laying out the front wall to the very top, it is possible to completely hide the body of the bath, thus preparing the base for subsequent tiling with ceramic tiles.
 brick screen
When performing these works, it is imperative to provide a small inspection hole necessary to provide access to the siphon. When finishing, this hole can be closed with a piece of drywall or by installing a small plastic door. In the event that you plan to finish the walls with ceramic tiles, a ready-made screen can be used as the front panel of such a base.
Installation on a metal frame

The specified method of fixing bathtubs is mainly used for the installation of acrylic products, which, as a rule, already provide for a ready-made steel frame (in its absence, this accessory can always be purchased separately or made independently). During the installation of such a bath, the mounting or guide rails of the frame are first attached to its bottom with the help of self-tapping screws (note that they are fastened in places specially designated for this purpose, which have thickenings). And then, on the guides fixed in this way, the included legs are installed by means of a bolted connection.
 Additional support
After fixing the legs, the bath will need to be put in place and the points of contact with the walls of the room should be marked, after which special strips are mounted at these points, providing additional support.
It is necessary to leave a small gap between the bar and the side (no more than 2–4 mm), taking into account the expansion of the bath after filling it with water.
Niche recessed bathtub
 Insert into a niche
AT small apartments very often a situation arises when the bathtub is placed with great difficulty in the place allotted for it, which, on the one hand, significantly complicates its installation, and on the other hand, provides the possibility of rigid and reliable fixation in the bathroom niche.
For tie-in and rigid fastening of the bath, you will need to prepare grooves in the wall along the thickness of the edge of the product on each of its sides (for these purposes, you can use a perforator or grinder). In the grooves prepared with their help, the edges or lapels of the bath should be inserted with a slight "interference", which guarantees maximum rigidity fastening due to the complete absence of play.
In case of insufficient rigidity of the legs supplied in the kit, you can additionally strengthen the fixing of the bathtub by using special transverse profiles that serve as supports for its lapels.
Video
How to install a bath in a strobe, see below:
When installing a cast iron bath, as a rule, you do not have to worry about accidentally moving it. But how to strengthen a steel bath so that it stands still, and can it be done at all? It is not easy to achieve complete immobility of a flexible and light container, but it is quite possible, and with your own hands. In this article, we will talk about several methods for strengthening the bath, which can be used both individually and in combination.
How is a steel bath
To figure out how to immobilize a bath, you need to familiarize yourself with its device.

Most often, there are no legs fastening elements on the bath itself. This has its pros and cons. The disadvantage is the lack of a sufficiently rigid fixation of the bowl. If, however, elements of rigid fastening of the legs are provided in the bath, then under the weight of an adult, the steel bowl made of thin metal will bend, and the fastening can damage the enamel.
legs

The manufacturer completes the bath with legs, the quality of which leaves much to be desired, or their design is not conducive to securely fixing the bath. This is not a hopeless situation, as universal self-adhesive feet can be purchased.
This is just one of the measures that will somewhat improve the stability of the bath, and as the only one it can be considered only if the bath will stand apart on legs.
If another way of installing this plumbing fixture is planned, for example on bricks, then the legs will not be needed.
Mounting methods
In the event that the bath is installed separately, a frame can be made under it from a profile or installed on bricks, only then it will be necessary to sheathe the bath from all sides. As a rule, such decisions are not made when creating original design large bathroom.
The most common option for fixing a steel bowl is to attach it to the floor and walls. It is more convenient to do this when the bath is installed between three walls. We will consider several relevant ways to fix this plumbing fixture:
- Making a brick base.
- Assembling a frame from a profile.
- Construction of a podium from brick or foam blocks.
- Fastening to the wall.
Brick base

Considering high level humidity in the bathroom and the considerable weight of the container filled with water, the use of durable and moisture-resistant bricks will practical approach to the solution of the issue of reliable installation of the bath. Tools will require a minimum - a trowel and a container for mixing the solution.
So that later nothing has to be redone, a certain procedure should be followed.
- It is important to decide at what height the bath will be installed. Many people want to raise it higher, but if the height of the front side is more than 70 cm, then it will be very inconvenient to get out of the bath without an additional step.
- To install the bowl at a standard height, you will need no more than 20 ceramic bricks, 2 buckets of sand and 0.5 buckets of M400 cement.
- You need to have a clear idea of where you need to lay the masonry and what height it will be. To do this, it is necessary to install the bathtub on legs in such a position as it will then stand with the siphon installed. It is important to check if there is the required slope towards the drain hole and if necessary adjust the position of the tub using the leg adjustment mechanism.
- In those places where the brick base will be laid, the distance from the bottom to the floor should be measured and recorded. Where the side of the bowl adjoins the wall, you need to outline its position with a simple pencil - this will help you then correctly install the bath.
- Now the container can be taken out.
- Let's prepare the solution. The above components are mixed, after which water is gradually added to the mixture. The solution should be quite soft, but not liquid. To make the mixture more plastic, half of the masonry mortar components can be replaced with tile adhesive. It is more convenient to work with such a solution, and its strength will increase.
- Now let's get down to bricklaying. Let's say that in the front of the bath the distance from the floor to the bottom is 17 cm, and in the back it is 18 cm. The width of the standard product is 70 cm. We need the upper brick not to reach the bottom of the bowl by about 10 mm, and the length of the improvised legs should be less than the width products.
- With a brick height of 7 cm, it is clear that the masonry height will be limited to two rows (7 + 7 = 14 cm).
- The length of the brick is 24 cm, so its consumption per row will be 2.5 pcs. (24+24+12=60 cm).
- To make a bowl, on top of the laid second row, along the edges, you will need to lay another half of the brick (or a quarter - depending on the shape of the bowl).
- 2 days after the mortar has firmly bonded brickwork, you can start installing the bath.
- Now we need to form a "bed" under the bath. To do this, a layer of cement is applied to the brick racks in such a way that it repeats the shape of the bottom as much as possible. Since the solution will begin to spread under load, the thickness of the applied layer in the center should be at least 2 cm.
- In those places where the bathtub will adjoin the wall, tile adhesive must be applied to its edges, but not stretched along the board. It should be some kind of mound.
- A bath without legs should be laid on the bed prepared for it and pressed firmly against the wall. If tile adhesive has come out, it should be removed as soon as possible by wiping the tub with a damp, but not wet, cloth.
- Check the level of its position so that there is a slope towards the siphon. Straighten it if necessary.
- Under the bathtub there will also be some solution that has fallen off the bed. When it ceases to be liquid, it can be returned to its place. Excess solution must be removed and the floor washed.
If the bath is long, then you should lay out another brick support in the middle of the tank.
Brick supports

If the bath is the same length as the width of the room, then to fix it, you can make brick supports, and then install a bowl on them. Often a combined method is used - both a bed and supports are made.
Corner installation

Instead of making brick supports on the wall, you can fix 2, and preferably 3 corners, and install a bath on them. This method is acceptable only if the walls are made of brick or similar durable material.

You can go the other way, leaving the legs intact, sheathe the bathtub with bricks. Then you need to take care of making an inspection window through which you can get to the siphon. Due to the fact that the steel bowl expands upwards, in those places where the whole brick does not fit, it will need to be cut off. Moreover, in such a way that when tiling, it does not protrude beyond the edge of the side of the steel product.
Wall profile frame

Making a frame from a wall profile for drywall is carried out within a few hours and will help not only sheathe, but also strengthen the already installed bath.
- The floor is outlined along the contour of the bath. This can be done with a plumb line, making marks on the floor.
- If the sheathing will be carried out with plastic panels, then, taking into account their thickness, the mark is shifted inward. When using drywall and tiles for sheathing, it is necessary to take into account not only the thickness of these materials, but also add about 3 mm to the adhesive layer.
- The UD profile is fixed to the floor with dowels, and the frame is made from the CD profile. In order to prevent the bathtub from staggering, the profile should rest against the sides of the bowl.
- Additionally, you can use brackets designed to fasten metal bowls to the wall.
The wall profile is not a durable material, but it will successfully serve as a support for a metal container mounted on legs.
wall mount

You can fix the bathtub more securely by attaching it to the wall. To do this, manufacturers produce a wide variety of fasteners. If the plumbing product stands securely on its legs, then it is enough to attach it to the wall. No matter how the bath is installed, it never hurts to fix it additionally.
Podium making

One of the options for securely fixing a metal bowl is to make a podium for it from bricks, foam blocks, timber, a profile pipe, a metal corner or other building materials.
A multi-level podium in a small bathroom will be inappropriate and inconvenient. If the dimensions of the room allow, then such a podium will not only be a reliable basis for a steel bowl, but also an original addition to the intended design.
Brick is more durable, but in old houses it cannot always be used because of the small bearing capacity interfloor floors. The same applies to the frame made of ceramic concrete. Foam blocks and timber are much lighter, but can collapse under the influence of moisture, however, if you follow the recommendations outlined in the article, using the listed building materials, you can make a reliable frame for a steel bath.
Podium of foam blocks or bricks

A single-level podium should be such that the bath enters it and its edges rest against the walls. The installation height is determined by the convenience of using the product. When using foam blocks, they must be treated with moisture-resistant compounds that will prevent the destruction of the material and prevent the fungus from starting.
Timber podium
When using a beam, it must be treated with antifungal impregnation, and twice: once (or twice) the beam is processed, and then the entire structure, especially saw cuts. If the podium is much wider than the bathtub, then thick moisture-resistant plywood is fixed on top, and a hole for the bowl is cut out in it.
When assembling the frame, use only stainless steel screws. The design should turn out to be solid, but it is better to calculate the installation of the bath in such a way that, when immersed in the podium, it rests with its legs on the floor or on stands specially made for this case.
Metal structure
The podium can be made from a corner or profile pipes. It will be very durable and not heavy. The disadvantage of this design can be considered the fact that for its assembly all parts must be welded. In the conditions of an apartment, it is far from always possible to use welding machine, and a structure welded on the street may not be able to be brought into the bathroom. Here you have to look at the circumstances. Usually there are no problems in the manufacture metal frame to install a bathtub in it.
If the choice is stopped on a metal product, then the finished structure should be degreased, primed and painted. If possible, the frame should be attached to the wall - this will prevent its accidental displacement. Only after these steps can you begin to install the bath and sheath it with plywood.
A lot of free space in the room is occupied by a two-level podium, but if you make niches in it, then you can store toiletries there.
The article lists the main ways to fix a metal container, but in the comments you can tell about your methods and the nuances that you encountered.
Video
Watch a video about installing a steel bathtub with two walls:
Ceramic tiles are the best flooring solution for bathrooms. It has many undoubted advantages and advantages, which allows you to install plumbing equipment of various types and sizes on it. Bathtubs are considered one of the most complex and demanding accessories. The technology for fixing a bathtub on legs depends on the characteristics of the floor in the room.
Before starting direct work, you should briefly familiarize yourself with the differences in flooring.
| Type of tiled floor | Description of technical characteristics |
|---|---|
| The most durable coatings that can withstand significant forces. Only on such floors is it recommended to install heavy cast-iron or stone bathtubs. The tile is laid on a leveling cement-sand screed on concrete, there is no insulation layer. If various heaters were used to reduce thermal conductivity, then it is not recommended to mount heavy containers. |
| Ceramic tiles are installed on sheets of plywood or OSB. used as load-bearing elements wooden beams. Such a base does not have high rates of physical strength; it is not recommended to install heavy bathtubs on them. The fact is that wooden structures change linear dimensions due to fluctuations in indicators relative humidity. As a result of such movements, the degree of adhesion of tiles and glue is significantly reduced. Loads from the legs of the bathtub speed up this process and increase the risk of tile delamination. |
| In terms of strength, they occupy an average position. The thickness and strength of the screed over the heating system cannot guarantee the integrity of the coating; chiseled loads from the legs of the bath can cause critical damage to the coating. |


Be sure to consider the features and specifications floors before buying a bath.
General tips for fixing a clawfoot bathtub on a tiled floor
Each type of device has its own characteristics, we will talk about them below. But for everyone there General requirements, observance of which is a prerequisite for proper installation.
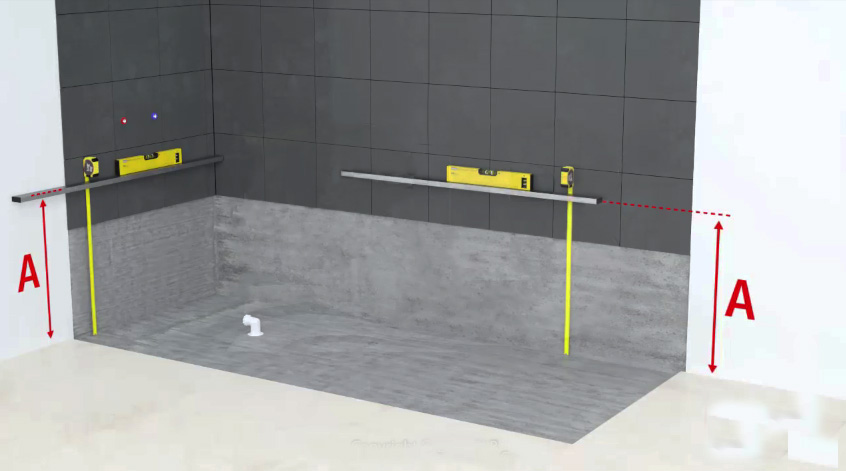
The quality of the flooring. Before installing the bath with a long level, check the levelness of the floor. Despite the fact that all the legs have their own adjustments, they cannot level out large irregularities. In addition, if the legs have a large variation in height, then this significantly worsens the appearance of the room, especially if the bathtub is freestanding.

Another important point. After you have decided on a specific location for the bath, make sure that the tiles under the legs are laid according to the technology. To do this, tap the ceramic tile with any hard object, the presence of a drum sound indicates the absence of glue under it. This tile is highly likely cracks, special measures must be taken before installation to increase the bearing performance of the coating.

Make sure the legs are strong. In many cases, they are not designed for constant loads, but should be used as additional elements during the exposure of the bath and its installation on more reliable stops.

Assemble the legs in strict accordance with the manufacturer's recommendations. If there is a desire to make changes to the design, then this must be done correctly, otherwise the stability of the bath will deteriorate.

We'll consider detailed instructions for installing a bathtub on legs for several cases: the legs are used as the main stop, the legs are used as an additional stop, the bathtub is free-standing or mounted in the corner of the room. Each type of work has its own characteristics of fastening, pay attention to them.
Tarkett floor tiles prices
tarkett floor tiles
How to fix a bathtub on a tiled floor on legs with an adhesive backing
Read the attached instructions, make sure that all items are complete and in good condition. Check the condition of the flooring using one of the methods described above. This type of bath can be mounted on both concrete and wooden supporting structures.
Step 1. Tip the bathtub upside down, making sure that the distance to the drain hole will ensure a good connection to the sewer pipe.

Practical advice. In order not to damage the tiles on the floor and the coating of the bath, put cardboard or wooden spacers between them. Installation work is much easier and faster to do with an assistant.
Step 2 Degrease the bottom of the bathtub at the locations of the double-sided tape. It is better to degrease with special solvents, if they are not available, then it is allowed to use alcohol or vodka. After vodka, the surfaces must be thoroughly dried. Places for gluing adhesive tape are marked on the bottom of the tub.

Step 3 Remove the protective oiled paper from the tape on the legs. Place them carefully along the lines and press firmly. Do not rush, work with utmost care. If you make a mistake, then tearing off the legs will be problematic. In addition, the adhesive surface will significantly degrade its original properties, fixing will be unreliable. You will have to change double-sided tape, and it is quite difficult to find high-quality in stores, and you will have to lose a lot of time searching.


Step 4 Tighten the adjusting bolts on the legs until they stop and check their location with a level. They should lie in the same horizontal plane, if this is not the case, then readjust them.


Step 5 Assemble and install a siphon on the bath, the specific work algorithm depends on the design features of the equipment.
Step 6 Measure the distance from the legs to the sides, it is necessary to mark the location of the side stops of the bath.
We have already mentioned that light steel and acrylic baths cannot be fixed to the floor only on legs. This is due to the fact that such structures are very unstable, during use they can tip over or slide on smooth ceramic tiles. It is possible to specifically fix the legs to the floor with anchors only in some cases for bathtubs installed in the middle of the rooms. And then such work is not recommended for two reasons: you need a lot of practical experience in installing bathtubs and you have to drill holes in the tiles.
If it becomes necessary to replace or move the bath to another place, the drilled tiles must be changed. This is quite difficult for two reasons. Firstly, most often you will not be able to buy exactly the same replacement tiles, there will be traces of replacement on the floor. Secondly, it is difficult to dismantle well-laid tiles from the base, there are high risks of damage to nearby ones.
Step 7 On the walls of the room under the level, draw lines at the height of the sides. Make sure all corners are at 90°.

Step 8 Temporarily put the bath in place and mark the fixing points for the side stops. Move the tub aside and drill holes for the dowels.


Step 9 Apply a layer of silicone sealant along the drawn lines, install the bathtub on hangers. The thickness of the sealant must be such that all the irregularities of the tile are covered. Squeezed out excess material should be leveled and removed.


Step 10 Finally align the legs and attach them to the floor. If it is made of wood, then it is enough to tighten the screws. If the floor is made of ceramic tiles, then for fixing it is necessary to pre-drill holes for the dowels and, after installing the bathtub, drive the dowel-nails into the plastic parts.

Step 11 Check the tightness of the siphon connection. This can be done under pressure using special equipment or by gravity. Fill the bathroom before the overflow of water begins, place sheets of paper under all piping connections. Open the valve and wait for the water to drain completely. Remove the paper, if there were minor leaks, then wet spots will appear on it. If problems are found, they must be corrected immediately.

The final step is the installation of a decorative screen. It can be made from masonry materials or shields, tiled with ceramic tiles or plastic panels can be used.


How to fix a wobbly bathtub
We have already mentioned that the legs are not recommended to be used as the main stop. They create significant point loads on the tiles, the surfaces of thin-walled acrylic bathtubs sag, etc. There is another significant problem with such stops. When long-term operation and heavy loads, the threaded connections of the legs are gradually loosened, over time, the fluctuations become critical and can cause leaks at the junction of the siphon with sewer pipes. In addition, the sealing of the joints of the bathtub with the walls is constantly violated, water penetrates into the cracks with all the negative further consequences.
What to do if you have just such a situation, the bathroom began to stagger on tiled floor? There is a way to fix the problem without dismantling the bath and without damaging the ceramic tiles.
If there is a decorative screen, then it should be dismantled. The removal process depends on the materials of manufacture, the most difficult with masonry materials. You will have to completely break the structure. During work, make every effort to preserve the floor and materials, with proper skill, they will all be recyclable.
To complete the work you will need a car jack, bricks or aerated concrete blocks, tile adhesive or cement-sand mixture, trowel, mortar container, electric drill with mixing attachment.
Step 1. Unscrew the nut that connects the siphon pipe to the drain hole of the bath. Remove the hose from sewer pipe.
Step 2 Using a jack, raise the container 5-8 cm above the set level. In order not to damage the bathtub, place a wooden chock or any small piece of board between the jack and the bottom.


Important. Do not rush to immediately raise the bath, first find the balance point. If the container tilts to one side or the other during lifting, lower the bath and change the position of the wooden lining and the jack.
Step 3 Lay two rows of bricks around the edges of the tub. Select the height of the masonry so that there is a gap of about 1 cm between the surface of the bricks and the bottom of the bath.
Step 4 Coat the top surfaces of the bricks with tile adhesive or cement-sand mortar and slowly lower the tub onto it. Make sure that the container lies on the mortar with a maximum area and evenly. Check its position with a level, if deviations from horizontal are found, correct the problems.
After the glue or mortar has completely hardened, connect the siphon drain pipe to the sewer. This method of attaching bathtubs on legs is considered universal; it is not necessary to make stationary stops around the perimeter. For a guarantee, you can tighten the adjusting bolts of the legs until it stops with ceramic tiles.
Practical advice. If the bathtub has a decorative screen, then it is recommended to smear the floor under the legs with tile adhesive. The glue adheres tightly to the tile and forms a recess under the legs, which eliminates the spontaneous movement of the bathtub on the slippery floor.
Next, proceed to seal the gaps between the wall and the bathroom. If they are large, then they must be pre-laid with any suitable building materials. Small gaps are covered silicone sealant. Use antibacterial compounds, black mold does not appear on their surfaces.


Practical tips for fixing a clawfoot bathtub to a tiled floor
After securely fastening the bathtub on legs to the tiled floor, it becomes much more difficult repair work and dismantling of plumbing. In order not to create problems for yourself while using the bathroom, do not rush to start work, carefully study the recommendations of professional plumbers. What should you pay more attention to?
Stack of water. It depends not only on the parameters of the siphon, as many inexperienced builders think. The main condition of the stack is that all curved siphon tubes and the drain in the bath must be located above the level of the sewer pipe. The greater the elevation difference, the faster the water will leave. The rapid flow of liquid automatically cleans the pipelines, as a result, it will be necessary to do preventive inspections and repairs much less frequently. Raise the adjustable feet as far as possible before fixing the bathtub. At the same time, make sure that the comfort of use does not deteriorate, the distance of the sides to the floor should be in optimal values and do not obstruct the use of the bathroom.

If possible replace the corrugated flexible siphon connection hoses with smooth plastic pipes.

Flexible hoses are much easier to work with, there is no need to precisely measure them, they can always be bent into the desired position. These are the undoubted advantages of such elements. But they also have a significant drawback. Dirt quickly accumulates in the folds of the corrugation, it will not be possible to remove it from there by simple washing, you will have to disassemble the siphon.

Frequent disassembly of the siphon can cause damage not only rubber seals but also threaded connections. As a result, serious damage occurs that requires a complete replacement of the device. Carry out these works on a firmly attached bath to ceramic floor extremely difficult. It is necessary not only to lie down under the bath, but also to carry out all work with extreme caution in conditions of limited visibility and accessibility.
Practical advice. To increase the reliability of using the bathroom, it is recommended to buy siphons without a separate sump. It brings more trouble than good. Buy those types of siphons in which the ordinary bend of the tube performs the function of a sump. This device does not allow unpleasant odors get into the room, it gets clogged much less often and, if necessary, is simply cleaned. It is not necessary to disassemble the siphon, it is enough to clean the pipe with an ordinary rubber plunger.

Try to buy baths from imported manufacturers. Domestic, unfortunately, are often of poor quality. This applies not only to enamel, but also to geometry. Check the corners of the sides with a long square; in domestic products they are rarely straight. An error of only a few tenths of a degree turns into a few millimeters over a long length of the bath. Due to this, a wedge-shaped gap is formed between the side and a perfectly flat wall. It is not recommended to close it with a silicone sealant, errors become too visible. You have to use special plastic or ceramic skirting boards for bathtubs, and they should only be mounted on fixed surfaces. At the slightest fluctuation, the corners come off; it is useless to re-glue them without securely fixing the bathtub.


Keep in mind that all repairs in the operated premises are much more difficult and expensive than taking timely measures to prevent problems during operation.
To increase the area of support of the legs against ceramic tiles, various durable linings can be used. But this mounting option is only suitable for those baths that have decorative screens. It is much more reliable to lay tiles for outdoor work, it has increased indicators of physical strength.
Be very careful when attaching the legs of freestanding bathtubs. The best option for such devices - installation on floors with concrete bases and thick, extra-strong tiles. If there is a possibility of the container shifting horizontally during use, then the legs can be fixed to the floor with small anchors. But remember that manufacturers do not provide for this possibility, the lower parts of the legs will have to be redone a little, and additional nuts should be used to adjust the height and horizontal. These works are very complex, it is better to use the services of professional plumbers. If possible, buy free-standing bathtubs without legs, such models rest against the floor with the entire surface of the bottom.

When marking holes in ceramic floor tiles, make sure that the holes are not located at or close to the joints of the tiles. In these places, the risks of cracking during drilling of holes increase significantly. Pay attention to the position of all four legs, not just the visible ones. During installation, it is always possible to move the container a few centimeters in any direction and select the desired position of the lower elements of the legs.

remember, that the adhesion of tile adhesive to the front surfaces is much lower than to the working ones. Before additional fixation of the position of the legs on the surface of the tile with glue, they should be thoroughly cleaned of dirt, dust and grease. If the fasteners are not visible, then it is recommended to remove the glaze from the surface in several places, this can be done with a grinder with a diamond disc or with sharp blows of a chisel. Never rush, cracked tiles will create big problems.
Very heavy bathtubs are much more appropriate to install on concrete base, and only after that lay ceramic tiles on the floor. the only possible problem such technology is the difficulty in replacing the old bath model with a new one. But do not despair, no one in the world has yet been able to foresee optimal solutions for all occasions.

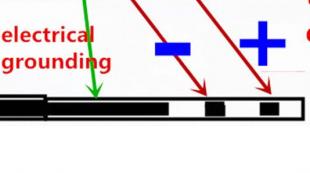
And the last tip. Modern bathroom equipment often has live parts. To prevent accidents steel and cast iron baths must be grounded. If the house has a three-wire wiring - great. If the wiring is old, then proper grounding cannot be done.

Important. Never use metal pipes as grounding, this is strictly prohibited by the PUE.

We talked about the main methods for attaching bath legs to ceramic tiles. If professional recommendations are followed during use, no problems will arise.
Video - Installing a bathtub on legs
The bathroom is the face of every home, the appearance of which speaks of the wealth, economy and style of the homeowners. The central place in the bathroom is occupied by a bathtub, which is used for taking hygiene procedures or washing. The choice and installation of a washing container is the most important stage in the repair in this room. To save money on calling a professional craftsman, you can install the tank yourself. In this article, we will tell you how to fix the bath so that it does not swing, but stands steadily.
Bath selection
A bathroom is a large-capacity sanitary container that is used for washing, washing and other household needs. Some time ago, they tried to replace this device with showers, however, they were defeated due to their lesser functionality. Bathtubs are made from such materials to support the weight of water and the person using it, so that it retains heat for a long time, and retains its appearance and tightness when in contact with water.

They produce 3 types of sanitary containers:

Note! In order for the bathtub to stand level and not sway after installation, it is necessary to choose the right size of the container. The length of the bathtub should correspond to the distance between the walls minus 3-5 cm. When deciding which bathtub to choose, give preference to models that are as close as possible to the calculated dimensions so that after installation is completed there are no gaps between it and the walls through which water penetrates. The correct choice of the size of the container will greatly facilitate the fastening of the bath to the wall and floor of the room.
Mounting Features
The question of how to fix the bath so that it does not play or sway worries most homeowners if they do their own bathroom renovation. The process of installing a sanitary wash tank has its own nuances and tricks, but you can cope with this task on your own, taking into account the features of attaching various types of bathtubs:

Important! During the renovation process in the bathroom, the bathtub is installed in place only after finishing the floor with ceramic tiles. To provide access to the floor under the bathroom, the container is lifted and then placed on bricks or wooden blocks.
Installation rules
When purchasing a bath, be sure to pay attention to the mounting system with which it is completed. After purchasing a sanitary container, carefully read the instructions, familiarize yourself with the installation method recommended by the manufacturer for this model.

In most cases, the bathroom installation process is as follows:
- Before fixing the steel bath, it is necessary to prepare the site for installation. If ceramic tiles are used as a finish, then it is necessary to lay the tiles on the floor and walls where the container is located.
- The bath is turned over on its side, and then carefully placed on the floor, since in this position it is much more convenient to connect the drain and overflow pipe.
- Without changing the position of the sanitary container, the floor siphon is connected to plastic pipes using a sealant or sealant.
- The legs are screwed or glued to the bottom of the bathroom, adjusting the supports in height.
- The bath is placed in such a way that the siphon can be connected to the sewer system.
- If necessary, a podium of bricks or other moisture-resistant materials is built under the bottom of the bathroom. They make a frame in order to hide the pipes behind a decorative screen.
- Lastly, you need to hermetically seal the joints between the walls and the sanitary container using a sealant, a moisture-resistant solution or a plastic corner.
After the installation is completed, experienced craftsmen check the quality and reliability of fastening. To do this, the sanitary container is completely filled with water in order to check whether the drain works correctly, does not swing or flow.
Video instruction
It is difficult to imagine life without taking a hot bath. Water procedures invigorate and at the same time relax the human body. If the bath installed in your house / apartment has already served its time, then, of course, it will have to be replaced. Bathtubs made of steel are in the greatest demand today. From this article, you will learn that installing a steel bath with your own hands is quite within the power of everyone.

Due to its massiveness, a cast-iron bath will stand securely, no matter how you install it. The same cannot be said about the steel bath. When installing it, it is important to make sure that it adjoins the walls on three sides. In this case, it will stand securely, and it will be safe to carry out water procedures in it.
Adjustable feet

When buying a bathtub, adjustable supports are included in the package. There are several types of supports, the safest support with a self-adhesive pad. This is especially true in cases where the manufacturer has provided fasteners on the tie bolts. When tightened or loaded at the attachment points, the enamel may peel off. Just for this purpose, a self-adhesive overlay is intended, which levels the load. In their form, the supports resemble a channel. They have adjustment screws with plastic tips.
The best fasteners are those with short supports and long bolts.
Installation of a bathtub on bricks

Due to its low weight, the steel bath is unstable. Therefore, it is necessary to take care of the manufacture of additional support. The ideal option there will be a brick frame. In the future, this support will be tiled, so it will not spoil the appearance of the bathroom as a whole. When laying out the bricks, it is necessary to leave a window through which it will be possible to clean or replace the siphon. In this window it will be necessary to install a decorative door.

You can install a steel bathtub without much effort. The process itself is quite simple and does not require special knowledge in construction. For you to succeed, closely adhere to the guidance outlined in this article.
The first step is to prepare a place for installation. At this stage, there should be outlets for water and sewer pipes. should be carried out close to the wall.

Next, carry out the fastening of the supports. To do this, turn the bath upside down. Under it, you need to put soft material or packing cardboard. The first support is fixed as close as possible to the outlet. The other support is located as close as possible to the opposite end of the tub. However, it should not be shifted from flat surface bottom. To prevent displacement, it is necessary to straighten the carrier channel. But do it not in the bath, but on the side.
If the supports of the bathtub you purchased have a self-adhesive surface, then it is recommended to treat the gluing place with alcohol or acetone. Mounting bar must be firmly pressed to the surface of the bottom. As a result, the support will hold very securely.
If you want to remove the protective film from the surface of the bath, use a hair dryer to do this. After warming up the film a little, it can be easily removed and no residues will remain on the surface of the product.

Threaded adjusting studs should be hammered into the plastic tip until they stop. This must be done very carefully so as not to damage the thread. Next, take the nuts that come with the supports, and screw them onto the stud. After that, lower the nuts to the tip and screw the studs so that they fall into place in the supports.
If your bathroom is narrow, then the supports should be assembled directly in it. When transferring the bath, hold on to its edges, but in no case by the legs.

Having installed the bath on supports, it remains to align it in height and level. To do this, you can use the building level, which you lay on the side of the bath. Do not put the level on the bottom, as it is initially filled so that there is a sufficient flow of water into the sewer. At the end of the installation, there may be a small gap between the wall and the bathtub. It should be sealed with sealant or foam. If you installed the bath on a pre-laid brick frame, then you just have to lay the tiles. If you have not resorted to such technology, then you can mount a protective screen. Given this, you can use a different technology for installing a bath. Screw metal hooks into the wall. Do all your measurements first. In the end, it remains just to put the bath on the hooks. With this technology, make sure that the legs are firmly on the floor.

It is also necessary to install a drain siphon. The scheme of its assembly is offered by the manufacturer. It remains for you to assemble the siphon design with the help of union nuts. On request, soundproofing and insulation of the bath is performed. For this, ordinary mounting foam is used. Apply it to the bottom and side outer walls. Depending on the size of the tub, you will need 4-5 bottles of foam.

To all of the above, it is worth adding a few nuances that must be considered during installation. The first nuance concerns the installation height. There are no special standards here. However, the choice of height will depend on the installation method you choose. If you are using factory supports and want to install a screen, then there are two standards: the height from the floor to the edge of the bath is 55 cm or 65 cm. Remember that the steel bath is covered with an enameled layer of paint. And if carelessly handled with it, then it can be harmed. So don't rush to install.
So, you have learned how to install a steel bath with your own hands. As you can see, the process is quite simple. You are required to have a desire, and in the course of work you will deal with all the questions that arise. If you have experience installing steel bathtubs, then write comments at the end of this article.
Video
Learn more about steel bath installation from the provided video:
A photo
From the photos provided, you can clearly see the intricacies of installing a steel bath with your own hands: