Bathroom installation with your own hands. Four ways to fix the bath yourself
The bathroom bowl is the main item toilet room. It is necessary to choose it, carefully considering the details of the design of the rest of the space of the room. The comfort during hygiene procedures depends on how well the bath is chosen. The installation process requires no less attention, because it affects the quality and duration of future operation.
There are several options on the market:

Can I install the bath myself?
Installing a bathtub with your own hands is quite a feasible task, but it will take time, care and the help of at least one person, especially when installing a heavy cast-iron model.

Before proceeding with self-installation, read the instructions for installing the bowl itself and connecting the water line and sewerage to it.


The technology for installing a corner bath and a straight-shaped bowl is no different. The main criterion is the material and dimensions of the bathroom.
Important! For a small room, a corner design is a great option that will allow you to rationally delimit the entire space.

Installation sequence
We will divide the entire course of work into several successive stages:
- Preparatory.
- Skidding and fastening of the bowl.
- Connecting the drain to the sewer.
- Grounding.
- Processing joints and gaps.
- Installation of a screen under the bath.
- Facing.

Preparatory work
This process is very important for the correct installation of the bathroom.

First take care of the availability of all the tools necessary in the process of mounting the bowl itself and attaching it to engineering systems. Refer to the following list:

In addition to preparing the tools, do the following:

Skidding and fixing the bowl
Installing a cast iron bath
Not only fixing the bathroom, but also its skidding has its own technology:

Installing an acrylic bathtub on a factory frame
The technology for mounting a plastic bowl is different from cast iron. To install it, you definitely need a frame, on which all the burden during operation will fall.

When buying, select additional equipment for installation:
- Details for fixing the bath bowl to the wall
- Fasteners for mounting the panel to the bath
- Set for connecting the drain to the sewer
- Decorative panels
- Frame.
In this case, the entire installation process will be fairly quick and easy.

Consider carefully the scheme for installing the bath and assembling the frame, attached to the instructions.

Instructions for installing a bathtub with a finished frame:

Installing a plastic bath on a do-it-yourself frame
The technology of self-creation of the frame will require more time, effort and Supplies. It is used in the absence of factory parts, as well as if the specified drain height does not match the height of the bowl.

Important! Installation of a steel bath follows the same principle.
Prepare in advance:
- wooden blocks
- drying oil or antiseptic solution for wood
- sheets of waterproof plywood, at least 15 mm thick
- self-tapping screws for wood and concrete
- adhesive mixture
- fastening corners.
Do the work, adhering to the following scheme:

Plumbing connection


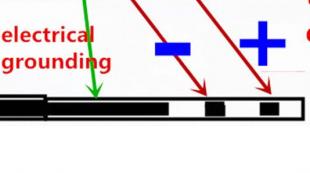
grounding
This process is mandatory when installing a steel and cast iron bath.

It is better to entrust grounding to a specialist, but if you decide to do all the work yourself, then consider the nuances of the technology:

Seal the seams when installing the bathroom
All seams, joints of the drain system and gaps at the points of contact between the bowl and walls at the end of all installation work should be carefully sealed. To fill the gaps, use a cement mixture if the joints with the sides of the bathroom are insignificant, or silicone sealant, which is also great for sealing the joints of the drain system.
In the case when the gaps between the wall and the sides of the bowl are more than 5 cm:

Installing a screen under the bath
In order to give an attractive and finished look to the design of the bathroom, installing a screen is an excellent solution. The simplest is the installation of a ready-made kit.

But it is quite possible to cut the parts yourself, only by choosing the material to your liking and a more suitable scheme.
The most popular options for screen design:

When creating it, adhere to the following recommendations:
- Eliminate the bearing load on the screen.
- Fill the opening neatly and tightly.
- Separate the floor under the bathtub from the rest of the room floor to prevent water from leaking in.
- Leave access to the drain system and other plumbing systems passing under the bath by installing a small door.
- Carefully measure all the details, observing the accuracy of the parameters
- Fasten to a pre-created frame or special panels.
- When making a screen made of chipboard, plywood or plastic, cut a 2 * 5 cm or 2 * 10 cm ventilation hole on the side opposite the service hole.

Facing
Wall cladding - the final stage decorative design bathroom. Do it only after securely fixing the bath and other plumbing items. Regardless of the chosen facing material, be sure to keep free access to pipes and joints.

Bathroom renovation
In order to repair a bathtub that has worn out or lost its attractiveness and smoothness of the surface, it is not necessary to change the bowl to a new one. A great alternative would be *installing liners in the bathtub*.

Most often they are made of acrylic, which makes the process less time consuming due to the lightness of the material.

Installing an acrylic liner in the bath will allow you to quickly return it to its proper appearance without undue effort.

Perform all work in the following sequence:
- Measure the bathtub and select a model of the appropriate parameters.

- Sand the entire surface of the old bowl with fine-grained sandpaper.

Important! The degree of adhesion between the surface of the old tub and the new liner depends on how carefully this process is carried out.
- Wash the tub, removing all debris and dust.
- Wait for the surface to dry.
- Remove the drain siphon.
- Install the liner inside the tub.
- Mark with a marker an extra protrusion along the side of the bowl and the places of the drain and overflow holes.
Important! Measure the drain and overflow circle, for example, using a removed siphon.
- Cut off all excess clearly along the lines.

- Apply sealant to the inside of the bath along the sides and foam over the rest of the area.


- Insert insert.

- Press firmly on all sides.
- On the sides for the most tight grip, press with clamps, placing wooden bars under them.
- Install the siphon immediately.
- Close the drain hole with a stopper.
- Pour water into the tub just below the overflow hole.

Important! Water will become a necessary load, and over the entire area of \u200b\u200bthe bowl, without empty spaces.
- Leave in this position for a day.
- Drain the water and start using the bathroom as usual.
- Watch a video on how to install a bath liner.
Conclusion
As you have already seen, the entire installation process is not particularly difficult. The main thing is to be consistent, do all the work carefully and carefully. The result of proper bathroom installation is convenience and comfort during water procedures for many years.
Bathroom renovation is a costly undertaking, not only in terms of construction and finishing materials, but also the cost of the services of masters. In this article, we will tell you in detail how the bath is installed, whether it is possible to do it yourself, without the involvement of third-party specialists. Thanks to this article, you will be able to save a significant amount of your renovation budget.
The installation of the bath takes place in several stages, some of them are common, while others are included depending on the material of manufacture of the equipment itself.
- Room preparation;
- Bath preparation;
- Assembly of the siphon group;
- Bathtub installation;
- Connection of drain fittings;
- Decorative design.
If the bath is metal, then the second item is omitted. The installation procedure itself is not complicated, but care is required when working with small parts. The main difficulty lies in connecting the siphon group.
There are two options for doing this
- Carry out the connection before installing the bath in its place. This is much easier, because access to the drain holes is not limited. And the process itself can be controlled visually. But during installation, extreme care will be required so as not to damage the installed fittings. Given that the bath is a large and heavy object, this is problematic.
- Install the bath in its place, align it. Only then connect the siphon group. The complexity of the process is seen in the fact that the work must be carried out by touch. It is impossible to see from both sides of the bath at once. But in return, the installer has the opportunity to handle the bathroom more freely.
The second option seems to be more preferable. In the end, anyone can brush their teeth with their eyes closed, and the toothbrush does not get past the mouth. Therefore, we will focus on the second method.

For the work of installing a bathtub, installers charge 1500-2500 rubles. And work there, with a prepared base, no more than half an hour. Therefore, we recommend installing a bath with your own hands.
Bathroom preparation
Work should be divided into two categories. It is one thing if the bath is installed in a newly renovated room, and quite another thing if the old equipment is being replaced with a new one.
In the first case, you do not need to prepare anything. Full repair, involves the preparation of the foundation. Note that floor tiles, if they cover the entire area of the room, should be laid on the adhesive applied in a continuous layer, and not on several points. Otherwise, a bathtub filled with water, and even with a person inside, can break through the tile.
But this flaw can be leveled if two boards are placed under the legs, placing them along the length of the bath. The wood material is larch. From contact with water, the resins contained in the larch polymerize, and after a while the boards will be impossible even to cut with a hacksaw.

In the second case, it is necessary to revise floor covering. Pay special attention to the places where the legs of the new bath will be. It is possible that new supports will lie in a different place.
In addition, it is necessary to measure the level at which the bath will adjoin the wall. With highly likely, it can be assumed that the walls are tiled not to the floor. And after old bath, at the place where it adjoins the wall, a clearly noticeable line remains. It's unlikely to be wiped off. Microscopic particles have penetrated into the pores of the glazed coating, with the formation of an inseparable conglomerate. If this defect cannot be eliminated, then it should be hidden. For this purpose, boards should be placed under the legs of the bath ( as described above).
Heated drying oil is applied to the boards in a thick layer. Then they can be painted in such a color that they do not differ from the dominant background.

Separately, we recall the optimal height of the bath. In the USSR, experts calculated that it is most convenient for an average person to raise his leg in order to step into the bath, to a height of no more than 60 cm. This parameter was included in the SNiP as a recommendation. But now there are many more bath models on the market, with different overall dimensions. So be guided by this case, should be your own preferences.
However, you need to know about one interesting feature. If the bath drain is located at least 3-5 cm higher than usual, then the water will flow faster. This will no longer allow blockages and deposits to form in the drainage fittings. Even on the drain grate, there will be no hair left.
If tiles were not laid under the bathroom, then it is recommended to slightly raise the level of the floor in this particular place. Even 1 cm of added height will be enough to keep water out of the tub.
This will require:
- Quick-drying self-levelling screed (20 kg):
- Deep penetration primer;
- Guide metal profile;

The floor surface is treated with a primer, and during its drying, with the help of a metal profile, a side is arranged. To do this, the profile is cut in such a way that it fits exactly in length between opposite walls. Adhesive tape is glued to the back, this will not allow it to be grabbed with a screed. Having laid, the profile is screwed through the side wall with self-tapping screws to the floor in 3-4 places. Then the screed is diluted according to the instructions on the package, and poured into a fenced area. The layer thickness is selected individually. Considering that ≈ 15 kg of the finished solution is consumed per 1 m 2 of the screed with a thickness of 1 cm. And from 20 kg of dry mix you get ≈ 30 kg of solution, then the screed layer in the bathroom will be 1.2-1.5 cm.
The next day, the dried screed is once again coated with a primer.
Bath preparation
Special preparation requires only an acrylic bath. She needs to be supported. There are three options:
- Legs. The standard solution for short-sighted users. A widely advertised option, but has several weak points. In particular, it is necessary to make blind holes in a monolithic case in several places. This increases the tension of the material. Self-tapping screws will be screwed into these holes, which, after filling the bath hot water also heat up. And their coefficient of thermal expansion does not match the same parameter for acrylic.
Yes, and the load is expected to be significant. 130 liters of water + 70 kg weight of a person. It's 200 kg for two flimsy supports. A very dubious choice. - Frame. Great alternative. Strong reliable frame made of profiled pipe, based on 6-8 legs. The integrity of the bath body is not violated. She's kind of in limbo. Please note that there are frames for all models of acrylic bathtubs.
- Stand made of bricks or blocks. Cheap and capital option. But somewhat inferior to the frame, because there is no lateral support.
- If the tub is old, then plan on installing the acrylic liner as the last step. Only after the base is completely mounted, you can start this work.

In objective consideration, there is no alternative to the frame. Depending on the shape of the bath, its price varies from 1800 to 2600 rubles. It is delivered disassembled. Connection of all components is carried out at the installation site of the bath, according to the attached instructions. IMPORTANT: the legs of the frame are height adjustable. After assembly, screw them in an equal number of turns, until the middle of the thread. This will make it possible to later more freely perform horizontal alignment.
Metal baths, both steel and cast iron, do not require special preparation. But they have one flaw that is easy to fix. We mean the high thermal conductivity of the metal. Such baths quickly heat up, and just as quickly give off heat to the surrounding air. This disadvantage can be leveled with the help of 3-4 cylinders of polyurethane foam. It is processed all outer surface metal bath. After polymerization of the foam, the cooling rate of water decreases by an order of magnitude. As a bonus, this treatment almost completely absorbs the sound of rushing water. If this is not essential for a cast-iron bath, then it is relevant for a steel bath.
In addition, the legs are screwed into the seats into the steel baths. TIP: between the body of the bath and the end of the threaded leg, we recommend laying a rubber gasket. This will further reduce the noise during water collection.
Assembly of the siphon group
Bathroom fittings sold separately. They are divided into two groups:
- prefabricated;
- Whole.
In the first case, the siphon group is assembled on threaded connections from small plastic parts. All curves are rectangular.
In the second case, the siphon is represented by a curved pipe. All bends are smooth, there are no threaded connections.
A one-piece siphon looks trivial, but it has huge advantages.
- The more threaded connections and parts, the higher the likelihood of leaks;
- Smooth bends do not impede the flow of water, draining is faster and the likelihood of deposits and blockages is extremely low;

And besides this, the siphon is not a subject for demonstration, and no one will see it except you. Therefore, an objective choice is a siphon with a solid body.
Its assembly consists in screwing through the cuff, the overflow system.
Bath installation
The bath must be installed by two people. Regardless of the material, this is a large-sized piece of furniture and one simply cannot cope with it.
For work you will need:
- Rule with a level;
- mallet;
- Adjustable wrench for leg adjustment.
The cast-iron bath is installed in the allotted place. With a properly prepared base, no adjustment is needed.
The acrylic bath is installed inside the assembled frame, and is slightly pressed down, until a characteristic click. This click means that the bathtub is in place and seated on the frame. Since the frame is prefabricated, it is required to adjust the plumbing according to the level of the horizon. To do this, it is better to use the diagonal method.

As a rule, the bathtub is laid diagonally, and if required, unscrewing the leg, raise the lowered side. Then the rule is placed on another diagonal, and again aligned, raising the lower edge. IMPORTANT: alignment is carried out only by lifting the low side. Lowering the high - you can not.
A steel bath is placed similarly to a cast-iron one. And the alignment according to the level of the horizon is carried out as in the acrylic counterpart.
Drain fitting connection
The assembled siphon group must be fixed at three points:
- Drainer;
- overflow;
- Sewage pipe.
First, fittings are installed in the drain hole. Fixation is carried out with a screw through the drain grate. The gasket is put on the drain itself, it has a specific shape, and provides sealing from both sides at once. TIP: apply between the gasket and the body of the tub, a little silicone sealant . Do not tighten the screw all the way.

Then, by adjusting the height of the corrugated pipe, the overflow is fixed. Here the gasket is installed outside the tub. It has a conical shape, and the “point” is directed “from the bath”. The screw is tightened to the end.
After that, press the screw on the drain hole.
TIP: the screw stops turning as soon as the plane of the drain grate begins to sag.
The last one is inserted into the sewer, the sewer. To facilitate this process, lubricate both the pipe and the entrance to the sewer with laundry soap.
Screen installation
Almost always, the screens are completed with steel and acrylic bathtubs. For cast iron, it must be purchased separately. But in any case, a ready-made screen is a more acceptable option than a home-made plastic construction.
To install it, you will need an adjustable wrench and a screwdriver.
Screen panels are assembled into a single structure. The legs are screwed into the seats and pressed to the maximum.
The screen is installed under the front edge of the bath, strictly vertically, focusing on a plumb line. Then the legs are unscrewed, and the top of the screen is pressed against the edge of the tub. On some models of acrylic bathtubs, there is a special groove where the top edge of the screen enters.
Complete fixation is accompanied by a characteristic click.
When carrying out repairs in the bathroom and self-replacing plumbing, such a problem as the correct installation of the font necessarily arises, since aspects such as comfort during the adoption of water procedures and the service life of the entire structure depend on how well this operation is performed. The correct installation of an acrylic bathtub with your own hands consists in the exact sequence of actions that include the assembly of the structure itself, the preparation of the installation site, and the installation itself. In this article, we will look at options for how to properly install an acrylic bath.
One of the main positive qualities of such structures, which distinguishes them from the background of outdated metal models, is not big weight, this quality makes it possible to independently carry out the installation of acrylic bathtubs, without resorting to the help of professionals. Installation of an acrylic bathtub is a rather complicated process, since this material is very sensitive to mechanical damage from sharp or heavy objects. It is also not worth delaying the installation for a long time due to the fact that a bathtub made of this material has one unpleasant property during improper or long-term storage, it can change its original shape.
Preparatory work and installation options for an acrylic bath
Before you install an acrylic bath with your own hands, you need to prepare the place and the bath itself for installation, remove all unnecessary items from the bathroom, dismantle the old equipment, prepare necessary tools and materials for installation work. You will need:
- bath;
- legs or frame on which the bowl will be attached;
- a hammer;
- Bulgarian;
- perforator;
- assembly sealant;
- level;
- wrench;
- insulating tape;
- mounting tape (construction tape);
- corrugated pipe;
- spare parts for attaching an acrylic bath to a wall or floor.
Before you install a new acrylic bathroom, you need to make some preparatory work:
- first turn off the water supply to the central tap;
- then dismantle the old bath;
- then crack or cut out the old drain;
- clean the sewer hole;
- insert a new corrugated pipe into the sewer socket;
- coat with sealant the joint of the corrugation and the sewer hole;
- level the floor for an acrylic bath.
Now you can proceed directly to the installation of new plumbing.
Installing a new acrylic bathtub is carried out using one of the following methods:
- on the metal carcass;
- on support legs;
- on brick supports;
- on a brick podium;
- combined mounting method.
Acrylic sanitary ware installation rules and regulations allow any of the above methods to attach a bathtub to a wall or floor, based on its type and model. So, if there is a metal frame in the kit, then it is better to install the font on it, while using the attached instructions. And if special legs are sold along with the bathtub, then an acrylic bathtub must be installed on the legs, since such a support is designed specifically for this model, taking into account the areas of greatest stress.
Let's take a closer look at how to fix an acrylic bathtub in each of the 5 listed methods.

Installing an acrylic bathtub on support legs
This is the fastest and easiest installation method that does not require a set of tools and special skills. The assembly of the bathtub with legs is easy if you use the instructions that are attached to the product. If, according to the instructions or during installation work, it becomes necessary to drill the font, then this should be done with a wood drill at slow speeds. Mounting on the support legs consists of screwing the legs to the bowl and adjusting them in place.
- Screwing legs. On the lower part of the body of the bath there are special seats marked with stickers or corresponding symbols. To relieve self-assembly acrylic bath, some manufacturers supply products with pre-drilled holes. And if they are not, then you need to make these holes yourself. Then the legs are screwed into these holes, otherwise the load will not be distributed evenly and the bath will quickly fail.
- Support adjustment. Almost all bathtub legs are designed with the ability to adjust the height of the support in order to attach the bowl at the desired slope using a level. First, the bath is installed against the wall, and then the legs are twisted, setting the desired height. After that, they proceed to horizontal alignment, when the level is set on the side of the bath in a horizontal position. If necessary, legs with wrench twist up or down.
When the optimal performance is set, the legs are fixed with nuts in the desired position. Sometimes, for greater reliability, the bathtub is screwed to the wall with special plastic or metal hooks, which are pre-mounted strictly horizontally around the entire perimeter of the bathtub into the wall at the same distance from each other. The hooks are screwed up to the wall cladding.

Mounting on a metal frame
The most reliable way, relatively simple, the main thing is to clearly follow the assembly instructions for the product. In this case, the acrylic bathtub is installed as follows:
- First of all, it is necessary to assemble the frame, according to the instructions, using the long self-tapping screws that are included in the kit.
- The product is turned over on its side or upside down, so that it is convenient to fix the frame.
- Then the frame is installed on the acrylic bath in the center of the bottom, and the legs are attached to the support.
- Two supports are fixed to the frame in the central part, two more along the wall, and three supports along the outer edge of the font.
- The legs are then adjusted to the same height so that the height of the tub does not exceed 65 cm for safety and ease of use.
- After that, the product is turned over, checked with a building level, whether the bath is level.
- Then the siphon and overflow are connected.
- If necessary, the font is attached to the wall with hooks or metal corners.
- Finally, a decorative screen is installed.
An installation option is also possible, when the frame with legs is mounted immediately on the floor, and then a bathtub is mounted on top of the fixed frame. Most often, the installed frame does not require additional fasteners, but if it does not seem reliable to you, then you can strengthen it with additional fastening hooks, which were mentioned above.

How to install a bathtub on brick supports?
In the event that a metal frame is not available, the installation of an acrylic bath is done on a brick podium. This method is not economical, despite the fact that the construction is particularly strong, due to the fact that it requires a huge amount of bricks. Moreover, an excessive load is created on the floors, due to the rather large weight of the finished podium. To reduce the cost of construction, as well as to reduce the load on the ceiling, it is recommended to install an acrylic bath on brick columns. To create such a design, you can get by with a small amount of mortar and 12 bricks.
Installation is carried out in the following sequence:
- Without removing the protective film, the bath is brought into the room and installed at the place of future installation, after which the location of the columns is marked.
- According to the length of the bathtub, it is noted where 2-3 columns will be located, where one is located in the middle of the bottom, and the other two are at the edges of the bathtub bend.
- After they take out the bath, they start laying out columns 17-19 cm long so that the height of the bath above the floor level is not more than 60-65 cm.
- The masonry is allowed to dry for 12-24 hours, after which a siphon is connected to the bath and pushed tightly against the wall, it is installed on the previously made posts.
- Using silicone sealant, fill the gap between the posts and the bottom of the tank.
- With the help of metal hooks and corners, the edges of the bath are attached to the wall.
Experienced experts recommend that, prior to installation, apply mounting foam to the lower surface of the acrylic bath, this little trick will reduce the thermal conductivity and resonant ability of the material. Also, the use of mounting foam during installation reduces the likelihood of damage to the bottom of the acrylic bathtub by brick supports.
Mounting method on a brick podium
In the event that there are no metal supports for a certain model, the installation is done on a brick podium. According to experts, this method is in no way inferior in terms of reliability to the previous version, the only thing it differs in is that this method takes more time, while it is somewhat “dirtier” than the previous version. Installation of an acrylic bathtub on the podium is done using a saw, mounting foam, bricks, mortar and moisture-resistant plywood.
Installation is done following the following technology:
- The bath is temporarily placed in place, while the protective film should not be removed from it, after which the place where the drain hole will be located is marked. This operation is needed in order to leave a gap in the podium to connect the drain.
- Under the entire supporting part, with the help of a mortar, brickwork is made to such a height that the sides would be at a height of 60 cm relative to the floor level. You also need to consider that there will still be 2-3 cm of mounting foam between the masonry and the bathroom.
- Around the brick podium, a frame cut from moisture-resistant plywood is assembled. In this case, it should be borne in mind that the height of the plywood should be higher than the podium by the thickness of the foam layer.
- We evenly fill the brick podium with one layer of mounting foam, after which this layer is covered with a sheet of moisture-resistant plywood of the appropriate size.
- The bathtub is turned over, mounted on the podium, after which, using the building level, they check how evenly the bathtub is placed.
- The bath is filled halfway, closing the drain, this is done to evenly solidify the foam. The period of foam drying is 12-24 hours.
- The bath is connected to a drain with overflow, mounted on a podium and attached to 3 walls with hooks and a metal corner.
Worth considering! Nowadays, acrylic baths have a sloping bottom, which accelerates the outflow of water into the drain, so during installation it is not necessary to install the bath on a slope.

The most famous method of attaching acrylic baths is the combined method, when the installation is carried out on a metal frame made of aluminum profiles, and ordinary bricks are used to prevent the bottom from bending or deforming. In order to build such a structure, you will need:
- bricks that will support the bottom of the font;
- for the manufacture of the supporting structure, a metal or aluminum profile is required;
- in order to fix the brickwork, cement mortar is required;
- to seal the seams, it is recommended to use a sealant;
- self-tapping screws will help to assemble the frame;
- for stirring cement mortar, use a special container and a trowel.
Worth remembering! When working with sharp and heavy objects, care should be taken, as an accidentally dropped tool can easily make a hole in the bathroom, thereby damaging the product. It is better to take precautions in advance by covering the font with thick paper or thick film.
In order to properly install an acrylic bathtub on the wall, it is necessary to note what its future height will be, starting from which we will form the height of the brickwork. We measure from the floor to the indicated line, from the results obtained we subtract the height of the bath itself, and what happened will be the thickness of the brick lining on which the bath will be mounted.
It is recommended to start installing an acrylic bathtub against the wall by mounting a metal profile, which will subsequently serve as a support for the bathtub. Then, along the lower level of the edge of the edge of the bathtub, you need to install a metal profile with dowels around the entire perimeter, where the bathtub will come into contact with the wall. It is on him that the sides of the bath will rest. Next, before installing the acrylic bath, we make a brick pillow along the bottom of the bath of the required height.
Need to know! Before fixing acrylic bathtubs in this way, everything must be calculated so that during installation it exactly lies with the sides on the previously installed profile, and the bottom is slightly in contact with brickwork by her. Attachment to the wall in this situation is done using a sealant, which is applied to the profile, and at the same time is a sealant preventing water from flowing.

Thus, the manufacture of the frame can be considered complete, but it is possible to create a front protective screen from the same metal profile. This screen will make it possible to hide the inside and be able to provide additional protection for the outer side, as well as make it possible to make a special hatch for the repair and maintenance of the siphon. You have learned how to properly install an acrylic bath on a do-it-yourself frame.
Installing a bathtub is a responsible, but relatively simple event. With a strong desire to deal with installation work can on your own, refusing the services of third-party specialists and significantly saving money.
To make the process as easy, fast and interesting as possible, you need to carefully prepare for it.
In the modern market of sanitary equipment are presented acrylic, steel and cast iron bathtubs.
Cast iron containers proven option with impressive service life and heat savings. The material is resistant to various loads and in general does not cause any complaints.
The only bad things are the high cost of such products, as well as the large weight. Due to the significant mass of the bath, its independent installation can be difficult - you will have to involve an assistant.
Acrylic bathtubs have many advantages, among which:
- light weight;
- almost complete absence of noise when filling with water;
- many different shapes, sizes and configurations;
- affordable cost.
Steel baths also weigh little and are relatively cheap, however when filling such a container with water, a lot of noise is created. Yes, and steel products serve for a relatively short time.
Thus, if you have sufficient budget and want to buy the most durable and reliable product, give preference to a cast-iron bath.
If your top priority is custom shape and configuration as well as beautiful and modern appearance, buy an acrylic product.
In the absence of special requirements for the parameters of the bath and desire to save, feel free to install a steel container. Otherwise, the choice is yours, and the article "" will help you decide faster.
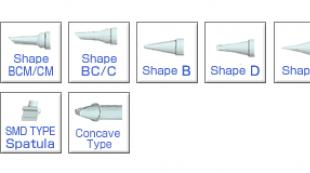
Determine the size and shape of the container
 Bathtubs of various shapes (oval, circle, rectangle, corner and non-standard designs) and sizes (on average from 1.2 to 2.1 m) are presented on the modern market.
When choosing the configuration and dimensions of the tank, focus on your preferences and available space.
Think about how the new bathtub will fit into the interior of the room, whether it will fit at all, whether it will be convenient to use the room after installing a similar bathtub, etc. In general, these moments are left to your discretion..
But there is a number of standards and requirements regarding various clearances and gaps. So at what height is the bath properly installed and what distance should be between other elements in the room?
- Before the bathroom you need to leave order 90 cm more free space.
- The size of the space between the toilet and the bath should be not less than 75 cm.
- The distance between the top edge of the bathtub without legs and the floor should be about 0.5 m, if the bath on legs, this figure increases to about 64 cm.
Preparing for installation
Regardless of the chosen material for the manufacture of the bath, for its installation You will need the following tools and fixtures:

- Screwdriver Set;
- grinder of small size;
- chisel;
- level;
- a hammer;
- gas key;
- cement mortar;
- insulating tape;
- mounting foam;
- drain fittings;
- corrugation with a diameter of 4 cm, rubber cuff 4x5 cm in case of connection to cast iron pipes, 5 cm drain corrugation when connected to plastic pipes.
The installation of the bath is best done before the walls are tiled.- in such a situation, the risk of damage to the finish is significantly reduced.
You need to do the following:
- shut off the water supply;
- dismantle the old bath;
- break out (plastic) or cut out (metal) old drain;
- clean the sewer socket and insert the corrugation into it, then thoroughly coat all joints with a silicone-based sealant;
- level the floor if necessary.
When choosing a place to install a new sanitary ware, remember: after installing the bathtub, there should be access to the pipes, but at the same time, the container should fit as tightly as possible against the wall.
At the end, you will only have remove construction debris.
Step-by-step instructions for acrylic products
Work on the installation of such a product is carried out in several simple steps. You only need follow the given instructions, and everything will definitely work out.
Mounting the frame/legs
How to properly install a bathtub on legs or a frame yourself? We do the following:
- unpacking support elements;
- flip the bath we mark on its bottom the places of attachment of the legs. One must be placed near the head of the bath, the second - closer to the drain hole;
- according to the marks we drill holes for the screws.
- fasten the mounting brackets to the bathtub. For this we use self-tapping screws. We fasten the legs of the sanitary ware to the installed mounting brackets.
The depth of the hole should be no more than 0.6 cm. Be careful not to drill through the tub. For greater convenience, make a mark on the drill with an insulating tape.
Siphon connection
 We work in the following order:
- first execute top drain connection, and after - lower;
- we assemble the siphon;
- we treat surfaces with a solvent for their thorough degreasing and then apply a thick layer of sealant.
The choice of siphon should be given special attention. The best way- This chrome-plated brass with semi-automatic system for opening/closing drain taps.
About installing storage electric water heater you can read in .
Sewer connection
One of the last steps in each of the above instructions was to connect the tub to the sewer. Let's consider this process in more detail.
Kits for connecting the bath to the sewer are sold unassembled. We begin work with the assembly of the system.
First we need to collect individual nodes. To do this, we take a hose, through which the overflow and drain are connected, and we put gaskets on it.
The gasket is made on a cone. It needs to be arranged thin side towards the ends of the tube.
Then we put nuts and gaskets on the elements of the drain structure and assemble its body. To do this, we fasten a part of the body to one side, and a drain neck to the other. In the end you get a water seal - a ready-made system of pipes.
In order for the connections of the structural elements to be of the highest quality and reliable, we place the cone-shaped gasket so that one of its parts enters the inner diameter of the second part to be connected and seals the resulting interface under the influence of a plastic nut.
Our next task is to connection of the drain body with the drain pipeline. To do this, we insert the pipeline into the drain body, not forgetting the rule for installing the gasket, after which we press the connection with a nut.
Next, proceed to the assembly of the overflow. To do this, we put on the sealing ring, after which we insert the body of the overflow system with inside our new bath. We attach a decorative overlay to the front side, and then we fix the structure with a bolt.
 Next to us you need to insert the tube into the overflow body. We do this from the inside of the bath. Due to the tube, the connection of the drain body with the overflow will be ensured.
We fix the drain body to the bath. Before that, insert the gasket into the drain hole of the bath. We place the gasket with the thick side under the bathtub, and the thin side on its front side.
We attach the drain body from the inside, after which we put the drain neck on the drain hole. It must be located on the front side of the sanitary ware.
We attach the drain to the bath with a bolt. Carefully tighten the bolt, tighten the rubber seals.
We connect the hose from the overflow hole to the drain body and fix it with a plastic nut. We connect the drain hose to the sewer system.
The bathroom is connected to the sewer. Turn on the water and check the tightness of the connections. If it drips somewhere, carefully tighten the nuts.
We tighten the plastic nuts only by hand, without using any additional tools.
In conclusion, all that remains is to finish the finish, if you want it or if the design idea requires it.
Finishing
 There are several basic options for finishing the decoration of the bath. You can do the following:
- tile the bathtub;
- close the space between the upper rim of the bathtub and the floor with moisture-resistant drywall;
- install a ready-made decorative screen.
Choose the method that you like best, and get to work.
Regardless of the finishing method chosen, you must leave windows for access to the drain and pipes so that, in the event of a breakdown, the necessary repairs can be carried out without hindrance. It is strictly forbidden to close these places tightly.
Now you have all the necessary information for self-installation and connection of the bath. Follow the instructions given and you'll be fine.
Successful work!
Steel bath - the cheapest option, with correct installation and additional processing in terms of performance is in no way inferior to more expensive analogues. The main advantage of heavy cast iron bathtubs- heat is retained for a long time. But in order to warm up the cast iron, you need a lot hot water, and this is associated with additional losses of thermal energy. In addition, during the adoption of water procedures, the water still cools down, the heat leaves through a large area of unprotected surfaces. There is a simple way to eliminate this disadvantage, if desired, the performance of an ordinary steel bath can be brought to high standards.
An important point right choice simplifies installation and increases comfort of use.
By what criteria are bathtubs classified?
| Parameter | Meaning and tips for choosing |
|---|---|
| 105x70, 120x70, 130x70, 140x70, 150x70, 160x70, 170x70, 170x75, 180x80. Choose the length and width of the bath, taking into account the size of the room and the height of the residents. Try to keep the product as close as possible to opposite walls, this will greatly simplify the installation process. | |
| 110, 120, 123, 136, 150, 170, 195, 210, 240. The volume directly depends on the depth, and this parameter affects the height of the edge. If elderly people or children live in the house, then you should not buy a large bath, it is difficult to enter and exit it. In addition, a large volume will require significant losses of hot water. But, on the other hand, the more water, the longer the comfortable temperature is maintained. | |
| Bolted or double sided tape. The first option is used by serious manufacturers, bolting is more reliable, in most cases it does not require additional reinforcement or installation on bricks. Tape feet - a budget option, is not stable. The legs can help level the plane of the bathtub horizontally; to increase the reliability of fixation, installation on brick linings is recommended. | |
| All steel bathtubs are covered with enamel. But the quality of coverage is different. Domestic producers cover the worst. Insufficient enamel thickness and low quality of the composition in terms of physical strength reduce the service life. As a result, the need to restore the enamel (long and unreliable) or replace it. |
Approach the choice of the size of the bath responsibly, take into account the characteristics of the residents and the room. Poor-quality enamel can be recognized by several signs.
- Run your hand across the surface. The surface must be perfectly smooth. Roughness or " sea waves» indicate a violation of the annealing regimes. Such a coating will quickly get dirty, requires constant cleaning.
- Examine the cover from various angles. If the standard thickness is not observed, then in some places the shade of white changes.
- Pay attention to the area of the bottom near the drain. There are cases when the drain is in the same plane or protrudes slightly above the surface. In this bath, the water will not leave completely, a small amount of it always remains near the drain. After drying, calcium is deposited in these places, over time it acquires a yellow tint.
Practical advice. Steel bathtubs belong to the segment of inexpensive goods, you do not need to buy the cheapest ones. Additional savings will eventually bring losses, purchase products only from well-known, time-tested and numerous buyers manufacturers.
steel bath
Site preparation
At the installation site of the bathroom, there should already be sewer and water pipes. Check the levelness of the floor and the corners of the room. If the angle between the walls is not equal to 90°, then this drawback must be taken into account during the installation of the bath.
The floor covering must be horizontal.
Of course, with the help of legs or bricks, the bath will be installed evenly, but there may be problems with water drainage during leaks. The fact is that it is difficult to detect small leaks under the bathroom, all elements are closed. If water accumulates near the wall, and the leaks are insignificant, then a fungus will definitely appear in this place. Getting rid of it is difficult, time-consuming and expensive. In some cases, you will have to completely dismantle the bath, make a set of special events and reinstall the bath. Minor leaks can occur for various reasons, it is impossible to completely guarantee their absence. If the water flows towards the screen, then the problem is immediately visible, the causes are eliminated in a timely manner and Negative consequences minimal.
Siphon and overflow installation
These elements must be mounted before installing the bath in place. In terms of their device and connection technology, all systems are the same, the difference is only in price and material of manufacture.
Step 1. Turn the tub upside down. To protect the enamel from mechanical damage during tipping, place cardboard or soft tissue. Do not do such work yourself, call an assistant. Together, the process is not only significantly accelerated, but the quality of installation is also improved.
Step 2 Read the assembly instructions, check the completeness of the siphon. Pay attention to the gaskets, they differ in appearance and size. Do not confuse the gaskets, each must be installed in its place.
Step 3 Assemble the siphon, fix it in the drain hole. Do not apply too much force, do not damage the oil seals and gaskets. To facilitate the assembly of the structure, it is recommended to use technical petroleum jelly or moisten the surfaces with soapy water.
The upper part is attached inside the bathtub, the lower part is attached under the drain hole of the bathtub
Important. The drain gasket has a groove dividing it into parts of unequal thickness. The thin side should go inside the bath, the thick side should be on the back side. Don't change position. Otherwise, the plastic element will protrude above the surface of the bath, the water will not be able to completely leave. The remaining part, after drying, forms yellow spots on the bottom, they will often have to be removed. All cleaning products contain compounds that have Negative influence on enamel. Although their concentration is insignificant, but with repeated use, the thickness of the enamel decreases.
Step 4 Turn the tub on its side, install the gaskets in turn and screw on the plastic parts of the drain and overflow. Doing this is much easier with two people. One should hold the parts, and the second should tighten with a mounting bolt. Do not apply too much force, the plastic may crack.
Check the tightness of the connections. It is best to do this before installing the bath in place, so it will be easier to eliminate leaks. Everything is fine - you can install the legs.
Leg mounting
We have already mentioned that the legs can be fixed with double-sided tape or nuts. The first option shouldn't be a problem. You just need to make sure that they do not interfere with the revision of the siphon and ensure the stability of the bath.
Assembling the second version of the legs will be more difficult. General recommendations it is impossible to give, each manufacturer develops its own design. Look at the pictures, read the recommendations. It is necessary to achieve reliable fixation of all structural details to the bath.
Adjust the position of the bath using the threads on the legs, check the levelness in two directions with a level. When you find the right position, be sure to fix the threads of the legs with nuts. They should not stagger, otherwise, over time, the slope of the bath will change. In addition, there will be gaps between the wall and the bathroom. To fix the problem, you will have to make additional stops under the bottom.
And one more piece of advice. Unfortunately, there are defective bathtubs, their factory slope of the bottom does not provide complete drainage of water. To prevent such situations, practitioners are advised to immediately increase the slope of the bath bottom towards the drain hole by a few millimeters. It is imperceptible to the eye, but there will be a guarantee normal functioning plum.
Bowl insulation
A very significant point, it makes it possible to significantly reduce the consumption of warm water, which is important given the current prices for utilities. After the bowl is insulated, in terms of heat saving indicators, the bath significantly exceeds all expensive analogues available for sale. In addition, it does not add weight, perfectly dampens unpleasant sounds during filling with water.
How is the bowl insulated?
Step 1. Work must be done in an overturned position. Recommended immediately after installing a siphon with a weir and legs. Buy two or three bottles of mounting foam. The cheaper the better. The fact is that cheap foam during solidification increases significantly in volume, and this is exactly what we need. More volume - more air bubbles, less heat loss. And the low price is due to the low compression force, this parameter in our case does not play any role.
Step 2 Clean the outside of the tub. If it has grease on it, you will have to wash it off with solvents. Working with solvents is unsafe for health, ensure maximum ventilation of the room. It is better to work outdoors than indoors. Be sure to use respiratory protection.
Step 3 After the solvent has completely dried, moisten the surface of the bottom with a spray gun. Moisture increases the coefficient of adhesion of the foam to the bottom by an order of magnitude. In addition, water contributes to the optimal mode of chemical reactions, the foam hardens much faster.
Step 4 Shake the foam bottle thoroughly, put on a special plastic tube. Start covering the bottom with foam. The process will go faster if applied in sectors from the bottom up. The foam should lie down in even rows at a distance of no more than a centimeter. The rows are wider - not a problem, after solidification, the gaps will get better. If the surface dries out, rewet it with a sprayer. Do not touch the wet foam with your hands, do not try to “stick” it to the surface. You will get nothing but additional problems. The foam will no longer increase in volume, and it is almost impossible to wash your hands. It will take a long and tedious to scrape it off with a knife.
Step 5 Wait until the foam hardens, check the uniformity of the coating, blow out the gaps.
Practical advice. If the foam falls off vertical surfaces, then turn the bathtub in different directions and finish only the horizontal ones. It will take longer to work, but the result is worth it.
Step 6 Cut off the excess foam near the edge of the bath, it should not interfere with the frame for the screen. The distance depends on the type and method of screen mounting.
This completes the preparatory work for the installation. The bath has a siphon, legs and insulation.
Installing a bathtub on bricks
This installation completely eliminates the staggering and tipping of the bath, we strongly recommend using it.
Step 1. Put the bath on legs in the right place, mark their location, draw horizontal lines. Bricks or blocks will be laid along these lines. The bathtub is pre-adjusted in height and inclination by the leg bolts.
Step 2 Measure the distance from the bottom to the floor, prepare the required number of bricks. If necessary, use a bricklayer's hammer to chip off the extra parts at the required height.
Step 3 Prepare cement-sand mortar. For one part of cement, give about three parts of sand, water as needed.
Step 4 Lay two rows of bricks where the tub is held. Place another two centimeters of mortar on top. The mortar should hold its shape and not spread over the surface of the bricks. If necessary, add a little sand and cement to it, mix thoroughly.
Step 5 Carefully lower the bath vertically into place until it stops with the solution. Now, with a little effort, shake and press it until the legs stop on the floor, repeat these actions on both sides. Take your time, let the bath gradually take its place and squeeze out the excess solution. As soon as the legs (if any) touch the floor, installation is complete. Allow the solution time to harden (about 24 hours) and proceed with the installation of the tub.
Bath screens
With the help of screens, communications are hidden, it is possible to make shelves for storing various household items. In addition, they significantly improve the interior of the room. The screen can be brick with further facing with ceramic tiles, MDF, plastic panels, gypsum boards, OSB or in the form of an ordinary curtain made of thick fabric. We will tell you in turn how to do each option.
Designs must necessarily provide convenient access to the siphon for periodic maintenance work to clean the system. The presence of an opening for the legs is advisable to do only when the bathroom is used for washing. As an option - country house for temporary residence. Put in it dear washing machine unprofitable and dangerous, summer residents, out of old habit, use a bath for washing clothes.
What are the frames for installing screens
Any type of screen, except brick, is mounted on a frame. They are made of metal profiles (the best option), wooden slats or square pipes. The latter option is very expensive and time-consuming, and has no operational advantages. Why do you need a frame that can withstand a load of hundreds of kilograms, if it actually does not exceed a few? We believe that it makes no sense to consider it. The manufacture of the structure must be approached very carefully; in any case, the curved structure will have to be redone.
How to make a frame from metal profiles?
Step 1. Count the number of profiles.
They need three baths vertical in height, two horizontal in length and two horizontal in width baths. To strengthen the structure, use jumpers, for the door you need to make a separate small frame. Three jumpers are enough in length, in width you can do without them. Knowing the size of your bathtub, it is easy to find out the total amount of material. Immediately buy self-tapping screws for attaching profiles.
Step 2 Make a markup.
A very important stage, do not rush, check the measurements several times. To improve accuracy, use a plumb line, the level of the vertical plane indicates inaccurately.
How to markup?
- Attach the plumb line to the wall and corner of the bath, wait until it calms down. Mark the top and bottom position of the thread, draw a line between the marks. Using the same algorithm, draw a vertical line at all free corners of the bath, there may be two or three, depending on the size of the bath and the room. Thus, the place of docking of the screen with the walls is indicated.
- At a distance of about 3-4 centimeters, draw parallel lines next to them outside the perimeter of the bath. The specific distance depends on the frame material and finishing materials: drywall, OSB, MDF or glue and ceramic tiles.
- Draw the same parallel lines on the bathroom floor. Check all dimensions again, do not make mistakes.
Further work depends on the material of manufacture of the frame. The best option- metal profile, but you can work with wooden slats.
Metal profile frame
Step 1. Cut the metal profile to size, as we have already described above, how to determine them. Do not deal with jumpers yet, make blanks only around the perimeter of the frame.
Step 2 Lay the long profile on the floor, one side must fit exactly on the marked line. Carefully mark the places for drilling the holes for the dowels with a marker. It is bad to work with a pencil, use a marker.
Step 3 Remove the profile, drill holes with a drill, put the profile in place and fix it. Do not immediately tighten the dowels, the slats have perforated holes, with which you can move the element a little in different directions and achieve the exact position.
Step 4. Now fix the planks to the walls. The algorithm of actions is the same. If it is planned to use a heavy OSB board for sheathing, then the vertical and horizontal profiles at the corners are interconnected with hardware.
Step 5 Fasten the profiles along the length and width against the upper side of the bathroom, you should get a solid frame. If necessary, make additional jumpers to strengthen the structure. They can be vertical or horizontal.
Step 6 Decide on the size of the door for the revision of the siphon, make a small frame for it in the right place. The position of all frame elements is constantly checked by a level. Door dimensions are at least 30 cm around the perimeter, otherwise it is inconvenient to clean the siphon.
The frame is ready, check its stability, apply multidirectional efforts from all sides. The structure is staggering - add jumpers in problem areas, achieve high stability.
Frame made of wooden beams
In terms of its performance, it is in no way inferior to the metal profile. Do not be afraid that rot will appear on the tree. There are concerns - soak it with antiseptics.
For the frame, you can use rails of various sizes. When choosing, take into account the load of the finish sheathing. Universal option you can consider the dimensions of the rails five by five centimeters. Do the markings on the floor and wall, as always. One feature - consider the width of the rails, they should go under the side shelves of the bath and not interfere with the finish. To fix the frame, use metal corners and dowels, the width of the corners is slightly less than the width of the rails. This will allow you to safely adjust the position of the frame. In addition, possible errors during the drilling of holes for dowels are easily corrected.
Step 1. Place a long bar on the floor, estimate the position of the corners. Make marks for drilling holes for dowels.
Practical advice. In order to completely eliminate the possibility of the corner going beyond the line, it is better to move it slightly inward. It is not scary that it will be screwed to the bar not in the center, but nothing will interfere with the finishing.
Step 2 Drill holes, fasten the corners with dowels and a bar to them with self-tapping screws. Adjust its position. In the same way, install a meek bar.
Step 3 Measure the height of the vertical elements. Make a gap of about 1 cm to the bottom of the sides of the tub. Fasten the segments with corners into a single structure with the bottom.
Step 4 Prepare two more long and two short ones for fixing at the top of the frame. Why two and not one? We recommend installing the first one at a distance of about 10 cm from the side, these bars are needed to control the size and verticality of the frame. On an already stable structure, it is recommended to fix one more close to the side. It is much easier to do this, the frame is more accurate. In addition, the strength of the structure is increased.
Step 5 In the right places, make a frame for the door, if heavy materials are used, then put a few jumpers. To increase strength, you can fix several spacers at the corners.
The frame is ready, you can start the finishing sheathing, fastening is carried out with wood screws.
brick screens
In terms of time, they do not take very much time, but in terms of strength, reliability and durability they are much superior to the previously described options. Prepare materials and tools. You can use bricks or concrete blocks. The number is calculated in this way.
- Calculate the side and end area of the space near the bathtub that you are going to cover.
- Divide the resulting amount by the area of one brick or block. Round off the number to a whole number. For a reserve, you can take one block or two bricks.
One bath will require two buckets of sand and a third of a bucket of cement. In the future, the surface must be finished with ceramic tiles, we will give a step-by-step design in the next section.
Step 1. Lay the first row of bricks on edge, constantly check its position with a level. You need to know that the masonry on the edge has its own characteristics, if they are not observed, the wall can “float”. First feature. The mortar should be slightly thicker than when laying flat. To increase the adhesion of the mortar to the side face of the brick, it should be moistened with a spray gun. Do not overdo it. The optimal degree of wetting will be determined in a practical way. The second feature. After three rows, you need to give time to the solution to harden a little. Take a break for two or three hours.
The brick is laid in a checkerboard pattern, the joints of the lower row are overlapped with whole bricks of the upper one.
Step 2 Continue work until the entire space is closed. It will be difficult to push the mortar into the gap between the masonry and the sides. It is desirable to make such an emphasis, it significantly increases the strength of the installation of the bath. Use for this purpose any narrow improvised means, such work cannot be done with a trowel.
Important. Do not forget to leave a hole for the revision of the siphon. Check the structure, remove the remnants of the protruding solution. Allow at least a day to dry.
Finishing with ceramic tiles
If the wall already has tiles, then the work is somewhat more complicated. The fact is, you need to take measures to match the seam between the tiles on the wall and the screen. There are situations when it is impossible to put a whole tile, you have to cut it into pieces. No practical experience in cutting tiles - use plastic inserts. They can even out jambs up to a centimeter, but the appearance, of course, will suffer a little. Real professionals do not use inserts for joints, their cuts fit snugly against surfaces without gaps.
Step 1. Count the number of tiles, the method is the same as for bricks. And you can buy one or two tiles in stock, you won’t need more, a very small area of \u200b\u200bthe surface to be trimmed. Glue need to buy about 10 kg.
Step 2 Start laying tiles from the bottom row. Check the position with a level or even rail, control several tiles at the same time. They must lie strictly in the same plane.
Step 3 The tile is placed on an uneven surface, it is impossible to use a comb. Apply glue with a spatula along the edges and in the center of the tile, about one centimeter thick. Next, the tile must be pressed and moved to the left to the right until the position is leveled. The final adjustment is done with a level. Don't forget to use crosses. Some beginners install crosses flat on the four corners of the joint. This should not be done for several reasons. Firstly, it is much more difficult to level the tile, the cross will constantly shift the nearby one. Secondly, there will be problems with removing the cross, you will have to pick out each one with a knife.
Step 4 No experience - use plastic elements in the corners and joints, they make the job much easier.
Step 5. You can start in about two hours. The color of the material should be in harmony with the tiles and the overall design of the room. Excess grout is removed with a damp cloth or sponge. Do not wait until it is completely dry, dry material is difficult to clean.
Finishing with OSB boards or drywall
Finishing with tiles is much easier than laying ceramic tiles. How is it done?
Step 1. Take the dimensions of the frame, mark the plate. As a rule, the length of the bath exceeds the length of the plate, you will have to join. Such a probability must be foreseen even during the manufacture of the frame and a vertical stand should be installed at the docking point.
Cut off all blanks. Drywall is easily cut with a mounting knife, for OSB you will need a hand-held electric saw or a jigsaw.
Step 2. Fix the elements in turn with self-tapping screws, carefully work with drywall. With great efforts to tighten the self-tapping screws, their heads fall into the gypsum, and new ones have to be screwed in.
Step 3 Screw small hinges at the door installation site. Check door functionality.
Step 4 Proceed to surface finishing. You can use ceramic tiles - long and expensive. There is an easier option - paste over the surfaces with a self-adhesive decorative film, on sale today huge selection- cheap and nice. In addition, you can easily change the pattern or repair the coating in case of mechanical damage. But the film has a drawback - the surface must be perfectly flat.
Practical advice. Don't try to stick the film right away without air pockets, it's almost impossible to do. Removing air is simple - pierce the pocket in several places with a needle and remove air by smoothing the pocket.
Plastic lining
The option is not the best. It is recommended to apply if the walls of the bathroom are finished with clapboard. The installation process is standard. The problem arises with the technological hole and the door. Practitioners recommend making them from drywall OSB, not wasting time on lining.
How to make sliding doors
Very simple and functional version of the screen. For manufacturing, you will need two guides and an MDF board. The disadvantage of this material is that there is a possibility of spontaneous deformation. You can get rid of it only by making a separate small frame for the doors. It is advisable to use thin wooden slats, MDF is glued to them with special glue.
Step 1. Make a frame from a metal profile, we have described the algorithm for manufacturing such structures. Check the position of all elements.
Important. For sliding screen it is especially important to maintain the parameters, the racks must be strictly vertical.
Step 2 Attach the rails to the frame. They can be aluminum or plastic.
Step 3 Measure the exact distance between the guides, the spread in parallelism cannot exceed 1–2 mm. Otherwise, during the opening / closing of the door will wedge.
Step 4 Cut out doors from MDF board the right sizes. 2-3 cm is enough to overlap. You can cut the plate with an electric jigsaw or a hacksaw. Work carefully, make an emphasis from below - the hairiness of the cut will decrease.
Step 5 Remove the bevel from the cut. Use sandpaper or a circular grinder. Install handles.
There is another way. It is the most reliable, but also the most time-consuming. It is advisable to use it before facing the walls, if they are already finished, then the work becomes somewhat more complicated.
Step 1. Remove a row of ceramic tiles at the level of the bath rim. If it breaks, there's nothing to worry about. Put a new one in its place and make the edging of the bathtub with a pattern, this will only improve the appearance.
Step 2 On the wall, draw a line for the position of the upper plane of the bath rim, draw another line at a distance of about 2 cm. It indicates the position of the protruding side of the side.
Step 3. Make a groove in the wall along the lines about 1 cm deep.
Step 4 Spread the ends of the side with sealant, put the bath in place. The sides should enter the groove a little, remove the excess sealant.

The tiles are laid, a decorative ceramic plinth is used to match the tiles
This method fully guarantees the tightness of the junction, water will never get behind the bath.
Use any method that is not difficult for you. If the technology is not violated, then the tightness of the place where the bathtub joins the wall will be sufficient.
Video - Installation of a steel bath