Ventilation in a wooden bath with hands. How to make a ventilation system in a sauna with an electric heater: technical nuances
Ventilation in the bath is essential. First of all, ventilation is designed to ensure the safety of people who take bath procedures.
Everyone knows that when you breathe, you inhale oxygen and exhale carbon dioxide. In a tightly closed room, he will begin to suffocate after a while. And in the steam room, where heat and the concentration of water vapor, this will begin to happen even faster.
Relaxing on a shelf, there is no time to get to the saving one. The price of the wrong ventilation device can be too high.
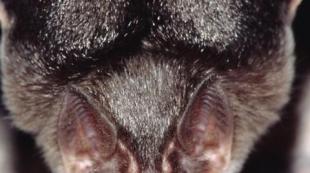
The second important factor is the decay of the tree. Enjoying bath procedures and benefiting from them, smelling rot and mold, is very problematic. Therefore, proper ventilation in a Russian bath is a guarantee not only of its benefits, but also of the health of vacationers.

In the photo - rotting wood with insufficient drying of the tree
Experts believe that such a ventilation device in the bath can be considered correct, in which the air in the room is replaced three times in one hour. The ventilation scheme in the bath is selected depending on the type of structure and materials used in the construction of the walls.
General principles of ventilation in the bath
The correct arrangement of the bath and ventilation in it, regardless of the type of structure, is based on the following basic principles:
- Fresh air that enters the steam room should not violate its temperature regime;
- The already exhausted air, which contains the most carbon dioxide, should be removed from the room;
- The location of the air in the steam room should be layered: the hottest - under the ceiling, on the bench - the most comfortable and cold - near the floor.
Note!
There should be no draft in the steam room!

If all these principles are followed, then bath procedures will bring the maximum effect for which they are calculated - the restoration of mental and physical strength.
Ventilation device in a free-standing wooden bath
The tree is considered ideal building material for a bath. wooden walls"breathe", so the issue of air exchange is partially solved in a natural way.
However, even in a wooden building in a steam room, ventilation is necessary. At least for quick drying of the tree after taking bath procedures.
An important role in the air exchange processes is played by the operation of the sauna stove. When water is poured on, a column of hot steam is created, which rises up. As it cools, it lowers, pushing the used air out of the steam room.

Together, the above factors allow you to create the necessary humidity and temperature in the steam room, and ensure normal air circulation.
Let us consider in more detail the ventilation device in wooden baths. The main tasks for us, of course, will be to ensure the inflow fresh air and removal of already fulfilled. Our instructions will help you cope with these tasks.
Ensuring air flow
The correct frame is laid in such a way that the lower crowns are free. With this installation, it is possible to access fresh air from the street.
In addition, in any case, there will be gaps around the steam room door that are sufficient for it to enter. The stove in such baths is placed closer to the door so that it immediately heats up.

If the steam room is designed for 6 or more people, a separate air duct is brought to the heater, which supports the combustion process. If you make this duct double, then the problem of fresh air supply is solved once and for all.
Exhaust air removal
If the heater is heated directly from the steam room, then the exhaust air is ejected through the furnace into. At correct installation oven, additional holes are not required.
In order to dry the room after the end of the bath procedures, a small hole can be cut in the wall (up to 200x200 mm). At the time of heating and work of the steam room, it is closed with a special plug.

If there is a window in the steam room, such a hole is not needed. Sometimes a window from the steam room is cut through into the washing room, and either a through hole to the street or another window is already made in the washing room. Thus, when drying, two birds with one stone are immediately killed, both the steam room and the washing room are dried.

Thus, the myth that ventilation is not needed for a wooden bath is confirmed when the following conditions are met:
- The steam room is calculated for 2-4 people;
- The lower crowns of the log house are laid freely;
- The stove-heater is heated directly from the steam room;
- There is a hole or window in the wall for ventilation.
Actually, such family baths are usually built on personal plots.
Ventilation device in a free-standing brick bath
A brick structure, as well as a structure made of foam concrete, expanded clay blocks and other capital structures, is another matter. Ventilation in a brick bath is more complex.
The first difference is that the floors in a brick building must be ventilated. The thing is that the floors in the bath are constantly in contact with water, and if they are deaf, then you will have to change the boards about once every three to four years. You can not even talk about unpleasant odors and mold.
The ventilation of the floor in the bath is laid even at the stage of foundation construction. To do this, special holes are made in the foundation on opposite sides. These holes will provide through air circulation under the floor and dry the log.

The second difference is the obligatory presence in the steam room of special supply and exhaust openings. There may be several. Two air inlets are made at floor level and covered with bars so that rodents do not penetrate.
There are 4 most popular schemes for the ventilation device in the bath, from which you can choose the most suitable for you.
- Scheme No. 1. The air inlet is located behind the stove at a distance of 50 cm from the floor. An exhaust hole is cut in the opposite wall no higher than 30 cm from the floor. A bath fan is installed on it, which will circulate air.

According to this scheme, the air in the steam room is heated evenly, the incoming air is heated from the stove and rises. Cooling, it goes down and exits through the outlet. The lower it is located, the stronger the air flow will be. When using a fan, a ventilation valve can be installed on the outlet.
- Scheme No. 2. Suitable for those baths where the stove is heated from the steam room. In this case, the inflow is done directly under the stove. The flow of fresh air is sucked in by the stove, supporting combustion, and provides an inflow directly into the room.

The exhaust hole is located above the floor and a corrugated pipe is connected to it, which rises up to the level of the roof and goes outside. In other cases, the ventilation duct is made in the wall.
Note!
If the walls of the bath are made of expanded clay concrete blocks, then it is best to lay the ventilation ducts during construction.
- Scheme No. 3. According to this scheme, ventilation for the bath is arranged through cracks in the floor. In this case, the supply hole is made in the wall near the stove at a height of 30-50 cm from the floor. The air, heated up, rises and exits through the cracks between the floorboards into the basement. From the basement space, it is thrown out with the help of a special pipe.

Note! For normal functioning For this type of ventilation, it is necessary to leave gaps between the floorboards of 5-10 mm.
- Scheme No. 4. This scheme is suitable in cases where the stove also heats other rooms.

Fresh air is sucked in by the stove through holes in the floor and, passing through the firebox, goes into the steam room and into the washing room. It is removed from the premises through the holes located below, above the floor level.
There are also combined ventilation schemes, but for their do-it-yourself device, consultation with a specialist is necessary.

To clearly understand how ventilation is arranged in the bath, the video in this article will help you.
Oxygenated air is vital for people. Especially if the person is in a closed space. Therefore, ventilation in the sauna, bath, bathroom and other rooms with elevated temperature and the level of humidity must be arranged correctly.
Otherwise, you can face a lot of unpleasant surprises and their negative consequences. Among the consequences are not only harm to health, but also damage to building structures, the development of fungus, and the gradual destruction of the building.
All about the methods and features of organizing the ventilation of Finnish and Russian steam rooms equipped with electric and wood-burning stoves, you will learn on our website. We will talk about the specifics of the device of air supply and exhaust systems. Let's list typical mistakes occurring with an illiterate structure.
The fact that a ventilation system is not necessary for a sauna can often be heard on forums and in conversations with more experienced acquaintances who have been steaming in a bathhouse / sauna built by themselves for the second year.
Their main argument is their example of the operation of the premises. After all, ventilation requires time and money.
Ventilation is easier to foresee immediately, even before construction, than to deal with the problems that arise due to its absence later
The opinion that everything works fine anyway is fundamentally wrong. The first year or two will work, but subsequently the owner of such a steam room will face a lot of trouble. Yes, and the quality of bath procedures in an unventilated room can be argued.
It is in the steam room with fresh air that you can get high-quality procedures that have a beneficial effect on the body as a whole.
The main problems to be encountered with an improperly equipped or completely absent ventilation system in a home sauna with an electric heater are as follows:
- lack of oxygen;
- bad smell;
- rotting structures;
- reduced service life of the premises;
- drafts;
- increased fuel consumption for heating.
All these signs or only a part of them, one after another, will begin to appear in a sauna / bath that has non-working ventilation. If there is no influx of fresh street air, and there are several people in the steam room at once, then there is a danger of getting burned. Especially if the vacationers are in a state of intoxication, which, unfortunately, can often be found.
Regarding the unpleasant odor, it appears due to the accumulation of sweat and insufficient removal of moisture in the room. Indeed, in the absence of ventilation, it is problematic to dry the steam room after use - you need to open the doors and make sure that everything is well ventilated and dried.
And this applies to all rooms - for relaxation, swimming, locker rooms and others built by a prudent owner.
It is convenient to use special gratings and valves - so no living creatures will fly in, and the inflow / outflow can be controlled
An unpleasant smell still appears as a result of rotting wood, which does not have time to dry. This happens after two or three years from the start of using the sauna. So, some craftsmen even advise a special technology for the interior decoration of the steam room - so that it is convenient to remove the rotten boards from below and replace them with new ones.

Many craftsmen do not even think that nothing will rot in a sauna with properly equipped ventilation.
Therefore, it is important to provide a ventilation system even before starting the building in order to avoid putrefactive odors and problems with replacing rotten boards in the future.
In addition to this problem, one can observe active on the walls and ceiling, the formation of condensate and swelling of wooden structures. All these troubles begin, like a snowball, to fall on the head of the owner of the sauna.
The result is a significant reduction in service life. Instead of 20-30 years, the steam room can only last 5-6 years. Moreover, an unpleasant smell will accompany guests enjoying bath procedures all these years.
If there is a ventilation system, but it is not arranged correctly, then there will be a problem of drafts walking along the legs of the steamers. And this does not add to the joy of taking hygiene procedures.
Another nuisance is the increase in fuel consumption for heating the steam room. This often occurs when the hood is working too actively, removing excess heat from the room.
A properly planned ventilation system in the sauna can save the owner from unnecessary expenses and save not only money, but also health
To prevent such problems from arising, you need to plan in advance and, choosing the optimal scheme for its arrangement. Moreover, there is no single correct solution to this issue - everything will depend on the specific room and its location.
Image Gallery
It is definitely impossible to answer the question of whether plastic ventilation is possible in a bathhouse. Such systems have proven their practicality and performance in domestic and industrial environments, but the bathing environment has its own specifics, which to a certain extent limits the use of plastic. When choosing plastic products for a bath in each case should be approached taking into account all the influencing factors and possible consequences.
In the bath can be used plastic pipes for ventilation in the bath
Reasons for the popularity of plastic
Ventilation structures made of plastic elements have gained wide popularity in various areas of human life. This is facilitated by their attractive appearance and numerous advantages over traditional metal competitors.
Note! Parts made of polyvinyl chloride (PVC), polyurethane and polypropylene find the greatest application.
The following positive aspects of plastic ventilation stand out:
- No corrosion. This advantage most often determines the choice of plastic. Any metal (even stainless steel) in the conditions of ventilation systems, where steam condensate occurs, the aggressive effects of various substances that pollute the air, are subject to corrosion. Plastic, on the other hand, is absolutely resistant in this respect.
- Low cost. Plastic systems have a significantly lower price compared to metal, which provides increased resistance to corrosion.
- Ease and quality of installation. When installing metal boxes and pipes, there are always problems in the places of knocks, requiring rolling, welding, and other operations. Cutting and joining plastic elements does not cause difficulties, and the ends are easily processed and aligned. Thus, the sealing of plastic boxes is much easier to ensure.
- Light weight. This advantage is provided by the ease of fastening at the installation site and transportation when delivering the goods.
- Plastic elements are resistant to water, steam, aggressive media, ultraviolet rays. They fit all sanitary standards under normal conditions.
 Device PVC pipes for ventilation
 Features of the use in the bath
In order to decide whether plastic ventilation is suitable for a bath, it is necessary to note the disadvantages of such systems:
- Low heat resistance of plastic. Already at temperatures above 80-85 degrees, the release of harmful components from a substance that poisons the human body begins. When heated, the plastic loses its strength and rigidity, which leads to deformation.
- Low resistance to open fire. Despite the fact that PVC does not support combustion, it is easily melted, and its drops, falling on other structures, cause a fire. In general, plastic elements belong to the group of flammable materials, which requires great care when placing them near the sauna stove and chimney. Even with a small fire, a large amount of acrid smoke is released, which is very dangerous for humans.
- Reduced resistance to cutting, abrasion, scratching. Under impact and cutting loads, plastic is easily damaged or deformed.

Given the problems outlined, it can be concluded whether plastic ventilation is suitable for a bath. The most extreme conditions are noted in the steam room. In the Russian bath, a temperature of about 60-65 degrees is maintained here with saturated water vapor. Such temperatures seem to be below acceptable, but they are close to critical values, and at the slightest excess lead to the decomposition of plastic. Thus, the use of plastic ventilation in the steam room of a Russian bath is dangerous for human health. It is absolutely unacceptable to use it in the sauna steam room, where the temperature can reach 100 degrees.
 The smoke from burning plastic is very corrosive and can lead to poisoning.
 In other bath rooms (washing room, dressing room, rest room), the air temperature does not have large values, and extreme conditions are associated with high humidity, which is not at all dangerous for plastic. Therefore, we can conclude that ventilation in a bath made of plastic pipes is quite acceptable in all rooms, except for the steam room.

Important! Particular attention should be paid to the location of the stove and its chimney, near which the air temperature can be critical. In addition, there are fire hazards.
 Particular care must be taken with the location of the plastic pipe for ventilation in the bath. It is better to place it behind a brick lining if it is near the stove.
 Design features
The standard set of bath forced ventilation includes the following main elements: fan (exhaust and supply); ventilation pipes and ducts; vents with plugs; connecting and accessories. Among the important components, the following stand out:
- turns: designed to change the direction of the ventilation duct;
- adapters: necessary when connecting route elements of different sizes;
- bifurcations and tees: are installed if it is necessary to divide the incoming air flow into several rooms;
- couplings: connecting and holding elements;
- flanges and gearboxes.

The basis of forced ventilation is made up of exhaust-type fans installed on the outlet duct, or the supply version, designed to suck in fresh air from outside and form an air flow. The supply system is most often used, and the fan can be installed alone to service all rooms or several devices separately in each room. In the first case, a sufficiently powerful mechanism is mounted, usually with metal blades, and the flow distribution then goes through the plastic ventilation ducts. Small fans in a plastic case with plastic blades can be installed in each room.
 Plastic fans are used in the exhaust bath
 Plastic air ducts for ventilation of the bath of the type in question are an important part of the system. They distribute the incoming air flow and direct it to the desired zone.

Another option is to install an exhaust fan not in the outlet duct, but directly in the most stagnant area. In this case, it is mounted at the end of an exhaust duct, through which the polluted air is directed outside.
Plastic boxes and pipes are produced various shapes and sizes. In cross section, they can be round and rectangular, and in design - smooth and corrugated. Most often, the input powerful air flow is directed into rectangular boxes, and then distributed through round pipes.
Nuance! The corrugated design is used in places where pipe movements in different directions are needed, or for fitting elements along the length.
 Types of composite connecting elements of the ventilation system
 Air ducts have different sizes, which are selected depending on required power system and volume of incoming air. Round pipes for a bath have a standard diameter in the range of 56-160 mm. Among rectangular ducts, air ducts 6x12 and 6x20.5 cm in size are most common. Corrugated elements usually have a round shape, and the diameter of such a pipe ranges from 15-55 cm.
 Plastic air ducts for ventilation come in round and rectangular shapes
 Additional elements
In addition to these elements used in the installation of the ventilation system in the bath, plastic parts are used that perform protective and regulatory functions. These include various dampers, hatches and gratings.

Plastic grills can have different purposes. The following main varieties are distinguished:
- inertial type: for flow separation without pressurization;
- adjustable grilles: allow you to change the volume of incoming air and distribution in one direction while blocking the movement of air in the other;
- unregulated type: distribution or flow restrictions without the possibility of regulation;
- external protective grids: to prevent foreign bodies from entering the channel.
 Extraction grates can be of an adjustable type
 Plastic hatches can be installed in powerful, branched systems for access to the ventilation line for revision, cleaning, repair. They can be mounted on the ceiling or walls of the bath. Damper doors are designed to allow access to natural flow. They can be mounted on the natural ventilation vents in the window or door. Standard sizes are 10x10, 15x30 and 25x60 cm.
Arrangement features
Installation of plastic ventilation in the bath can be done by hand. The main stages of work: the manufacture of vents; installation of fans; installation and fixing of the input box; installation and fixing of the branching system of incoming air flows; arrangement of the outlet vent; installation of shutters and hatches.

When carrying out work, the following recommendations should be taken into account:
- The plastic elements are connected to each other by soldering. In the presence of threaded elements, sockets, flanges, adapters, couplings are used, which makes it possible to provide a collapsible system.
- A special sealant is used to seal the joints.
- Cutting elements or changing their shape is done with a knife or a special hacksaw.
 Wiring diagram of the fan section in the forced ventilation system
 For installation work, you will need the following tools: an electric drill, a screwdriver, a grinder, a knife, a hacksaw, pliers and side cutters, a screwdriver, a paint brush, a tape measure, a metal ruler.
 Before use, it is necessary to check the ventilation system in the bath
 Plastic ventilation in the bath can be installed in all rooms, except for the steam room. Plastic cannot be used in it because of the risk of harmful emissions when heated. You can easily install the system with your own hands.
The sauna is a great place to spend your free time, as well as to improve your health.
However, a quality stay in it can only be ensured through ventilation.

During the construction of the steam room, a special role is always given to the correct ventilation of the sauna.
This is explained by such reasons:
- Provides fresh air supply.
- It is she who is capable distribute oxygen throughout the room heat it evenly and evenly.
- Will help speed up cleansing of accumulated carbon dioxide, which will facilitate the process of staying in such a space.
- Due to the ventilation in the steam room, proper air circulation, which avoids excessive moisture settling on all wooden surfaces. As a result, the tree will last longer, it will not be covered with a layer of mold and fungus harmful to the human body, and will not rot.
- Correct the operation of the furnace is also directly dependent on air exchange.
- Eliminates the chance of suffocation, because quite often a group of people gather in the steam room who can drink alcohol to improve their mood. Without an influx of fresh air, after 30 minutes it will be almost impossible to breathe in such a room.
- The entire room can be well ventilated and thoroughly dried, which is important for a comfortable stay in it.
Paying attention to all the above arguments, and asking yourself the question:
Is ventilation necessary in a sauna? There is, of course, an unequivocal answer - yes!
The main thing is to do it in a timely and correct manner in order to avoid the processes of wood decay, the presence of drafts and an unpleasant smell in the future, which will not please the visitors of the steam room.
Proper ventilation of the sauna or bath
 Access to fresh air and maintaining a constant, high temperature can only be achieved through the presence of ventilation in Finnish sauna. It cannot exist without extract and inflow.
The extract in the sauna is needed to remove carbon dioxide from it, and the inflow creates all the conditions for pure oxygen to enter the room.
Before you start construction, you need to know about the unchanging rules and regulations for creating it in the bath.
- After 25-30 minutes of the sauna, it often becomes difficult to breathe in it, the head begins to spin and hurt. The reason for this lies in the fact that there is an incorrect change of musty air filled with steam and human sweat. According to SNIP, the air in such enclosed spaces must be updated at least 5-6 times per hour. At the same time, its speed can be at least 20 cubic meters for 60 minutes.
- The chimney should not be very narrow. It is better to make its diameter the same as that of the supply one.
- Inlet openings may only be placed at the bottom. The permissible height from the floor cannot be less than 20 cm. Install it strictly behind the stove. Otherwise, the cold air will not have time to heat up, which will lead to drafts and uncomfortable sensations for people staying in such an enclosed space.
- To know which pipes with which section you need to purchase, you should take into account certain norms and rules: for 1 cubic meter of the equipped room, there must be a pipe with a cross section of at least 24 centimeters.
- The intake and exhaust openings must not be opposite each other..
- It is imperative to think about the possibility of adjusting the air flow, reducing or increasing it. This can be done through valves that are installed in the vents of the bath.
- Often in the sauna leave a gap between the bottom of the door and the floor due to the absence of a threshold or its very low height. It is needed for natural exhaust in the Finnish sauna.
The scheme of oxygen movement will look correct only if there is more than one hood in the room in question. Paying attention to where the inflow is located, strictly on the opposite side of it at a height of up to one meta, the first exhaust hole is equipped. The second must be done directly under the ceiling. The main thing at this stage of work is to connect both holes with a single box leading to the chimney or a common exhaust duct.

Consider the principle of operation of the Finnish sauna:
- Before starting the steam room, it should be thoroughly ventilated, which will freshen the air.
- Close the outlets and doors with the help of valves, which will allow the air in the steam room to heat up quite quickly.
- The inlet valve remains open. This is done in order to avoid air discharge.
- After waiting for the room to warm up completely, we monitor the proper ventilation in the sauna. To do this, slightly open the lower channel. Thus begins the gradual movement of oxygen. At the same time, it must be remembered that the upper channel should not be opened so as not to miss well-heated air from the bath. Fresh, cool air, after entering through the supply channel, slowly warms up due to the furnace and immediately begins to gradually displace the air that has already stagnated.
Such a system will not be noticeable to people if its preliminary installation is carried out correctly, adhering to all the advice and recommendations of specialists. Being in it, vacationers will not even feel discomfort and will enjoy a pleasant temperature and comfortable humidity.
An equally important role is played by the stove, which is equipped either in the steam room or in a separate room. It is made of metal and lined with brick on the outside. Performs the following functions in the sauna:
- heats up total area premises.
- Heats up water.
- Produces steam.
When choosing this device, you should be guided by the following criteria:
- Size - great if the oven is small, which will save space.
- Must be reliable and secure.
- Have the ability to heat up quickly.
- Have a low cost.
- It must have a long shelf life in order to constantly withstand heavy loads and temperature changes.
- When choosing a stove, first of all, consider its power and size relative to the size of the sauna.
Kinds
To date, there are three types of ventilation in the sauna. Let's consider each of them in more detail.
Natural
Occurs due to pressure differences indoors and outdoors. Differs in low costs for installation work as well as ease of operation. This is done in the following ways:
- Due to the wind pressure, which is possible only in buildings made of logs. The air pressure inside the room occurs due to powerful gusts of wind, which create a significant air discharge on the leeward side. The movement of air in and out occurs through the gaps between the logs.
The disadvantage of this type of ventilation is that it is impossible to regulate it, which directly affects the temperature inside the bath.
As a result of strong winds, drafts are possible, which also causes no less inconvenience for vacationers.
- thanks to aeration. Its meaning lies in the penetration of air masses directly from the street through the bottom of the room, in which there are special vents. Outdoor air, getting into the sauna, squeezes out a hot stream from above and directs them into the duct. This sauna ventilation system is perfect for rooms with very hot air and a lot of steam. Oxygen circulation here is very fast.
Mechanical
Settled only when supply ventilation you can't do it in a sauna. That is why it is also called forced. It consists of rather expensive elements: coolers, heaters, fans and air filters.
To achieve the exit of treated air from the room, with forced ventilation in the sauna, exhaust fans are used, on which filters are necessarily mounted. 
This type of ventilation is used in very large rooms where there are pools, showers and a huge number of visitors. It makes the air clean from steam, sweat and unpleasant odors in a short time.
Using mechanical ventilation using forced oxygen supply. This is achieved through a very complex system that has the following components:
- supply chamber.
- Mechanisms that reduce the amount of noise.
- Diffusers.
- Check valves.
- Distribution grids.
In order for the supply air to be comfortable when it enters the room, it is pre-cleaned and heated.
Combined
It is used in baths only if this is due directly to the peculiarities of their structure. So, a sauna located in a house and bordered by three of its walls with common housing cannot have natural ventilation. At the same time, it will not be possible to arrange the inlet and outlet holes according to all the rules. Therefore, observing the norms, it is allowed to equip the inlet at a height of at least 20 cm from the floor, and the exhaust is placed on the same wall at a similar distance from the ceiling.
The principle of operation of such air exchange is the entry of cold air into the room, its passage through the stove, heating and circulation throughout the sauna.
Be sure to install valves on all openings that regulate the flow.
The disadvantage of such a system is the rather strong speed and amount of air masses.
In some cases, the supply channel is mounted not under the heater, but above it. The outlet is then placed on the opposite side a few centimeters higher. So it will be possible to reduce the air flow, but there is an insufficient amount of rice. To avoid this, a fan is additionally installed in the outlet channel.
Ventilation system diagrams

There are three device schemes:
- high-speed consists in installing the supply channel strictly behind the stove at a level of 20 cm from the floor. Be sure to place an exhaust hole on the opposite wall at the same distance, inside which a fan is placed.
Outdoor air, getting into the room, instantly warms up due to the stove already red-hot at that time. Then he rises to the ceiling, cools down a little, lowers down and is taken out of the bath. Thanks to this air flow, the temperature that is most comfortable for the human body is achieved, because all air masses are mixed gradually and evenly.
- If the sauna is located inside an existing room and she has only one wall bordering the street, the inlet and outlet channels are mounted on this surface. Main conditions: they are located at the same distance from the floor and ceiling (20 cm) directly opposite the stove. So, at the top there is a forced outflow, and at the bottom - an inflow.
With this scheme, the air, entering the room, immediately goes to the furnace and gradually heats up, after which it is brought out.
- The most gentle heating of air masses is achieved through the use of this scheme. Its principle is to locate the inlet behind the stove at a height of 60 cm from the floor, and the outlet with a fan just on the opposite wall at a height of 20 cm from the floor.
Outdoor oxygen, penetrating into the room, heats up and rises. Already slightly cooled air masses leave the building. Due to the slower flow, staying in such a sauna becomes very comfortable.
Sauna ventilation device
When planning to make ventilation in the sauna with your own hands, you should not forget that you need to ensure high-quality air exchange of the floor of this room. Otherwise  the premises will quickly fall into disrepair, and flooring cannot last more than 3 years.
Floor ventilation involves the following stages:
- During the construction of the concrete base, install vents on opposite walls of the basement. If the foundation has already been built, then any interference with its integrity can significantly affect the quality of the entire structure.
- In opposite walls, cut through holes for air to enter, which are recommended to be covered with metal bars. This will prevent various rodents and insects from entering the room.
- When equipping the stove, the blower should be slightly lower than the top level of the floor, which will allow it to work as a hood.
- When installing floor boards, it is necessary to leave small gaps between them, the size of which should not exceed 10 mm. This will allow the water to naturally exit through the floor.
Consider how to make ventilation in the sauna, depending on its location.
Ventilation in a sauna with an electric heater:
- Under the door, a gap of high-rise buildings up to 5 cm must be left.
- The inlet channel is placed under the stove.
- Exit holes are made on the opposite wall: one above the floor, the other under the ceiling.
- For correct operation, the holes are connected by a box, which is led into the chimney or the entire ventilation system of the house.
- Gates are installed on the air ducts, which makes it possible to regulate the flow.
Ventilation of a sauna in a private house requires the presence of an ideal waterproofing material in such a room.
Most often it is placed near the bathroom, because it already has its own hood, which facilitates the process of connecting two air exchanges.
The ventilation in the sauna in the basement is connected via channels to the general system of the house. In such versions of the baths, an electric stove is installed on the floor or hung on the wall.
- Do not forget about the ventilation errors in the home sauna:
- Air duct schemes need to be thought out in advance.
- Lack of clearance under the door and air inlet can lead to suffocation.
- Creating a hole only for air outflow leads to the absence of air circulation.
- Lack of valves results in an inability to regulate the flow.
- The inlet and outlet channels are placed opposite each other at the same level, which leads to the presence of drafts.
- Expensive equipment should not be used for ventilation, because constant temperature fluctuations will quickly require repair and possibly renewal of some components.
How much does it cost
When planning to make ventilation in the sauna with your own hands, you need to know that its cost will cost about 24-38 thousand rubles. Everything will depend on the cost of components.
- The ventilation valve can be purchased for 650-1500 rubles.
- Lattice for 300-400 rubles.
- Supply- exhaust system for 18500 rub.
The creation of a high-quality air exchange system is an important part in the operation of a sauna, therefore, it is necessary to carefully and timely approach the choice of its components, as well as the installation process.
Ventilation in the bath is a mandatory structural element. Without proper air exchange and fresh air supply, even the highest quality wooden building capable of completely becoming unusable in 2-3 years. However, even in this short period of time, bathers will have to enjoy such “charms” as dampness, unpleasant smell, lack of fresh air.
Therefore, the installation of the ventilation system must be approached with all responsibility. This is not difficult. Moreover, in most small private baths (especially with the “Russian bath” mode), natural ventilation is the most optimal. And its construction, unlike the forced analogue, will not require the installation of expensive fans. And in some baths, it is generally created "by itself" - only due to the appropriate design of the steam room.
How is the natural ventilation system arranged?
Natural ventilation is driven by air convection that occurs when there is a difference in pressure (temperature) in the room (bath) and outside.
According to the laws of physics, the heated air in the room always rises, and the cold air descends to the floor. The main task of ventilation in the bath is to ensure the flow of fresh air (cold) and displace the exhaust (warm). Therefore, when planning natural ventilation, the inlet is usually located below the exhaust. Then the warm air, rising up, goes out through the exhaust shaft. At the same time, a vacuum (reduced pressure) is created in the room and fresh cool air is drawn in through the inflow near the floor. Gradually, it warms up again, rises and displaces a portion of the exhaust air through the hood. This ensures continuous convection and natural ventilation.
As extracts in a bath with natural ventilation, air vents, vents, and a stove chimney can be used. The air flow is carried out through the crowns of the walls (in chopped baths), ajar doors, ventilation openings. Both supply and exhaust openings (air vents, vents) are provided with shutters or adjustable grilles. This helps to control the air exchange in the room and prevent drafts.


There are several options for natural ventilation. Each of them has its own advantages, special functionality and some restrictions on use.
Option 1. Volley ventilation - airing
Volley ventilation is common in small Russian baths. This is the usual ventilation, which is performed either after bathing procedures, or between entering the steam room. Volley ventilation contributes to a quick change of air, drying the surfaces of the steam room.
With burst ventilation, the role of ventilation holes is performed by a door and a window leaf located on opposite walls. To change the air, they are opened for a short time after soaring (or between visits to the steam room). Depending on which direction the pressure drop is directed, air will move from the window to the door or vice versa.
The role of salvo ventilation is to freshen the air in the steam room, but at the same time not to cool the walls. Therefore, the ventilation time is short - 1-2 minutes is enough.


Option #2. Ventilation with outflow through the chimney
A stove with a chimney can be the driving force behind ventilation. When the fuel is burned, the exhaust air is drawn into the furnace blower and exits through the chimney. In order for fresh air to flow in, a gap of about 5-10 mm is made at the bottom of the door. Or loosely close it during procedures. In log cabins, when a fire is burning in a stove, air from the street is drawn in through loosely fitted lower rims.
Ventilation through the outflow of air through the chimney is only possible while maintaining the fire in the stove. If fuel combustion is not maintained during vaping (e.g. in black-baths or in a short-time oven), no air change will be performed. A more versatile ventilation system will be required.


Option #3. Air exchange through vents
Air exchange through special vents is a universal type of natural ventilation. It allows you to gradually change the air in the steam room several times during the soaring (ideally - 5-6 times per hour). With proper planning of such ventilation, drafts and a decrease in surface temperature will not be observed.
The exhaust hole is usually arranged under the ceiling, above the top shelf. It has dimensions of 15-20 cm, it is square or round. The hood is closed with a removable plug or a sliding flap (door), with which you can change the size of the hood and the degree of air exchange.

A few more rules:
- It is undesirable to place the ventilation holes at the same level opposite each other. It is highly likely that fresh air entering the steam room will immediately fly out into the hood. This eliminates the full circulation of air, but leads to the formation of a draft.
- The linear dimensions of the hood, ideally, should match the dimensions of the inlet. Or be more. If the dimensions of the hood deviate downwards, new clean air will not enter the bath.
- If you want to increase the outflow of exhaust air, the dimensions of the hood make it larger than the supply vent. Or they arrange 2 hoods for 1 inlet.
For the influx of clean air in the steam room, an inlet is equipped, as a rule, 0.2-0.4 m from the floor surface. It can be on the same wall as the hood, or on the opposite side. It is desirable - next to the stove, so that the incoming air has time to heat up and enters the soaring zone already warm. The inlet is closed with a ventilation grill so that the air is drawn into the room in separate streams, and not in a continuous stream.
Step by step installation guide
The classic workflow is:
- In the walls of the bath, two holes are made with transverse dimensions of 100-200 mm. It is advisable to form the ducts even at the construction stage, so that later you do not have to carve them into prefabricated walls. One hole is made behind the stove (or next to it), at a distance of 20 cm from the floor. The other is on the opposite wall, diagonally, at a distance of 20 cm from the ceiling.
- Boxes are installed in the holes. They can be bought ready-made - made of metal or plastic. In chopped baths, it is better to use wooden boxes knocked together from boards.
- A ventilation grill is placed on the inlet, and a valve on the exhaust. If one of the holes goes outside, an insect net is installed on the outside of the box.
But this order of work is not the only correct one - it all depends on what kind of structure you have and what duct scheme you have chosen.
Advantages and disadvantages of such a system
Among the advantages of natural ventilation, the most significant are:
- simple device and easy installation;
- low cost - natural ventilation does not require the installation of expensive forced fans;
- Efficiency in work - allows you to avoid spending on electricity;
- reliability - no mechanical devices makes natural ventilation practically “eternal”, not subject to breakdowns and not in need of repairs.
There are also disadvantages:
- the dependence of the ventilation force on the temperature difference in the steam room and on the street;
- in autumn and winter, cold air coming from the supply openings lowers the temperature in the steam room, drafts may occur;
- smells from the street.
Agree, the shortcomings are insignificant. In a small bath, standing on its own site, natural ventilation is the most rational solution. If there are no pools and large washing facilities inside, there is no point in overpaying for mechanical fans (for forced air exchange). If, for some reason, natural ventilation will not cope with the functions assigned to it, you can convert it to mechanical at any time - just put fans on the holes!
Do-it-yourself ventilation in the bath - scheme
A well-equipped ventilation system, ceteris paribus, guarantees, firstly, long term services of building and finishing materials involved in the arrangement of the serviced premises, and secondly, the comfort and safety of visiting the latter for the user. Particularly relevant is the issue of arranging full and sufficiently effective ventilation in the bath, due to the characteristic temperature and humidity conditions and additional requirements for such buildings.


General requirements for ventilation in the bath


Video - Requirements for ventilation in the bath
The choice of the optimal type of ventilation system for servicing a bath is a topic for many hours of discussion. For example, there is natural ventilation. The cost of money, time and effort for its arrangement is minimal - the work literally comes down to drilling holes in the walls, installing boxes / pipes and valves / gratings.


 Ventilation damper and grille
  Ventilation grilles for baths and saunas


However, it is impossible to use natural ventilation to serve all the premises of the bath. Of course, it would be possible to save money, but the disadvantage of such a solution will become obvious with the arrival of the first winter: along with the influx of fresh air from the street, cold will come in, and everyone knows the combination of frosty air with humidity - everything around will simply freeze. Therefore, natural ventilation in some rooms must be combined with other existing options in other rooms of the bath.
If the bath is equipped with a washing room or even a private pool, natural ventilation will definitely not cope with the maintenance of such premises - you will have to equip an exhaust system. And in general, the presence of a forced inflow / outflow of fresh air will be useful for both visitors to the bathhouse and its premises. Recommendations regarding the optimal composition of the air exchange system are given in the table.
Table. The choice of ventilation system for different rooms
| Steam room, dressing room or rest room | Under aeration it is necessary to understand the organized natural air exchange. The option is most optimally suited for use in a bathhouse: air is supplied from the bottom of the stove (for other rooms - 25-30 cm above the floor), exhaust air is removed through an opening in the upper part of the room. The work of air exchange is based on elementary physical laws: cold air from the street displaces warm air masses, which have less weight, up the room. Aeration is ideal for use in rooms with high heat dissipation rates. The presence of additional moisture contributes to an even more pronounced increase in the efficiency of the system. |
|
| Wash room, bathroom, pool room | The system is equipped with a fan and, if necessary, cleaning filters. Mechanical exhaust ventilation is ideal for use in the washroom, pool room and other damp and high traffic areas of the bath. Mechanical hood provides effective removal unpleasant odors and excess moisture, which makes the air in the served room safe and clean. It is impossible to use only exhaust ventilation - air rarefaction is formed. To compensate for the rarefaction, air is supplied from the street or other rooms. Along with this, the presence of forced ventilation will eliminate the likelihood of drafts. The supply ventilation system can be either natural or mechanical. In combination with mechanical exhaust ventilation, it is more expedient to use mechanical supply system, because the potential for natural inflow may ultimately be insufficient to compensate for the resulting rarefaction. At the heart of mechanical supply ventilation is a blower fan. Additionally, it can be equipped with an air heater, which will eliminate the inconvenience and solve the problems of ventilation of the serviced premises during the cold season. Additionally, the supplied air can be humidified or purified using appropriate devices. The mechanical system is more complex in arrangement compared to its analog, which works according to the laws of physics: in addition to fans and air ducts, the system may include additional equipment and devices (diffusers, air distribution grilles, automation equipment, silencers, etc.). This gives an excellent opportunity to arrange an air exchange system that fully meets the wishes of the user. |
In vestibules, warehouses and other premises of a similar purpose, a natural hood is made.
Regardless of the type of ventilation system chosen, the bath must have conditions for simple ventilation. Install adjustable windows in all rooms, the location of which allows this.
Video - Types of ventilation systems
Instructions for self-calculation of air exchange
For the calculation, an elementary formula is used:
W (required volume of fresh / exhaust air) \u003d k (coefficient indicating the frequency of air exchange) x V (volume of the serviced room, determined by multiplying the width of the room by the length and height).
That is, first you must calculate the volume of each room and find for it the required indicator of the volume of clean air (in calculations it is customary to denote Wpr, i.e. inflow) and a similar indicator of exhaust air (indicated as Wvt, outflow). In this case, multiplicity factors must be taken into account. The calculated values are rounded up - the last digit in the number must be 0 or 5.
Next, the summation of all Wpr is performed. A similar action is carried out for the found Wvt. The amounts received are compared. If the total value of Wpr exceeds the total indicator Wpr, it is necessary to increase the exhaust volume for rooms with a minimum air exchange value, if vice versa, increase the inflow by the missing value. That is, at the output, the sum of all Wpr should be equal to the total value of the found Wvt.
The results of the calculations will allow you to determine the optimal cross-sections of the installed air ducts and choose the appropriate type of ventilation system. Thus, with the calculation of the volume of premises and other related data, there will be no particular problems. For greater convenience of subsequent processing, enter the found values in a simple table, as in the example presented.

In the given example, the total value of Wpr is less than the sum of all found Wvt by an indicator equal to 110 m3. In order for the balance to be maintained as a result, it is necessary to ensure the flow of clean air in the missing amount. This can only be done in the waiting room. Thus, the value of 55 m3 for the dressing room, given in the table, must be replaced with an indicator of 165 m3. Then the balance will be struck.
Proceed to the calculation of the installed air ducts and the drawing up of the structure of the equipped ventilation system.
The ventilation system is designed in such a way that the air moves through the installed air ducts with the following speed indicators:
- ≤ 5 m/s in main channels and ≤3 m/s in existing branches - for mechanical ventilation systems;
- ≤ 1 m/s - for air exchanges operating according to the natural principle;
- 2 m/s - for natural air exchange directly in the steam room.


When choosing the cross-section of air ducts, consider the above indicators. As for the profile of the box / pipe, this moment is determined by the design features of the air exchange and the bath itself. For example, air ducts round section are easier to install than their rectangular counterparts, and it is much easier to select the required connecting fittings for round air ducts.
The relationship between the diameter of the air ducts and other significant indicators is shown in the following tables.


For example, we will work with round ducts. We select the necessary sections according to the corresponding table, focusing, at the same time, on the indicators of the table An example of calculating ventilation.
Estimated air consumption is 165 m3/hour. The air flow at this flow rate should not move faster than 5 m/s. In accordance with the table above for round ducts, we select the section according to the specified data. The tabular value closest to ours is 221 m3/h. Air duct cross section - 125 mm.

 Air duct with insulation
  Flexible ducts
 In the same order, we determine the optimal sections for all branches of the system in the serviced premises, remembering that in them the air flow should move at a speed not exceeding 3 m / s (in vestibules and closets - 1 m / s, in the steam room - 2 m / s). sec):
- steam room: calculated Ww is 60 m3 / h, which requires the installation of an air duct with a cross section of 125 mm;
- shower room - Ww is 50 m3 / h, air moves at a speed of 3 m / s, a 100 mm air duct is suitable;
- toilet - the indicators are similar to the shower room;
- pantry, vestibule, etc. - indicators (except for the speed of air movement) are similar to the shower and toilet.
Important! In the shower room (washing room, room with a pool), an increased level of humidity is noted. When determining the cross-section of the duct for this room, it is necessary to make an upward adjustment (in this example, 125 mm).
For greater convenience, enter all the information received in the table. As an example, you can use the template below.

Important note! In the table above, the extract volume exceeds the clean air supply. This happened because the sections were determined by the nearest flow rate, and the diameter of the air duct in the washing room was deliberately increased. In practice, such an approach will only benefit - the margin for outflow and inflow will not be superfluous.

SNiP 2.08.01-89. Residential buildings. Download file
SNiP 2.08.01-89
Sanitary and epidemiological requirements for residential buildings and premises. Sanitary and epidemiological rules and regulations SanPiN 2.1.2.1002-00. Download file
SanPiN 2.1.2.1002-00
Building regulations Russian Federation heating, ventilation and conditioning heating, ventilation and conditioning SNiP 41-01-2003. Download file
SNiP 41-01-2003 (Heating, ventilation and air conditioning)
Area cross section the ventilation window is determined in accordance with the volume of the serviced premises: 24 cm2 for every 1 m3.
It remains to figure out only the optimal height of the ventilation holes:
- for the influx of fresh air - an average of 25-30 cm above the floor (in the steam room - near the stove);
- for the outflow of exhaust air - about 15-20 cm below the ceiling, as a rule, on the wall opposite to the supply air.
Popular bath ventilation schemes
Separate consideration deserves only options for arranging ventilation in the steam room - in the rest of the rooms everything is done according to the standard scheme, for example, like this:

Air exchange in the steam room can be organized in accordance with 4 main schemes presented in the following image.

Scheme "a". The most popular option. The window for air flow is next to the stove, at a distance of about 25-30 cm from the floor. The incoming clean air gradually displaces the exhausted warm upwards to the opposite wall. On it, about 15-25 cm below the ceiling, there is an exhaust hole.
Scheme "b". Both holes are on the same wall. The circuit will only work if an exhaust fan is installed. Fresh air enters through the lower opening, equipped in the wall opposite to the stove. The air will rush in the direction of the stove, and then, covering the space of the steam room with an arc, move to the hood and be discharged outside the bath.
Scheme "in". The option is suitable for steam rooms with a leaking floor. The inlet opening is located as in scheme "a". After warming up in the upper part of the steam room, the air descends to the floor, passes through the gaps in the boardwalk, contributing to more efficient drying of the boards, and then is removed through the exhaust hole, usually equipped in another room. Also, the hood can be carried out through a separate insulated channel.
Scheme "g". Option for baths with a constantly working stove. In this case, the function of the hood is performed by the blower hole of the furnace. The supply window is arranged under the shelf, in the wall opposite to the furnace. The height of the inlet must correspond to the height of the furnace blower. Fresh air rushes to the stove, displacing the air masses heated by it to the ceiling. Cooling down there, the air descends and is removed from the bath through the blower.
In order for the operation of the air exchange system to be as efficient and high-quality as possible, before starting its installation, study and remember a few simple tips.
If your bath has a bathroom or even a kitchen, equip them only with exhaust ventilation - this solution will eliminate the possibility of unpleasant odors spreading to other rooms. Alternatively, you can equip other rooms with forced ventilation, and equip the bathrooms natural exhaust- in this case, the air will move to the bathrooms.


When calculating the performance of fans, it is recommended to reduce the total capacity of the supply units by 5-10% of the total performance of the exhaust units. In this case, the exhaust air will be completely displaced by the incoming air masses, and a 5-10% reserve will compensate for the inflow of air entering through windows, slots, etc., which will allow you to maintain a balance.

In rooms with only natural ventilation, it is recommended to definitely make opening windows - this will increase the efficiency of fresh air intake and reduce the risk of fungi, mold, rot, etc.


Important! If your bath has a non-standard configuration, the ventilation system project will also be individual. When compiling it, the features of the composition of the premises, their design, design features etc.
The main stages of independent arrangement of the ventilation system
Any ventilation system in any room is equipped in approximately the same sequence. Differences are present only in the characteristics of the air vents and their locations, as well as the configuration of the system (mechanical, unlike natural ones, are supplemented different kind devices).
For example, the following arrangement of ventilation elements can be used.


Or its somewhat modified counterpart, shown in the following image.


Recommendations regarding the choice of the location of each opening, the type of air exchange system for different rooms of the bath, as well as the procedure for determining the characteristics of ventilation elements, were discussed earlier.
Along with this, the procedure for arranging ventilation may vary depending on which design option you prefer. There are few solutions available:
- independent ventilation in each room. An easier option. Work is limited to the installation of transoms, vents, fans and other necessary elements, if provided for by the project. Fans can be mounted both in windows and in separate channels brought outside through the wall;
- centralized system. More difficult option. Requires ventilation ducts. It is used mainly in private homes - in the case of a bath, this option will be too costly and time-consuming;
- "hybrid" option. Some rooms are ventilated individually, some are combined into a joint system.
A reasonable option for use in a bath is independent ventilation - the owner can choose the optimal characteristics of fans and other elements for each room, saving money, time and effort on the activities necessary to combine the channels into a single system.
Important! The location of some bath rooms may not allow to equip independent supply and exhaust ventilation. In this case, it will not be possible to avoid laying ventilation ducts. Alternatively, the boxes can be placed in the attic, and the ventilation holes can be arranged in the ceiling or connected to the channels equipped in the walls (the option is more complicated if the laying of such channels was not provided for by the project at the construction stage of the bath).
In most cases, the first option is used: ventilation pipes of the required length are led out through openings in the ceilings of the serviced premises and either equipped with their own fan, if necessary (easier to implement for an unprepared user, the procedure is similar to that given in the following table), or connected into a single circuit and connected to a common hood (may require the involvement of specialists).
Remember: maximum efficiency The operation of the ventilation system is ensured by using as short and straight air ducts as possible - up to 3 m when arranging natural air exchange and up to 6 m when using electric fans.


The procedure for arranging an independent ventilation system is given in the following table.
Important! The example considers instructions for arranging a mechanical ventilation system using fans. The order of installation of natural air exchange remains almost the same: only the stages of laying wires and installing fans are excluded.
Table. Arrangement of ventilation
Stage of workExplanations
 |
The operating procedure remains the same for the supply and exhaust openings. Only the height of their arrangement and location change (possible options were considered earlier), as well as the type of fans used (supply or exhaust). The characteristics of the latter are selected on an individual basis, taking into account the volume of the serviced premises, the required air velocity in the air ducts, the required air exchange rate, etc. - all these moments were consecrated in the theoretical part. We equip the holes in the following order: - we outline the center and contours. We make the markup so that the diameter of the hole as a result is slightly (usually a 2-3 mm gap) exceeds the diameter of the installed pipe (recommendations for choosing the diameters of the ducts were given earlier); - Using a perforator, make a hole in accordance with the markings. We hold the working tool horizontally, but with a slight downward slope; - carefully take out the cut material (a hammer and a chisel will help us with this), after which we carefully clean the finished hole from dirt and dust. |
 |
The ventilation pipe (ventilation duct housing) is placed in the prepared hole, but before that it (if mechanical / forced ventilation is planned) must be equipped with a fan. Useful recommendation! Initially, buy ready-made kits for arranging ventilation, including, in addition to related accessories, a ventilation duct / pipe and a fan with an appropriately sized case - this way you will avoid difficulties during the assembly phase. The pipe with the fan is placed in the prepared hole, and the remaining gaps are filled with mounting foam. |
  |
The fan is an electrical appliance, therefore, it must be connected to the mains. Let's do this while the mounting foam dries (at least 10-12 hours). The procedure is standard: - the contours of the strobe for the cable are cut out in the wall using a grinder. Excess material is removed using a chipper; - a hole is prepared in the wall for installing the switch box (for example, you can use a puncher). The box is installed (pre-read the instructions specifically for your switch). The switch itself will be mounted after finishing; - the wire is laid in a strobe. We use alabaster to fix the cable; - connect the wire to the switch and fan. We must first study the connection diagram recommended by the fan manufacturer in the attached instructions, because. it may differ for different devices. For example, one of the most commonly used schemes is given. |
  |
It remains only to bring the whole structure into its proper form. To do this, we do the following: - get rid of excess dried mounting foam with a knife; - putty strobes; - we mount adjustable ventilation grilles on both sides of the pipe. For fastening we use self-tapping screws. If provided, we install additional elements at the appropriate stages of work (for example, an air heater, a filter, etc.). Each of these devices is mounted individually - we first clarify these points in the manufacturer's instructions. |
Video - Arrangement of ventilation holes
Video - Do-it-yourself ventilation in the bath - scheme
State norms for ventilation of premises are regulated by SNiP 41-01-2003, the document establishes the minimum frequency of air exchange in rooms, depending on their purpose and features of use. In residential premises, ventilation must perform two tasks - to provide favorable indicators of the percentage of oxygen in the air and to remove exhaust gases.

SNiP 41-01-2003. Heating, ventilation and air conditioning. Download file
SNiP 41–01–2003
For a bath, ventilation tasks become more complicated, it must additionally remove moist air as quickly as possible (fast drying of wooden structures is ensured) and regulate the temperature in the steam room. There are cases when it is necessary to quickly reduce the temperature in the steam room before taking procedures by small children, the elderly or large people. The stove continues to give off heat for a long time, it takes a very long time to wait until the bath cools down on its own. With the help of room ventilation, you can quickly set the desired temperature and maintain it within the specified limits all the time people stay in it.

What are the types of ventilation and the method of their calculation
Ventilation can only exist when there is an inflow of fresh air and an outflow of used air into the room. Often you can find the concept of "supply" or "exhaust" ventilation. These are not quite correct concepts, there cannot be only supply or only exhaust ventilation, it is always only flow-exhaust. Why are these concepts used? Thus, it is emphasized that the supply or exhaust of exhaust air is carried out in a forced way, and, accordingly, the removal or supply of fresh air occurs in a natural way.


When calculating the parameters of ventilation systems, the initial data take into account the volume and purpose of the premises, the presence of special conditions in them in terms of air indicators, the presence or likelihood of the presence of carbon monoxide or other chemical compounds harmful to health. Based on these data, state regulations establish the frequency of air replacement within an hour, it can vary from 1 ÷ 2 to ten or more.


Next, engineers determine the parameters and location of the channels to ensure the necessary intake and removal of air, taking into account weather conditions and climate zone. If natural ventilation cannot provide the required frequency of air changes, then forced systems are used that supply / exhaust air with electric fans. Baths have their own characteristics of each type of ventilation, consider them in more detail.
General rules for ventilation in the bath
The principles of the ventilation device in the bath largely depend on the architectural features of its design. If the floors have slots for draining water, then supply air can also be supplied through the same slots, there is no need to make a special hole.


Quite often, small windows are installed in the bath - when opened, they “turn” into exhaust holes. In addition, if the furnace firebox is located directly in the steam room, the room can be ventilated even easier - open the firebox and, by changing the position of the damper, adjust the air change rate.

These are the simplest options for a steam room (by the way, the most efficient and low-cost ones), but there are cases when the furnace firebox is located in another room, there is no window, and the floors are solid without gaps. It is on such a bath that we will focus in our article. Why do you need to do ventilation in the bath?
- For better mixing of air throughout the volume. Natural convection of air masses is not able to equalize the air temperature along the height, the difference in indicators under the ceiling and near the floor can reach tens of degrees. This negatively affects the comfort of taking water procedures.
- For the supply of fresh air. If one person is steamed in the steam room, and the residence time does not exceed 20 ÷ 30 minutes, then the oxygen concentration in the air will not have time to drop to critical values. And if several people steam at the same time in the steam room for a long time, then the influx of fresh air becomes mandatory.
Quite often, developers fall into two extremes: in order to save heat, they generally refuse ventilation or make it too strong and unregulated. Both extremes have negative consequences, ventilation should not be neglected, it is cheap, and the positive effect is very impressive. But it should be done correctly, taking into account the features of the premises, the requirements for the temperature in the steam room, the materials for the manufacture of walls and cladding.


In the event of a complete lack of ventilation, the risks of oxygen starvation increase and, if the furnace firebox is located directly in the steam room, carbon monoxide poisoning. In the case of strong unregulated ventilation, the heating time increases significantly, warm air is quickly removed from the room. But this is not all the problems - the rapid removal of warm air automatically causes an equally rapid influx of fresh air - the floors will always be very cold, and this increases the risk of colds.


Uncontrolled ventilation is fraught with cold floors
The influx of fresh air in the steam room is arranged in two places: behind the stove or under the sun loungers.
There are many air movement patterns on the Internet, most of them are made by amateurs, you should not pay attention to them. Follow only two conditions: air inflow at the bottom, exhaust at the top, placement of channels diagonally across the room.


This is quite enough to ensure normal circulation and air mixing. Everything else is reasoning about nothing, they can only confuse inexperienced developers, significantly complicate the ventilation system, make it expensive and unreliable. There are options with two multi-level exhaust valves, with two supply valves, etc. The air outlets are located at different heights.

One under the very ceiling, is used only for complete ventilation of the bath after the completion of water procedures. The second is done 30 ÷ 40 centimeters below the first and is used during washing. Some craftsmen connect them together with internal air ducts, install several control dampers, etc. We assure you that these complications do not have any visible effect on the comfort of staying in the steam room.


A few words should be said about the ventilation ducts in the bath, they are often suggested to be used in steam rooms. In large buildings, ventilation ducts serve to connect several various premises to the general ventilation system, it does not matter which - natural or forced. This is quite justified from both technological and economic points of view.


And what other rooms can be connected to the steam room with ventilation ducts? Weird question. Then why make complex channels under the wall sheathing? Wouldn't it be easier to make ordinary holes in the walls and insert ordinary pieces of pipes and grates with elementary valves into them? Of course, we will talk about a real, effective, simple and cheap way to install ventilation, we will not lay any channels anywhere. This universal option, perfect for both "budget" and expensive exclusive pairs.
Video - Ventilation in the bath
Natural ventilation of the bath
The most accepted option for most baths, minimal in cost and safety, and quite effective. The specific locations of the ventilation openings should be taken into account, taking into account the size of the premises, the location of the shelves, the stove and the material of the building. The general rule is that the holes should be located at different heights, as a rule, the inlet (supply) 20 cm from the floor and the outlet (exhaust) 20÷30 cm from the ceiling. When choosing holes, you need to consider where the holes will be located on outer walls. It is desirable that they do not stand out too much on the facade walls.

The dimensions of the holes are approximately 300÷400 cm2, it is better to make them larger than smaller. In case of too rapid air exchange, leading to a decrease in the temperature in the steam room, the channels should be covered with control dampers. For improvement appearance it is better to use decorative grilles, they can be purchased at specialized stores or made independently.


Somewhat complicates the ventilation system, requires the installation of electrical equipment. Another problem is related to the microclimate in the steam room. There, high temperature and humidity are the main enemies of any electrical equipment. Fans must have a reliable protection of the housing from moisture; during connection, the recommendations of the Electrical Installation Code must be strictly observed. And in order to comply, you need to know them.


The advantages of forced ventilation - the rate of air change in the room is significantly accelerated, the control parameters are expanded. Natural ventilation is very dependent on weather conditions, in some cases it can become ineffective. Especially if the wind is at right angles to the exhaust vent. Forced ventilation works with the same efficiency in any weather and regardless of the direction and strength of the wind.
How to make ventilation in the bath with your own hands
Initial data. The architectural features of the bath do not provide for air to enter through the cracks in the floor, doors, windows or the furnace. It is necessary to make holes for both entry and exit of air. There is no internal and external wall cladding, the bathhouse is built of sawn timber.
Step 1. Decide on the location of the input and output channels.
We have already mentioned that it is better to place the inlet channel near the stove at a distance of about 20 centimeters from the floor level. Exit channel diagonally under the ceiling. This position of the inlet and outlet openings will ensure the distribution of air flows throughout the volume of the room. In addition, the inlet air will not cool flooring. Channels should be easily accessible. There are recommendations to make an exit hole in the ceiling. We are opponents of such a decision, humid air will certainly cause great damage to the entire truss system.


Step 2 Purchase or make your own grates and valves.
They can be of various sizes and geometric shapes: round, square or rectangular. At the same time, take into account the materials of the future cladding of external and internal walls, consider how the decorative grilles will be attached to them.
Important. Be sure to install grilles with adjustable gaps, only they can provide smooth adjustment of the frequency of air changes in the room.
And one more thing - from the outside of the bath, the holes should also be closed. Moreover, the closure should be as airtight as possible, to prevent moisture from rain or snow from getting on the log house crowns.
Step 3 Make holes in the walls.


The most time-consuming operation, you have to work manually. Pre-in the marked places, you need to drill holes around the perimeter. The closer they are to each other, the easier it is to gouge the wood later. When the holes are drilled, take a chisel, a chisel and a hammer in your hands and begin to destroy the timber bridges remaining between the holes. Ventilation holes should be made 1-2 cm around the perimeter more than the inserted pipe. The fact is that then this pipe must be insulated to prevent the appearance of condensate on wooden structures.


Use only a sharp chisel and a chisel - the timber will have to be cut across the fibers, this is quite difficult. If the thickness of the beam is 20 centimeters, then it is better to make half the depth of the hole from the inside of the bath, and the second half from the outside. If you have extensive experience using a gasoline saw, then you can cut a hole. But we immediately warn you that it is very dangerous to work with a gasoline saw in such conditions. You will have to cut with the end of the tire while grabbing the tree bottom chain saw will be pulled out of hand. This way of using the saw is strictly prohibited by safety regulations, remember this.
If there is a need to dilute the inlet in the wall and in the bath, then buy a pipe with an elbow. It is advisable to use not round pipes, but rectangular ones, they take up less space under the lining of the inner walls of the steam room.


Be sure to seal the joints of the elbow and pipe with silicone and wrap with adhesive tape for reliability.


Scotch metallized
Step 4 Lay foil or polyethylene film and mineral wool around the perimeter of the holes, the wool layer should be dense, without gaps. It will not be possible to make the edges of the hole absolutely even, carefully make sure that the waterproofing is not damaged by the sharp protrusions of the timber.
Step 5 Insert the pipes into the holes in the log house. They should enter with little effort, quite tightly. In order to increase the reliability of sealing and fastening, be sure to walk around the perimeter of the hole and pipe with foam. Mounting foam eliminates all invisible gaps in thermal insulation between the pipe and the wall and firmly fixes it in the desired position.
We recommend foaming the holes and after wall cladding, the foam will eliminate the gaps between the wall and the vapor barrier. During the expansion of the foam, the vapor barrier will press tightly around the uneven hole, all possible small damages will automatically close.

The pipe to the hood may not be insulated, warm air comes out through it. But we advise, just in case, to do all the operations for her. First, you will lose a little time and money. Secondly, you will make additional and reliable protection against penetration to wooden structures atmospheric moisture.
When both holes are prepared, you can start upholstering the walls and install decorative grilles with adjustable throughput parameters.

Important. We strongly advise you to ventilate the space between the wall cladding and the aluminum foil during the installation of steam room ventilation. The work is performed according to the above algorithm with one difference. Ventilation should be either permanently closed (during the adoption of water procedures) or permanently open (during the airing of the bath). Using foil as a wall vapor barrier has many benefits. But there is one problem - the difficulty of removing condensate between the skin and insulation. An ordinary hole solves all problems and completely eliminates damage to wood.
Video - DIY ventilation
How to make a hole in a log house with a crown
If you do not want to make holes for ventilation manually, you can drill them with a special metal crown. They are sold in stores and are inexpensive. The only problem is that the crown requires a powerful low-speed drill or a hand-held drilling machine, ordinary drills can quickly fail due to a heavy load. Another limitation is that the maximum diameter of crowns is rarely more than 120 mm. But for most baths, small volumes of this size are enough.


Step 1. Choose a crown suitable diameter and secure it in the chuck. Mark the drilling site.
Step 2 To lighten the cutting force, be sure to lubricate the bit with machine oil. Lubrication should be repeated periodically. Once the bit is about two-thirds deep, stop drilling, remove the bit and re-lubricate its inner and outer surfaces.
Step 3 Mark the center of the hole with any thin drill. Insert a crown into a shallow hole and start drilling the timber.
Step 4 Drill as long as the bit height allows. Carefully monitor the operation of the electric tool, do not allow heavy loads. Loads are regulated by the force of pressing the crown to the bar.


Step 5. The crown does not work further - take it out and gradually remove the cut wood with a chisel or chisel. It is removed quickly, start gradually chipping holes in the corners. Don't cut the log across the grain with the chisel, only chip it along the grain, it's much easier to do the job.


Repeat the steps until the hole is through. If the timber is so thick that the drill cannot go through it on one side, go to the other. To do this, you need to find the center of the already made hole as accurately as possible. The crown has its own centering drill, but its length may not always be enough to reach the reverse side. You will have to find the center yourself. To do this, install a thin wood drill in the drill, insert it into the existing hole from the center drill of the crown and very carefully make a through hole. The more precisely you drill the center, the easier and faster it will be to work on the other side of the wall.
Video - How to drill a hole with a crown
Bath ventilation with heating
Enough original way ventilation devices, not only fresh air lends itself to the bath, it is immediately heated. This is very important in winter, as it is possible not only to increase the comfort of your stay, but also to speed up the heating of the premises and save firewood.
The air intake is made at the bottom of the bath and is fed into the air intake duct with the help of electric fans.

The stove has a metal chimney, a special screen is installed around the chimney, air from the duct enters the screen channels. The screen performs two functions: it protects the limbs from burns and serves as a radiator for heating the air coming from the duct. The heated air exits the screen into the steam room.
If desired, you can slightly improve the design. Install a tee with a damper on the air duct. This will allow you to take both air from the bathhouse and from the street - the possibilities for regulating the parameters of the microclimate in the room are significantly expanded.

Video - Ventilation in a steam room with heated air


Why is ventilation needed in a Russian bath? Let's take a simple example: a person is steaming, there is hot steam around him and he breathes it. Oxygen is exhaled and carbon dioxide is constantly inhaled - and if there is no influx of fresh air in such an environment, the vacationer can simply burn out. That is, if there is no ventilation - the bath becomes simply life-threatening - which is why there are so many subtleties in the technical rules for the operation of the bath. Yes, sometimes you can hear from experienced craftsmen that ventilation in a brick bath, for example, is not needed - but this is not about the fact that fresh air is not needed in the steam room, but that sometimes natural ventilation is enough in the bath, and she doesn't need a forced one.
So, how to make ventilation in the bath - we are looking for an answer together with the Stroy-Banya.com portal.
General rules for planning bath ventilation
The ventilation system in the bath itself has two main tasks: to deliver fresh air during the procedures and to ensure fast and high-quality drying of the bath rooms after them. And both options should be thought out and implemented.
And here is what ventilation should not do:
- Violate with fresh air temperature regime baths.
- It is wrong to stratify temperature flows - i.e. it can be cool only near the floor, but not on the shelf where a steamed person sits.
- To remove from the steam room the wrong air - not exhausted, in which there is the most carbon dioxide.
Also, the lack of fresh air will invariably lead to the appearance of an unpleasant smell in the bath - and it is difficult to get rid of it. Yes, the air filled with mold and fungus spores is not the most healing for a resting person.


In total, ventilation in the bath is provided by the following types:
- Natural, when the entire air flow occurs due to the pressure difference between the street and the room.
- Mechanical - when both the temperature and the air supply are monitored by devices.
- Combined, when pressure is artificially created using a fan.
And in the bath itself, not only inflow is needed, but also outflow - and this is already done with the help of a box, which is always located diagonally from the supply channel.
Ventilation is vital not only in a stuffy steam room - but also in the shower room, in the locker room and even in the rest room. Just initially you need to decide which of its types is suitable for a particular bath.


The floors in the bath should also be ventilated - because they are constantly in contact with water, which can lead to their destruction. If this is not done, they will have to be changed at least once every 5 years. Therefore, in order to extend their service life, it is important to do the following:
- Initially, even during the laying of the foundation, it is necessary to ensure the ventilation of the floors - to make small vents on opposite sides of the basement.
- It is necessary to leave two more ventilation holes near the opposite walls of the steam room - for fresh air. And so that a rodent does not accidentally enter the bath, these windows are usually closed with bars.
- During the installation of the stove, it is important to make sure that the level of the finished floor is slightly higher than the blower - then it will work as a hood.
- Boards should be laid so that there are gaps between them from 0.5 to 1 cm.
- At the end of the bath procedures, the floors must be dried well - every time.
You can also make ventilation “according to Bast” in the bathhouse: arrange an influx of fresh air under the stove, and exhaust from the ceiling directly opposite the door in the corner. For this, a special exhaust box is used - it can be made from a board and sheathed inside with foil
Correct direction of air flow
Under the floor, the veterinary duct must be made directly right at the metal sheet - it is he who protects the floors from fire. And the size of the box itself should not exceed the diameter of the chimney by 20%. In general, such a system is good - it is easy to regulate the flow of fresh air from the street, but the unpleasant smell no longer penetrates into the steam room.
If the firebox is located directly in the steam room, then this option is the most rational. Of course, the design turns out to be more complex - after all, two boxes already need to be installed in it: one to ensure the convection of air masses, the second - to burn firewood. And the channels themselves can be placed directly in the brick podium - if the furnace is installed.


5 popular device schemes to choose from
But the ventilation in the steam room should be thought out especially carefully - otherwise there will be no comfort from pleasant procedures. And you can provide it in different ways:
Option number 1. The inlet is located behind the stove, half a meter from the floor, while the outlet is on the opposite side, at a height of 30 cm. A fan is installed in it for forced air movement. In this option, the air warms up evenly - cool streams heat up from the furnace and go up, where they cool down and go down. There they are already brought out through the exhaust hole. And the lower it is, the stronger the air flow will be.
Option number 2. Both vents are on the same wall - opposite the stove. But the input is at the bottom, 30 cm from the floor, and the output is at the top, 30 cm from the ceiling. Here, a fan is also placed in the outlet. But the flow pattern is somewhat different: cold air enters the steam room, hits the stove, heats up and rushes up - into the hood and out.
Option number 3. In this method, the inlet is behind the stove, at a height of 20 cm from the floor, and the outlet is at the same height, but on the opposite side. And here, too, a fan is placed. The whole system is quite simple: cold air enters the steam room, passes through the stove and is pulled out with the help of a fan.
Option number 4. This option is ideal for a steam room with floors where there are gaps for water to flow out. The inlet behind the stove at a height of 30 cm from the floor, the air that has cooled down, goes down and penetrates through the floor, and then through the ventilation pipe is discharged into the street.
Option number 5. This method is for those baths where the stove is constantly working. The inlet is opposite the stove, 30 cm from the floor, and the chimney and the firebox with a blower act as an exhaust hood.
If you need to raise the temperature in the steam room or increase the amount or saturation of steam, then it will be enough to close the inlets with plugs. And after the end of the procedures - remove the plugs. And it's easier than pressing the buttons on some remote control to a complex and expensive ventilation system. This is how the ventilation of the bath is done with your own hands - nothing complicated!
Ventilation is needed in all rooms, the rules for its installation are prescribed in SNiP 41-01-2003. But they concern only residential, public and industrial premises that create favorable conditions for humans. At the same time, it is taken into account that people stay in such premises for a long period of time and for everyone it is necessary to create the same standard indicators of the microclimate and air quality.

Baths have completely different tasks, they create a stressful microclimate for the body - high performance temperatures (in Russian baths up to +60°C, in saunas over +100°C) and high air humidity (up to 90%). Moreover, in one room, the temperature and humidity indicators should vary widely, depending on the wishes of the washers. Changing the microclimate parameters should be carried out as soon as possible, and the achieved values should be maintained for a relatively long period of time. And another very important difference between the bath and ordinary rooms. If, secondly, people have the opportunity to “protect themselves” from temporary inconveniences with clothes, then this is impossible to do in the baths.


Based on these features, the ventilation of baths must perform individual tasks, and this affects the principles of its design and features of operation. Ventilation in the bath can be natural and forced, each type has its own characteristics, characteristics, advantages and disadvantages. In this article, we will talk in detail about only one type of ventilation - natural.


Types of natural ventilation baths
We have already found out the tasks of bath ventilation and how it differs from the ventilation of other rooms, now it's time to tell you in what ways they can be achieved. The methods depend on the architectural features of the room and your preferences.
First you need to remember the lessons of physics from school. Ventilation of premises occurs due to the difference in air density in the street and in the room. Warm air has less weight and rises, cold air is heavier and sinks down, so-called convection occurs. Accordingly, in order for the room to be ventilated, hot air must be able to leave, and cold air must be allowed to enter, inlet and outlet openings are needed. These can be ordinary cracks in windows and doors or specially made ventilation holes.


On the Internet, you can find statements that these holes must necessarily have the same dimensions, otherwise the ventilation does not work or “blowing in the wrong direction”. Only those who skipped classes can say that. The ratio of the size of the inlet and outlet of air does not affect the performance of ventilation.


Square ventilation window
If the outlet, for example, can release only 1 m3 of warm air per hour, then exactly the same amount will enter the cold room, no matter what the size of the inlet, and vice versa. And the effect of reverse thrust is obtained in the case of wind backwater or in the complete absence of fresh air. In the first case, a strong external wind "drives" the air into the room, in the second case, after the air leaves the room, a small vacuum is formed, which draws the air back into the room. This is not to say that ventilation is completely absent, it just becomes cyclical and works on a back-to-back basis. Of course, the efficiency of such ventilation approaches zero, the air moves a little only near the holes.


And with these phenomena it is clear, now we will consider specific types of natural ventilation of the bath. Let's start with the simplest ones and work our way up to the more complex ones.
The simplest, but also the least effective method ventilation.


In the steam room, a door opens or a door and a window open at the same time - ventilation occurs quickly, but not in the way we would like. Why?
Steam is removed from the bath, and this has negative consequences.

Bottom line - ventilation is not the method of ventilation that should be used all the time. This is an extreme method, it is recommended to resort to it only in case of urgent need.


This method can be considered more successful, but it is possible only in one case - the furnace of the sauna stove is located in the steam room. Warm air is removed through the firebox and chimney; it can enter through floor cracks, an ajar window or door. Sometimes a special hole is made in the lower part of the door leaf; to improve the design, it is closed with a decorative grille.


Benefits of ventilating a bath with a stove.

There are, of course, disadvantages, we will name the main ones.
- Insufficient performance. It will not be possible to quickly change the temperature or humidity in the steam room.
- The presence of "dead" zones. Mixing of air throughout the volume does not occur, there are zones with drafts and zones with stagnant air.
- Dependence of draft (ventilation) on weather conditions.
Despite some shortcomings, this method of ventilation in combination with ordinary ventilation is very often used in "budget" options for baths.

For a budget couple the best way- oven ventilation and ventilation


Airing the bath with a stove - scheme
The best option for ventilation devices for most baths.

Advantages:

Important. It is desirable to think over the ventilation device even before the start of the construction of the bath. Resolve issues with specific hole placement and overall dimensions. We advise you to make the height of the ducts no more than the height of the beam, and to adjust the length of the holes.


Why is it better to provide ventilation at the construction stage?

Variants of placement and sizes of ventilation products
For all natural ventilation products, there are several general rules. Firstly, in order to improve the efficiency of the system, the cold air inlets should be located at the bottom of about 20 centimeters from the floor level. The exit holes should be placed at the maximum height - under the ceiling or on the ceiling. Secondly, the mixing of different layers of air in the volume of the steam room is improved if the inlet and outlet are located at the maximum distance from each other, preferably along the diagonal of the room. Where are they recommended to be installed?

It can be done at the bottom of the steam room door leaf.


Advantages - there is no need to make an extra hole in the wall of the bath. This saves time and effort, in addition, the possibility of getting wet of the lower rims of the log house is excluded. The disadvantage is that in most cases the doors are located opposite the shelves for taking bath procedures, cold air flows appear, creating a number of inconveniences.
Under the shelf


Advantages - the inlet is imperceptible, cold air flows are well mixed with warm air throughout the volume. The disadvantage is that access to the grate for opening / closing the damper is more difficult. If during washing it is possible to regulate the intensity of ventilation only with the help of the upper grate, then after airing the baths, both must be closed. And this means that after some time you will have to visit the steam room specifically to close the vent.
Important. The dampers on the ventilation openings must be installed two for each - outside and inside the steam room. After airing the baths, both should be closed. Choose a grille installation technology that guarantees complete tightness of the external dampers. It is strictly forbidden to get atmospheric moisture on the crowns of the log house.
Behind the oven.


Most best option. Cold air from the street hits the stove, warms up a little and breaks into several separate and low-speed flows. Drafts are completely eliminated. Disadvantages - it is not always possible to install decorative grilles in this place. If the stove is close to the wall, then the high temperature adversely affects the plastic or wooden materials decorative lattice. In addition, according to safety regulations, such places behind the stove must be insulated with sheet metal using thermal insulation.
Doesn't fit your particular case? No problem, make a hole where you see fit.
As for the outlet, there are fewer problems with its placement. Our only advice - do not do it in the ceiling. Waterlogged air cannot be taken out to the attic, it will cause constant wetting of the wooden elements of the truss system, and its premature repair always costs a pretty penny. To protect the rafters, moist air will have to be brought to the roof. Why make an additional hole in the coating, why worsen the tightness of the roof coating with your own hands and at your own expense?


Dimensions of openings for natural ventilation
The technology for calculating the dimensions of ventilation openings is indicated in the current regulations. Determining the size of vents for natural ventilation is much more difficult than for forced ventilation - there are too many factors beyond the control of people. The main performance parameter of the ventilation system is the frequency of air changes. For residential premises, the minimum value of the multiplicity is regulated, while taking into account both the temperature in the rooms and the temperature outside. The temperature in residential premises fluctuates within insignificant limits, which simplifies the work of designers.


In pairs, the situation is much more complicated - the temperature and humidity indicators vary over a very wide range. In addition, the rate of arrival / entry of air in different situations may differ significantly. Such preconditions make it virtually impossible to accurately calculate the optimum air exchange rate for natural ventilation.

Some bath owners are afraid to suffocate while taking bath procedures due to lack of oxygen. We bring to their attention that one cubic meter air is enough for one person to breathe for an hour and a half. Calculate the cubic capacity of the steam room and find out how long you can safely steam, the bill goes to tens of hours.


Problems can cause carbon monoxide. If you closed the stove gate before the firewood is completely burned out, then no ventilation will help. It can ventilate the room only if there is no more carbon monoxide coming in. Heat the stove correctly and never burn out, do not rely in vain on ventilation.
How to make a ventilation hole in the wall of the bath
For example, we will take the most difficult option - the outer and inner lining of the walls of the bath has already been done. The hole can be round, square or rectangular.
Step 1. Mark the location of the vent on the inner lining of the steam room. Before starting work, you must not only know the location of the hole, but also its dimensions and configuration. It is desirable that air ducts and decorative grilles are available, this will make it possible to accurately control the size of the hole and not do extra work.
Step 2 Prepare a long drill for wood, the working length should exceed the thickness of the bath wall together with the outer and inner lining. In the center of the drawn contour of the vent, drill a through hole from the inside of the steam room. The exit of the drill outside the steam room will be the center of the air. Draw around it the dimensions of the hole, similarly made in the steam room.


Step 3 Remove elements of internal and outer skin in contour. If your bath is sheathed on both sides with natural clapboard, then the process is simplified, just carefully cut the boards. If metal sheets were used on the outside, use a grinder.

Step 4 Carefully inspect the supporting structures of the skin, if they are damaged, repair. Drill through holes as close as possible to each other along the contour of the ventilation duct, constantly check where they exit from the outside of the wall. The drill must always be perpendicular to the plane. Drill the same holes over the entire area of \u200b\u200bthe vent, the more there are, the easier it is to make a hole in the wall.


Video - How to drill a large diameter hole in a tree
Step 5. Next, you need to work with a chisel and a chisel, gradually remove the wooden bridges between the holes. It will not be possible to completely gouge a hole on one side of the wall - it is too difficult to reach with a tool. Do half of the work from the inside of the steam room, and the other half from the outside. It is not necessary to carefully level the surfaces of the holes, the main thing is that the air duct fits easily into the channel.


The most difficult physical work is done, you can proceed with the installation of the duct and gratings. Don't be discouraged if it takes a long time to make holes, even experienced builders can rarely prepare more than two holes a day.
How to install ducts and grilles
For air ducts, you can take metal galvanized or plastic pipes, the length is determined by the length of the passage. Select the grate according to the size of the hole; to adjust the ventilation efficiency, it must have dampers.


Step 1. mineral wool insulate the planes of the hole, carefully insert the air duct into place. In order to firmly fix the pipe in the desired position, use mounting foam. Excess foam that has come out should be cut off after hardening.
Step 2 If there is waterproofing between the sheathing and the wall, foam the gap between the wall and the hole in the sheathing with foam, it will seal the cut and prevent water from entering the wooden structures.


Step 3 Fasten the gratings, the method of fastening depends on the material of manufacture of the wall cladding and the crate.


Check ventilation with a smoldering firebrand or other source of smoke. Bring it to the inlet and observe how and at what speed the air flows in the steam room.

In the photo, the air inflow valve and its performance check
Experiment with natural ventilation at various damper settings, from maximum to minimum.
Video - Installing the KPV 125 valve
Video - Ventilation in a bath with a Termofor air conditioning oven