How to sheathe a house with clapboard from the outside: consistent work technology. Features and technology of lining walls with clapboard Is it possible to sheathe a house with clapboard
Building a house made of wood is a profitable solution for many reasons, but this material needs mandatory protection from the destructive effects of natural factors. One solution is sheathing. wooden house clapboard outside: this type of cladding will increase the durability of the house, while it will not affect the environmental friendliness of the building. The lining can have any color, so the sheathing will preserve the aesthetic appearance of the building.
What are the advantages of wall paneling for house cladding

The lining is a durable smooth panel made of wood or plastic, the sides are equipped with a system of spikes and protrusions that allow for a strong waterproof mount. Sheathing with clapboard on the outside of a wooden house will solve several problems at once: it not only protects the wood, but also improves some important characteristics of the structure. Sheathe wooden house clapboard will be beneficial for several reasons:
- This is a fairly durable material, if you take care of its protection from decay and insects. After treatment with flame retardants and antiseptics, the lining can last for many years, and if necessary, damaged elements will not be difficult to replace.
- It improves the thermal and sound insulation qualities of the house. In combination with modern insulation, this material will create a strong and durable protection against cold and street noise.
- The lining looks beautiful, and it will allow you to save all the aesthetic advantages of a wooden house. Natural material has a unique pattern that will look great.
How to choose the right material for exterior cladding
Sheathing a wooden house with clapboard has become a widespread option, but it is important to choose the right material, which will become a truly reliable solution. Its production is carried out by domestic and foreign manufacturers, the quality of imported products is usually slightly higher. The lining is divided into several classes depending on the quality of the wood; when choosing, you can focus on a few basic rules:
- The moisture content of wood should not exceed 15%. Otherwise, very soon, as a result of shrinkage, cracks will appear in the lining, which will significantly reduce its effectiveness.
- Boards should not be affected by the fungus, they do not have traces of wormholes. The owner of the house needs to check the quality of the material before buying, otherwise he will have to spend money on home repairs and a new purchase.
- The material must not have knots. Their presence is the most important negative factor that reduces the class of the material. Sheathing with eurolining of a wooden house increases the overall durability of the structure, so it is better not to save on the quality of the finish.
The choice on the market is quite wide: you can pick up lining from various tree species, but it is better to give preference to coniferous forests. The wood will be denser, and the high resin content allows it to successfully resist decay. Houses sheathed with wooden clapboard on the outside will look very nice if you choose the right material.
Cladding installation technology
The technology of sheathing a wooden house with clapboard is the creation of a multi-layer ventilated facade: such a finish combines insulation and protection from destructive factors. You will need to purchase insulation (usually mineral wool is used for a wooden house), as well as all auxiliary materials to create a frame and a waterproofing layer. How to sheathe a wooden house with clapboard?
The walls need pre-preparation. Before lining, they must be treated with an antiseptic, as well as flame retardants to protect against fire, in addition, log house it is necessary to caulk. When the walls are ready, it will be possible to clad the house:
- A vertical frame made of thin timber is stuffed onto the walls, the correctness of its location is checked by a plumb line. The distance between the frame elements should be slightly less than the width of the insulation, this will allow it to be tightly fixed so that there are no gaps.
- A waterproofing film is installed on the heat-insulating layer. It is better to purchase a modern membrane that will allow water vapor to pass from the house to the outside, but retain moisture from the outside.
- A second layer of sheathing is nailed over the frame, which will create a ventilation gap. It will provide effective ventilation of the insulation.
- We sheathe a wooden house with clapboard: the boards are cut to length, after which they begin to be installed from the bottom up. The first board is positioned so that the spike is at the top and the groove is at the bottom. The lining can be attached to the frame with nails, screws or other fasteners.
Each next board is placed in the groove of the previous one, all walls are faced in the same way. The boards are fixed in the corners, after which they can be treated with antiseptic impregnation and painted.
The cladding will take on a neat appearance, and it will be reliably protected from various damaging factors. It is no coincidence that this material has become one of the most popular options; clapboard cladding is a beautiful and reliable solution that is ideal for a wooden house.
There are many types finishing works and ways to improve the look and feel of your home. One of the solutions is lining the house with clapboard!
The stages of this work, which includes the choice of material and stepping actions, you will find by reading this article.
Variety of lining
What is a lining? It's long wooden plank, ready for use after numerous woodworking jobs. The thickness of such a board is usually no more than 20-22 cm. This is a standard lining, but there is this species material, but already consisting not of wood, but of plastic (plastic lining).
Each of the proposed materials is undoubtedly practical and each is endowed with its own qualities and advantages.

Let's talk about plastic outer lining!
- The artificial material that this lining consists of does not rot, which means that this material is very durable!
- The smooth surface and special composition of this product is not exposed to the aquatic environment, which means that it has water-repellent properties!
- And since we already talked about water repellency above, it's time to say that this material is the best in caring for it, which means it is very easy to wash (clean).
- The service life will also please you very much 25-30 years - this is very decent!
Let's talk about the usual classic wooden lining known to everyone!
- Good appearance, you can safely sheathe your house or interior with it!
- If your house is located in close proximity to the highway, railway or a noisy enterprise (institution), then, of course, best material in soundproofing - this lining!
- The low thermal conductivity of this material will help keep your home warm in winter and cool in summer.
If you decide to choose the second type of lining, then you should know that it can be of several types! These species differ only in the place of production (Russia, Europe). Because of this, the price of this product also varies! The one made in Russia is much cheaper, has simple design, and the European one is complex in geometric design and made of more expensive materials, and therefore more expensive.
When choosing a lining, you must be extremely careful
- Pay attention to humidity, if it is less than 8-15%, then this will lead to drying out of the material and significantly reduce the service life.
- It is also worth looking at the number of different knots and notches, choose those boards that have much less of this flaw!
- If you see small black or blue dots, then you should refuse such material, because it has undergone fungal infections!
When choosing, consider what kind of wood this material is from; undoubtedly, coniferous material will be the best!

Let's proceed to the stages of cladding work
- vapor barrier
- Attaching the frame for the vapor barrier
- Installing a vapor barrier in this frame
- Fixing the vapor barrier
- Installing the second frame
- Exterior lining

First step
Vapor barrier can be several materials (roofing felt, polyethylene film, aluminum foil).
the main task this stage work to create ventilation of the facade of the house using a film. To do it correctly, you need to attach narrow (2.5 cm) slats to the house at a small distance from each other (usually they are attached at a distance of about a meter). With the help of a stapler, the vapor barrier layer itself is attached. And to ensure the ventilation itself, it is necessary to make small cuts (they are made below between the rivers)
Second phase
From small boards we make a frame for thermal insulation. The boards are attached to the wall vertically on their side, the distance between which we attach the boards should be slightly less than the insulation that you purchased.
Third stage
When installing thermal insulation, it must be taken into account that the layers of wool should not have any gaps between them, lay the sheets in two layers, and close the joints of the first layer with the second. The frame was made a little smaller because the thermal insulation itself will be located in the frame without special fasteners (on its own).
Third stage
We install waterproofing on top of the thermal insulation, in the form of a special film. It keeps moisture! This film, like thermal insulation, must be laid in two layers, also fix the joints with adhesive tape, and attach the first layer with a stapler. Please note that the film must be laid with the rough side to the lining.
Fourth stage
The next frame is attached to the boards of the lower frame, on top of all insulating coatings. Leave a small space between the new slats and the waterproofing layer to allow condensation to escape.
Nail a metal mesh to the bottom of the remaining space to protect against various pests.
Fifth stage
Now we cover with clapboard! It's worth starting from the bottom. The first board should be placed spike down. Be sure to check its horizontal level.
Fasten with nails.
The next board should be firmly installed with a blow into the groove of the previous one. We fix it. Let's continue to do the same!
When the entire lining is installed, you must nail the boards vertically at the corners of the house, overlapping one on top of the other. We also make platbands for doors and windows, and only after all the work is completed, start painting! You can use a special liquid (impregnation), it will protect the facing layer from external influences. But sand your home before painting.
As you can see, this type of work is not difficult at all and you do not have to put in a lot of effort!
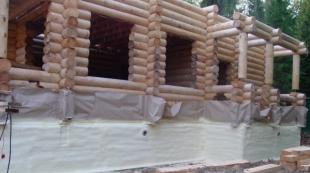
In the photo - the beginning of work on sheathing the house with wooden panels
Clapboard sheathing on the outside of the house is an excellent choice for those who decide to improve the exterior of the house, since such a finish will allow you to change it external design. In addition, the use of eurolining as sheathing material will improve the properties of insulation, in particular sound and heat.
This article will tell you not only how to sheathe a house with clapboard from the outside, but also help you choose the right material.
Types of panels by raw material
In total, there are two main types of lining, depending on the feedstock - wooden and PVC. It is possible to talk about which option should be preferred, and, only by studying their features.
Features of plastic outer lining:
- long service life (no decay process);
- no need for care;
- external plastic lining is not affected by the environment.
Features of wooden lining:
- elegant design;
- high levels of sound insulation;
- thermal conductivity is low.

Wooden lining, also known as lining for exterior finish, can be divided into a simple variant and . The separation takes place taking into account the use of estimated data for comparison with generally accepted standards.
The main standard for the production of this material is GOST 8242-88, abroad DIN 68126. At the same time, import indicators are somewhat different from Russian ones due to the external indicators of wood, more deliberate geometric properties, which cannot but lead to the fact that the price of the material is significantly higher.

The basics of choosing eurolining
Before you start choosing a material for sheathing, you should study a few rules:
- To avoid further deformation of the material, which occurs as a result of shrinkage and leads to the formation of cracks, you should choose the type of lining, the humidity of which will lie in the range from 10 to 15%;

Tip: Ask the seller to confirm the declared humidity - if he refuses, there is reason to think about the advisability of buying.
- Be sure to inspect the material for wormholes and foreign spots;
- The number of knots in the selected material should be minimal.
Note! Sheathing the house with clapboard on the outside should be made from a material created from coniferous species, since hardwoods (not counting aspen) are not suitable for external sheathing.

Installation stages
- Vapor barrier fasteners;
- Installation of the frame itself;
- Installation of thermal insulation;
- Carrying out waterproofing;
- The construction of the frame of the second;
- Exterior lining .
Vapor barrier fastener
Initially, you should choose a material that will act as a vapor barrier, usually roofing material is used for this purpose, aluminum foil or even ordinary plastic wrap.
When starting a simple painting, you should observe some nuances:
- The entire surface is pre-treated grinder. It requires the presence of fixed sandpaper (grain 40-25-80 or 120);
- In the case of using oil paint, it is necessary to apply drying oil in two layers, and apply the paint only after it has completely dried.
Results
Despite the fact that everyone can take advantage of the opportunity to sheathe a house with clapboard from the outside, this process requires certain physical and time costs. Great analogue wooden finish there will be a plastic outer lining.
On our site you can find a large number of videos that allow you to take out some valuable tips and step-by-step instructions.


The only logical option for finishing a log house or log house is wood paneling. Of course, the walls of the bathroom and the bathroom can be partially or completely tiled, and at the sink and stove of the working triangle of the kitchen, an apron can be made of tiles, but no more. All other surfaces must comply with the general style. And the most common way is to decorate the walls with clapboard in a wooden house. The installation itself does not take much time, and the choice of wood species and panel profiles is very large.

The interior decoration of a wooden house with clapboard fits organically into the rustic style
Lining grade
Under the general name "lining" in the catalogs of manufacturers and sellers there are at least a dozen varieties of wooden sheathing boards. And since there is no single standard, and each domestic manufacturer works according to its own specifications, then they all differ from each other in size and type of profile. Even in determining the grade of lining according to the quality of wood and the cleanliness of surface treatment, there are certain "liberties" of interpretation.
Important! Determine which lining is best for interior decoration at home it is necessary only on the basis of their own ideas about class and quality. "Premium" or "extra" - this is from the evil one. With such high-profile names, sellers are simply trying to attract a buyer.
According to the "old" domestic GOST (for profile parts made of wood), there are two grades. They conventionally divide products into "transparent" and "opaque" coatings. In fact, there are two varieties - I and II.
Eurolining (which is not necessarily brought from Europe) must comply with the European standard DIN 68126, and there are three grades - A, B, C.

The prefix "euro" does not mean high quality at all - there is also a second grade
The choice of lining
Conventionally, the entire range of lining can be divided into four large classes:
Domestic profiles. The simplest is a quarter board. It is rarely used, since there is no convenient “thorn-to-groove” connection. The profiles “standard” and “collective farmer” (“calm”) are more common. In the first case, at the ends of the front panel, the chamfer is standard (at an angle of 45°), in the second, it is rounded.
Eurolining. Differs in a deeper groove and the presence of a "shelf" in front of an elongated spike. There are also two versions: the standard eurolining has beveled chamfers on the front surface, the “soft line” has rounded ones.
timber imitation. By the type of profile, this is a typical “standard” lining, but only more powerful. And although there is overlap at the boundaries of the size ranges, the difference lies in the purpose. Imitation of a bar is used when it is necessary to preserve the style of a "bar" house during finishing. Therefore, this type of panels is mounted mainly horizontally (and the lining is more often vertical).

Imitation of a bar is wider, and it completely repeats the laying of its "full-length" counterpart
Block house. The scope of application is the same as that of the imitation of timber. But in this case, the front surface of the panel has an oval profile, which, during installation, repeats the relief of the wall made of logs. For interior decoration choose the thinnest panels. They are mounted exclusively horizontally.
If the lining of coniferous wood is mainly allowed to finish the facade, then for the interior the choice is much wider. In addition to the "popular" pine or larch, you can find offers for the sale of lining made of cedar, oak, linden, ash and even exotic overseas species.
For living rooms there are no restrictions on operating conditions and humidity conditions. The only room where high humidity and wet conditions are dangerous for wood is the bathroom. In this case, it is better to use a lining with factory processing - the usual technology of "staining" with antiseptics protects only the top layer, and vacuum impregnation at the factory makes the wood in the "mass" invulnerable to moisture and fungal attack, including from the wrong side. One more modern version"factory" protection - heat treatment of panels.
Good to know! Impregnation is one of the most effective methods impregnation, since during the process of impregnation, air is removed from the pores of the wood, and an antiseptic solution is “pushed” into its place under pressure.
There are also such types of lining profiles as “land house”, finca and a whole subspecies of “wooden wallpaper”, which differ from ordinary lining and eurolining by the complex relief of the front surface. It's decorative wooden panels, which are used in doses - for finishing small areas.

Lining "brick" has a relief similar to brickwork
On our website you can get acquainted with the most popular projects of wooden houses from construction companies presented at the exhibition of houses "Low-Rise Country".
Technology
The clapboard decoration inside the house can be decomposed into several main stages: preparation, installation of the crate, fastening of the panels, installation of additional profiles.
Preparation and installation of the crate
Clapboard lining internal walls wooden house is on the crate. And this is one of the few opportunities for hidden laying of electrical networks. Of course, you can run cables and wires under the floor surface or in the attic along the ceiling, but the vertical sections to sockets and switches must be pulled along the walls. And this is not a brick or building concrete blocks- it is very difficult to cut a channel in a log or beam of an already standing house, especially considering the constant "breathing" of a wooden house.
And here the main thing is to properly lay the cables and install the sockets. The peculiarity of a wooden house is that all power circuit cables with hidden wiring on a combustible base must run in metal pipes (steel or copper). These are the requirements of the PUE. And the wall thickness should ensure the localization of the cable in case of a short circuit - the pipe walls should not “burn out” from the arc. Therefore, neither plastic nor metal corrugation is suitable here.

As an alternative to hidden wiring under the lining - retro style with open wiring on ceramic insulators
On our website you can find contacts of construction companies that offer home insulation services. You can directly communicate with representatives by visiting the exhibition of houses "Low-Rise Country".
The first stage of preparatory work - pipe laying, installation metal boxes for sockets and switches. And already based on the diameter of the pipe and the height of the boxes, they choose the cross section of the beam for the crate.
The lining must be delivered in advance so that the wood can adapt to the operating conditions. Usually they are kept for several days, even if the wood is seasoned and has its own normalized moisture content.
Necessarily! If the lining is packed, then it must be unpacked.
During this time, the timber for the crate must be treated with an antiseptic.
The next step is marking under the crate. The lining is usually mounted vertically, and the block house and timber imitation are horizontally. The crate is made perpendicular to the panels.

Combined wall decoration with clapboard in a wooden house
Note! Sometimes the lining is laid diagonally. In this case, the crate can also be made vertical, but with a smaller step.
The step of laying out the lathing beam depends on the thickness of the panels - the larger it is, the wider the step. The recommended layout range is 50-80 cm. And a specific value is chosen such that from corner to corner the crate bars stand at approximately the same distance.
Video description
Concisely and accessible about the three main mistakes of the preparatory stage is described in the following video:
Installation of lining
Finishing the house with clapboard in each room starts from the corner that is “in plain sight”. At this point, both walls should converge in equal, and preferably whole, panels. But if the skin ends in a very narrow strip at the other corner, then it will look unattractive. Therefore, before starting installation, it is necessary to calculate the number of whole panels and the width of the "remainder". If it turns out to be narrow, then the installation must begin with a trimmed panel.

Along the perimeter of the sheathed plane, it is necessary to leave small gaps to the adjacent surfaces
The first panel has a groove from the corner outwards. If the panel is intact, then with a spike in the corner. Fastening to the crate from the side of the spike is carried out with thin nails, which are driven in at such a distance from the corner that their hats can be covered with a decorative corner.
From the side of the groove, the lining is attached to the crate with clamps.
The next panel is inserted into the groove of the first. If they are lining a bathroom or a bathroom, then they do not drive it to the end, leaving 1-2 mm to compensate for changes in size with fluctuations in humidity.
Video description
The whole sequence of work is clearly shown in the video:
Important! It is also impossible to butt-join lining panels for interior decoration of a seasonal residence.
Features of interior decoration with block house and timber imitation
Only thin and narrow panels of this type of lining can be mounted on clamps, other sizes are mounted on nails or self-tapping screws. But if a wooden house is a seasonal residence, and in winter there are “arrivals” in it, then in any case it is better to choose traditional mechanical fasteners.
There are two options for fastening with screws:
open method- for "thick" panels;
through the base of the spike, or hidden method (for panels of medium thickness).

Fastening through the base of the spike is more difficult, but this method is the most reliable for thick panels
To decorate the corners of a block house, one of four methods is used:
washed down the panels at an angle of 45°;
through the bridging bar with a side equal to the thickness of the panel in the wave;
with a wooden corner or two boards connected by an angle;
panel fit on one side of the wall under the profile of the other wall, but for this the layout is shifted relative to each other by half the width of the panel.
It is the last docking option that allows you to get the most reliable imitation of a room inside a wooden frame made of logs. Although the execution of a figured cutout will require some skill in marking and fitting. And it will take longer.

This method of designing corners requires precise marking and jewelry ownership of the tool.
Conclusion is a last resort...
There are also options for finishing a wooden house: slatted panels made of fiberboard and PVC. But they are used extremely rarely - only in case of urgent need to make repairs at the lowest possible cost. Fiberboard tolerates high humidity worse, and the laminated surface is easily damaged. Plastic lining in a wooden house will naturally look only in the bathroom or bathroom.
02.12.2016 0 commentsEvery person wants to live in a comfortable, beautiful house. Therefore, thousands of our compatriots prefer to use lining. Finishing a house with clapboard has a number of advantages. Relatively inexpensive, durable and at the same time beautiful material will become good choice for residents of regions with different climates. It is important that it is not necessary to use the services of professionals, giving them a lot of money for their work. Each person can do the lining of the house with clapboard outside with their own hands - it is enough to study the theory and have a minimum set of tools.
In contact with
classmates
How to choose a lining?
 Going to the store, decide in advance which lining you need - wooden or plastic. These types of lining have certain advantages and disadvantages. For example, plastic has a lower cost and does not dry out, which could cause cracks. Also, high humidity will not lead to the fact that the facade of your house will be decorated with mold spots. On the other hand, wood is better tolerated by low temperatures inherent in many regions of our country, and ultraviolet rays do not cause it to become brittle. Therefore, only you can make the final choice.
With a choice plastic lining problems usually do not arise - the manufacturing technology has long been verified, and the main thing here is not to make a mistake with the choice of manufacturer. With wood it's more difficult. It is advisable to buy material with a moisture content of not more than 10-15%. Otherwise, over time, it will dry out and cracks will appear. Try not to have knots on the lining - they not only spoil the appearance, but also often fall out. And the holes in the facade decoration will not add beauty to it.
What tools are useful?
When the material is selected and purchased in sufficient quantities, it's time to collect all necessary tools. In order to successfully complete the job, you will need:
- screwdriver;
- drill;
- saw;
- mallet;
- level;
- screwdriver;
- pliers;
- marker.
As you can see, all materials can be purchased at any store or borrowed from friends. There is nothing highly specialized or worth a lot of money on the list. When all the necessary tools are collected, you can start lining the house with clapboard from the outside.
The sequence of operations for sheathing a house with clapboard
Before starting work, you need to know what the scheme of the future design looks like.

Scheme of the correct pie for lining the house with clapboard.
Preparatory work
As with any other construction work before you start lining the house with clapboard, you need to prepare the base. If you are sheathing a wooden house, then make sure that it does not have weaknesses- affected by mold or rot. Otherwise, take action by treating the walls with a special antiseptic.
Regardless of the material of the walls, thoroughly clean them from dust and dirt. All cracks must be carefully caulked and covered over - even tiny cracks can cause serious heat loss in winter. And removing the lining to eliminate the gaps is a huge amount of unnecessary work.
The wall should be perfectly flat and as smooth as possible.
Let's take care of the insulation
IN  residential areas are always humid. And moisture will inevitably, even through the smallest pores, partially seep into the street. And a layer of heat-insulating material is usually placed under the lining. If it gets wet, then its properties will drop sharply, and it itself can quickly become unusable.
That's why it is extremely important to ensure good ventilation and protect the thermal insulation layer from moisture. It is best to use roofing material for this - a durable and durable material. But it's not cheap, and big weight can cause some trouble during installation. So, you can also use thick construction polyethylene - less reliable, but cheaper and easier to install material.
Wooden bars are installed directly on the wall. Optimal distance between them - 1 meter, and the cross section of the bars - 2 × 2-3 × 3 centimeters. This will provide a gap between the wall and the heat-insulating material sufficient for ventilation. The selected material is attached to the bars. Make sure that there is also a gap at the bottom and top for ventilation. After that, we can assume that the vapor barrier has been successfully laid.
Working on the frame
 The next important step is the frame. It is necessary for comfortable and easy installation of thermal insulation. When installing, it is best to use boards 3-4 centimeters thick and at least 10 centimeters wide. Boards are fixed vertically. The distance between them should correspond to the width of the insulation sheets, and ideally be 1-2 centimeters less. This will provide the most reliable fixation, and at the same time will not exert too much compression, which could lead to a significant deterioration in the thermal insulation qualities of the material.
The boards must be carefully leveled with a level - even small irregularities will be especially noticeable after clapboard lining. In addition, it is very important to choose high-quality boards. Under no circumstances take the material high humidity. When dried, it can be seriously deformed, which will lead to the destruction of the lining or, at least, deterioration appearance Houses.
Laying thermal insulation
 High-quality thermal insulation is especially important in our harsh climate. Any material can be used here, but most people prefer mineral wool, which is cheap, easy to install, and durable.
Laying starts from the bottom. Inserted between two boards, cotton wool sheets are securely fixed and do not need additional fastening. The next layer is laid directly on top of the previous one. Here it is very important to ensure that there are no gaps between the sheets - even a gap of half a centimeter can cause serious heat loss, especially on windy days.
Don't forget waterproofing
In order to reliably protect thermal insulation, which in most cases is afraid of moisture, from snow, rain, fog and simply high humidity, you need to take care of reliable waterproofing. It is best to use a special waterproofing film - it allows the materials to "breathe", but at the same time reliably protects it from moisture.
Installation does not take much time - the film is laid on top of the heat-insulating material and fixed on the boards with staples or nails. To ensure maximum reliability, it is advisable to make a small overlap (5-10 centimeters), and glue the joint with a wide adhesive tape. Moreover, film needs to be installed smooth side inside, and rough outside– many non-professionals do not know this.
Let's start upholstery
 Everything preparatory work completed, and now the most important stage begins - lining the walls with clapboard.
It is advisable to prepare the lining in advance - adjust the material, and if necessary, cut it into pieces of a suitable length. The first board is mounted horizontally at the very bottom, with the groove up. Use a level to lay it perfectly even. It should be fixed directly on the frame. To do this, you can use both ordinary screws and kleimers. The second option is more troublesome, but if necessary, to carry out dismantling (to replace thermal insulation or for other reasons), the lining will definitely not be damaged.

Ways of fastening lining.
Next, the lining is installed from above so that the spike enters the groove. To completely eliminate the gaps, you need to use a mallet - light blows along the entire length will allow you to fit the lining as tightly as possible. At the joints, the lining must also be adjusted as tightly as possible so that the gaps are minimal. This applies to both joints on the walls, and at the corners, with perpendicular laying. Only with careful fitting will you ensure maximum attractiveness of the exterior decoration of the house.
Now, knowing how to sheathe a house with clapboard from the outside, you can do all the work without unnecessary difficulties.
In contact with