Make a jig for drilling holes. How to make a furniture conductor with your own hands? Device for drilling holes for dowels and confirmations
The main fastener in the assembly of furniture is confirmat. It is screwed in with a pre-drilled hole. It is the drilling of assembly holes in chipboard for confirmations that we will consider in this article.
To assemble chipboard parts, we need:
- screwdriver
- Bat for confirmations
- Ruler or tape measure
- Pencil and awl
Hole depth and width
When usually used confirmat size 6.4 * 50. Because the diameter of the thread is 6.4 mm, and the diameter of the body of the confirmation is 4.4 mm, then for high-quality fastening of parts, the diameter of the hole should be in the range of 4.5-5 mm and a depth of at least 50 mm.

If the thickness of the hole is more than the specified one, the confirmation will not hold the parts well, if it is less, it can break the chipboard with its thickness.
For drilling, a confirmation drill with a diameter of 4.5 mm is used, which is equipped with an additional head for drilling an enlarged hole for the neck of the confirmation, which also makes a countersink for its head.

Of course, you can use a conventional drill with a diameter of 5 mm, but for high-quality fastening in the hole, you will additionally need to make room for the neck of the confirmant and his hat.
To perfectly fasten two parts, it is necessary to mark the places of their attachment as accurately as possible.
On the part that will be superimposed on the end (the one on which there will be a through hole), you need to make two measurements - along the length (usually 5-10 cm) and from the edge - exactly 8 mm (this is if the plate thickness is 16 mm).

On the part that lies perpendicularly, we mark the drilling point at the end. Here you need to maintain the same distance in length (5-10 cm from the beginning), and in width - strictly in the center (8 mm from the edge).
Marking should be done as accurately as possible, especially along the length, because. if the layout is incorrect, your parts may have extra gaps or protrusions when docking.
It is better to make a through hole in the first part, attach it to the second one - and immediately mark the place of drilling at the end of the second part with a drill. And then, separately already, calmly drill a hole.
We make a hole at a distance of 8 mm from the edge.
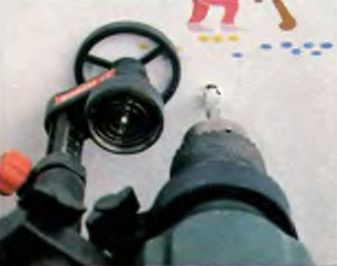
The drill must ALWAYS be held strictly perpendicular to the surface.
Before you make a through hole, place a piece of unnecessary chipboard under the part. This will prevent chipping on the back.

When the through hole is made, to drill holes for the neck and the cap of the confirmation, the part can be drilled on the fly.


The main rule is that when drilling at the end, the drill must be strictly perpendicular to the end of the part. If you don't hold the drill straight, the drill may go sideways and come out, ruining the part.
When drilling, you need to pull out the drill several times so that chips do not clog in the hole.
This option is considered the most accurate and, moreover, the fastest. But in order to make a hole in two parts at the same time, you will need to fix them before drilling. This may require special clamps, clamps and other devices.


Hole drilling accessories
In order not to mark 8 mm from the edge both into the layer and along the end each time, you can use a special device, which, by the way, is easy to do yourself.
It is a kind of wooden template with a metal sleeve for the drill inside.
It looks like this, see the photo:


And this is more professional stuff:

Watch a short video on precise drilling of holes in chipboard for confirmations and assembly of furniture parts:
Dowel drilling
The hole for the dowels is made with an 8 mm drill. Also, in order not to drill through the part, it is advisable to equip it with a depth gauge.

At the end, we drill with the same drill to a depth of 20 mm. Do not forget that during any work, the drill must be strictly perpendicular to the plane of the part.
Of course, if you took a drill in your hands for the first time in your life, you will not succeed very well. But this lesson can be learned pretty quickly.
Sometimes at home you need to make holes in blanks for wood, metal, chipboard or other material.
Swivel
Bushings are provided on the body of the device, which regulate the axes of rotation in the horizontal, vertical and inclined planes. These models of conductors are designed for drilling cylindrical products.
sliding
The name speaks for itself, the conductor is not attached in any way, it is simply applied where a hole needs to be made.
Tiltable
Able to make holes in several planes.
Stationary
They do not have rotary elements, they are able to move the part and process the same type of workpiece.
Universal
These conductors have such a function as readjustment. This allows small enterprises to quickly and conveniently switch to the production of a new product.
Description of conductors
Let's start with the concept of conductor- this is the so-called template, the use of which allows for comfortable and ultra-precise drilling.
Moreover, drilling can be both perpendicular to the surface, and at any angle. If you use a conductor, then you do not need special qualifications, do complex calculations, make markings where there will be holes, which saves a lot of time.
Applications
As we can see, due to the versatility and simplicity of their design, conductors are widely used in different areas activities.
mechanical engineering
In the mechanical engineering industry, they are used to drill holes in various workpieces made from common materials. Conductors are used that repeat the drawing with exact observance of all dimensions. It is also used when drilling of mixed type holes is required.
Furniture manufacturing
Conductors received the most important distribution in furniture production. Furniture conductors are used to install fittings, assemble furniture and many other technological processes.
At the same time, furniture assembly is neat, accurate and fast. A large amount of furniture contains dowels, which must be installed very accurately and here without a conductor there is nowhere.
The most common jig for dowels is doweling. They mainly use overhead conductors made of lightweight materials.
Construction
Another area in which conductors are widely used for drilling holes is construction. With their help, drilling of technological holes in building structures, for example, .
Main benefits of using
You can buy a conductor or make your own.
But before choosing a model, you should decide for what tasks it will be used, and based on all this data, you should choose the type and design of the tool.
So why should you use jigs for drilling holes:
- Intuitive use that does not require professional skills.
- The low price of the device, as well as the possibility self-manufacturing.
- Saves a lot of time.
- On the surface to be treated, it is not required to apply markings with.
- Drilling precision.
A jig for drilling holes is an integral part of not only production, but it will also be useful in home life.
How to make a conductor with your own hands
Since there are many types of conductors, we will consider original design and analogue, respectively. So, let's begin.
Jig for perpendicular drilling
Its main purpose is to obtain holes in thick workpieces at an angle of 90. In fact, it is a set of bushings combined in one body. Usually these are overhead conductors, which are widely used in the assembly of furniture.
It is worth attaching the device to the surface and you can immediately start drilling, without punching. There is one minus, the device should be held tightly, and especially at the beginning of work. Because from vibration, the fixture can move.
This type of conductors, you can do it yourself.
- As a basis, you can use a wooden block, a piece of textolite, reinforcement with a square section of 10x10 mm.
- We process the surface well, clean it and proceed to the marking.
- It should be noted that the center of the holes should be located at 8 mm. from the edge of the workpiece. This is due to the fact that 8 mm. this is half the thickness of the sheet.
- According to the standards, there should be exactly 32 mm between the centers of the holes.
- After that, in these centers we make holes with a diameter of 5 mm.
A home-made jig can be used, but for more convenient use, an emphasis should be designed; for this, metal with a width of 23-25 mm is used. and 1 mm thick, after which the sheet is bent at an angle of 90 and attached to the conductor. Also, bushings of different diameters can be inserted into the base of the conductor.
Jig for pipes and cylindrical blanks
Everyone knows that making a hole in a sloping surface is problematic, the end of the drill constantly jumps off. This type of conductors is fixed in a predetermined position and allows you to work with high accuracy.
This type of conductors can be done quickly and independently.
- To do this, we need a bar of hardwood, loosened diagonally. And we attach a piece of plywood to the edge of the bar using self-tapping screws.
- Then we make holes of the desired diameter in a wooden bar.
That's all the conductor is ready to go. In order for the holes to break less, they can be reinforced with metal sleeves, which are made from round pipes of different diameters.
Angle drilling jig
This type of drilling is rarely used.
It should be noted here that in metal products this type of hole is made only with a cutter. As for wooden products, there are turnkey solutions in the form of kits.
It is easy to use these conductors, we press the workpiece tightly to the base, set the given height and as a result we get even and beautiful oblique holes at an angle. Yes, if we do not need a through hole, then it is unforgettable to put a stop ring on the drill itself.
On your own this species devices are difficult and problematic to manufacture. Is there enough simple ways and variants, but they do not differ in accuracy. So, for example, a drill is placed on a prepared inclined surface and our workpiece is drilled at the angle obtained, as we understand the accuracy suffers greatly.
Jig for drilling holes for dowels
Their main purpose is to maintain the alignment of the holes, in the future, into which dowels will be installed. That is, when you apply the jig to both sides of the product, you get the perfect joint.
As you understand, this type of conductors can be made independently. If you have a stream of workpieces with the same geometry, it will be convenient for you to use an invoice template. It is desirable to use hardboard or other transparent material (plastic) as a template.
We mark and drill holes. It is advisable to hammer brass or copper tubes into the holes so that the drill does not break the calibration hole.
Universal fixture
When you use blanks various forms and sizes, you will need a universal fixture. The most interesting thing is that this device can be made from improvised materials.
- For this we need plywood, about 15 mm thick.
- We make three identical blanks.
- Along the edges we make holes into which dowels are installed as legs.
- We make one hole in the middle, which we reinforce with a metal tube.
- We make three metal strips with symmetrically arranged holes, they will serve as a shoulder. These shoulders are responsible for the linearity of the holes of the future conductor.
- We make cuts in plywood blanks and install metal shoulders, we fix everything. Our universal self-centering jig is ready.
Conclusion
Any universal conductor for drilling holes made to save time and money. And you make it yourself or buy it ready-made in the store, it's up to you.
Description and features of the device
The conductor is a bar with several holes and sleeves. Such a device is fixed to the necessary part, and then a drill is carefully inserted into the sleeve and a hole is made. To fix two parts, you need one jig, so that the fixation is reliable.
- drilling accuracy;
- ease and speed of creating holes.
It is worth noting that conductors are sometimes used in mechanical engineering, and not only in construction. Moreover, with the help of this device it is possible to make holes in cylindrical blanks and pipes. Also, the jig allows you to make perpendicular holes.
Main types of equipment
All conductors used in various industries, divided into several groups .
Methods and scope of the conductor
There are many ways to use such equipment. Naturally, the main area is considered building sector .
furniture industry
When assembling furniture, it may turn out that some holes are missing. It is for this reason that you will have to drill various parts with your own hands. To perform the work did not cause difficulties, it is necessary to use a conductor. This will make furniture assembly accurate and fast. The use of such equipment is really relevant if you do not have a drilling machine.
Although today there is large selection of accessories and fasteners, dowels are still often used in the furniture assembly process. They must be installed very precisely, otherwise the parts will be displaced. To avoid such an unpleasant consequence, you should use the conductor.
Pipe drilling
If it is necessary to prepare holes in pipes and various cylindrical workpieces, the use of a drill will not be best idea, since it often slips off, which means that the holes will not have the desired shape. To facilitate the work, you should use a universal conductor.
It should be noted that there is special equipment that allows you to perform perpendicular holes. and this is very important when processing rounded elements and edges of workpieces.
Purchased or homemade conductor?
 As mentioned earlier, such a product is indispensable in the process of assembling furniture. Some people make these devices with their own hands, while others prefer to buy.
Conductors are sold in almost any hardware store, however, finished products may not be suitable for specific purposes. It is also important to remember that the cost of the device depends on the purpose, size and manufacturer. Most simple options are inexpensive. which cannot be said about professional equipment with large quantity additional features.
Many consumers prefer to make a jig with their own hands. For this purpose, a metal sheet or wooden plank. Holes are prepared here, which will act as guides. In general, everyone will cope with such work.
Creating a conductor with your own hands
As already mentioned, you can make a similar product for drilling yourself. For this you need to prepare welding machine, grinder, drill and several locksmith tools. You will also need fittings. dimensions 10x10 mm .
- The workpiece is cleaned with sandpaper and markup is performed. According to accepted standards, the distance between centers should be about 32 mm.
- Next, the template holes are drilled.
- The next step is to create an emphasis. It can be a metal plate 1 mm thick. It is carefully bent and a place for carving is prepared.
- Then both parts are carefully connected.
So that the process of drilling holes does not cause any difficulties, it is worth using a jig. Such equipment is indeed indispensable in the process of assembling furniture. You can buy it, but it's better to do it yourself, because homemade device exactly tailored to your specific needs.
Device for drilling holes at right angles.
When you make any kind of furniture for the home, there is always the task of drilling a hole in the piece at a right angle. And no matter how hard you try, the result is not very good. If the drilled hole is too "gone", then some distortion is possible when connecting the two parts.


It is very difficult to catch a right angle without using any special devices. Available for sale various devices to help the home master. But with the help of some devices, holes can only be drilled with a drill that has a seat for an additional handle, i.e. for cordless drills, such a nozzle is not suitable. Another type of right angle drill found on the market was more versatile and could have been purchased, but. Price. The price of such devices is exorbitant. For those people who more or less constantly make something out of furniture, the purchase of such a nozzle may be advisable. But for the average person who makes household items infrequently, the price is high. The device that the author of the article encountered in 2011 cost more than 800 rubles.
Therefore, when once again the opportunity arose to make another product from chipboard, it was decided to try to make an assistant from improvised materials. We took old chipboard trimmings.

And first they made a device for drilling holes in the end of the chipboard panel. Figured it should look like this

This thing will have holes with which it will be possible to more accurately position the drill, and it will be put on the end of the panel.

Before assembling the device, we made markings on it for three holes for Euro screws of different diameters.


We took three euroscrews with a diameter of 5mm, 6.3mm and 7mm. And under them holes were drilled 3.5mm, 4mm and 4.5mm, respectively.


Collected the final piece. Drilled holes for one holder and attached it.

And then drilled holes for the second holder. When drilling, a piece of chipboard was placed between the holders in order to more accurately drill holes for the second holder. Since a home-made device should “sit” on the end of the panel very tightly and not play.


Assembled device.

This fixture is only for drilling holes at a right angle in the end of the panel. And in order to position the drill and more or less clearly drill a hole on the plane of the panel from a small piece of chipboard, they made another device. Just in a piece of chipboard, they also drilled 3 holes 3.5mm, 4mm and 4.5mm.


And now about how it is thought to drill holes at right angles with the help of newly made "helpers".
We make the markup on the panel. We pass the drill through the device and outline the hole.

After marking, we lower the device completely onto the panel, with its help we position the drill at a right angle and start drilling.

By the same principle, holes are drilled in the end. We passed the drill through the end assistant, marked the hole, pressed the device tightly against the end, and began to drill.

Other materials of the section:
Drilling at a right angle
According to statistics, an electric drill is the most common power tool in the household. However, carefully drilling a hole is not so easy. It is even more difficult to make holes at a right angle or at an angle. It is no coincidence that people invented drilling machines. But buying such a bulky device for the vast majority of home craftsmen does not make sense. In addition, it is not convenient to drill holes in every detail on a drilling machine. For example, attach a long board, or a furniture panel under drilling machine not always convenient. And I want to drill for sure, so as not to spoil appearance future product. Many people, I think, have come across a situation where you mark holes on one side of the board, drill it, everything seems to be smooth, but as soon as you turn the board over, you are horrified, all the holes are awry.
In order to drill at the right angle, various devices are used that allow you to accurately guide the drill. Not all such devices are equally convenient, but with their help it is possible to achieve incomparably best result than without them. I believe that if there is a drill at home, then at least one of these devices should also be available. Everything without him beneficial features and the capabilities of the drill cannot be fully utilized. Unfortunately, such necessary devices are rarely found on sale.
The most painful places of such devices are that they have backlashes and with their help it is not always possible to smoothly guide the tool. Accuracy also suffers from this. In addition, when holding a drill in one hand, the sole of the device must be pressed against the working surface of the part with the other hand. If the combination of a drill and a device is perceived in the hands as a whole, then it is pleasant to work. When there is no such feeling of solidity, then discomfort arises, and more effort has to be made in the course of work.
Taking into account practical experience, I want to offer, in my opinion, a fairly successful and simple design of such a mobile drilling device. Instead of a handle, the device itself is attached to the drill. Its base plate has a rubber outsole for better traction. The rotary die, parallel to which the drill moves, can change the angle of inclination from 90 to 45 degrees. Fixing the selected angle is very rigid. It is secured with two screws. If you want to drill at a smaller angle, then you need to unscrew and remove the handle so that it does not interfere. With the handle removed, the device folds up so that it takes up little space and is convenient for storage. Moving the drill along the die is provided by moving a wide and fairly long plate in the grooves. The length and width of the plate significantly reduce the likelihood of jamming and ensure smooth movement. The grooves can even be slightly lubricated with silicone grease to improve glide. The top spring is much stronger than the bottom one. This provides a smoother "click" of the drill. The lower spring performs the function of stretching, so that the structure dangles less. In a word, everything can be seen from the above diagrams.
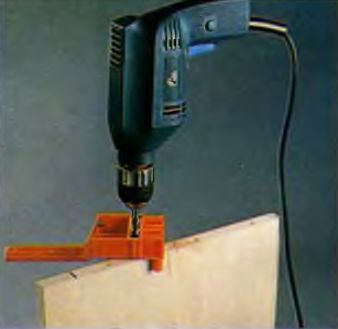
This holder is designed for drilling holes in edge boards, see.
Furniture jig for drilling holes: types, DIY
Accurately and efficiently make holes in products made of natural wood, chipboard, MDF, metal and other materials, such a convenient device as a jig allows. Such a device, in particular, is actively used by specialists involved in the production of furniture. At the same time, the conductor can be either purchased in serial execution or made by hand.

Universal slide-type jig for drilling holes for euro screws and dowels
Design features and types
The jig, in fact, is a template for drilling holes, allowing them to be made as accurately as possible. It is also used to create holes, the axis of which is perpendicular to the surface of the part, and for drilling at an angle.
Due to their versatility and simplicity, drilling jigs are actively used in various fields. In particular, in the engineering industry, they have long been successfully used for drilling holes in workpieces of various configurations and made of different materials. It is impossible to work without a conductor in the furniture industry, where such a device is actively used when assembling furniture, installing accessories on it and performing a number of other technological operations. Construction is another area where conductors find wide application. With their help, in particular, they drill holes in building structures. Jigs are also needed for drilling pipes and other tasks.

Even a simple fixture in the form of a bar with an emphasis greatly facilitates and speeds up the process of making holes of the same type.
As a furniture conductor, overhead models are most often used, made of lightweight materials, so that it is more convenient to manipulate them. You can purchase such devices in the factory version or make a furniture conductor with your own hands. Qualified furniture makers may not use a jig to drill a hole in furniture construction elements with high quality and accuracy, but for this they must have extensive experience in their field.
The most significant advantage of the jig is that with its help, even a person who is not highly qualified can perform high-quality and accurate drilling of both a perpendicular to the surface of the part and an inclined hole. The use of conductors eliminates the need for complex preliminary calculations and marking the locations of future holes, which reduces the complexity of assembling a furniture structure and allows you to perform such work in a shorter period of time. Even a novice specialist can understand the use of a jig for drilling under dowels and for solving other technological problems.

Attachment jig with turret is suitable for drilling standard holes for dowels of any size
Before you purchase or make your own homemade jig, determine what tasks you need to use it for, and based on this data, select its type and design.
Among the conductors for drilling holes by type of construction and functionality a number of categories can be distinguished. Overhead
These conductors are called so because they are applied to the workpiece and fixed on it, or simply fixed by hand. By means of conductors of this type, in particular, holes are drilled in chipboard, MDF boards and other flat parts.
Such templates can be used to make holes on cylindrical parts. Conductors of this type are equipped with vertical and horizontal axes of rotation, which makes it possible to perform holes with their help at various angles.
These are fixtures that are especially relevant for small batch production, where the ability to quickly change over the equipment used is important. The conductor of this type is just endowed with such functions.

This universal jig is designed for drilling holes for minifix, confirmat, rafix and door hinge
These devices for drilling holes are required in cases where such a technological operation has to be performed in several planes.
Sliding and fixed
The sliding jig, in full accordance with its name, does not require fixing: it is simply applied to that part of the surface of the part where the hole needs to be drilled. Fixed jig devices, although they are more convenient, somewhat limit the freedom of action of a specialist, which is especially critical when performing drilling work on machines equipped with only one spindle.
Areas of use
Furniture conductors and templates are devices that are practically indispensable when assembling furniture structures. The use of jigs avoids the main problem that occurs when drilling holes - the drill enters the workpiece at the wrong angle. Correcting this error takes a lot of time and effort, and it is not always possible to fix it at all. The jig used for drilling holes not only allows the drill to be correctly oriented at the machining site, but also prevents the tool from going astray.
Devices such as furniture jigs and templates are used both in the manufacture and assembly of furniture, when it is necessary to make holes in the elements to be joined to accommodate fasteners. In such cases, a jig for dowels or a jig for drilling for confirmation is often used, without which it is not possible to make high-quality holes for fasteners. Such a device is indispensable in cases where it is required to make holes, including at an angle, in thin slabs (in particular, when making holes in chipboard or MDF).

The conductor for oblique holes is indispensable for the installation of hidden joints of panels and boards
When using a jig for drilling holes, the process of assembling furniture is simple and fast. Using such a device, holes can be drilled at any distance from the edge of the part, regardless of its width.
In modern furniture, dowels are actively used, which at the same time are quite an outdated fastener. That is why the jig for dowels (doweling jig) is used in the production of furniture structures. The main difficulty when using such fasteners is that the axes of the holes made in the parts to be joined have a right angle between them. Accordingly, such holes should be located strictly perpendicular to each other. Without the use of such a device as a jig for dowels, it is difficult to perform them.

A jig for making holes in the tubes will be a very useful tool for a home workshop.
Furniture production is not the only area in which conductors are used for drilling holes. Templates are no less often used in order to drill a hole in a pipe and other parts that have a cylindrical shape. Conductors allow you to make high-quality holes even in pipes of small diameter.
The size and principle of operation of modern conductors can be different. Some of the models of such devices are much easier to buy, and some are easy to make with your own hands. In favor of making a furniture jig for drilling holes with your own hands, the fact that serial devices, especially for universal purposes, are not cheap, also speaks.
Homemade conductor devices
The conductors of the simplest design, for example, those used to drill holes for confirmation, are relatively inexpensive, so many craftsmen are not puzzled by their independent manufacture and purchase serial models. Meanwhile, there are those who are even simple devices trying to do it by hand. The question of how to make a jig for drilling with your own hands often appears and, if necessary, drill non-standard holes.
To independently make a jig for dowels or a simpler jig for confirmations, you can use the drawings and videos on the Internet.

In the manufacture of the jig, perfectly precise drilling of pilot holes and hardening of the finished fixture will be required.
For the manufacture of such a device, of course, its drawing is required. You also need a minimum set of tools and equipment:
- electric or hand drill;
- a set of locksmith tools;
- Bulgarian;
- welding machine (for the manufacture of conductor fixtures of a more complex design).
The simplest homemade jig can be made from improvised tools and materials that are abundant in most home workshops or garages. The use of such materials, which include pieces of metal fittings, wooden blocks, metal plates, etc., can significantly save on the purchase of a serial model of the device.

Drawing of a home-made conductor for drilling holes for confirmations
Making a homemade jig for a drill or a single-spindle machine takes place in several stages.
- Square reinforcement with a cross section of 10 by 10 mm, using a hacksaw for metal or a grinder, must be cut into pieces of the required length.
- The centers of the holes to be drilled through must be 8 mm from the edge of the jig plate. It is at this distance that the center of the chipboard or MDF board is located, in which a hole is drilled.
- The step between the holes on the conductor in accordance with generally accepted furniture standards is 32 mm, while the diameter of such holes should be 5 mm.
- If you equip a homemade jig with an emphasis, then using such a device will be much more convenient. To create such an emphasis, you need a metal plate 1 mm thick and 25 mm wide, which is bent at a right angle and fixed on a ready-made jig made of reinforcement.
- After the structural elements of the homemade conductor are fixed with a clamp, they must be securely connected to each other using threaded fasteners.

Ready-made jig with swivel stops
To minimize the amount of dust generated when using a homemade conductor, its design can be supplemented with a half plastic bottle. Such a simple device can also act as a pallet in which the chips formed during the drilling process will be collected.
The method described above allows you to make the simplest home-made jig, which greatly facilitates and speeds up the process of assembling any furniture structure.
Attachments, nozzles and accessories for drills

Drill attachment - Malco Turboshear TSNS1 scissors. Able to cope with both slate and slate.
But did you know that a conventional drill can do much more than just drill? Its capabilities are significantly expanded by special attachments, nozzles and various devices.
Surely not every drill owner knows that it can not only drill holes, but also saw, mill, and even turn into lathe or pump for transferring liquids. Such an enviable multifunctionality of an ordinary electric drill is due to the abundance of a wide variety of attachments, attachments and devices. It is hardly possible to find another power tool for which there are so many attachments as for an electric drill.
Of course, the multifunctionality of the drill created by attachments is in no way able to replace the fleet of special professional tools (in terms of cleanliness of processing, accuracy and productivity). But at the household level, all the additional functions acquired by the drill will fully satisfy the needs of the home master.


The SC 165 quick clamp ensures fast clamping of the workpiece when drilling. The holder for a drill provides fast fixing of a drill and performance of stationary works. Can be rotated 360 degrees like vertical. Likewise horizontally.
The most widely represented drill stops. The simplest stop, mounted on the auxiliary handle of the drill (accessory set: auxiliary handle and stop with a metric scale), allows you to drill holes to the desired depth. With it, you will never accidentally drill through a workpiece or a thin partition.
Parallel stop more perfect, since it controls not only the depth of the hole, but also its verticality relative to the surface to be machined. This type of attachments is available for both construction (drilling in walls and ceilings) and carpentry (furniture) work. Attachment for construction purposes - professional and is a single unit with additional handle mounted on a powerful drill. Some models have a built-in dust extractor connected to a vacuum cleaner.

The simplest stop for a drill is an additional handle. It has an adjustable drilling depth stop (metric)

The professional stop is more reliable and has a convenient metric depth gauge scale.
Parallel stop, in addition to the depth of the hole, sets its perpendicularity. Model for working on vertical surfaces.

A dust extractor is also required for a drill. They are equipped with individual models of professional stops. Connect to a vacuum cleaner.
Attachments for carpentry structurally close to the racks of hand mills, but made less accurately and are intended only for home small jobs. And more is not required here: a drill is a low-speed tool (relative to an electric cutter) and does not provide high accuracy in surface treatment. The drill is clamped in a basket that easily moves along two vertical rails.
Attachments and nozzles for drilling at an angle It will allow you to drill a hole where it is simply impossible to approach with a conventional drill. Depending on the version and manufacturer, the drilling angle may be different. The most common nozzles allow drilling at an angle of 90º.


This attachment allows you to limit the drilling depth. provides a strict verticality of the hole and allows you to perform (appropriate nozzles) some milling work. This is especially important when making furniture at home: inserting furniture hinges, holes for assembly fasteners and dowels, or grooving. The stop can be equipped with various inserts for lateral drilling in round or complex profile parts. Some models of stops have a dust extraction device connected to a vacuum cleaner. But a professional will prefer a manual milling machine (same operating possibilities, but high surface finish and precision).
Of course, holes in parts can be made most accurately and quickly on a drilling machine. But also a drill equipped with drilling stand- guide attachment. shows excellent results. As a rule, such a stand is equipped with a convenient clamping vice (for the workpiece). The vise can be moved along the rack frame to the desired position.


The drill (almost any) is easily and quickly clamped in the “basket” of the rack and the drilling machine is ready to work. Its compact size, smooth feed and accurate metric scale make it a valuable asset for the small workshop.
A home master can get by with the simplest parallel stop: made of plastic, the dust localizes in itself.

Carpentry rip fence: Guide slot and inserts for lateral drilling in timber and round workpieces.

Removal of dust and sawdust in this attachment is essential. With it, the drill can already work as the simplest manual milling machine.

There are additional functional holes on the attachment platform, with which you can also install a side stop. In this case, the drill is able to perform all operations hand cutter e.g. select the groove evenly (with a suitable nozzle).
Can't help but arouse interest attachment to a drill that turns it into a wood lathe. The prefix is easily fixed on the table and the machine is ready. Offered in several designs. As a rule, a certain set of fixtures and cutting tools is offered for it. This type of attachment does not pretend to be a professional tool, but many parts for individual furniture or country house it can be made quite well. But if you start mass production of turned legs for tables or balusters on this console, it will quickly break down, and the drill will not withstand such violence. Our photographs give a visual representation of the design and principle of operation of this console.


Compact wood lathe from a drill
A compact wood lathe is the dream of any home craftsman. There are several types of turning attachments for drills. They differ not only in their design, but also in the set of cutting tools offered for them.
The most famous and common are prefixes that turn drill in electric grinder. Here we will introduce you to only two specialized attachments of this type: one for sharpening blades circular saws and another one for sharpening drills, chisels and planer knives. The value of prefixes lies in the fact that they allow you to refuse the expensive services of professional sharpeners of such a tool. With them, you will not have problems with either the sharpening angle or the perfect cutting edge (even if you have never done this before). Installing such prefixes on a drill does not cause difficulties.

A drill stand plus a drill is a handy drill press. The design of the bed allows you to mount a clamping vice on it to fix the workpiece.

Vice for racks come in different modifications. But their mounting holes must necessarily correspond to the grooves in the rack frame.

The vice on the bed can be displaced. There are options with rotation of the vice around the axis and even with a changing angle of the rack.

A drill mounted in a stand, plus an abrasive nozzle, allows you to create high-quality concave surfaces.
Worthy of attention convenient for work and compact milling attachment grooves in the ends of cabinet furniture or joinery (for corner connections). Working with it is very simple: there is no need to clamp the workpiece on the workbench, the quality and accuracy of processing are high, the depth of the groove and its level are set by a simple adjustment. This prefix will quite satisfy also the professional furniture maker.
For those masters whose work is very diverse, it will not be superfluous and long flexible or angle drive for drill. They are simply installed in the drill chuck and have their own chuck suitable for any attachments (drills, grinding stones, bits, etc.). These attachments allow you to work with a drill in the most inaccessible places. It is unlikely that anyone would think of using a drill for pumping liquids.

Nozzle - water pump for Bosch drill

Nozzle - water pump. Productivity up to 2500 l/h.
But it is quite real and not without meaning, if you use attachment-pump installed in the drill chuck. Of course, it is not designed for long-term continuous operation and has a low productivity, but it is possible and quite convenient to pump out paint (viscous) from a barrel or dirty water from a basement. By changing the speed of the drill, you change the speed of pumping fluid. As a rule, the entire body of such a set-top box is plastic: the service life is short, but the price is low.

The attachment for sharpening disk blades allows you to do it yourself, without resorting to an expensive professional service.

Grooves for corner joints can also be selected with a drill, equipped with a special attachment. It has a dust extraction device.

The long flexible drive with chuck is another nice addition to the drill. It works with any attachments.

High-quality sharpening of a drill, chisel or planer knife will help to make a small attachment to the drill. Sharpening angle is adjustable.

The drill can be used as a screwdriver, suitable for working even in hard-to-reach and inconvenient places.

The drill can work as a pump. Nozzles come in different capacities (suitable for paint and even dirty water).

Professional template: durable, reduces the labor involved in marking and drilling standard holes for furniture assembly.

Furniture template for drilling holes has standard sizes: holes, distances between them and from the edge of the part.
This template ensures the verticality of the hole and its centering. Home master a plastic template is enough.
It is generally accepted that templates noticeably speed up many operations, increase the accuracy of processing parts and their assembly. This can be confirmed by the abundance of existing drill templates. We show only the most common patterns that are most often in demand when working with a drill. Among them there are both professional (durable and maintaining the accuracy of their dimensions), and for home craftsmen (made of plastic).

Drill template
If you make furniture with your own hands, then you know that all products must be joined end-to-end. In this regard, there is a need to drill a lot of holes. To do this, all masters use a special tool. We are talking about a jig for drilling holes.
What it is?
The conductor is a plate on which holes and sleeves are located. Even a beginner can use such equipment. It only takes a few steps:
- the equipment is fixed in the right place;
- a drill is inserted into the sleeve;
- a hole is carefully made.
To fasten two parts you need only one jig.

Advantages
Such a device is used not only in the manufacture of furniture and construction, but also in mechanical engineering. It can be used to drill holes on any surface. There are several other benefits:
- highest precision;
- ease of use.
Variety
All models, regardless of their application, are to some extent divided into several main groups. Let's consider them in more detail:
- Overhead. This name they received due to a special application. Equipment is applied to the selected workpiece. Fix or leave without clamp. Ideal for applications in materials such as chipboard.
- Swivel. If you need to make a passage on a cylindrical surface, then you should definitely use this type of equipment. This view has several axes of rotation: vertical, horizontal, inclined. For the latter, there is a guide sleeve in the housing.
- Overturned. If you need to drill simultaneously on several planes, then you should use this type of conductor.
- Sliding. The last group is not in demand, as it is considered the most inconvenient. Before drilling, it is necessary to bring the device into working position. This type cannot be fixed on the surface.
Application
The drilling jig is used in many fields of activity. Most often in construction. But apart from this, there are several other important industries.
Furniture
During assembly, many craftsmen are faced with such a problem as a lack of holes. In this case, you have to make new ones yourself. To do this with ease, it is recommended to use a jig. With its help, all work will be done quickly, efficiently and accurately. It is also necessary to resort to the help of such a device for craftsmen who do not have a special machine.
Modern assembly is different wide choice furniture fittings and various fasteners. All this requires precise installation without offsets. This is where the conductor will help.

Pipes
It is quite difficult to make holes of the correct shape on cylindrical surfaces. Using a drill in this case is useless. It will constantly slide off, which means that they will all turn out to be irregular in shape. For this, it is recommended to use a conductor.
Additionally, it can be used with tools that help make perpendicular holes. It will also help to process rounded elements and edges.

Purchased or homemade: which is better
When assembling furniture, the use of such a device is mandatory. Someone prefers to buy a ready-made version in the store, and many make them on their own.
As for the sale, they can be found in almost every hardware store. However, here it may turn out that the purchased equipment may not be suitable for your needs.
The following factors affect the cost of products:
- method of use;
- size range;
- manufacturer.
Simple equipment has a low cost, but products with additional functions will cost more.
Having a little idea about the jig and some tools, you can make it yourself.

Self-manufacturing
For work it is necessary to prepare the following materials and tools:
- metal sheet or wooden board;
- welding machine;
- angle grinder;
- drill;
- screwdrivers;
- wire cutters;
- sandpaper;
- pliers;
- fittings with a size of 10 * 10 mm.
- Make a preparation. It must be cleaned with sandpaper. Make markings for future holes. For this, there is a standard that says that the distance between centers should be 32 mm.
- We carry out drilling.
- The next step is to make a metal plate support. Its thickness should be 1 mm. It must be bent and mark the place for threading.
- Connect the two pieces together.

Technical side
It is worth familiarizing yourself with several drilling techniques in detail.
Under confirmation
In self-manufacturing of furniture, confirmations are often used. For such drilling, special drills with a size of 4.5 mm are used. It is easy to recognize by the additional head.

Face drilling
This is the most complex technique. The drill should be perpendicular to the end. In this case, the drill must be held firmly and evenly. It is very convenient to use special equipment.

Drilling in two parts at the same time
This is the most accurate and fast way. For this method, it is necessary to prepare special clamps (clamps). Fixing must be of high quality so that the parts do not stagger.

Drilling for dowels
To do this, use a drill about 8 mm in size. To prevent through holes on the parts, it is necessary to install a special depth gauge. For the end, it is also recommended to use a drill, and the depth should not exceed 20 mm.

Video
From the video you will learn how to properly use the jig for drilling holes in chipboard.
A jig for drilling holes with your own hands will not be a reliable solution, but it will be beneficial in financial plan. If possible, it is better to buy it in special shops for furniture making tools.
According to the statistics of furniture manufacturers, most of the time is taken by marking, harvesting and making holes. For this reason, the furniture assembly jig becomes a very important element.
The importance of using conductors
In order not to resort to manual measurements and sketches, a special device was invented - a jig for drilling holes. Its use allows you to hold the drill at an angle of 90 degrees to the furniture, which eliminates deviations from the required direction. When making deep holes, the result of using this device becomes especially noticeable.
A jig for drilling holes in high quality chipboard must have the following qualities:
- be useful for fast furniture assembly without the use of complex tools;
- provide the ability to simultaneously make several holes, excluding manual marking;
- improve drilling quality.
The material for the jig for drilling holes is different. Among tools made of plastic or organic glass, the steel version stands out.
It has such advantages as:
- less susceptibility to deformation;
- exact direction of the drill;
- does not heat up during operation.

Very popular among home craftsmen is the conductor for assembling furniture with their own hands. To make it at home, you need a small number of tools.
Experts recommend fixing this device with the help of dowels. In the manufacture wooden furniture only these elements are allowed to be used together with glue. In any case, a home-made jig for drilling holes is very useful in practice, and without it it will be difficult to carry out assembly work.
The process of drilling holes for conformation and dowels looks quite laborious. The reliability and appearance of the manufactured furniture will depend on the quality of its implementation.
A do-it-yourself furniture jig for drilling holes will help improve the quality of the holes made. Without their use, errors in manual marking cannot be avoided.
There are many different conductors from various manufacturers. Among them, there are such specialized options as a jig for drilling holes at an angle. Not less than interesting option can become a jig for drilling end holes.
All this diversity makes it possible to simplify many complex operations that may occur in the manufacture of furniture. With their use, marking and drilling holes of any complexity on doors, on tiles, when assembling furniture can become a very simple task.
However, tools of this level are quite expensive, which causes the popular question: “How to make a jig for drilling holes yourself?”. It's easy to do and almost anyone can do it.

The process of self-manufacturing conductors for drilling
In principle, the jig for the holes can be made from improvised materials. First you need to calculate the folding conductor for drilling holes with your own hands. The next step is to work on the drawing. A furniture jig template for drilling holes can help solve this problem. You can find one on the Internet or from repair specialists.
Detailed description of all stages of production furniture conductors can be found on special videos on the Internet. But still important point it remains to make the correct drawing of the conductor for assembling furniture. In each case, it can be different and you need to take into account all the features.
Do-it-yourself jig drawings for drilling holes may not have the required accuracy. For this reason, there is a need for additional verification during the manufacture itself. It is also important to be extremely accurate and accurate, otherwise the manufactured tool will not bring any benefit and can only aggravate the process of furniture production.
The variety is very large, so you can hear the following question from novice furniture makers: "How to make a jig for drilling pocket holes with your own hands." One of the secrets in the manufacture can be the use of metal bushings. This approach will extend the life of the conductor and make it a more reliable tool.