Consignment note for drilling. The nuances of manufacturing high-quality furniture conductor, do it yourself
Furniture conductor - simple mechanical device, which serves to speed up and simplify the actions when drilling holes. The use of this device allows you to create technological holes without pre-applied markings and do it with perfect accuracy, as well as a verified inclination. The device is indispensable during the assembly of furniture structures, during carpentry work. For use in everyday life and in the production of small volumes, it is very easy to make a furniture jig with your own hands.
In fact, a furniture conductor is a regular template with holes of the desired diameter. The working part of the device is a rectangular block of solid material with holes located according to the required markings. For convenience, it can be equipped with regulating and fixing mechanisms. Based on the simplicity of the design, you can quickly make stencils for furniture with your own hands from improvised means.
The jig provides the desired direction of the drill at an angle of 90 degrees to the surface, eliminating the possibility of deviation. This is especially important when working on narrow pieces of furniture, such as the ends of walls or doors. Without this device, it is quite difficult to maintain the desired angle, which can lead to marriage, because even a slight deviation in the direction of the mounting hole can make it impossible to assemble individual elements into a single structure.
For perfect matching of furniture elements to each other also great importance has the accuracy of the location of the holes for fasteners. Those who make furniture with their own hands are often faced with the need to create a series of identical holes at a certain distance from each other. To facilitate the work, to make it faster, it is easier not to markup each time, but to apply a template.
With the help of the conductor, you can work with different furniture materials: wood, chipboard, MDF.


The choice of model for manufacturing
Conductors industrial production are specialized and general. Templates of the first type are used to perform certain operations on typical parts. Universal devices suitable for work with different materials and objects of various configurations.
By design features and functionality conductors are divided into the following types:
- overhead - when used, they are applied to the surface in the desired area, fixed with clamps or held by hand. Used for drilling holes in flat parts;
- rotary - the working part moves both in vertical, and in horizontal planes. It is used when working with elements of complex geometric shape and for creating holes, the axis of which should be at an angle;
- tiltable - used to create holes in perpendicular planes.
To mark the places for drilling holes, a marking jig is used. It is much thinner and lighter.
The conductor device can be specially created for a certain type of fastener: dowels, confirmations, screws, corners. There are devices to simplify the process of installing fittings.
According to the type of fixation, furniture conductors can be sliding or fixed. The former move freely over the surface if necessary, the latter are rigidly fixed in the right place. The presence of an adjustment mechanism will help to combine the device with different types of workpieces.
For major manufacturers furniture, the presence of a variety of additional devices plays a decisive role, as they significantly reduce time costs. In this case, the cost of the tools does not really matter. A completely different approach to acquiring the necessary equipment from those who have a small furniture production or from independent craftsmen who make certain types of furniture. In this case, making furniture templates with your own hands is much cheaper and more practical. The choice of the right options, the complexity of the fixture is determined not only by production needs, but also by the skill and experience of furniture manufacturers.

Overhead

Turning

Universal
Materials and tools
For the manufacture of the device, it is necessary first of all to determine the tasks that it will perform. Accordingly, they select desired material, from which a furniture template will be made with your own hands. The most durable, reliable and "long-playing" is considered a metal conductor. For creating furniture conductor for drilling with your own hands, it is permissible to use wood, plywood, textolite, plexiglass. This is due to lower labor costs and low cost of material. All this is important, especially if you are going to make several different templates yourself.
For the manufacture of a conductor, a piece of reinforcement, a bar or a plate is suitable - something that is sure to be found in any garage or home workshop. To make a simple marking device, you can take a regular school ruler - wooden, plastic or metal.
Of decisive importance in the manufacture of the jig is the exact calculation of the location of the holes on the workpiece. You can take a ready-made scheme or make it yourself. The latter option is preferable, since the dimensions in the drawings must correspond to the tasks being solved.
Of the tools you will need:
- drill;
- grinder or jigsaw;
- a set of locksmith tools;
- clamps;
- vise.

In the manufacture of the jig, perfectly precise drilling of pilot holes and hardening of the finished fixture will be required.

Drawing of a home-made conductor for drilling holes for confirmations
Manufacturing steps
Consider the process of creating a metal conductor device for confirmations. This fastener is most often used in furniture assembly:
- a piece of the desired length is cut off from a metal bar of square section (10x10 mm) using a grinder. The ends of the resulting segment are leveled with a file and cleaned of burrs. Corners and edges can be rounded for convenience and safety of use;
- holes are marked on the workpiece. Their centers should be located at a distance of 8 mm from the side face (chipboard sheet thickness - 16 mm). From the end and between the holes should be 32 mm, according to the generally accepted system of furniture fastenings. For marking, you can use a carpenter's corner or caliper. It is better to make marks on the part with a sharp metal object - an awl or a large needle. You can use a core and a hammer to make holes for the initial installation of the drill. It is important when drilling holes to prevent displacement of the drill and make them strictly perpendicular to the surface of the workpiece;
- using a drill with a diameter of 5 mm, make holes;
- to create an emphasis, you need to cut a piece of the desired length from a metal plate (1x25 mm);
- finish the edges with sandpaper;
- bend the workpiece at a right angle, holding it in a vise. Fold the parts, aligning them coaxially;
- fasten the parts in this position with a clamp;
- on the side of the plate along the length of the device and at the end, drill holes corresponding to the size of the screw. Cut threads and fasten parts;
- cut off the excess of the stop plate, process the edges.
Video
When creating furniture, almost all the details have to be joined end-to-end. This is done with the help of dowels in which holes are made. This is where a special detail is needed. You can buy it or make a furniture conductor with your own hands.
What is a furniture conductor
The conductor is a bar that has several holes and sleeves. It is applied to the desired part, the drill is inserted into the sleeve and a hole is made. To fix two parts, you will need the help of one conductor, while the parts are fixed as securely as possible.
Conductor Benefits:
- precise drilling;
- simple and quick creation holes.
At the same time, conductors are used not only during construction, but also in mechanical engineering. Also, this device allows you to drill cylindrical blanks and pipes.
Different types of conductors
Depending on the industry, conductors are divided as follows:
- Overhead. They got their name because of the scope. This device is superimposed on the workpiece and fixed, with the help of which holes are made.
- Swivel. They are used to drill cylindrical holes. In this case, the rotary axes can be located both horizontally and vertically, and at an angle. The housing here is equipped with swivel bushings.
- Overturned. They are used when holes are created in several planes.
- Sliding. Used to make each individual hole. In this case, this model is not fixed on the surface, which means that it is not the most convenient.
Do-it-yourself furniture conductor
As we wrote above, this product is needed when assembling furniture. Someone prefers to buy it, and someone to make furniture holes with their own hands. Such products are sold in any hardware stores, it is important to choose finished products for a specific purpose. The cost of a furniture conductor will depend on its size, purpose and manufacturer.

The simplest option is inexpensive, but professional equipment with various additional functions costs a lot. Therefore, today more and more often do-it-yourself furniture conductors and templates are made.
They are produced using a metal sheet or a wooden board. They make holes that will serve as guides. This job is easy and anyone can do it.
How to create a conductor
So, creating a furniture conductor with your own hands is not difficult. To get started you will need:
- welding machine;
- Bulgarian;
- drill and some locksmith tools;
- you also need to prepare reinforcement 10 x 10 mm in advance.
First, the workpiece is cleaned with sandpaper and marking is performed. The distance from center to center is approximately 32 mm. Next, each template hole is drilled. After that, an emphasis is created - for this you can take a metal plate 1 mm thick. It needs to be bent and a place for carving prepared. The last step is to connect these parts.

The product must be made as accurately and accurately as possible, otherwise there will be no benefit from it, and in an unfavorable situation, it can even damage furniture. You can learn more about how to make a conductor by watching various video tutorials. The easiest way to make it is according to a furniture template, which can also be peeped from specialists.
In order for drilling not to cause complications, a conductor is needed. This device is really needed when assembling furniture. Of course, you can buy everything today, but it’s better to make a furniture conductor with your own hands, because then such equipment is exactly right for each specific purpose.
A jig for drilling holes is a device used in mechanical engineering to simplify the process of processing a part. In fact, it is a template that serves to guide or position the workpiece. Can be applied on various equipment, for example such as or installation of diamond drilling.
In engineering production, conductors are fairly accurate fixtures (up to 0.05 mm (depending on the requirements for the part being manufactured)). They come in two main types: overhead (in the form of plates) and box-shaped, which are three-dimensional structures. There are also conductors for drilling of mixed type. These devices are used to reduce labor intensity: from technological process machining of the part, the marking operation is removed, in addition, it becomes possible to drill several holes at the same time.
The drilling jig is used only in serial and mass production. This is due to the fact that for a small batch of parts it is impractical to manufacture a separate fixture, which, moreover, will have to be installed and configured separately.
A drilling jig is usually used to process several holes that lie in the same plane. It is best if the parts are unified in terms of standard sizes, this will allow the device to be used for a wide range of products.
The drilling jig is also used in light industry and construction. Such devices are only of the overhead type, made of or lighter materials, such as wood or plexiglass. These products are not designed for high accuracy, the positioning error is only ±0.5 mm. But this is more than enough to make holes for fittings in furniture or drill a series of holes in the wall of the house. As equipment, use a conventional drill or drilling machine desktop type.

You can independently make a conductor for domestic needs. It will be needed during repairs, when you need to make a lot of holes of the same type and there is no desire to spend time on preliminary marking. For its manufacture, you can use any improvised materials: on a sheet of metal or wooden board mark and drill everything desired holes to serve as guides. If necessary, a plumb line is additionally made so that chips or concrete chips do not fall to the floor. It is possible to make a dust-free jig when the template is covered with a specially fitted half of a plastic bottle.
The main advantages of these devices are high accuracy positioning holes without pre-marking, high labor productivity and reduced perpendicularity deviation (due to guide bushings). However, the use of a drilling jig is not always economically justified, especially with small batches of parts in production.
A drilling jig is an indispensable attribute in large-scale production, no matter which one. Where there is a lot of drilling, it is really necessary, especially when production is serial or mass.
With a conductor to a large extent production is accelerating, the labor of the worker is facilitated.
A drilling jig, as a rule, is a bar (plate) with holes and bushings (sleeves). By means of a conductor, it is much easier, for example, to drill pipes.
As for the production of furniture, they are also used here, although recently.
With this equipment, the manufacturer is relieved of the following problems:
- Markup.
- Punching (point recesses in the material for the drill).
- Drilling with observance of perpendicularity.

Some operations, such as dowel drilling (short wooden rods designed for hidden joining of parts), require very precise marking, and no less precise drilling at an angle of 90°.
With such a device as a conductor, these tasks are solved easily and simply.
Types: choose the one you need
 Overhead. They do not need fixing before their intended use. Structurally simple, mobile, but they need to be kept free from the drill by hand, since often the equipment is not fixed in a special device, which is not very convenient. Considering simplicity of design making it by hand is pretty easy. Applicable for chipboard drilling and MDF.
Angle drilling jigs. The design is easy to imagine as the name speaks for itself. Such equipment can also be consignment note. In the production of high-quality furniture, drilling at an angle is also present, which is not the easiest operation in the production process - this requires skill. Although in this case, the desired angle is sometimes violated, the assembly as a result will no longer be of such high quality and suffer appearance furniture, especially if it is not made of chipboard, but of wood - here you can’t putty on ugly drilling. Tooling same desired design completely eliminates unnecessary problems.
Rotary jigs. They have folding brackets, and this allows drilling on two adjacent planes.
Sliding gearboxes. With their help, without reinstallation, you can drill several holes. To work with such equipment, however, the necessary skills are required.
Device for drilling holes for dowels and confirmations
 Despite the fact that today a lot of new fittings have appeared in the furniture industry, the good old dowel is still used. This is due to the fact that the joints are not visible through this piece of fittings, and this is especially valuable in the production of natural wood furniture.
As already mentioned, dowel drilling creates a lot of problems for furniture makers, especially those who are not qualified enough.
In order to furniture planes were perfectly joined, accurate marking is required, and this equipment allows you to speed up the work and bring the quality to the desired level.
Working with confirmations - special furniture screws - although less troublesome, but also requires certain skills. And considering how many holes you need to mark and drill before screwing the confirmation in one piece of furniture, such a device will greatly speed up the work, and its quality too.
The simplest devices
- The conductor is two-slider. It allows you to drill holes in two adjacent (mating) parts. The fixture is constructed from two rulers that serve as guides and are connected to the mounting plate. The holes made in it make it possible to install a bar on parts of different widths. Housings moved along the rulers (replaceable) have a set of guide bushings, where the distances between them are different. The conductor is fixed with connecting strip, on the opposite side there is a stroke limiter, pressed by a thumb screw.
- The conductor is multiposition. Attaches with clamps. The design allows for vertical drilling. It is made from thick-walled aluminium. Since the fixture has a significant length, it is equipped with an intermediate mount in the center of the structure. The thick wall of the corner was very successfully applied, which cannot be overestimated at the moment of applying the fixture to the surface of the part and when reinstalling the conductor by 90 °. The selection of the distance between the bushings is carried out according to the most common values \u200b\u200bfor the installation of dowels or confirmations.
How to work with a conductor:
- The device is fixed on the workpiece.
- The sleeve is inserted into the hole.
- Drill through the sleeve.
Do-it-yourself furniture conductor: drawings with dimensions to help
Principle of this equipment:
- Corner case. It is superimposed on the plane of the parts, which will then be connected to each other.
- Guide bushings. A drill will enter through them.
- Clamping devices. They fix the conductor and are made from the end part.
 Designing your own jig should be based on the fact that with this equipment you can do most of the work performed related to fasteners of various types.
Important! If you need a universal assistant - this applies to professional furniture makers, then it would be better to purchase industrial equipment, which is made more accurately and efficiently. It is such a device that will be preferable and will quickly pay for itself, especially if you also take into account the fact that this device often comes with a lot of different templates, stops and other little things that are also necessary in the work. They are much cheaper than buying at retail.
And yet this device, if necessary, can be made with your own hands.
Such equipment, perhaps, is needed not so often in a particular production, and even home master- especially. So for many users, doing it yourself will be much more profitable.
If the design of such remains relevant, then you need to prepare materials for the manufacture of a home-made conductor for drilling for confirmation:
- corner. You should stop your choice on the unequal type of this rental - its possibilities are wider. The corner shelf must be chosen with the greatest thickness, which can reach up to 8 mm. This is well justified, since then guide bushings with an outer diameter of up to 6 mm can be inserted. Based on this, drills from 3.5 to 4 mm can be used. Even if that diameter is not enough, then the material is drilled with a large drill, without using any other devices.
- Guide bushings. Here it will be preferable to use stainless steel pipes, which are selected, first of all, according to the inner diameter. Example: a 6×1.5 pipe is suitable for a drill no larger than 2.7 in diameter. Explanation: its inner hole will be 3 mm, and a small gap along the entire inner diameter is taken into account due to the thermal expansion of the material. The sleeve length is the depth of the hole in the corner, multiplied by two or more. The fit of the bushings is either transitional, or with an interference fit, or according to the shaft system. The latter is the most appropriate.
Instead of pipes, of course, you can use ready-made bushings used in wire drawing machines - such are available, for example, in mechanical engineering. Such parts (even used ones) will come in handy: they are made of alloyed steels and have an almost unlimited service life.
Choice of mounting method
Options:
- Fixing with self-tapping screws. They are screwed into the part, which prevents the device from moving due to friction. This is convenient because these marks will be needed for subsequent drilling of other holes.
- Spring stop. It will securely fix the conductor on the part. For such an emphasis, a flat spring with an appropriate clamping force is suitable.
- External clamps. Under them it is necessary to lay rubber gaskets. Corrugated rubber is ideal as a material. This, of course, slightly increases the weight of the tool, and the elasticity of the pads can negatively affect the squareness of the bushings. To prevent this from happening, the drill is inserted into the sleeve in order to mark the hole, and only then the clamps are clamped.
For drilling pipes and cylindrical parts
 In modern furniture, not only chipboard, fiberboard, MDF and wood are used. As additional elements can be used steel pipes different diameter. Covered with chrome or stainless steel, they perfectly complement the overall furniture ensemble.
It is very difficult to drill a spherical surface - the drill strives to slip to the side. Yes, and marking is not so easy when there are a lot of holes and they are arranged in several rows.
In order for the notorious colander to turn out of the pipe, but the correct part with precisely made holes, you need a jig - this perfect solution in the given situation.
 There are steel conductors made in the form of an adjustable clamp. This design feature allows you to clamp pipes of different diameters in them and drill holes in them with high accuracy.
Without being able to make such a device, you can use waste materials, making an even simpler device using a bar and a strip of plywood. So, a bar cut diagonally lengthwise on a circular saw can be nailed or screwed with self-tapping screws at an angle of 90 ° to plywood. The resulting device is superimposed on top of the pipe, and a strip of plywood, resting against a table or workbench, does not allow the specified angle to be violated. Holes of the required diameter pre-drilled in the bar are placed taking into account the required distances between future holes, which will allow you to quickly and accurately drill the pipe exactly according to the drawings.
Do-it-yourself furniture conductors and templates
How conductors are made is now clear, as well as their need for furniture production.
Not only conductors, but also templates are necessary in furniture production. The simplest pattern, sometimes it will save a lot of time and enable no less accurate drilling than a jig.
For example, the simplest metal prefabricated invoice template, consisting of two sheet blanks measuring 130 × 70 mm and a steel square with a cross section of 20 mm. They are interconnected by screws in the upper part of the structure - this is how they are attached to the square. The square is drilled under the bushings, where the latter are pressed. Such a device for drilling holes in the end of a part made of chipboard will make it possible to drill without thinking about marking and perpendicular drilling at all. And the price of this equipment is below any idea of \u200b\u200bsavings.
Instead of metal, you can and should use those materials that are inexpensive and easy to process.
Materials:
- Plywood.
- Textolite or fiberglass - preferably thick.
- Hard wood.
- Hardboard or its equivalent.
It must be borne in mind that these materials are short-lived, and so that the devices do not have to be made every day, it is quite reasonable to press metal tubes into them.
In conclusion, it is worth summarizing what has been said. Making a jig or a template yourself or buying it in a store is up to each individual. If a home craftsman needs to make some kind of furniture in a single copy and there is material for the conductor, as well as the possibility of manufacturing it, you can use this. It is possible that such equipment will never be useful to the master again.
But even if a small furniture workshop is engaged in the production of mass-produced furniture, and enough people work in it, it is probably easier to purchase something ready-made, especially since they will need several copies of these irreplaceable assistants to the craftsmen.
In the latter case, it makes sense to purchase more expensive, accurate and wear-resistant conductors instead of making handicraft ones that are less accurate and durable.
Good luck in your work!
Furniture jig for drilling holes, drawing a kind of template that allows you to accurately install the assembly elements and greatly simplifies and speeds up the assembly.
With this device, you can make holes for:
Dowels
footer
pinch bolt
fixing holes for the mounting plate of the furniture hinge
fixing holes for the furniture hinge cup
center for furniture hinge flange
eccentric brace center
The design consists of two parts:
Marking knot
retainer
MARKING KNOT
It is a “L” shaped plate made of corrosion-resistant steel plate, in which through holes with a diameter of 8 and 3 (mm) are drilled horizontally and vertically. To make the processing tool fit better into the holes, chamfers of 0.25x45˚ are made on its edges. The plate is hardened and ground.
Drawing

RETAINER

Made from a steel circle, which allows you to install a furniture jig for drilling holes at the required distance from the edge of the processed chipboard. The movement step is ten millimeters.
Drawing

Let's say we want to install a furniture hinge:
1.
We lay the template on the facade.
2.
3.
We drill a hole with a diameter of three millimeters for the fixing screws of the cup to the desired depth.
4.
We drill a hole with a diameter of three millimeters to the desired depth for further processing. The prepared hole will be the guide center for milling the hole for the flange of the furniture hinge with a diameter of thirty-five millimeters.
5.
We lay the template on the body.
6.
We drill a hole with a diameter of three millimeters to the desired depth for the fixing screws of the striker.
Let's say we want to install an eccentric coupler:
1.
We lay the template on the horizontal surface of the chipboard part.
2.
Install the latch in the hole.
3.
We drill a hole with a diameter of three millimeters to the desired depth for further processing. The prepared hole will be the guide center for milling the hole for the eccentric of the furniture tie with a diameter of fifteen-five millimeters.
4.
From the end of the chipboard, along one center line, we drill a through hole with a diameter of eight millimeters to the required depth
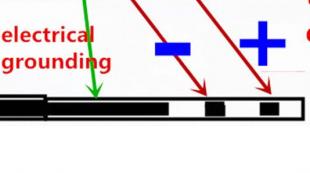
In the picture shown

AT different colors shows the center on the furniture conductor for various technological operations.