Furniture from wooden boxes. Do-it-yourself table from boxes
- Drawer tables
- Wooden table on a carved leg
- Final finishing steps
Ready-made factory furniture is not always diverse, and the cost of unusual and high-quality models is sometimes high. Why not try making your own furniture? If there is no confidence in own forces, then you can start with a simple coffee table. Making a table with your own hands is not so difficult, you can use not only ordinary wood, but also wooden boxes. The design can then be treated with varnish or stain. Get an unusual and durable model.
In order to make a beautiful table, you do not need to buy expensive materials at all, you can make it from ordinary boxes.
Drawer tables
How to make a table wooden boxes left over from vegetables or wine? For manufacturing, you will need 4 drawers, furniture wheels, fixing metal corners, wood screws, stain of the selected color, clear varnish and brushes.
Ready-made boxes greatly facilitate the work, since there is no need to assemble individual parts of the table from the boards.
In fact, the work is only to fasten the individual elements together, and then install the wheels.

If the interior of the room is bright, then such a table can be painted. acrylic paint red, yellow or other color.
- first, a frame is made for the future coffee table, and the wheels will be attached to it. For the manufacture of the frame, an ordinary board with dimensions of 40 * 100 mm is taken. The shape of the table will be square, which means that the frame should have the same shape. The boards are knocked together, nails and self-tapping screws are used for fasteners. In the middle of the structure, it is necessary to attach the fifth board, it will act as a reinforcement;
- now you can start installing the boxes on the frame of the structure, they will be connected with self-tapping screws. Mounting brackets are mounted at the bottom and at the top, it is necessary not only to fasten the boxes to the frame, but also to each other in order to get a stable and reliable design. First, it is recommended to connect the boxes together, then install them on the frame;
- the next step is the installation of furniture wheels. Too small can not be taken, as they may not withstand the weight, the best fit is a medium size made of rubber or special plastic that does not leave scratches on the floor;
- the final stage of finishing is reduced to grinding the surface. You can do it manually, for stripping, ordinary sandpaper is used. After cleaning with a stain of the selected color, the entire structure is covered, then varnished. Such work will not cause difficulties if the distance between the individual boards is sufficient to inner space could be painted after assembly. If the stain is dry, then the structure can be covered with several layers of varnish. But what if the space between the boards is too small? Then the inner surface of the drawers should be painted before installation, at the same time it is recommended to varnish the wood. This will avoid difficulties when everything is already assembled, and it is difficult to get inside.
If the interior is bright or you want to add a bright spot to it, then such a table can be safely painted with acrylic paint in red, light green, yellow or another color. On the surface, you can even depict any pattern, geometric patterns. After the paint has dried on the front surface, you can fix the glass top, which can be solid or consist of 4 parts.
Back to index
Wooden table on a carved leg

Drawing of a coffee table.
If there lathe and the skills to work with it, then you can start making a beautiful coffee table that will stand on a carved leg and have a round tabletop.
For work, in addition to the lathe, it is also necessary to prepare a milling machine, clamps, grinder. Of the materials used:
- wooden beam 50 * 50 mm;
- boards with a thickness of 25 mm, a width of 45 mm, 10-15 mm;
- special wood glue.
First you need to start making legs for the future table. In this case, the round tabletop will not be large, so one support will be enough. For the manufacture of the legs, a beam is used, 2 of its parts are glued together. Why exactly 2 beams? Using only one will not give the strength that is needed for the countertop. The future shape of the leg will look like a baluster for stairs. A lathe is used to process wood. When making the legs, it is desirable to make a thickening at the base; the shape should not be too thin. After the workpiece has received the desired shape, it is necessary to grind its surface.
Now we need to prepare the central leg for attaching the side supports, there will be 4 of them. Eyelets are cut out at the base, each depth is 1 cm. You need to cut the side supports only from a solid board, you can’t glue it, so you should immediately choose the thickness and width of the required value. On a milling machine, the blanks are given a semicircular shape, then they are ground.
In the upper part of the central leg, special through holes for the cross must be cut with a cutter. It is made from a board with a width of 45 mm and a thickness of 19 mm. The length in this case depends on what parameters the countertop will have. All ends of the cross will rest against the underframe, creating a reliable foundation. The made cross is placed in the prepared hole and glued.
Now you can make an underframe for the future carved table. Boards are taken with a thickness of 20 mm, a width of 45 mm. They are cut into equal parts, after which they are assembled into a hexagonal shape. After grinding, it is necessary to carefully glue the blanks with carpentry glue, leave to dry. For the underframe, it is recommended to make a decorative edging; it is enough to glue rounded wooden planks along the contour. Fasten the finished underframe to the cross with self-tapping screws with a length of 65 mm.
The tabletop will be round, you can use furniture board. It is best to take 2 such shields with a thickness of 300 mm, they must be carefully glued together, then mark up in the form of a circle and carefully cut out the future tabletop. The part is ground, after which its edges are processed by a milling machine. To fasten the tabletop to the leg, you need to use the so-called crackers. They will be screwed to the countertop with self-tapping screws.
In recent years, the so-called "life hacks" have come into fashion. From improvised means, through simple manipulations, they construct something useful for the home. Wooden boxes are also used, from which it is easy to assemble original, multifunctional furniture. Mostly they use containers from under the products: canned food, fruits and vegetables. In bachelor apartments, military boxes, in which weapons and cartridges were previously stored, will look good. Stylish, "masculine" decor is not specially stained to maintain the markings and natural shabby look. Of course, such a non-standard decoration is not combined in interior design with all styles. Strict classics, uncompromising modern, laconic hi-tech are difficult to combine with wooden containers. The boxes will look cute and appropriate in homes where the concept of Provence, country, ethnic, fusion, Scandinavian, Russian, rustic style is implemented. If you try with decoration, then such decoration can be organically entered into the design composition of the loft and minimalism. Let's talk about ways to use wooden boxes in the interior and how to make furniture elements from them with your own hands.
Wall shelves
Most often, slatted boxes are used, but plywood "models" are also found. Both options are useful for decorating a room. Wall storage is a must in every home. With the help of hanging shelves, you can save space in a cramped bathroom, living room, kitchen, and even in the closet or on the loggia. Wooden fruit or vegetable crates make an excellent organizer that will help keep things and household items in a strict order. After pre-treatment of the container, the modules are fastened together by screwing self-tapping screws into their side walls. If you need "single" shelves with gaps between them, then the scale of work is reduced. They are dyed in desired color, decorate and attach the bottom cover to the wall vertically or horizontally. The sides will serve as shelves. In another version, the boxes are arranged "naturally", that is, one of the sides leans against the surface. Such shelves will turn out to be more capacious, but are used more often in pantries, since the contents will not be on display. The original solution will be the manufacture wooden frame, in which the decorated boxes will be placed as pull-out containers. By the way, in the same way you can organize hanging shelves from baskets. To make the storage system look more beautiful, it is decorated with forged support from below. Metal goes well with wood. Unusual design solution will be the design of the wall in the hallway with the help of different-sized drawers. The center of the composition will be a mirror in a wooden frame. Boxes of different sizes are placed around it: some are used as key holders, hats and gloves are placed on others, and on others - houseplants and small decor. They complete the design by fixing the slats with hooks for bags.
Wooden boxes can be decorated with original shelves for storing wine bottles. Inside, they are divided into sections with the help of crossbars, and then varnished, decorated with twine, pieces of burlap, fixed on the wall and laid on a bed of hay. Themed shelf for storing wine is ready. In another version, an open cabinet is made from a box. It is placed vertically top cover reinforce with a decorative tabletop made of boards. Inside, crossbars-shelves are installed for horizontal placement of bottles, as in wine cellars.
Shelving
Wooden crates make great shelving. They can be strictly rectangular or have asymmetrical edges, which will give a special flavor to the room. This storage system is ideal for a home workshop, office or living room. The boxes are fixed together with self-tapping screws or screws, painted and attached to the wall. You can store everything your heart desires on such racks: books, things, jewelry, food, towels and pillows, household chemicals, and small decor. Designs look original, on the shelves of which “necessary” things are placed, alternating with flower pots. Rectangular racks can be assembled from the same boxes, which are arranged in a strict order or vertically and horizontally, but in such a way that a storage system of the correct form is formed.
The drawers, fixed on special legs with gaps between the modules, will be a great addition to a rustic-style kitchen. They store vegetables (potatoes, onions, carrots), jars of pickles or canned food. It is important that each drawer is fixed in a natural position, that is, bottom down. Thus, the strength of the locker will increase, because the container was originally designed for heavy loads.
The footwear stand
The cabinet for shoes is assembled according to the same principle as the rack of boxes. The only thing to consider: different heights of sneakers, shoes, ankle boots and winter boots. For the first two, shelves from boxes located horizontally are suitable, and they are placed vertically under high shoes. If you make a home-made cabinet from an old container, which is unevenly painted, then such an element will complement the Provence-style hallway.
Bedside tables and tables
Drawers can be used to make cabinets, coffee tables and storage boxes instead of plastic or wicker baskets. In the latter case, choose a container with high sides. It is simply sanded, varnished or painted and equipped with paired handles on the sides for ease of movement. Bedside tables are assembled from two boxes connected to each other. They store photos, watches, phones, magazines and books, and use the top cover as a shelf for lamps or indoor plants. To create a coffee table you will need:
- Four drawers;
- Plywood sheet;
- self-tapping screws;
- Wheels (optional).
A square-shaped pallet is cut out of plywood. The width of its faces should correspond to the sum of the length of one box and the height of the other. If desired, you can add small indents of a couple of centimeters. First, the wheels are attached to the pallet, and then the boxes in a spiral, that is, the sidewall of the next rests against the back wall of the previous one. Decorate the empty middle flower arrangement, a group of candles or a lamp. This coffee table can decorate the living room or backyard in the summer. It is complemented by sunbeds assembled from pallets or pouffes from old tires decorated with a rope.
From miniature boxes you can make decorative jewelry boxes or flower boxes on the festive table.
Ottoman for the hallway
To make an ottoman for the hallway or living room, you will need:
- Box;
- A sheet of durable wood for the top cover;
- Foam rubber;
- upholstery material;
- Construction stapler;
- Wheels.
The box is sanded and varnished. Wheels are attached to its bottom, and a lid is fixed at the top. If you need to use the ottoman also as a storage system, then it is put on hinges so that in the future the seat opens. Then foam rubber is fixed on the lid and upholstered with cloth using a stapler.
Entertainment complex for cats and cats
An entertainment complex for cats is created from boxes and metal pipes. As you know, tailed people get bored in apartments. So that the animal does not spoil the furniture and wallpaper, you can take it in your own miniature cottage, where the cats sleep, play and sharpen their claws. Some boxes are covered with plywood lids with round entrance holes, others are left with only the bottoms, which are covered with soft foam rubber and upholstered with cloth, and claws are fixed on the third. Modules are interconnected in random order. Additionally, the "house" is equipped with a ladder system to make it more convenient for the animal to move around the "floors". Instead of a purchased bed for a cat or a dog, cribs are created from a box. The box is carefully sanded. It is better not to cover with varnish, as the pet may not like its smell. Then, a pair of upper rails are cut off from one of the sidewalls, which will be the front. Inside, the box is filled with foam rubber or other soft material and covered with a blanket on top. Additionally sleeping place decorated with miniature hand-sewn pillows. Of course, the size of the box and the future crib is selected according to the dimensions of the pet. To make a feeder, you will need a stainless steel bowl, wooden containers and plywood. The top cover is cut out from the last sheet. Made in the center round hole under the bowl Then the plywood is fixed on the box. It remains only to insert the bowl. You need to choose it with protruding sides, with which the container will hold on to the lid. The bowl is easy to remove to wash or replace with another one. A double feeder is made from a large box using the same technology with paired containers for food and water.
Use of boxes in the garden
The boxes make excellent flower beds. They can simply be placed on a substrate, creating an original composition in front of the house, or combined into a vertical flower bed with several floors. Boxes in a chaotic mess are stacked on top of each other, connected in parallel with self-tapping screws to obtain a stable structure. In more complex versions, four slats are used, fixed in pairs at an angle to each other. Instead of steps, this "ladder" has boxes with flowers or herbs. If there is a free wall outbuildings or wooden fence, then the modules are fixed on it, in the manner of shelves in which pots with plants are placed. original version there will be a composition of five boxes, four of which form the sides of the rectangle, and the fifth will become the center, touching the corners with the rest of the modules. If containers of different sizes are available, then a multi-tiered flower bed is made from it. A large box is placed at the bottom, and smaller modules are placed on top so that the tiniest one becomes the top of the pyramid. The “square-rhombus” alternation will look beautiful in this composition. Also, garden flower beds-steam locomotives are made from boxes, where the modules are equipped with decorative wheels and are transformed into trailers, and the front one will become the “head of the train”.
Where does your old furniture go after you get a new one? To the garage? To the cottage? To "poor relatives"? But, as you know, if the furniture is still quite strong, it deserves to get a chance on new life- just thanks to your imagination and skillful hands.
Suppose you have an old chest of drawers, a desk or kitchen cabinets, which you don’t want to throw away, but there’s no point in leaving them in the same place, because their new counterparts have already been bought. What unites these pieces of furniture is that they have drawers that can be turned into an unusual and practical element of the interior.

You can make original wall shelves and even racks from the drawers of an old dresser, table or cabinet. On such impromptu shelves, you can place useful or simply beautiful little things, creating cute islands of decor. Most likely, such a creative will appeal to fans of vintage solutions, as well as those who want to update the interior with little or no investment.
Any old boxes will do - made of wood or chipboard, from a chest of drawers, desk or old kitchen:


any size and number of drawers can be put to good use, as you will now see.
Here is the algorithm of your actions:
remove drawers from old furniture, check them for integrity of surfaces and joints;
to remove the handles or not is a matter of taste, however, many believe that with them the view is more original;
change the appearance of the boxes if you want;
add transverse shelves if you want to place little things in several tiers;
screw to the wall with screws at a convenient height;
small boxes can be made removable - on the back of the frame, attach 2 fasteners for hanging light furniture on the wall;
arrange your little things or decor.
how to use drawers from an old chest of drawers or closet
Small drawers are optimal for decorating the interior, while medium and large drawers can be used to create additional storage space.
option number 1: beautiful - displays for decor:
Beautiful dishes, small plastic, any collections and even photographs - all this in boxes mounted on the walls looks very unusual.


option number 2: convenient - shelves for small things:
Books and CDs, bath and table accessories, shoes and jewelry, handicrafts and stationery, garden and home tools - this is not a complete list of little things that can be placed in boxes of old furniture hung on the wall.


how to make drawer shelves more attractive and practical
Change the look of the boxes as your fantasy tells you and based on the purpose.
back wall design:
In this case, the “back wall” is the bottom of the box. How to make it more interesting? Leftover wallpaper or fabric (for all surfaces), smooth or textured paint (for wood and plywood), slate-effect paint, sheet music, or old maps. In a word, everything that is in the house.


internal shelves:
In drawers that will turn into voluminous shelves, it makes sense to make horizontal partitions, i.e. internal shelves. Sometimes they already exist as intended by the manufacturer. If you are going to place small but heavy items, take care to reinforce the bottom (with a wooden plank or bracket).


other ideas for creating shelves from the drawers of an old closet
If you have collected a lot of boxes from old furniture, you can create a creative composition. And the shelves of the boxes can be horizontal, as if moving out of the wall.
how to combine multiple boxes:
Side by side or spaced apart, at different angles and combined with traditional shelves, adding wall decor or modular bays.


horizontal mount:
In small boxes, traditionally fixed to the wall (handle forward), you can place even more small things. But they must be hung on reliable brackets used for shelves.


floor shelving from old chest of drawers
And you can also build a rack, and even if it is not the most spacious, but you will not spend a dime! In addition to checking the reliability of the boxes and possibly updating their appearance, you will need to correctly compose the composition of the modules so that it is stable, and then firmly connect the boxes to each other, and then additionally attach them to the wall.


modular bookshelf from old boxes:

Not less than interesting solution when from the old kitchen furniture from wood there are not only boxes, but also frames. By turning the elements on different sides, create the optimal composition, if possible, without gaps. Attach each element to the wall and add strong brackets underneath.

To make it, it is enough to connect 4 ordinary wooden boxes. They can be painted, simply varnished or impregnated for wood to emphasize the natural color and texture. By the way, the table will also turn out with shelves for storage, and if you attach wheels to it, it can be moved around the apartment.
2 Shelving with storage boxes
Such a rack can be placed in any room: living room, hallway, nursery. It will fit perfectly into, especially Scandinavian and loft. To repeat this experience, drawers of different sizes and countertops for the base and top of the shelving are needed. You can paint it in any color, but you don’t have to put the same wooden boxes inside, you can use any boxes or baskets.

3
Such a shelf can be used simultaneously as a bench. It is enough to connect 3 drawers, put them on legs and attach the tabletop. And choose the color according to your taste and desire.

4 Shelf for books and storage
Another example of a cute rack for, only this time the owners decided to fold the boxes like a puzzle: one horizontally, the other vertically. The rack can be painted with colored paint or varnished.

5 Bedside table
One wooden crate made such a cute little nightstand with storage space. The box needs to be painted, but inside. In principle, the design of such a bedside table can be anything: depending on whether you paint the box and use prints.

6 Pouf
Pouf from a wooden box? Easily! It is enough to strengthen the corners with metal plates and reinforce the top of the box before making a soft seat - this will increase its strength and you can sit down without fear of being on the floor or breaking the structure.

7 Shelves for storage in the hallway
This idea is easy to implement - take a few ordinary boxes, paint them and attach them to the wall in random order. Ready! On such shelves you can also have the necessary accessories in the hallway.

8 Children's "garage" for toy cars
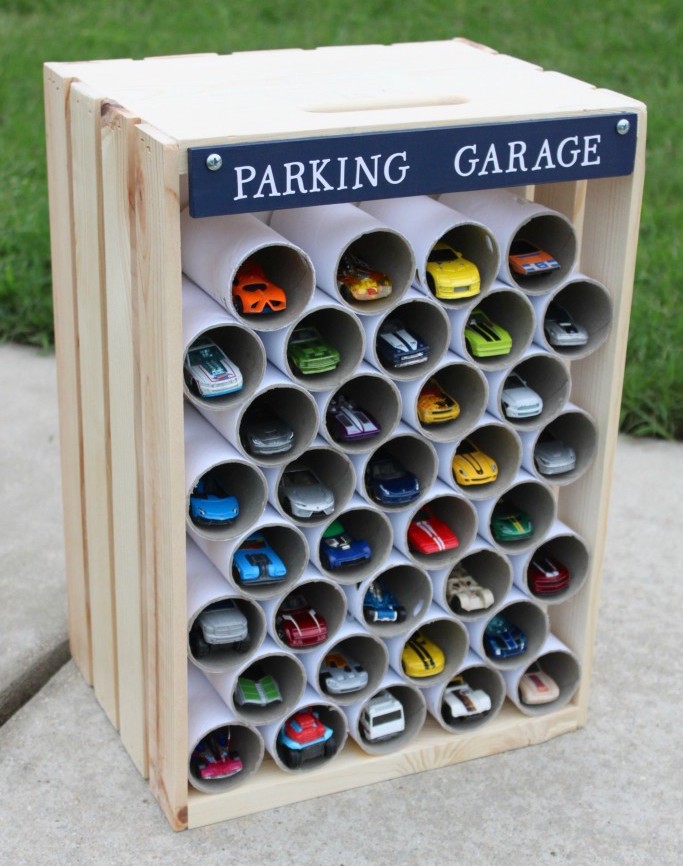
Inventive parents can make such a garage for children's toy cars. To do this, you need one wooden box and cardboard sleeves - you can use paper towels. Divide them into several parts and fold them like a checkerboard inside the box. Can be glued on. The child will surely like it.
9 Pet couch
One box, 4 wheels and a soft blanket are all you need for your pet's personal couch. Suitable for a cat or small dog.

10
There is nothing complicated in this idea either. The main thing is to come up with the design of the box and, for convenience, attach wheels to it.

11
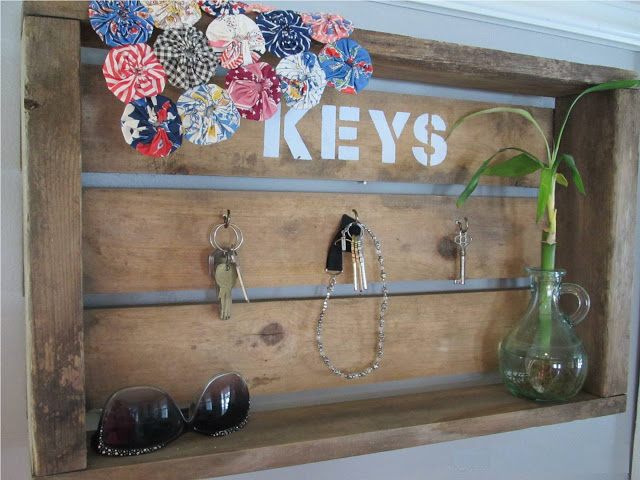
In the hallway, a mini-shelf is useful for important little things and keys. And it can be made from a wooden box. Attach nails or hooks on the inside to hang a bunch of keys on and experiment with decoration: paint, varnish or sign the box.
12 Turntable table
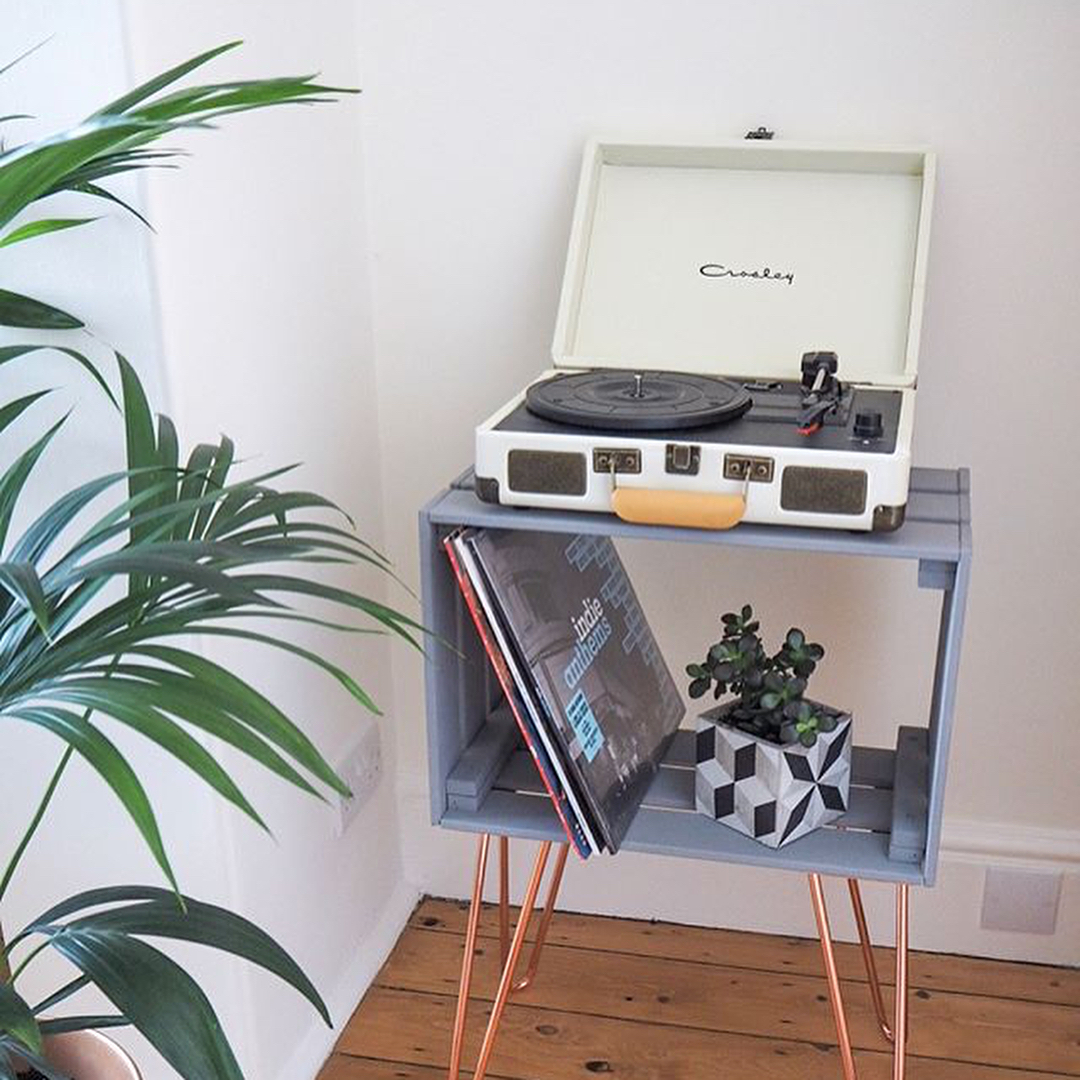
Look at this wonderful table in. Of course, it is not at all necessary to use it for a turntable and records, but in this design it looks very stylish. But everything is much simpler than it seems: an ordinary box was painted and attached to metal legs.
13 Wine cabinet
From a wooden box and a beam that was sawn, painted and attached to the box in a criss-cross pattern, a very stylish wine cabinet turned out. It will truly brighten up any kitchen. modern style, as well as in the aesthetics of country or Provence. Take note.
Boxes, do not immediately get rid of them - perhaps you can make something interesting and useful out of them.
Using some tools and paint, the boxes can be made into various items furniture that will come in handy in the garage, in the country and even in your home.
Old boxes are very easy to paint, because. they are made from untreated wood. They are also easy to connect to each other.
Here are a few ideas that can be made into reality from ordinary old boxes:
Toy storage box
If you refurbish an old box, paint it and add wheels, you can get such an interesting and convenient storage for toys.
You will need:
Sandpaper (if the wood needs to be processed)
Acrylic paint and brushes
Wheels (4 for 1 drawer)
Screwdriver and screws (to attach wheels)
Wood glue (if necessary)
Chalkboard (optional)

1. Sand the boxes.
2. Paint the boxes any color you like (you can get the kids to color them however they like).

* You can attach a chalk board to the side or make such a board with your own hands from a piece of plywood and special paint, which, after drying, turns into a cool chalk board on which you can draw with chalk. On such a board, you can write which or whose (if there are several children in the house) toys are stored in one or another box.
The board can be glued to the box.
Bench with drawers
From several boxes you can make just such a shop.

Treat the boards and paint them if necessary.


Shoe box (with seat)

You will need:
Sandpaper (if needed)
Screwdriver and bolts
Acrylic or spray paint
Wheels (optional)
Small piece of plywood (for seating)
Filler
thick fabric
Construction stapler.
* A soft seat can be omitted, but it still adds charm to your product.
1. To make a seat, prepare plywood, attach to it from several sides along the edges dense fabric leaving room for filler. Insert the filler and fasten the fabric to the end.


2. The box can be processed and painted.

3. Attach the seat to the box with a screwdriver and bolts.
4. You can attach wheels to make it easier to move the seat.

* If you have extra plywood, you can make a drawer shelf out of it, which can be attached using corners.

What can be made from boxes: bookshelves
In the images you can see bookshelves made of drawers. All of them take up an entire wall in the bedroom, but they all look very pretty.

Boxes can be processed and painted. They are connected with bolts, and if necessary, they can be attached to the wall so that they do not fall.

Do-it-yourself compact garden from boxes
From wooden cargo pallets and crates, you can create a multi-level garden where you can grow flowers and herbs, for example.

To do this, you need to fix a dense plastic film inside each box. To make this easier, use a construction stapler.
Shelves for small flowers, books and other little things from plywood boxes
Small drawers can be turned into such cute shelves for small things. If necessary, the drawers can be processed with sandpaper, and if they are painted, they become even more beautiful.

Please note that the boxes were painted one color on the outside and another on the inside, which gives them a very nice look.
Such shelves are attached to the wall, but they can also be stored on the floor, in a closet, on a balcony, window sill, etc.
Kitchen table made of wooden boxes
If you have several large boxes or wooden pallets lying around, you can make a kitchen table out of them.

Treat the drawers with sandpaper and paint in a color suitable for the interior.
Secure everything with bolts so that the structure is strong and does not stagger.
It is not necessary to make a table for the kitchen, it can be made for giving to sit in nature with a cup of tea.
Coffee table from drawers
If you connect 4 drawers in a certain order, you can make a pretty coffee table.
Pay attention to how the boxes are connected.

It is also worth noting that it is desirable to process the boxes and paint them with varnish or brown paint so that they look even more like a coffee table.
Wheels can be attached if desired, although this may require attach a few plywood boards (which will better secure the entire structure)to the bottom of the table and only then attach the wheels.


