Janome sewing machine disassembly. Do-it-yourself Janome sewing machine repair
The site has a lot of articles on repair sewing machines. However, first of all, these articles are of an informative nature, intended not for amateur craftsmen, but for owners of sewing machines.
From them you will learn how this or that sewing machine is arranged, what breakdowns it can have if the operating instructions are not followed. And finally, how to perform a simple repair of a sewing machine with your own hands, if it is not possible to contact the workshop.
In this article, you will learn how the Janome sewing machine works. What is the difference between inexpensive models of Janome machines, what breakdowns do they have and whether it can be repaired on their own.
1. Janome sewing machine with oscillating hook

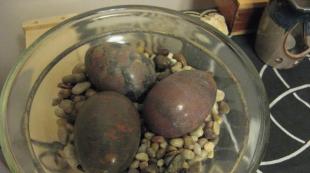
This model sewing machine Janome has an oscillating shuttle type. Such a shuttle is used only by Janome, but also by other sewing machine manufacturers. These are cars of the initial price, which you can buy in the range of 4-5 thousand. They are quite reliable and "hardy", but there are limits to everything, and after that, when it was on this machine (photo) that they decided to hem several jeans at once, it ended up in our workshop.
Look at the photo. The arrows indicate the nose of the shuttle and the eye of the needle. You can see that when the hook nose approaches the needle, the eye of the needle is too high, and therefore no stitches are formed. This is a very common failure. In quotation marks because such a failure occurs when the operating rules of any sewing machine are not followed, and Janome is no exception. This is not even a breakdown, but a violation of the interaction parameters of the shuttle mechanism and the needle. It happens at the moment of excessive load. And the execution of the finishing line on the hem of jeans is just that case. The toothed belt connecting the upper and lower shaft "skips a tooth" and the machine stops making stitches, although it still works fine. Jeans are probably the biggest "enemy" of all sewing machine manufacturers. How much they undermine the image of any of them. After all, it is jeans that most often disable household sewing machines.
To understand why this happens, and why jeans cannot be hemmed on household sewing machines count how many layers of tissue are formed at the roughest point (the junction of the seams). From 9 - to 12 layers. Take a needle and try to pierce such an area with a hand needle, it is unlikely to succeed. Only if the needle is hammered.

But let's get back to our Janome sewing machine and try to figure out how such a failure occurred and whether it can be fixed on our own.
Firstly, it must be said that if the machine stops forming stitches normally, gaps appear, the thread breaks, then look at how the shuttle nose interacts with the needle.
Detach the presser foot, needle plate. Lay the machine on its side and remove the upper part of the shuttle so that the hook remains in its grooves and is not skewed. Now gently turn the handwheel and bring the hook nose up to the needle. If you find such a "picture" as in this photo, then the cause of the malfunction is different and the machine does not need to be disassembled. The photo shows that the nose of the shuttle fits, as it should be, 1.5-2 mm above the eye of the needle. If the spout is below the ear or flush with it, then you will have to disassemble the body of the machine in order to have access to the node we need.

I do not recommend disassembling modern sewing machines. There is nothing complicated about this, but only for someone who knows how to do it right. In any other case, there is always a desire to use a nail puller. Well, like all the screws are unscrewed, but the case is not disconnected. Be careful, you can easily break not only the body mount, but also the necessary part of the sewing machine.
Each machine uses its own options for attaching halves of the body. First you need to carefully study them, find them. For example, several pieces may be located under the front cover, in the area of \u200b\u200bthe upper thread tensioner, the shuttle mechanism (remove the needle plate).
Further, some of them "hide" under the plugs, which are easily removed with a knife blade. What else can you advise. Well, for example, for this model Janome does not need to remove the levers for switching types of stitches. By the way, do not forget about the reverse lever when you assemble the body back. In general, for a non-specialist it will be much more difficult not to disassemble it, but to assemble it, keep this in mind. Mark where and which screw was. And if you don’t have a single “extra” screw left, then you passed the attentiveness test by 5 points.
4. The device of the Janome sewing machine
If you are going to buy an inexpensive Janome sewing machine, you can look at these photos that demonstrate its design well. This will help you make the right choice.
In the next paragraph, you will find out the cause of the malfunction of this sewing machine.

If the copier is "dry", its grooves must be lubricated with grease.

Check the tension of the drive belt of the electric drive. If it is loose, slightly tighten it with the screws securing the motor to the housing. The belt must not be overtightened; when pressed with a finger, it should bend a little.

If your machine has "problems" with the tension of the upper thread, this knot is most likely the cause. Raise and lower the presser foot several times and check that this lever works correctly. It may need to be adjusted.

Behind the upper thread tensioner, there is a housing fixing screw. It is easy to unscrew, but not easy to put back. Put a screwdriver on the magnet for half an hour, and then it will be easier to install it.
The tensioner screws should not be unscrewed when removing the housing cover.

The cause of the malfunction was in this node, marked with an arrow. And it didn't take long to find out. Toothed beltconnecting the main shaft to the lower shaft, this model of the Janome sewing machine did not have. Instead, a crank mechanism was used. It is quite reliable and can withstand heavy loads, so the search for the cause of the failure was directed in the other direction.

However, later it turned out that during the hemming of jeans, the eccentric mounted on the main shaft and transmitting movement to the lower shaft shifted. As a result, without load, the parameters of the machine were normal, and when sewing, the line did not form. The fastening of this eccentric is inside (arrow).
After setting the correct parameters for the interaction of the needle and the nose of the shuttle and then tightening the fastening of the eccentric (screw), the breakdown was eliminated.
Janome sewing machines (Janome) have many different models designed for different categories of customers. There are a number of economical sewing machines, affordable and designed for small tailoring and repairing clothes at home.
www.site
A. Removing the top cover

2. Close the protective cover, lift the handle and remove the screw to the left of the handle.

3. To remove the cover, press the latch inward at the base of the handle and remove the cover together with the handle.

B. Removing the side cover

2. Remove the screws from the bottom of the machine A and B. Screw B the smaller of the 2 screws located there.

3. Position the machine vertically and remove the plug from the side cover below the flywheel using a small screwdriver.

4. Remove the screw FROM.


C. Verification
1. After checking the relative position of the parts, look at the upper shaft from the side of the right support, between the support and the shaft limit washer. Check for any darkening, scuffing of the shaft. If darkening is present, the bearing shaft and bushing must be replaced.

2. Loosen the set screw on the left end of the top shaft. Try to move the shaft from left to right. If the shaft does not move, this also indicates that the shaft and sleeve need to be replaced.

D. Shaft replacement
1. To begin the shaft replacement procedure, place the top counterweighted shaft in front of you so that you can access the retaining screw and positioning washer screw. Note that the single lobe on the positioning washer is to the right (remember the position). Remove the fixing screw and the positioning washer screw.


3. Remove the screws BUT and AT.

4. Remove the thread drive unit (thread take-up unit) and place it behind the machine.


6. Using a hammer and a 3.0 mm center punch, remove the pin from the counterweight.

7. Position an impact driver or punch on the end of the top shaft in the counterweight (see inset). Knock out the shaft to the right about 1.5 cm.


10. Remove the top shaft. Remove and set aside the retainer, retainer screw, positioning washer and its screw.

11. Using a small screwdriver, knock out the upper shaft bushing to the inside cars. Be careful not to damage the molded parts of the seats when doing this.

12. Install new bushings, install bushings with a rounded end into the mounting hole ...

13. ...make sure the bushing is flush with the seat casting.

14. Remove retainer, bushing and counterweight onto new shaft..

15. Remove the flywheel by pulling it out.


17. Remove the balance wheel and the metal and plastic washers.

18. Remove the belt pulley by turning it clockwise and pulling it out.

19. Remove the clutch springs from either end of the shaft ( BUT) or belt pulley ( B) by rotating clockwise and pulling out.

20. Use a 2.5mm screwdriver or hexagon to knock out the top shaft camshaft pulley pin and remove the topshaft camshaft pulley pulley, washers and shaft clutch bushing.


22. Remove the shaft from the ring coupling. Use an impact screwdriver...

23. Install the pulley on the new shaft using a 1.5mm hex screwdriver.

24. Install the gland washers, clutch bushing and O-ring on the right side of the shaft.

25. Hold the clutch sleeve with a 2.5mm hex screwdriver and position it so that the sleeve moves no more than 0.5mm from left to right. Then tighten the 2 clutch screws.

26. Install the clutch springs inside the clutch bush by turning the springs clockwise. The spring must be installed in the groove of the clutch sleeve.

27. Install the belt pulley by turning it clockwise until it stops.

28. Install the plastic, after the metal washer. Install the balance wheel with the flat side against the belt pulley.


30. Install the flywheel, making sure that the tabs on the flywheel fit into the slots on the balance wheel.

31. Insert the left end of the upper shaft through the belt into the seat sleeve.

32. Thread the end of the upper shaft through the positioning washer, yoke, gland and counterweight. Remember that the single lobe of the positioning washer must be on the right.


34. Move the release lever towards the front of the machine to protect it from impact from the clutch sleeve.

35. Install the pin against the counterweight through the shaft (a 1.5mm hex screwdriver can be used to poke). If the pin does not go through the shaft, remove the pin, rotate the shaft 180 degrees and reinstall the pin.

36. Position the machine with the counterweight forward. Move the shaft to the right, slide the retainer to the left, and tighten the retainer screw.

37. Set the positioning washer in such a position that it is located with a single blade to the right and up. Install the washer and screw, move the positioning washer to the right or left so that the petals pass through the sensor without hitting it. Tighten screw.

38. Install winder with screw. Make sure the end of the spring fits into the casting hole as shown.


41. Place the white thread guide between the two black parts of the thread holder.

42. Fix the thread drive unit with screws A and B.

Setting
1. Remove the presser foot, needle and bobbin case plate. Loosen the 2 screws of the drive pulley lower shaft (2.5 mm).

2. Before adjusting the hook, make sure the presser foot is in the down position. Insert the needle from the left.

3. Adjust the hook and needle so that the nose of the hook is about 1 mm above the needle eye in the left needle position.

4. Tighten the 2 screws of the drive pulley lower shaft (2.5 mm).
5. Install the bobbin case, needle plate and presser foot. Connect the power cord and turn on the machine. Select Zig Zag stitch (stitch #8). Turn the handwheel to make the needle swing to the right and left. The needle should be 7.8 to 8.2 mm above the surface of the needle plate when rolling.

6. As a point of reference, the needle should swing at the level of the presser foot when the presser foot is in the raised position.

7. To adjust, loosen the upper shaft positioning washer screw.

8. Turn the positioning washer in direction A if the needle is more than 8.2mm above the needle plate and direction B if the end of the needle is less than 7.8mm above the needle plate. Tighten screw.

Installing the side cover
3. Install screws A and B from the bottom of the machine. Screw B is the smaller of the 2 screws located there.
Installing the Top Cover
1. To install the cover, press inward at the base of the handle and install the cover with the handle.

Good luck with the repair!
All the best, write© 2011
There is a water leak in the kitchen, a drain in the bathroom is clogged, you need to install a toilet, sink and more? All these issues require urgent solutions. Professional plumbing services to help you! Calling a plumber at home in Moscow from our company means getting quality plumbing services at an affordable price and on time.
Don't know how to call a plumber to your house? Call us! A plumber on call will come to you in 30 minutes for free. Leave a request and wait for the plumber.
How to solve plumbing problems?
There are three options for solving a plumbing problem: do it yourself, contact the housing office or call a plumber at your place of residence from our company. The first one is, of course, the most a budget option. But he requires you to understand this area, have free time, as well as the availability of special tools and spare parts. The second option involves a lot of inconvenience. A utility worker can only come to you during business hours, which may not coincide with yours. And if you have a force majeure event in the evening, at night, on a weekend or a holiday? For example, did a drainpipe break, a sewer clogged, a toilet flush tank not working, and more? There is a way out - contact us and order plumbing services urgently! We work around the clock, without breaks and weekends, and within a short time our specialist will be at your door. Plumbing services are provided with careful observance of the relevant regulatory documentation. Calling a plumber to your home in Moscow with a guarantee for the work performed. Urgent repair, installation and dismantling of plumbing from market leaders!
We are a team of professionals, we have been working in the plumbing services market for many years. Our staff consists of qualified specialists who thoroughly understand both the plumbing and sewer systems, and the latest generation of plumbing. Our masters are equipped with everything necessary, which allows them to provide speedy service, diagnostics and repair of plumbing equipment. Our Moscow emergency service of plumbers promptly visits you and solves plumbing problems efficiently around the clock.
We provide plumbing services not only to owners of apartment buildings, but also to owners of the private sector. The arrangement of an autonomous heating system is also our profile. Taking into account the individual features of the structure, we are ready to offer different solutions for the problem of rational heating of housing.
Services we offer:
- laying / replacement / cleaning of sewer pipes;
- installation of a water heater, boiler and heating radiators;
- installation of a filter system and pumping equipment;
- wiring of plastic and metal-plastic pipes;
- replacement of the siphon, fine or coarse filters;
- installation of hot and cold water meters;
- connection household appliances to water supply and sewerage;
- dismantling of plumbing equipment and more.
Our plumbing services the best solution For you!
Plumbing services - the work of professionals
 Any plumbing work requires a professional approach. As practice shows, amateurish actions can only aggravate the situation. Not worth it on your own equip, for example, a water heater. We install boilers and boilers in accordance with the rules for the safety and operation of this equipment.
You need to conduct a collector wiring polypropylene pipes water supply or change the battery at the height of the heating season? Not a problem, call us! With the help of a pipe freezer, we will quickly and efficiently, without draining the water, perform all the work.
We also install hot tubs and jacuzzis. These activities are usually associated with dismantling, connection to sewerage and water supply. Our experienced craftsmen, taking into account knowledge, new technologies and modern tools, will always find the most practical solution for your situation. The appearance of a blockage in the pipeline is a reason to call a plumber to your house.
5 reasons why you should choose us:
- we provide a full range of plumbing services;
- guarantee the quality and efficiency of work;
- fulfill our obligations;
- issue a guarantee and documentary reporting;
- We approach each order individually.
The sewing machine is the main working tool of the needlewoman. In order for it to serve for a long time and not cause trouble in operation, it is necessary to carry out the procedure for adjustment, cleaning and lubrication in a timely manner. This is usually done according to the supplied instructions, which should always be kept near the instrument. After that, all the details begin to function more smoothly, and the workflow is a pleasure. All the subtleties and nuances of how to lubricate a Janome sewing machine are presented below.
Why grease
If you do not clean and lubricate the sewing machine in a timely manner, it may fail. Namely:
- details will start to creak;
- there will be noise
- the threads will break;
- the seams will become uneven and tight.
To prevent this from happening, you need to know how and where to properly lubricate the Janome sewing machine.
This is necessary for:
- long service life;
- neat stitches;
- obtaining an easy move;
- ensuring a soft move;
- easy settings.
What do you need to work?
To carry out the procedure at home, you will need:
- 100 g of machine oil for lubrication (available at a specialized or hardware store);
- medical syringe;
- a special brush for removing dust and threads (often included);
- soft cloth to eliminate excess fluid;
- screwdriver;
- tweezers;
- film.
Video action algorithm
For the lubrication procedure, no other oil other than machine oil can be used! First you need to pre-prepare the sewing machine. For this:
- Remove dust from parts of the instrument, including under the platform.
- Get rid of dirt in lubrication holes.
- FROM outside wipe with a cotton swab soaked in alcohol and vaseline oil.
Important! When the unit has not been used, it must be stored under a hood or cover.
Consider an algorithm for how to lubricate a Janome sewing machine. In operation, you must follow the instruction manual.
Step by step algorithm:
- Disconnect the device from the power supply and free from threads.
- Spread the oilcloth on the table and put the typewriter there.
- Unscrew the screws and remove the plastic housing as instructed. To avoid confusion during assembly, fold them onto signed paper sheets.
- Brush the “backbone” to remove all impurities.
- Draw oil into the syringe, lubricate all parts and rubbing parts indicated in the attached documentation. Usually there are photographs, so it will not be difficult to figure it out.
- Blot excess oil with a tissue.
- Assemble the body.
- Thread your sewing machine and sew a few stitches to make sure the seam is clean and free of oil marks.
- Procedure completed.
Features of the lubrication procedure
A common mistake is to apply as much oil as possible. Actually, it is not. During operation, dust accumulates inside the device, which gets there along with the cloth. For this reason, there may be problems with the advancement of the web. Pollution creates an additional load on the drive of the device. A large amount of oil applied during care contributes to the accumulation of dust, threads, and scraps of fabric. Forming lumps, the mass accumulates in a certain place, which leads to congestion and malfunctions.
footage
The owners of Janome brand sewing machines know firsthand about the excellent quality of this sewing equipment and have personally seen this from their own experience. Although sometimes you still have to make minor repairs to the Janome sewing machine with your own hands, which consists in replacing the needle or adjusting some of the units of the unit for more correct and accurate work. But not a single type of mechanical equipment is insured against wear or complete failure of some spare parts, and even more so equipment with electronic filling.
Needless to say, if there is any breakdown in the Janome sewing machine, the best solution would be to call the master at home or transport the sewing machine to a service center to correctly determine the cause of the breakdown and effectively eliminate it. The subsequent reliability of the functioning of the sewing machine directly depends on the professionally carried out repair and adjustment of the sewing equipment.
Our official service has professionally trained employees and all the necessary modern resources, including tools and original spare parts, to carry out quality repair sewing Janome machines. A large number of people turned to us for help in repairs and were completely satisfied with the quality of the work performed. According to our customers, what they liked the most about our service center was the following:
The speed and quality of work related to the diagnosis, repair and adjustment of Janome sewing machines;
The service of calling the master to the house, which allows us to significantly save time and money for our customers, and also not to worry about the way the machine is delivered to our service center;
Sufficiently low prices for our services, regardless of the complexity of the breakdown or the model of the Janome sewing machine.
Feasibility self repair sewing machine Janome directly depends on the complexity of the breakdown, confidence in the accurate diagnosis of the cause of the problem, as well as the ability to eliminate it. For example, if a needle breaks in your sewing machine, then it is quite possible to replace it on your own, but if the sewing equipment becomes unstable or stops turning on at all, in this case it is better not to even try to fix something yourself, because this way you can finally break sewing machine, without the possibility of subsequent recovery.
If, without proper knowledge and skills, you try to fix an unknown problem on your own, then there is a high probability of further aggravating the breakdown that has occurred and making its subsequent repair more difficult and expensive. Only a person with experience and sufficient knowledge is able to diagnose the cause of the problem and professionally eliminate it. By contacting our service center, you will receive high-class qualified assistance in repairing Janome sewing machines in the face of our professionally competent craftsmen.