Interesting experiments with plants. Amazing plant experiments How to do plant experiments
colorful celery
You will need:
Long stalk of celery with leaves.
Red and blue edible paints.
Three small glasses.
Scissors or scalpel.
Plants extract water and nutrients from the soil with the help of tubules-vessels that run along the stem from the roots to the leaves. The structure of this system is similar in all plants - from huge trees to a modest celery. This project will help you track the nutrition of plants.
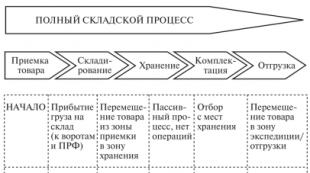
Scheme of work
1. Pour 50–100 ml of water into each of three small glasses. Add blue paint to the first glass, red to the second, and both blue and red to the third (you will get purple paint).
2. Have an adult carefully cut the celery stalk lengthwise into three strips with scissors or a scalpel. Place the celery in three cups as shown in the picture.
3. Don't touch the celery. You will see results in one or two days.
Result. Celery leaves absorb red, blue and purple dye. Different leaves are colored differently.
Explanation
Plants have two types of vessels. Vessels-tubules, which are xylem, transfer water and nutrients from the bottom up - from the roots to the leaves. The nutrients formed in the leaves during photosynthesis travel from top to bottom to the roots through other vessels - the phloem. Xylem is located along the edge of the stem, and phloem is at its center. Such a system is a bit like the circulatory system of animals.
The most effective result is obtained in one or two days, so you need to accurately calculate the beginning of work in order to show the most beautiful celery at the exhibition. You can make several colorful plants - one per day. Then, if the plant wilts during the show, you can replace it.
Do you know?
Damage to the vessels can kill the plant. That is why it is impossible to spoil the bark of trees, since the vessels are close to it.
How do fruits and vegetables ripen?
You will need:
-
Self-adhesive labels.
2 very ripe bananas.
3 green bananas.
2 green tomatoes.
3 paper bags.
You may have heard that one rotten apple can ruin an entire bag. But it can also be said that a ripe banana helps other fruits to ripen. The same applies to vegetables, such as tomatoes. This project will help you monitor the ripening of fruits.
Scheme of work
1. Put one green banana on the table, the second green banana in the bag, and the third green banana in the bag along with the ripe banana. Sign the bags and tie them up.
2. Place one green tomato on the table and the other in the bag along with the remaining ripe banana. Tie and sign the package.
3. Put the bags in a dark place and don't touch them for five days. Then take out all the bananas and tomatoes from these bags and compare them with those on the table.
Result. The green banana and green tomato on the table are a little ripe - they have become softer and changed color. The green banana in the bag ripened more, but the banana that was in the bag along with the ripe banana ripened even better. Both bananas are almost black. Better ripe and green tomato, which was in a bag with a banana.
Explanation
Fruits and vegetables ripen faster without light and in sealed paper bags. In addition, ripening fruits and vegetables release a substance that accelerates the ripening of other vegetables and fruits. This substance, which is ethylene gas, is used to accelerate the ripening of a wide variety of fruits and vegetables.
In addition, in the process of ripening in a limited space, a vegetable or fruit, left to itself, begins to absorb its own ethylene, thereby accelerating its ripening.
In addition to the release of ethylene, or the “ripening hormone,” as scientists also call it, during the ripening process, fruits absorb oxygen and release carbon dioxide. Paper bags, unlike plastic bags, allow enough oxygen to pass through to ensure that the ripening process continues.
Do It nice photos all stages of work. Be sure to take pictures of all fruits at the end of the experience. Show signed packages at the exhibition.
Do you know?
When growing fruits and vegetables in greenhouses in winter, ethylene is usually used to speed up ripening. But with accelerated ripening, the transformation of substances occurring inside the fruit will be incomplete. Therefore, the greenhouse tomatoes and cucumbers that we eat in the winter will never compare in taste with vegetables grown in the garden.
The southern fruits that are sold in our stores do not ripen on trees, but in boxes on the way to the store. Pick them up green.
Vaccination with chewing gum
You will need:
A bush of tomatoes in a pot about 30 cm tall.
A bush of potatoes in a pot of the same height.
Razor blade.
Soft braid.
In this project, you will combine potatoes and tomatoes into one amazing plant - "carmidor". Of course it won't the new kind plants, because ordinary tomatoes will grow from its seeds. Implementation of vaccination projects takes a lot of time. You will need at least eight weeks for the plant to bloom, bear fruit and form tubers after grafting.
Scheme of work
1. Pull the main stems of the two bushes together and tie them loosely with braid.
2. Have a grown-up help you carefully cut away the inside skin of the stems with a razor blade.

Gum grafting between tomato and potato stalks (stages 1–5)
3. Connect the stems with cut sections and wrap with braid more tightly.
4. Chew the gum until it is completely soft.
5. Stick the softened gum around the connected stems.
6. After about a week, check if the vaccine has worked. If both plants look healthy, you can cut off the top of the potato stem and lower part tomato, then from two plants one will turn out - "carmidor".

Result. When tomatoes appear on the plant, carefully dig the ground - you will see small potato tubers.
Explanation
Vaccinations are often used by gardeners who grow rare, especially valuable varieties of fruit trees. When growing apple trees, one cannot do without vaccinations at all - everyone knows that an apple tree grows from the seeds of any tastiest apple, bringing ordinary small, wild apples. tender plants they are grafted onto strong wild trees, for example, one or even several varieties of different apple trees can be grafted onto a wild apple tree. With the help of grafting, hybrid fruit trees are also propagated - grapefruits (a hybrid of lemon and orange) and nectarines (a hybrid of peach and plum).
Take photos of your work and connected plants. Show the resulting plant with tomatoes and potato tubers.
Do you know?
Now scientists are attracted by a new direction of work with plants - genetic engineering. The artificial introduction of new genes makes it possible to improve the quality of agricultural plants, for example, to increase their vitamin content. With the help of genetic engineering, plants are also obtained that are not afraid of pests.
By the way, do you know the difference between fruits and vegetables? The fact that almost all fruits grow on trees, and almost all vegetables grow on the ground or in the ground.
mushroom drawings
You will need:
Fresh agaric mushrooms. (Do not take unfamiliar and poisonous forest mushrooms. Spongy and worm mushrooms are also not good - it is better to buy mushrooms in a store.)
Sheet of white paper.
Have you ever seen mushroom seeds? No matter how hard you look, you can’t find real seeds, like flowers, in mushrooms. Fungi reproduce by spores.
The spores do not contain nutrients, unlike the seeds of flowering plants, they are only the embryos of the fungus. The spores are very small, and many of them are formed - several million in plates on the underside of one mushroom. Spores can only be viewed under a microscope. But in this project, you can see the disputes by the patterns they form.
Scheme of work
1. Carefully separate a few mushroom caps from the stems.
2. Lay the caps flat side down on a sheet of paper.
3. Don't touch the mushrooms for a few days.
4. Take the mushrooms off the paper.
Result. Mushrooms will leave behind a beautiful brown pattern on paper.

Explanation
If you do not touch the mushroom caps, they will “ripen”, and spores will fall out of them on paper. The spores stick to the paper, repeating the pattern of the fungus plates. The longer the mushroom cap lies on paper, the brighter the drawing will be, but a faint imprint of the cap will appear after an hour.
Show the resulting drawings at the exhibition. Try to get on one sheet a drawing of mushrooms lying on paper for different times - from several hours to several days. You will see a wide variety of patterns - both the color and the lines formed by the spores will differ.
Do you know?
Spores can remain unchanged for a long time - until conditions become favorable for their growth. Spores usually require heat and high humidity to germinate.
big green solar car
You will need:
-
Pencil.
Calculator.
A tree with large leaves (you must reach the lower branches of this tree).
Sheet of white paper.
Plants feed using the energy of sunlight. Solar energy helps to synthesize glucose from carbon dioxide in the air and water, which the plant receives from the soil. This process is called photosynthesis.
The leaves of a tree can be thought of as parts of a large solar battery. The larger the total leaf area, the more solar energy the tree uses. In this project you will be able to calculate the area of all the leaves of a tree.
Scheme of work
1. Using a pencil and a ruler, draw a grid of squares with a side of 1 cm on a sheet of white paper. (You can take paper in a box - the side of one square on such paper is 0.5 cm.) Make more of these grids.
2. Pluck from a tree or pick up from the ground one medium-sized leaf - not big and not small.
3. Put the sheet on the grid, circle its outline with a pencil and remove the sheet.
4. Put a tick in all cells of the grid that were completely covered by the sheet or more than half.
5. Count the number of cells with checkmarks - this will be approximate area leaf area in square centimeters. Write down this number.
6. Look carefully at the tree (you can take binoculars). Count how many leaves are on a small branch, how many small branches are on one large branch, and how many large branches extend from the tree trunk. Write down all the numbers.
7. Multiply all the numbers that you have written down: the area of the leaf, the number of leaves on a small branch, the number of small branches on a large branch, and the number of large branches on a tree. You will get the total area of all the leaves of the tree (in square centimeters). Write this result in square meters(1 m 2 \u003d 10,000 cm 2).
Result. It turned out that the leaf completely or more than half covers 15 cells, on a small branch of a tree there are 12 leaves, on a large branch there are 8 small branches, on a tree there are 10 large branches. Multiply these numbers: 15 x 12 x 8 x 10 = 14,400. total area of all leaves of a tree is equal to 14,400 cm 2, or 1.44 m 2.

Sheet and grid with checkmarks to calculate sheet surface area
Compare the results obtained for different trees. For the exhibition, cut out a piece of paper or old fabric, equal in area to all the leaves of the tree.
Do you know?
Solar panels are man-made devices that use solar energy and convert it into other forms of energy. But while artificial solar panels work much less efficiently than natural ones.
* Fragments from the book Do it yourself! 100 most interesting independent scientific projects. - M .: "Publishing House AST", LLC "Publishing House Astrel", 2004.
EXPERIMENTS ON VEGETATIVE REPRODUCTION OF PLANTS
"Propagation of plants by stem cuttings"
Purpose: to master the method of propagation of plants by stem cuttings.
Equipment: a pot of earth, scissors, a glass of water, a glass for covering the plant, rubber gloves.
Working process
1. Carefully cut stem cutting with 3-4 leaves from a hibiscus plant.
2. Remove the two bottom sheets from them.
3. Make a hole in the soil
4. Place the cutting in the soil so that the bottom knot is hidden by the soil.
5. Sprinkle the cutting with earth.
6. Water gently.
7. Cover the cutting with a glass.
8. Make an experiment protocol
9. Draw a conclusion.
"Propagation of plants by leaf cuttings"
Purpose: to master the method of propagation of plants by leaf cuttings.
Equipment: a pot of wet sand, scissors, a glass of water, a glass to cover the plant, rubber gloves.
Working process
1. Carefully cut a leaf from a peperomia plant
2. Make a hole in the sand.
3. Place the leaf cutting in the recess and sand the cutting.
5. Cover the cutting with a glass
6. Draw up an experiment protocol
7. Draw a conclusion.
"Propagation of plants by creeping shoots"
Purpose: to master the method of propagation of plants by creeping shoots
Equipment: a pot of soil, scissors, a glass of water, rubber gloves.
Working process
1. Carefully cut a small plant with roots from the mother plant Chlorophytum
2. Make a hole in the soil
3. Place a small plant there and gently cover with earth
4. Water the plant
5. Draw up an experiment protocol
6. Draw a conclusion.
"Propagation of plants by layering"
Purpose: to master the method of reproduction indoor plants layering
Equipment: a pot of soil, a glass of water, hairpins, rubber gloves.
Working process
1. Carefully bend down the syngonium shoot so that its middle part touches the ground, and the top is pointing up.
2. Secure this shoot to the soil of another pot with studs (1-2)
3. Having fixed the layering of the syngonium, lightly sprinkle it with earth.
4. Pour some water over
5. The daughter shoot is separated not immediately, but after the rooting of the young plant.
6. Draw up an experiment protocol
7. Draw a conclusion.
Experience "Movement to the Light"
The purpose of the experiment: to establish that the plant needs light, and it is looking for it.
Equipment: plant (eg lemon, hibiscus, pelargonium).
The course of the experiment: put the plant by the window for three to four days. Turn the plant 180 degrees and leave for another three to four days.
Observations: The leaves of the plant turn towards the window. Unfolded, the plant
changes the direction of the leaves, but after a while they turn towards the light again.
Conclusion: The plant contains a substance called auxin, which promotes cell elongation. The accumulation of auxin occurs on the dark side of the stem. Excess auxin causes cells on the dark side to grow longer, causing stems to grow towards the light. This movement is called phototropism. A photo -
means light, tropism means movement.
Experiment "Breathing of plants"
The purpose of the experiment: to find out from which side of the leaf air enters the plant.
Equipment: plant (tradescantia, ivy, pachistachis), petroleum jelly.
Experiment: spread a thick layer of petroleum jelly on the upper surface of several leaves. Smear a thick layer of petroleum jelly on the underside of several leaves. Observe the plant daily for a week to see if there is any difference between the leaves smeared with Vaseline on top and bottom.
Observations: Leaves on which Vaseline was applied from below withered, while others were not affected.
Conclusion: Holes on the lower surfaces of the leaves - stomata serve to move gases into the leaf and out of it. Vaseline closed the stomata, blocking the access to the leaf for the carbon dioxide necessary for its vital activity and preventing excess oxygen from leaving the leaf.
Experiment "Evaporation of water by plants".
Purpose: to introduce children to how a plant loses moisture through evaporation.
Equipment: plant (Aucuba, Decembrist, Lemon), plastic bag, adhesive tape.
The course of the experiment: place the bag on a part of the plant and securely attach it to the stem with glue
some tape. Put the plant for 3-4 hours in the sun. See what the bag looks like from the inside.
Observations: water droplets are visible on the inner surface of the bag and it seems that the bag is filled with fog.
Conclusions: the plant absorbs water from the soil through the roots. Water travels along the stems, from where it evaporates through the stomata. Some trees evaporate up to 7 tons of water per day. When there are a lot of them, plants have a great influence on the temperature and humidity of the air. The loss of moisture by a plant through stomata is called transpiration.
Experience "A plant needs light"
The purpose of the experiment: to bring children to the conclusion about the need for light for plants. Find out why green plants growing in the ocean do not live deeper than a hundred meters.
Equipment: two small identical green plants(sour), black package.
The course of the experiment: place one plant in the sun, and hide the other under a black bag. Leave the plants for a week. Compare then their color. Swap plants. Leave the plants also for a week. Compare plants again.
Observations: the plant under the bag became paler in color and withered, and the plant in the sun remains green as before. When the plants were reversed, the yellowed plant began to turn green, and the first plant became pale and withered.
Conclusion: in order for a plant to turn green, it needs a green substance - chlorophyll, which is necessary for photosynthesis. Plants need light for photosynthesis to occur. When there is no sun, the supply of chlorophyll molecules is depleted and not replenished. Because of this, the plant turns pale and sooner or later dies. Green algae live at depths of up to 100 meters. The closer to the surface, where there is most sunlight, the more abundant they are. At a depth of less than a hundred meters, light does not pass, so green algae do not grow there.
Experience "Aerial roots"
The purpose of the experiment: to identify the relationship between increased air humidity and the appearance of aerial roots in plants.
Equipment: chlorophytum, saxifrage, monstera, transparent container with a tight lid and water at the bottom, wire rack.
Course of the experiment: find out why there are plants with aerial roots in the jungle (in
the jungle has little water in the soil, the roots can take it from the air). Consider monstera aerial roots with children. Consider the plant chlorophytum, find the kidneys - future roots. Place the plant in a container of water on a wire rack. Close tightly with a lid. Watch for a month for the appearance of "fog", and then drops on the lid inside the container (as in the jungle).
The aerial roots that have appeared are considered and compared with monstera and other plants.
Observations: this suggests that the plant is adapted to take water from the air, although we did not water it, and then it is necessary to put this plant in the room like other plants. The plant lives as before, but the roots on the plant have dried up.
Conclusion: in the jungle there is very little moisture in the soil, but there is a lot of it in the air. Plants have adapted to take it from the air with the help of aerial roots. Where the air is dry, they take moisture from the ground.
Experiment "The plant wants to drink"
The purpose of the experiment: to highlight the environmental factors necessary for the growth and development of plants. Lead the children to the conclusion that plants need water.
Equipment: two pelargonium flowers, a watering can.
The course of the experiment: find out from children whether plants need water. Put two plants in the sun. Water one plant and not the other. Observe the plants and draw a conclusion. Water this plant and watch for another week.
Observations: a flower that has been watered stands with leaves, green and elastic. The plant, which was not watered, wilted, the leaves turned yellow, lost their elasticity, sank to the bottom.
Conclusion: a plant cannot live without water and can die.
Experience "What makes a plant"
Purpose of the experiment: to establish that the plant releases oxygen. Understand the need for respiration for plants.
Equipment: a large glass container with an airtight lid, a cutting in water or a small pot with a plant, a splinter, a match.
The course of the experiment: to find out why it is so easy to breathe in the forest? Suggestion: plants
provide oxygen for human respiration.
Place a pot with a plant (or cuttings) in a container. They put it in a warm place (if the plant gives oxygen in the jar, it will become more).
After 1-2 days, check with the children whether oxygen has accumulated in the jar. Check with a lit torch.
Observations: observe a bright flash of a torch in a container immediately after removal
Conclusion: plants emit oxygen, which burns well. We can say that plants are needed by humans and animals for respiration.
Up or down experience
The purpose of the experiment: to reveal how gravity affects the growth of plants.
Equipment: Pilea Cadieu, stand.
The course of the experiment: press the stem of the plant to the ground with a bracket. During the week, observe the position of the stem and leaves.
Observations: stems and leaves turn upwards.
Conclusion: the plant contains a growth substance - auxin, which stimulates plant growth. Due to gravity, auxin is concentrated at the bottom of the stem. This part grows faster, the stem stretches up.
Experience "Where is the best place to grow?"
The purpose of the experiment: to establish the need for soil for plant life, the influence of soil quality on the growth and development of plants, to highlight soils that are different in composition.
Equipment: tradescantia cuttings, black soil, clay, sand.
The course of the experiment: together with the children, choose the soil for planting. Children plant Tradescantia cuttings in different soil. Observe the growth of cuttings with the same care for them for two weeks. They make a conclusion.
The cuttings are transplanted from clay into black soil and observed for two weeks.
Observations: the plant does not grow in clay, but in black soil the plant does well. When transplanted into chernozem, the plant has good growth. In the sand, the plant grows well at first, then lags behind in growth.
Conclusion: in the black soil, the plant grows well, because there are a lot of nutrients. The soil conducts moisture and air well, it is loose in the sand. The plant grows initially because it has a lot of moisture for the formation of roots, but the sand does not have enough nutrients so necessary for plant growth. Clay is very hard in quality, water passes very poorly into it, there is no air and nutrients in it.
Experience "What are the roots for?"
Purpose: to prove that the roots of a plant absorb water; clarify the function of plant roots; establish the relationship between the structure and function of the roots.
Equipment: a stalk of a geranium or hibiscus with roots, a container of water, closed with a lid with a slot for the stalk.
Course of experience: Students examine hibiscus or geranium cuttings with roots, find out why the roots are needed for the plant (the roots fix the plant in the ground), whether they absorb water. An experiment is carried out: the plant is placed in a transparent container, the water level is noted, the container is tightly closed with a lid with a slot for the cutting. Determine what happened to the water after a few days (water became scarce). The assumption of the children is checked after 7-8 days (there is less water) and the process of absorption of water by the roots is explained. The children draw the result.
Experience "How to see the movement of water through the roots?"
Purpose: to prove that plant roots absorb water, to clarify the function of plant roots, to establish the relationship between the structure and function of roots.
Equipment: hibiscus or geranium stalk with roots, water with food coloring.
Course of experience: Students examine cuttings of geranium or hibiscus with roots, clarify the functions of the roots (they strengthen the plant in the soil, take moisture from it). And what else can take roots from the earth? Children's ideas are discussed. Consider food dry dye - "nutrition", add it to the water, stir. Find out what should happen if the roots can take up more than just water (the roots should turn a different color). A few days later, the children sketch the results of the experiment in a diary of observations. They clarify what will happen to the plant if substances harmful to it are found in the ground (the plant will die, taking harmful substances with water)
Experience with plant propagation
Purpose: to show children, using the example of tradescantia, how plants can be propagated.
Observation sequence: at the first stage, consider with the children the Tradescantia flower itself: the shape, color of the leaves, the length of the stems. At the second stage, tell that this flower can be propagated and how. Select 3 old, longest stems of the flower, cut them off at the root (the flower should not bloom). Then cut off its ends with young leaves and put in a glass of water. Let the shoots stand in a glass for several days until roots appear. Then the sprouts with roots must be planted in a pot with moist soil. Cover the pot with glassware and observe in the future how the plant is taken, periodically moisten the soil.
Helpful Hints
Children are always trying to find out something new every day and they always have a lot of questions.
They can explain some phenomena, or you can show how this or that thing, this or that phenomenon works.
In these experiments, children not only learn something new, but also learn create differentcrafts with which they can play further.
1. Experiments for children: lemon volcano

You will need:
2 lemons (for 1 volcano)
Baking soda
Food coloring or watercolors
Dishwashing liquid
Wooden stick or spoon (optional)

1. Cut off the bottom of the lemon so that it can be placed on flat surface.
2. On the reverse side, cut a piece of lemon as shown in the image.
* You can cut half a lemon and make an open volcano.

3. Take the second lemon, cut it in half and squeeze the juice out of it into a cup. This will be the backup lemon juice.
4. Place the first lemon (with the part cut out) on the tray and spoon "remember" the lemon inside to squeeze out some of the juice. It is important that the juice is inside the lemon.
5. Add food coloring or watercolor to the inside of the lemon, but do not stir.

6. Pour dishwashing liquid inside the lemon.
7. Add a full spoonful to the lemon baking soda. The reaction will start. With a stick or spoon, you can stir everything inside the lemon - the volcano will begin to foam.

8. To make the reaction last longer, you can gradually add more soda, dyes, soap and reserve lemon juice.
2. Home experiments for children: electric eels from chewing worms

You will need:
2 glasses
small capacity
4-6 chewable worms
3 tablespoons of baking soda
1/2 spoon of vinegar
1 cup water
Scissors, kitchen or clerical knife.
1. With scissors or a knife, cut lengthwise (just lengthwise - this will not be easy, but be patient) of each worm into 4 (or more) parts.
* The smaller the piece, the better.
* If scissors don't want to cut properly, try washing them with soap and water.

2. Mix water and baking soda in a glass.
3. Add pieces of worms to the solution of water and soda and stir.
4. Leave the worms in the solution for 10-15 minutes.
5. Using a fork, transfer the worm pieces to a small plate.
6. Pour half a spoon of vinegar into an empty glass and start putting worms in it one by one.

* The experiment can be repeated if the worms are washed with plain water. After a few attempts, your worms will begin to dissolve, and then you will have to cut a new batch.
3. Experiments and experiments: a rainbow on paper or how light is reflected on a flat surface

You will need:
bowl of water
Clear nail polish
Small pieces of black paper.
1. Add 1-2 drops of clear nail polish to a bowl of water. See how the varnish disperses through the water.
2. Quickly (after 10 seconds) dip a piece of black paper into the bowl. Take it out and let it dry on a paper towel.

3. After the paper has dried (it happens quickly) start turning the paper and look at the rainbow that is displayed on it.
* To better see the rainbow on paper, look at it under the sun's rays.


4. Experiments at home: a rain cloud in a jar

When small drops of water accumulate in a cloud, they become heavier and heavier. As a result, they will reach such a weight that they can no longer remain in the air and will begin to fall to the ground - this is how rain appears.
This phenomenon can be shown to children with simple materials.
You will need:
Shaving foam
Food coloring.
1. Fill the jar with water.
2. Apply shaving foam on top - it will be a cloud.
3. Let the child begin to drip food coloring onto the "cloud" until it starts to "rain" - drops of food coloring begin to fall to the bottom of the jar.
During the experiment, explain this phenomenon to the child.

You will need:
warm water
Sunflower oil
4 food coloring
1. Fill the jar 3/4 full with warm water.

2. Take a bowl and mix 3-4 tablespoons of oil and a few drops of food coloring in it. In this example, 1 drop of each of 4 dyes was used - red, yellow, blue and green.

3. Stir the dyes and oil with a fork.

4. Carefully pour the mixture into a jar of warm water.

5. Watch what happens - the food coloring will begin to slowly sink through the oil into the water, after which each drop will begin to disperse and mix with other drops.
* Food coloring dissolves in water, but not in oil, because. The density of oil is less than water (which is why it "floats" on water). A drop of dye is heavier than oil, so it will begin to sink until it reaches the water, where it begins to disperse and look like a small firework.
6. Interesting experiences: ina bowl in which colors merge
You will need:
- a printout of the wheel (or you can cut out your own wheel and draw all the colors of the rainbow on it)
Elastic band or thick thread
Glue stick
Scissors
A skewer or screwdriver (to make holes in the paper wheel).

1. Choose and print the two templates you want to use.

2. Take a piece of cardboard and use a glue stick to glue one template to the cardboard.
3. Cut out the glued circle from the cardboard.
4. Glue the second template to the back of the cardboard circle.
5. Use a skewer or screwdriver to make two holes in the circle.

6. Pass the thread through the holes and tie the ends into a knot.
Now you can spin your spinning top and watch how the colors merge on the circles.


7. Experiments for children at home: jellyfish in a jar

You will need:
Small transparent plastic bag
Transparent plastic bottle
Food coloring
Scissors.

1. Lay the plastic bag on a flat surface and smooth it out.
2. Cut off the bottom and handles of the bag.
3. Cut the bag lengthwise on the right and left so that you have two sheets of polyethylene. You will need one sheet.
4. Find the center of the plastic sheet and fold it like a ball to make a jellyfish head. Tie the thread around the "neck" of the jellyfish, but not too tight - you need to leave a small hole through which to pour water into the head of the jellyfish.
5. There is a head, now let's move on to the tentacles. Make cuts in the sheet - from the bottom to the head. You need about 8-10 tentacles.
6. Cut each tentacle into 3-4 smaller pieces.

7. Pour some water into the jellyfish's head, leaving room for air so the jellyfish can "float" in the bottle.
8. Fill the bottle with water and put your jellyfish in it.

9. Drop a couple of drops of blue or green food coloring.
* Close the lid tightly so that water does not spill out.
* Have the children turn the bottle over and watch the jellyfish swim in it.
8. Chemical experiments: magic crystals in a glass

You will need:
Glass cup or bowl
plastic bowl
1 cup Epsom salt (magnesium sulfate) - used in bath salts
1 cup hot water
Food coloring.
1. Pour Epsom salt into a bowl and add hot water. You can add a couple of drops of food coloring to the bowl.
2. Stir the contents of the bowl for 1-2 minutes. Most of the salt granules should dissolve.

3. Pour the solution into a glass or glass and place it in the freezer for 10-15 minutes. Don't worry, the solution isn't hot enough to crack the glass.
4. After freezing, move the solution to the main compartment of the refrigerator, preferably on the top shelf and leave overnight.

The growth of crystals will be noticeable only after a few hours, but it is better to wait out the night.
This is what the crystals look like the next day. Remember that crystals are very fragile. If you touch them, they are most likely to break or crumble immediately.

9. Experiments for children (video): soap cube
10. Chemical experiments for children (video): how to make a lava lamp with your own hands
Summary: Experiments with plants. How to paint fresh flowers. Experiments at home for children. Interesting experiments in biology. Fun experience with kids. Entertaining biology for children.

Thanks to this experiment, the child will be able to observe the movement of water in plants.
You will need:
Any flowers with white petals (such as white carnations)
- water tanks
- food coloring in different colors
- knife
- water
Work plan:
1. Fill containers with water.
2. Add food coloring of a certain color to each of them.
3. Set aside one flower, and cut the stems of the rest of the flowers. Scissors are not suitable for this purpose - only sharp knife. You need to cut the stem obliquely by 2 centimeters at an angle of 45 degrees in warm water. When moving flowers from water to containers with dyes, try to do it as quickly as possible, holding the cut with your finger, because. upon contact with air, air plugs are formed in the micropores of the stem, preventing water from passing freely along the stem.
4. Place one flower in each dye container.
5. Now take the flower that you put aside. Cut (split) its stem lengthwise from the center into two parts. Repeat with it the procedure described in point 3. After that, mark one part of the stem in a container with dye, for example, of blue color, and the other part of the stem into a container with a dye of another color (for example, red).
6. It remains to wait until the colored water rises up the stems of plants and colors their petals in different colors. In time it will take about 24 hours. At the end of the experiment, don't forget to examine every part of the flower (stem, leaves, petals) to see the path of the water.
Experience Explanation:
Water enters the plant from the soil through the root hairs and young parts of the roots and is carried through the vessels throughout its aerial part. With moving water, minerals absorbed by the root are carried throughout the plant. The flowers that we use in the experiment are devoid of roots. However, the plant does not lose the ability to absorb water. This is possible due to the process of transpiration - the evaporation of water by the plant. The main organ of transpiration is the leaf. As a result of the loss of water during transpiration, the sucking force in the leaf cells increases. Transpiration saves the plant from overheating. In addition, transpiration is involved in creating a continuous flow of water with dissolved mineral and organic compounds from the root system to the aboveground plant organs.
Plants have two types of vessels. Vessels-tubules, which are xylem, transfer water and nutrients from the bottom up - from the roots to the leaves. The nutrients formed in the leaves during photosynthesis travel from top to bottom to the roots through other vessels - the phloem. Xylem is located along the edge of the stem, and phloem is at its center. Such a system is a bit like the circulatory system of animals. The structure of this system is similar in all plants - from huge trees to a modest flower.
Damage to the vessels can kill the plant. That is why it is impossible to spoil the bark of trees, since the vessels are close to it.
Guys, we put our soul into the site. Thanks for that
for discovering this beauty. Thanks for the inspiration and goosebumps.
Join us at Facebook and In contact with
There are very simple experiences that children remember for a lifetime. The guys may not fully understand why this is all happening, but when time will pass and they will find themselves in a lesson in physics or chemistry, a very clear example will surely pop up in their memory.
website collected 7 interesting experiments that children will remember. Everything you need for these experiments is at your fingertips.
refractory ball
It will take: 2 balls, candle, matches, water.
Experience: Inflate a balloon and hold it over a lighted candle to show the children that the balloon will burst from fire. Then pour plain tap water into the second ball, tie it up and bring it to the candle again. It turns out that with water the ball can easily withstand the flame of a candle.
Explanation: The water in the balloon absorbs the heat generated by the candle. Therefore, the ball itself will not burn and, therefore, will not burst.
The pencils
You will need: plastic bag, pencils, water.
Experience: Pour water halfway into a plastic bag. We pierce the bag through with a pencil in the place where it is filled with water.
Explanation: If you pierce a plastic bag and then pour water into it, it will pour out through the holes. But if you first fill the bag halfway with water and then pierce it with a sharp object so that the object remains stuck in the bag, then almost no water will flow out through these holes. This is due to the fact that when polyethylene breaks, its molecules are attracted closer to each other. In our case, the polyethylene is pulled around the pencils.
Non-popping ball
You will need: balloon, wooden skewer and some dishwashing liquid.
Experience: Lubricate the top and bottom with the product and pierce the ball, starting from the bottom.
Explanation: The secret of this trick is simple. In order to save the ball, you need to pierce it at the points of least tension, and they are located at the bottom and at the top of the ball.
Cauliflower
It will take: 4 cups of water, food coloring, cabbage leaves or white flowers.
Experience: Add food coloring of any color to each glass and put one leaf or flower into the water. Leave them overnight. In the morning you will see that they have turned into different colors.
Explanation: Plants absorb water and thus nourish their flowers and leaves. This is due to the capillary effect, in which the water itself tends to fill the thin tubes inside the plants. This is how flowers, grass, and large trees feed. By sucking in tinted water, they change their color.
floating egg
It will take: 2 eggs, 2 glasses of water, salt.
Experience: Gently place the egg in a glass with a simple clean water. As expected, it will sink to the bottom (if not, the egg may be rotten and should not be returned to the refrigerator). Pour warm water into the second glass and stir 4-5 tablespoons of salt in it. For the purity of the experiment, you can wait until the water cools down. Then dip the second egg into the water. It will float near the surface.
Explanation: It's all about density. The average density of an egg is much greater than that of plain water, so the egg sinks down. And the density of the saline solution is higher, and therefore the egg rises.
crystal lollipops