Wood crafts - what kind of tree is used, interesting products from the array, roots and branches. Original crafts from tree branches that you can do with your own hands How to make an animal out of driftwood
Nature brings many surprises. Twisted branches of trees, parts of roots, turn into snags. There is a whole trend in art.
The creation of such masterpieces involves spatial thinking, rich imagination and a non-standard approach. Not everyone can see the future creation in individual sticks.
It is difficult to comment on all this, you need to enjoy the result of your work.
The framing of the entrance resembles a temporary portal.


It is very comfortable to sit on such a bench.

Leshy's bench.

The table seems unstable, but this is an illusion.

Framing the railing for the hut.

On such a bed you should sleep sweetly.

This is a work of art. You can look at it for hours.

Framing the stairs leading to the second floor of the tower.

Comfortable sofa with lots of soft pillows.

Chest of drawers and wood.

A tree hanging from the ceiling is a chandelier.

This is how you decorate the wall.


These are magnificent and unique sculptures.


A garden of snags is called a rutary.

Do-it-yourself stump table: 10 stunning photos
A table is an important attribute of any home. At the table, the most important action takes place - the meal. Scientists advise using wooden tables They don't release toxins like plastic ones. Glass tables are more dangerous and can be fragile. Good wooden tables cost a lot of money, and many decide to make a table with their own hands. The cheapest and easiest way is to make a table out of hemp.
It looks very beautiful and beautiful, but this is an ordinary stump.

They simply nailed the countertop to the hemp, and it turned out to be a good table.

Such work will require considerable time and experience in carpentry, but it is worth it.

A table can be made from small stumps and varnished.

It's not easy to find such a big stump, but coffee table Came out great.

To create such a small table, they took a small stump and an ordinary round timber from a tree.

The tabletop can also be placed on top of glass, which will add even more attractiveness to your table.

You can also fasten the wheels to the stumps and the table will be mobile.

A backlit table can also be made from hemp.

The coffee table in the form of a month is a wonderful work.

They say that sitting on a stump is even useful. Previously, hemp was often used as a chair and did not bother much, even now many people do this in the villages. But in an apartment or house you can make a beautiful chair from a stump with your own hands, for this you need only properly growing hands and imagination. In this article you will be able to consider the best work.
Very simple and soft - soft stump.

You can carve the original chair with a chainsaw and a turbine.

And here is a stump-chair with legs.

In hemp, you can make the back if desired.

Nice dark wood stool.

Screw on the wheels and here is a stump office chair.

Stumps can be used almost any.

From small stumps, you can glue such a table and a stool.

Hemp chairs for the whole family.

And in such here they even made a former.

Hemp royally look beautiful.

You can cut the stump into pieces and make a stool.

Crafts from stumps for the garden with your own hands: 10 photos
garden plot can be decorated with the most different materials, which have already served their age, as well as materials of natural origin. These include cut down trees, or rather what is left of them - these are real stumps. From stumps, you can build a variety of outlandish things that can please the eye. Let's present 10 photos of DIY crafts from stumps for the garden.
A stump with a cute frog perched on it.

An original and outstanding fly agaric was built from a stump.

Baba - Yaga from a stump will please anyone, make him laugh, and even cheer up.

Forest brethren from birch stumps.

Stump house for a variety of inhabitants.

The fly agaric house is a great idea.

A stump house with a roof, windows and flower beds - balconies.

The two stump brothers created an interesting composition.

House for an Elf from a stump with a powerful door.

A house with a chimney and a porch for the gnomes.

Top 13 do-it-yourself stump products - only the best ideas
Unnecessary tree stumps are an excellent material for creativity and making money. And fantasy, as you know, has no limits and boundaries. With a certain processing, objects from the stump will last a very long time. We have prepared a selection of the top 13 DIY stump products. Happy viewing! These will only be the best ideas.
Glowing seats can be made from a stump. Having painted them with luminescent paint, it is good to use in the garden.

Candlesticks from a stump - creative idea for home.

If you carefully work with tools, then from a stump you can get a stand and a shelf for books: two in one.

A stump lamp is an ordinary accessory made from an unusual material.

From a stump you can make a bar counter for several bottles of wine.

A coffee table made of stump and glass will successfully fit into the interior of the living room.

From a small stump you can make a bird feeder.

Mini - a waterfall from a stump. But the stump is suitable from a healthy dried tree, carefully treated with impregnations.

Stump crafts in garden design are a great idea.

A stump garden table will decorate a terrace or a conservatory.

Stands and flowerpots are obtained from a stump of different sizes.

A stump of an old tree will make a beautiful flower garden.

Figurines from a stump can be placed in a garden, park, playground.

Do-it-yourself stool from a stump. 10 amazing ideas + photos
From unnecessary leftovers, designer things are obtained. From an unnecessary stump you can make: benches, tables, stools. The stump does not need to be processed with tools. Such furniture has a special style and design. Furniture in Russian traditions will look in the garden, bathhouse, summer kitchen. We offer to evaluate stools from a stump with your own hands. 10 amazing ideas + photos.
Economical furniture: the stool is made from two saw cuts of one stump.

For this stool, you will need a high stump so that you can cut the back back.

This model is sustainable. But you need to make an effort to cut a figured leg out of a stump.


The most common model of a stump stool. But in order for the furniture to last longer, you need to properly fix the legs.

The stump is upholstered soft cloth. This stool is comfortable to sit on.

Stump stool - comfortable and simple model: cut out the legs - the seat is ready.

Stable, not high stump stools. True, they do not weigh much.

To make such stools from a stump, it will take a lot of time and effort, large stumps. And yes, the price will be high.

This high stump stool is perfect for a bar counter.

Often, to decorate our home, and regardless of whether it is an apartment or a country house, we use natural materials. Their main advantage is ecological cleanliness. Again, such materials look very original and beautiful in interior design. Well, the fact that no financial costs are required for their acquisition is clearly a huge plus.
In this article, we will share some ideas do-it-yourself homemade products for home and garden from branches and snags. Another option for natural materials is a natural stone. Read about what can be made from pebbles in this article.
From branches, sticks and snags, you can make a lot of useful and interesting homemade products. Looks very original made of them DIY furniture. And you can fantasize and experiment. For example, you can clean everything from the bark to the white state of the material, or leave it straight with the bark. In both cases, it looks very nice. But if you still decide to remove the bark, we recommend covering it after assembling the entire structure. by special means. For example, acrylic or oil varnish. Well, in general, what to cover - a huge mass of options. Moreover, these funds can be both colorless and all kinds of shades. As for the connection of parts, they can be fastened both with fasteners (nails, self-tapping screws, screws), and using the groove-thorn technology. Again, you can make such furniture both for the house and for the street.

Fig. 1 DIY furniture

Fig. 2 Do-it-yourself furniture

Fig. 3 Do-it-yourself furniture

Fig. 4 Do-it-yourself furniture

Fig. 5 Do-it-yourself furniture

Fig. 6 Do-it-yourself furniture
A very good option for products made from natural materials will be all kinds of lamps. They can be made from snag, branches or just from a log.

Fig. 7 Log lamp

Fig. 8 Driftwood lamp

Fig. 9 Driftwood lamp
All kinds of shelves, stands and tables made of branches and snag, which do it yourself not difficult at all.

Fig. 10 Shelf of branches and snags

Fig. 11 Shelf of branches and snags

Fig. 12 Shelf of branches and snags

Fig. 13 Shelf of branches and snags

Fig. 14 Shelf of branches and snags
Often, various cornices or hangers are made from sticks or thin logs. Well, if your house has more than one floor, then interesting option there will be a railing for the stairs made of wood.

Fig. 15 Log railing

Fig.16 Hanger

Fig.17 Hanger

Fig.18 Hanger

Fig. 19 Driftwood cornice

Fig. 20 Hanger made of driftwood
Also, various fences made of such materials look great. And here you can also not clean the bark. Such a fence looks very unusual.

Fig.21 Fencing
branches and driftwood can be hung on the wall as a decoration. The walls decorated with sticks and logs look very beautiful.
Well, if you replace the legs of the bed with real cuts of trees, you will plunge into the atmosphere of the forest right in your bedroom.

Fig. 22 Decorating a room with wood

Fig. 23 Decorating a room with a tree

Fig. 24 Decorating a room with a tree

Fig. 25 Decorating a room with a tree

Rutarium will allow you to make furniture for summer cottages from snags, stumps. Also from these materials you can make flower girls, sculptures with your own hands.
Rutaria is an interesting direction in landscape design. He will help turn the cottage into an unusual corner. Stumps, various snags, an old tree are suitable for this.
DIY stump crafts
If you got a plot with the root system of a tree and its low above-ground part, do not uproot this element. To make crafts from stumps for suburban area, you will need:
- stumps or one;
- colored chips;
- antiseptic;
- stones;
- flowers;
- the soil;
- tassel.

- To make the stump craft last as long as possible, take out the dust from the inside. Dry this inner hole. Remove the bark from the stump.
- Paint this natural wood element inside and out with two coats of antiseptic. When it is completely dry, you can start decorating the flower girl.
- Pour fertile soil inside the hemp, plant undersized flowers. Mulch the surface with ordinary or colored wood chips. Put stones next to the stump.

Instead of stones, you can use inverted glass or plastic bottles. The latter have their necks cut off.
If you don’t know how to arrange the northern part of the territory in the country, then place the rutar here, plant shade-tolerant flowers in it.
Not only hemp is suitable for adaptation, but also all kinds of snags.

If you have an unnecessary log for a long time, saw through it from above, take out part of the wood, remove the bark. Also treat the surfaces with an antiseptic, then sprinkle fertile soil, plant unpretentious plants.
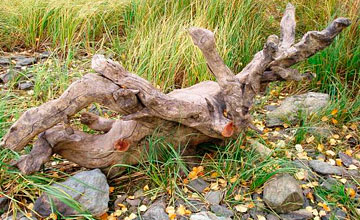
Take a closer look, maybe a snag found in the forest reminds someone? In the photo, she looks like a fairy-tale dragon, you just need to work out the details so that they become obvious. To do this, use a hatchet, hacksaw, wood carving tools.
Crafts from snags can be not only in the form of flower girls, check out the following ideas.
How to make furniture for a summer residence, wood sculptures?
See what results the craftsmen achieve. Having marked some details of the silhouette, you can make such a Bigfoot or a good-natured Leshy.

To make this type of chair, take:
- driftwood;
- board;
- rope;
- stain;
- varnish for wood for outdoor use;
- brush;
- self-tapping screws;
- saw.
- To make the chair reliable and stable, choose only strong, not light snags, oak ones are perfect.
- Saw off parts from them that will turn into legs. The two front ones are short, the back ones, together with the back, are long. Make the base of the seat, put a couple of boards here, attach them with self-tapping screws.
- From strong snags, make armrests, secure them with self-tapping screws and rope. For the backrest, a reliable cross member is taken, which is fixed in the same way. Two small snags are attached vertically to the center of the back.
- It remains to cover the chair with stain, when it dries 2 layers, apply three layers of varnish with intermediate drying.

If you want to emphasize the natural structure of the tree, then do not varnish it, but just walk with an antiseptic, it can be transparent. See what wonderful chairs are made from stumps. The table is made from the same workpiece, only the top is attached to the top.

But what can be done from a large hemp by sawing off its upper part. Then thick intricate snags will turn into table legs.

A bench made of wood will also turn out to be unusually interesting, openwork and even fabulous.
To do this, take:
- two strong boards, preferably floorboards;
- driftwood;
- self-tapping screws;
- glue for wood;
- antiseptic;
To securely connect them to the legs, attach snags here with self-tapping screws. Additionally, they can be fixed with pins by sawing holes of such a diameter in two connecting elements into which glue is poured.
In the same way, fix the back, consisting of many snags. Sand down some elements if your design needs it.

Almost the same type you can create a massive sofa. But its legs and base are logs.

You can leave the product in this form or paint it with varnish, it also turns out very beautiful and unusual.

Not only individual items will come out of the old tree, but the whole set. Coated with antiseptic and varnish, it will be able to stand outdoors in the air.

On such country furniture it is so pleasant to sit in the shade, eat food here, arrange holidays.

If you use a spray of golden lacquer to decorate furniture made of driftwood, create, for example, a chic shop that will look like an old one with a copper sheen.

If you only have an old stump, remove the bark from it, take out the dust, prepare it as described above, put tempered glass on top, you will get a wonderful wooden table.

He may come out different. If you have a longitudinal saw cut of a tree, process it, attach the legs from below, put glass on top. Instead, you can make a countertop from.

Rutarium from snags: a master class
We continue the topic of how a rutarium is created. In order for the crafts to come out beautiful, you first need to prepare the snags. For this you will need:
- soda ash;
- bleach for linen;
- iron brush;
- Plastic container;
- sandpaper.
- Pour into container hot water if it has a volume of 10 liters, then add two glasses of soda ash, stir. Put driftwood here. Place weights on top to prevent them from floating up. It can be plastic cans with water.
- After two days, the pieces of wood will soften, then clean the surface with an iron brush. Since the wood will be uneven in color at this stage, rinse the blanks. Pour 10 liters of water into the same 10-liter plastic bowl, add one and a half cups of bleach. Place snags here for two days.
- After this time, lay them out in the sun for 3 days. Then, using sandpaper, you need to grind the unevenness of the place.

Now you need to fold these blanks in order to use them for crafts if you wish, for example, to make such a three-dimensional star.

For her you will need:
- plywood sheet;
- jigsaw;
- driftwood;
- hot glue;
- star pattern.

Sawing pieces of driftwood to the desired length, glue them to the star, starting from its outer edge.

Then, gradually move towards the center, try to cover all the plywood with chocks.

Wait for the glue to cool, spray-paint your work desired color. The silver star looks great.

For such crafts from snags, a door is perfect country house. Attach finished work here, so that the star adorns the building. You can make another rutary.
See what a wonderful wooden shelf you get.

For her you will need:
- strong snag;
- rosewood varnish;
- iron brush;
- construction hooks;
- corners;
- brush.

If you like, you can cover the hooks and corners with gold paint, when it dries, use these elements.
Screw on building hooks to hang mugs or wine glasses on them. Attach the driftwood shelf to the wall with metal corners.

From snags, wonderful things are obtained not only for the street, but for the home. Watch the following master class, from which you will learn how to make a flower stand with your own hands. For this creation you will need:
- small log;
- snag;
- shells;
- leg-split;
- river pebbles;
- hot glue;
- self-tapping screws;
- saw.

First you need to prepare the wooden parts. To do this, remove the bark from a wooden log. This must be done very carefully so as not to damage your hands.

Saw circles about 5 cm thick from the log. You also need to remove the bark from the snag. If this blank is of the wrong type, then bleach it in the same way as it was described earlier.

While the driftwood dries, you will have time to decorate the flower stand. On the side surface Glue the rope around the top and bottom with a hot gun. Using it, attach pebbles, shells. Paint the surface with varnish in 2 layers.
In the same way, decorate other pallets where the plants will stand, including the largest one, which will become the basis for the flower girl. Attach a snag to it, attach the circles to the tops, on which the planters will stand.

Paint the driftwood also with varnish in 2 layers, let it dry. You can decorate the flower stand with artificial greenery.

In some places, glue shells on hot glue, you get a very beautiful picturesque stand.

Do-it-yourself rutary in the city
If you don't have personal plot, you live in a city, trees were cut down here, interesting snags, stumps remained from them, then you can decorate the yard using this idea. To carry out this venture, you will need:
- stumps and snags;
- dye;
- brushes;
- seedling;
- fertile soil.

If it is difficult to take out the middle part of the tree cuts, then just paint them, for others, remove this middle part, fill it with earth, and also paint these blanks to make them look more positive. It is possible to use not only White color, but also any others.
From the branches of cut trees, make a semblance of a well, putting four pieces in a row. Here also fill the soil and plant seedlings of flowers. If there is little sun in the yard, then use shade tolerant plants, for example, hostas, loaches, ivy.

If there are a lot of snags available, you can make interesting sculptural compositions from them. For example, these horses.

If you know how to carve wood, then try making a rutary with a sculpture of a funny man.

DIY wood figures
They can also be made to decorate the yard in the city or in the country. Such a rutarium looks great, adds personality to the site, it is clear that a jack of all trades lives here.
If you want to know what kind of wood is best to carve a sculpture, then check out the following information.
- Linden is one of the best materials. Such wood is cut softly and easily. The structure of this tree is light, it almost does not warp or crack.
- Aspen is also easy to work with. Products from it can even not be varnished, then after time they will have a beautiful silver color. But crafts made from such wood are prone to chipping, so it is used to create large sculptures.
- Alder lends itself well to cutting and processing, resistant to cracks. Therefore, it is also an excellent material. Take note of this when you do the rutaria on the site.
- If you want to make fine artistic elements here, use a walnut, it is very decorative, does not warp and is chip resistant.
- Birch is not processed so well and warps. Therefore, if you want to carve wood, use this to create small parts and souvenirs. But the birch is well painted and has a beautiful relief.
- Large carvings can be made from oak, they will be durable. But such dense wood is difficult to cut, so you have to make an effort or use an electric tool.
- Of the large ones, this is an ax, a hacksaw and even a chainsaw.
- Using cutters with a blade width of 1.5 cm, you can cut small elements that are in hard-to-reach places. There are many cutters, each designed to perform a specific function.
- Tesla is suitable for the initial processing of small parts.
- Also for wood carving, knives, jambs and chisels are used. The latter perform any notch, designed to work out the details. The cutting edge can be of various shapes.
- The Bogorodsk knife is perfect for carving wood sculptures. It is named so in honor of the village in which such work has long been performed.
- The drill is suitable for drilling holes.
- To make the surface of the product smoother, use a rasp, grinder and sandpaper.

The photo shows how woodcarving is performed. You can see the stages of creating a sculpture from this material using the example of carving a bear.

This is preceded by the following work:
- creating a sketch on paper, it needs to be drawn from various angles;
- then this sketch is transferred to the workpiece, which is best used as a rectangular bar;
- if you want to avoid mistakes when carving a sculpture from wood, then mold it first from plasticine or clay, make adjustments;
- now you can move on to rough cutting, which is carried out with a hatchet or saw;
- small details you will create with a tesla;
- and the cutter and chisel will allow you to cut off extra corners.
Next, the details of the bear's nose and sternum are worked out. Then he will acquire ears, front paws and hind legs. At the next stage, they are marked more clearly, and a stand for a wooden sculpture also appears.
For the next step, you need to use chisels, a Bogorodsk knife, and jambs that will help make facial features, bear claws, and fur more realistic.

At the final stages, you will need to sand and sand the wood sculpture, then cover it with stain and varnish. You can use special wax.
If you want to see how a bear is carved out of wood with a chainsaw, then refer to the next master class.
If you want to know what a rutarium can be like in your country house, then turn on the following video.
Another one will clearly show how you can decorate the yard with the help of sawn trees.
Snags are called partially rotted fragments of trees that have been lying on the ground for a long time.
Despite the peculiar and sometimes unpresentable appearance, snags are good material for the manufacture of various crafts and products.
The material combines a fairly high mechanical strength and an unusual shape, and also has a wood texture.
In this article we will talk about what can be made from snags, and also teach how to process this peculiar material.
 The basis for the appearance of driftwood is a living and dead tree, as well as its parts.
When a plant weakens or ages, it the immune system can no longer effectively resist various pathogens and pests.
Therefore, in some areas, damage appears that changes the properties of the wood.
Over time, damage leads first to death, and then to decay, resulting in part of the plant loses its strength and collapses by wind, rain or other factors. Since there is no clear boundary between normal and damaged wood, the destroyed areas take on the most bizarre forms.
If destructive processes occur on a tree, then over time the damaged fragment breaks off from the trunk or roots and turns into a snag, that is, a severely damaged piece of any part of the tree.
If a branch or trunk broke off from a tree even before the damage, then they are a snag become only after various microorganisms have sufficiently damaged them, and these defects will be noticeable even with a cursory examination.
If the damage has affected the roots, then they turn into a snag after the trunk breaks off from them, and root system will come out of the ground under the influence of various factors.
Where can I find it and can it be collected?
Since driftwood comes from unmaintained trees, easier to find them:
- forests;
- forest parks;
- windbreaks;
- groves.
 Although allows you to collect driftwood and other tree fragments naturally separated from the plant, local authorities often impose various restrictions.
Therefore, before going for a snag into the forest, ask your local government whether there are any restrictions at the local level.
The brush removes dirt well and cleans even cracks and depressions, but it damages the surface of the wood, so it will have to be sanded. Most effective, however, almost completely removing the bark, is the processing of driftwood pressure washer. This machine removes any dirt, but does not damage the wood.
Bark cleaning
Bark removal can be either a separate operation or one of the actions carried out when removing loose wood or grinding.
In the first case use blunt chisels with which from wood. It is undesirable to use sharp chisels, because they can damage the wood and deprive it of its natural texture.
In the second and third cases, standard tools are used for removing or grinding, that is, attachments for a drill / grinder or sandblaster.
Drying
forest snags have very high humidity(25–55%), which makes it difficult to stop the destruction processes in them, because high humidity is the main condition for the active life of microorganisms that feed on wood.
In addition, washing the material with a sponge or sink high pressure further increases this parameter, making the material even more vulnerable. So driftwood after cleaning it is desirable to dry. This can be done in two ways - forced and natural.
 For forced drying, the wood is placed in a dryer or oven and the heat is turned on.
The liquid inside begins to evaporate and look for a way out, which leads to cracking of the material. Depending on humidity and temperature, such drying takes 10-50 hours.
For drying naturally the snag is laid in a well-ventilated shaded room without drafts, it is desirable that the temperature in it be within 15–25 degrees above zero. Drying time is 10–30 months, due to the slow release of moisture on the surface of the wood, no new cracks appear.
Loose part removal
Before removing loose or rotten wood, it is necessary to mark its boundaries with a simple pencil.
It is undesirable to use a marker for this purpose., because its paint is absorbed into the wood and it will be possible to remove it only together with the top layer of the driftwood surface.
Then the middle of the rotten area delete different ways , for example:
- break out by hand;
- knocked out with a hammer or an ax;
- cut with a jigsaw;
- grind with a brush-nozzle with hard steel hairs.
During this stage, it is advisable not to approach the edges of hardwood, because you can accidentally damage them, after which you will have to grind this area hard. Rude on the border with hardwood removed with a large rasp or nozzle brushes with soft metal hairs.
Shape change
Despite the fact that the unusual shape of driftwood is its main advantage, sometimes you have to change the shape.

For this:
- it is cut with a hacksaw, jigsaw or chainsaw, depending on the size and thickness of the driftwood;
- the surface of the material is leveled using manual / electric planers and jointers;
- cutouts are made in the walls using manual and electric jigsaws.
All these operations are performed in the same way as when processing any other wood, for example, boards. Therefore, those who know at least a little how to work with wood will be able to independently change the shape of the driftwood, giving it the desired shape.
Putty
For sealing cracks use both ready-made putties for wood, and a mixture of wood dust with PVA glue. You can get the dust of the desired color using a grinder. In addition, wood dust of any color and suitable water-soluble colors can be used.
Before puttying it is necessary clean the surface wood and, if possible, sandblast it.
After filling the defect with putty, it is necessary to remove all excess, so that the putty area does not protrude relative to the surface wood. If the size of the defective area of the driftwood exceeds the values recommended for putty, then it is advisable to fill the defect several times, this will keep the putty from cracking.
Grinding
 Sanding eliminates minor imperfections, and also make the texture of wood more clear.
Coarse sanding can be done with a grinder and coarse sandpaper or with a brush attachment with soft metal hairs inserted into the drill.
Medium grinding of hard, as well as medium and final grinding of soft rocks, is performed only by hand using sandpaper with numbers from 20 to 6, gradually reducing the grit. For final grinding of hard rocks, use 5-n or 4-n sandpaper.
If during coarse or medium sanding it is not possible to remove the pile, which constantly rises after the passage of sandpaper, then the surface of the wood must be wetted. For any grinding method, periodically change the direction of movement of the sandpaper to avoid deep marks.
Burning
This operation is used for surface color changes polished driftwood, because during heat treatment the wood darkens, and the stronger the heating, the darker it becomes. You can burn both the entire surface of the driftwood, and only certain sections.
For firing use a blowtorch or gas burner. All flammable substances must be removed before firing.
If, by firing, the surface is made a little darker than necessary, and then sanded again, you will get a very unusual pattern of wood texture, which will retain its shape, but greatly change the color.
Impregnation with various reagents
Such impregnation is carried out if the finished product is located in places with high humidity or high temperature.
 For this processing,:
- antiseptics (protect against pathogenic bacteria);
- insecticides (protect against pests);
- hydrophobic or water-repellent (to protect against high humidity);
- flame retardants (to protect against high temperatures and open flames).
For such processing, it is advisable to use only high-quality ready-made formulations, and also act in accordance with the instructions that are pasted on the reagent containers.
In addition, snags often boiled in soda or table salt, however, both methods are applicable only for those products that will then be constantly in water, because soda and salt are very hygroscopic, therefore they draw in moisture even from the air.
Painting and varnishing
For painting, both paint from aerosol cans and any water-soluble, for example, acrylic dyes, are used.
Before painting with materials on water based, it is necessary to carry out a “wet” grinding of the surface in order to completely remove the pile, otherwise, after contact with water, it will rise and the surface will have to be sanded first to remove the dye, then repainted.
Also you can use paints and enamels on any polymer bases However, before this, the driftwood product must be thoroughly dried, otherwise excess moisture will not be able to escape through the vapor-tight polymer layer, and the wood will begin to collapse.
You can also change the color of the wood surface with the help of stains. Their main advantage is that they penetrate deep into the wood by 0.1-1 mm, so by carefully grinding individual sections, you can change the color saturation.
In addition, the color saturation in individual areas can be adjusted by the amount of stain or by applying it in several layers.

For varnishing, you can use any varnishes compatible with dyes. Varnishes based on acrylic and wood resin allow water vapor to pass through, so the workpiece can not be dried too much. Varnishes based on other polymeric materials form a vapor-tight film, so only well-dried snags can be covered with them.
Polishing and joining with other parts
Lacquered surfaces can to polish using the same mastics that are used to polish parquet or wooden floors. In addition, you can use any polishes for lacquered furniture.
There is two conditions for high-quality polishing:
- use a mastic or polish that is compatible with varnish;
- strictly follow the procedure described in the instructions for the polishing material.
Often a snag is, albeit the main one, but only an element of the whole composition, so it has to be combined with other details.
For this use:
- glue;
- pins;
- nails;
- locks;
- threaded elements;
- furniture corners.
Any of the methods of connection does not differ from the same action applied to any wooden details, so you will find more detailed information on this issue.
What products can be made?
Due to their unique appearance and rather high strength, driftwood is a good basis for making a wide variety of crafts.
 Here short list what can be done with them:
- decorations for an aquarium or terrarium;
- lamps and chandeliers;
- candlesticks;
- decorative figures from snags for the garden and interior;
- furniture;
- wall and table decorations;
- watches and watch stands;
- gazebos.
Decorations for aquarium and terrarium
Snags in aquariums and terrariums not only play the role of decorations, but also create a more familiar habitat for fish and other living creatures.
For a terrarium, you can choose wood of any species, however, when making driftwood for an aquarium it is better to use the hardest hardwoods of all that are available.
Although you can use driftwood from branches, material from the roots is better suited for terrariums and aquariums. And it is advisable to take a firewood for this purpose, that is, wood that has lain in the sea or running water for a long time.
The selected material must be cleaned of and dirt, then carefully sandblasted or soft wire brush. This will help you find any rotten or moldy areas that need to be removed, including some of the healthy wood.
 Since the use of purchased antiseptics is unacceptable, because they can be harmful to the inhabitants of terrariums and aquariums, during the preparation of wood boiled in a solution of common salt for 3-10 hours.
After that, it is boiled for another 5–15 hours in clean water, changing the liquid every half hour.
Such preparation completely cleans the wood from harmful substances and dangerous microorganisms, and also saturates it with water, so that it will not float.
If the snag still pops up, then you can attach rubber suction cup and with its help to fix on the bottom. If the snag is prepared for the terrarium, then after boiling it is dried in a ventilated room for 3–5 months.
Lamps and chandeliers
Due to their unusual shape, driftwood is well suited for the manufacture of lamps and chandeliers. It is best to use snags from the butt (lower part of the trunk) or roots that contain indentation with jagged edges.
You can install a lamp in the recess, and uneven edges, especially with roots coming out of them, will give fancy shadows.
Making a lamp from driftwood is usually includes several steps:
- cleaning from dirt and bark;
- removal of loose areas;
- drilling holes for hanging on a wall, ceiling or other surface;
- drilling holes for installing the lamp and cartridge;
- coarse and medium grinding with lint removal;
- impregnation with stains or firing;
- fine grinding;
- varnishing;
- polishing;
- installation of a lamp and cartridge;
- laying wires;
- wall mounting.
Candlesticks
 For the manufacture of a candlestick, a snag of any shape is suitable, while the type of wood does not matter.
If the candlestick will stand on the table, then it is necessary provide maximum stability, which may require changing its shape.
If the candlestick is installed on a wall or ceiling, then it is necessary to install the mount on the most durable part of the material.
The most important steps processing are:
- cleaning from dirt;
- removal of loose areas;
- grinding;
- flame retardant impregnation.
In addition, very it is important to choose the right place and method of installing candles. Candles can be placed either directly into the wood, for which you need to drill a hole 1 cm deep in the snag, the diameter of which is slightly less than or equal to the diameter of the candle, and into metal glasses of any shape that are attached to the wood with self-tapping screws.
decorative items
In the vast majority of cases, in the manufacture of decorative figures, you have to perform all the processing operations, and some need to be done several times.
Some snags similar in shape to humans, animals, or mythical creatures, so you can make beautiful decorative figures from them and use them in garden design.
Often you have to make a composition either from several snags, or from driftwood and various additional elements, which can be anything.
For example, a figurine of a mythical gnome can be decorated with a wide-brimmed hat and old boots. And the figurine of a horse - with bundles of natural or artificial hair imitating a mane and tail. In addition, other crafts for the garden can be made from driftwood, for example, flower stands.

Beds, tables, cabinets and other furniture
For the manufacture of furniture, you need to use the strongest and largest snags from roots and branches, because the finished product will experience significant loads.
From this material you can make:
- tables and coffee tables;
- chairs or stools;
- beds;
- bedside tables and cabinets.
In the manufacture of tables from snags, only the legs or the body are made, but they have to be made from another material.
The choice of finishing method depends on the shape and color of the driftwood, so in each case it is selected individually.
However, in any case, mandatory steps are:
- cleaning from dirt;
- bark removal;
- grinding with lint removal;
- drying.
 In the manufacture chairs or stools both individual legs and the entire structure are made from driftwood.
In order for such a chair or stool to be more comfortable, for him make soft bedding, which can either be attached to the surface of the seat, making it part of the structure, or made in the form of a removable pillow.
The minimum set of operations is the same as for tables. In the manufacture of beds, driftwood is used as a decorative element or a supporting structure.
In the first case, these can be relatively small parts of any thickness, in the second case, it is necessary to use only material from roots or thick trunks, and most of it should retain its mechanical properties.
The frame and lattice for the mattress are made of planed boards or metal, connected with snags in various ways, providing the necessary strength and beautiful appearance.
In addition to the minimal processing used in the manufacture of other furniture, interior details from knots, branches, roots and snags must be soak thoroughly with antiseptics and insecticides so that they do not appear various diseases and the bugs did not settle.
All parts made of natural material must be varnished in order to prevent raising the pile and the appearance of splinters.
 For nightstands and cabinets made from snags body only, as seen in the photo, and drawers and top cover or the tabletop of a piece of furniture (if provided for by the design), are made of other materials.
This approach allows you to make a bedside table that can not only be used to store things inside, but used as a stand.
In addition to the minimum set of operations have to change shape snags, because without this it will not be possible to insert a box into it or fix a beautiful lid / table top on top.
Wall and table decor
Due to the unusual shape of the snags are obtained stylish wall and table decorations. It can be flat, partially or completely three-dimensional figures. For the manufacture of a flat decoration, you can use both a snag bent in two changes, and a cut from a large snag of any shape.
The cut can be made with a chainsaw, circular or band saw, then level the surface with an electric planer or electric jointer. The same trimming can be carried out for a partially voluminous product, this will preserve the voluminous appearance, but greatly reduce the overall thickness of the product.
On such decorations, the remains of the bark can harmoniously fit into the overall pattern, so it is very important to remove all damaged fragments as much as possible and thoroughly soak the workpiece with antiseptics and insecticides.
If this treatment is not done or done carelessly, then it is likely that after a few years, due to the destruction of the cellulose, the bark will peel off the wood, and it will have to be glued into place. In addition, various bugs can settle in poorly processed bark, which will spoil its appearance.
Watches and stands for them
 From snags, beautiful and stylish cases and watch stands are obtained.
To make the case, pick up a piece of driftwood that is noticeably larger than the size of the watch, then either insert them into a natural recess wood, or first cut or gouge a hole under the clock with a chisel, then insert them there.
The first method is preferable for those who are not very good at working with a chisel, but the second method allows you to make a complete imitation of the fact that the watch is part of a snag.
In addition, from driftwood you can make not only the case, but also the dial, into which the clock mechanism will then be embedded. To do this, it will be necessary not only to create a flat plane, but to partially disassemble the watch, after which inside attach the mechanism to the structure, and install arrows and numbers from the outside.
If a stand is made of driftwood, then it is necessary select material with a flat area at the top, the size is not inferior to the clock.
In cases where there is no such platform, it can be made either by sawing off the upper part of the material, or by hollowing out a recess of the required shape in it with a chisel.
gazebos
Due to the unusual shape, driftwood can be used to create decorative arbors, including antique ones. The thickest and strongest snags fit well for the role of load-bearing pillars, medium and small parts can be used for wall cladding.
 Such a gazebo will look most stylish if its roof is made of straw or various plants, while the roof frame is best made from boards small thickness.
Chairs or benches, as well as tables in such a gazebo, should also be made of snags, in which case the whole structure will be made in the same style.
In order for the wood not to lose its color over time, its it is desirable not only to clean, sanded and impregnated with stain, but also varnished.
Links to thematic forums
Homemade products from snags are in great demand, so the authors often discuss their works on thematic forums and share their experience there, what and how can be done.
- Aquaforum;
Any snag, regardless of its shape and condition, can be used. However, in order for the product from it to serve long years, the material must be properly processed.
Now you know:
- what can be made from snags;
- how to prepare and process them;
- what kind of driftwood can be put in an aquarium, and where to look for other ideas and tips on the use of this material.
In contact with
Cold autumn evenings give a lyrical mood and are perfect for various crafts. At this time of the year, it is pleasant to work with natural materials, especially when traveling to the forest for mushrooms, you will not have to experience a shortage of such materials. In this article, we invite our readers to do crafts from branches and snags and decorate their interior with stylish and fashionable handmade items.
Before you start manufacturing directly interior items, you need to properly prepare the branches of driftwood. How to do it? It’s not easy, but after processing, you can be sure that your products will not turn black and crumble into dust.
How to prepare driftwood for crafts?
You will need:
- Plastic container;
- soda ash;
- Sandpaper;
- Laundry bleach.
In order to prepare tree branches for crafts, it will take about a week in total. Therefore, it is recommended to immediately select the right number of branches for the future product and process them all together.
Step 1. In a large plastic container (basin, bucket, old baby bathtub) add about 1-2 cups of soda ash and pour into it. Then put the branches there and press them down so that the water covers the wood completely. Fill several containers if the branches do not fit entirely in one bowl. As a load, you can use a glass jar filled with water. The branches should be left in the water for about 48 hours or longer, so that the bark softens and can be easily removed with a wire brush.
Step 2 When all the branches are stripped of bark, you will see that the color of the wood is not uniform. For the beauty of future crafts, the branches need to be bleached. To do this, pour again clean water into the container and add bleach. For seven liters of water - about one cup of the product. We again immerse the wood in the container and press down with containers so that the branches are completely in the water. We leave for 48 hours.
Step 3 After the branches have acquired a light uniform shade, we take them out of the water and put them in a sunny place. Let it dry for another two or three days. The sun should dry the tree well, and it is not recommended to dry the tree on heaters or on. Too much heat can cause wood to dry out and crack.
Step 4 The materials are almost ready for making crafts, but they are still rough. All sharp and uneven places (knots, bends) must be cleaned and sanded with fine sandpaper. And now you can safely start needlework.
How to make a candlestick from branches
The original candlestick is very easy to make. According to this principle, you can make a vase, planters for indoor flower, bread box.
You will need:
- Transparent glass cup;
- Thin branches;
- Glue;
- Twine;
- Candle;
How to do: if you are making a very small candlestick, then the branch can not be processed according to the above scheme, but simply washed and dried on a battery. Then cut them into segments of the same length. Apply glue to the branch and attach it to the wall of the glass. Do this with all the other blanks until the entire glass is hidden behind a row of branches. Outside, you can tie a candlestick with a harsh twine or colored ribbon. Insert a candle or plastic bowl inside the glass.

Shelves for books and small items made of tree branches

Branch photo frame
You will need:
- For the base, a wide wooden frame;
- Smooth thin branches;
- Glue;
- Beads, natural materials and any other options for decorating the frame.
How to do it: cut the branches into equal segments, a little more than the length of the sides of the base of the frame. Glue each branch wooden base. Cover all 4 sides of the frame with branches. In the corners, you can glue artificial flowers or other decorations, or even paint the entire branches. acrylic paints in any suitable color.

In skillful hands, any snag will turn into an unusual shelf or small items. Lots of interesting homemade crafts to decorate your home, you can make from branches and snags, including paintings, figurines, shelving, mirror frames, clothes hangers, screens, and even chandeliers. The main thing is to see the silhouette of the future in a simple branch and make efforts to make the branch become one.