Pumping stations without a hydraulic accumulator and with a hydraulic accumulator: principle of operation, device, advantages and disadvantages. How to install a hydraulic accumulator for a water supply system Diagram for connecting a hydraulic tank to a well
Most of the work related to the development and installation of water supply systems requires a certain amount of experience and a clear understanding of the specifics of the operation of a water supply system based on an artesian well. But even in such a difficult matter, there are many individual elements and nodes that are quite capable of being installed with your own hands. For example, connect a hydraulic accumulator and a pressure switch to a pump. The complexity of such work is minimal, the installation of a hydraulic accumulator for water supply systems does not require special skills or knowledge of electrical installation;
What and how to adjust in a system with a pump and a hydraulic accumulator
There are three classic options layout of pumping and accumulator equipment for a well:
- In the first case, a submersible pump is used, located in a well under a layer of water of 1-2 meters, automation, a filter and a hydraulic accumulator can be located in a caisson at the head of the well, but with the same success for all equipment, the installation can be performed in basement Houses;
- In the second case, a surface pumping system and a hydraulic accumulator are used, which do not have the pressure capabilities of submersible units, so they are tried to be located as close as possible to the well and the water level. Most often, a pump with a water pressure switch and the accumulator itself are mounted in the caisson;
- In the third variant, also called dacha-garden, water from the well is lifted by a surface pumping unit or a simple vibrating “Kid” into a huge water tank. Water can be supplied to the water supply at home without using an additional pumping device, only the natural pressure of the water column, water the beds and fill Summer shower, wash appliances, in general, use the installation on your own.
Note! In any case, before setting up the accumulator pressure switch, you will need to correctly calculate the required water pressure in the house, taking into account the requirements household appliances and the existing height difference between the level of the pump and the maximum point of water extraction in the house, most often this is an air outlet valve for the heating system.
The sequence of work when installing a hydraulic accumulator with your own hands
Immediately after drilling the well and determining the debit, they begin to equip it. Based on the depth of the aquifer and the degree of its contamination with salts and sand, they decide on the method of designing the head, where it is necessary to place the pump, and which version of the pumping system and pumped storage installation is best suited.
Installing a hydraulic accumulator paired with a submersible pump
The submersible pump unit has always had a lot of advantages, but the more powerful and perfect the pump, the larger the volume of the pumped storage unit must be used to compensate for pulsation and water hammer. Therefore, when choosing a scheme for installing pumping equipment and a hydraulic accumulator device, the system parameters were successively determined:
- The required pressure and water flow to ensure normal water supply to the house, taking into account the depth of the well and the distance from its head to the building of the house;
- What pump power and the volume of the accumulator tank will provide the necessary performance and smooth operation of water supply systems;
- Where to locate the main components of the equipment of the water supply system: pump, accumulator, automation and filters.
Note! To ensure the operation of expensive and powerful pumping systems of Danish, German and Italian manufacturers, hydraulic accumulators from 50 to 100 liters are most often used, which are installed in a well-equipped basement or basement.

The high pressure and pressure of "European" models make it possible to install pumped storage units at a considerable distance from the well, even if the building has a second floor and household appliances that require increased water pressure in the water supply system.
The standard piping connections are shown in the diagram.
This option of installing a hydraulic accumulator in a water supply system provides a number of significant advantages:
- A well-ventilated and partially heated room helps prevent condensation on the surface of the accumulator and electric automation systems;
- It is convenient to maintain the accumulator tank and filter; according to existing standards, it is recommended to check the pressure gauge readings in the air chamber of the accumulator cylinder and the settings of the pressure switch for the accumulator at least once every two to three months;
- If necessary, you can drain the water from the water supply system directly into a reserve tank or into a sewer.
Important! Installation of a hydroaccumulating device in a separate room requires that polypropylene pipes be laid in the ground to a depth not less than the freezing depth with a slope towards the well of at least 2o. This will allow air bubbles to escape to the filter and the connection point of the hydrostorage tank.
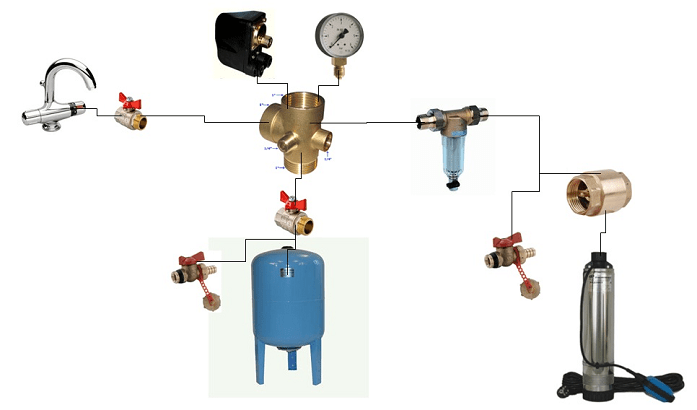
The basis for the construction of such a node of the water supply system is a hydraulic accumulator tank, most often of a vertical design on supports. At the bottom of the tank, a five-pin fitting is screwed in, through which the pump line, outlet line, pressure switch sensor and pressure gauge are connected. The pumping line, most often from the well to the accumulator, is made of polypropylene pipe. In small water systems, connections can be made with flexible hoses, and the relay and filter are usually located on a special mount at a height of at least a meter above the floor.

The disadvantages of such schemes include the sensitivity of submersible pumping systems to a high content of sand and salts. The non-return valve in submersible systems is most often located at the outlet of the pump at great depths. After raising a certain amount of water, the sand remaining in the outlet pipe slowly settles, sinking to a depth, and gradually accumulates on the body of the check valve, gets inside the device, which leads to the failure of an expensive unit.

For domestic submersible pumps of the "Vodomet" type, you can install in a caisson or head well. Most often, such a scheme is used for low-power pumping systems, with a shallow aquifer.
In the photo you can see the classic correct option installation of a submersible pumping system and a hydraulic accumulator in the well.

The output from the wellhead is fed to the filter, then to the accumulator, and only after that to the pressure switch submersible pump. The output from the well to the filter and accumulator is made with a flexible hose, all other fittings are soldered from plastic pipes. What gives such a scheme? Such an installation allows you to issue sand-free water to the accumulator and relay.
By connecting the system to the water line through a filter, the reliability of the automation is significantly increased. The relay should be freed from dirt and sand as much as possible, otherwise, after a couple of months there will be interruptions in operation.
In the central part of the output line running from the pressure switch to the entrance to the house's plumbing system, there is ball valve with a tee, which allows you to solve a rather difficult question: how to drain the water when adjusting the pressure of the automatic relay.
For large height differences, or if the water in the well is of very poor quality, install additional pumped storage devices with volume separation clean water and technical water. The system consists of two hydraulic accumulators and a clean water tank. In a set for the pump in the well, a standard hydraulic accumulator-accumulator of raw water is installed, from which the liquid through the filter of dirt and neutralization of suspensions enters the inlet of the vortex pump, which pumps water through membrane filters into the accumulator for clean water, located in the house or basement. Water is taken from the tank and sent to the place of use in the water supply system by a conventional network pump.
A pumping device that takes untreated water from a well should be as insensitive as possible to the content of hard salts and clay suspension in artesian water.
Easy installation of accumulator with surface pump
It is best to install a properly tuned centrifugal pump with an ejector and a small hydraulic accumulator for these purposes. The first accumulator will not be used as a backup source of water, so you can limit yourself to a small membrane model of 10-12 liters.
There are no special differences in the use and installation of a hydraulic accumulator with a surface pump, except that:
- The installation of the accumulator and pressure switch should be carried out as close as possible to the pump;
- Between centrifugal pump and the accumulator must have a filter and a check valve, otherwise, every time you turn on the water tap with noise and vibration, you will receive a mixture of air and water.
Country-garden option for installing a hydraulic accumulator
The country-garden option, for all its primitiveness, makes it possible to very rationally use the capabilities of pumps with high water flow and get by with the minimum size of the accumulator.
The advantages of the pump installation option shown in the photo are obvious. Firstly, there is no need to install a large and expensive accumulator, which does not always make sense to purchase for the needs of a summer residence. Secondly, the relay on the pump can be connected with a flexible hose to the place where water is taken from the tank and adjusted to the minimum 0.1 and 0.2 atm off and on, respectively. In some cases, the pressure switch membrane is replaced with an electromechanical timer that allows you to pump out a certain amount of water from a well or well at a programmed time interval.
Conclusion
All of the listed options for installing a hydraulic accumulator have been tested in practice and proven to be reliable. If the quality of water in your estate or private house leaves much to be desired, use the pump method described in the article with two accumulators and a membrane water purification filter. Most branded hydraulic accumulators have a certified rubber sheath in which you can store a supply of purified water for a long time. drinking water. For technical needs, you can use a conventional tank, described in the last subsection, complete with a small and cheap vortex pump.
A hydraulic accumulator is an extremely useful device, both for organizing autonomous water supply and for improving the performance of a system connected to a central water supply.
A master with at least minimal experience in plumbing work will install a hydraulic accumulator with his own hands without any problems and connect it to the water supply system.
Agree, the key to successful work is an understanding of the device and the principle of operation of the equipment. We will help you understand these issues and describe and illustrate step by step technology hydraulic accumulator installations.
Information about connecting, setting up and conducting current repairs storage tank will come in handy during its operation.
From this device during the day, water is taken and pumped. As a result, the unit is constantly under the influence of the working process, during which it makes noise and vibrates. This point should be taken into account when choosing a place for its installation.
Image Gallery
Schematic connection pumping station can be presented in the following steps:
- Prepare a solid base in a suitable place for installation.
- Install the pump station on the base.
- Measure and correct the air pressure in the empty accumulator.
- Install a fitting with five outlets on the outlet pipe of the accumulator.
- Connect the pipe of the surface pump to the nozzle outlet.
- Connect a water pipe to the other outlet.
- Fill the accumulator with water.
- Check the presence / absence of leaks in the places of threaded connections.
- Set pressure switch.
A surface pump is not always used in the autonomous water supply system of a private house. Owners of deep wells have to use special submersible pumps.
The process of connecting the accumulator to the water supply system is performed according to the following scheme:
- Lower the submersible pump prepared for operation into a water source (well, well, etc.)
- Connect the pressure hose or water supply pipe of the pump to the fitting with five connectors.
- Connect the accumulator branch pipe to one of the fitting outlets.
- Install pressure gauge and pressure switch.
- Connect the accumulator to plumbing system Houses.
When connecting a hydraulic tank to a submersible pump, an installation should be provided that will prevent the outflow of water into the well when the pump is turned off.
A few important nuances
To connect the accumulator, special flexible adapters are used. This helps to reduce the effect of vibrations on the plumbing system.
It should be borne in mind that in this section, between the water supply and the accumulator, it is unacceptable to reduce the clearance of the connecting structures, since this will worsen the hydraulic characteristics of the system.

To reduce the effect of vibration that occurs during the operation of the hydraulic tank, it is recommended to use special flexible conduits. Their dimensions should not be less than the diameter of the outlet to which they are connected.
The initial filling of the tank with water must be done very slowly. The point is that at long-term storage the rubber membrane, made in the form of a pear, could simply stick together.
A sharp stream of water can break the gasket, and with a weak pressure, it will neatly straighten out. One more really important point- before water is supplied to the accumulator, air must be completely removed from the part into which water will be pumped.
Immediately after unpacking the purchased battery, and / or immediately before connecting it, it is necessary to measure the pressure of the air that is pumped inside. This indicator should be 1.5 atm, this is how hydraulic accumulators are pumped during manufacture. However, during storage in a warehouse before sale, leakage of part of this air is a completely natural phenomenon.
The most reliable option for such measurements is a conventional automobile pressure gauge with a suitable gradation scale that allows measurements to be made with an accuracy of 0.1 atmospheres. As practice has shown, it is not worth using cheap Chinese plastic models for these purposes, their accuracy is very doubtful.
Electronic models are state sensitive environment, and this is too expensive an option for a conventional hydraulic accumulator.
What should be the air pressure in a hydraulic tank filled with water? Everything depends on the situation.
A pressure of 1.5 atmospheres will provide quite a decent water pressure in the plumbing system. But it should be remembered that the higher the pressure, the smaller the volume of water stored in the tank. If you need both a solid supply of water and good pressure, it makes sense to look for a large tank.

To control the air pressure in the hydraulic tank, it is recommended to use a conventional automobile pressure gauge, which allows measurements to be made with an accuracy of 0.1 atmospheres
It is recommended that in the accumulator the operating parameters of the air pressure be less than the minimum pressure that causes the pump to turn on, by about 0.5-1.0 atmosphere. Sometimes they act differently.
The air pressure in the accumulator is left at the level of 1.5 atmospheres, as set at the factory, and the value of the minimum pressure or switch-on pressure is calculated as 2.0-2.5 atmospheres. Thus, to the air pressure in an empty tank - 1.5 atmospheres - add this difference of 0.5-1.0 atmospheres.
Excessive pressure does not reflect well on the integrity of the elements of the hydraulic tank, but low air pressure in it is not useful either. If this indicator is reduced to a level of less than one atmosphere, the membrane will touch the walls of the tank. This will lead to its deformation and rapid breakage.

Two springs are used to regulate the pressure switch. With the help of the first set the pressure to turn off the pump, and with the help of the second - the difference between the maximum and minimum pressure
After the system is installed and connected, it is necessary to set up the pressure switch. To do this, under the body there are two adjusting nuts with springs. The procedure for adjusting the pressure switch is usually described in detail in the instructions that come with the device.
Rules for operation and repair
Connecting and setting up the accumulator correctly is only half the battle. In order for the device to work for a long time, it must be properly operated, periodically perform preventive inspection and maintenance.
The instructions prescribe a medical examination twice a year, but practice shows that this is not enough. The condition of the accumulator should be checked every three months. With the same frequency, it is advisable to monitor the settings of the pressure switch in order to correct them if necessary.
Incorrect operation of the relay creates additional loads on the entire system, which can also affect the condition of the accumulator.
If dents or signs of corrosion are found on the body of the device during the inspection, these damages must be repaired. It is best to do this as early as possible, otherwise corrosion processes will develop, which can lead to a violation of the integrity of the accumulator housing.
An important preventive measure is to check the pressure in the hydraulic tank itself using a pressure gauge. If necessary, the required amount of air should be pumped into the device or its excess should be bled off.
If this does not help and the new pressure gauge readings do not correspond to the expected ones, then either the integrity of the accumulator housing is broken or its membrane is damaged.

If the membrane installed in the accumulator is worn out, you can try to replace it with a new one. To do this, the device will have to be dismantled and disassembled.
Some craftsmen manage to detect and repair damage to the hull, but such repairs are far from always durable and reliable. Rubber liner or membrane - weakness hydraulic accumulator. Over time, it wears out.
You can also replace the membrane with a new element at home, but for this you will have to completely disassemble and reassemble the accumulator.

When choosing a suitable place to install the accumulator, it should be remembered that it must be spacious enough to carry out Maintenance devices
If a home craftsman doubts his abilities in this area or does not have enough experience, he can cause even more damage to the device than the previous breakdown. In such a situation, it is better to contact the service center.
Conclusions and useful video on the topic
An overview of the operation of a 50-liter hydraulic accumulator is presented in the following video:
This video clearly demonstrates the procedure for adjusting the pressure in the hydraulic tank and setting the pressure switch:
The advantages of using a hydraulic accumulator are obvious, so this device is increasingly being used both in private houses outside the city and in metropolitan apartments. If the unit is installed and connected correctly, it will long years work without breakdowns and interruptions, providing the family with high-quality water supply.
Do you have experience in self installation and connecting a hydraulic accumulator? Please share information with our readers, tell us about the features of setting up and operating a hydraulic tank. You can leave comments in the form below.
Today it is unthinkable to imagine a house without a water supply system. But sometimes there are cases when water cannot always reach one or another draw-off point. Then the accumulator comes to the rescue, which regulates the pressure in the network. Next, we will talk about which scheme for connecting the accumulator to the water supply system is effective.
Hydraulic accumulator device

For the normal operation of the water supply system in the house, in some cases, a hydraulic accumulator is installed on the network section, which is a container with a metal case. Inside the tank is a rubber "pear", which plays the role of a membrane. The hydraulic accumulator, which is a link in the water supply system, accumulates a certain volume of water under pressure. During the operation of plumbing fixtures, dishwashers or washing machines, the accumulator supplies the network with water.
The rubber membrane is fixed to the tank body by a flange, the design of which includes an inlet pipe. Inside, the accumulator is designed in such a way that between the inner walls of the cylinder and the rubber "pear" there is air, which is compressed after it is pumped into the container by a pump - bicycle or automobile. When pumping water into the tank, the volume of which is limited by a pear, compressed air counteracts further expansion of elastic rubber, thereby protecting it from tearing. At the same time, compressed air provides the necessary pressure in the network.

If we take into account the design of a typical hydraulic accumulator, we can distinguish the following components:
- a housing, which is a hermetically manufactured tank, which is designed for a working pressure in the range of 1.5–6 atmospheres. This value can be increased to 10 atmospheres under the condition of a short-term load;
- "Pear", which is an elastic membrane. It is attached to the inlet of the tank and is located inside the cylinder. The flow of water occurs through the passage flange, which is equipped with a valve and is fixed to the neck of the accumulator tank.
- nipple, which is arranged on the other side of the body - opposite to the location of the through flange. The nipple is designed to pump air through it into the space of the battery, which is formed between the outer surface of the "pear" and the walls of the housing from the inside.
In addition to the main elements, legs are welded to the drive for stability, located at the bottom of the body, and a support bracket for installing a surface-type pumping unit, which is located in the upper part of the cylinder.

Depending on the place of application, hydraulic accumulators are divided into:
- products for work in system of cold water supply;
- devices for functioning in the hot water supply network;
- expansion tanks for heating systems.
Hydraulic accumulator for supply cold water it is designed in such a way that it accumulates and supplies liquid, and also has the ability to avoid water hammer in the network and protect the pump unit from unnecessary inclusions. Analogue that supplies consumers hot water, has the same characteristics as the above product. The difference lies only in the properties of the membrane, which is able to withstand high temperatures. The purpose of the expansion tank in heating systems is to compensate for the expansion of water.
The principle of operation of the accumulator

The water supply system, in the circuit of which there is a hydraulic accumulator, works according to a certain scheme.
- Starting from the water intake, which can be a water supply system, a well or a well, water is supplied through the pipeline to the accumulator, namely, to the rubber “pear”.
- In the rubber membrane, using a control relay that determines the lower and upper thresholds of the required parameter, the pump creates pressure, for example, 1–3 atmospheres.
- After reaching the setpoint pressure in the device, the pump automatically switches off.
- After the consumer opens the faucet on the sink or turns on the dishwasher, the membrane begins to push water out of the accumulator and supply it through the network to the draw-off point.
- When the pressure in the device drops to a critically low level, the relay is activated and the pump automatically starts its work. But first you need to connect the pump to the accumulator.
The number of pump starts per unit of time directly depends on the volume of the cylinder. The smaller the tank, the more frequently the pump will turn on. With this option, the pump and valve flange will run out of working resources faster. Since the cylinder is not affected by external loads, it is not necessary to additionally fix it to the floor. To ensure the stability of the accumulator, its own legs are enough.
Options with a choice of accumulator

Hydraulic accumulators come in different designs and volumes - from compact devices for 24 liters to overall products for 1000 liters. When choosing a drive, you need to consider the volume of water that is used by consumers in the house. If no more than two people live in the house and a minimum of plumbing fixtures and household items are installed, then it is enough to purchase a tank with a volume of 24 liters. If, based on various factors, the water consumption is large, then the accumulator must be installed in a larger size and volume. It is necessary to calculate how many water points can work at the same time and, based on the calculated flow rate, select a suitable capacity. If the water supply system is already equipped, and the situation has changed in the house - the number of residents has increased or, for example, a washing machine has been added, then you need to change the battery to a larger one or deliver another tank.
Wiring diagram for surface pump version

Before connecting the accumulator for water supply, it is necessary to check the air pressure in the tank. It must be less than the pressure of the pump when turned on, which is set on the relay, by a value of up to 1 bar. To connect a tank to the pump, you need to purchase a fitting with outputs in the amount of 5 pieces, a relay that regulates pressure, a pressure gauge and sealant in the form of tow or FUM tape.
- One of the important details when installing a hydraulic accumulator is a 5-way fitting. Through this part, a pump, relay and pressure gauge are connected to the tank. Another 1 fitting outlet is intended for connecting a water supply system, which branches to water intake points. On the initial stage the fitting is connected to the tank through a rigid hose or directly through the through flange with a valve. Then, an adjustable relay and a pressure gauge are screwed to the separating part, as well as a pipe that is routed further from the pump.
- Particular attention must be paid to the connection of the relay that controls the pressure. The instrument has top cover to be removed. Under it there will be 4 contacts with the inscriptions "network" and "pump". Due to their presence, it is difficult to confuse the connection of wires. According to the marks, the wires connected from the pump and going to the network are connected.
Not all manufacturers put inscriptions on the relay, counting on the knowledge of the fitter. If the person involved in connecting the relay does not know which contact to connect this or that wire to, it is better to contact a professional electrician.
All threaded connections must be carefully sealed. Tow or FUM tape is suitable for this work. In conclusion, you need to turn on the pump unit, after which it is necessary to visually and by touch check the installation sites for leaks.
Wiring diagram for version with submersible pump

Already by the name it can be understood that the submersible pump is placed in the aquatic environment of a well or well, from where water is supplied directly to the accumulator. The water supply system with such a pump must be equipped with a check valve. This detail does not allow water after the membrane to return to the deep water intake. As a rule, the check valve is mounted directly on the pump, while the other end is connected to the pressure pipeline. There are varieties of pumps in which the fitting on the cover has an internal thread. Then, during installation, you need to use a part on which 2 external threads are cut. Following the check valve is a pipe that is laid to the accumulator.
When installing the pump, it must be taken into account that the unit should not reach the bottom of the well or well by about 30 cm.
Video
The video provided shows how the pump is connected to the accumulator.
A stable, well-functioning water supply network is the real merit of the owner country house. Anyone who has installed and maintained a stand-alone system knows how difficult it is to foresee water supply failures that are dangerous for household appliances. One pressure jump and there is a risk of breakage dishwasher or gas water heater. To warn possible problems, you need to contact a specialist or connect the accumulator with your own hands.
The device and types of accumulators
Before you start connecting, you need to get acquainted with its constituent parts and the purpose of each of them.
Hydraulic accumulators of blue color designed for water supply systems. Expansion tanks for heating systems are red

Hydraulic accumulator device diagram: 1 - metal case, 2 - membrane, 3 - flange with valve, 4 - nipple for air injection, 5 - compressed air, 6 - legs, 7 - pump platform
A hydraulic accumulator is a metal tank, inside of which there is a pear-shaped rubber membrane. A rubber (rubber) membrane is attached to the body by a flange with a branch pipe.
The accumulator stores water under pressure. Pressure in household appliances(1.5 bar) is created using air, in production models - inert gas.
Compressed air can be pumped into the housing using a bicycle or car pump. When water enters the tank, the compressed air prevents the bulb from bursting by providing resistance. With the help of it, the pressure in the accumulator is also regulated. In the process of drawing water, water from the apparatus moves into the system.
Hydraulic accumulators are somewhat different in their purpose, so they can be conditionally divided into 3 types:
- For cold water. It supplies and accumulates water, protects equipment from water hammer during pressure surges. Protects the pump from wear during frequent switching on.
- For hot water. Its difference is the ability to function in a high-temperature environment.
- For heating systems (expansion tanks). They are an important part of closed heating systems.
You will learn about the types of expansion tanks for heating systems, their pros and cons from our next article:.
The place of the accumulator in the water supply system
The pump pumps water from a well, well or water supply through pipes into a hydraulic accumulator, or rather, into a rubber membrane inside it. The process continues until the pressure reaches a certain point. The required pressure is set on the relay-regulator, usually it is 1-3 atmospheres. When the desired pressure is reached, the pump switches off (automatically).
Let's assume it's turned on washing machine, shower or faucet in the kitchen - water from the membrane immediately flows back into the pipes. At the moment when the pressure reaches the lower threshold, the relay is activated and turns on the pump again. Thus the cycle begins anew.
The video below will give a complete picture of how the accumulator works:
The frequency of switching on the pump directly depends on the volume of the accumulator. The larger its tank, the less often the pump turns on. Accordingly, the less often the pump is turned on, the longer the flange with the valve and the pump itself last. The equipment is placed on the floor or mounted on the wall. In any case, its body does not suffer from operation.
Connection using a surface pump
Consider step by step how to connect the accumulator to the water supply system if a surface-type pump is used.
- Checking the air pressure inside the tank. It should be 0.2 - 1 bar less than the indicator indicated on the relay (to turn on the pump).
- Preparation of equipment for connection: fitting for 5 outlets (used to connect the accumulator, relay, pump and pressure gauge; one more outlet, the fifth, is needed to connect the water pipe); manometer; tow with sealant or FUM tape; relay for pressure control.
- Connecting the fitting to the tank. The connection can be either a rigid hose or a flange equipped with a check valve.
- Alternate screwing of the remaining elements: relay, pressure gauge, pipe leading to the pump.
Testing the system for leaks. Particular attention is paid to connections.

The connection diagram of the surface pumping station is similar to the connection diagram of the pump
When connecting the pressure switch, we carefully study the labels. Under the cover are signed contacts: "network" and "pump". The main thing is not to mix up the wires. If there are no marks under the relay cover, a specialist (electrician) should be called for connection.
During connection, it is necessary to monitor the tightness of the threaded connections. For a tighter fit, use tow (technical linen) with sealant or FUM tape.
Wiring diagram using a submersible pump
A submersible pump is different in that it is located in a well or in a well, that is, right in the place where water is supplied to the house, in this case, to the accumulator.

Scheme of installing a hydraulic accumulator in a water supply system with a well

Installation diagram of a hydraulic accumulator with a submersible pump in a well
Here, a non-return valve plays an important role, which insures the system against water flowing back into the well (well). The check valve is mounted in front of the pipe, directly on the pump. To do this, an internal thread is cut into its cover. Therefore, the fitting will have external threads on all sides. First, a check valve is mounted, then the accumulator is connected to the water supply system.
An approximate diagram for connecting a hydraulic accumulator is as follows:

Having installed the fitting, it is necessary to check the tightness of the connections
To measure the length of the pipe leading from the submersible pump to the edge of the well (well), a rope with a load is used. Having lowered the load to the bottom, the upper edge of the well is marked on the rope. I will stretch the rope, you can calculate the length from the bottom to the top point. Subtract the length of the pump and the distance from the place where the pipe goes into the ground to the top of the well. We also take into account the location of the pump: it should be about 20-30 cm from the bottom.
Which accumulator model to choose?
Manufacturers, responding to consumer requests, produce equipment of various sizes. The "corridor" of volume indicators is 24-1000 liters. What should be considered when choosing?

The volume of the tank depends on the amount of water consumed
The determining factor is the amount of water needed to service the house (possibly personal plot). The minimum tank volume - 24 liters - is enough for a family of 2, if we take into account the shower, toilet, kitchen and watering the crops on the site.
More significant water consumption requires a tank with a volume of 50 liters or more. You should calculate how many household appliances use water at the same time, add the number of people who also use water, and, based on this, select the necessary model.
It happens that the number of users has increased or a new one has appeared household appliance using water. In this case, you should simply replace the tank with a large tank, since connecting a hydraulic accumulator with your own hands is a quick and easy process.
When providing the building with water from a well or a well, a hydraulic accumulator is installed without fail, which is a container of a suitable volume. It is usually used in conjunction with a special pressure switch. For a hydraulic accumulator, it is a control device that allows you to reduce the number of pump cycles.
Main components pumping unit with hydraulic accumulator
From the point of view of design features, the relay is a small unit equipped with special springs. The first of them defines the limit of maximum pressure, and the second defines the minimum. Adjustment is made by means of the auxiliary nuts placed in the case.
The working springs are connected to the membrane, which reacts to pressure surges in one way or another. Exceeding the maximum values leads to compression of the metal spiral, and a decrease leads to stretching. Thanks to such a device, in the contact group, contacts are closed and opened at a certain moment.
The principle of operation of the pressure switch for the accumulator is as follows. Water enters the membrane tank until it is completely filled, which leads to an increase in pressure. When the maximum allowable level is reached, it stops pumping liquid.
As water flows, the pressure in the system drops. When the lower level is overcome, the equipment will turn on again. The cycles of switching on and off are repeated over and over again until the elements of the system are in working condition.
Typically, a relay consists of the following elements:
- plastic cases;
- rubber membrane;
- brass piston;
- membrane cover;
- threaded studs;
- metal plate;
- couplings for cable fastening;
- blocks for terminals;
- articulated platform;
- adjusting springs;
- contact node.
Addition! When working on the moving part of the platform, adjusting springs press against the force created by the piston. Turning the pump on and off depends on the degree of their compression.
Optimal pressure inside the hydraulic tank
Any accumulator inside has a rubber membrane that divides the space into two chambers. One contains water and the other contains compressed air. Thanks to this structure, it is possible to create the necessary pressure when filling and emptying the rubber container.
To extend the life of the device, you need to know what pressure should be in the accumulator. It largely depends on the indicators set to turn on the pump. The pressure inside the tank should be about 10 percent less.
For example, if the switch-on is set to 2.5 bar and the switch-off is set to 3.5 bar, then the air pressure inside the tank should be set to 2.3 bar. Finished usually do not require additional adjustment.
Carrying out work on connecting and setting up a pressure switch for a hydraulic accumulator
Although many people find the process of mounting and adjusting the instrument difficult to understand, in fact it is not. Each owner of a country house with a well or a well can independently connect and configure a device to provide the building with water.
Standard scheme for connecting a pressure switch to a hydraulic accumulator
The finished product interacts with both the plumbing and electrical systems of the building. When closing and opening contacts, liquid is supplied or blocked. The pressure device is installed permanently, since there is no need to move it from place to place.
For connection, it is recommended to allocate a separate power line. Directly from the shield should be a cable with a copper core section of 2.5 square meters. mm. It is not recommended to connect wires without grounding, because the combination of water and electricity is fraught with hidden danger.
Cables should be passed through the holes located on the plastic case, and then connected to the terminal block. It contains terminals for phase and zero, wires for the pump.
Note! Electrical work must be carried out in a disconnected state from the network. When installing, you must not neglect the observance general rules technical security.
Correct setting of the accumulator pressure switch
To adjust the device, an accurate pressure gauge is required to determine the pressure without errors. Focusing on its readings, you can make a relatively quick adjustment. By turning the nuts located on the springs, you can reduce or increase the pressure. During setup, you must follow a certain sequence of actions.
So, the adjustment of the pressure switch for the accumulator is carried out as follows.
- The system turns on, after which, using a pressure gauge, the indicators are monitored at which the device is turned on and off;
- First, the lower level spring, which is large, is adjusted. For adjustment, a regular wrench is used.
- The set threshold is being tested. If necessary, the previous paragraph is repeated.
- Next, the nut is turned for the spring, which allows you to set the upper pressure level. It has a smaller size.
- The operation of the system is fully tested. If for some reason the results are not satisfactory, then a reconfiguration is performed.
Note! Before you set up the accumulator pressure switch, you need to remember a simple truth. The minimum allowable difference between the maximum and minimum value should not be less than 1 atmosphere.
The cost of relays and accumulators of some manufacturers
Relay models can be purchased relatively inexpensively. Usually the cost of products does not exceed one thousand rubles. However, electronic counterparts may have a higher price, as they allow for more precise tuning. The table shows the models of some manufacturers and their cost.
| Image | Model | Dimensions in mm | Price in rubles |
|---|---|---|---|
 | Gilex RDM-5 | 110x110x70 | 900 |
| Danfoss KP1 | 107x65x105 | 1 570 | |
| Belamos PS-7 | 150x80x150 | 575 | |
| Caliber RD-5 | 103x65x120 | 490 |
Related article:
If the water pressure is normal or even strong, then you just need this device. And why you will learn from our separate review.
As for hydraulic accumulators, their cost can be noticeably higher. It mainly depends on the volume of the structure. A capacious tank can significantly reduce the number of work cycles. However, there is not always enough space for it. The table shows prices for accumulators for different sizes.
Note! On average, for a family of 4-8 people, as a rule, a hydraulic accumulator with a capacity of 50 liters is enough. With a smaller number of people living, a capacity of 24 liters is purchased, and with a larger number - 100 liters.
Summarizing
Since the hydraulic accumulator is not capable of functioning without a pressure switch, which is a control device, special attention was paid to the installation and configuration of this particular device. With proper adjustment of the product, it is quite possible to extend the operational period of the main equipment.
Adjusting the pressure switch of the hydraulic accumulator of the pumping station - nothing complicated (video)
You may also be interested in:

 Self-installation and adjustment of the water pressure switch for the pump