Making wicker flower beds with your own hands. Do-it-yourself basket of stones for the garden: a master class with a photo Do-it-yourself metal baskets for flower beds
Interesting solution, because it is a luxury to receive a basket of flowers as a gift. Such a luxurious gift can be received from yourself, having at your disposal a small summer cottage.
Making a flower bed in a basket is not at all difficult, it's even easier than making a wattle fence. The dimensions are much smaller and you don’t have to worry much about stability.
Moreover, improvised means are used to decorate the flower garden in the most literal sense - thicker sticks are stuck into the ground along the perimeter of the planned flower bed, a fence of the desired size and height is woven from long thin twigs and pieces of bark. All of these materials are suburban area can actually lie right under your feet. Even dry branches and bark can be used by soaking them in water for a couple of days.

But best of all, of course, willow twigs are suitable. Prepare the required amount from spring and you will have excellent material for a flower bed and more.
We make a flower bed in this order.
- carefully remove the bark from the rods;
- cut to length so that everything is the same;
- designate the site and hammer in the pegs in a circle;
- the distance between the pegs is arbitrary, but the denser they are installed, the more reliable the fence will be .;
- then we skip the rods between the pegs, as in the picture;
- after the fifth row, tap to the right and left of the peg with a wooden mallet, this is for compaction;
- fasten the ends of the rods.
The resulting recess is filled with a suitable earthen mixture, in which selected flowers are sown or planted - one- or perennials. You can choose plant varieties so that they bloom from spring to autumn, decorating the site.
The flower bed can be of any shape, such as square or rectangular. The principle of installation and weaving is the same as that of the round 
It’s even easier to make such a flower bed, just stuff the pegs and start weaving rods on the front side. 

The rods should be laid tightly, tapping with a wooden mallet so that cracks do not form after drying. 
The difference with a round flower bed is that in this case we weave each wall separately, and then fasten it at the joints. In principle, such sections can be made in advance and then driven into the ground, but there are some nuances here, because they will have to be dried first.
Flowerbed-basket with support
 If you plan to plant a flower bed-basket climbing plants make a support for them. Visually, it will be like a basket with a handle. You will get a tall wicker structure in human height, it will look very nice if you put it at the porch or gate at the entrance to the yard.
 Making such a basket will not take much time, the main thing is to prepare the rods of the required length in advance. For our flower bed, you will need rods up to two meters. Then make a template from plywood or thick cardboard. This will be the base around which we will build a flower bed. Since the basket will not be completely round, in this case a back support wall is provided, make a cut on one side of the template.
 Prepare the site, in the place where the flower bed will be located, it is necessary to remove the turf and prepare a small recess in a circle, in a word, a small trench. We will insert thick rods into it, the future wall of the basket. The distance between the bars can be chosen arbitrarily, but not more than fifteen centimeters.
 Then we begin to weave a basket, the first vine will lie on the ground, braid the pegs with several rods, moving one peg with each level. So that the tips do not stick out, they can be cut or carefully woven into the edge of the row. Each "tape" must be braided to the end.
 Where we will have a wall, we marked it with a trimmed template, the ends of the rods must be collected and diagonally twisted with opposite ends. You should get such a high “handle” that can be fixed with wire. Then we form a “lattice” from the long rods of the wall. This completes the work, then the most pleasant part, we fill up the soil and plant flowers. A combination of flowers and climbing plants will look very beautiful.
Flowerbed from an old basket
 If you do not know how to weave and do not want to learn, although it is simple, you can make a flower bed from an old basket, although it is possible from a new one, if it's not a pity. Here, you don’t need to do anything at all, except to soak the basket with an antiseptic, otherwise it will very quickly become unusable in the ground.
There are two options, you can make a stationary flower bed, remove the bottom of the basket and deepen it into the ground, or use it as a portable flowerpot and put it, say, on the veranda. Or hang, which is often done. But in this case, consider the first option, the photo shows how from two old baskets made a stationary flower bed s, and one of them was laid on its side, also beautiful. In this case, unpretentious summer flowers were used - marigolds and pansies. But if you set up a flower bed for a long time, you can plant perennial seeds from spring.
Hanging planter from the basket
 As mentioned above, you can make beautiful hanging planter from the cart, for this you can use ordinary baskets, but to make it beautiful, it is better to use special ones, for flowers, it is better to use different sizes. In this case, a variant of three baskets is shown. You can, of course, and more, if there is where to hang. In general, we need to purchase baskets and find a strong rope.
First, I will distribute the flowers, depending on what kind of composition we have planned. In the upper part, you can plant plants that will hang beautifully, because the usual ones simply will not be visible, but something brighter from below or vice versa, as in the photo, is also not bad. 
Then we assemble the structure, you need to make sure that the distance between the baskets is the same. You can lay everything out on the floor as in the photo and measure carefully. Then we thread the rope and fix the baskets with knots. 
 Let's hang it up and see how it looks. You can correct the distance between the baskets on weight, by the way, it’s easier to do this if you don’t tie knots, but make small wooden sticks, which can be threaded into the rope, although in this case it is better to use not an ordinary rope, but thin braided rope. In my opinion, this is even better, the design is stronger and you don’t have to guess with knots, and if necessary, you can move the baskets to the desired distance. Knots will only need to be tied under the bottom of the lowest basket.
That's all, it remains only to plant flowers.


Flowerbeds in baskets can be made very beautiful, of course, rods, the material is not durable, but if everything is done correctly, it will stand idle for several years. Look at this selection of flower garden options, for sure you will also want to do something similar.
A wicker fence is more of a beautiful designation of the boundaries of the site and an element of landscape design than a reliable fence to protect the territory. Wattle attracts with rustic charm and a sense of comfort, so quite often this type of hedge is used in the country as a fence inside the site or a border for a flower bed.
Several options for arranging wicker fences and fences in the country
You can make it yourself from almost any flexible materials: 
Having decided to install a wattle fence on your site, you need to evaluate all the pros and cons of such a fence. has the following advantages:

Wicker fence also has disadvantages:
- Short service life and instability to natural factors. A wicker wattle, hazel or willow will last no more than 10 years;
- The wattle fence is considered an insufficiently strong building, unable to protect the site from uninvited guests. Although a two-meter fence of tightly woven branches with a diameter of more than 2 cm is quite difficult to overcome;
- Complicated restoration work. If one fragment is damaged in the fence canvas, it is possible to remove and replace it only when the section is completely disassembled;
- Fire hazard. Wattle fence combustible;
- Such a fence organically looks only in the country and near cottages in a rustic style.
Types of wicker fences
Types of wattle fence depending on the height

Wicker fences by weaving method

By installation method
- Mounting on . When the rod ends, a new one is taken and weaving continues; the ends of the branches are fixed with wire. If used, the strength and durability of the wicker fence increases significantly;
- Installing wattle in sections. Pre-woven fabrics are located between the pillars of the support. Such sections are easier to restore or completely replace if damaged.
Procurement and processing of material for a wicker fence
You can make a wicker fence from any malleable rods. The traditional material for weaving is willow. This is the strongest material with excellent flexibility, which is also quite common. For weaving, rods with a length of at least one and a half meters are needed.
It is best to harvest willow branches in the spring before the start of sap flow, in late summer or autumn. The rods are selected as even as possible, of the same thickness.
These can be young one-year-old shoots that are used for weaving in bunches, or branches 2-3 cm thick for a high fence. For medium and small hedges, shoots with a diameter of 1-2 cm are cut off. The branches on the wattle fence are cut with an oblique cut, they can be used freshly cut or prepared for future use and dried. Dry branches are steamed before installation.
Material preparation

Living and non-living way of weaving a willow fence
There are a lot of weaving methods, and the first step is to decide which type of fence is preferable for a particular area: its height and weaving technology. Willow wattle is of two types: living and inanimate.
Living wattle
The peculiarity of a living wicker fence is that the fence begins to grow gradually and forms a fairly strong canvas. Taking care of the fence is simple: the growing branches are cut or give them a new direction. Although such a fence will protect the territory no more than a picket fence, over the years the living wattle fence does not deteriorate and only becomes stronger.

An example of the device and cultivation of a living wicker fence
Making such a fence is not difficult. Consider a master class for vertical arrangement of a living wicker fence with your own hands: 
The formed grid of rods will soon turn into an unusual one. hedge. Such a fence does not need protective painting and impregnation, unlike inanimate wattle.
Everyone wants to garden plot was beautiful and unique. For this, as well as possible, a decor made independently in a single copy is suitable. A basket of pre-prepared garden stones will be the highlight of any suburban area made by hand. Such baskets will become original flower beds and will please the eye throughout the season. Let us consider in more detail several options for their manufacture.
We make a basket of stones for the garden with our own hands in the lesson
The flat pebbles from which the basket is made create an interesting effect, imitating the interlacing of twigs. Such a peculiar flower bed is best suited for unpretentious and not very catchy plants. They will favorably emphasize the originality of the flower bed and the beauty of the pebbles, especially when they shine in the sun after the rain.
Work on the basket will need to be carried out in stages over several days, as the handle is attached to the already frozen main part. It performs a decorative function, and it is not recommended to use it for its intended purpose, lifting the basket by the handle.
Required materials and tools:- flat pebble gray color- about 220 stones.
- Container with cement, spatula, modeling tool.
- Moisture-resistant and frost-resistant cement adhesive.
- Plywood sheet 25x25x1 cm.
- Wire mesh 25x25 cm.
- Nippers and scissors.
- Jigsaw.
- Hammer and 8 flat-headed studs.
- Paint and brush.
- Transparent film and tape.
- Pencil.
- 2 plastic pots.
At the beginning of our master class, we cut off plastic pot bezel 2.5 cm wide. We compress it into an oval, place it on a plywood sheet, circle and cut the workpiece with a jigsaw.
We put the rim on an oval base and connect them by driving in nails at regular intervals. We cover the base with a transparent film.
Now you need to knead the cement solution to the consistency of the dough and fill it with a form on top of the film with a layer of a little more than 1 cm. Cut the mesh to the size of the form and press it on top.
On the reverse side of the pebbles, we apply small portions of cement glue and cover the bottom with them:
Leave the base to dry overnight in a cool, dry place. Then we remove the plastic bezel with the plywood base and trim the film.
We begin to lay out the walls of the basket, gluing rows of pebbles along the edge. Glue is also applied to the back of the stones.

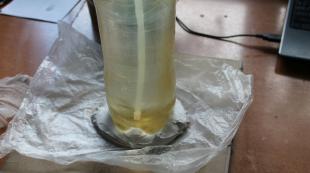
With each row, we slightly expand the oval, giving a slight slope to the walls of the basket. Thus, we lay out 5 pebbles with cement next to each other and take a break for 30 minutes so that the solution hardens slightly. If the cement hardens longer, the walls must be supported with a cylindrical metal object. In this case, the excess part of the cement will need to be removed with a modeling tool and treated with a damp brush.
We spread 2 more rows with the same pebbles, then the last row with round pebbles. In the middle, on both sides, we leave a gap equal to the length of the flat pebbles, here the basket handles will be attached.
We remove the excess mortar and leave the basket to set the cement for an hour.
For the handle, we cut out 2 rims from a plastic pot, connect them with adhesive tape for strength. We skip the bezel in the center of the product, it should rise above the walls. We spread flat pebbles on the handle, there should be more cement between the pebbles. This must be done from below at the same time on both sides, the last pebble lies in the center of the handle. The manufacture of the handle can be seen in the photo:

Leave for a while and remove excess solution. After 2 hours, you can remove the plastic rim and excess cement from the inside of the handle.
The basket is ready! For planting plants, it is recommended to leave small drainage holes at the base of the basket.
How to make a flower bed-basket of stones of different sizes?
Let's analyze the process of making another stone basket for the garden with our own hands. It looks very original, but at the same time it naturally and perfectly fits into the landscape of a suburban area.

- We collect the required number of stones for work. The boulders should be of different sizes and different shapes.
- We choose a place for the future flower bed and mark a circle on the ground on which the base of the basket will stand.
- Now you need to prepare the concrete solution. Mix cement with sand 1:4 and dilute with water. The consistency should be quite thick.
- We lay out the stones for the first row for the base of the basket.
- In the same way, lay out a few more rows, fastening them with a concrete mixture.
- Remove excess cement. We measure the diameter of the base.
- We lay out a circle of stones on the ground, equal in diameter to the base of the flower bed. We connect the stones with a concrete mixture and wait for hardening.
- We attach the strengthened circle to the base using a concrete mixture and pebbles.
We dry the finished flower bed. Then you can fill the basket with soil and plant flowers.
Video on the topic of the article
A selection of video tutorials on making baskets of stones:
From point of view modern man wattle is an archaic attribute. Such uncomplicated fences, strongly associated with rural life, have long been replaced by strong, solid, reliable fences. But the wicker type of fence over time acquired a new meaning, turning from a household tool for delimiting the territory between neighboring houses into a colorful decor element that designers actively use to decorate a flower bed or flower garden and visually delimit areas of the territory.
Such a wicker fence is quite simple to make yourself from improvised materials. This activity can also bring a lot of pleasure to a person with creative thinking and skillful hands.

Features of a wicker fence
It cannot be said that there is a place for wattle only outside the city, for example, in a country house or in a village. Such decorative fence with its uncomplicated rustic look, it will look good in the design of a flower garden near the city's five-story building, which is jointly looked after by residents. There will be a place for him on the territory kindergarten or near a summer cafe in the city center.
This fence has a number of advantages:
- As a rule, it is made from natural material, which is important for additional environmental friendliness in the process of contact with the fence.
- The product is very easy to install.
- If necessary, the fence can be assembled and disassembled again.
- Such a fence gives a lot of room for original design solutions.
- In addition to branches of trees and shrubs, you can use some modern materials such as thin PVC pipes.


Among the disadvantages of a wicker fence, the following signs can be distinguished:
- The structure is short lived.
- Such a fence is not a capital building that carries the function of protection.
- The complexity of the repair. In case of damage, a significant part of the fence will have to be bound.

A fence reaching a height of two meters can become a fairly reliable limiter in the way of strangers. If you make stone pillars and install wicker sections of vines between them, such a fence can be considered impregnable.
To delimit the territory, you can install a wattle fence about a meter high. A playground with a swing will seem very cozy to the children if it is isolated from a noisy street with the help of such an interesting fence. A wattle half a meter high is well suited for "marking" and emphasizing the beauty of a flower bed.
Flexible branches are suitable for creating wattle. The most short-lived is the reed, which can last a maximum of four years. Then it will dry out, which will lead to the rapid destruction of the fence. A wattle fence made of boards or PVC will become a completely reliable structure.
Horizontal wattle is more reliable than vertical, but you can create complex and intricate patterns by interlacing vertically installed branches.


Preparatory work
The creation of the wattle fence needs to be taken care of in advance. In order not to harm trees and shrubs, it is advised to harvest the material in January. Choose flexible branches at least half a meter long. The thickness of the blanks should be one to two centimeters. To have a lot of room for creativity, it is good to stock up on branches of different colors.
Before starting work, the base of the future wattle fence is soaked. It is necessary to ensure that all the branches are completely in the liquid. Soaking can last at least a week. If they are cut off quite recently, a couple of days will be enough.


The most common material for wattle is birch, willow, walnut, apple tree. But it is not necessary to focus only on these species of trees and shrubs. A wicker fence will work well from the branches of a wide variety of trees, as long as they are flexible. As a rule, branches of shrubs and trees growing near water bodies have such properties. They usually have a smooth surface and a large supply of moisture inside.
Reeds, unlike vines, should be harvested in August. This process can be extended until October. To achieve a certain design effect, it makes sense to weave a straw fence. For this, rye is best suited. With careful soaking, it remains flexible and elastic. Despite the fact that rye straw already has a beautiful color, it can be dyed to any color. Aniline paints are suitable for this.


How to do it yourself: master class
In order to create a wattle fence yourself, you need to decide on the choice of the installation site for this fence and the material from which it is to be woven. You can do it simply by preparing a vine from what grows in the area - hazel, willow, acacia, aspen and other trees and shrubs.
At the chosen place, make the basis of the future wattle fence. To do this, you will need stakes (pillars) that need to be driven into the ground to a depth of at least twenty centimeters, but so that such a fence does not exactly fall down and your work does not become in vain, it is better to “ground” these supports half a meter. To facilitate the work, you can use a crowbar, with which it is convenient to make holes for stakes.
The pegs themselves must be at least five centimeters in diameter. Larch is the preferred option. Although both plastic and metal supports are suitable for the base, fittings or PVC pipes will come in handy. They are easy to paint in the desired color.
If they are empty inside, it is better to make plugs in them, which will serve as a guarantee that the base for the wattle fence will be durable.

It is better to treat wooden pegs with an antiseptic, paint, varnish so that they do not rot. Places of cuts are recommended to be burned and soaked with an antiseptic. You can also hammer into the ground before installing them plastic pipes right size, and already insert wooden supports there. This will allow the fence to last a long time, as it will prevent the process of rotting the tree in the ground.
The distance between the elements of the base should not be more than half a meter. It would be rational to arrange the supports in thirty to forty centimeters, not sparing the material. The rods themselves, like the pegs, can be painted in the desired color. Suitable for this and conventional paints, and dyes of vegetable origin. You can give the fence a yellow tint thanks to the peel of onions, birch leaves, brown is created using black alder. Stain or potassium permanganate is also suitable for staining.

It must be taken into account that you can start a repainting operation only if you are going to build a small fence, since each branch will have to be processed individually. To paint the rods, you need to remove the bark from them. This will help the soap solution, in which you need to lower the branches for several days.
To remove the bark, use the so-called pincher, which is just a split branch with a limiter. Quite successfully, this tool is replaced by wire cutters or pliers. The rod is inserted into the clamp with wire cutters or pincers and pulled towards itself. From a well-soaked branch, the bark is removed very easily. If the original color of the material suits you, do not clear the branches, but simply take on modeling.

To create a horizontal fence, braid vertical pegs with branches. Weaving starts from the thick end of the branch, threading it between the pegs to the end of the entire fence or a separate section. Then this procedure is repeated, only the branches are already directed in the opposite direction. They must braid the stakes in turn. If one branch is located to the right and the other is to the left of the base, the result will be a figure-eight pattern.
If you create a fairly dense structure, after every fourth row, you should lightly tap with a hammer on the upper woven branches to compact the structure of the product. Every six to seven rows, the spans are reinforced with wire.
Care must be taken to securely attach the lower rods to the supports, otherwise the entire wattle fence will sooner or later slide down.

Throughout its length, the wattle must have the same thickness. To do this, thick and thin branches must be evenly distributed over its entire surface. When the rod ends on one post, a new one is woven into the previous one. This allows you to maintain the uniformity of the entire structure. For the same reason, the course of weaving is changed by directing the rods in the opposite direction.
At the end, the fence needs to be trimmed along the top line, cutting the thick branches of the base with secateurs at a certain height. Although they can be curly bent, creating openwork arches. Also with It is necessary to cut off the excess on the sides of the fence so that it “does not bristle”.

To create a vertical wattle fence, several branches are horizontally tied to the pegs of the base, which will serve as straps for fastening other branches that make up the "body" of the fence. The branches used directly in weaving are placed vertically, with their thick side resting on the ground. They need to braid horizontal strips. From above they need to be tied with a wire or rope.
If natural materials for the fence were not found, use PVC pipes. Make the base, drive the stakes into the ground to the length indicated above. You need to start braiding the stakes with tubes from below. To make the wicker fence look really colorful, you can plant sunflowers next to it. This is a traditional design technique. In urban conditions, even plastic flowers will not cause confusion, and they will not have to be looked after.


Also wattle will look good in combination with field and garden flowers. It is no coincidence that it is chosen for the garden as an alternative to the border tape around the flower garden, creating decorative fences of amazing beauty.
In addition, wattle can be an excellent support for beautiful bindweeds. And if, next to such a fence, a roughly knocked together shop of chocks and boards is built, such a neighborhood will turn out to be very picturesque. You can hang old cracked lids on wattle stakes, or even old shoes original look giving the building a unique look.

A more solid wattle fence can be created from the board. Instead of wood, you can also use MDF panels or, for example, plastic siding. But it is much better to use natural material.
You should calculate in advance the number of boards and determine their quality. For a dacha, where guests are rarely met, you can choose third-rate boards, and for a representative country house a fence made of the finest lumber would be best. These should be well-crafted boards, the thickness of which is at least two centimeters.
For supports, you can choose not only wooden, but also metal, concrete or brick pillars. These supports should not prevent the boards of the future wattle from bending.
To prevent the fence from being knocked down by a strong wind, you will have to use self-tapping screws and nails in the work.

To create such a fence, vertical supports are installed at a distance of two meters from each other, and additional pillars are placed between them. For reliability, the supporting elements are best concreted.
The most difficult thing is to install the boards horizontally, bending around the posts. In the process of erecting a fence, they need to be screwed to the supports. It is recommended to bend each next board opposite to the direction of the bend of the previous one.
After completion of work, such a solid wattle is treated with varnish or an antiseptic - so it will last a long time without losing a respectable appearance.


Care
The disadvantage of wattle from natural materials is that it rots over time. Therefore, even at the stage of creating a fence, it is possible to make a drainage layer along its entire length, which will quickly absorb water after rain. So wattle branches will not periodically stand in a puddle. To do this, it is necessary to dig a trench half a meter deep and fill it with sand and gravel.
From time to time, a wicker fence needs to be treated with an antiseptic and insect repellent.

Beautiful examples
There are a lot of ways to weave from branches. You can use them not only to create original baskets, but also to build fences. All these numerous techniques are used in landscape design. A wicker fence can look very textured if, by highlighting each row with several layers of branches, you create a checkerboard pattern on the surface of the fence. A high wattle fence will not only decorate the territory, but also hide it from prying eyes.
A basket with a wicker handle assembled from bars gathered a flower harvest.
This one is made of clay or cement mortar. Inside you need a frame, especially for the handle.

Little wicker fence frames a round flower bed. The handle makes it look like a buried basket.

Small stones are collected in baskets. The structure rests on the frame and concrete.

In this version, because of the stones, the bonding solution is not visible and it seems that the design is not simple, but magical.

Flat pebbles are neatly laid out in rows. They even did a great job on the handle. At night, the composition is illuminated.

This gigantic structure was made by an experienced craftsman.

The basket is woven from strips of linoleum, which are braided around tubes inserted into the ground.

Woven like a real wicker basket. The vines of flowers have already braided the handle of the vine.

Wires of various sections served the gardener a service.

An old tub turned into a flowering basket.

The iron frame set the composition, flower growers filled it with the vital energy of flowers.