Print stencils for February 23. Festive window decorations “Happy Defender of the Fatherland Day! Letters and numbers from different materials
In this article, we offer you schemes, stencils and templates for vytynanok, cutouts on a military theme for children, boys with their own hands on February 23 and May 9 on Victory Day
Vytynanki are decorative ornaments that are made by drawing a pattern on paper and contouring the figure. Most often they use the New Year theme on the eve of the winter holidays. However, these decorations can be prepared for other memorable dates, including Victory Day.
We will look at how to make a decoration at home, the most popular stencils, which Additional materials worth preparing, as well as how to work with template images. Also in this article we will analyze the most successful places for placing protrusions and their varieties.
Vytynanki for February 23 and Victory Day - tanks: print templates, photo
Vytynanki on the eve of Victory Day and February 23 can be made from the most simple materials. Among which:
- Stationery scissors
- Stationery cutter
- colored paper
- album sheet
- white cardboard
- Pencil
- Eraser
- Transparent electrical tape
- Glue brush
With the help of protrusions in the form of tanks, you can decorate:
- doors
- Classroom
- Children's task group
- office space


For their manufacture, it is important to adhere to the following sequence:
- Print a stencil
- Glue it to cardboard and let dry.
- Using a utility cutter and scissors, cut out the excess pieces of paper
- Attach the screen blank to the prepared colored paper
- Mark all the details of the image with a pencil
- Using clerical scissors, cut out the outer borders of the protrusion
- Cut tape into small strips
- Separate the internal parts of the workpiece from excess paper using a clerical cutter
- Attach the prepared vytynanka to the window or furniture surface
- Secure its location using cut tape.
Vytynanki by February 23 and Victory Day - planes: print templates, photo
Aviation was an integral part of the Soviet army. Therefore, the images of aircraft occupy one of the most important parts in the painting of socialist socialist realism. However, craftsmen also did not stop praising their heroes, so the images of vytynankas in the form of airplanes are still relevant today. In order to prepare them yourself, you need:
- Stationery scissors
- Stationery knife
- Colored or white paper
- Pencil
- Eraser
- Ready-made templates with images
- Scotch


The step-by-step process of work is divided into the following stages:
- We apply the stencil to a sheet of colored or snow-white paper and draw a contour with a pencil
- Cropping the image according to all line boundaries using a utility knife and scissors
- Cut tape into rectangles
- We attach the protrusion to the window and fix its location
As additional decorating elements, you can use:
- Painting with colored pencils or paints
- Applications
- Combination of several colors
- Using a camouflage stencil to paint elements of an aircraft body
Vytynanki for February 23 and Victory Day - soldiers: print templates, photo
The images of soldiers are not inferior in popularity to others among the vytynankas for the Victory Day. You can make them yourself using colored or white paper. When using landscape sheets, you can also decorate the scenery in accordance with the Soviet form. And in order to cut out a patriotic vytynanka, we need to prepare:
- Colored or office paper
- Stationery and manicure scissors
- Ready template images
- Pencil
- Eraser
- Blade
- Scotch


 Stencils for Victory Day May 9


You must also follow these instructions:
- We apply the template to a white or colored sheet
- Outline the drawing with a pencil
- We cut out all large and small details, in accordance with the picture, using manicure and stationery scissors
- We cut the adhesive tape
- The image is placed on a window or any other flat surface
- We fix the vytynanka with adhesive tape
Vytynanki for February 23 and Victory Day - stars: print templates, photo
Images of protrusions in the form of stars can be made both symmetrical and voluminous. For their manufacture it is worth arming:
- Multicolored office sheets
- Stationery scissors
- blade
- With a simple pencil
- with scotch tape
- Eraser
- Ready stencils


In order to make a symmetrical vytynanka, it is important to follow all the stages of preparation:
- Grind the tape, breaking it into small pieces
- Fold colored paper in half
- Attach the stencil to the prepared sheet
- Outline all parts of the image with a pencil
- Cut out the fold with clerical scissors
- Separate small parts using clerical scissors and a blade
- Straighten the decoration
- Attach the protrusion to the window or smooth surface of the furniture
- Secure the pommel with pieces of tape
If you want to create a three-dimensional star, you should follow all the above points, however, to apply contour lines, the stencil is applied to a flat sheet of paper. Therefore, all the details are cut out alternately on each side with a blade.
Vytynanki on February 23 and Victory Day - fireworks: stencils, photo
- Windows of any premises
- holiday posters
- Cabinets and doors

For the manufacture of decorating elements, you need:
- White office paper
- Pencils and colored pencils
- Eraser
- Scissors
- Blade
- Scotch
- Ready-made stencil pictures


Step by step work looks like this:
- Attach the finished templates to a sheet of paper and circle the outline with a simple pencil.
- Crop the image at the outer edges and also remove the inner crops
- Cut tape into squares
- Using colored pencils, color in the image of the salute according to your personal preference.
- Attach the protrusion to the window and fix it with pieces of adhesive tape
- As an additional decor, you can use sequins, sequins, rhinestones, finely chopped New Year's rain or crushed glass toys to create a sparkle effect.
Vytynanki for February 23 and Victory Day of the eternal flame: stencils, photo
The eternal flame symbolizes honor, respect and memory of all those who died during the Great Patriotic War. It is rational to use the vytynanka of this image for decorating holiday posters, postcards, as well as rooms of any type. To this end, you need to stock up on the following materials:
- White sheets of paper or cardboard
- scissors
- Printed stencils
- With a simple pencil
- Eraser
- Stationery knife
- with scotch tape
- Paint brushes
- gouache
- Water container


Following these sub-points, you can create a festive vytynanka with your own hands with a minimum amount of time:
- A sheet of paper or cardboard is applied to the stencil
- All contours of the drawing are selected with a pencil
- Cut out the picture using scissors and a utility knife
- Tape cut into thin strips
- Using gouache, apply the first coat of paint and allow it to dry completely.
- Then apply 2-3 small drops of bright yellow color and smear them with fingertips
- After the previous layer has completely dried, highlights are added to the pattern using a thin artistic brush and white paint.
- Next, the vytynanka needs to dry
- Now choose the location of the scenery
- And fix the image with pieces of adhesive tape
Vytynanki for February 23 and Victory Day - pigeons: stencils, photo
Drawings of doves personify the image of peace on Earth. This symbol has been used by the best masters of painting and monumental art for many centuries. Therefore, dove-shaped vytynankas are the best fit on the eve of Victory Day. To prepare the decorations you will need:
- Scissors
- Stationery cutter
- White paper
- Ready printed stencil drawings
- Pencil
- Eraser
- Scotch
- hot silicone
- White goose feathers or any bird down of the same color
- Black rhinestones
- Black pen
- Husks from pumpkin seeds


- Apply the template to white paper
- Outline the drawing with a simple pencil
- We cut out all large and small details, in accordance with the picture, using scissors and a clerical cutter
- Cut tape into small pieces
- Grind large feathers up to 3-5 cm in length
- With a pen we direct the future place of the dove's eyes
- We apply hot silicone and carefully fasten down and feathers
- We also set black rhinestones as eyes
- Cut one part pumpkin seed husk into 2 parts
- We glue the first half with hot silicone, forming a bird's beak
- Draw the eye contour with a pen
- We place the image on a window, postcard, poster or any other flat surface
- Fix with adhesive tape or hot silicone
- To make the dove stand out on a white background, you should first paint it with light gray paint, or change the color of the location of the protrusion
Vytynanki for February 23 and Victory Day - carnations: stencils, photo
The carnation is a permanent symbol of memory of those who died during the Great Patriotic War. Therefore, the use of this image in the vytynanka technique is especially popular. Indeed, with the help of such a drawing, one can show respect for all the fallen in such a tragic time. To use the flower image you need:
- Printed petal patterns
- Stationery scissors
- Eraser
- simple pencil
- hot silicone
- album sheets
- Cutter or blade
- Nail scissors with a rounded end
- Sheets of red paper for needlework


Step-by-step preparation of vytynanka is not difficult if you follow all the steps indicated:
- We apply the template drawing to the red sheets and trace the outline with a pencil
- Cut out all the details, following the contours
- We glue the blanks of the petals using hot silicone
- Let the patch dry completely
- We place the drawing on a postcard or poster, fixing its location with silicone
To make vytynanok with a symmetrical pattern, it is enough to adhere to classical rules their manufacture. And as decorative elements, you can use different painting techniques with gouache or oil pencils.
Vytynanki for February 23 and Victory Day - tulips: stencils, photo
Step-by-step production of jewelry is divided into the following stages:
- We apply the stencil to the colored paper from the inside
- Outline using a simple pencil
- We remove excess paper, along the outer border of the picture, using scissors
- Cut out the uneven edges of the protrusion with nail scissors
- We separate the internal parts with a clerical cutter
- Cut a strip of tape into small rectangles
- We fix the protrusion on glass or other surface using sticky blanks
Making windows with bulges for February 23 and May 9 at school and kindergarten: ideas, photos
For the festive decoration of a school class or group kindergarten on the eve of Victory Day and February 23, it is important to choose those decor elements that would help students learn the material they have learned, feel the grief of generations and plunge into the atmosphere of the euphoria of victory. To this end, you can use the following techniques for ennobling windows:
- Volumetric and septenary protrusions for any military theme
- Flower arrangements from different types paper
- Using protrusion templates and decorating effect window spray
- Installation of voluminous birds and flowers as harbingers of the onset of spring and peacetime
Also, the elements of the protrusions can be used:
- When making postcards
- Festive posters
- Corners of children's creativity
- As bedroom decorations and wardrobes in kindergarten


The most understandable and accessible for children will be the symbols:
- Carnation
- pigeons
- Military equipment
- eternal flame
- military vehicles
When communicating with children, remember that the main task is to explain the story as clearly as possible. After all, kids are not always able to remember complex historical chains of events, names, and settlements. Therefore, joint preparation for the holiday will help not only to explain the material in a more accessible way, but also to establish contact with all the kids.
Vytynanka from February 23 and Victory Day: ships, helmets, inscriptions


Video: Master class "Vytynanki"
Tatiana Pivovarova
Vytananki copied from the coloring pages, it was necessary to think about where to make slots:)
It turned out, so we can say with confidence - a vytananka can be made from any coloring book.


Similar craft"tank" from matchboxes showed up here on Maam, where the "turret" of the tank was made from a piece of sponge. We have plasticine, but so that there is no left on colored paper greasy spot, a self-adhesive square is glued, and plasticine is already on it.

Modeling "soldier". One of these soldiers was brought to me last year by the parents of the children of the group as crafts for February 23, then there were nurseries, and I blinded several of the same for the dressing room decor - they are upstairs. This year, according to this model, the soldiers were blinded by the children themselves - the formation in the middle. One decorated with epaulettes, and medals - turned out to be a general, he is on the right The craft is very simple, the head is a ball of white plasticine, the nose is made of potatoes, black eyes, a helmet on the head. The torso is a cone of light green plasticine, on it there are "protective" spots of dark green, short legs, brown shoes, hands made of posts, even without palms, the hand salutes.

On this day humanity
There are reasons to celebrate:
Happy Defender of the Fatherland
Congratulations, men!
Related publications:
On the eve of the New Year, everyone is preparing for his meeting. Especially children! Therefore, I am sure that decoration is most carefully done precisely.
Older children are happy to do vytynanki. In September, kids entered my group three years of age. They, of course.
The holiday is coming soon, so we tried. We will decorate the windows with garlands later. I took templates from websites. Increased.
I have two news! The first is the transition to another kindergarten, I now work closer to home. My group is new.
Traditionally, for the New Year, each kindergarten is considering how to decorate itself! So this time everyone got the task to arrange their groups.
And so another year has come to an end. The year of the sheep is leaving us, and now the monkey is knocking on the window. For sure in everyone.
The most important window was decorated with a recognizable character from the fairy tale "The Snow Queen". I drew it myself on a large paper, then cut it out with stationery.
Good day everyone! February 14 is followed by another holiday, which is celebrated in our country annually on February 23. Last time we talked about what, and also did with the children
Today we continue and will, together with the children, congratulate our defenders and make interesting and original cards for them.
This type of work for schoolchildren or kindergarteners is the most common. Because it is not so difficult to make such a miracle, you just need to listen to the instructions of the teacher and everything will work out.
So, if you have not yet decided to do this and give it as a gift, then perhaps you will stop at this option.
On this day, all mothers, daughters, grandmothers and indeed the entire female half of the population congratulates the male half on this celebration. It is so customary that the symbols of this holiday are state flags, military equipment and other vehicles, as well as stars on shoulder straps.
Therefore, all drawings or pictures are directly related to this. I propose to make the first option out of paper - this is a tie using the origami technique.

And I also really liked the idea with a dollar bill, or you can take our rubles and roll it up, like this, it looks pretty cool, and as they say, a small stash is at hand.

For the smallest craftsmen of the second junior group of the kindergarten, you can make work from plasticine.

Now we will make a postcard on which the car will be depicted. Such a lovely and funny creation you can make with children of the eldest and preparatory group, or use in elementary grades.

Stages of work:
1. Prepare everything you need for work, these are paper, glue, scissors and pictures with cars.

2. Cut out the necessary details to complete the plot.
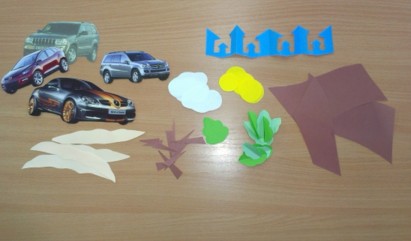
3. Then, to make the machine seem voluminous, make an incision, while folding a sheet of paper in half.

4. Here is such an interesting and cute story.

5. outer side You can decorate as you like, using various decorations and decors.

6. You can do it as an application, or simply draw with colored pencils or felt-tip pens.

Cool design in the technique of scrapbooking
I give you a few ideas that impressed me, you can take them as the basis of your work and create your own plot. See how bright you can make a star.

Miloi is very talentedly executed, even a flower is not at all superfluous here.

Wow, a message or a little surprise).

In general, it looks wonderful and not primitive.

So, do something for everyone!

And surprise, in general, act.

And I also offer you a step-by-step instruction that you can take for your creative work in the scrapbooking style, here:
Original ideas for greeting cards for schoolchildren on February 23 with templates
I want to make and decorate a postcard in a special way, I know that many are interested in options for bulk products, because they look great and amazing. Especially if there is step by step instructions, then you and your children at school can do such a miracle.
Or you can create this creation at home, and then your son or daughter will give it to dad.
Stages of work:
1. First of all, you will need to find a double-sided cardboard, it is advisable to take blue or blue, this will be the background of the sea. Then fold the blue sheet in half and glue the base in the form of a boat to it.

2. Accordingly, in order to glue the base from the ship, you first need to make it, for this, find the image of the ship or ask me for a template, I will send it to you for free by mail. So print it on A4 sheet and cut out the desired image along the contours with a clerical knife.


4. Glue the white base gently to the blue base.

5. This is how it should work out for you.

6. Looks just fantastic beautiful and charming.

You can make a simple application from colored paper and from geometric shapes, to do this, draw patterns, and glue the composition on them.


You can go another simple way, print this sample, and then color it or make an application.

I liked another type of postcard, I am happy to show it to you.
We will need:
- colored paper or cardboard
- scissors

Stages of work:
1. Draw the templates, as I showed you in this picture, it’s not difficult, even a beginner can do it. But what color to make for each workpiece, decide for yourself, this is a creative work that can be done in a labor lesson.

2. For the base, it is best to take colored cardboard or double-sided or plain. Fold the paper in half and cut out a circle on one side.

3. Now it remains to design the product. Find the right text or write your own by hand.

4. Glue the congratulations inside the card.


6. And the front side will look like this. It's like a ship is floating on the waves.

I also saw such a handsome boy yesterday, I suggest you build it too.

To create such a charm, cut the blanks with scissors.

Glue everything you have in mind on the background you want. The flag can be made from satin ribbons and a match, or use a cotton pad instead of a stick.

If you want a masterpiece in general, take a look here, a stylish and very cool idea for children of any age.

We make postcards with children in kindergarten from paper for dad and grandfather
An excellent option would be a rather unpretentious postcard with the image of a bear cub in military uniform. You need to make such a background on a piece of paper using a printer.

Cut out the stencils according to the pattern.
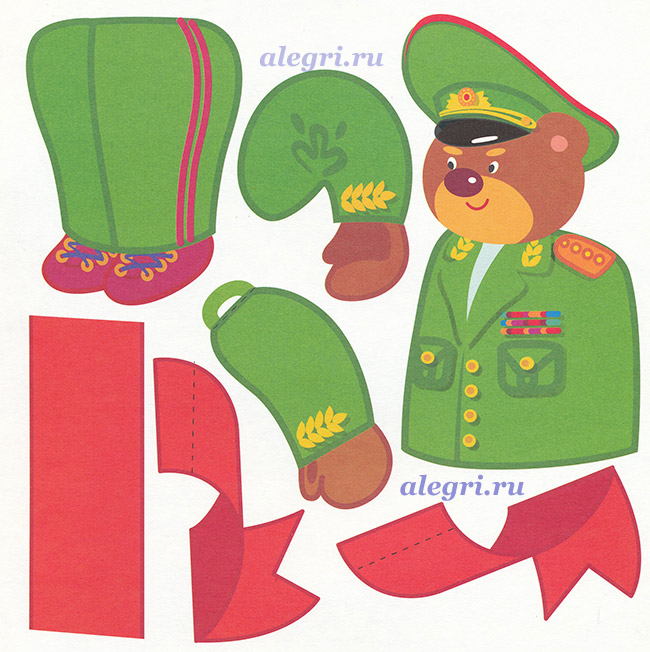
Then glue them to the background.

And on the back, write or print a congratulation.

Well, I also found such a simple idea for very small young talents.
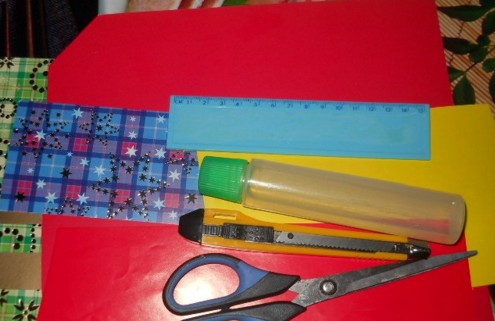
We will need:
- multi-colored cardboard with embossing
- colored paper
- scissors
- ruler
Stages of work:
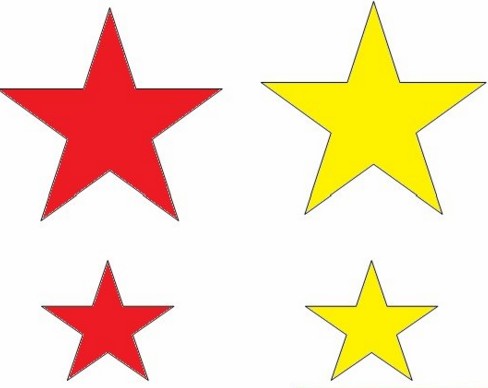
1. Print the stars on an A4 sheet, or make stencils, and then draw them on colored paper and cut them out.
2. Fold the embossed cardstock in half. Cut out two strips of colored paper and glue them overlapping. Also decorate with a star.
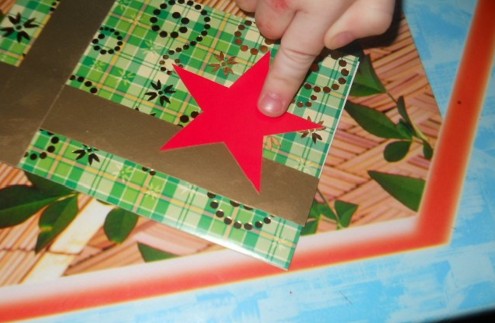
3. Such a very beautiful and cute result, write wishes on the other side.

Unusual gift in the style of quilling Tank
It will be really cool if you make a postcard and, in addition to everything, present a small souvenir in the form of

Those who are familiar with this technique will easily create any plot).

And for those who are not familiar yet, I found a video for you from which you will learn how to do this:
You can deviate from the topic and make it out of numbers, but in the same style.

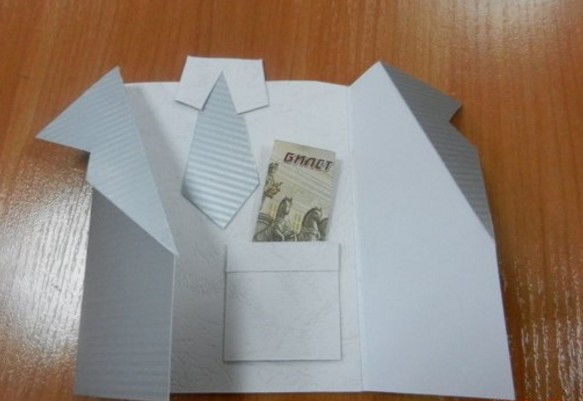
Master class on how to make a shirt with a jacket
The easiest option can be an origami souvenir, using colored double-sided paper or a white A4 sheet.

It turned out a small shirt with a tie.

In addition to everything, since this is a postcard, you will need to come up with a poem or congratulation and read it with expression.
Or you can go another way to make a blue or blue sheet tie first, and decorate it with all sorts of stickers, sequins, rhinestones, etc.

And then glue it and you get the easiest gift option.

And if you want to do something more serious, then use this instruction.

It is necessary, as shown in the figure, to make a product layout.

Then use the ruler to collapse along these lines. Of course, draw the lines with a pencil, not a felt-tip pen, a felt-tip pen is shown here so that you can see it better.

This is how the jacket looks like.

It remains to make a collar, make it according to the scheme.

Then cut and roll.

Finish by gluing on the right touches for completeness, this is a satin ribbon or paper tie and a poem.

You can also make a postcard with a little secret.

Take a piece of paper and make these marks as shown.

Plus there will be a vest.

The result can turn out for you, the main thing is to try to do this work with great love, and then, what could be more pleasant to give to grandfather or dad on the long-awaited day.

If you want to be original, you can put a bill or something else more impressive.
You can even stick a calendar.

We create a three-dimensional postcard with children for the holiday of Defenders of the Fatherland
Such products are usually in great demand because they look spectacular and beautiful.

See how cool they designed a regular photo frame. Make a boat or steamer first.
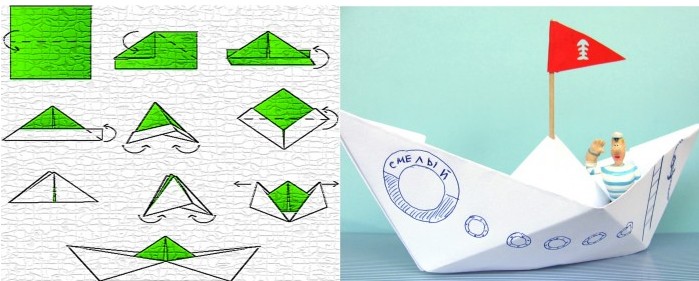
A diagram of such a craft is presented here.

You can use another option, like this, you have to stick the desired images on a piece of paper.

And then color it with paints or felt-tip pens. Blanks can be downloaded and printed.

 By this principle, you can do other work.


Every boy or guy does not dream of good set tools, right? So let's give him a dream.

For the next work, you will need 2 pieces of paper. different colors, pencil, glue stick and utility knife, because the poking style will be applied.

It will turn out very stylish and tasteful.

You need to print the template on the printer, request it from me. And then connect the white base and blue images.

From corrugated paper or thick cardboard, carefully cut out the stars, 3-4 pieces and glue on the base.

That's all dear friends and subscribers. If you were interested, share this note on social networks or leave your feedback on this post. Good luck to all! And our defenders of good health, success in everything! Bye everyone!
Sincerely, Ekaterina Mantsurova
Everyone on earth knows: dad's holiday in February! This simple couplet reminds us that in a few days the whole country will celebrate the popularly beloved holiday Defender of the Fatherland Day. On this day, we congratulate our beloved men: husbands, fathers, brothers, grandfathers. And, of course, I would like to thank them for their care, warmth, courage, strong character and love.
How to congratulate your main protector of the family - your spouse? This question is asked by women the day before. But, besides, children also like to congratulate dad and, of course, want to give him a gift with their own hands and, perhaps, hear praise from dad. Let's think together how to congratulate dad so that he likes it?
Gift from mom
Many women consider February 23 to be a great occasion to renew their husband's, so to speak, "men's set" - socks, tie, shaving accessories, a lighter (if he is a smoker), shower gel and the like. In addition, on the Internet you can peep ways to design such a set, such as this option:
Vytynanki by February 23
In addition to gifts and treats, give your beloved man that you can write in beautiful postcard. And again, we recommend that you make a unique little thing that your defender will be delighted with and will certainly put it on his desk. This is a vytynanka postcard for February 23.
We talked more about the technique of openwork paper cutting in an article about. And now we suggest that you continue to improve this type of creativity and make vytynanki by February 23. For example, this technique can be applied in the manufacture of the original postcard.

The boat will look best if you transfer the template to pastel paper. Print this template and use a carbon paper to transfer it to a postcard blank. Carefully cut out the necessary contours with a clerical knife.


You can decorate the card to your liking, as well as make a three-dimensional inscription. Print the templates of these inscriptions, transfer them to the selected thick paper and stick the inscription with the help of bulk adhesive tape.

The vytynankas look very original against a background with a contrasting color. Thick paper is taken, again, you can use pastel paper, the sheet is folded in half. On the top, you cut out the image, and put a contrasting background inside. You can decorate the card with letters, beads or make inscriptions with your own hand. Below, see an example of a finished postcard and templates for cutting protrusions by February 23.
How to make a paper window decoration for February 23 or Victory Day? A holiday is not only congratulations and gifts, but also a special atmosphere, which is created by various elements of the decor of the room.
And in order for the child to better feel the upcoming festive event, he can be involved in the process of transforming an apartment, house or kindergarten group. It is customary to decorate the room for the New Year and Birthday. But you can create a festive atmosphere for other holidays - for example, Valentine's Day, or Victory Day. At the same time, you can decorate not only the inside of the room, but also doors and windows, and most available material in this case will become self-adhesive paper.
Paper window decoration on February 23 or Victory Day can take the form of some kind of weapon or heavy military equipment: and even a submarine. The latter option is quite simply made and does not require jewelry work from the child with scissors.
What you need:
- self-adhesive dark blue or purple, as well as blue and other bright colors;
- paints and brush, water;
- pencil and eraser;
- scissors.
On a sheet of paper from the wrong side, a submarine is drawn and then cut out in the form of an oval elongated and pointed at the edges. A characteristic appearance is given to it by the periscope and the tail section. We draw portholes with paints or cut out from a lighter one.
 Paper window decoration - submarine 1
 An addition to such a submarine can be a whole ensemble of inhabitants of the underwater kingdom: fish, octopuses, jellyfish. They will give the decoration a cheerful look and remind you that today the kids are growing up under a peaceful sky.
 Paper window decoration - submarine 2
  Paper window decoration - submarine 3
 In order to stick figures from self-adhesive on glass, it is enough just to remove a layer of protective film. At the same time, you can decorate not only windows, but also balcony, as well as interior doors.
 Paper window decoration - submarine 4