Gate thrust. Leaf retainer for garage doors
Swing gates can be considered an ideal design, if not for one significant drawback - the tendency to spontaneously close from the slightest gust of wind. The result is scratches and dents on your favorite car, and sometimes even injuries of varying severity on the body of their owner.
Allows you to avoid trouble simple fixtures- clamps for sashes, which are popularly called stops. Those who have not realized the need for their use may prop up swing gates any object that comes to hand, or go to the store for a ready-made stopper. And you can strain your own mind, and make emphasis with your own hands.
Stoppers-constipation

The easiest and favorite option for home craftsmen. The stopper works much like an old-fashioned window latch, but its size is much more impressive. Such a device has not yet been mass-produced, but it is quite possible to make it yourself. For this you will need:
- two steel tubes (one for each swing gate leaf) about 15 cm long and 1.6 cm in diameter;
- steel plates 10 cm wide and 15 cm long;
- pins freely entering the branch pipe, at least 20 cm long.
The whole process of making a latch with your own hands consists of several stages:
- Steel tubes are welded to the plates and then attached to the bottom of the gate. For sashes sheathed with wood, this is done using self-tapping screws; the plate is simply welded to metal sashes.
- A lever is welded to the upper end of the pin at a right angle, playing the role of a handle or just a pin, preheated on a gas burner, which is bent and inserted into the pipe.
- Now we open the sash and find a place where it will be necessary to drive the counterpart of our “espagnolette” to a depth of about 30 cm. We take into account that the pin should enter it by at least 10 cm. Do not forget that the gate leaf can be located slightly higher than the entrance level.
- So that the pin does not interfere with opening the swing gates, we weld a hook above the lock, on which the pin handle will rest.
But consider the disadvantages of this device. The return pipe, into which the pin should be lowered, can be covered with snow in winter and will have to be dug out, for which there is not always time. You can do without a counterpart, but in this case, the ends of the pins should be pointed. Such a latch will, of course, be less reliable than the original version, but in extreme cases it will fit. If not steel pipes the desired diameter, you can slightly modify the fixture. Replace it with two or three loops. It turns out a simple, but quite effective design.
Stops on carabiners

original and cheap solution DIY problems. For implementation, you will need (for each of the wings of the swing gates):
- cargo sling with a metal hook at the end;
- small carabiner;
- eyebolt with M8 thread.
From the tools you need a drill with an F7 drill, an M8 tap and a wrench for it, any adhesive-sealant. If you have experience using the above tools, then mounting the latch will take no more than half an hour. The process will consist of the following steps:
- On a frame with inside two holes are drilled at the same height, and a thread is cut into them.
- The eyebolts are coated with sealant and screwed into the prepared holes.
- Carabiners are put on eyebolts, and cargo slings are threaded through them.
The hooks can be hooked onto the adjacent garage door. But nothing prevents the use of a bracket fixed on a fence post or wall for these purposes. It can be mounted on any nearby solid structure and get a cheap and reliable stop, devoid of the disadvantages of a latch-constipation. Unfortunately, the appearance of this device is not very attractive, which many may consider a significant disadvantage.
Hook for aesthetes

A very simple device, but it does its job perfectly. It has a respectable appearance and even allows you to fix swing gate leaves in two or more positions. For manufacturing you need (on both wings):
- metal corners 50 mm long, 80 cm and 15 cm;
- a steel bar with a section diameter of 12 mm and a length of approximately 1.2 meters;
- welding machine, self-tapping screws, drill, vise.
And now we perform a few simple steps:
- In a larger corner, which will play the role of a hinge, three holes are drilled on one side for fastening to the gate frame. On the other hand, there are two holes at the edges, of such a diameter that the end of the steel bar freely enters into them.
- Now the hardest part is making the hook. One side of the heated steel bar is bent into a ring (do not forget to leave a gap so that the hook can be put on the canopy!). The other side is given a U-shape. It's difficult, but quite possible.
- Now a canopy is made from a smaller corner, for which two holes are drilled in it on one side for fastening to the sash, and in the middle of the other side - one hole for fixing the hook.
- We fix the corners so that the larger one is on the gate frame, and the smaller one is on the sash. You can use self-tapping screws (for wooden gates) or welding (for metal ones) for these purposes. We put the hook on the canopy and finally bend the ring.
That's all, the length of the hook and the location of the holes will have to be calculated empirically, experimenting with the gate leaves. The result is a simple but reliable do-it-yourself emphasis. It will allow you to open the sash completely or leave the swing gate ajar.
Stopper

A simple device that can be used by someone with a gate lined with wood. To make it with your own hands, you will need a wooden block and a window hinge. One end of the loop is rigidly fixed at the end of the bar, the other is movably fixed on the gate leaf.
You can also make a metal analogue of this device, consisting of a pipe movably fixed to the sash. In the non-working position, the pipe rises up, and here it is held by a rope loop. To fix the gate, it is enough to lower the pipe. To increase the stop area, the top of the pipe should be cut at an angle.
Trap catch with pawl and spring
A more complex device that has the advantage of allowing the gate to be locked automatically. It consists:

The pipe with the dog is attached at the right distance from the wall. The bracket is fixed on the gate leaf. The principle of operation is quite simple. When the sash moves, the bracket attached to it raises the pawl, which then lowers and securely fixes the sash.
A similar device can be placed at the bottom of the gate, you just have to supply it with a spring. It will return the dog to a horizontal position. To subsequently close the gate, it is enough to slightly lower the dog with your foot.
Trap without spring
To make it, you need a thick steel plate that needs to be bent on one side and a handle welded to the bent end. A steel bar is welded to the bottom of the plate, which is subsequently inserted into brackets fixed to the ground.
Important condition! For correct operation stop, it is necessary that the flat part of the plate be much longer, and, therefore, heavier than the curved section. Then the gate leaf, when moving with its mass, will lower the curved end of the plate. After that, the remaining flat part under its own weight will lower, raise the curved end with the handle and fix the gate. To close the swing gate, just push the handle down.
The described clamps are far from all options for wind stoppers for do-it-yourself swing gates. Perhaps the described devices will serve as an impetus for your imagination, and you will come up with your own. original way problem solving. And we can only wish good luck to the master!
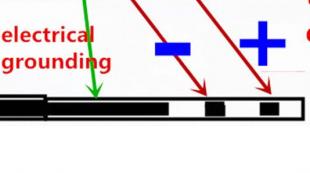
When installing garage doors, you also need to take care of their fixation in the open position. After all, very often unfixed sashes can easily close on their own from the slightest gust of wind and damage your car.
To avoid such an incident, it is necessary to install a gate leaf retainer. Moreover, in this case, you will not only be able to protect the car, but also yourself, since if the garage doors are suddenly closed, they can also injure a person.
It is quite easy to make such clamps with your own hands.
Retainer-constipation
The simplest and most common option that is suitable for any garage. The principle of operation of the latch is similar to a window latch, only it is large and not mass-produced, so you will have to make it yourself.
1. First you need to prepare steel tubes with a diameter of 16 mm and a length of about 15 cm. Since the garage door has two wings, you will need two sets.
2. Then a plate is selected under the prepared pipe, the width of which should be about 10 cm, and the length should correspond to the parameters of the pipe. It is welded to the plate in the middle using a welding machine.
3. If the garage door leaf is sheathed with wood, then holes must be drilled in them to fix the plates. Then the plates are attached to the bottom with bolts. If the sheet is metal, then the plate can be welded with your own hands directly to it. It is possible to weld a guide tube without a plate
4. Next, you need to make a pin with your own hands, the length of which should be 60 mm longer than the guide pipe. In addition, the length may depend on the location of the garage. After all, the position of the open doors is sometimes higher than the entrance itself, and the pin should be lowered into the pipe about 10 cm clogged into the ground.
5. Then, to the upper edge of the pin, it is necessary to weld a lever under 900, which will be used as a handle. It can also be done by bending the edge of the pin, heating it red-hot with gas burner.
6. Next, you need to open the garage door leaves and leave them in this position. Then mark the location of future pipes for fixing the pins. Pipes must be driven into the ground by at least 30 cm and stick out of it no more than 5 cm.
With this latch, you can fix the garage door even in the closed state.
To do this, in the lower part of the box, it is necessary to make holes of the appropriate diameter for the pin.

Hook retainer
This method of fixing the garage door leaves is also quite simple, and it will not be difficult to do it yourself.
1. First of all, you need to make a hook loop. To make it, you will need a metal corner 50 mm long, about 80 cm. On one side of the corner, you will need to drill 3 holes for fastening. On the other side, along its edges, two holes are drilled for a hook with a diameter.
2. Then you need to make a hook with your own hands. For this, a steel bar with a diameter of 12 mm is used. The length of the rod should be about 1.2 m, on the one hand it must be bent in the form of a ring, and on the other - under 900. To do this, you first need to heat it red-hot with a gas burner, and then clamp it in a vice and give it the appropriate shape.
3. Then you need to make a canopy under the hook. In this case, you can also use a 50 mm corner 15 cm long. Two holes are drilled for fastenings on one side of the corner, and one on the other side, right in the center, a hook will be hung on it.
4. Then you need to start fastening all the parts. First, you need to attach a canopy to the canvas. If it is made of wood, then the corner is attached with self-tapping screws; it can be welded onto a metal sheet by welding. Further, the holder loop is inserted into the opening of the canopy and finally bent.
5. After that, you need to attach the loop directly to the box with your own hands. As in the case of a canopy, it is attached to a wooden box with self-tapping screws, and to a metal one by welding. Since the hinge has two holes, the doors can open in two positions. They can be fully opened or left slightly ajar, in any case, they will be securely fixed.
Trap Retainer
This device has a rather complex design, since fixation occurs automatically. It is only required to bring the canvas to the latch, and he, in turn, will do the job.
For manufacturing, you will need a profile pipe 50/30 mm, a metal plate about 30 cm long and 5 cm wide.
1. To begin with, the profile pipe is buried in the ground. To make the structure more reliable, it is better to concrete it to a depth of about 40 cm. A hole is first made in the pipe for a metal plate, which will later act as a retainer.
2. Next, one edge of the plate is made under a cone, a small overlay is welded to it, which protrudes 20 mm beyond its edge and makes the element look like a hook. Then, holes are drilled on the other side and in the middle, one of them will serve to fasten it, and the other under the spring.
3. When the profile pipe is fully installed, a prepared retainer is screwed to it with a bolt. Then a ring is welded to the pipe in the lower part, for which the second end of the spring clings, which, in turn, returns the latch to its original position.
4. To keep it in a horizontal position, a stopper is welded onto the pipe from the side of the spring, which can be made from metal scraps. To fix the garage door, it is enough to press it against the fabricated structure.
The solid canvas has a large windage, the wind slams or opens the sash. To prevent injury and damage standing next to machine, it is necessary to install a stop for the gate. The stop will fix the sash in the desired position and will not allow it to close freely. Ready-made gate stoppers can be purchased at the store and made independently.
model on the gate
Mechanisms consist of the following elements:
- bracket with holes for fastening to the sash with self-tapping screws;
- pin;
- spring.
The bracket is a round plate bent in a U-shape. Inside it is inserted a tube 14 mm thick. It is attached to the U-shaped plate with a bolt that acts as an axis of rotation. The spring is fixed in the place where the bracket fits to the door and is fixed on the stop tube. A rubber pad is put on the lower end of the pin. When not in use, the leg rises and is held by a spring. Stops are available with pin sizes of 350 mm and 250 mm. The latest model with a short pin, door.
Spring lock mechanism
By analogy with ready-made models, a home-made emphasis is made for. It rests at an angle on the ground, not allowing the gate leaf to close from the wind.
Ready-made antiwinds have beautiful view, gold plated. They can be installed in minutes. The purchase price is less than 500 rubles. Thanks to the rubber pads, the legs do not scratch the floor and do not slide on the ground.
Homemade locking structures for garage doors look worse, but are stronger than purchased ones and can withstand heavy loads. They can be welded to metal frames.
Garage door installation diagram
Purchased, as well as most homemade stops, do not allow the sash to close. If the gate is not fully open, then the wind can open it.
The idea of placing a stopper in the form of a deadbolt
For the manufacture you will need a rod, a plate and a pipe.
- Turn a rod with a diameter of 10-14 mm on one side into a cone. At the top, bend at a right angle - make a handle and emphasis.
- Weld two rings from the pipe to the plate at a distance of 100–120 mm from each other. These are rod guides.
- Insert a rod into the rings.
- Tighten the bolt above the upper ring or weld a piece of rolled metal in such a way that when turning the pin handle is fixed and does not allow it to rise.
- Attach the plate to the canvas and insert the stopper into the rings. It is welded to the iron frame from the inside. It is attached to the wooden sheathing with self-tapping screws.
- Weld the cut pipe or nut to the frame in the upper position of the pin for similar fixation in the closed form.
- Open the gate and mark the point where the rod rests on the soil.
- Drill a hole in the ground along the mark and hammer a pipe 300 mm long.
Stopper scheme
The stopper should go into the pipe at least 150 mm, in areas with strong gusty winds, preferably 200–220 mm. Sliding gates can be fixed in two extreme positions. To do this, two pipes are driven under one rod. At the same time, in the closed position, the stopper additionally keeps the solid leaf of the sliding sash from tipping over by gusts of wind.
The advantage of stoppers in a strong and reliable fixation of the gate. The model is simple. Even those who do not know how to weld can easily understand how to make a stopper or an emphasis for swing gates with their own hands, fixing everything with bolts. The stopper can also be used for fixing, as well as an emphasis, if the exit from the garage is with a gate.
Swing gate retainer
The disadvantage of stoppers is the ability to fix swing gates in only one position, or you have to hammer several pipes.
The holes for the pin will constantly be clogged with dirt.
stop stop
An anti-wind stop, reminiscent of Chinese in design, which can be freely bought. The price for it in the store is 300-400 rubles. The design of folding stops for the gate is made by hand.
Such models perfectly cope with gusts of wind.
Option for those who know welding.
- AT profile pipe with a section of 20x20 mm and a length of 400 mm, we cut out the front and side walls to a height of 50 mm.
- A hole Ø 6.5 mm is drilled in the remaining walls.
- The second end of the pipe is butt welded to the plate, perpendicular to it.
- A bar with a diameter of 14 mm and a length of 400 mm is sharpened on one side at an acute angle. He will hit the ground.
- From the other end, the same hole is drilled as on the profile.
- The M6 × 50 bolt is threaded into the holes and twisted. The pin must rotate freely in the pipe.
Scheme of a conventional design
Holes are made in the plate for self-tapping screws for mounting on the canvas. When opening, the stopper slides along the ground and works as a reverse, resting against the ground if the wind tries to close the sash.
Assembled product
So that in the non-working position the stopper does not interfere, it is pulled to the canvas with a spring. To do this, make a long plate, about 150 mm. weld at the bottom. At the top, one end of the spring is fixed, the second - on the rod, approximately 80 mm below its axis of rotation in the pipe.
On unsheathed sashes, a similar hinged stop can be made of a simplified type. Replace the pin with a strip of metal. Make a hole in its upper part and fix it on the bolt between the washers. The strip of metal is parallel to the mounting plate. A bolt for the spring is attached to the upper edge.
Flurries can easily shift such a design
The entire structure is mounted on the outer rack of the frame frame from the inside.
Lack of design in fixing the gate to close. The wind can easily open the sash more strongly, and the stopper-reverse will not interfere with it.
Drawing of a conventional valve with a spring
Stops on carabiners
In 15 minutes, you can install stops from cargo slings and carabiners. Before you make the simplest design, you need to prepare for each sash:
The sash is fixed with a carabiner
In the open position, it is enough to hook the hooks of the sling onto the ledge, and the sash is fixed in the open position.
The disadvantage of the design is that the fixation is not rigid, the wind will swing the sash, and it must be pulled to the wall. In a garage cooperative, the piers are narrower than the canvas, the gates will be located on the neighboring territory and attached to someone else's garage.
Latch for additional fixation
Hook-lock
The simplest design for use in a single garage. On the sash and the wall is attached with a loop. A ring of wire stop is threaded into one of them. The hook on the other end of the wire clings to the second.
Fastener components
The hook-clamp serves as a good limiter for the movement of the gate, a kind of latch. It holds hard, but only in one position. You can make it quickly, a 5 mm wire is suitable. The length is chosen by the fact.
A novice and an experienced car owner - everyone remembers such a nuisance when suddenly an unexpected gust of wind slammed the gate at the most inopportune moment when the beloved car drove out of the gate. What a misfortune! After all, repairing even a small dent costs a pretty penny. What to do?
Someone keeps pebbles in the garage and carefully props up the treacherous gates, while someone still hopes for a chance. I offer you a couple of tips about simple designs to fix open gates.
Metal support for the gate
1. Perhaps the easiest way to make a retainer in the form of a prop. You can take a metal rod and make a design, as shown in the picture. You can also use old ski poles for this purpose. To do this, cut off the piece you need. the tip of the ski pole will rest against the ground, and at the other end, drill holes for the pivot axis. If you have galvanized sheet, at least 1 mm thick, then you can use it to make brackets for the axle. You will need two more parts to fix the stop itself when you close the gate - these are the latch holders.
Pick up two suitable bolts with a lock nut for the rotary axis. In order for the stop to securely fix the gate, the angle of its entry into the ground should be approximately 45 degrees.

2. The second method is a mechanism for snapping an open gate leaf with a metal spring mechanism. The photo clearly shows how to make it. You can place this mechanism both above the gate, by mounting it into the wall of the gate, and from below, by mounting it into the ground. Such a hook will not allow the gate to collapse unauthorized at the most inopportune moment.
 Gate lock in the form of an ordinary hook
 3. There is a third way - to fix the gate using an ordinary design, but a very strong hook. The plate with holes is attached to
the top of the wall, and the hook to the gate leaf. The wind pressure will be restrained by the hook in such a way that the sash will be rigidly fixed in one position.
There are other designs that you can easily buy in the store if you don’t feel like messing around and reinventing the wheel. By the way, not a bad idea to design it from improvised means!