DIY bird feeders: interesting ideas and tips for their implementation. Bird feeders: instructions, photos and original ideas Build a bird feeder by hand
Birds living in the wild need protection and care. It is especially difficult for them during the winter: when it is cold outside, it is so hard to find shelter and food.
That is why caring people try to feed our younger "brothers" as much as possible. One of the ways that will not only help the birds, but also decorate your garden, is a feeder made from improvised materials.

In this article, we have collected some of the most affordable options - focusing on descriptions and photographs, using already unnecessary items (plastic bottles or old dishes), you can easily equip a place where flocks of birds will gather.
Material selection
After evaluating the resources you have to create a feeder, you can choose an idea to your liking. However, it is worth remembering that not only its appearance depends on the configuration, but also practical characteristics such as stability.

That is why a good feeder must meet the following requirements:

Wear resistance and durability. Preference should be given to wood or plastic that can withstand weather conditions without getting wet from rain and snow, without collapsing under gusts of wind.

In addition, the birds themselves are often the cause of damage to the feeder - in search of crumbs, their beaks and claws scratch and tear fragile materials.

Proper size. Remember that if you cut a small feeder, for example, from a tetrapak, then large birds will not be able to eat from it, and small ones will start fights for a place and shake out food on the ground.

No sharp edges, "pulling out" carnations, etc. Birds are very delicate creatures, their feather protection and skin on their legs cannot prevent cuts from sharp objects, so make sure that your feeder is not dangerous for them, especially if it is made of glass, plastic or knocked together from planks!

Location and installation
Choosing the right place is extremely important!

Having chosen the most suitable position in terms of landscape design, evaluate:

Accessibility for birds. Perhaps the feeder will be closed from them by thick branches, or, conversely, too open, and then, with a strong wind, the birds simply will not be able to get close to it.

Difficulty for cats. These animals are excellent hunters, especially those who live in villages and holiday villages. They are stronger, faster and more agile than their domestic counterparts, and therefore, sneaking up to the feeder, they can cause great damage to the bird community.

Ideas for creating a do-it-yourself feeder
There are a huge number of different types of feeders - it all depends on your imagination and the materials available.

We will try to consider both the simplest and the most original ideas.

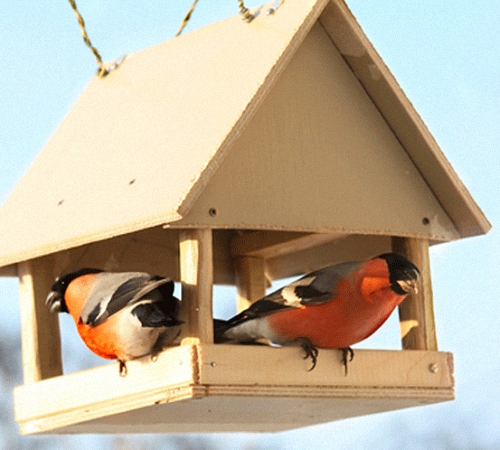
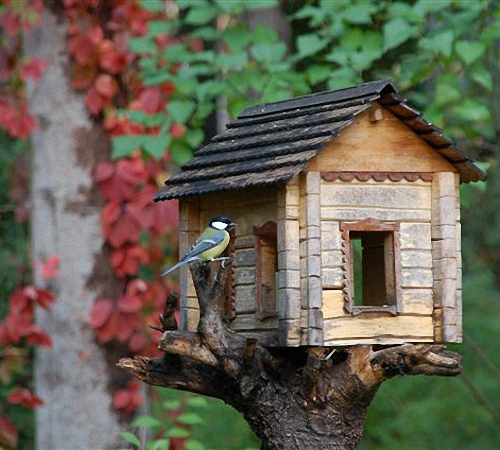
House made of wood or plywood
Despite the apparent complexity, such a design can well be assembled with unnecessary boards, pieces of wood, glazing bead, plywood and, of course, special glue or nails.
Note!

The base should be a heavy flat plank. For the manufacture of walls and roofs, you may need a drawing, however, it is quite possible to get by with an eye.

A wooden feeder, depending on how much attention you pay to it, can become not only a place for feeding birds, but also an elegant decoration of your garden.

Plastic bottle feeder
This type of feeder is very easy to make and is great if you decide to involve children in the process of creating. You need to cut one or two holes in the bottle in such a way that it is possible not only to pour the food, but also access to it is not difficult.

Of course, you should try to make the cut edges come out neat and not too sharp (in addition, it is advisable to glue them with tape).
If you are using a small bottle (1.5-2 liters), then you can do it in two ways: cut a square or rectangular hole in the bottle, or prefer a U-shape so that you can bend a piece of plastic and make a visor.

In the event that you decide to use a large bottle (5-6 liters, in which drinking water is usually sold), you can make a large side cutout. So it will be possible not only to fill up more food, but also give the birds room to maneuver.
Note!


In order to prevent the wind from ruffling a light bottle, it is worth putting a stone or a brick fragment on the bottom. This also applies to the next type of feeder.

Tetrapack bird feeder
In order to make a bird feeder, you can also use juice or wine boxes.

To do this, follow the same technology as in the previous case: mark the place of the cut, cut it out in shape, glue tape (or adhesive tape) on the underside of the opening, then make holes for a strong rope in the upper part of the tetra pak. It remains to hang the feeder in the place of your choice.
Shoe box feeder
The cardboard from which the shoe box is made cannot be considered a durable material, but it is sufficiently resistant to moisture, and if it is cold outside, such a feeder can hang until spring.

The manufacturing technology of the feeder, as in previous cases, is also very simple: make four to six holes for the rope, cut on the sides and put a weight on the bottom - for stability.

Note!

Other options
The above options are extremely popular - such feeders can be found in any country house. If you want to make a unique feeder with your own hands, you should take unusual materials, for example, old tableware: a cup and a saucer.
In the autumn, you can cut a product from a pumpkin or zucchini; in winter, halves of an orange peeled from the pulp are suitable for this. Such feeders will surprise your neighbors and will undoubtedly decorate the garden!

DIY bird feeder photo


The bird feeder performs several functions at once. Firstly, it is a place for saving birds from starvation. Secondly, the feeder - decorates the exterior, gardens, parks or simply streets. Thirdly, making a feeder is quite an entertaining process that brings parents and children together and teaches the younger generation the norms of behavior and human qualities. Therefore, whenever possible, we recommend building feeders, and we will learn how to do this later.
How to make a bird feeder with your own hands
We offer you to get acquainted with the main variations of bird feeders, which are most often used for feeding them in the winter.
The first and easiest option is to make a roofless forest dining room. It has a flat shape with sides that prevent spillage of feed. Such a bird dining room is good because it attracts birds, as they do not like a closed area. The disadvantage of the feeder is that the food, under atmospheric influences, quickly gets wet and deteriorates, and the wind easily overturns such a dining room. For the construction of this variation of the feeder, one piece of plywood and bars that serve as a frame are enough. Fixing the feeder is carried out using a regular rope, in order for the feeder to attract birds, paint it in a bright shade.

A do-it-yourself bird feeder made of wood with a roof is a more sustainable option. On a regular base, four support posts are installed, and the roof of the feeder is fixed on them. The top piece for the roof should be slightly larger than the bottom to protect the stern from rain and snow. This version of the feeder also belongs to the simple ones and does not require special experience in working with wood. Among the disadvantages of this design, we note that snow accumulates on a flat roof, the feeder becomes heavy in weight, and may fall from the tree. Therefore, it is recommended to periodically clean such a feeder from snow or install a pitched roof.
If there is a sunflower at home or large berries that birds can eat, it is enough to treat the birds with them. A variation in the manufacture of rowan beads or beads from cones is possible. You can build such a feeder from improvised materials. For example, you can put goodies in a regular grid that sells tangerines or oranges. You need to hang such a gift on a regular rope. Another way is to add wheat or other grain delicacy to unsalted melted lard, after hardening, you need to make a small ball from this mixture, which is installed in any place accessible to birds. The hardened fat holds the grain, which is gradually eaten by the birds.

To protect the food in the tangerine net, you can additionally build a roof. Thus, the food will not be exposed to moisture and snow. Periodically, such a feeder needs to be filled with new food. It is possible to supplement the main feeder with additional feeders with nets, in which there is a variety of treats. These feeders will be a great place to feed small birds.
If you have a coconut shell at home, you can also build a small feeder out of it. It will be a natural addition to any tree, and will not really stand out against its background. Two round holes must be cut in the shell. We also recommend placing grain mixed with melted fat inside the feeder. This variation of the feeder has an unusual and original design. If you have a steel mesh with a small section of cells at home, you can also build a feeder from it. Choose the diameter of the feeder individually, try not to make it too large, as a lot of feed makes the structure heavier. Make a protective cover on such a feeder to prevent food spoilage.
There are many ideas for do-it-yourself bird feeders, it’s enough to dream up and get the right materials. A feeder can be built even from cutting a branch. It is enough to connect several of these parts together to get the bottom of the feeder. The roof is made in the same way.

Some craftsmen make feeders from ordinary glass jars. They set them at a certain angle and pour food inside. You can paint such a feeder using special paints for glass surfaces. In the same way, you can make a feeder from the old part. It is better to fill it with food gelatinized, previously poured with melted gelatin. In the same way, you can make attractive bird feeder ornaments. For example, a solution of gelatin and various seeds is poured into a silicone mold, after hardening it is possible to obtain beautiful heart-shaped, star-shaped, semi-circular, etc. shapes.
Beautiful do-it-yourself bird feeder
We offer a variation of creating a cereal dining room for birds with your own hands. For this product, it is enough to use food, while the feeder perfectly complements the exterior of the garden and becomes its decoration. When performing the workflow, you will need to have accessories in the form of:
- a variety of small-sized feed, most often cereals or cereals are used;
- eggs;
- oatmeal;
- flour;
- gelatin composition;
- pencil
- thick cardboard base;
- scissors and thread.

Using a pencil and cardboard, come up with a shape for the future product. A variation in the manufacture of a dining room for birds in the form of a star, polyhedron, oval, circle or heart is possible. Using scissors, cut out the previously prepared drawing.
Prepare materials that act as bird food. It is possible to use different grains or bread crumbs. Using a needle, put a thread on the future sketch, which will later fix the feeder on the trees. In order to firmly hold the grains on the feeder, it is necessary to connect them with a natural adhesive composition.
To prepare it, combine the ingredients in the form:
- two tablespoons of oatmeal, beaten into flour;
- one egg;
- one teaspoon of honey;
- a few tablespoons of flour.
After connecting all the components, leave them for half an hour and only after this time, combine with previously prepared food.

First, the base of the workpiece is covered with an adhesive composition. In a separate container, all ingredients for the feed are combined with glue. Roll the workpiece in the resulting composition on both sides. For faster freezing of the feeders, place them in the refrigerator for 2 hours.
In the absence of any of the ingredients of the adhesive composition. You can prepare natural glue in another way. To do this, just take one pack of gelatin and soak it in warm water, according to the instructions on the package. Small grain products are combined with a solution and placed in a refrigerator to solidify.
This composition can be put in an old cup or glass, they are also fixed on trees with a rope. Such a bird canteen is quite easy to make, but at the same time it is an excellent place to feed birds in the winter season.
We also suggest that when performing the workflow, prepare materials in the form of:
- three flat-shaped candy boxes;
- glue;
- adhesive tape;
- ropes.

In order to build this feeder, it is enough to connect two candy boxes together with an adhesive solution. At the same time, they must form a roof. The third box is used as the bottom section of the feeder. This variation of the feeder is quite easy to manufacture, but at the same time it is an excellent place to feed the birds. To protect the cardboard from moisture, the feeder is covered with tape on all sides. In order to fix the feeder on the tree, an additional rope is attached to it. You can decorate the feeder with colored paper, in relation to the chosen design. The only drawback of such a feeder is the lightness of its weight. It is unstable and poorly held on weight.
Make a bird feeder with your own hands photo:
We offer another not difficult variation of creating a bird dining room. To do this, you must use a box from under any drink. The upper part of the box is fixed on the tree with a cord, and a hole is cut out on the lower part for feeding and eating food. It is recommended to additionally glue the box with adhesive tape, in order to avoid its destruction under the influence of water.
DIY bird feeder - original ideas
There are many extraordinary ideas for creating bird dining rooms. Most often, these exterior elements are made of wood or plastic. We suggest that you familiarize yourself with the variation in the construction of PVC feeders.
To complete the workflow, you will need:
- scissors or knife;
- a plastic tank with a volume of five liters;
- wire.
In addition, food for birds should be prepared, which will be located in the forest canteen. Using a utility knife or scissors, cut a round hole in the bottom of the container. The diameter of the opening should be such that a bird can easily fly into it. A variation of the construction of several windows at once is possible, through which feed will be supplied. The upper part of the container is wrapped with wire and installed on a branch. To weight the finished product, use plywood or similar material that fits on the bottom. This feathered canteen has a roof so the bird food will not get wet. In addition, the presence of large holes in diameter is a guarantee that there will always be a lot of birds in your feeder.

It is possible to design a do-it-yourself bird feeder using PVC bottles. When working on a dining room for birds, you will need to prepare materials:
- PVC bottles;
- wires;
- two spoons made of wood.
Using a knife or scissors, make an opening in the tank so that you can put a wooden spoon through it. 5 cm higher, make another identical hole. Set the spoons and pour the food into the bottle. On one side of the spoon, which is adjacent to the bottle with a wide edge, build a hole of a larger diameter. Thus, food, as it is eaten by birds, will spill out of the bottle. The upper part of the container is fixed to the tree, most often using wire or rope.
DIY bird feeders photo:
An easier variation on making a bird canteen is to cut a small door in a PVC bottle. In order to avoid injuring the birds in the process of getting into the feeder, all edges of the hole are sealed with electrical tape. Food is poured directly into the container.
Original do-it-yourself bird feeder
In the process of creating a wooden forest dining room for birds, you need to stock up on tools in the form of:
- wood or plywood;
- hammer with nails;
- timber;
- screwdriver;
- compositions to protect wood from high humidity.
Using plywood and a board, use a screwdriver to cut out the base for the feeder. The second part should be the same shape, only slightly larger. Thus, it will protect the feeder from moisture. Saw the timber into several parts, of which you need to make the sides for the feeder.

To fix the beam, use fasteners and a hammer. A wire or cord should be fixed on the roof, which will hold the roof on the branches. To connect the roof and the bottom of the forest dining room, additional supports are used, installed at the corners, or two - in the center. Open the feeder with an antiseptic, which prevents its destruction under atmospheric influence, it is additionally recommended to varnish the feeder.
Please note that it is strictly forbidden to feed birds with fresh bread, rye types of bread and flour, citrus fruits, salty foods, toasted seeds, oatmeal. These products will not bring any benefit to the birds, but only harm them.
Various types of grains, wheat, nuts, fruits, dried foods, lard, mountain ash with viburnum, etc. are used as food for birds. A beautiful do-it-yourself bird feeder will decorate any interior, children will be happy to watch how the birds eat food and rejoice that they are taken care of.
DIY bird feeder video:
Winter time is a serious test for birds. Every day it becomes more and more difficult to find food. Take care of the birds - hang a feeder made with your own hands from the simplest materials at hand, which we usually throw in a landfill. We have selected photos and original ideas for making feeders that do not require special skills and complex drawings.
By accustoming the birds to the feeder, you can observe the entertaining turmoil of birds and the secret life of birds.
Some of them defend their rights in a fight with relatives, others enter into competition with other species, but without exception, all carefully look around so as not to miss the attack of a small hawk, which is very interested in the visitors of the feeder.
 A simple bird feeder will bring great benefits to birds
 Materials for the manufacture of feeders can be very diverse, but there are some general design rules:
- the feeder should be, first of all, convenient for the birds, there should not be any difficulties when extracting food;
- the roof and sides will help protect the food from snow, rain and wind. From exposure to moisture, food can deteriorate and become moldy, which means it will turn into poison for birds;
- it is desirable that the material from which the feeder will be made is resistant to moisture, otherwise this design will not last long and a new one will need to be made;
 The feeder should be safe: not have sharp sides and be located high enough above the ground
 - walls and corners should not be sharp and prickly;
- feeders for small birds are made small so that larger and more aggressive species do not encroach on their food;
- it is better to place feeders on the branches of trees or attach them to the walls of outbuildings at a height of about one and a half meters so that cats do not offend the birds, and it is convenient to add food to feathered friends.
Advice. Birds get used to a permanent feeding place and are ready to travel many kilometers to the feeder. Therefore, feeding must be constant, otherwise the birds may die.
Plywood bird feeder
You can buy a feeder in a hypermarket, or you can make it yourself in a few hours. A plywood feeder can be made open, with a flat or gable roof, a bunker compartment can be provided if you cannot constantly monitor the amount of feed in the feeder. Of course, you will need drawings, fortunately, there are plenty of them on the Internet with ready-made sizes of parts for cutting. Choose the design that you like, the drawing will facilitate the work and ensure that the end result is exactly what is shown in the photo.
 Lightweight and durable plywood feeder
 When choosing a drawing for a future feeder, consider the bird population in your region. Jays, pigeons and magpies can eat all the food, leaving little titmouses hungry. To prevent this from happening, make the size of the openings of the feeder so that large birds cannot reach the feed.
So, you will need a hammer, an electric jigsaw, nails of a suitable length, water-based glue, sandpaper, plywood, 20 x 20 mm timber. Consider the simplest feeder.

Wooden bird feeder ideas and drawings
Wooden feeders are attractive because they will last a long time, keep their shape well - this is due to the properties and reliability of wood. To make such a feeder, you will need at least minimal skills in working with tools and a drawing. The board for manufacturing should be 18 - 20 mm thick. Consider the option of making a feeder, which you can do yourself or take a photo as a basis for a drawing. We will need a 4.5 x 2 cm timber for the racks, a 25 x 25 cm square of plywood for the bottom, two pieces of 35 x 22 cm for the roof, nails, self-tapping screws and glue.
 Feeding trough made of wooden beams
Such a feeder can be installed permanently on a dug-in pole or drill two holes in the ridge, screw in a screw with a hook and hang it on a wire. Several birds can fly up to the feeder at the same time, the food is protected from the wind by the sides and the roof, the feathered friends of the garden will like such a cozy dining room.
 Finished wood feeder
 If there is a gazebo on your site, hang a simple feeder without a roof there. It is enough to make a side and a bottom. If you want to paint the feeder or open it with varnish, then use water-based compounds so as not to harm the birds.
Advice. To prevent the tree from splitting, the tip of the carnation must be made blunt, and a hole must be drilled under the self-tapping screw before screwing in.
Making a cardboard feeder (suitable for children)
One of the simplest feeders. The cardboard option is interesting in that it can be made in a place with children and at the same time have a great time with them. This would be a great craft for kindergarten or elementary school. There is a lot of room for creativity here. Cardboard is a great option, it is only afraid of straight water. But if you want to play it safe and make the feeder more resistant to moisture, then you can glue the outer elements of the feeder with wide adhesive tape, especially its upper and lower parts. In the forest or in the park, such a feeder can easily last all winter and part of spring.

 Cardboard feeder collage. Photo livemaster.ru/topic/179659-delaem-kormushku-iz-kartona
 The set of tools and materials is minimal, and if you don’t have something from this list, you can always find a replacement for it. So we need these materials and tools:
- A pair of cardboard sheets, (A4 format or more) ;
- Ruler;
- Adhesive tape (for structural reliability);
- Stationery knife;
- A tourniquet or a piece of nylon rope to hang the feeder;
- Pencil or felt-tip pen;
- Glue for cardboard or glue gun;
- Hole puncher.
If such a feeder is going to take the prize as the best craft in your kindergarten, then you will have to work a little in terms of external design. Here our cardboard will give odds to any Tetra-Pak (this is a package of milk or juice), you can draw beautifully on it and decorate it in every possible way. Undoubtedly, the prize from kindergarten will be yours!
pumpkin feeder
But here, as they say, words are superfluous - everything can be seen in the photo collage. I would like to add that such a feeder looks very attractive and unusual and will be a real decoration of your garden, this is due to the shape of the feeder and its color, which looks great against the background of white snow. 

This option is also suitable for making with children. And such a beautiful, bright craft in kindergarten will definitely not go unnoticed.


Bird feeder out of the box Tetra pak) from juice or milk
You can make a feeder from a milk bag or a tetra pack from under the juice, like this. This is even for a child. For this you will need:
- a clean juice bag;
- a piece of nylon rope or wire to hang the feeder;
- adhesive plaster;
- marker;
- scissors or utility knife.
 Bird feeder from a milk bag
 First of all, we mark and cut holes on opposite sides of the tetra pack. To make it convenient for the birds to take food and fly out. We glue the window on the underside with adhesive tape for the convenience and safety of the birds. We pierce a hole under the holes with scissors and insert the cardboard folded into a tube, which remains from cutting the holes above. In the bent corners we make small holes for the wire or rope. And tie to a branch.
The feeder can be attached to a tree trunk. Such a feeder will not sway in the wind. For this, feeding slots are made not on opposite sides of the package, but on adjacent ones. On the opposite side, we fix the wire in the slot and fasten it to the tree.
 Tetro pack horizontal feeder
 You can make a feeder out of two juice bags. We cut the first package along the narrow sidewalls, leaving the top not cut. We cut off the third part from the second tetra pack and cut a hole on the front side of the package - this will be the stern board or the bottom of the feeder. We combine the bottom with the first package so that we get a triangle. Parts can be connected with glue, wrapped with tape or pierced at the bottom of the sidewalls to insert tubes for cocktails.
Bird feeder from plastic bottles 1.5 - 2 liters
Consider some variations of the execution of the feeder with your own hands from plastic containers.
Option number 1. The simplest feeder
Symmetrically, on both sides of the bottle we cut out two holes: round, square, rectangular or in the form of an arch. Jumpers should remain between the holes. If you make a slot in the form of an inverted letter "P" and bend the plate up, you get a visor from the rain. You can stick a band-aid or fabric tape on the bottom edge of the hole - the edges will not be pointed and the birds will sit comfortably. We make symmetrical holes in the lower part and insert the stick - the result is a feeder with a perch.
 A simple plastic bottle feeder
 You can attach such a dining room for birds on a tree by wrapping a jumper with tape, rope or other suitable material, as seen in the photo. If you make a hole in the cap of the bottle and insert the ends of the twine, and then tie them into a knot, you get a loop that can be thrown over the branches of garden trees.
 Be sure to make the edges of the plastic feeder safe - seal the cuts with electrical tape
 Option number 2. Bunker feeder.
This design is rational in use in that the feed can be poured with a margin for several days. The food, as it is eaten by the birds, will automatically fill up on the feeding ground itself.
 Bunker feeder made of plastic bottles
 You will need two bottles of the same volume. We mark one bottle with a marker before cutting. We make holes at the bottom, as in feeder No. 1, and remove the upper third of the bottle. We make two symmetrical holes at the top - a ribbon or twine will later be attached to them for hanging the feeder. In the second bottle, we cut several holes at the narrowest part - food will spill out of them. Do not immediately make large holes, it is better to expand them later. We fill the bottle with food, tighten the cork and insert the bottle into the first bottle cut off by a third.
Option number 3. Feeder with spoon
We make a hole in the cork and insert the twine for hanging. Then we symmetrically make two holes the size of a spoon. Above the bowl-shaped deep part of the spoon, we cut a hole in the bottle, slightly expanding it so that the birds can take food. We fill the feeder and hang it up.
 Feeder with spoon
 Advice. With a red-hot needle or small nail, make several holes in the bottom of the feeder to remove moisture that has got inside.
Bird feeder from a plastic bottle 5 liters
Probably, in every house there is an empty plastic five-liter water bottle. It is very simple to make a feeder in one evening for feeding birds in the winter from this material. Such a container will hold much more food than a smaller plastic bottle, as can be seen in the photo. Several holes will allow you to comfortably feed several birds at once.
 Feeder from a five-liter plastic bottle
 This is a very simple and quick option, invite your children or other family members to take part in the manufacturing process: find a ribbon or wire to tie the finished feeder to a tree branch, prepare a treat for the birds. Prepare a clean bottle, a sharp knife, secateurs or a clerical knife.
We cut the hole based on how we plan to fix the container on the tree:
- horizontally - cut a wide hole from the side of the bottom of the bottle and the same from the side of the neck;
- vertically - at a height of 5-7 cm from the bottom of the container, we cut several square holes or three rectangular ones.
 Materials needed to make a feeder
 It is convenient to tie a bottle by the neck to a branch with wire or twine. If the feeder is made in a horizontal version, then make two holes on the wall with a knife, through which pass the twine for tying. To prevent the feeder from swaying in the wind, put a quarter of a weight brick on the bottom, and load a treat on top.
From a five-liter bottle, you can also build a bunker feeder. To do this, you will need a five-liter bottle and two 1.5-liter bottles, a marker, a stationery knife and a rope.
 You can place the feeder under the roof to make the birds more comfortable
With a little ingenuity, you can create unusual canteens for birds from the simplest plastic bottles that will decorate your site.
Shoe box bird feeder
Everything is simple here. We take a dense shoe box with a lid. We make a round hole in the lid. The hole needs to be shifted slightly from the center to the bottom edge of the box (a little different in the photo), this is necessary so that the birds can get to the food that will lie at the bottom of the box.
We make a small hole in the upper part of the box and insert a tourniquet or rope into it. Tie an old pencil or stick to the end of this rope. We will then tie the other end of the rope to the branch of the tree on which we plan to hang the feeder. Then you can wrap the box with wrapping paper, but this is for the aesthetic component, you can not do this.
We make a roof from ordinary cardboard and put it on glue. Next, we glue the lid to the box itself with tape, as in Figure 3, 4, and also thread the rope through the lid.


At the moment when we hang the finished feeder on a tree, the roof may peel off from the box, but this is not scary, it cannot go anywhere, because. rope will hold it.
And in the picture below is an even simpler version of the shoe box feeder. But there is no need to explain anything, everything can be seen in the photo. The whole box is simply rewound with tape, which, by the way, is very practical. And in our opinion it turned out - original and unusual.

Cardboard box bird feeder
To make a bird dining room with your own hands, the simplest material will do, which is stored in abundance on the balconies of most families: boxes for electrical goods, cardboard packaging for food. Choose thicker cardboard with a laminated coating, the laminate will slightly increase the life of the feeder. Although, as written above, wide tape can be used for these purposes. The advantage of this design is that there is already a bottom, walls and roof of the future feeder, which needs to be slightly modified by cutting square or rectangular holes on the sides.
 Even a schoolboy can make a cozy feeder from a mailbox
 You will need a nylon cord, scissors or a clerical knife and adhesive tape. Since cardboard is a very short-lived material and is afraid of moisture, the finished feeder wrapped with tape will last until the next season. Having cut through the side holes and fastening the cord, you can hang the feeder and fill it with treats for birds that will not take long to wait. Put sand or some pebbles on the bottom so that the structure does not shake much with the wind.
 If you cover the cardboard feeder with paints, then it will last longer.
 You can do it a little differently. We glue the lid of the box perpendicularly so that the lid serves as a stern stand, and the second part of the box is a side and a roof. We glue the structure with adhesive tape. We make two hooks from the wire: we bend a piece of wire in half and pierce the “ceiling” of the feeder with the ends, twist and bend from the inside. By connecting the hooks, you can hang the feeder on a branch. As you can see in the photo. Now pour the food and wait for the guests.
Bird feeder on the window (with suction cups)
Such feeders are a very interesting option for the overall development of children, and adults too :). The feeder is attached to the window, or rather to the glass, with the help of suction cups. Usually such feeders are also made transparent in order to fully enjoy watching the birds. If you have suction cups, you can make such a feeder yourself, for example, from the same plastic bottle, but you must admit that it will still not be as aesthetically pleasing as the finished version from the store. Children will probably start taking pictures of it all, and photos with yellowed, cloudy bottles will, to put it mildly, not so hot. Purchased options look very nice.


Bird feeders can be seen in courtyards and parks. If you want to design something special, extraordinary, then we will tell you how to make a bird feeder yourself.
An easy way to feed birds

The feeder can be made from improvised means, for example, take a piece of board, plywood or any flat and durable material at hand and place it higher from the ground. This will keep food available to the birds.
This is a temporary measure, as precipitation may fall or the food will simply be blown away by the wind. But such a feeder can save birds from starvation.
We use plastic bottles
From a plastic bottle, you can build both a very simple and a multifunctional dining room for birds. Consider in more detail some of the ideas of feeders, and their implementation.
Hastily

If you cut a hole on the side of the bottle, then we can say that we have done half the job. Near the neck, you need to make 2 holes with an awl, insert the wire and fix the feeder on a branch of a tree or shrub. If you pour food on the bottom, after a while you can see how birds flock there.
So that moisture does not spoil the food when precipitation gets inside the bottle, drainage holes must be made in the lower part of the container.
We complicate the design

From a plastic bottle, you can make a feeder with a "dispense window". Having picked up a container that is suitable in size, cut a small hole on one side, and pierce the bottle with scissors on the opposite side. Insert a wooden spoon with the handle forward so that it fits snugly into the pierced hole. The spoon should be positioned so that the grains roll into it as the birds peck at the food. The number of spoons involved can be different, but most often there are two.
To hang the bottle, you can pierce the cork with an awl (or nail), thread a nylon thread into it, and tie a knot inside the cork.

How to decorate a gray, unsightly bottle? If desired, you can make the feeder an ornament to any garden.
Feeder on glass

You can make a simple design from a plastic bottle, which will be attached directly to the glass using suction cups. The device of such a feeder is very simple, and for its manufacture you will need only 1 container and 2 suction cups.
A small square or rectangular hole is made with a construction knife. With a soldering iron or a hot gas nail on one side of the bottle, you need to make 2 holes, into which the sucker heads will fit tightly. In our case, the suction cups were with hooks, so we first removed them, and then fixed them with them, inserting them into their places, but already inside the bottle.

The positive aspects include the fact that the birds can be observed, almost close to them approaching. A significant disadvantage is that the birds defecate near the feeder, so the glass and tide will have an unsightly appearance.

Video: making a plastic bottle feeder
Use of glass

Glassware can be used to distribute food to birds. The container must be securely fastened down with the neck at a short distance from any platform. Pour food into this container and set it in place (holding the hole with your finger so that the grains do not spill out). As feed is used up, what is in the bottle will flow to the site.
Video: glass feeder
Other improvised materials

It will not be difficult to come up with a lot of ways in which you can feed the birds.

Tits love not only grains. You can feed such gourmets by hanging a piece of unsalted bacon wrapped in rope or wire on a branch.

If you buy products packaged in nets in supermarkets, then this container can also be used by pouring nuts into it.

From small loose feed, you can mold a ball (adding flour and water) and also hang it in a net. In frosty weather, the food can be mixed with vegetable oil. Milk or sour cream is not suitable for these purposes, since the bird's body does not accept such food.

In order to protect the food from precipitation, you can build a plywood roof.
Pumpkin


A pumpkin feeder can be called waste-free production, as the birds first eat the food, and then the edible "dining room" itself. It is enough to cut holes in the pumpkin and pull out the core.

You can cut the pumpkin in half, thread a rope with a knot tied at the bottom through both halves. To fix it in a disconnected state, you need to install spacers from twigs between the halves. In extreme cases, you can use pencils as coasters. The upper edge of the rope threaded through the pumpkin is tied to a branch, and the feeder is ready to receive feathered guests.
Video: pumpkin feeder
Couch spring
Such things and objects can be used that usually have nowhere else to apply.

If you still have a spring from an old sofa, then you can also use it by holding pieces of bread between the turns. This feeder can be hung both vertically and horizontally.
car air filter

A wire mesh feeder can be seen on the counter of a store, but a similar design can be built from a used paper car air filter.

For manufacturing, you need to cut off the upper part of the filter, and remove the paper filling (it can be done together with the inner or outer mesh, if you do not plan to put food between them). Outside the filter, a wire is tied to the top of the net, which will serve as a loop for hanging the feeder on a tree. Suitable food is poured inside, and the cut top of the filter can be used as a cover.
To reduce feed loss, a plastic bucket lid can be glued to the bottom of the feeder with hot glue. From the same cover you can make a canopy.
teapot for brewing

If you have an old kettle and it’s a pity to throw it away, but it’s no longer possible to use it for its intended purpose, then you can make a feeder out of it. How to hang it? Drilling a hole in a faience product is a very thankless task, so you can use hot melt adhesive. If there is a hole in the lid, then you need to insert the ends of the rope into it and make a knot inside. For safety, it is better to tie a small washer. Now the lid can be glued to the teapot, the neck of which will now serve as an entrance for the birds.

Looking into the barn or pantry, you can find things that are "hard to carry, but it's a pity to leave." An old metal bread box belongs to the category of those. Great imagination is not required for its placement - he tied a rope and hung it on a branch.

Similarly, you can use an unnecessary plastic container.
Use of various boxes

It will also be easy to make a feeder from a juice or wine box.

One or two windows are cut out in the box so that there is a small bowl for food at the bottom.

When cutting out the window, care can be taken to protect the food from precipitation. For this, a small visor is left, but so that it does not fall and close the entrance, it can be fixed with a nylon thread in the open position.

To make a large cardboard feeder, you need a large box. With a construction knife or scissors, a window of the desired size is cut out in it. If the box is very large, then you can cut out a smaller product from it and wrap it with tape. It is important to realize that such a feeder will last only until the first rain.
Tin box

Often, manufacturers sell products in tin boxes, which can also be used to make a feeder.
In addition to the bank itself, we need:
- metal or plastic chain - 2 m (4 pieces of 0.5 m each);
- detachable ring (used for keys);
- small cotter pin - 8 pcs. (you can do with knitting wire);
- awl;
- alcohol marker;
- wire cutters or scissors for metal;
- ruler;
- pliers.

Now let's start manufacturing.
- As accurately as possible, you need to mark 4 points on the jar and transfer the same marks to the lid.
- According to the marks with an awl, you need to make holes so that a cotter pin passes through them.

- With wire cutters, cut the chain into four pieces of 50 cm each.
- Having passed the cotter pin through the last link of the chain, we insert it into the hole and from the inside of the can with pliers we push its ends apart.

- Having measured 15 cm of the chain (starting from the can), we will pass the remaining 4 cotter pins into it and fix the lid with them.
- Now we will pass a detachable ring into the ears of the free ends of the chain.

After hanging the feeder on a branch, look in which direction the box slopes, and pierce it with an awl in the bottom (from the inside) - this will be a drainage hole.
branches


From large branches, you can assemble the original feeder. To complete the work, you will need an ax, a hammer, nails and a little imagination.
Plywood

Plywood products are strong enough, but are afraid of moisture.

A simple version of the feeder consists of just a pallet with sides, two pieces of plywood serving as a roof, and a rope connecting all the parts. To fix the bottom and roof in the desired position, knots are tied on the rope.
If there is a desire and a jigsaw, then you can design a more complex feeder using one of the presented drawings.
Log


When harvesting firewood, logs with a rotten core are found. This piece of the trunk will serve as a base for us. You need to extract the core. Windows are drilled in the hollow trunk or its longitudinal part is cut out. The ends are closed with selected "plaques" sawn off from other trunks. A tree trunk feeder can be found in both horizontal and vertical versions.

For manufacturing you will need:
- self-tapping screws;
- small nails;
- slats.
For the manufacture of the roof and bottom, you can use plastic or HDF (which you can find, since this material is sold only in large sheets).

In the manufacture of any design, it is convenient and practical to use drawings that indicate the dimensions of the parts. We will also use the drawing in order to cut all the blanks to size.

They can be lightly sanded with sandpaper.

First, we will assemble the narrower part of the future feeder, hammering 3 nails on each side.

Then the whole frame is assembled in a similar way. If the nails are short, then you can use 5 pcs.

We will install the frame on the prepared bottom and outline it with a pencil from the outside - so we get the markup along which this part will need to be cut out and then nailed.

In order to fix the upper rails, we use 4 self-tapping screws - 1 pc each. for each attachment point.

From the remaining rails we will make the upper part of the feeder, fastening the parts with self-tapping screws. The final step will be marking, sawing and fixing the roof. The joint of two sheets of roof sheathing can be hidden by nailing a corner rail on top.
There are some points to consider when making and determining the installation location of the feeder:
- Do not underestimate cats, because they can get to the feeder, and then the birds will fly away or become the prey of a domestic predator.
- The feeder needs to be made with a large roof, then a lot of precipitation will not get into it.
- The entrance to the feeder should not be small, as fear may be stronger than hunger, and the birds may not take advantage of your hospitality.
- The design is best made from moisture-resistant material, then it will last a long time. Other materials must be treated with water-repellent compounds.
- If the feeder is too light or has a large windage, then it can be turned upside down by a gust of wind. Even a short turn will cause all the feed to be on the ground. Lightweight construction needs to be weighted down.
Photos of original feeders


Video: original ideas brought to life
Drawings and sketches


