Sliding gates do-it-yourself drawings. Varieties of designs and technology for manufacturing sliding gates with their own hands
More and more owners of private houses choose retractable gate. Production is quite a costly activity, so many people decide to make sliding gates with their own hands. This will also require certain costs, you will have to buy materials and deal with the availability of tools, but in the end you will get a wonderful high-quality gate at an affordable price.
It is worth considering that even independent work will cost more than another type of gate, but quality, durability and comfort are a great motivation to make a choice in their favor. To make sliding gates with your own hands, drawings and diagrams will come in handy. You can use ready-made schemes that you will find in this manual.
How to make a sliding gate with your own hands? First of all, you need to deal with the materials.
You will need painted corrugated board, rectangular pipes of different sizes, fittings, primer, self-tapping screws and automation. The most expensive on this list are accessories that you can buy as a set and automation, which includes a drive with a control unit, a rail and remotes. If you wish, you can take care of security.
Thus, you need to select a sufficient amount of material. To get started, you will need a drawing and dimensional information so as not to overpay for extra items. For example, if the gate is 3X2, then corrugated board will need 6 m2, and pipes a certain number of kilograms.

Having learned the dimensions, making sure that this drawing is suitable, you can start buying material. You can use the drawings from this manual, already proven schemes will not cause inconvenience. Next, you need to make sure that you have the tools necessary to build a sliding gate with your own hands.
Tool preparation
Prepare or borrow a grinder, grinder, concrete mixer, brick laying tool, screwdriver, stepladder, shovels, hammer, level, wrenches, crowbar and tape measure from friends.
The list turned out to be quite extensive, and if you have not acquired a particular instrument, you should not buy it right away, perhaps your friends have it or have the opportunity to rent it. Because with the purchase of equipment, you are unlikely to save on installing sliding gates with your own hands.

When everything is ready, it is worth starting directly to work.
Sliding gates with their own hands. Installation
We are preparing - an important stage
To get started, do some preliminary work. The vegetation layer of the earth will have to be removed, if there is another coating in this place, you still have to get rid of it. For convenience, you need the marking of future sliding gates.
Further, in the process of laying out, it is necessary to use four reinforcing elements of 1 meter each and electrodes - axes (permanent and temporary). Before hammering the rebar, make sure that the diagonals of the rectangle match. After that, score, leaving 20 centimeters on the surface. A fishing line is superimposed between the reinforcement. From the main axes, you can create temporary ones.

Advice. Do not forget that the hole for the post must be slightly wider than its size. For example, with a pillar size of 40X40 cm, the pit should be at least 42X42 cm. The foundation will be wider and it will become easier for you to lay bricks.
The embedded part also requires certain conditions from the foundation. The pit must be half the length of the gate opening.
Advice. Consider the climate of your area when creating holes. The depth must be large, greater than the freezing depth. If the foundation is too close to the top, the frozen soil will push it out, the structure will turn out to be unreliable. Sometimes the depth can be almost one and a half meters, you should not be dismissive at this stage.
When the walls crumble during the creation of the pit, formwork cannot be dispensed with. In this case, you can save money by choosing old material, the boards will be covered with soil.
Pour the finished pits with water to achieve tamping. If further work will continue later, be sure to cover them and protect them from rain, which can wash them out.
In order not to spoil the passage later, dig a trench in advance, where a sleeve with an electric cable will be laid, so that later you can connect the sliding gate automation easily and quickly. For this work, you will need a regular plastic water pipe, choose a diameter of about 20 mm. At the moment when the sleeve is laid, cover the ends of the pipe with polyethylene, which will protect against dirt and moisture. When the sleeve has been laid and backfilled, pour water over the place where the laying has taken place in order to achieve tamping of the soil.
So far, the sliding gate sketch has been little used, but in the future it will still be very useful.
Preparing the pillars
The function of the core will be performed by metal products, in this case, pipes. It is better to take rectangular products with dimensions of 80X80 mm or 100X100 mm. Round metal pipes are also suitable, we take a diameter of 80 mm.
The pipe above the ground (its upper part) should be slightly lower than the post, a couple of centimeters is enough. If, for example, a pillar is 2.5 m high, then the core must be 2.45 m. The part underground should not reach the bottom of the pit. 5 cm is also enough. If the pit is 90 cm deep, then the lower part of the pipe is 85 cm.

Advice. To achieve maximum strength of the core, so that the construction of sliding gates with your own hands is strong, you can make a kind of reinforcement by welding two reinforcing elements crosswise at the bottom. The length of the welded parts is 25 cm.
When the pipe is installed in the pit, protect it from moisture by covering it with something.
Do-it-yourself sliding gates: creating an embedded part
Your work as a whole will depend on the quality of this element, because the embedded part affects the movement of the gate and the electric drive.
For this element, a channel is quite suitable, the width of which is approximately 20 cm, but not less than 16. The length should correspond to half the width of the gate opening.
In order for the channel to hold securely and durably in concrete, it will be necessary to weld the reinforcement. Again, a welding machine will come in handy. For work, select 4 pieces of reinforcement, the length of which should be approximately 90 cm. Weld on both sides and tie with reinforcing jumpers, choosing a diameter of 10 mm.

Concrete foundation for sliding gates
The preparation of metal products is in principle completed, you can proceed to a new stage of work. It is necessary to pour the foundation for the sliding gate with your own hands. As a standard, it is better to take the brand of concrete M200. We prepare the mixture: 1 bucket of cement, sand - 3 in, crushed stone - 5 in. (fraction 5-20 or 20-40). Considering the total volume of the batch, use 20% water.

Wait until the temperature is normal, because in the cold you will have to use additional anti-freeze additives. If the temperature outside is normal plus, you can start the process of concreting.
Before pouring the concrete foundation for sliding gates with your own hands, once again make sure that all metal structures in the pits have not shifted and are securely located. Under the weight of concrete, they can move, make sure that this does not happen. Using a level, check how level the installation is by checking horizontally and vertically.
Channel - exactly at the level of the horizon surface, if the passage is not ready, calculate the distance of the top. Ideally, there should be 7 cm between the leaf and the surface so that in snowy weather the gate does not stick snow when it moves.
Advice. Do-it-yourself sliding gate design must be durable, do not forget to constantly ram the concrete when pouring each portion of the mixture to avoid the formation of voids.

When the concreting is complete, you can start leveling to remove any unevenness. If it is very hot outside, the concrete should be protected from cracks by covering it. Water it a couple of times a day.
While the concrete is gaining its strength, you can rest for a week. This is a strong recommendation if your goal is a reliable and durable gate.
Brickwork pillars for sliding gates
Having coped with the foundations and after waiting until they become strong, you can start laying bricks, installing embedded elements for flashings. Use a 50x50 mm corner, which is approximately 8 cm long, and a reinforcement with a diameter of 8 mm is equal to half the post. Weld it to the core.

The flashing requires three tabs of three parts: 1 at the bottom after laying 3 rows of bricks, then the middle one - in the middle, and 1 part at the top - knowing the top edge of the gate in the future, do the laying a little lower.
Do-it-yourself sliding gate frame
To make it more convenient for you to create a frame, use pipes with a section of a rectangle or square. To create a sliding gate with your own hands, drawings and diagrams will still have to be used. Drawing - a detailed diagram of your work, which was discussed at the beginning, will now be very important. If you have a sketch of a sliding gate, there will definitely be no problems. It also helps to save materials, using exactly as much as is required to make sliding gates with your own hands.

Remove rust from metal pipes, degrease and primer all other elements. In the standard version for sashes and load-bearing elements, a pipe 60X40 mm or 60X30 mm is used. The second inner frame is 30x20 mm.
The entire assembly begins with a guide rail, which means that at this stage it must be prepared in advance. When assembling the frame, ensure its stability in a vertical position, weld two parts of the pipes (square), they will act as supports.
In the supporting frame, weld the lower pipe to the rail using tacks. Use a seam length of 15-20 mm, a step of 600-700 mm, on both sides, the order is checkerboard.
Advice. Don't make a continuous seam. This is not only impractical and leads to excessive consumption of electrodes, but also threatens that the guide profile will lead, the gate will jam, the movement will become heavy.
After that, we can expose vertical pipes, grabbing them with one welding. Using a level, check the resulting vertical evenness, when you make sure that everything is in order, only then make a continuous welding.
Further inside, along the perimeter, it is worth welding the pipes of the second frame, not the main one, corrugated board will be welded to them later. The pipes must be in the center of the supporting frame so that the flooring, when it is already in the sash, drowns a little.
Welding work is over, you can clean the seams with a grinder, prime them and paint them.
Advice. Painting is best done in three layers.
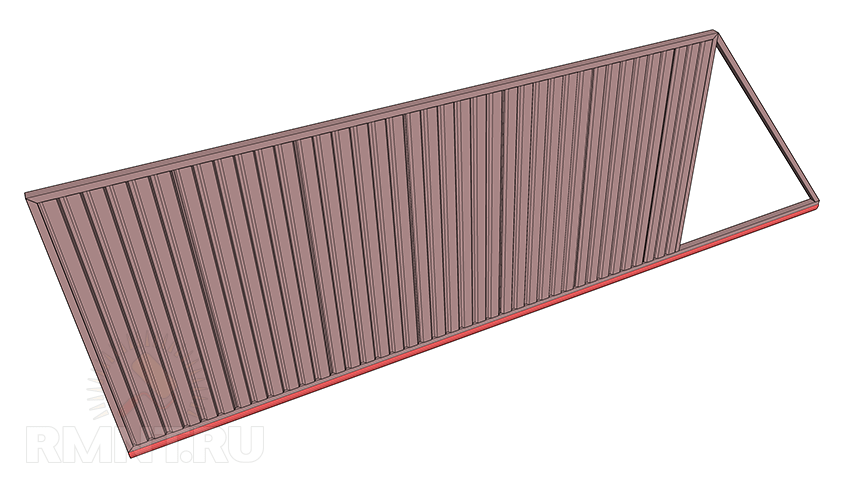
To fix the corrugated board, use 19 mm special-purpose screws - for metal, to make it easier, you can attach it when the sash is already installed in the opening on the support. Each sheet must be adjusted separately, it must fit to the frame. Leave the part of the sash with the shape of a triangle without installing profiled sheets, because this part will not fall into the opening anyway.
Everything is on the sashes, but other equally important details remain.
There is very little left to complete the makeshift sliding gate.

From metal pipes 60X30 or 60X40 mm, flashings are created and mounted.
To create a sliding gate with your own hands, select fittings:
- The guide rail is a good quality profile, the surface is smooth, no flaws, no roughness, no scale. The metal must be specific, the composition must contain more than usual carbon
- Roller carriages - with metal rollers, polymers cannot be taken. Bearings with metal rubber anthers. Move without difficulty. Be sure to take care of corrosion protection.
- The top plate with rollers, there should be 2 or 4 of them. It is better to take it with a rubber coating that will not scratch the canvas.
- Bottom end roller - either polymer or metal is suitable.
- Lower and upper catchers.
- Rubber plugs, preferably with a corrugated part.
- Roller mounting plates.
The device of sliding gates with your own hands will not be many difficulties. It remains to carry out the installation of the listed elements and start installing automation. The design of sliding gates seems complicated, but you can do it yourself, without third-party paid help, using our instructions and watching the video instructions below.
Sliding gates are in the same demand as standard swing gates. If they don’t think about installing such doors in the local area, it’s only because they differ in relatively complex assembly. However, this is not a reason to refuse gates that, if necessary, go to the side. They can be built by any man who understands the design, made the right calculations and is ready to strictly follow the manufacturing instructions.
The design and principle of operation of sliding gates
The basis of the design of sliding gates is a frame that changes its location in space thanks to special trolleys, which are also called cantilever blocks. Equipped with these elements, the gate frame can roll both to the left and to the right.
It is necessary to correctly install the channel to which the sliding gates will be attached
Carts are mounted on a concrete base, created at the beginning of work on the construction of the mechanism of the door structure, mounted away from the driveway. The sliding gate leaf moves along a rail, that is, a narrow steel beam attached by a welding machine under the frame. The rail acts as a guide and supports the weight of the entire structure.
Principle of operation
Automatic opening and closing of sliding gates is provided by rollers fixed on a swinging base. These structural elements are arranged in pairs, and each of them must be higher than the previously installed one.
In order for the automation to work correctly, the gate needs a counterweight.
In general, the main elements of sliding gates responsible for changing the position of the door leaf are:
- several cantilever blocks that distribute the weight of the structure;
- guide rail;
- end roller, consisting of a platform and a base and guaranteeing a smooth entry of the door leaf into the catcher;
- upper bracket (supporting), excluding deviations and falls of the retractable structure;
- end roller catcher mounted on a holder located near the pole.
With the help of end rollers, the door leaf moves along the rail
Preparation for construction: drawings, sketches, dimensions
Depicting sliding gates on paper, indicating the dimensions, follows after the calculations. To do this, you need to perform the following tasks:
- determine the width of the future gate using the formula L = A + I + (a + b + c + d), where L denotes the width of the structure, A - the width of the passage, I - the distance between the carriages, dimensions a, b, c, d - technological indents ;
- decide what the gate will be in height;
- find out what the counterweight should be, balancing the sash during movement, given that the minimum allowable load length is 40% of the opening width;
- calculate the weight of the structure web, which is affected by the material used (for example, a square meter of a 2 mm thick steel sheet weighs 17 kg);
- based on the weight of the gate leaf, set the dimensions of the components and the supporting beam, for example, for a structure of 300 kg, you need a beam about 4 mm thick with 9 × 5 cm ribs;
- find out how durable the components should be, that is, take into account the frequency of use of the gate and the strength of the wind.
Before choosing a roller mechanism, you should read some tips. For sliding gates made of profiled sheet, installed in an opening of 4 m, it is best to take reinforced roller bearings up to 350 kg. If you plan to put the gate in an opening of 7 m and sheathe the structure with wood or forged elements, then it is more expedient to purchase sets up to 800 kg.
The roller mechanism must withstand sashes that have considerable weight
Drafting
After doing the calculations, you can start drawing up drawings. In the diagrams, it is required to indicate the main dimensions of the sliding gate, that is, the height and width of the structure, the length of the opening and the guide beam. It is recommended to supplement the drawings with a frame welding scheme.
The drawing must indicate the dimensions of the structure
The choice of building materials and components for the gate
Before proceeding with the manufacture of sliding gates, it is necessary to make the right choice of material and components.
Material selection
It can be difficult to choose the material to create the frame and sash. It is more reasonable to make the backbone of the structure from shaped pipes or wooden bars, and the following building materials should be used for the gate leaf:
- wall corrugated board, which weighs little, is easily mounted, does not deteriorate due to mechanical stress and looks aesthetically pleasing;
- metal sheets that are heavy and therefore require special skills during installation, but guarantee high structural strength;
- wood, the main differences of which are an attractive appearance and quick deterioration in the absence of proper care (mandatory treatment with protective agents is required);
- forged elements that make the gate a real work of art, but require serious investments.
Wall corrugated board is lightweight, so it is easy to install
Having decided to build sliding gates from wood, forged elements or sheet metal, it must be borne in mind that these materials are heavy, which means that reinforced fittings and components will have to be used.
Accessories
For the manufacture of the door structure, you will need the following parts:
- bearing profile;
- supports for rollers and carriages;
- support rollers that will limit vibrations;
- upper and lower catchers;
- a roller that acts as a support;
- guide caps.
When choosing components, you should proceed from the size and weight of the gate
When choosing accessories in a store, one should proceed from the parameters of the opening and the weight of the canvas that will be hung on the frame. In addition to the standard set of accessories, it is recommended to purchase adjusting plates that can eliminate minor errors in calculations without compromising the entire structure.
Material calculation and tool preparation
Usually the opening for the gate is 4 m, and profiled sheets are used in the manufacture of the door leaf, so before starting construction work, you need to prepare the following:
- embedded channel 40 cm wide and ½ the width of the gate;
- 15 m of iron bars (reinforcement);
- 10 m 2 wall corrugated board;
- profile pipe 60 × 60 mm in size and at least 5 m long or bricks (for poles);
- pipe 60 × 30 mm, length 20 m;
- pipe 40 × 20 mm, length 20 m;
- liquid concrete M250 with the addition of crushed stone;
- sand;
- coloring emulsion, primer and solvent (one can each);
- packaging of electrodes;
- bracket;
- 200 pieces of rivets and anchors with studs or a set of self-tapping screws (if the posts are metal).
Required Tools
When working with the listed materials, you will need some tools:
- grinder with a disc for cutting metal products;
- apparatus for welding;
- screwdriver;
- drill;
- concrete mixer (for constant mixing of liquid concrete);
- shovel;
- axe;
- hammer;
- building level, plastic tape with division into centimeters and a plumb line.
Step-by-step instructions for making a gate
Before proceeding with the construction of sliding gates, it is necessary to decide whether to build new pillars or leave the old ones. The second option is possible if the supports are made of brick or reinforced concrete blocks with a section of 20 × 20 mm. You can also refuse to dismantle old poles when shaped metal pipes with a cross section of 60 × 40 mm are securely fixed in the ground. Otherwise, new supporting structures should be erected, for example, brick ones.
Construction of a mechanical structure
The production of sliding gates is carried out in stages:
- First of all, pillars are erected by completing two brickwork. On each brick support, 3 steel plates 100 × 100 mm in size and 5 mm thick are fixed. The top plate is placed on the inside of the post, mating with the edge next to the opening. At the same time, 20 cm recede from the upper edge of the support. The lower plate is fixed in the same way, and the middle one is fixed in the central zone of the column.
Instead of brick, you can put metal poles
- At the level of zero marks, that is, at the border of the surface at the entrance to the opening, they pull the cord, drawing it close to the back of the pillars and 2 meters further from them. The horizontality of the stretched matter must be checked.
- In the ground, which is adjacent to the supporting pillars, they dig a hole 50 cm wide and at least one and a half meters deep. To reinforce the foundation and ensure its connection with the sliding gate channel, 3 skeletons with a square section (140 cm long) are welded. The fabricated frames are welded from the bottom of the channel, in the middle of its shelf. In this case, the axes of the extreme skeletons are located at a distance of 40 cm from the edges of the profile, which will be located in the concrete base.
- Ten centimeters of the pit are covered with sand and covered with a polyethylene film. The made “pillow” is rammed, after which a channel with reinforcement bones is placed on it. This part is positioned, docking with the carrier column parallel to the gate movement line.
- The structure exposed in the pit is poured with concrete gradually, from time to time making holes in liquid concrete that will allow air bubbles to escape. The top layer of the mixture is smoothed, and the surface of the channel is wiped with a damp cloth. Further work on the foundation is carried out after the concrete has completely hardened, after one or two weeks.
While working with concrete, it must be constantly mixed so that it does not freeze.
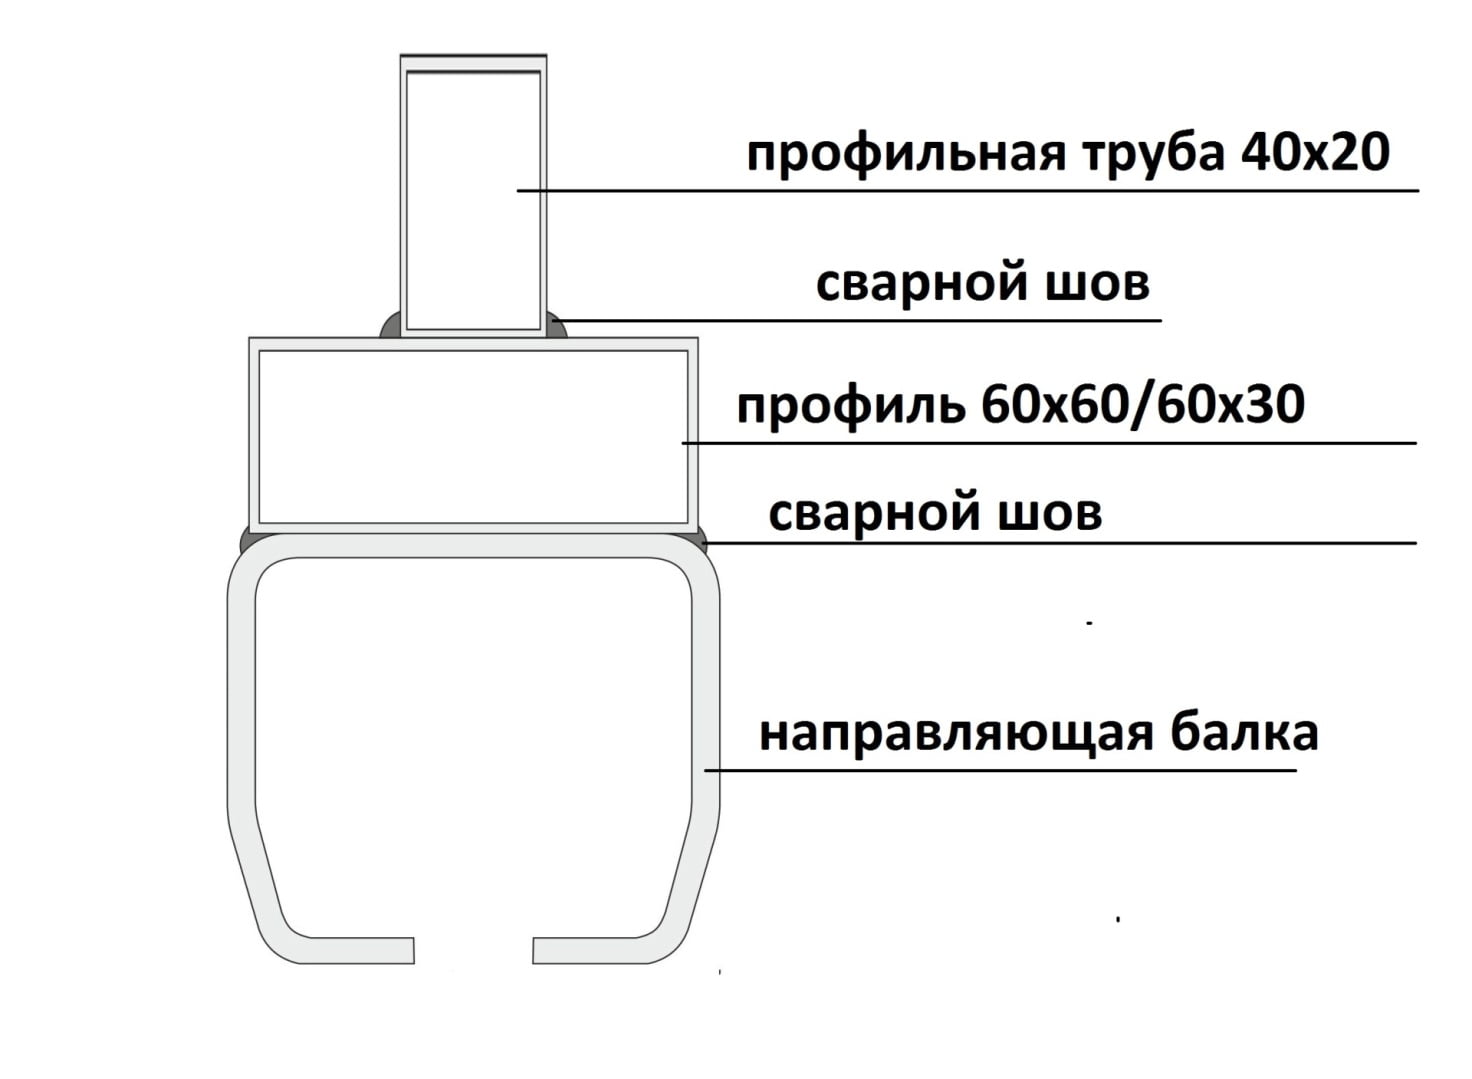
- A pipe with a cross section of 60 × 30 mm is divided into segments to create a gate frame. Stiffening ribs and diagonals are attached to it, made of a pipe with a size of 40 × 20 mm. It will be easier to weld parts if you make a mounting table - a structure of three stands of the same height and boards. Before welding, carried out on a special platform, all pipes are cleaned of corrosion using a grinder. The seams created by welding are leveled with a grinder, and the protruding ends of the pipes are welded with plugs.
Assembling the gate frame on the mounting table will make the difficult task easier
- A guide beam is welded to the lower zone of the finished gate frame. At first, this part is attached only with clamps to check whether the axles and beams of the structure are in the correct position. After that, welding is used, making seams of 40 mm.
- The skeleton of the gate is placed vertically and coated with a primer that protects the metal from corrosion. After the first layer, a second layer of the agent is applied to the product. The dried composition against corrosion is covered with two layers of paint. The emulsion is not applied only on the reverse side of the carrier beam.
Apply paint evenly with a sprayer
- A sheet of corrugated board is attached to the metal frame of the gate. For this, fasteners are used.
Sliding gate installation
Installing a door structure requires the following steps:

At this stage, you need to check how the gate "walks" and see if the verticality and horizontality of the structure are observed when closed. Gate correction is carried out by adjusting nuts on studs. If no problems are found, then the fasteners need to be tightened.
After inspecting the gate, you can proceed to further installation work:

Video: budget sliding gate option
Usually sliding gates are preferred to be finished with wood materials. At the same time, only construction raw materials are used, the quality of which is beyond doubt. The wooden covering of the gate must be resistant to mechanical stress, otherwise it will quickly become cracked and lose its shape.
Door structures with wood cladding are a winning option, but they are expensive.
The wood used for cladding the gate must be resistant to mechanical stress.
If it is not possible to invest a lot of money in the construction of sliding gates, then you should think about finishing them with plastisol. True, with the use of this material, the door structure on the territory of a private house will not look respectable. Still, plastisol looks like a smooth or corrugated sheet coated with polyester. But this building material is durable and therefore often used in the construction of parking lots.
Gates made of plastisol are durable and practical
When neither wood nor plastisol is to your taste, you can try to trim the sliding gates with sandwich panels or corrugated board. And the original lining of the door structure will be clapboard lining. Thanks to this material, the gate will become reliable and last a long time.
Having installed sliding gates, you should take care of the safety of their use. The operation of such a door structure requires adherence to the following rules:
- do not create obstacles for the movement of the gate;
- visually control the opening and closing of the structure;
- do not stand in the movement zone of the sash;
- refuse to use the gate if the control devices are damaged;
- do not try to independently alter the design of the gate;
- do not use the gate as a means to move any objects.
Building a sliding gate is not as problematic as it might seem. To put into operation a complex door structure, it is necessary to study it thoroughly and follow all the instructions for manufacturing an object.
Sliding gates, or, as they are also called, sliding gates, are very convenient, save space, and when automatics are connected, they also become comfortable - you don’t have to get out of the car to open them. Let's look at the design of sliding gates that you can do with your own hands.
We will consider the advantages of various designs of sliding gates, the criteria for choosing fittings and a drive. We will show the stages of manufacture and installation. The examples are accompanied by comparative tables, drawings and diagrams.
Advantages of sliding gates
The main advantages of sliding gates are:
- land area savings;
- structural rigidity, high resistance to wind loads;
- strength and long service life;
- the possibility of covering a wide opening;
- ease of control and comfort (for automatic models);
- modern status look.
The disadvantages include the relatively high cost of components and dependence on electricity to power the drive.
Construction types
Structurally, sliding gates are subdivided into cantilever (the door leaf moves along the upper rail) and monorail (the leaf slides along the rail located above the ground level).
- mild climate without significant winter precipitation;
- the need to pass oversized vehicles or special equipment, which may interfere with the console.

When driving through such a gate, you will have to put up with an obstacle when crossing a rail located just above the “0” mark.
Cantilever gates are better protected from precipitation, and for regions with snowy winters, their design is preferable.
The gate leaf can be moved manually or automatically. The question of choosing from these options is in the price and requirements for the comfort of the owner of the vehicle. Additional convenience is created by the equipment of the gate in the canvas, equipped with its own locking device. Also, the gates differ in the way they are sheathed:
- corrugated board (one- and two-sided sheathing);
- rental - sheet or rod;
- forged metal;
- lumber.

Before choosing a skin, it should be taken into account that the materials have different weights. The greater the weight of the casing, the more metal-intensive the sash frame should be, the higher the drive power, the more expensive the fittings and the engine. The lightest is sheathing with corrugated board, especially one-sided. The weight of a steel sheet web depends on its thickness, but it is not recommended to use rolled products that are too thin. Wood paneling can be quite massive due to the thickness of the material. Welded bar structures or forged openwork structures may not be too heavy, but in this case the site remains in front of passers-by, which not everyone likes. A forged canvas with a backing is the heaviest. To move such a mass, industrial fittings and a drive may be required.
Hardware selection
Complete set of purchased fittings
Fittings are selected according to the weight of the gate and the width of the passage. It is desirable that the hardware kit consists of the following items:
- load-bearing beam (guide profile);
- roller carriages (roller support);
- trailer roller;
- top support rollers;
- upper and lower catchers;
- plugs.
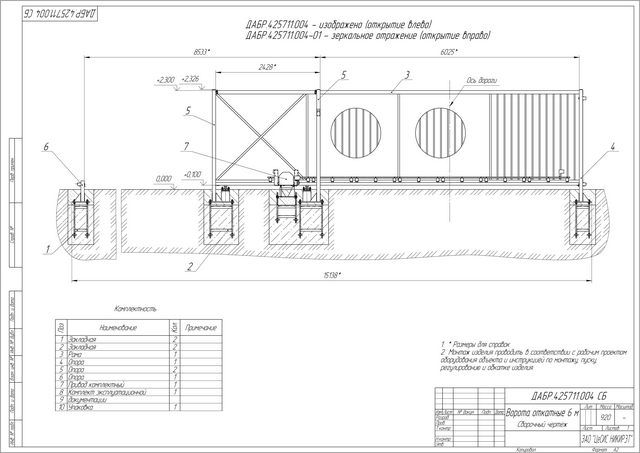
 Components of sliding gates: 1 - electric drive; 2 - roller bearings; 3 - adjustable stands; 4 - guide; 5 - end roller; 6 - bottom catcher; 7 - gear rack; 8 - upper roller catcher; 9 - supporting rollers
The length of the carrier beam should be 1.35-1.5 of the passage width (a smaller figure is acceptable for the lightest gates). In this element, the exact geometry of the profile and the absence of curvature along the length are important to prevent jamming of the rollers. Gates move on roller carriages. Rollers can be made of plastic or steel. In this assembly, you need to pay attention to the bearings used - the reliability of the design depends on them.
The trailer roller is intended for partial unloading of roller bearings. The top rollers support the door leaf. Their frame must be made of steel with a thickness of at least 3 mm. Experts recommend choosing rubber rollers as frames that are more gentle on paint. In the case of plastic rollers, it is recommended to install an aluminum pad under them. The lower and upper catchers fix the gate leaf in the closed position. A kit without a top catcher for high gates is not very convenient. Plugs protect the guide from moisture and dirt.
Comparison of sliding gate fittings from various manufacturers
The market presents accessories of various price categories of domestic and foreign manufacturers. To orient ourselves, we will consider some options, and for a correct comparison, accessories with approximately the same weight of the gate are taken - from 400 to 500 kg.
Comparative table of offers for fittings from various manufacturers
| Manufacturer | A country | Gate weight | February 2016 price | Completeness data |
| Rolling Center | Italy | 500 kg | 13 500 rub. | Carrier trolley - 2 pcs., Carrier beam - 6 m, end roller - 1 pc., end roller trap - 1 pc., supporting rollers - 1 set. |
| Alutech | Belarus | 500 kg | 10 800 rub. | Roller support - 2 pcs., guide rail - 6 m, cap for the guide rail, end roller, lower catcher, upper bracket with 2 rubber rollers. |
| Welser Profile | Austria | 500 kg | 12 000 rub. | Roller carriages - 2 pcs., guide - 6 m, upper and lower catcher, supporting roller, end roller, guide caps - 2 pcs. |
| doorhan | Russia | 400 kg | 12 700 rub. | The kit includes: cantilever pipe - 6 m, pipe plug - 1 pc., trolley with rollers - 2 pcs., end roller catcher - 1 pc., end roller - 1 pc., guide bracket with rollers - 1 pc. |
| deva | Ukraine | 400 kg | 7 500 rub. | The fittings are made in China, the guide profile is made in Russia. Knurled roller without metal plug, roller made of strong polymer. |
| "Roltek" | Russia | 500 kg | 12 700 rub. | Guide rail 6 m — 1 pc., Roller support — 2 pcs., Upper bracket with rollers — 1 pc., Removable end roller — 1 pc., End roller catcher — 1 pc., Upper roller catcher — 1 pc., cap - 1 PC. |
| Svit-Vorit | Ukraine | 400 kg | 8 500 rub. | Guide rail - 6 m, roller carriage up to 400 kg - 2 pcs., upper support rollers, knurling roller with polymer wheel, lower and upper trap, rubber plugs, no bearing inside the wheel. |
| Came | Italy | 500 kg | 13 700 rub | Trolley S with 8 rollers - 2 pcs., end roller, conc. roller, plug for the rail - 2 pcs., guide bracket FRS 2 with 2 rollers, M10x25 screws - 15 pcs. The guide rail S is not galvanized. |
| Fratelli Comunello | Italy | 500 kg | 15 000 rub. | The recommended width of the opening should not exceed 4.5 meters, the height should not exceed 2.5 meters. Beam dimensions (w-h-d): 65x65x6000 mm, wall thickness: 3.5 mm. |
| Combi Arialdo | Italy | 450 kg | 16 800 rub. | Guide rail 6 m - 1 pc., Roller support 2 pcs., Top bracket with rollers 1 pc., Removable end roller 1 pc., End roller catcher 1 pc. |
Drive selection
If you decide to install an automatic gate, you can buy a ready-made kit consisting of an engine and a remote control, or you can make it yourself. For the drive to work, one more element is needed - a gear rack, which, as a rule, is not included in the hardware kit.
Gate automation
Since there are a large number of offers from different manufacturers with different characteristics, we have compiled the most popular of them in a comparison table for a gate weight of 400-500 kg. When comparing, pay attention to the power of the drive and the intensity of use - these are the most significant criteria.
Comparison table for actuators from different manufacturers
| Manufacturer | A country | Gate weight | February 2016 price | Completeness data |
| doorhan | Russia | 800 kg* | RUB 17,475 | Sliding-800 KIT. Oil bath drive kit, 230V, 50% intensity. Opening speed 12 m/min. Set: drive with built-in control unit, gear rack 4 m, signal lamp with built-in antenna, safety photocells, key switch, remote control. |
| Came | Italy | 500 kg | RUB 28,125 | Came BX-78 KIT. Main characteristics: 230 V, self-locking, for gates with a motion control and obstacle detection sensor (encoder), intensity 30%. Set: electric drive, built-in control unit, 4 m rack with mounting kit, AF43s radio receiver, Kiaro 230N signal lamp, safety photocells, 2 control panels. |
| Faac | Italy | 500 kg | 13 125 rub. | 230 V, intensity 30%. Opening speed 12 m/min. Set: Drive 740 E, control box 740 D, 230 V, Z16, V 12 m/min, magnetic limit switches, grease lubricated, with mounting plate. |
| Nice | Italy | 500 kg | RUB 15,825 | Ro 500 KCE. Intensity 9 cycles / hour, speed 0.18 m / s, speed, effort, pause, acceleration and deceleration at the end points, obstacle detection, gate function. Set: electric drive, built-in control unit, radio receiver, 2 remote controls. |
| Sommer | Germany | 400 kg | 16 400 rub. | Gator SG1. For gates 6 m. Maximum drive speed 200 mm/s, maximum pull force 800 N, max. power consumption 51 W, motor supply voltage 24 V. Complete with 5 m plastic-coated rack. Built-in receiver and 1 remote control 4-button. Function of definition of obstacles. Extended operating temperature range. Unlocking with a key. |
| BFT | Italy | 500 | RUB 11,840 | BFT DEIMOS BT. Motor power supply 24 V, power 50 W, speed 13 m/min, intensity of use - intensive, torque 10 Nm. Set: drive Deimos BT + built-in control unit A600 + built-in 2-channel radio receiver Clonix-2 for 63 users. Self-locking electric drive. Electronic adjustable torque limiter. Built-in 2-channel radio receiver. 2nd radio channel - gate mode only. A gear rack is required for installation. |
| Somfy International | France | 500 kg | 18 800 rub. | Somfy ELIXO 500 230V RTS. Set: drive Elixo 500 230 V RTS — 1 pc. Keygo RTS radio remote control 4-channel — 2 pcs. External RTS antenna with 8 m cable — 1 pc. Power supply type - 230 V DC current. Power consumption - 290 W, capacitor - 1 mF, gear ratio - 1/30, travel speed - 8.5 m / min, obstacle detection - mechanical, maximum number of cycles per day - 100, control unit - built-in with microswitches, maximum number of radio transmitters - 36. |
| FAAC | Italy | 500 kg | RUB 10,320 | FAAC 740 actuator with integrated control board and mounting plate (art. 109780) - 1 set. Power supply voltage 230 V, 50 (60) Hz, power consumption 350 W, current consumption 1.5 A, pulling and pushing force 45 daN, motor speed 1400 rpm, motor thermal protection response temperature 140 °C, gear ratio 1: 25, gate speed 12 m/min (sprocket Z16). |
* For gates weighing 300 kg, the price is slightly lower
Do-it-yourself gate drive
If desired, the drive can be made independently. We talked about this in detail in the article."Do-it-yourself sliding gate drive".
Also watch two videos with different solutions.
Video number 1: Sliding gate drive based on a screwdriver
The system is controlled by 6 relays: switching from 12 to 220 V, providing 220 V to the screwdriver, and 12 V to the car alarm.
Video No. 2: Drive based on purchased and used elements
For safe operation of automation, it is desirable to install a signal lamp and photocells.
 Typical wiring diagram for gate automation
We talked in detail about the automation of sliding gates in the articles:
- "Automation for sliding gates. Assembly of the electrical circuit "
- “Automation for retractable gates. Remote control"
Gate leaf manufacturing and installation steps
Before starting work, determine the dimensions of the gate - width and height. In our example, we considered a variant with a passage width of 4 m, a guide length of 6 m, and a gate height of 2 m.
Materials and tools
The calculation of materials was made for the structure shown in the drawing, with one-sided sheathing with corrugated board, for a climate with soil freezing to a depth of 1.5 m.
 Gate drawing
Table. Consumption of materials for the installation of sliding gates
| Material | Consumption | |
| Concreting of the power frame to a depth of 1.5 m | cement | 150 kg |
| sand | 450 kg | |
| rubble | 450 kg | |
| fittings, diameter 10-14 mm | ~20 m | |
| Mortgage | channel No. 16 - No. 20 | 2 m |
| flashing | square pipe 60x60x2 mm | 2.5 m |
| Gate leaf (4x2 m) | corrugated board | 10 m2 |
| rectangular pipe 60x40x2 mm | 26 m | |
| rectangular pipe 40x20x2 mm | 20 m | |
| dye | 1 bank | |
| primer | 1 bank | |
| solvent | 1 bank | |
| electrodes | 1 package | |
| self-tapping screws for metal | 150-200 pcs. |
Required tools:
- shovel;
- Bulgarian;
- welding machine;
- screwdriver;
- level;
- roulette;
- paint brush or spray gun.
sash manufacturing
Frame frame - welded construction. Before starting work, you need to organize a place - lay out bricks under the future structure using the building level. Make frame blanks. Clean pipes of dirt and rust.
You will need pipe sections 60x40 mm long: 6 m - 1 pc., 4.4 m - 1 pc., 2 m - 2 pcs., 2.56 m - 1 pc.
And pipe sections 40x20 mm long: 4.32 m - 3 pcs., 1.92 m - 2 pcs., 1.88 m - 4 pcs.
To the guide (must be bought), closed on both sides with plugs, weld a pipe 60x40 mm 6 m long, grabbing on both sides every 750 mm. Weld perpendicular to the base (also pointwise) pipes 60x40 mm 2 m long (cutting the edges at 45 °) and connect their tops with a pipe 4.4 m long.

From the free end of the base to the nearest corner, weld a pipe 60x40 mm long 2.56 m. Fill the area of \u200b\u200bthe canvas with a structure of pipes 40x20 mm according to the scheme. At the same time, a narrow pipe must be welded flush with a wide one - with one-sided sheathing and in the center - with two-sided.
Clean the welding seams with a grinder and treat with an anti-corrosion agent. Color the resulting frame.
Cut the corrugated board and sheathe the frame with self-tapping screws.
Concrete works
Prepare the power frame. To do this, it is necessary to weld a structure 2.2 m long and 1.5 m high from the reinforcement and channel according to the presented scheme.
 Scheme of the frame for concreting the power frame
Prepare a U-shaped pit for the frame as shown in the figure, prepare a solution based on the calculation of the material (in portions), install the frame and concrete the structure. Freeze time is at least a week.
 Power frame mounting scheme
On the opposite side of the passage, next to the fence post, install a post for attaching the upper rollers and catchers (flashing). It can be concreted, or it can be welded to embedded structures from a corner mounted in a fence post.

Assembly of the structure
When buying accessories, you will be given installation instructions, but sometimes the seller simply does not have it. Let's consider the general case.
1. Weld the adjustable stand to the load frame (at the beginning and end, leaving the necessary clearance) and install the casters on the stand bolts.
2. Weld the platform for the drive to the power frame.
3. Install the gate on the roller bearings by inserting the rollers into the slot of the guide beam. Use a level to level on the adjustable stand. If the stand is not provided, the roller bearings are welded to the mortgage (channel) after checking the horizontal position.

4. Weld the frame of the upper rollers to the mortgages on the pole from the power frame side. Check that the door leaf is perfectly level.

5. Weld to the flashing first the lower and then the upper trap. The lower catcher should be a few millimeters higher than the end roller of the guide. The upper catcher is welded just below the top of the gate.

6. Bolt the end roller into the guide beam.
7. Install and connect the drive and, if necessary, the remote control.

Your gate is ready for operation.
Sliding gates can be called the most popular type of gate today. Previously, not everyone could purchase such a design because of the high cost of both fittings and other elements of such gates. Today, their prices are much more affordable. The advantages of such gates are practicality and durability. But since this is a complex technical design, it is better to leave the installation of the gate to professionals. If you are confident in your abilities, have some construction skills and tools, then installing sliding gates with your own hands will not be fraught with many difficulties. Moreover, you can save on hiring specialists. The main thing that is needed is to take into account technical requirements, select components, comply with standard loads and follow the instructions. Let's take a closer look at the installation process.
Elements and components of the gate
In fact, having everything you need to do the job, it will not be difficult for you to install the gate. You do not need particularly deep knowledge in construction, just basic knowledge, material and following the recommendations of specialists are enough.
For work, you will need consumables, but the main and important part of the elements is the fittings responsible for the movement of the gate. It consists of:
- roller trolley or carriage (2 pcs.);
- lower and upper trap;
- guide U-shaped beam;
- gear rack;
- removable end roller;
- upper retainer with rollers;
- plates for fixing the roller trolley.

When choosing high-quality accessories, pay attention to trusted manufacturers, taking into account the price and quality of products. You can also seek help from professionals who will help you choose the best option.
It is much easier to buy a ready-made gate kit with all the necessary elements, which you only need to assemble and install in place. It has a special installation instruction, thanks to which you can easily do all the necessary work.
Work plan

- Digging a trench and building a foundation. Retractable gates are quite heavy, so for smooth and proper operation, you will need to make a foundation.
- Wiring, if you want your gate to open automatically from the drive, or if you plan to install a video camera on it.
- Installation of roller elements.
- Installation of the gate on the rolling mechanism. At this stage, you need to hang the gate without adjustment.
- Fixing the hardware that catches the gate.
- Final adjustment of the gate.
- Connection of automation, if it is provided.

If you want your gate to serve for a long time and without interruption, you need to strictly adhere to the plan and follow the instructions, carefully following each step.
Digging a trench and preparing the foundation

First of all, you need to do the preparatory work for the foundation. Start with trench planning. To do this, follow these tips:
- From the border of the gate, step back a distance that is equal to half the width of the entire passage. For example, the width of your passage is 4 m, then the length of the foundation will be 2 m from the border.
- The width of the trench depends on the width of the structure of the gate itself. For example, the width of your gate is 20 cm, then you need to dig a trench 10–15 cm wider in two directions, that is, 40–50 cm.
- Depth is a matter of controversy for specialists. Some say that it is important to deepen the trench below the level of freezing, others - that this factor does not affect the future foundation at all. According to the first, the foundation should go 1–1.5 m deep, according to the second, 0.5–0.7 m will be enough. What depth you choose is entirely up to you. We recommend doing it no more than 1 m.
After you have decided on the size, use a shovel to dig a trench in the right place. You should end up with something like the picture below.
We prepare the mortgage element

In order to make a mortgage element, you will need:
- channel width 18–20 cm (it can be replaced with a corner of the same size);
- fittings Ø 12–15 mm;

A backfill element is a structure made of a channel and reinforcement, which in the future will be installed in a trench and will be concreted. Take a metal channel and cut it to the length of the entire trench. If it is 2 m, then the channel should be 2 m long. After that, reinforcement must be welded to it to form a metal frame. The length of the reinforcement rods should be 5–10 cm more than the depth of the trench so that it can be sunk into the ground. How exactly you will weld the reinforcement depends on you, there are no restrictions here, it can be welded in increments of 15 cm. The main thing is that the frame is strong, has a vertical base, which is connected by jumpers.
Instead of fittings, you can take a different type of metal products, for example, corners.
After the frame is ready, it can be installed in a trench. But before that, the bottom of the trench should be covered with sand or small gravel and tamped down, making cushion for foundation 5 cm high. Sink the reinforcement so that the surface of the channel is flush with the road surface. Using the building level, set the frame perfectly level. If a strong skew forms on either side, remove the frame and add sand to that place. If the mortgage is placed unevenly, it will prevent the correct movement of the gate.

The foundation must be level with the road. The ground clearance can be no more than 5 cm, so that you do not have problems using it in winter.
Electrical wiring

If your gate will be equipped with an automatic gate opening and closing system, or if you need to install CCTV, you need to take care of laying electrical cables. They need to be carried out immediately before pouring the foundation. The cable is placed in a special corrugated hose and laid in the foundation structure. In advance, you need to decide on the place where the drive will be installed, and run the wires there. The free ends of the wires must be brought out 1–1.5 m above the foundation level. In order to do everything yourself, look at the wiring diagrams and drawings for sliding gates.
Foundation pouring

Once you have laid the wiring, the embedded element can be poured with concrete mix. For this you will need cement grade M400, sand and gravel. The proportions are as follows: for 1 kg of cement, 3 kg of sand and 4–5 kg of crushed stone are needed. Water should be half the weight of all components. It turns out:
The total is 4 liters of water per 1 kg of cement, 3 kg of sand and 4 kg of crushed stone. Mix the required amount of mortar and fill the trench. It is important that the channel surface is not completely concreted, the concrete must be at its level. Now the foundation must be left to dry. It will take 3-5 days, during which it will get stronger and be reliable enough for further work.
Door leaf assembly

To make a frame for the gate, you need to have the skills to work with welding machine, since all elements must be connected by welding. If you do not have welding experience, you can ask your friends or a special workshop for help, where a gate frame will be made according to your drawings.

To make a gate frame, you need to purchase profile pipes. Their size will correspond to the desired gate size. There are many designs that you can make. The main thing is to choose the right one for you, cut the pipes of the right size and do the welding. Professionals advise to cook the frame so that the horizontal cross members are on top of the vertical pipes. Thanks to this, you will prevent corrosion, you only need to plug the horizontal pipes. When the structure is ready, the joints must be cleaned and the frame covered with protective paint.
If your gate is larger than 1.5 m, to strengthen the structure and prevent sagging, you need to weld the crossbars in 50 cm increments.
At the same stage, a guide U-shaped beam should be welded to the lower pipe, thanks to which the gate will move. After that, the frame is sheathed with a profile sheet.
One of the options for how to make a gate frame is presented below.
Installation of roller trolleys to the channel

Roller carriages can be called the most important mechanism, since they must withstand the load of the entire structure, so they should be attached to the channel as securely as possible. Plates for attaching rollers must be welded to the channel. Everything is done as smoothly and in the same plane as possible so that the gate moves freely. To line them up, you can use a laser pointer or a stretched cord. Another option is to draw a parallel line on the foundation, which will be a tangent line to the edge of the plate. The plates should be welded in the middle of the channel. To do this, step back 15 cm from the edge, closer to the opening and fix the first plate. The second plate is attached 10 cm from the opposite edge.

Now you need to fix the roller carts on the plate. Usually they are connected with bolts and nuts. Tighten them securely and install the gate. Check for smooth running, check measurements and adjust the position of the roller bearings to align the door perfectly. To do this, you can use the cord, which must be pulled along the opening line of the gate, at a distance of 20 cm from the surface and 3 cm from the second post. The cord will serve as a guide that will help set the gate perfectly level.
Installing the top retainer

So that when the gate moves, they do not move out, a latch or guide is installed on top of the pole. He will stop the gate and prevent it from swinging in strong winds. To do this, holes for fastenings should be marked on the support column. Measure everything correctly so that the upper frame can go into the latch without obstacles.
On the pole, you need to install a bracket for mounting the guide. If you will be fixing it in concrete or brick, use anchors with a stud diameter of 10 mm. If you are attaching it to metal, then special screws will do. In the case when welding is used, the rollers must be removed.
After fixing the latch, check it. The gate must move smoothly, remain vertical, and the rollers must cover them tightly.
There are different clamps, roller or in the form of a conventional bracket. Which device to choose is your decision.
End roller and plugs

From below, at the end of the guide U-shaped bar, in its front part, it is necessary to fix a removable end roller, which is inserted inside the profile. It attaches easily with screws. On the opposite side, you need to install a plug (plug) or the same roller.
Such a roller is needed so that when the gate is closed, the guide rolls onto the catcher located below, which will be installed on the pole on the other side. In this way, you will be able to reduce the load on the base plates that hold the rollers to the foundation. Plugs or plugs act as a barrier to snow, rain, dirt, and debris that can enter the guide bar. If they are not there, then the roller carriages can quickly fail, and the gate will not open smoothly and easily.
Fixing the upper and lower trap

To secure the lower and upper trap, you need to close the gate as far as it will go. On the post, mark the places where the frame of your gate ends. In this place, above and below, you need to fix the mortgages, to which the traps will be attached. Depending on the mortgages, they can be fixed by welding or bolting.
Catchers will soften the contact of the gate frame with the support rollers, as well as minimize loosening of the structure in strong winds. The lower catcher also serves to reduce the sagging of the frame, which may appear after a long operation of the gate. Finally, check that your gate is properly installed. Open and close them several times, make sure the movement is smooth and even.
Installation and connection of automation

If you want your gate to open and close automatically, you need to purchase special equipment and install it.
First of all, a mounting plate should be welded to the channel, to which the drive will be connected. Usually such a plate is included in the kit. For welding, you can use profile pipes that are welded to the channel, and then a plate is welded to them. After that, the engine itself is installed on the base and fixed with the help of bolts, which are also included in the kit. It has adjusting screws, thanks to which the motor can be adjusted up-down, left-right.
It remains only to weld the gear racks to the U-shaped frame. This will require patience and accuracy, since the slats should be welded so that they are as a whole. Then, when driving, you will not hear any extraneous knocks from the gate. Then adjust the drive so that it easily drives the gate. It remains only to configure the mechanism according to the manufacturer's instructions.
That's all, after all the manipulations, your gate is ready for operation. You can be proud of yourself, because you yourself were able to do such a great job. Properly installed gates will be quite reliable, and their service life will please you.
Video
Watch the detailed video instructions for installing sliding gates:
Another video tutorial:
Retractable or sliding gates are a complex mechanism, but, nevertheless, because of their convenience, they have become widely used both in industrial facilities and in private households. There are many manufacturers that make ready-made gates and accessories for them, a qualified workforce will quickly and competently install, but those who want to save money and use creative energy in business will be interested in installing sliding gates with their own hands. Moreover, it is quite possible.
Types of sliding gates
Sliding gates come in different designs, each with its own advantages and disadvantages. Let's note them.
Hanging sliding gates
These gates were most often used at the entrances of enterprises and other protected areas. At a considerable height, in order to be able to enter freight transport, a metal beam was mounted, and no longer Not It was with the help of roller carts that the door leaf was hung.
 Hanging gates - reliable, but material-intensive
 This design is quite reliable, and such gates, created more than 50 years ago, still work, but now they are rarely used for two reasons:
- The upper beam still limits the dimensions of the gate opening.
- Such a design is very material-intensive and what was allowed in the days of the USSR at the then metal prices is simply unacceptable now.
Sliding rail gates
This is the simplest sliding gate design and theoretically the most reliable. The door leaf, standing on rollers, rides on a special rail located on the surface. The gate is still supported at one upper point in the place where the gate leaves when opened. Such gates are best used where the territory is periodically and constantly cleaned, which is often unattainable in Russian conditions. Normal snowfall will easily block the operation of such gates, and it can be very difficult to get them to work again.

A significant advantage of such gates is that in order to open them, they need to leave the fence exactly the width of the opening, and this, in conditions of lack of space, can be a determining factor for making a decision in favor of such a design.
Cantilever sliding gates
Cantilever sliding (sliding) gates were invented to ensure that the gate had no size restrictions from above and there was no contact with the ground rail. This is the most complex gate design, but these "victims" are absolutely justified. The leaf of such gates does not have contact with the surface, but is suspended on cantilever roller blocks using a guide beam. Most often, such a beam and roller blocks are located at the bottom of the gate.

There are cases when the guide beam and roller blocks can be located in the middle or even on top of the door leaf. This can be justified when the cantilever units can be hung on the main wall of the building or there are any building structures or structures that can withstand the loads from the door leaf. Otherwise, you will have to specially construct a load-bearing structure for the gate, which is far from always beneficial.

That is why, in most cases, cantilever sliding gates with a lower location of the carrier beam are used.
sliding gate prices
Sliding gates
Description of the design and operation of cantilever gates
A schematic diagram of a sliding gate with a lower console location can be seen in the figure.

The door leaf is mounted on a frame (1) made of a shaped metal pipe. A carrier beam (2) is welded to the frame, having a special profile, inside of which roller carriages (3) fit tightly. At the same time, the beam can move along with the gate to the left - to the right along the carriages, ensuring the opening and closing of the gate. It is obvious that the beam and roller carriages bear the greatest load, especially at the moment of their closing or full opening of the gate. In order to unload the gate when fully closed, an end unloading roller (4) is used, which enters and abuts against the lower catcher (5). In another part of the gate, to fix the leaf when fully opened, an end roller with a catcher limiter can also be used, but it is not visible in this diagram.
To ensure that the gate does not have lateral rolling, there is a guide with rollers (7) and an upper catcher (6) that fixes the leaf in the closed state. Plugs (8) are used to avoid the ingress of dirt and foreign objects into the inside of the beam. The entire gate structure is mounted on three main power elements: a support post (9), a counter post (10) and a foundation for roller carriages (11). If the site already has sufficiently strong supports for the gate (brick, concrete or metal), then they can be used as support and response pillars, and if not, then they will have to be built separately from a profile metal pipe. The foundation for the console in any case will have to be built separately.
In sliding gates, an electric drive is quite easily implemented, which is fixed between the roller carriages. To set the web in motion, a gear rack is fixed to its side surface. The drive is equipped with a control unit, as well as various safety devices.

Benefits of cantilever sliding gates
Cantilever sliding gates have a number of advantages:
- Such gates do not have detachable leaves and therefore do not reduce the usable area of the territory, and if the gate is accidentally opened, there is no danger of damaging the vehicle standing in front of them.
- The gate opening has no lower and upper restrictions on dimensions.
- Abundant do not disrupt the operation of the cantilever gate, as the canvas is hung at a distance of about 10 cm above the ground.
- All rolling elements that ensure the operation of the gate are located inside the beam, so they are not affected by weather factors. Even a child can set the gate in motion, thanks to a well-thought-out design and low friction.
- A strong cantilever foundation and a well-thought-out system for keeping the door leaf in a vertical position allow such doors to withstand heavy wind loads.
- Sliding gates are the easiest to equip with an electric drive and security elements.
Still, sliding gates have disadvantages, but there are few of them:
- Cantilever sliding gates are one of the most complex in design, and therefore their installation is not easy.
- To install them, it is necessary to have a free section of the fence one and a half times larger than the size of the opening, which is not always achievable.
Determination of the possibility of installing sliding gates
Even with a great desire and remarkable financial capabilities of the site owner to install sliding gates, situations may arise when installation is either impossible or very difficult. What are these situations?
- The space where the gate will roll back along the fence must be free for at least one and a half width of the gate opening. This is explained by the fact that on the door leaf, in addition to the part that closes the opening, there is also a technological part, which occupies at least half of the width of the opening in length - this will better distribute the loads from the gate to the cantilever block.

- Sliding gates move in a straight line, which means that the necessary section of the free space of the fence must also be straight.
- In the place where the gate will move, there should not be any uneven terrain that will prevent the free movement of the gate.

- There should not be gates on the path of the gate, it is better to make them from the opposite side. Sometimes sliding gates with built-in gates are ordered, but they will inevitably have high thresholds, which is extremely inconvenient for children and the elderly.
- It happens that the owners intend to use the gate as a gate - when the canvas drives off a distance sufficient for the passage of people. This is not necessary, since any gate mechanism is designed for a certain number of cycles and their frequent use will greatly reduce the resource.
- If the entrance to the territory of the site occurs from a narrow lane, then to facilitate maneuvering, it is necessary to increase the gate opening, which will affect the dimensions of the canvas.

If there are no such difficult situations on the site, then you can proceed to the installation of sliding gates with your own hands.
In order for the sliding gates to be installed correctly and have a long service life in the future, it is necessary to break the technological process into several stages.
Preparatory work
The first and one of the main parts of the preparatory operations is the assessment of the gate installation site. What should you pay attention to?
- If the gates will be placed instead of the old ones, having a different design, then the presence and condition of the supporting pillars is assessed. If they are made of brick, reinforced concrete with a section at least 20 per 20 cm, shaped metal pipe with a cross section at least 60 per 40 cm, their strict verticality is maintained, and they are securely fixed in the ground, then they may well serve as a supporting and reciprocal column of sliding gates. If not, then you will have to build your pillars again.
- Near the support post, it should be possible to dig a hole for the foundation, which should be located close to the post, run parallel to the fence and have dimensions of 500 mm by 2000 mm.
- If there is a new fence on the site, then all the work on its construction and preparation for the installation of sliding gates can be combined, which is most preferable.
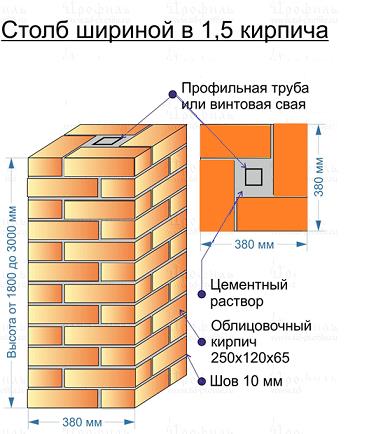
- Very often, brick pillars are erected at the entrance to the territory, which is both practical and beautiful. During their construction, it is necessary to make embedded elements in the form of steel plates 100 * 100 mm and 5 mm thick, three on each column. The top plate must be placed on the inside of the post against the edge closest to the opening. The distance from the top of the post to the plate is 200 mm. The lower embedded plate is located similarly to the upper one, but at a distance of 200 mm from the zero mark. "Zero" is considered to be the level of entry through the gate. The middle plate is placed in the middle between the top and bottom. Gate elements will subsequently be attached to them.

- When building a new fence, you can take into account that most often the width of the passage for sliding gates is 4 meters. This standard has long been adopted in Europe. All manufacturers of components and accessories have the necessary sets of elements for this size of gate. To greatly facilitate your work, it is better to use a ready-made solution.
- It is necessary to decide on what the door leaf will be and how it will be lined. There are a lot of options, and in each of them the gate will have a different mass. This may affect the selection of the desired force elements. Most often, corrugated board has been used recently, but there are options for cladding with wooden clapboard, forged decorative elements, or simply leaving a lattice structure made of steel pipes.

- Before purchasing the necessary components, you need to draw up your detailed drawing with a specification or use ready-made solutions that are in the albums of gate manufacturers and on the forums of country house owners on the Internet. In any case, you need to be very clear about the design of how many materials you need and which ones.
Marking work
When the gate posts are installed, regardless of whether the fence is erected or not, you can already start marking. For this you need:
- Determine the level of the zero mark, which is taken as the surface level at the entrance to the garage opening. Moreover, it is not necessary that at the time of the start of work, the entrance surface will already be ready. This can also be done later. This level should be marked on one pillar, and then transferred to another using a water or laser level.
- At the level of zero marks, the cord is pulled close to the inner surface of the poles, and the cord must go beyond the support table (the one where the gate will move when opened) for a distance of at least two meters. The horizontality of the stretched cord is checked.
Sliding gate foundation
In order to perceive the loads from the weight of the gate at rest and during their movement, it is necessary to equip the foundation. To do this, as the upper part, on which the roller units and the electric drive will be mounted, you need a channel No. 20 with a length of 2000 mm. For the foundation, it is necessary to dig a hole, which is adjacent to the support post, has a length of 2100 mm, a width of 500 mm. Depth is determined by the level of soil freezing in winter. In most regions, a depth of 1500 mm will be sufficient.

To reinforce the foundation and create a connection between the channel and the foundation, three square-section frames with a side of 150 mm from reinforcement No. 16 and a length of 1400 mm are welded. For cross ties, you can use reinforcement No. 10-12 with a pitch of 300-400 mm.
Finished frames are welded to the lower surface of the channel in the middle of its shelf. The center lines of the extreme frames are located 400 mm from the edges of the channel, and the third - exactly in the middle. After that, it is necessary to add 10 cm of sand or a sand-gravel mixture to the bottom of the pit, compact it and begin to install the finished channel with reinforcing cages. This should take into account:
- The channel is laid close to the bearing post, strictly parallel to the gate movement line, flush with the zero mark. A previously stretched cord will help to do this.
- In order to prevent cement milk from leaking into the ground from the concrete mixture, which reduces the strength of concrete, it is better to line the bottom and walls of the pit with plastic wrap.
- The surface of the channel should be at zero, therefore, when installing frames with a channel, it is good to use pieces of reinforcement that can fix the structure in the pit. When concrete is supplied, a solid load will affect the frames, so the fixation must be reliable.
- In order to make it easier to level the upper part of the concrete with the channel, it is very convenient to install edged boards on top with a surface at zero level.

- If you plan to use an electric drive with an automation unit and a security system, then you should immediately take care of laying the necessary cables. The wiring diagram can be seen in the figure. Cables should be laid either in a corrugated pipe, or better - in a polyethylene pipe with a diameter of 20 mm.

It's time for concrete work. For pouring the foundation of retractable cantilever gates, concrete of a grade of at least M250-M300 must be used. For its preparation, you will need components in the following proportions by volume:
- One bucket of cement M400.
- Two buckets of washed sand.
- Four buckets of crushed stone or gravel.
- The amount of water depends on the moisture content of sand and cement and ranges from 0.7 to 1 bucket. The use of plasticizers reduces the amount of water needed and increases the flowability of the mix, which is beneficial when laying.
The amount needed for the foundation, of course, will be larger, the main thing is to observe the indicated proportions. To prepare the concrete mix, it is best to use a concrete mixer or a powerful construction mixer. With manual mixing, the quality of concrete deteriorates.
 Concrete mixer - an indispensable assistant for the construction of the foundation of the gate
 First, sand and cement are poured into the concrete mixer. After mixing them, part of the water is added so that the solution is mixed until a homogeneous state. Next, crushed stone or gravel is added and water is gradually added until the concrete becomes homogeneous and mobile. When laying concrete in a pit, you must:
- Feed the concrete mixture gradually so as not to move the leveled structure.
- After laying the next portion of concrete, it is necessary to pierce it in several places with a bar of reinforcement - to remove possible air bubbles.
- After laying and leveling the top layer, it is necessary to wipe the surface of the channel with a wet cloth so that it remains clean for subsequent operations.
Full maturation of concrete occurs within 28 days, but after a week it will already gain the strength that will allow installation of the gate. And at this time, you can do other technological operations.
Manufacturing of sliding gates
In the manufacture of the door leaf, if there are not sufficient skills in welding metals, it is better to contact the place where specialists in the workshop will make them according to the required dimensions. Sliding gates are a fairly large structure and at home it will be difficult to ensure that all parts are in the same plane, which is extremely necessary. Another advantage of manufacturing gates in workshops is that priming and painting can be done with a compressor, and this gives a better finish. But if you still have a desire to do everything yourself, then this is quite possible.
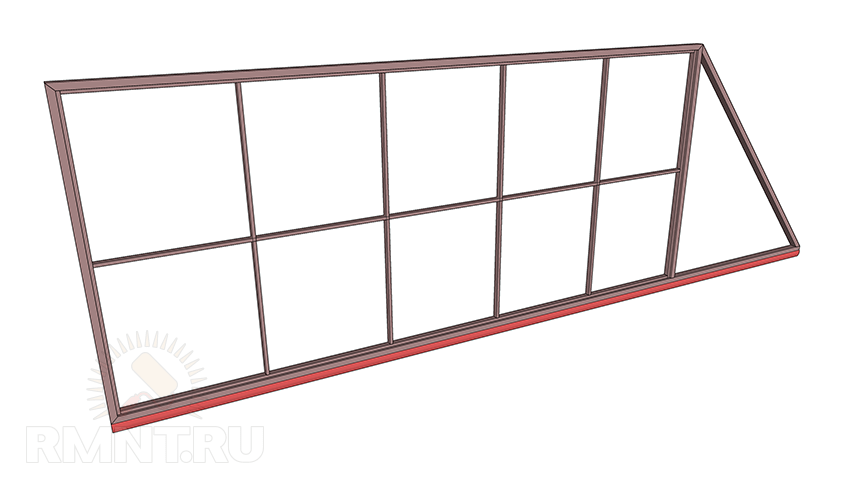
One of the possible options for the door leaf is shown in the figure. The main frame is made from a profile pipe 60*40 mm, while the stiffeners and internal filling are made from a pipe 20*40 mm. The supporting beam, which is located at the bottom of the drawing, has a length of 6 meters and it must be welded to the gate, so it is time to purchase a set of accessories for retractable cantilever gates and profile pipes for making the leaf.

A wide range of fittings for sliding gates is presented in various stores and in the construction markets. It is both a Russian manufacturer and an imported one. When buying accessories, you need to take into account the weight of the future door leaf and the size of the opening. In our case, the size of the opening is 4000 mm, and the weight of the canvas, if it is sheathed with corrugated board, will be up to 400 kg, which must be reported to the seller.
The standard gate kit includes:

- Guide beam 71*60*3.5 mm, 6 meters long.
- Two roller bearings.
- End roller.
- Lower catcher of the end roller.
- Upper catcher.
- Guide with two rollers.
- Two plugs per beam.
To weld the gate, you will need to make an assembly table consisting of three stands of the same height. As supports, stakes driven into the ground at the same level and boards laid on top can be used. The main thing is that all three stands lie in the same horizontal plane.
Another option for an impromptu mounting table can be bars or building stones laid on the ground and set on the same level.

A profile pipe purchased at a metal warehouse rarely has no centers of corrosion, therefore, before making a gate, all pipes should be thoroughly cleaned of rust stains and dirt. It is most convenient to do this with a grinder with a special grinding disc.

According to the drawing, profile pipes 60 * 40 mm are cut for the main frame of the gate. At the same time, one should try to make sure that during welding there are no holes left for access to the internal cavity of the pipe. Marking should be done with a tape measure and a square, and cutting with a grinder with a cutting disc, or better, with a cutting machine that allows you to accurately observe all angles.
Pipes are laid out on the mounting surface, guided by the drawing, compliance with the dimensions and perpendicularity is checked, and then all seams are successively tacked. After checking the dimensions and plane, all pipe joints are welded with a continuous seam. All remaining open ends of the pipes are welded with plugs. After that, all welding seams are carefully cleaned with a grinder with a grinding disc.

Profile pipes 40 * 20 mm are cut to size for stiffeners, which are then applied to the inner surface of the main frame, pulled together with clamps and pinpointed. This is how the entire internal frame is assembled. After checking the compliance with the dimensions in the drawing, checking the diagonals of the rectangular part of the gate, the plane of the structure, all seams are scalded. On the joints of the pipes of the inner frame, continuous seams are applied to each other, and to connect the side surfaces of the main frame with the inner one, seams of 10-15 mm are made with an interval of 400-500 mm. Welding must be done in a checkerboard pattern so that the entire structure does not “lead” from excessive overheating in one place.
A guide beam is welded to the lower surface of the gate. To do this, it is fastened with clamps, the correspondence of the axes of the door leaf and the beam is checked, and then it is welded with 30-40 mm seams through 400-500 mm. After that, the grinder cleans all the seams.
For priming and painting, the gate must be set in a position close to vertical. It is best to use an automotive anti-corrosion primer, which must be applied in two coats. It is preferable to do this with a compressor and a sprayer, but you can also use a brush, but it will take longer, and the quality of the coating will be worse. Particular attention should be paid to ensuring that the primer sheds a gap between the beam and the gate. It would also be appropriate to cover this gap with "sausages" of acrylic sealant. After that, the gate can be completely painted in two layers. Under no circumstances should you paint the inner surface of the carrier beam!

After the paint has completely dried, the cladding can be mounted on the gate, the most preferable of which is corrugated board, as it combines light weight, strength, beautiful appearance and reasonable price.
Sliding gate installation
The installation of a cantilever structure on a previously mounted channel can be started no earlier than 7 days after concreting. For the installation of roller carriages, it is recommended to purchase a mounting plate with studs, which will allow:
- Adjust the position of the gate in height and horizontal.
- It is easy to remove the gate for repair or replacement of roller blocks.

To install the gate you need:
- Push the roller carriages onto the mounting plate, making the height the same and medium on all the studs. Do not overtighten the top nuts.
- On the foundation it is necessary to mark the position of the mounting plates. To do this, 150 mm is measured from that edge of the channel, which is closer to the opening, and a line perpendicular to its length is drawn. This will be tangent to the edge of the first mounting plate.
- To find the position of the second support, measure the total length of the gate and subtract 100 mm from it. The resulting distance must be postponed from the beginning of the return post parallel to the goal line to the channel. At this point, a perpendicular is drawn, which will be tangent to the second mounting plate.
- If the bearing capacity of the poles is good and anchor bolts will be well attached to them, then the use of additional metal poles is not necessary. If not, then according to previously prepared mortgages, a profile pipe is vertically welded along a height equal to the height of the gate plus 200 mm, with a section of 40 * 40 * 2 mm. On the support post, it can be welded close to the edge, and on the return post, it can be welded at a distance of 20-50 mm from the edge of the post.

- At a height of 150-200 mm, at a distance of 20-30 mm from the supporting and supporting posts, a cord is stretched horizontally, parallel to the gate movement line. It will indicate the position of the tangent to the edge of the carrier beam. The cord must be taut throughout the movement of the gate: from the opposite table and up to the position of the edge of the gate when it is fully opened.
- Roller carriages are placed in the carrier beam and shifted approximately to the middle of the gate. Then, with the participation of assistants, the door leaf is placed vertically above the channel. The roller carriages are bred along the previously marked lines, and the tensioned cord should touch the guide beam along its entire length. This position can be fixed with the help of supports from the planks. After checking the verticality, the roller platforms can be "grabbed" by electric welding in several places.
- The door travel is checked, its verticality and horizontality, which is checked in the closed position. If necessary, adjusting nuts on the studs of the platforms are corrected. The gate should move easily along the rail, parallel (lightly touching) to the tensioned cord. The gaps between the supporting and reciprocal pillars should be the same, and from the zero mark to the bottom edge 80-100 mm. If everything is in order, then the carriage nuts can be tightened, and the platforms themselves can be scalded in a circle.

- A plug is mounted on the rear cantilever part of the carrier beam. An end roller is mounted in front of the beam. Each manufacturer has its own installation method, so you need to use the instructions.
- A guiding device with two rollers is mounted on the support column in its upper part. To do this, a bracket is attached to the pole for attaching the guide, and holes are marked. In brick or concrete, it is necessary to fix it with anchors with studs with a diameter of 10 mm, and in metal - with appropriate self-tapping screws. If welding will be used for fastening, then it is better to temporarily remove the plastic rollers. After mounting on the pole, the rollers are set so that they tightly cover the door leaf, maintain its verticality and at the same time do not interfere with smooth running.

- The gate rolls out to the fully closed position, and the place of attachment of the lower catcher is marked on the counter post. The end roller should fit snugly on the catcher shelf, partially relieving the load from the roller blocks. The trap is mounted with appropriate fasteners and the door movement and the ease of their fixation in the closed position are checked.

- An upper catcher is mounted, which prevents the gate from swinging in the wind. In a fully closed state, the position of the trap is outlined and its fastening is made. Very often, the upper catcher in the kit also has a protective bracket that is put on the door leaf, which saves from damage to the coating. The bracket is mounted so that when closing, it enters the trap.

- If necessary, a rear limiter is mounted, which will not allow the gate to roll far when fully opened.
After a well-conducted installation, the gate should move very easily and be fixed in the extreme positions. The final work will be cleaning of all welds, coating them with an anti-corrosion primer and painting. Further on the door leaf, you can fix the handles for opening and closing, as well as install. Each manufacturer of drives has its own installation features, which are described in detail in the attached documentation. But this work will already be much easier, since the main thing has already been done - do-it-yourself sliding gate installation.
Video - Installation instructions for sliding gates
Video - Installation of a finished set of gates without welding
Video - How to make a sliding gate yourself


