How to assemble a children's tricycle. How to build a road bike out of the box Assembling a Merida bike out of the box
Have you just received a long-awaited bike from a transport company? Now you have to assemble and configure it! Using the 2011 Giant Cypress city bike as an example, all the nuances of assembling a bike from scratch are considered - from unpacking to setting up switches. If you have never assembled a bike before, I strongly recommend taking it to the nearest bike workshop - save a lot of time and nerves. If you still want to do it yourself - this article is for you;)
Unpacking and installing the main elements of the bike
This is what the box with the bike looks like when it comes from the factory. All bikes usually come with a crankset, chain, rear and front derailleurs, rear wheel, brakes and steering column.
Steering wheel, seat, front wheel, pedals, reflectors and other small things are packed separately.
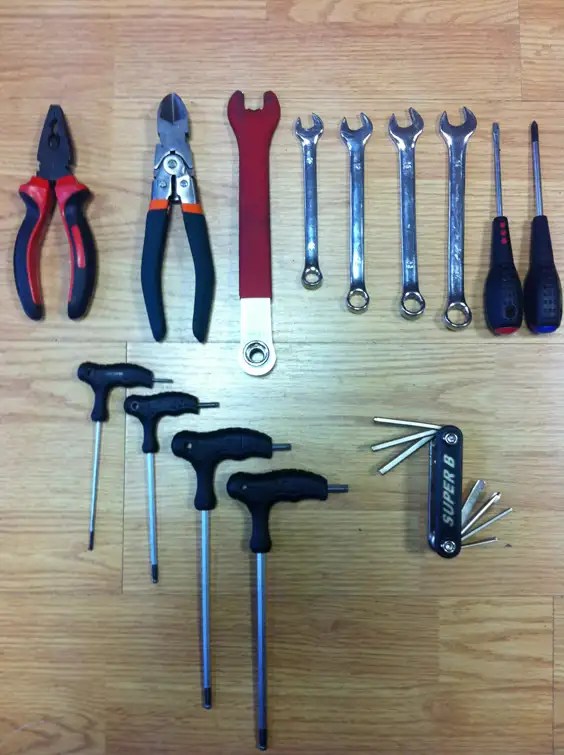
To assemble the setup, you will need a number of tools:
- hexagons (4, 5, 6 mm), but rather a set,
- wrench 15 (for tightening the pedals),
- key for 10,
- crosshead screwdriver,
- pliers (for crimping the cable),
- nippers (for cutting the cable).
We take the bike out of the box. With wire cutters or powerful scissors, we cut off all the plastic clamps and remove the packaging. Be careful - at this stage it is easy to damage the paintwork of the frame.


First, attach the saddle to the seat post. To do this, unscrew the mount on the seatpost with a 6mm hexagon, install it in the grooves of the saddle frame, close the bracket on top and twist it. This clever design also allows you to move the saddle back and forth and adjust the angle of inclination. Now it’s enough just to tighten the bolt, and it will be more convenient to make settings on the assembled bike.

We fix the reflector as close as possible to the saddle.

We lower the entire structure into the seat tube to the end and fix it with an eccentric clamp. If it closes too easily, then open it all the way, tighten the tightening wheel and try to close it again. If it does not close, on the contrary, weaken it.

Next, we are engaged in the removal of the steering wheel and the steering wheel. It happens differently on different bikes: either the stem is already fastened to the steering wheel, or not. In either case, the offset is set first. When installing the stem and handlebar, pay attention to the shifter and brake cables - they should not be tangled. Pay attention to the vertical marks on the stem - this is the maximum possible lifting height.

There is an important bolt hiding under this little plug! Using a 5 or 6 hexagon, the stem is fixed in the steering column, and the steering wheel is adjustable in height.


Let's take the front wheel. First you need to correctly install the eccentric (it is in the box with small things). The photo shows the correct position of all elements. Pay attention to the springs - they are located with a narrow part inside, i.e. to the wheel.

We remove the plug and spring from one side of the eccentric (from the one where there is no lever) and insert the axle into the front wheel hub. The question may arise, which side to insert it? Just look at which side it is installed on the rear wheel (usually on the left) and do it by analogy.

Next, insert the wheel into the fork. It is necessary to “unfasten” the front brake of the bicycle in advance (in the case of rim brakes) or remove the rubber band from it (usually it is secured with an elastic band or tie in the factory packaging).

It is most convenient to tighten the eccentric by approaching the bike from the front. In this case, it is possible to monitor whether the wheel is centered. Tightening is done as follows: turn the wheel on the left clockwise and try to close the lever. If it closes very easily, fold it back and spin the wheel again until the eccentric closes with effort. You don’t need to overdo it, otherwise you can break the eccentric!

Now you can pump up the wheels. The recommended pressure is always indicated on the tires in psi and bar. Bar = atmosphere. Please note: the pressure in the bicycle wheels must be from 3 atmospheres and above. 3.5 is the best option. 2.2, like cars, is no good. During operation, periodically check the pressure in the wheels - this is a guarantee of the absence of "eights".
Install the pedals. The photo shows that each pedal is signed as L or R. Sometimes stickers are still molded. L (Left) - left, R (Right) - right. Be careful: the pedals have different threads! Both pedals are twisted "in motion" of the bicycle, i.e. left to the left (counterclockwise) and right to the right (clockwise).

First, we twist them with our hands, and then we tighten them with a key by 15.

If the chain is not in place, it can easily be returned there. To do this, press the foot of the rear derailleur and the chain weakens. Now you can simply pick it up with your hand and put it on one of the front stars.

Installation and adjustment of the front brake; adjustment of both brakes
Now let's install the front brake. Find this curved tube in the box. You need to thread the front brake cable into it so that the wide part is at the top, and the narrow tip at the bottom is closer to the brake levers (on the next photo).

We do as in the photo. The rubber band must be put on before you screw the cable. An elastic band is needed to protect the cable from dirt.

Now we loosen the bolt and start the cable there.

We compress the levers so that 2-3 mm remain from the pads to the rim. and tighten the bolt (without fanaticism, otherwise the cable will start to "push").

We leave a small part of the cable (5-7 cm.), Cut the rest with wire cutters (very good wire cutters are needed, otherwise the wire will fluff up at the end). Next, put on the tip and clamp it with pliers. If suitable tools are not available, take this step later. But don't put it off for long - the cable may "fluff" and you will have to change it.


Now you need to adjust the brakes. It would be good to devote a separate article to such a difficult issue, but now I will try to briefly describe the adjustment process.
The precise operation of the brakes consists of many nuances. First, spin the wheel (after inflating to the recommended pressure) - is there a figure eight? If it is, then it needs to be corrected. This is best done by an experienced master or look for an article on eliminating eights on the Internet. If everything is in order, we move on.
When assembled, the brake pads should be at equal distances from the rim. This is achieved by tensioning the cable - you can loosen the bolt with which you fastened the cable and pull it harder. And there is also a "lamb" - it is located right next to the brake handle - they can also tighten or loosen the cable. Never unscrew it all the way! The pads themselves should be parallel to the rim. Check if this is the case. If not, you need to loosen the bolt that secures them and adjust their position (see photo). You can, for example, apply the brake (then the pads will be pressed parallel to the rim) and immediately tighten the bolts.

Now we press the brake lever and watch how the brake levers converge. And they must converge at the same time! Look at the video.
If, when you press the brake lever, one lever presses the block faster than the other, you need to make adjustments with special screws (see photo). The setting is as follows: select the lever where the block is pressed against the rim faster and stronger and tighten the screw on this side clockwise by one or half a turn. Click and see if the situation changes. Usually the pads begin to press against the rim at the same time after adjusting with one screw. If not, then turn the screw on the other lever (where the pad is further from the rim) counterclockwise one - half a turn. Continue the described steps until you achieve the result, as in the video. The same procedure must be done with the rear brake.

Rear and front derailleur adjustment
Now it remains to configure the switches and soon it will be possible to go for the first test drive. Adjustment of the switches must begin from the rear. The front is usually well adjusted from the factory. To adjust, you'll need a stand to put your rear wheel on, or an assistant to lift the bike up by the saddle so you can pedal and see how it works.
First, check if the rear derailleur requires tuning. To do this, set on the front derailleur the first (smallest star) and shift gears one by one on the back while pedaling. If the chain does not rise or fall properly on the sprockets, adjustment is required.
You need to start by adjusting the spring tension in yourself O m rear derailleur (or make sure it is set correctly from the factory). To do this, set the front and rear derailleurs to the first star (number 1 on the derailleur knobs). Those. in front it is the smaller star of the three, and in the back it is b O the smallest of seven (or eight, nine). Spin the pedals to place the chain on the correct sprockets. Now pay attention to the screws H (High) and L (Low) on the rear derailleur. H - high gears, for example, the seventh; Low - lowered, for example the first one.

Since we have set it to first gear (lower), our attention should be drawn to the screw L. Before we turn it (or maybe not at all), we need to make sure that the rear foot of the switch is exactly opposite the first star ( see photo). In the photo below, the chain is on the second star so that you can see the warp more clearly. The chain must be on the first star!

If all goes well, you're in luck! If not, turn screw L to one side or the other. You should see the switch tab begin to move slowly to the left or right. You know the task - the stars in the switch foot must lie in the same plane with the first star of the cassette. After adjusting the derailleur with screw L, set the rear and front derailleur to the last chainrings and repeat the procedure with screw H.

Now let's take a look at the chain tension. If the chain does not rise well from 7 to 1, then you need to slightly tighten the cable. If it does not go down well from 1 to 7, then the cable will be pulled, and it needs to be loosened. Necessary adjustments can be made using the adjustment wheel on the rear derailleur. Cr at turn counterclockwise - tighten the cable, clockwise - loosen. Again, don't over-twist it or the wheel will just pop out of the switch. If the desired effect could not be achieved, then you need to loosen the nut by 9 holding the cable, tighten / loosen the cable and fix it again.

The front derailleur is configured in a similar way. Only with H and L screws, the opposite is true: a small star is an L screw, a large one is H.

I hope everything worked out for you! If not, don't despair. Look for specialized articles on the Internet, or seek help from an experienced bike master. We, in turn, will try to make detailed articles for each stage. Good luck with your setup and happy travels ;)
Please leave your feedback and comments in the form of comments below. The text and photos of the article, if necessary, will be finalized.
Despite the abundance of bikes in stores and the emergence of a popular service of bike assembly to order, self-assembly is still in demand among fans. Why is she so attractive?
Creating a fundamentally new, exclusive bike is a creative process, which consists in the selection of spare parts and checking their compliance with the desired parameters. And the assembly will allow you to accurately understand all the nodes of the bike and gain good experience in technical aspects.
Assembling a bike is a delicate and painstaking task. The difficulty lies not only in the correct installation of all components, but also in the selection of all spare parts.
The main requirement for them is quality, reliability and demand. It is unlikely that with self-assembly it will come to mind to put bad brakes or some unnecessary body kit, then it’s better to go blindfolded to the store. How to plan the work, what is needed for this and how, in fact, to assemble a bicycle, will be described later.
Drawing up requirements for the bike and a plan for its assembly
Before you collect the bike yourself, you will have to decide what should happen in the end. General bike options:
- urban signalspeed;
- road or sports bike;
- mountain bike;
- hybrids.
Based on the main types, we conclude where the bike is going to be used, what speed and running performance it should have, how comfortable it will be in riding. The last parameter is especially important, it is he who pushes the cyclist to assemble the bike with his own hands.
Where to get spare parts? They can either be purchased independently or ordered. In the first case, you will have to wander through the specialized departments for quite some time in search of every detail. The second option is simpler: pre-select a model, enter your wishes into it and place an order. Of course, it is much easier to assemble a bicycle out of the box, however, it will cost more.
Basic and mandatory structural elements for a new bike:
- The frame is the body of the bike. It determines the purpose of the bike, its weight, dimensions and behavior on the road.
- The fork is the attachment point of the front wheel and steering wheel to the frame. Forks can be either rigid or shock-absorbing, it all depends on the type of bike. A mountain bike is equipped with a fork with a shock absorber, road and single speed bikes have a rigid version. The fork provides control of the bike.
- Steering wheel. The shape determines the comfort of control, fit and maneuverability. A huge range of handlebars pleases us with a variety of options: from absolutely straight to “lambs”, with and without a stem, adjustable and non-adjustable.
- Wheels. Their diameter affects the speed, amount of rolling, controllability. Tires, as an element of wheels, determine the dynamic performance, as well as the cross-country ability of the bike. Larger wheels will hold the speed better. They are sensitive to steering, but more prone to deformation. Tires, the thicker, the better they behave in off-road conditions and worse on smooth roads.
- Carriage and crank-pedal pair. It is difficult to overestimate the importance of the carriage assembly. It serves as an element for transmitting torque from the pedals to the drive star and then to the rear wheel. High-quality assembly of the bottom bracket and cranks is the key to a long ride in a wide variety of conditions.
- Cassette. This knot is available on a speed bike. It consists of a set of rear and front sprockets. A switch and a chain tensioner are connected to it.
- Saddle. Attaches to the seatpost, which is installed in the middle tube of the frame.
- Brakes. An easy and common option is v-brake. Disc brakes are more difficult to install, however, if the discs themselves are already installed on the wheels, then the installation process is much simpler. Finally, the brake in the rear hub requires no work at all other than connecting the wheel to the frame.
Bicycle working units (on the example of a hybrid)
Approximately in this sequence you will need to assemble the bike. In the work you will need tools: both ordinary keys and special devices.
Tools for work
The bottom bracket and cassette will require special tools, so let's talk about those first. To install the carriage, you will need a key called a puller. The knot is installed in the glass of the frame and then tightened with a wrench, then the connecting rods are mounted on the axle. For a square connection, you will need a connecting rod puller.
Attaching the bottom bracket and connecting rods to it is a rather troublesome business in terms of effort, since it is necessary to tighten it to the maximum. In the process of putting on the connecting rods, we make sure that one of them does not fly off, otherwise problems with periodic loss cannot be avoided later.
The cassette assembly is mounted on the rear wheel hub using a special cassette puller with a whip. Here you will also need maximum effort, the whip helps the stars not to turn when twisting.

Carriage (1) and cassette (2) pullers
Chain lock for link release and chain length adjustment. The squeeze allows you to disconnect the fastened chain anywhere. Chains, for the most part, do not have a special lock. If there is one, you can, in principle, do without squeeze. However, the chain may be too long, and this device is indispensable for removing extra links.

Circuit breaking device
Wrenches for attaching the saddle and wheels to the frame. The dimensions are selected according to the dimensions of the nuts. It is advisable to use ring wrenches. The adjustable adjustable version does not allow you to tighten the nut to the desired force, in addition, it can eat corners. It is best used for pre-rolling.
A torque wrench will be an excellent assistant during assembly. If the disassembled bike arrived in a complete set, assembly instructions will be attached to it. It will most likely contain the values \u200b\u200bof the optimal tightening torques.
In practice, these figures allow you to achieve the strongest twisting, and during operation, metal fatigue will be minimized. Also, compliance with the prescribed tightening torques will ensure the geometric integrity of all connections.
A set of screwdrivers and hex keys. These tools will be needed when installing handlebars, saddle, brakes, and canopies such as footpegs. Wire cutters are another useful tool. They are used for smooth cutting of cables. They will also need trailers and a braid.
Sequential assembly of bicycle components
At the first stage, we have a bare frame and all spare parts aside. We start by attaching to its frame. Installation is greatly simplified if the ball bearings have been placed on the fork stem beforehand.
Installing the bearing cone and cup yourself is quite problematic, you will need special equipment - a lever press. Hammering is allowed, but this must be done with the utmost care so as not to damage the fork stem itself and the walls of the head tube of the frame.
A ready-made version with a bearing assembly is preferable, here you only need to correctly insert the fork stem into the frame. It is easier to install if the frame lies down, that is, the stem enters the pipe horizontally. The right end of the head tube corresponds to the top. Holding the pipe with one hand, insert the body of the part into it with the other.
The lower and upper cones of the fork must exactly fit on the bearing balls. After that, a special washer and mustache are put on the stem, which must enter the hole in the fork rod. Using an open-end wrench or box wrench, the lock nut is tightened to the limit. The fork is ready.
A steering part is installed on top of the fork. Correctly put the steering wheel will work with the vertical position of the frame. The only inconvenience of inserting the part into the fork is the instability of the frame, so it is better to ask someone to hold the structure in advance. First, the steering wheel is tightened at half strength, then it is centered strictly in a straight direction and then it is twisted completely. You will probably need to hold the steering wheel.

Handlebar and fork on a bicycle frame
Saddle. First, the seat itself is attached to the seatpost. The shock absorber, if planned, is attached simultaneously with the seat, and not after it. The pin is lowered into the pipe and tightened with a nut (or a ready-made eccentric). Like the handlebar, the saddle needs to be centered in a straight direction.
The next stage is the installation of the carriage in the glass. Turn the frame upside down and install the carriage assembly. The finished body is inserted and fixed in the glass with a key. If the carriage is assembled from scratch with your own hands, then we carry out the following manipulations:
- lubrication of the internal cavity of the body;
- insertion of an axial part;
- lubrication and installation of bearings;
- fixing the carriage with a puller.
After the carriage, we take a short break and install the tires on the wheel rims. First, a flipper is put on the inner surface - a protective rubber fabric from punctures of the chamber by the bases of the spokes. The flipper hole should line up with the nipple hole. A deflated chamber is carefully inserted into the rim, the nipple is threaded into the hole, and a tire is placed on top.
When installing a tire, it is necessary to follow the direction of the tread pattern. It must match the direction of the bike. Special mounts or plastic spatulas can help in installing tires. Do not forget to pump up the chambers to the desired pressure!
A cassette is put on the rear wheel hub. Its upper stars are in a free state, therefore, when inserting a node, we do not turn it over so as not to lose any asterisk. The cassette is mounted on the side of the leading front star (stars) and is tightened with force by a puller.
When working, it is necessary to hold the wheel, and also use a whip to fix the stars of the cassette. After installing it, a chain is thrown over the large star, the rear wheel is inserted into the dropouts, and the other end of the chain is pulled to the front stars. With the help of a squeeze, the chain is fastened, and the wheel is twisted on the dropouts. By analogy, we put the front wheel on the fork.

Working with carriage and cassette in pictures
The cassette is connected to the speed switch. If the bike also has a front derailleur, then, accordingly, it is connected to the chainring system. Through the cables, shifters are connected to them, which are mounted on the steering wheel. Cables with the help of clamps are neatly fixed on the frame pipes.
Assemble and install V-brakes:
- put the claws of the front and rear brakes on the steering wheel;
- attach the pads to the clamping mechanism;
- release the brakes and fasten to the fork and the rear of the frame, respectively;
- connect the claws and clamping mechanisms using cables;
- adjust the length of the cables and the position of the blocks.
Details on adjusting V-brakes:
The new assembled bike is ready for test rides. Testing is a mandatory procedure after assembly, which will show where and what needs to be fixed. Particular attention should be paid to the build quality of the fork and handlebar, bottom bracket and brakes. We also check how accurately the gears shift, whether the chain jumps off.
Assembling a bike is fun, rewarding, and, as it turns out, not too long. A self-made bike will allow you to feel comfortable on trips, it is fully maintainable, unpretentious and has the required running parameters.
Good day to all!
Looking forward to the future, we bought a tricycle for our Kinder in the winter. And winter, as you know, is not the season for such equipment, so the store gave it away with a good discount. The usual price is 6-7 thousand. We bought it for 3500. For several months, the disassembled bike lay in a box and waited in the wings. And at the beginning of spring I got it to collect. By this time, the child had just grown up and the bike was supposed to come at the right time.
Trike Power Neon bike model. Green color.
From the tools you will need open-end wrenches or heads for 10, 13 and 17. A hexagon, it comes with the kit.
Bicycle in a box. Assembly start.

For convenience, I laid out all the details from the box on the floor.

The young assistant was already interested and joined the process :)

Assembly starts with a fork. You need to insert a shiny wing into it and fix it with a screw. For orientation: the eyelet with the hole and the plastic cover must be on the left.

The wing front and back has different lengths. The short side should be installed in front, the long side in the back.


We shift the plastic cover and iron bushings to the center.

We insert the plug into the bushings and tighten the screws.

The right pedal is labeled "R". So it should look like this: an eye with a hole for traction on the right, a short part of the wing in front, a pedal with the letter "R" on the right.

Let's move on to the back. We take the rear wheels and iron guides.

You need to put plastic gears on the wheels. Thanks to them, the bike will have brakes. In this case, the nipples should be out.

We find in the kit such black bushings with red pedals. It is also part of the braking system.

We dress them from the outside to the stop. First you need to remove the plugs from the pipes.

We put the wheel on the frame with the help of guides.

We twist the guides with a hexagon. It is not necessary to the stop, but so that the wheel can rotate freely.

This is what the rear axle looks like assembled.


We remove a small plug from the eye on the frame. We remove the side plugs from the footrest by unscrewing the central screw.

Insert the footboard into the eyelet. You also need to insert a metal pin for intermediate fixings of the footrest. We put on the side plugs and screw in the central screw.

We proceed to the installation of guides for the roof. It is attached to the frame with three bolts.

One bolt at the bottom. Two bolts on the back.

We insert from below the guide for the control knob. For orientation: it has an eye for traction. When installed, it should be on the right. The guide simply snaps into two latches.

A slingshot for the handle is inserted into the guide. Fixed with a lever.

And finally, we set the parent handle. Fixed with two fasteners. Two positions are possible - short and long positions.

Installing the chair. Attaches with two screws.

Intermediate testing :)

Install the steering wheel. The tie bolt must be on the side of the notch, otherwise the handlebar will not tighten. The photo is not correct, the latch must be rotated 180.

Installing the luggage rack.

Attaches with just one bolt.

Here is the trunk assembled.

On the right side we fasten the control rod. One end to the fork, the other to the guide.

The pull length can be changed. This is necessary to align the front wheel and parent handle with respect to each other.

We install the roof. It is necessary to insert the legs into the guide and tighten the bolts, one on each side. We also install the front support arcs.

The final test was a success!
That's all and good luck to everyone!
Suppose you bought a bicycle, but disassembled. And on the floor in front of you lies a box filled with all sorts of parts and spare parts. It remains only to assemble the unit and, without wasting time, go for a ride to the nearest park.
No problem! Now we will tell you how to save on the services of a bike master and handle the assembly yourself!
To assemble the bike, you will need the following tools: cable cutters, bike stand, set of hex keys, screwdriver, 15mm pedal wrench.
Step #1
We release the bike from the factory packaging.
Step #2
It is recommended to use wire cutters to cut the plapic clamps. In a small box there are all the small items (eccentric, reflectors and pedals), as well as a passport for the bike.
Step #3
We start assembling the bike from the front. Carefully unscrew the take-out cover. We install the steering wheel exactly in the middle (at risks). We twist the bolts in turn, cross to cross.
Step #4
Now you need to install the front wheel. We insert the eccentric (clamp) so that the foot is on the left, and the springs are on both sides of the sleeve.
Step #5
Tighten the eccentric with medium force. Then we extend the steering glass. We check that it does not hang out, but at the same time spins freely.
Step #7
The next step is to install the brake caliper (braking machines). First, install the adapter on the left leg of the fork (if necessary).
Step #8
Next, install the caliper itself. It is important to center it relative to the brake disc. Next, we fasten the hydraulic line to the fork, in order to prevent it from falling into the wheel.
Step #11
Screw on the pedals. After that, you need to adjust the speed switches. We install the chain on the smallest star in front and the largest in the back. By turning the screw L (Low), we set the position of the frame so that the chain is as close as possible to the inner plate and at the same time, when pedaling, it does not touch the frame. Then we transfer the chain to the largest front and smallest rear sprocket. By turning the screw H (High), we set the position of the frame so that the chain is as close as possible to the outer plate and at the same time does not touch the frame.
Step #12
Set the height switch. The switch foot should be at a height of 2-3 mm from the chain. Next, remove the sticker with a hint and switch paws. The chain should move from one sprocket to the next smoothly and quickly, without hitting the derailleur ring. The tension of the cable is adjusted on the shifter (a device for switching speeds on the steering wheel).


