Do-it-yourself quick clamp. How to make clamps from wood, plywood, metal Homemade clamps for carpentry
Anyone who has had to make something with their own hands in the direction of improving their own home, there is no need to talk about the importance of various clamps and clamps. Without their presence, it is impossible to imagine both carpentry and metalwork. To process any detail with high quality, a clamp is needed. With your own hands, it is quite possible to make it at home with the help of the most elementary tools.
Types and types of clamps
Mechanical clamping devices differ both in purpose and in the material from which they are made. The main raw materials are wooden beams.
Sometimes clamps are assembled with a rather complex spatial configuration: they provide both horizontal and vertical compression of the workpiece being processed. For assembly, when constant control of the right angle is necessary, the angular clamp is very convenient. It is quite possible to make it with your own hands, but it is better to practice on less complex structures.
Clamps also differ in the type of elements that create mechanical compression. The most common are clamps based on a screw mechanism. But anything that can provide the necessary compressive force can be suitable for the design. Up to cut from old automobile chambers.
Why not just buy them?
In any tool store, clamps are presented in a more or less wide range. And any master has a sufficient number of them in his arsenal. What usually stops a craftsman from buying another one? Firstly, the price - a quality instrument cannot be cheap by definition. Secondly, it is not always possible to find what you need. A do-it-yourself clamp, made for a specific task, ensures the process of assembling the product on an individual basis. With the help of a universal clamp from a tool store, this can not always be achieved.

Disadvantages of a standard tool
On the construction market, you can find a lot of clamps that look like real ones and are expensive, but they only work for a very short time. They are usually made in China. They will have to be thrown away after the money that was paid for them. Most often it fails, it is made of a cheap low-quality alloy. If there is no desire to throw money away, then you should think about how to make a clamp with your own hands. The result of this will be not only one more useful thing in the tool arsenal of the master, but also an increased level of qualification and self-respect.
Do-it-yourself clamp: what is needed for its manufacture

First of all, it is necessary to acquire a high-quality hardwood timber or a piece of a metal rolled profile (preferably a channel section) - this is the basis on which the stop and the screw mechanism should be mounted. It is he who is the most important element of the clamp. A bolt with a large thread profile nut is best suited. To assemble the structure into a single whole, you will need a drill with nozzles and standard bolted fasteners. Making clamps with your own hands does not require outstanding qualifications, but you should still have elementary carpentry and locksmith skills.
Making a clamp
The most important advantage of a homemade clamp is its narrow focus on providing a specific technological operation. That is why it is necessary to carefully measure everything and sketch out a schematic drawing of the future product. A do-it-yourself clamp can and should last a very long time, but this will only happen if it is correctly designed and correctly assembled.

An emphasis and a screw mechanism must be mounted on the supporting bed bar. The free play of the screw provides sufficient compressive force. The fastening of the stop and the screw with the nut must prevent them from being pulled out of the fixed position when the technological force is applied. An important point is the presence of a flywheel mounted on the head of the process screw. If it is not foreseen and not performed, then the clamp will have to be compressed with the help of which is neither productive nor functional.
In order to be able to use the clamp in as many operations as possible, the emphasis on it is usually made in the form of a removable block that can be placed in several fixed positions. For the assembly of large wooden planes, it makes sense to construct a more complex clamp in the form of a system of two or more screws mounted on one bed base. The efforts invested in the manufacture of a technological tool always give the proper return when using it.
Simple and functional handmade f-clamps will become indispensable helpers in your workshop and will allow you to save a lot of money on expensive clamps, which, as you know, do not exist in many. The cam-type quick-clamp is optimal for situations where high clamping forces are not required: gluing narrow or small parts, edges, fixing workpieces, etc.
The cam clamp works on the principle of the classic f-shaped clamp. It consists of a guide rail and two jaws: movable and fixed. By fixing the workpiece in the jaws and turning the cam 90°, the tool will provide a strong and secure clamping. It will not be difficult to make a homemade clamp with your own hands at home, with a minimum of tools and consumables.


The proposed clamp drawing and detailing are a baseline. The design of the product is such that you can not go in cycles in materials and dimensions, changing them to suit your needs. The tire can be made from both metal and wood. You can also vary the length and width of the jaws to increase the grip depth of the clamp. Rivets or small bolts may be used instead of metal pins. The movable and fixed jaws are a mirror image of each other, so it is convenient to produce these parts in series, several pieces at once.

Having made a set of clamps and plain wooden stops shown in the photo with your own hands, you will get an effective corner clamp, which will become an indispensable tool for gluing ideal frames.
In the process of woodworking, in most cases, a joiner's clamp is indispensable. Whether it is necessary to glue wooden blanks, fix a sheet, board, slab during cutting - a clamp will definitely be needed. There are similar products on sale, but, according to experienced craftsmen, they are characterized by two significant drawbacks - limited size and low strength, since soft metals (alloys) are mainly used for their production in order to reduce costs.
Those who have to work with wood quite often prefer homemade carpentry clamps. How to make such a device with your own hands, what to pay attention to and take into account - this is described in the article.
There are many modifications of carpentry clamps - angular, G-shaped, edge, universal. Some are used for permanent work with various blanks (by area, thickness), others are made for a specific technological operation (for one-time use).
The author considers it appropriate to dwell only on those that are most often used by "home craftsmen". If the principle of their functioning becomes clear, then with your own hands you will be able to make any kind of carpentry clamp, according to your own requests. Unless, of course, "turn on" the fantasy and think carefully.

The author deliberately does not indicate the linear dimensions of the clamps. One of the advantages of their self-production is the possibility of arbitrary choice of the shape and dimensions of carpentry clamps. There is no standard for such devices. And it is hardly advisable for a person who is accustomed (and knows how) to do everything with his own hands to “chew” elementary things. The main thing is to give an idea, to “suggest an idea”, and everything else is at your own discretion.
Option number 1
The simplest modification of the clamp. It is done quite quickly, but the use of such a joiner's clamp is somewhat limited. Although in most cases, when working with small-sized samples, it is quite enough.
The frame of a hacksaw for metal is taken as the basis of the device. The fastening elements of the canvas are replaced by long threaded rods, at one end of which there is an iron “patch” (as an option, a nut), at the other, either a removable handle or a head for an open-end wrench.

Since the frame can be adjusted in length, such a clamp will allow you to fix workpieces of various thicknesses. It is mainly used when gluing parts (), since the body of the fixture itself cannot be fixed on any surface. The only thing to consider is that if the frame is collapsible (the old modification of the “hacksaw”), then you will have to put a “tire” at the bend (for example, wrap it with adhesive tape). In operation, such a clamp is not entirely convenient, but in the absence of something more suitable, it is a good solution to the problem.
Option number 2
Also a fairly simple clamp model. It is done by hand relatively quickly. The device of the device is clear from the figure. All you need is a metal corner and a couple of long screws or threaded rods.

If you make several of these clamps, then with their help it will be possible to perform various carpentry work. For example, glue long workpieces. To do this, it is enough to set the clamps at a certain interval, and lay metal strips or slats of hardwood between the stops and the workpiece. Alternatively, fix the assembly on a workbench. The same applies to cutting blanks.
Before sawing, they are fixed on the tabletop, and their immobility will be guaranteed. This design can be modified by welding metal plates to the corners. This significantly increases the clamping area.

In fact, for domestic use, such a modification of a joiner's clamp is one of the best. Experienced craftsmen always have a ready-made set of several devices with different dimensions at hand. Depending on the specifics of the work, you may need a clamping device from a corner either 25 or 45.
The versatility of such a modification is that it is made of metal, therefore, it is characterized by sufficient strength. Unlike wooden clamps, here you can adjust the clamping force in a wide range, and work not only with wood, but also with other materials - glass, plastics, "iron". What in everyday life and often have to do.
This design can be somewhat modified. For example, when processing logs at a mini-sawmill (cutting into boards, sawing), they must also be fixed. In this case, an improved modification of such a carpentry clamp is suitable. It is enough to take strip iron as its basis, at the ends of which to weld the same corners.
Varieties and modifications
Here are a few more types of carpentry clamps. All these clamps are easy to assemble with your own hands.


The question is different - how expedient is it to use wood as a starting material? There are arguments both for and against. But if a tree is chosen for the base of a joiner's clamp, then it must meet certain criteria.
- The breed is only hard (pear, oak, walnut and the like). Otherwise, there is no need to talk about any clamping force. And the durability of the clamp of their “soft” wood raises certain doubts.
- Humidity is minimal. Only after high-quality drying of the material can it be used for the manufacture of clamping parts.
Good luck, reader, in making your own clamp. Do not be afraid to fantasize, and everything will work out for you!
A clamp is a universal tool that no master can do without. On the market, the cost of such a device is quite high, so a do-it-yourself clamp will be the best option for working with wood and metal. The manufacturing process does not require a lot of materials and financial costs.
Varieties and principles of work
There are two main types of clamps: for carpentry and metal work. It is possible to use metal clamps to work with wood, but you will always have to put gaskets under the sponges, otherwise the product will be damaged. In carpentry, it is quite common to use corner clamps - whether it is tightening two frames, where an important aspect is to maintain an angle of 90 degrees, or assembling entrance and interior doors. When gluing the main frame of the door, clamps are indispensable. On the Internet you can find a wide variety of options for making clamps with your own hands, drawings are also present. Here are the most common options.
A drawing of a homemade carpentry clamp is shown in the figure.
For assembly, you need: stops, block clamps, movable blocks and planks, which can be made from 3/4 plywood, and the top and bottom can be made from 1.2 mm thick plywood. The angle clamp is fairly easy to assemble, and the plywood won't scratch wood, plastic, or other surfaces. The material will need quite a bit, which significantly reduces the price of the product. The carpentry version of a homemade clamp is simple in design and provides good compression of the parts together. You can make a tool from improvised materials:
- Two bars 4-5 cm thick, the length can be selected depending on the tasks.
- Two furniture nuts.
- Two pins.
- Wing nuts for studs.
 The bars need to be shaped like a kind of ticks. This can be done with a jigsaw or a regular wood saw. Then the bars lean against each other, and two holes are drilled in them. The studs are screwed into furniture nuts and locked. The compression of two wooden planks occurs with the help of lambs. The cheeks of the product must be made of soft wood - in order not to damage the surface during compression.
Tape clamps are very popular among carpenters. They can be used to compress large objects. The manufacturing sequence is as follows.

This look provides strong compression, and assembly material is sure to be found in every workshop.
Making an angle clamp
 Angle clamp is also widely used for welding work. Almost any work with welding involves connecting parts at a certain angle and keeping them stationary. When a welder welds, he has a holder with an electrode in one hand, and a mask in the other, so angled clamps will greatly simplify the work with the product. In stores, the price of such devices can reach 2 thousand rubles. and more.
Therefore, the best option would be to make a metal clamp with your own hands. This will not only save money, but also allow you to make a tool of any size and add some changes to the design. The drawings of the corner clamp are shown in the figure.
To do this, you need: strips of metal 8-10 mm thick. To fix metal elements, you need to take a corner 40 by 40 mm or 50 by 50 mm. The corners can be fastened together by bolting or simply welded, which will provide them with the necessary rigidity. For a clamping device, 3-4 nuts need to be welded together, but the best option would be to make a bracket with a threaded hole 30-40 mm thick. To move the clamping mechanism, it is necessary to make guides. Using a drill, drill a hole, insert a bolt into it and tighten it with a nut.
The next modification is simple, but the finished tool must be fixed on a workbench - for convenience. The clamp consists of two corners and two strips from sheet metal. For a quick-clamping design, you will need two corners 70 by 70 or 50 by 50, depending on the dimensions of the metal. If the metal is large, then it is advisable to take more corners. You will also need 2 steel studs that will act as clamps, 6 nuts and 2 or more sheet metal plates.
Weld two corners together at 90 degrees, the distance between them can be reinforced with metal strips or the same corners. Now in the middle of each corner you need to weld one bracket.
Next, you should cut the thread or simply drill a hole and weld a nut into which a stud will be screwed, fixing the workpiece. At the end of the stud, weld the nuts, having previously welded them together.
Tubular construction
 Professional or amateur welders quite often have to work with different pipe diameters. To weld two pipes, the two pipes must be matched exactly. With their help, you can not only save time, but also quickly set the alignment of the pipes and make tacks. There is a large selection of clamps of this type in hardware stores, but, as a rule, such products are rather weak, and those that are of good quality cost a lot of money.
Therefore, the best option would be to make them yourself. On the farm, it is desirable to have several types of clamps, depending on the diameter of the pipes. For the manufacture of the first option, you will need two pieces of a U-shaped profile, two nuts and two bolts.
Manufacturing sequence:
- Saw off two pieces of U-shaped profile about 20-40 cm and weld them at an angle of 90 degrees, as shown in the figure.
- In order not to cut the threads in the holes, you can simply weld a nut on top of the hole.
- The width of the profile can be chosen depending on the diameter of the pipe with which the work will be carried out, and bolts and nuts will certainly be found in every workshop.
The design is quite simple and does not require special skills for the manufacture. The same option can be made for butt-butt welding of pipes: for this you need to take a U-shaped straight profile from 1 m to 2 m long, screw it to a workbench and make similar clamps that were in the previous version.
Universal option
If you have to weld pipes at different angles, then this option will be preferable. For manufacturing, you will need 2 corners 70 mm by 70 mm, 2 strips of thick metal 7-10 mm (possibly thicker) 3 M17 bolts and 5 nuts.

Cut the ends of the slats at 45 degrees, then weld to the corners. Pre-drill holes at the ends of the slats and fasten them with a bolt. As shown in the picture, weld pieces of corners with a width of 5 to 7 cm to the main corners.
Then drill holes in pieces of corners and weld one nut on each side. This design of clamps is good because it is possible to weld pipes at any angle, it is enough to unscrew the nut on the bars and set the desired angle, and the bolts that are screwed into the clamps from above will provide reliable fastening of the pipe. Such a design can be clamped in a vice that is available in every workshop, after setting the angle. If it is necessary to weld pipes with a large diameter, then the corners are taken thicker.
Quick clamp method
If a conventional screw clamp needs to be twisted and wasted time, then a quick-clamp will be able to press two surfaces very quickly. Required items:
- Plywood 3 or 4 mm.
- Springs (the harder the springs are used, the stronger the pressure will be).
- A small piece of plywood 1.5 or 2 mm, for making templates.
To begin with, cut out the finished parts according to the templates. Then, in the workpiece number 1, make cutouts with a manual router.
The next step is to prepare the steel bar along which the moving part will move. It can be cut from sheet metal with a thickness of 5-7 mm.
Then assemble the mechanism itself, for this you will need springs and two steel strips with slots in the middle, which can be cut quite easily with a grinder. Assemble the mechanism as shown in Fig. 10.
Insert the trigger and place the second half of the part on top. Drill holes and fasten the two halves together. Fabricate fixed jaws from sheet metal as shown in fig. eleven.
 Weld the fixed part of the sponges onto a pre-prepared bar 50 cm long and 3 cm wide. Wooden tips must be made on the sponges themselves in order not to scratch the product during clamping.
All wood parts can be impregnated with superglue to increase tool life. The final version looks like this:
This type of clamp is very convenient and allows you to compress fairly large parts together, and the compression force can reach up to 400 kg.
Thus, clamps of various types are suitable for fixing various parts in a stationary state and during welding, which will make work more comfortable.
Experienced furniture makers, carpenters, plumbers rightly believe that a clamp is no less important tool than a comfortable workbench, a well-balanced planer or a set of razor-sharp Swedish steel chisels. The device can be bought, rented, but it is best to make a clamp with your own hands. In this case, there will be confidence that a simple device will not let you down at the most crucial moment.
The essence of the clamp device
Structurally, a clamp is the simplest device that allows you to press a part, a workpiece, several components into one whole for installing fasteners - self-tapping screws, bolts with nuts, rivets, or while the glue dries.
To the device of the clamp, regardless of the design, material and size of the fixture, two basic requirements are imposed:
- The frame of the clamp must not deform under load, the rigidity of the frame of the fixture must be sufficient to keep the clamping jaws parallel to the plane;
- The design of the clamping screw should provide adjustable and smooth pressing of the movable clamp support on the fixed surface.
There are a fairly large number of various clamp schemes, and although the device of any clamp is essentially primitive, no one is trying to make a universal design that could be used in any situation. The device turns out to be very heavy, uncomfortable and difficult to use.
Therefore, the dimensions and scheme of the fixture are selected based on the dimensions of the parts to be joined and the required pressing force. Conventionally, clamps are divided into three large groups:
- Carpentry and furniture bar clamps, they are trying to be made from hardwood and metal;
- Mounting clamps of high rigidity;
- Locksmith resistant clamps.
In addition to classic ruler clamps, custom-made clamps of non-standard schemes are widely used, most of them are made for one or two operations of increased complexity.

For example, drilling in an array of several boards to a great depth, cutting or gluing a beam in a figured way at a right or non-standard angle, welding parts of a complex configuration. There are more than enough options, the best way to ensure the highest quality connection is still to make a clamp of the right size and shape.

DIY wooden universal clamp
The easiest way is to make a clamp from a wooden plank and timber. Wood is a fairly democratic material, therefore, if you mark up the parts correctly and use the proper tools, you can make a clamp of any level of complexity without much effort.
To make a wooden clamp, you will need the following tools and fixtures:
- Desktop drilling machine with a power of 400-500 W for drills from 1-15 mm. The vertical stroke of the drill chuck must be at least 120 mm;
- Electric grinding wheel. It can be made independently, for this, instead of an abrasive stone, a circle of plywood is installed on an electric grinder, 10 mm thick and 350 mm in diameter, on which sandpaper sheets are glued on both sides;
- Hand-held circular saw for wood with a blade diameter of at least 150 mm. You can use a grinder or a band saw.
All other operations can be done with a hand tool. Of course, you can also drill holes and cut grooves with a hand drill and a hacksaw, but it will be very difficult to achieve the required quality and manufacturing accuracy using hand tools.

Classic F Clamp
The design of the simplest wooden clamp looks like the Latin letter F. The vertical and upper horizontal bars are one piece - a fixed guide connected by an emphasis of one of the jaws. The central bridge of the letter F is the movable or reciprocal part of the jaws, which is driven by a lead screw. The third part of the clamp with a drive screw is made in a removable version. The clamp can be moved along the length of the guide bar, the distance between the jaws can be made smaller or larger, as far as the length of the base rail allows.
The general view of the clamp is shown in the photo.

First you need to make a guide rail. For these purposes, larch or spruce board is suitable. All other parts of the clamp can be made from any wood, except for soft varieties - poplar, linden, birch.

Important! For the manufacture of any fixtures and accessories, only defect-free wood is used. If there is none, then it is best to make a clamp from ordinary plywood 15-20 mm thick.

The base bar is cut along the length of the future fixture. The supporting fixed part of the jaws of the clamp bears the lion's share of the load, so it is best to make the guide from the strongest wood or use a little trick.
A semicircular groove is cut along the side end of the rail, into which a steel bar with a diameter of 8-10 mm is placed. On the one hand, the end is bent around the end, at the other end, the rod is connected to a fixed sponge with a nut screwed onto a pre-cut thread.

The fixed part of the jaws is glued to the guide bar with carpentry glue, after the glue has dried, the supporting surface is carefully cut at an angle of 90 ° to the guide bar. This part can be made glued, or a mounting groove can be cut with a hand-held circular saw.
The reciprocal or movable part of the jaws is cut out together with the support for the screw from one bar. Next, in both blanks, you need to make U-shaped cuts, allowing you to put the parts on the guide bar. After removing the burr, the workpiece is installed in a package in a drilling machine and a hole is drilled for the lead screw.
If a sufficiently intensive use of the clamp is expected, then a brass tube must be pressed into the hole for the screw, and a plain bearing must be made. Otherwise, the lead screw will quickly break the hole by 2-5 mm, which will make the tool unsuitable for work.

Clamp assembled from wood and steel
It is convenient to work with a wooden clamp if you need to make a small pressure to fix a package of several planks or glue two parts together. If it is planned to process a beam or board with a carpentry tool, planer or grinder, then it is best to make a clamp for fixing the material with a metal guide.

The process of making a clamp from wood and steel is as follows:

It remains to assemble the clamp, the rearranged part is drilled under the fixing bolt, a bolt or stud is installed and tightened with a nut. At the end of the assembly, two or three idle runs should be made to upset the walls and facilitate the rotation of the screw.
Wooden clamp for fixing and screed sets
In 40% of cases, work in a carpentry or furniture workshop requires the use of long clamps to tighten whole sets or packages of planks, form furniture panels, tabletops and door leaf. The manufacturing process of clamps for the needs of the screed is practically no different from the usual wooden F-shaped fixture.

Unlike other fixture schemes, the screed clamp is made of massive timber, with a section of 50x50 mm and a length of at least 100 cm.
In addition, three blocks of oak or beech are required in order to make a fixed support with a lead screw and two parts of the jaws - rearranged and movable.

On the reciprocal rearranged support, an installation groove is cut and a hole is drilled into which a nut is pressed under the mounting bolt. The distance between the supports can be made larger or smaller if the sponge is moved to the next hole and fixed with a bolt.

Wooden clip from hanger parts
A small device, very reminiscent of a tightening type of clamps, can easily be made from ordinary suit hangers. The wooden base of the hanger is made of two identical halves of a trapezoidal shape.
First of all, to make a clip from a hanger, you need to fold the two halves of the hangers into one bag and clamp it in the vice of a drilling machine.
Without opening the machine vise, you will need to make four holes with a diameter of 8 mm. Two blanks are obtained, each of which has a pair of through holes. It remains to make a clamp, for this it is necessary to cut off two studs with an M8 thread, each 25 cm long. Studs can be glued into one of the halves or make a symmetrical version, as in the photo.

From the clamp, you can make a fixing device for gluing boards, holding pipes, or pulling together a package of several planks.
Fast C-clamp for wood
In addition to the classic options for carpentry clamps and clamps, when working with furniture and wood materials, you have to use small-sized clamps. One of these devices is a C-shaped clamp made of wood, photo.

Before making a clamp, you need to find a suitable wood blank. C-clamps require very strong wood, so acacia, elm or steppe oak are used for manufacturing. The U-shaped body is cut out with a grinder. With a total body size of 100x100 mm, the width of the sidewalls must be at least 2.5 cm.
In one of the sidewalls, you need to make a through hole with a diameter of 12 mm, into which two steel nuts, M8 or M6, are pressed. The easiest way is to screw the nuts onto the threaded rod, grease with glue and insert into the hole. It is necessary to make several gentle blows with a mallet so that the nuts with a slight interference fit into the through hole. It remains to make a handle, and the C-shaped clamp is ready.
Do-it-yourself metal clamp
Most metalwork and carpentry clamps are made of metal, most often steel or aluminum alloys, there are only two reasons for such selectivity:
- High strength of metal parts;
- Long service life even under heavy load.
To make metal clamps, you will need welding equipment, a grinder and a regular electric drill and a jigsaw.
Long clamp
It would be most logical to make a clamp in which the guide rail or plank of wood is replaced by a square profile pipe. A meter clamp can be made from a 20x20 mm square, for a two-meter one you need a 30x30 mm profile. The use of a tubular square profile allows you to make the structure very rigid without “toffees” and shrinkage, as is the case with lumber.

The easiest way is to make a long clamp according to the classical scheme. Stationary, movable and adjustable parts are made of thick plywood.

Each part consists of two halves, which are cut with a jigsaw and bolted together on a long square tube. The lead screw can be made from two parts of a threaded stud and a regular piece of reinforcement.
Homemade welded rebar clamp
Instead of wood, you can use a regular reinforcing bar with a cross section of 8-10 mm. To make a clamp body from reinforcement, you will need to cut two blanks 65 and 55 cm long. The bars are heated on a blowtorch and bent on a steel mandrel at a right angle according to the drawing.

The bent blanks are welded into one L-shaped structure, the spout and the linear sections of the reinforcement are necessarily connected by a welding seam.
The next step is to make a stand for the lead screw from a segment of 20 cm, to which a nut is welded. If the clamping force on the clamp is more than 50 kg, then the rack can be made bent or strengthened with an additional brace.
Homemade G-Clamp
The G-body design is also called a screw press for the tremendous force that can be obtained with a lead screw. Making a G-shaped clamp is quite simple. To do this, it is necessary to cut the workpiece of the body of thick metal with a grinder, at least 7-8 mm thick.

The body is welded with the letter P. On the top shelf, you need to make a hole for the nut, then screw it onto the lead screw and install it in place of welding. A small piece of metal is placed on the bottom shelf - a table, which is pressed with an unscrewed screw. You only need to make a few welding points or seams to weld the table and nut, and the clamp is ready.
Wooden spacer for metal clamp support
An important part of any clamp is the lining that is installed under the supporting surfaces of the clamp. This is done to achieve two goals:
- Prevent damage to the part clamped by the clamp, since in metal fixtures the clamping pressure can easily reach several hundred kilograms;
- Uniformly transfer and distribute the force from the lead screw to the surface of the furniture board or fixed part.
It is best to make a gasket from ordinary birch plywood or softwood with a rough surface.
Clamp for winding the wire on the mandrel
A very difficult task is considered to be a reliable fixation of steel wire on a round workpiece, for example, a rubber pipe or a fitting head. Structurally, such a device consists of a double body and a winding pin.

The wire is wrapped around the pipe and hooked on a pin with a bolt head. For 2-3 turns with a key, the wound one-and-a-half loop is pulled to the desired state. It remains to twist the wire on the hose into several turns by turning the body and cut off its ends.
Do-it-yourself angle clamps
The use of specialized clamps today remains the only possible way to assemble any rectangular or square structures made of wood and metal with an ideally set right angle.
For example, a system of ready-made triangles that cover the planes of the joining sides and firmly hold them in the desired position until the fasteners are installed or welding is completed.
Clamp universal for any angle
A right angle, as a rule, is not a particular problem when working with clamps, it is much more difficult to make an angle of arbitrary size. To solve such problems, you need to make a fixture for the clamp, as in the photo.

The additional device is based on an ordinary pine block with a right angle sector cut in the center. The second part is the usual right-angled triangle, which can be made from spruce or pine slats.
A through hole is drilled at the top of the corner of the sector, with a diameter of 5-6 mm. It is the hole that allows the triangle to swing and change the angle of inclination of the clamp by 3-7 o.
Angle Steel Assembly Clamp
Connecting two parts at a right angle is much easier if you fix them in an angled clamp. In the simplest case, the device consists of two guides made of a cut profile pipe or a steel corner.
The guides must be set using a square at an angle of 90 ° and connected with additional sheet metal overlays.

To ensure that the workpieces do not fall out of the fixture during operation, two G-shaped clamps are additionally installed on each of the guides.
Do-it-yourself quick-clamp clamp
Sometimes when working with wood, clamps are required, with which you can fix or tack the part to the desktop or place in just a few seconds.
In order to make a quick clamp, you will need wooden boards or plywood 16-18 mm thick. Initially, the tracing paper of the details is transferred to the tree and cut out using an electric jigsaw. In the driven parts, it will be necessary to make cuts for the entry of the counterpart.

At the marked points of the axes, you need to make holes with a diameter of 20 mm.
Hinge axles are cut out of a round billet, ground and pressed into holes. It turns out the design of the clamp, somewhat reminiscent of scissors. The drive uses a standard lead screw with a diameter of 6 mm.
Clip for holding and fixing small parts
In a similar way, you can make a clamp for fixing especially small parts. You will first need to mark and cut out two halves of a device similar to tweezers or a medical clip from OSB or plywood.

The crescent-shaped blanks are interconnected using a wooden axis, so a hole of the appropriate diameter must be made in each of the parts of the clamp. For the body of the clamp, you can use ash or spruce, the axis must be made of a harder material - oak or beech.
Clamp made of rebar and wood
Using a reinforcing bar with a length of 50-60 cm and a diameter of 8 mm, you can make a very strong and at the same time lightweight frame for universal use.

The structure is based on a solid wood support block. The dimensions of the block are 150x50x30mm. Dimensions may vary depending on the thickness and bending radius of the reinforcing bar. A hook from a piece of rebar can be bent with a heavy hammer on a steel pipe. The bend must be made so that the bent reinforcement is flat.
Tape universal clamp
One of the most interesting unusual clamp designs uses a thick polyester fabric belt as a strength element. A band clamp is used where it is necessary to evenly tighten several parts.

To make a tape clamp, you need to make corner elements and a device for tensioning a polyester belt. Three corners are cut out of ordinary pine on a printed tracing paper. The fourth element - the tensioner is made of two blocks and a tension screw.
The tape is passed around the block, if you unscrew the screw with a wrench, the distance between the blocks increases, and the belt of the device is tightened, pressing all four blocks to the part.
Cam fast clamps
Often, a part or workpiece in a clamp must be fixed quickly, and the clamp must be made without unnecessary movements. For example, when drying or painting a batch of panels or frames. For these purposes, it is best to make a specialized device with cam clamps, photo.

The difference of this device lies in the fact that instead of the traditional lead screw, plywood eccentrics are installed on the vertical jaws of the clamp.
To do this, on wooden racks, you must first make a cut along the thickness of the eccentric.

Telescopic folding clamp
The idea of a telescopic clamping device is based on a set of pipes that fit into each other with a minimum gap, like a folding fishing rod, and a set of ring clamps with a screw lock.
A ring is cut off from each pipe, to which a piece of metal with threaded threads is welded. A wrapped screw or bolt fixes the pipe located inside, which allows the entire structure to be clamped into one extended rod.
Mounting universal clamps
In addition to clamps, two-shelf universal clamps are widely used to fix glued parts of complex configuration, photo.

The idea of a clamp is borrowed from a bookbinding press, the dimensions and number of clamps are selected depending on the size of the part.
4-Way Poly Clamps for Wooden Panels
The lack of reliable fixation remains one of the problems that one has to face when assembling and gluing a shield from several wide and flat strips. It will not work to make an assembly even from five or six glued planks and pull the material with ordinary long clamps; with the slightest increase in effort, the shield arches.
The solution to the problem will be a fixture with four clamps, photo.

The panel is fixed with two pairs of clips. At the ends of each pair, you need to make a cross-shaped clamp from a nut and metal plates. At the opposite end of the mount, a height-adjustable hinge is installed. The lead screw of each clamp rests against a wooden lining. It is enough to make a few turns of the screw so that a pair of bars firmly compress the parts to be glued.
Clamping box for workbench mounting
If there is no special mounting lodgement, it is not so easy to fix parts of a complex configuration on a flat surface of a workbench. In this case, for processing a wooden part of a complex spatial structure, it is best to make a clamping box.

Making the design is quite simple:
- A box-shaped frame is assembled from plywood;
- Two beams are sewn along the long sides of the box, best made from pine, with a section of 50x50 mm;
- A number of mounting crossbars are stuffed from the same material.

The box allows, with the help of clamps, to ensure the retention of any, the most complex part. If it is planned to use powerful power tools for its processing, a clamp or clamp must also be made for the box-shaped base, fixing the fixture on the table.
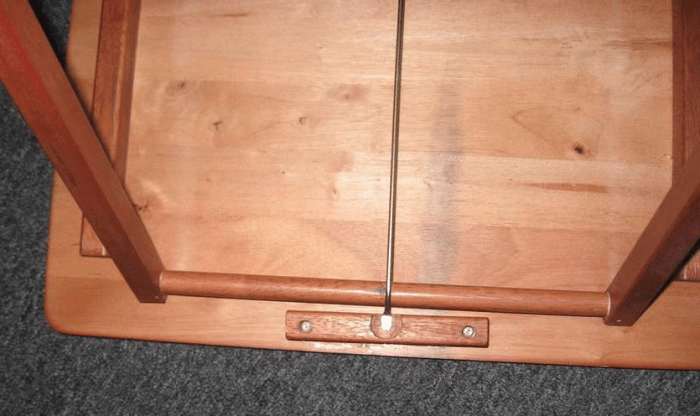
Homemade coffee table clip
A serious problem of all wooden magazine-type tables has been and remains the low lateral rigidity of the frame, even without a load, the table top often has a small but extremely unpleasant backlash.
You can fix the problem by installing a homemade clamp or a tightening spring. Two planks or blocks of wood are connected to each other with a long metal bracket.
The fixture can be made with a screw clamp or self-clamping. In any case, the bars will strengthen and fix the frame with legs, thereby eliminating the existing backlash.
Inexpensive simple clip from a PVC pipe ring
Sometimes you have to look for improvised means to hold when carrying, but more often when drilling or processing parts and round objects. The simplest version of the clamp can be made from a PVC pipe ring.

It is enough to drill two through holes, insert a couple of pieces of reinforcement and cut the wall of the ring in one place. The device is designed for a certain diameter of the part, so you will have to make a whole set of clamps to work.
Racks for a set of clamps
Work tools and clamps should first of all be stored in a specially designated place. Instead of a pile of tools that are difficult to find and select the necessary device, it is best to make several split racks or shelves. In this case, it will take only a couple of minutes to quickly select a few of the most suitable clamps in terms of size and design, and not half a day, as before.

Improvised clamps
Often, in carpentry work or when assembling wooden structures, there is not enough time to make full-fledged clamps and clamps. That's when wit and experience come to the rescue.
For example, a round workpiece can be fixed with several rings stuffed onto the frame.

A reinforcing bar or a water pipe can be clamped with an improvised clamp from several bars and adhesive tape.
An ordinary trunk tie-down cord will help pull off a set of a dozen wooden planks like a tape clip.


