Installing a lock on a door: how to do it yourself? Recommendations: how to install a lock on an interior door How to embed a door.
The door lock is an important detail. It performs not only a decorative, but also a protective function, so the requirements for it are high. From this article you will learn how to embed a lock into an interior door yourself.
Depending on the insertion method, ease of use and other characteristics, the following types of locks are distinguished:
- Flat, having a rectangular frame and tongues separated from the lock latch. The design is highly reliable and is equipped with a push handle (halve).
- Round locks in a cylindrical body, the latch and tongue are combined. The handle can have any shape. The stopper and the cylinder cylinder of the lock are inserted into the spindle.
- Reduced size flat locks equipped with a rotary handle. The latch is missing.
- Round, in the design of which there is a special knob handle.
Castles can be classified according to other criteria. The types of locking mechanisms are as follows:
- bolts;
- fall;
- latches with lock;
- mortise type;
- invoices;
- magnetic.
The latter type of locking devices does not create a sharp sound when closing and can be mounted in any interior door (even one already installed); Magnetic locks are becoming increasingly popular.
To install a lock into a newly purchased door, you need to know the thickness of the door leaf and the features of its structure. There are these types of interior doors:
- MDF 35 mm wide.
- MDF 45 mm wide.
- Wooden door of a new design (panel width from 50 mm).
- A wooden fiberboard door of an old design with a plank frame.
You can install locks on interior doors yourself, knowing the design features and operating principle of the lock.
Flat
This category of locks is the most expensive. They are more difficult to install, but provide good burglary protection. They put additional load on the door, unlike round locks. The flat latch will fit the existing door.
It is permissible to install only flat locks of reduced size on a door made of MDF with a width of 35 mm. Also, only those locks whose widest tongue is 15 mm are allowed to be embedded into MDF. The end plate must not exceed 24 mm in width. This is due to the fact that only a wooden frame can bear the dynamic load created by the lock, and MDF is a weak material.
Round
This type of locks is most suitable for an apartment or residential building. They are designed to fit into any door. The push handle is most often used in homes where people with limited mobility live. Using the rotary handle requires more effort.
The knob handle is distinguished by its safety: it is impossible to get hurt or get caught on clothes.
The installation process for round locks with any handle remains the same. The lock mechanism with a cylindrical body is produced for doors whose thickness is 35-45 mm. Locks for large wooden structures cannot always be found on sale in small towns. But round locks are different in that they can be adapted to any door thickness. To do this, you need to replace the latch carrier by installing a longer one. It is a rectangular steel plate 2-3 mm thick. There is a hole at one of its ends.
The latch exit toggle switch must be placed in a position that will correspond to the material from which the door jamb is made. For wood it is 70 mm, for MDF – 60. The production of locks for interior doors has its own characteristics: their cylinder is located inside for the convenience of locking the door from the inside.
When the door opens to the left and a suitable lock has not been found, the latch and cylinder must first be swapped. To do this you will need to disassemble the structure. This option is not suitable for office premises, because such a lock from the cylinder side is easy to disassemble even without the use of special tools.
Preparatory stage
The insertion technique depends on the design of the lock. The easiest way to install is the latch handle. For this purpose, a hole of the required diameter is carefully made. (Craftsmen recommend carrying out all finishing and installation work after the floor repairs have been made.)
Installing an interior lock with a rotary lock (or with a handle and a cylinder) is more labor-intensive: it will be necessary to make a nest at the end of the door leaf, as well as 2 holes for the cylinder and the handle.
It is necessary to correctly calculate the height at which the handle will be installed. When choosing a wooden door, there are no restrictions on this parameter. On a frame structure, the handle should be embedded at the location of the cross beam, located at a distance of 90-100 cm from the base of the door leaf. The thickness of the vertical beam varies depending on the thickness of the door leaf.
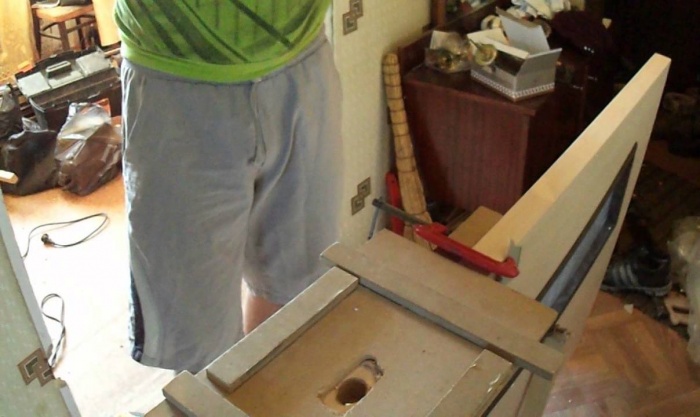
Most often, the lock is installed in an installed door, but you can cut it in before installation. When it is planned to make a recess for the lock using a manual electric router, the blade must be firmly secured in a lying position using a slipway, turning the side to be processed towards you.
Lock Mortise Tools
To install the locking mechanism in the door, you need to have the following tools:
- Pencil for marking.
- Joiner's triangle.
- Roulette.
- Screwdriver complete with a set of bits.
- Screwdrivers (flat and Phillips).
- Feather type drill, 6 mm wood drill, crowns of the required size.
- Hammer and chisel.
- Bit.
- Slipway.
- Manual electric milling machine.
There are special tool kits that include all the necessary drills and crowns.
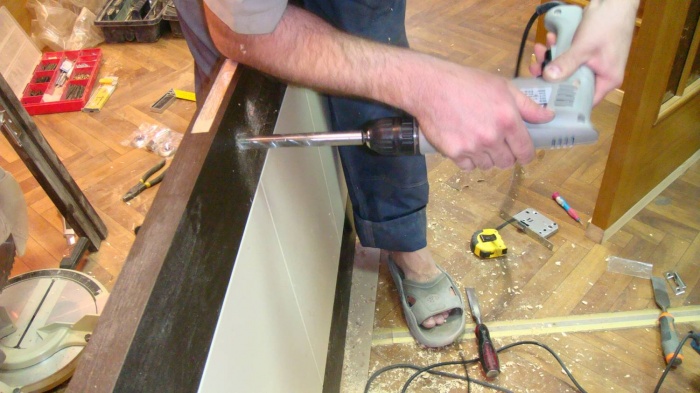
Mortising a lock with a milling machine
The lock should be attached to the canvas, having first retreated a distance of 1 m from the floor. The handle can be located at a different height depending on the wishes of the owners. Now you need to determine the depth of the insert: using a triangle, measure the body of the mechanism and mark the required depth with a simple pencil; trace the upper part of the device along the contour.
Then you should choose a location for the keyhole and latch. The locking device is measured from the end to the center of the keyhole, and markings are made on the door. After this, the holes for the keyhole and latch are drilled using a feather drill.
Then marks are made for the future recess for the lock. To do this, it should be leaned against the end side of the door with a crossbar. A cutter of the corresponding circle is inserted into the router, after which the recess is drilled. Care should be taken to ensure that the crossbar completely fits into the door leaf.
Then you need to cut a recess for the lock structure. A groove cutter is “loaded” into the router, with which the groove is cut. This must be done so that the locking mechanism fits clearly into it. The boundaries of the recess should be processed with a hammer and chisel to give them an aesthetic appearance.
It is necessary to remove the shavings from the recess and then place the lock there. The crossbar strip is attached using self-tapping screws to the side of the door, and then the door hardware is installed.
Mortise a lock without a router
To install the locking device manually, the following tools are required:
- pencil;
- ruler;
- roulette;
- electric drill complete with drill 10-14 mm;
- chisels of different widths;
- round files.
It is necessary to count from 70 to 100 cm from the bottom edge of the canvas and mark the future location of the locking mechanism. Having placed it sideways, you should mark its inner part and note the width of the rear plane of the structure. After that, according to the markings, we drill holes. Then you need to drill holes deep into the door. To do this, hold the drill at a slight angle.
Using a chisel, you need to level the surface of the socket so that the mechanism can fit into it. Having attached the lock to the front part of the blade, you should mark the position of the handle and the core, drill holes and align them using files. Repeat the same process on the opposite side of the door. The structure is inserted into the groove, then a rod is threaded onto which the handles are attached.
The locking tab is exposed. Marks for the tongue are placed on the door jamb, a recess is made under it with chisels, where the mating part of the lock (bar) is placed. The bar is secured, after which the lock is ready for use.
Marking
Before installing a door lock, you need to figure out how to correctly mark the required type of locking device.
Most often, markings are applied using templates or corresponding parts of the locking mechanism that are applied to the door. It is recommended to draw lines using a sharp awl or needle to work directly along the contour. When using a pencil, you will need to take into account the width of the drawn line and its distance from the part. This is not easy to do even for a professional.
It is forbidden to use a mechanic's scriber for this purpose, since the indentation from it is even greater than from a pencil, and it is impossible to erase scratches after it. The door will need to be repaired.
Round
First you need to determine the place where the round lock will be located, after which you should mark it using the installation instructions and template. The distance from the floor should be 965 mm. This side of the marking should be applied taking into account the thickness of the door and the length of the lock tongue. Marking is applied from the side of the larva.
When marking two points on the front part of the door leaf, it is necessary to retreat from the end edge of the door 60 mm (for the first point) and 70 mm (for the second).
It is necessary to mark a hole on the door leaf, the diameter of which is 50 mm. It is intended for a pen. The second hole is made at the end of the door, opposite the main hole. It is 23mm in diameter and is designed for a snap-on design.
Flat
On the door jamb, the vertical and then the horizontal axis are marked with a pencil. The latter is applied at a height of 965 mm from the floor (for structures made of solid wood and older specimens - 800 mm). Marking is carried out according to the attached lock using a pencil. You must select a slot for the lock along the marked line. As a result, it will turn out a little larger than necessary. This will create the necessary gap for installing the mechanism.
There are some peculiarities when marking the recesses for the cylinder and the spindle: it is done by attaching a lock to the side, while the holes are made with an additional indentation from the door end. These holes should be equal to the width of the end plate.
Flat lock mortise
If the door is made of wood, then the lock can be inserted anywhere. If the door is made of MDF, then the locking mechanism must be embedded at a level of 1 m from the floor, since the location of the wooden beam inside the hollow door is at this level.
It is preferable to drill a hole for the lock using a feather drill, the diameter of which exceeds the thickness of the lock structure by 1-3 mm. It is best to drill through pioneer holes in 2 passes.
Then we select the nest with a chisel and make a hidden one (after marking its outline along the embedded lock) according to the instructions.
The shaped recess for the larva is performed in the following steps:
- Drill a larger round hole for the cylinder.
- Drill a round hole of smaller diameter for the bottom of the pin cassette.
- Using a chisel, remove the remains.
After this, you can insert the lock into the door. To do this, you need to remove the handle and larva from it, and then insert it into the socket. After this, the fittings are installed back. The assembled loose lock should have a play of 1 mm on all sides.
Now you should identify and mark the holes for the screws. When the places for the screws have already been marked, we drill holes for them according to the markings. Having attached the lock structure to the door with their help, you need to install the handle and the lining under the tongue.
Handles can be round or L-shaped. To install the handle, you must:
- Install decorative overlays on both sides of the canvas, securing them with self-tapping screws.
- Insert and secure the handle bar.
- Close the door and make a mark on the frame where the tongue is located.
- Determine the length of the tongue using a ruler and make appropriate markings on the box.
- Attach the overlay to the marks and trace it.
- Drill recesses along its boundaries, bringing them to the required shape using a chisel.
- The final stage: the cover is inserted and secured with self-tapping screws.
You should check whether the door opens and closes easily. If necessary, the location of the tongue can be changed.
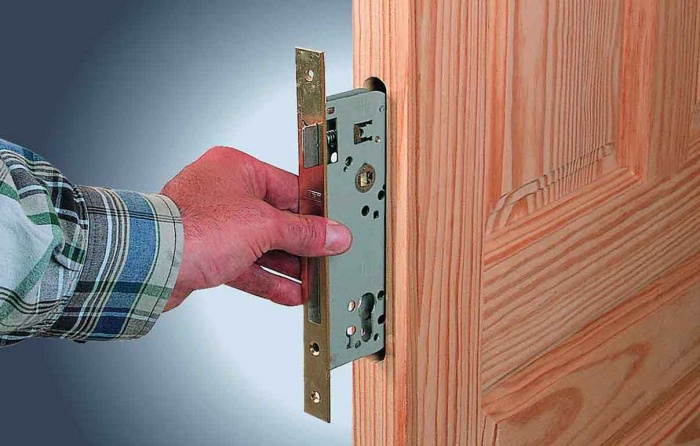
Lock mortise with cylinder
The insertion of the locking mechanism with the cylinder is carried out similarly to the previous option. Having made marks on the door end, you should drill a vertical strip of recesses located as close to each other as possible. You can remove the jumpers by using a chisel. A nest of the required size should be prepared. A hole is drilled in the door leaf for the cylinder (or rotary key) and handle on both sides using a crown.
After this, a chisel is used to make a selection for the lock plate, and the locking device, handles and the counter part of the bar are mounted.
It is best to carry out this work using a router: problems may arise when using other tools, such as a chisel and chisel. A hand router allows you to achieve smooth surfaces with the smallest errors. In this way, it will be possible to maintain the aesthetic appearance of the door.
Round lock mortise
To drill holes according to the markings, you need to select a crown of the appropriate diameter. It must be calculated so that the hole is covered by the outer casing of the device. But the circumference of the recess should be sufficient for the installation of internal mechanisms.
In specialized stores you can purchase kits for inserting round locks. They consist of 2 crowns of the required diameter.
Having prepared the necessary tools, you can begin drilling the hole according to the previously made markings. To prevent the appearance of cracks, splits and other deformations of the door leaf, you should make a hole from 2 sides down to the middle. Then you need to make a hole in the end of the door in the same way, into which the mechanism will be placed. The strike plate in the door frame is installed in the center of the drilled hole for the tongue.
The device should be placed in the finished socket and traced around it. After this, the latch is pulled out. Using a chisel, you need to make a hole large enough to fit the outer plate. This work should be carried out with care so as not to exceed the required hole depth and not damage the side of the blade.
Now you can install the mechanism, checking that it closes correctly (you can read in detail in the instructions for how to install a lock on the door).
Door designs are supplied to the market in different designs - in cheaper models the door leaves are not equipped with locks, and you have to solve this problem yourself. Knowing the nuances of such work, and having the simplest household tools at hand, installing a lock on an interior door will not create any difficulties.
What to prepare for the master
For interior door panels, handles complete with a locking mechanism are usually used. Therefore, apart from the tools and materials traditionally used for insertion (drill with a set of drills, chisels, hammer) and materials, there will not be enough.
Scotch. Door leaves installed inside the home have a surface coating. Even metal sheets, not to mention their wooden counterparts, are finished with veneer, solid wood or laminated. Since any work related to the installation of something always begins with markings, there is a risk of damage to the door surface at the stage of preparation for insertion. Therefore, you will definitely need tape.

Set of feather drills. When inserting, you cannot avoid the through passage of the blade, and you cannot do without such a cutting tool. A regular drill definitely won't work here. You can also use a crown, but purchasing it for a one-time job is not advisable; it costs much more. In addition, it is not a universal device, since it has a fixed diameter. But a set of feather drills is always useful in the house.
If the thickness of the sash is significant, then it is still better to work with a crown. This will greatly facilitate the drilling process, and the accuracy of the passage and the cleanliness of the “channel” will be maximum. But you should purchase it only after purchasing the lock, choosing a tool “for it.”
Procedure
All stages of inserting a lock into an interior door with your own hands are performed in a certain sequence.
Marking the canvas
At the handle installation level (which is usually 100±10 cm from the floor covering), strips of adhesive tape are glued to the door; from the end and sides. That is, in those areas where drilling will be carried out.

Locks from well-known manufacturers come with a template. Marking it is much easier. Even when purchasing a product, it is advisable to check its availability.
If there is no factory template, you will have to use a lock. It is partially disassembled, applied to the canvas, and traced along the contour. Drilling points for fasteners are also marked with a sharp object.

Making holes
Under the arm. To prevent the “feather” from moving to the side, in the place of the through passage you need to mark a shallow hole with a minimum diameter for the tip of the cutting tool. The peculiarity is that the interior doors are decorated, so the work is carried out in 2 stages. First drill from one side, but not all the way. As soon as the central tip of the “pen” appears from the reverse, it is reinstalled on it. Passing the material on both sides allows you to avoid chips on the veneer or damage to the laminating coating.
In this regard, magnetic locks are much easier. After marking, it is enough to drill out “channels” for fasteners, and you can install the elements fixing the canvas.

For fasteners. To ensure they hold securely, the diameter of the drill is chosen smaller than the thickness of the legs of the screws.
Under the latch. The work is not difficult; The main thing here is to maintain the direction of passage. The drill is selected according to the size of the “tongue”, and the hole is made until it exits into the “channel” for the handle with the opening mechanism.
Lock installation
Cleaning drilling sites. This applies to the holes into which the lock elements will be placed. Otherwise, during operation the mechanism will become jammed.

Installation of the tongue. After aligning the latch, a frame is placed on it, and both its outline and the attachment points are marked.
Wood sampling. If the decorative strip is not recessed, the interior door will not close completely. An incision is made along the contour (with a knife) so that the lamination or veneer of the canvas is completely cut off from the working area. After this, a small layer of wood is removed with a sharp chisel with a narrow tip. It's important not to overdo it here. It is better to make a shallow recess; subsequently the frame will simply be pressed into the wood with self-tapping screws.
Re-installation of the tongue. After this, a decorative strip is applied and lightly tightened with fasteners.

Installation of the handle. The operating procedure is specified in the product instructions. Each manufacturer has its own characteristics. Therefore, even at the preparation stage, you should clarify how to embed a lock into an interior door. Although usually everything is limited to placing cylinder mechanisms in the hole made (on both sides) and securely fixing them in place. At the last stage, they are covered with decorative rims.
- Please note that in the normal position of the door handle, the latch should be extended. Accordingly, when you press the handle, the “tongue” is retracted and the blade is released.
- The cylindrical elements of the lock should not be over-tightened with fasteners. Otherwise, their work will be difficult, and problems will arise with turning the key and the free movement of the latch.
Installation of the “reciprocal” part
This is the name given to the strip that is attached to the frame of the door block. The “tongue” of the lock extends and the door closes until it touches the opening. Next, its location in height is outlined with a pencil. All that remains is to correctly determine the centering of the bar.
You can focus on the position of the latch at the end of the door. It (after the “tongue” is retracted) closes tightly. It is not difficult to mark the cutting line of the canvas on the block. Everything else is simple. The distance of the latch from the outside of the door is measured, and the same distance is marked on the jamb.

Having lines in height and width, you can outline the contour of the “reciprocal” part on the frame. Everything else is the same as for the “tongue” overlay strip (marking + a small sample of wood). If there is a significant gap between the block and the canvas, the latter will not be needed.
All that remains is to check the tight fit of the door and the alignment of the slot in the “reciprocal” part with the latch. Miscalculations made are easy to level out.
All indicated technological operations are typical. Depending on the lock model, their list may increase, but basically such work is standard, and any man can do it.
Do you want to have your own space and be sure that no one will break into it? Then installing a lock on your interior door is the only right decision for you. You can do this yourself, without resorting to outside help. It is only important to choose the right accessories. It must be of high quality, match the interior in shape, color and design.
Choosing a lock for an interior door
Based on function and design, there are several types of door locks:
- regular latch or halyard lock;
- latch with lock;
- mortise;
- magnetic;
- overhead;
- latch;
- latch;
- level
This is the most primitive type of lock, which is used in almost all interior doors. It is a simple design consisting of a cylinder and a plastic or metal tongue. Often such a mechanism is mounted together with a handle that controls the tongue.
The latch is the simplest mechanism installed on interior doors
The purpose of a halyard lock is to keep the door closed. A conventional latch is simple, reliable in operation, and characterized by a wide range of designs. However, due to the overly simple mechanism, it has not found widespread use.
Locking latch. It is considered a variation of a regular latch, which is equipped with an additional latch. It blocks the movement of the handle. There are two types: lever and push-button. The first type is more practical and reliable. A push-button lock is no worse, but it can cause such an unpleasant situation as accidentally slamming the door.
The latch with a lock has a number of advantages: simple installation, simple design, wide selection of models. The disadvantage of this type of lock is its weak locking mechanism.
When purchasing a product, pay attention to whether the movements of the tongue are smooth and whether the spring returns it inside the door.
It was popularly called a mechanism with a key cylinder. Outwardly, it is similar to a lock for street doors, but has a simpler design. The device includes a cylinder and a lock block.
 Mortise locks are reliable and durable
 There are two types of cylinder: “key-key” and “key-turner”. The first is installed if the lock is used occasionally. The second, on the contrary, is suitable for more frequent use.
Mortise locks are used to close bedrooms, offices, and storage rooms. They reliably protect against penetration, are durable, and rarely break. If we talk about the disadvantages of the device, then this includes the complexity of installation and the dependence of the device parameters on the thickness of the door.
If you can afford to splurge, then this type of lock is for you. It is intended primarily for rooms where it should be as quiet as possible: bedrooms, children's rooms, offices.
 The magnetic lock is quiet, but its cost is quite high
 Silent operation is ensured due to its design, consisting of a crossbar, a strike plate, a magnet, and a case for the magnet. The bolt is attracted to a strike plate with a magnet, which is located on the box.
Along with the advantages of the product, there are disadvantages. Firstly, this is the impressive cost of the castle. Secondly, the lock case is not very compact in size, which is why it looks bulky.
Rim lock. Products of this type can rightfully be called a rarity. However, despite this, the demand for it has not fallen to this day due to the simplicity of the mechanism and uncomplicated installation.
Current models boast a comfortable body. The device is mounted on the inside or outside of the door, thereby providing protection against unexpected entry.
The original purpose of the lock was to secure one of the double doors. Currently, it is installed mainly in the bathroom and toilet.
 Espagnolette installed in bathrooms
 The operating principle of this product is so simple that even a small child can handle it. Its installation does not require special knowledge and experience.
Latch. This is the simplest type of castle. A latch is a metal plate with a retractable lever. It is installed as a main or auxiliary lock.
The mechanism has become widespread due to its high degree of reliability and protection. It is used for both street and interior doors.
To fix the bolt in the mechanism, plates (levers) with grooves of various shapes are used.
 Level lock has a high degree of security
 Each insert has a corresponding key bit profile. The lock will open only when the levers are in the correct position and the groove is free for the bolt to pass through.
If you have made your choice in favor of a stylish but simple lock, you can get to work.
Tools and materials
To install the mechanism you will need the following materials:
- handles of any shape (round, in the shape of the letter “G”) – 2 pieces;
- cylinder mechanism with spring;
- fastening screws that connect the cylinder mechanisms;
- crossbars;
- sockets for closing cylinder devices – 2 pieces.
In addition to materials, the work requires a small set of tools:
- a simple pencil;
- roulette;
- drill;
- office knife;
- chisels at 0.1 and 0.2 cm;
- feather drill 2.3 cm;
- drill 0.2 cm;
- crown 5.4 or 5 cm based on the thickness of the door;
- masking tape;
- hammer.
If you don’t have any of the listed tools at home, you will have to buy more. Their cost is low, and they are always useful on the farm.
Lock installation
Installing the mechanism yourself will not be difficult. You just need to forget about the rush and be attentive enough. The success of the business depends on many factors, including the type of door.
The easiest way is to insert the lock into a piece of wood. It will be more difficult with a product made from MDF, since it already requires skills and knowledge. Therefore, in this case, it is better not to take risks, but to call for help from a master of his craft..
Otherwise, poorly performed work will lead to damage to the mechanism, which will require it to be repaired or even require a complete replacement of the product.
Preparatory stage
Marking is the initial step towards installing a lock. The first thing to do is to prevent possible damage to the door.
 The lock is mounted at a distance of about 1 m from the floor
 For this purpose, measure a distance on the canvas of 0.9 - 1.1 m from the floor covering - this is the location of the lock. Then apply masking tape in that place to the end and surface of the door. This procedure will not only protect your product from scratches, but will also make it easier to take measurements.
The template is sold with a lock included in the set. It allows you to accurately apply marks indicating the position of the holes. To do this, fold the stencil along the fold line and attach it to the end. Then use a self-tapping screw to mark the centers of the holes on the end and on the flat surface of the canvas.
Making holes for the handle and lock mechanism
After applying the markings, proceed to the following stages of work:

Mortising a lock with a router
A small vertical machine is called a milling machine. It is easy enough to use, so even a beginner can operate it. To embed a lock into an interior door using a machine with your own hands, you must:
- Place the canvas perpendicularly on its side and secure it with a slipway.
- Measure and mark for the tongue.
- Place the lock on the sash so that the marked line runs clearly in the middle of the recess made under the tongue. Trace the body of the product with a pencil, as well as the bar along the upper and lower borders.
- Draw straight lines on the end of the canvas. Use a square if necessary.
- Use the machine to select the opening for the lock.
- Change the cutter in the machine, based on the dimensions of the plank, and adjust the depth required for its thickness. Make a notch in the center.
- Make a socket for the lock case. To do this, draw a straight line in the middle of the marking.
- Drill holes on the resulting line with a drill. The wood that remains is removed with a hammer and chisel.
 The opening for the lock can be made with a router
 Thus, an opening for the lock was created. To check if everything is done correctly, insert the device into the seat.
Mortise a lock without a cutter
The absence of a cutter is not a reason to put off installing a lock until better times. To perform the installation, the most common tools that can be found in any home are suitable.

Although it should be noted that there are cases when you cannot cope without a professional machine. For example, installing a lock with a latch.
Mechanism insert with cylinder
Sometimes a lock is installed on a door that already has a handle. It is for such situations that mechanisms with a larva are designed. They have the shape of a rectangle, so this work will seem overwhelming for a self-taught master.
 Locks with a cylinder are mounted in doors with an installed handle
 However, you don't need any tools or skills. Only after trying, you will learn how easy it is to insert a lock with a cylinder into a wooden door.
To do this, find a place for the lock (above or under the handle) and undertake the following points:
- On the end part, draw a center line where the mechanism is mounted.
- Attach the lock and make marks indicating the height of the product.
- Drill holes along the center line with a small distance between them.
- Using a drill, remove the jumpers between the holes and make a neat socket that matches the size of the lock.
- Place the mechanism in the resulting opening, secure it with self-tapping screws. Using a utility knife, mark and cut out the perimeter of the locking plate to approximately the same thickness as the locking plate itself.
- Remove the mechanism and use chisels to make an opening for the device.
- Place the lock against a flat surface of the canvas and mark the location of the cylinder. Then outline the larva. Do the same on the back side of the door.
- Drill a hole for the larva. In order for the device to fit in freely, you need to go slightly beyond the contours of the markings.
- Place the lock and screw it with self-tapping screws, the holes for which should have been made in advance.
- Attach the cylinder and check how the mechanism functions. Place linings on it using self-tapping screws as decoration.
Installation of the lock mate
This is the final moment of installing the locking mechanism. To install the response part, follow these steps:
- Close the door and draw two lines on the opening, the distance between which corresponds to the size of the lock latch.
- Measure how far the beginning of the latch is from the corner of the door.
- Measure exactly the same distance on the opening - this is the beginning of the recess.
- If you are going to recess the counter part into the jamb, then install it in place and trace it with a pencil along the inner and outer contour. If not, then outline only the inner one.
- Before installing the answer, use a tool to make indentations for the tongue and screws.
- Install the striker and close the doors. If excess play occurs, eliminate it by bending the tongue on the response.
 The lock mate is secured with self-tapping screws
 Thus, you have come to the finish line. Installing a new lock or replacing an old one is not a very complicated process, but it requires care. When changing the previous mechanism, make sure once again that reinstallation is advisable. After all, the problem can sometimes be solved by simply adjusting the device.
If the purchased interior door is not equipped with a lock, you should figure out how to install it yourself. This will not only save money, but also carry out all the work efficiently. Before starting installation, you should understand the instructions and the choice of locking mechanism. It is worth considering that the thickness of the timber from which a standard wooden structure is made must be more than 40 mm. To figure out how to embed a lock into an interior door, you should get acquainted with the features of the process.
Features of locks
There are several common types of locking mechanisms that can be installed on interior doors. Some of them are equipped with handles, others come separately. Independent locking mechanisms are installed in this way - first the lock is cut in, and then handles are installed on both sides of the leaf.
Also, instead of a full-fledged lock, you can choose simple handles with small locking devices (latches). They have a simple design, but the work of installing them is a rather complex process. For installation you will need to have special tools.

After purchasing the lock, you can begin installing the structure. It fits in quite easily. You can do the work yourself. The procedure is not very complicated. You should not rush during the work process.
Typically the handle is located at an equal distance from the floor and the top of the doorway. Therefore, before installation it is necessary to measure 1 m from the floor and mark it. After this you will need to use a drill. A hole for a lock must be provided at the end. The drill must have a diameter that is equal to the thickness of the locking device body. The depth is determined by the length of the locking device.

Then, at the end of the door leaf, you need to mark the location for installing the support plate. To do this, the contour of the part is applied to the wooden product. First, you need to make a hole with a drill in the place where the door handle will be installed. Drilling must be done with great care.
When the drill appears on the other side of the blade, drilling must be stopped. Then drilling is carried out on the other side. Some craftsmen drill right through the canvas. However, this technique can easily damage the canvas.

After this, a lock is installed on the product, and the places for screwing in the screws are also marked. In the marked places it is necessary to make holes into which the fasteners will be screwed. To understand how to insert a lock into an interior door with your own hands, it is worth learning about attaching the handle and the features of working with doors made of different materials.
Handle attachment
To install the handle, you must first install decorative overlays on each side of the canvas. Once they are secured, you can place the handles in the prepared holes.

First, the rod is fixed. It will become the connecting element between the door handles. The length of the latter is measured using a ruler.
You must attach the receiving pad to the resulting marks, and then trace it with a pencil. You can drill holes along the contour and use a chisel to bring it to the required shape. Next, the overlay is installed.
Important! After installation, you should check how the lock opens and closes. If necessary, you can bend the tongue of the lining.
This algorithm for installing a lock is more suitable for wooden structures. It is easy to embed a locking device into it, choosing any place on the door. If the canvas is made of metal, you will need to perform the work using a special algorithm. Sealing elements should be installed between the frame and the door.

Differences between MDF and metal doors
Products made from MDF are easy to install. The work does not require specific skills. You also don't need to study editing theory. A basic knowledge of the installation procedure is enough. The block inside the door is located at a height of 1 meter above the floor.
If you do not have enough experience to install such a structure, you can damage the product when trying to install the lock. Therefore, the installation of locks on interior doors made of MDF is usually carried out by specialists who have extensive experience and special skills.
The insertion of a locking mechanism into metal structures is carried out only by professionals. If you try to install the lock yourself, you can seriously damage the structure. Such an attempt may result in a damaged door leaf and a broken lock. As a result, you may need to install a new box.
Inset using a router
A hand router is used for quick installation of locking devices and hinges. This device has many differences. Some believe that the router is a fairly large and difficult to control mechanism. However, the manual device is quite compact and also extremely convenient to use.

Using a router, niches are prepared for locks and hinges. How to cut a groove for a lock using a router? To perform such work, you must use a standard set of tools.
To install a lock on an interior door, you will need to complete the following steps:
- The door leaf is secured vertically in a side position using a slipway. This is necessary so that during installation there is no need to hold the door structure.
- Now you need to mark the place for the tongue.
- Try the lock on the canvas so that the drawn line is in the center of the drilled hole for the tongue. After this, you should mark the bottom and top edges of the bar and the lock.
- Using a square, you need to draw straight lines at the end of the door.
- We insert another cutter into the device, which will fit the dimensions of the plank. After this, a hole is made in the center of the marked area.
- Wood is then drilled into the door and then knocked out. You need to insert a lock there and then install the handles.

If you don’t have a router, you can get by with standard tools. In the process of this work, a neat hole is made into which the locking mechanism will be placed. In addition to repairing and inserting locks, you may need to completely replace the locking mechanism. How to disassemble the lock of an interior wooden door? If the door is made of MDF, the process will be quite simple. The main thing is to accurately select a lock that will fit the dimensions of the already created recesses.
As you can see, installing a lock on an interior door is quite simple. To work, you will need to have a milling cutter or a standard set of tools. Special care must be taken when installing the lock. It is necessary to carefully make a recess in the door leaf.
In order for all the work to go quickly, you should carefully prepare for installation - collect the necessary tools, select materials. You should also take into account the basic rules when working with wooden structures. For example, you should not drill a hole for handles right through. It is better to do them on both sides.
It will not be difficult to mortise the lock yourself.
A lock installed on an interior door always significantly increases the functionality of the room. Its insertion is not difficult for a professional, but still has some points that need to be taken into account when working for beginners.
First of all, you need to prepare your tools. To installing a lock on an interior door was done in a short time, you will need the following tools and materials:
- Forstner or feather drill with a diameter of 22 or 23 mm;
- drill 2 mm;
- wood crown, diameter 50 or 54 mm;
- screwdriver or drill;
- chisel;
- roulette;
- masking tape;
- simple pencil.
The handle lock is installed approximately at a height of one meter from the floor if the door is made of MDF or chipboard. On a door made of solid wood, the handle can be installed higher or lower, as it will be more convenient to use it.
You should measure the distance from the floor and cover the door with masking tape at a given height. You can do without tape - it is only needed to make it easier to apply marks and not accidentally damage the canvas. An oilcloth is placed under the door, since some debris is generated when drilling. At this point the preparation is complete, you can begin marking and drilling the canvas.
Mortise the lock: procedure
Markup: how to make a template
The lock comes with instructions, in which you can find a diagram of the location of the holes. If necessary, make your own template yourself:
- a line is marked on a piece of paper the size of the width of the door leaf;
- a rectangle of a given width is drawn with the height of the locking tongue plate of the lock;
- On both sides of the rectangle, draw two symmetrically located circles, the diameter of which corresponds to the diameter of the locking mechanism of the door handle.
A template cut out of paper is applied to the end of the door and outlined with a pencil. The master for whom installing a lock on an interior door with your own hands - a familiar process, without a template. In this case, he simply measures the same distance from the floor and makes marks in the center of the end of the door and on both sides. In the latter case, the points are at the same distance from the edge of the door.
Making holes

The hole is drilled with a special nozzle.
A hole is drilled in the end. An interior door can consist of solid wood or be hollow. In any case, drilling is carried out to the depth of the locking mechanism.
To drill round holes on the canvas, an attachment - a crown - is installed on the drill. By placing a drill with a nozzle at the marked point, a hole is drilled on one side of the door leaf. The drilling depth is until the drill appears on the other side of the door. After that, in order to avoid chips on the canvas, you should stop and use a crown to drill a circle on the second side of the canvas.
As a result, we have a round through hole connected to a hole that has access to the end of the door.
Installation of lock parts
Drilling a hole for the end plate

A chisel is used to make a recess for installing the lock plate.
The next step will be to select the door leaf material from the end side to install and deepen the plate with the locking tongue. Here you will need a chisel prepared in advance and a stationery knife.
The plate is applied to the end, outlined with a pencil, and then an incision is made along this contour with a stationery knife. This is necessary in order to carefully cut off the film covering the door leaf. After which, using a chisel, select a layer with a thickness slightly less than the thickness of the lock’s overlay plate– when tightened with screws, it will be flush with the plane of the end. Holes for screws are drilled according to the markings.
You can begin installing the lock with a handle.
Assembly and installation of the handle

The mechanism is fixed with screws.
First of all, let's pay attention to the locking tab - if there is one, it should be located on the inside of the room. The lock set includes a key with which the decorative rosette is disconnected from the locking mechanism.
The lock consists of two handles: one is connected to pins, the other has holes for the pins. The handles are inserted from opposite sides of the canvas so that the pins fit into the holes provided for them. The cylinder mechanism is fixed to the door with screws. Before a click appears, decorative rosettes are installed.
A plate with a locking tongue is mounted at the end and secured with screws. This completes the installation of door handles. The next step is to cut a hole and install a plate under the entrance of the locking tab on the opposite doorway.
Installing the lock plate

The lock plate is installed on the door jamb and secured with screws.
The same distance from the floor is marked on the jamb as for installing the handle. You don't have to use a tape measure for this. It's easier to close the door and make marks on the jamb opposite the top and bottom corners of the lock plate at the end of the door. Then the marks are transferred to the plane of the opening using a ruler. A hole is drilled for the tongue and four holes for the screws. You can use one drill for the job. The size of the hole is not very important, the main thing is that it is no smaller than the size of the locking tab. The plate is installed and secured with screws. At this point, the installation of the door lock can be considered complete.
- Describing the steps sometimes takes longer than installing the lock on the door itself. In reality, the work is not as difficult as it looks on paper. It is important to complete all marks carefully.
- Locks for interior doors are available with different handle configurations. The procedure for installing them, as a rule, does not differ from each other.
- As noted above, an interior door can be hollow inside. According to standards, a wooden beam is mounted inside a door made of MDF or chipboard at a height of one meter from the bottom edge of the door. The installed lock must be located directly in this place, otherwise it will not stand firmly and will damage the door leaf during operation. You can check the presence of a beam inside by tapping the door leaf.
We hope that this article will help the master, who is starting to work on inserting a lock for the first time, to complete the entire process efficiently and quickly.


