Automatic gates with a homemade drive: we build with our own hands. Do-it-yourself swing gates, drawings, videos, step-by-step instructions How to weld entrance gates
Gates and wickets are a necessary addition to their corrugated sheet fence. The gate provides access to the site for cars and special equipment, and the gate is intended for those who came on foot. Unlike a fence, the design of gates and gates turns out to be more complex, so a separate drawing is developed for them and a special calculation of materials is made.
We would like to offer you several ready-made drawings of gates and gates made of corrugated sheets, which you can adapt to your conditions. The height of the fence and gate must correspond to the height of the fence.
Main types of gates for country and country houses
- hinged - are two hinged doors that open inward or outward. They are simple and cheap to install, however, they can damage the car when entering, especially if there is strong wind. Also, a significant space needs to be cleared for them.
- sliding or sliding gates with a guide rail - the door moves on a roller mechanism along the fence line. The complex design and special expensive fittings make such gates not the most affordable. But they provide a higher level of comfort: an automated drive makes it possible to open them without leaving the car.
Drawings of swing gates and wickets
When drawing up a drawing, it is important to determine the width of the gate and wicket opening, the height, as well as the frame model. Do not forget that when designing a gate, you need to correctly distribute the load along the leaf, because it is attached to the side hinges and their weight rests entirely on the support posts. For this reason, gate posts are often made of thicker profile pipes or laid out of brick.
The metal thickness of the profile pipe must be at least 3-4 mm. Accordingly, the foundation under the gate supports must be quite reliable. Weak supports will lead to sagging of the sashes and deformation of the structure from wind loads and the gravity of the sashes. For the frame, you need to use a lighter profile pipe to prevent overload on the sashes, but a frame that is too thin will not withstand wind loads.
Pay attention to the choice of gate width. The optimal width is 4 meters; it allows both cars and trucks to easily enter even from a narrow street. Remember, the wider the sash, the greater the load it creates on the supports (in accordance with the law of leverage).
Schemes of gates and wickets made of corrugated sheets with a parallel frame
1. Before us is a “classic” and well-balanced drawing of a gate with a wicket. The height of 2 meters corresponds to the traditional height of a fence made of corrugated sheets. 60x60 posts should cope with a 40x20 pipe frame. The frame itself is not overloaded, is easy to calculate, and does not require a lot of materials. It has only one drawback - the lack of diagonal rigidity. It is compensated by the presence of two horizontal strips of a profile pipe, which form three sections 60-70 cm wide on the sash.
Another characteristic feature is the presence of a top crossbar. It provides a more balanced distribution of the load, prevents the pillars from moving towards each other, however, in order to successfully enter the site for tall vehicles, it must be made removable.
2. Another version of the drawing. This time without the crossbar. Please note that the support posts have a larger diameter due to the absence of a crossbar.

3. Swing gates with a built-in wicket. This scheme is perfect for those who have limited space to enter/enter the territory. A width of 4 meters accommodates both a gate and a wicket. However, it is worth understanding that the presence of a gate increases the weight of the gate, which means the cross-section of the side post must be at least 10x10 cm and it is better to place the gate closer to the post (according to the law of leverage, it will put less load on the gate support).

Schemes of gates and wickets with diagonals
The presence of diagonal frame elements increases the rigidity of the structure and makes it resistant to various types of deformations, however, it should be remembered that additional lines are an additional load and it is important to choose the right pattern. So, instead of two horizontal slats, it is better to use one. Options for the location of diagonal strips are shown in the drawings below. The cross-section of support posts for a fence with diagonals must be at least 80x80.
1. Diagonals from the extreme corners to the middle or vice versa. Such schemes look quite nice. One looks like a snowflake, the other forms a diamond-shaped pattern.


Length of the hypotenuse: where A And b- sides of a right triangle.
2. Diagonals from one corner of the sash to the other. The scheme allows you to minimize the load on the sash and at the same time impart the necessary rigidity, however, welding such a diagonal is not very convenient.

3. Small diagonals at the corners of the sashes. It looks quite beautiful and creates a minimum load, but such doors have a high windage capacity, which means they can suffer from wind loads.

In the following video you will receive valuable tips on how to prevent support posts from bevelling under the weight of the sashes:
Drawings of sliding gates made of corrugated sheets
The most optimal option for a sliding fence, which you can build on your own, is a design with a guide rail. It is enough to simply select kits of fittings and automation systems. The gate includes a retractable leaf with a bottom rail that moves on a special roller system. In order for the structure to be balanced when closed, an additional triangular console is welded to the side of the frame.

As you can see, the gate frame consists of a frame and a console, which are made of a thicker profile pipe (60x40). It is also better to make the internal elements of the console from this pipe. Inside the gate frame, the frame design can be made in different versions (with rectangles or triangles. The main thing is that the pipe is a lighter pipe (for example, 40x20). Also, do not make the grille too thick. The installation procedure for a sliding fence is presented in the following video:
We hope that the following drawings will help you make your own gates and wickets from corrugated sheets that will be comfortable, reliable and durable.
The arrangement of any territory requires the presence of a boundary fence. A mandatory attribute of such a design is a gate to ensure unimpeded entry into the facility. Such systems are used both in industrial enterprises and in private areas. Products of this type can vary in complexity and design. Preliminary preparation will allow you to choose the best product option, taking into account all the nuances.

Peculiarities
Gates are universal enclosing structures that are installed at the entrance to a specific facility or private territory. Today there are many varieties of such structures, which allows you to select them depending on their purpose.
Regardless of what type of gate is being considered, the product consists of several basic elements:
- Canvas. This part is the main part of the entire system. Depending on the design, there may be several canvases. Some models may have a complex geometric shape, given to create a unique design.
- Supports. These products take the main load created by the sash or leaf. The shape and technical features depend on the method of fastening the gate.

The gates have several distinctive features:
- Simplicity. The manufacture of some modifications does not require knowledge and experience in working with different materials.
- Durability. High-quality products can last up to 15-20 years with proper care.
- Ease of control. Today, all types of gates are supplemented with special hinges, rollers and other systems that simplify opening the doors.
- Variety of designs. Products are manufactured using various materials and approaches. This allows you to obtain not only durable, but also beautiful products.


Kinds
Gates are an integral element of many enterprises and private estates. These designs must solve several universal problems. Today you can build them yourself, using special drawings or sketches. Depending on the technical parameters, gate systems can be divided into several types.

Recoil
The leaf of such a gate moves parallel to the fence or one of the walls. The main components of the products are the canvas, cantilever beam, rollers and supports. The fastening scheme of these attributes depends only on the selected type of sash and its location.
The frame is shifted by means of a cantilever beam and rollers.

The most popular type is cantilever gates, but there are also suspended and rail systems. The latter, for example, are very similar to console ones, but movement is carried out on a special rail. There are also so-called folding gates. In them, the sash seems to enter into itself. This is achieved by using metal profiles of various thicknesses and its fastening. Sliding gates are universal, as they can be installed both at the dacha and at an industrial facility.
Among the disadvantages are the need for free space on one side, as well as the high cost of the product.

Swing
This type of gate consists of one or two leaves that open in an arc. The use of swing systems today is very diverse. They are used both in private households and in large agricultural enterprises where additional fencing for areas is needed. The construction of these gates is one of the simplest, which has led to their widespread use. To install them, you will need metal and welding, with which the frame of the canvas is welded, and then the gate is installed in the right place. Today swing gates are used as entrance gates.

Rolled
A feature of such designs is that the fabric is wound on a special shaft when moving upward. This was made possible by dividing the canvas into small sections that are interconnected. Theoretically, roller gates can be installed outdoors as fencing systems, but this process is quite labor-intensive, so they are installed in garages or warehouses, where the frame can be attached to the base of the building. Among the disadvantages of these structures is their low strength.
There are varieties in which the canvas is not rolled into a roll, but folded into an accordion, but they are used quite rarely, since they are not so practical.

Sectional
Gates of this type consist of a large leaf of several sections, which moves along special guides. Similar systems are used in the construction of large warehouses, garages and other industrial facilities. To increase thermal insulation, insulation is inserted inside the canvas. The gate lifts up, so no additional space is required near the base. Some modifications can be supplemented with windows and gates.
Among the disadvantages are the high cost and limited use (installation is carried out only on solid foundations).

Tilt&Turn

Materials
Theoretically, gates can be made from almost any material. Today, several types are used for such purposes:
- Metal sheets. Often, for such purposes, a profiled sheet is used, which is selected according to thickness and color. The canvas itself is formed from it. Please note that iron sheets not only cover the frame, but also form the top layer of the roll mechanisms. To protect the metal, the surface is coated with PVC solutions.
- Pipes. Both round and profile products are used. Homemade gates are often made from a profile: you just need to weld the blanks correctly.
- Metal corners. They are necessary to create or strengthen the frame. This material is not used for heavy gates.
- Wood. This material is the most affordable and widespread, but wooden gates are becoming increasingly rare today, as they are quite demanding on climatic conditions.
- Metal rods. Decorative elements are made from them. They are the basis of forged gates, which are distinguished by their originality and beauty.


How to make it yourself
Gates can differ radically from each other in design and technical parameters. The construction of some modifications is technically impossible at home. These include hanging or roll varieties.
Before you start building a gate in a private house, you should take into account several recommendations and proceed in stages.
- Decide on the type of structure you plan to build. Today, many people prefer sliding systems, but they require free space along the fence. This must be taken into account when planning. At this stage, it is advisable to take all measurements in order to have data from which the main parameters of the canvas will be calculated.
- Calculate all the parameters of the canvas and the wicket (if there is one). To do this, it is better to make a small drawing on which all the main dimensions of the future sash should be plotted. Particular attention should be paid to cantilever and fan systems: for them, accuracy is most important.
- Stock up on tools. The construction of some types of gates requires not only a hammer and welding, but also other auxiliary tools: circular saws, grinders and many others.
- Before starting work, buy building materials in the required amount: plastic pipes, corrugated pipes, rollers, loops and the like. The required set is determined by what kind of gate you are going to build.


Installation of supports
Technically, supports can be called system elements that hold the canvas in a certain position. These structures take the main load, so they are built from durable materials. The simplest option is to install fence posts for swing systems.
It consists of several sequential steps:
- Initially, they determine the location. Often, for double-leaf gates, the support posts are placed at a distance equal to twice the width of one leaf plus a small margin. It is also important to consider the direction of movement of the web. If it opens into the yard, then you need to leave room for plowing.
- Concreting pillars. Concrete structures, wooden beams or metal channels of varying thickness are used as supports. They are selected depending on the weight of the gate. When concreting, it is important to deepen the pillars by no less than 50 cm. It is advisable to position them strictly vertically, since any displacement can affect the ability to close the doors.
- When the concrete is poured and the pillars are aligned, you need to install a brace so that the pillars do not change position while the solution hardens.

Installing a support system for sliding panel gates is a more complex process.
It can be described in several points:
- Digging a ditch for the lower support beam. It will take the main load from the departure track. The ditch is located along the opening, and its length often does not exceed half its width. The depth of the pit reaches 1-1.5 m.
- Construction of the beam. This structure consists of a steel channel and metal supports that are welded to it. As a result, the entire structure resembles the letter “P”. The channel is installed with the legs down, its flat side should be flush with the ground.
- Concreting. When everything is ready, the ditch with the support beam is poured with concrete. It is important to control that the elements do not move in space. The beam must be in a horizontal plane. If this condition is not observed, then the movement of the exit track on the rollers will be complicated.
- When the support beam has frozen, they begin to form the side support pillars. They are needed to optimize the operation of the folding structure. Closers, support rollers, motion sensors and other auxiliary attributes are mounted on them. Many experts recommend making decorative fence posts first, and then attaching the remaining parts to them.


As for armored gates or structures made of sandwich panels, they are not installed on the street. These systems are attached directly to the building frame, which acts as supports.
Some modifications are equipped with a metal frame that is easy to attach at the factory.

Installation
Before you begin installing the gates, they should be assembled. Swing and sliding systems are considered the easiest to assemble. The technology of construction and installation of swing-type structures should be considered.
It can be divided into several stages:
- Frame installation. The door can be made of either wood or metal. The latter option is preferable, since the metal is stronger and more durable. Initially, profile pipes are cut into blanks, which, when folded, should form a rectangle. The corners of the elements are connected to each other by welding. To strengthen the product, metal corners are welded at the joints, adding rigidity.
- Sheathing. When the frame is ready, it is sheathed with profiled sheets, wood or chain-link mesh. If you want to get a beautiful and unusual design, then you can use forging elements as decoration. They require experience working with metal, because it needs to be bent into a certain shape. If you do not have experience, you can purchase ready-made options.
- Fastening. Hinged hinges are welded to the finished canvases and support posts. It is advisable to do this before laying the stone, so that both halves of the loops can be aligned perfectly evenly. If the hinges are welded correctly, then you can simply “put” the sash on the support pin. At the very end, locks and a gate are installed.

Installing sliding gates is much more difficult. It involves performing the following operations:
- Construction of a metal frame. It is made from durable, thick profile pipe. The length of the canvas is often about 50% greater than the width of the opening. This is necessary to create a kind of counterbalance. If the width of the canvas is small, you don’t need to make a counterweight. The technology also involves cutting metal into blanks and then welding them at the corners, which need to be given special attention. Vertical supports should be welded along the entire length of the frame, to which the sheathing will then be attached.
- Installation of the support beam. Outwardly, it resembles a profile pipe with a longitudinal section. The length of the beam is equal to the width of the lower end of the gate. It is attached to it using spot welding.
- Sheathing. Sheets of profiled steel are placed on top of the frame. They are attached using special self-tapping screws that are not afraid of moisture and do not damage the metal.


- Installation of rollers and top guide. Support rollers are attached to a metal platform. It is advisable to fix it by welding on a channel, which acts as a base. The rollers are securely screwed with ordinary bolts. The top guide is a small bar that moves along the rolls. The rolls, in turn, are attached to the support pillars. They do not allow the canvas to move to the sides when moving. The procedure is completed by installing removable polypropylene plugs, which are attached to the ends of the pipes, preventing moisture or dirt from entering them.
- Gate installation. When all systems are secured, the canvas should be put on the rollers and tested. It is advisable to perform all operations with at least two people, since the gates are quite bulky and heavy.


For more information on how to install sliding gates with your own hands, see the following video.
Automation
The frame of many gates is made of metal, which increases its weight. Opening such systems manually is not always comfortable. This problem is solved with the help of automatic drives. It is impossible to make them yourself, since this requires special equipment. They install automation on roller shutters, sliding and swing gates. This process can be broken down into several sequential steps:
- drive mount. It is a motor with gears that drive the entire system. They are located inside a special housing, which allows them to be protected from external factors. At this stage, the device is adjusted relative to the blade so that the rail moves without load.
- Rail fastening. It is fixed on the canvas so that it coincides with the internal gear. It is important to take the product in length with a small margin. When fastening the gate must be completely closed.
- Setup. In order for the motor to move the sliding gate, the teeth on the gear and rack must match. They are combined using special methods, which you can ask experienced craftsmen about.
- Connection. The motor is connected to the electrical network of the house, and sensors are used to open the gate using a phone or a regular button.
Acquaintance with the house begins from the gate. Essentially, this is the owners’ business card. Therefore, their appearance should, by definition, be solid and beautiful. But, at the same time, their main purpose is to ensure the safety and security of private country houses and dachas.
How to combine these two purposes together? How to make swing gates for your dacha beautiful, reliable and functional. What types of swing gates are there and which ones are better to choose? How to make and install. There are detailed step-by-step instructions about all this in our article.
Before we move on to describing the process of installing gates, we will focus on their pros and cons.
Advantages of swing gates:
- simple design;
- relatively low price;
- undemanding in maintenance;
- long service life;
- strength;
- ease of operation;
- unlimited choice of design solutions and shapes;
- no need for concreting the site. For example, under the rollers for;
- possibility to install automation.
Flaws:
- the need to provide quite a lot of space for opening and closing;
- the need to take into account the wind load in the region.
Simple arithmetic shows that swing gates have significantly more advantages. And the shortcomings are removable or not critical. The long history of their existence only confirms the reliability of the system.
Swing gate design
No matter what materials appear, no matter how the fashion for decorating gates changes, the basic principle of their arrangement remains unchanged. Structural device:
- pillars (racks). In fact, they are not gates, but they are supports for their fastening;
- frame for swing gates. Wood or metal can be used in its manufacture. The latter is more popular because gives the frame greater rigidity;
- finishing (cladding) material for cladding;
- loops;
- latches and locks.
So, we have decided what swing gates are and what features they differ from.
Making swing gates - tools and materials
Having made sure that we can make them ourselves, we will begin construction.
The required tool for making swing gates and consumables for it.
Tool
Mandatory for the manufacture of the frame and arrangement of racks:
- Bulgarian. Designed for cutting and grinding metal workpieces;
- threaded discs;
- grinding discs;
- welding machine;
- electrodes;
- roulette;
- building level;
- corner;
- hammer;
- shovel;
- Master OK.
Auxiliary:
- compressor, spray gun or brushes for painting racks and/or gates;
- drill. If necessary for fastening the gate trim;
- rivet, as well as rivets for it.
Material
- pipe for making a frame. It is preferable to use a profile pipe 60x40x1.5. 40x20x1.5 will also do. The final choice depends on the finishing material and taking into account the wind load;
- pipe for making racks. Here you should also be guided by the weight of the finished gate.
- gate weight is within 150 kg. and below. A pipe 80x80x4 is suitable;
- gate weight from 150 kg to 300 kg. Pipe - 10x100x5;
- The weight of the gate exceeds 300 kg. Pipe -140x104x5.
Tip: You can use brick, concrete or even wood for the racks. In any case, correlate the properties of the material with the expected load.
- hinges for swing gates. They can be adjustable or unregulated. Must be made of high-quality material and be able to withstand significant loads;
- locks. Can be mechanical or electromechanical. The choice is discretionary;
- dye. Needed for painting racks and/or trim;
- sheathing There is also complete freedom of choice here. The main thing is that it is to your liking and affordable;
- automation for swing gates. To be able to make automatic gates. You can not install it at all or install it later. But, if its installation is expected, even in the distant future, it is better to make the frame of the swing gates more durable.
How to make swing gates with your own hands
Do not think that homemade is a synonym for the words “ugly” and “unreliable”. Quite the opposite - homemade swing gates mean creativity, individuality and concern for your own safety.
Sequence of work.
- stage - installation of racks for hanging gates.
- stage - manufacturing swing gates.
The stages, of course, can be changed. But the installed racks (posts for swing gates) must last at least a week. In order not to prolong the pleasure, the waiting time can be occupied by welding the gate.
Stage 1 - installation of swing gate posts
The following can be used as a stand:
- profile pipe. The choice of pipe cross-section is justified above in the “materials” section;
- concrete pillar - purchased or poured on site;
- brick or natural stone. The latter is used more for cladding due to its non-standard dimensions;
- wooden beam (100x100).
Methods for installing poles/racks:

The pipe can be driven to a depth of about one and a half meters
This installation method is the fastest, most cost-effective (no concrete costs), and it is possible to replace the stand. The main thing when constructing pillars using this method is to maintain the level. This will prevent the gate from skewing.
Material prepared for the website www.site
 Strengthen the support pillar with concrete (concrete), i.e. make, a kind of foundation for the base of the gate.
We will describe the second one, because the first requires brute force and suitable soil.
Installation of gate posts
Execution sequence:
- Dig or drill with an earth drill a pit at least 1 meter deep. The diameter of the drill must be at least 200 mm, with a pipe cross-section of 100x100.
The depth depends on the depth of soil freezing in the installation region. The width of the sides is determined by the quality of the soil and the dimensions of the supports (pipe, wood, concrete).
- We arrange a sand and crushed stone cushion under the concrete. Its height is 150-200 mm. The purpose is to prevent the post from deepening and to create a foundation for concreting.
- We install the post and level it using a building level.
- Prepare the concrete and pour the stand.
Concrete pillars must withstand for 7 days, no less. The concrete must harden well. While the concrete is curing, periodically moisten it with water. Of course, cracks in such a small area are not as dangerous as, for example, cracks in the foundation of a house. But it's better to avoid them.
Tip: If you use brick or concrete rather than a pipe, the depth of the recess will also be 1 m.

For reliability, the racks need to be reinforced. And also, take out two or three reinforcing embeds in advance for attaching the hinges.
Stage 2 - production of swing gates
Sequence of independent device.
Installation location and appearance of swing gates
This is the starting point from which all work begins. Often the installation location has a direct impact on the appearance of the structure.
For example, you need to install a gate in the backyard, at the entrance to the garden, or to fence off a future construction site. Then both the material and the design will be as simplified as possible.
If it is a front gate or a garage, then the costs will be higher.
Swing gate sizes
Ideally, the gate is made together with the fence. However, if, for example, you have a hedge or you are expanding the driveway and need a new gate, you should accurately measure the dimensions.
Tip: Try to make swing gates in the same style as the fence.
It is important to measure the height and width of the opening for the gate. When measuring the height, keep in mind that a technical gap is usually left at the bottom of the gate. Its value depends on the coverage of access roads. If you have asphalt, tiles or concrete in the gate area, then 5-7 cm of clearance is enough. If the soil is not strengthened (grass grows) and the surface is not flat - then about 10 cm. Technical clearance is also needed to reduce the wind load, if the future gate is solid, without ventilation gaps.
It is also necessary to ensure that there is sufficient clearance between the sashes. This will level out slight displacement of the racks.
Drawing of swing gates
Having at your disposal a drawing and design diagram of swing gates, it is easy to calculate the amount of material required.
Try to make a frame for the gate so that its dimensions correspond to the dimensions of the intended finishing material. This will make the installation process easier for you and avoid connecting seams on the front surface of the gate. For example, the standard width of PS-10 corrugated sheet is 1,100 mm.
Advice. When making calculations, use the working, and not the total, width of the finishing material.
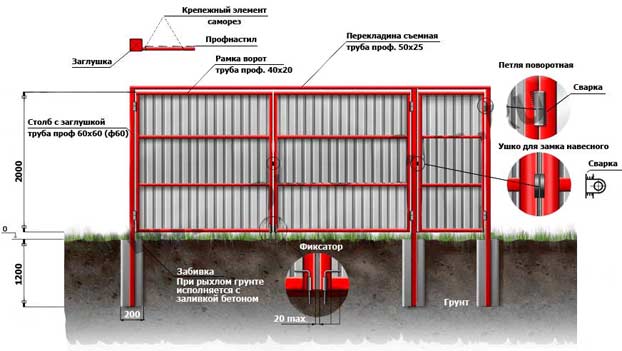
The figure shows a diagram of a frame for swing gates, which we will take as a basis.

Using this drawing as a basis, you can calculate the amount of material, attachment points and parameters of pipes and finishing materials.
In our example, the frame is a welded structure. It will be made of pipe or metal profile. But you can also use wood. If, for example, you have a completely wooden gate.
The picture shows that the frame has a square appearance and internal jumpers. They are needed to give the frame rigidity.
Please note that this diagram is shown for swing gates that are not equipped with a wicket. The gate is located separately. If you decide to save space and embed the gate into the gate, consider this need when creating a drawing of the frame for swing gates.
Calculation of swing gates
For the frame shown in the diagram you will need the following material:
- profile pipe 60x40 - 22 meters - for the perimeter of the frame and lintels. This pipe will be attached to the racks and support the entire structure;
- profile pipe 40x20 - 15 meters - for the internal frame (perimeter reinforcement). Namely, the gate lining material will be attached to this pipe.
Usually pipes are sold by linear meters, so it is better to immediately take the sizes that you need. Among other things, this will make delivery easier for you.
Pipe cutting and grinding
At this stage, the manufacturing of frame components occurs. The pipes are cut to the required length and polished.
Grinding is needed to remove rust from pipes. If the metal is lubricated with oil, it must be removed using a solvent (usually gasoline).
Welding swing gates
When carrying out welding work, remember safety precautions. It is better when this type of work is performed by a specialist. This way the quality of welded joints will be higher. And the appearance is more beautiful.
When welding, it is important to make joints in such a way as to protect the pipe from water leakage. Otherwise, water or snow will get into it. In winter it will freeze, and with warming it will begin to expand. This will inevitably lead to expansion of the pipe walls. And, as a result, to deformation of the entire structure.
In our example, the internal pipes are welded in the form of squares. But this is not of fundamental importance.
The pitch of welding fastening of the external and internal frame (pipes 60x40 and pipes 40x20) is 250-300 mm. Maintain staggered order. This way, the pipes will not break the weld seam due to thermal expansion.
Some drawings of frames for swing gates are given below.


The more stiffening ribs, the greater the wind load your gate can withstand.
If you are sewing up a fence with finishing material, then weld the pipe in the middle of the outer one. This way, it’s easier to mark the place where the casing is attached.
Primer
It doesn’t matter what material was used to make the frame - metal or wood - it needs to be primed. A primer will extend the life of the paintwork and make the application process more enjoyable.
Welding areas are primed especially carefully.
Latch and hinges for swing gates

The hinges are welded to the frame and to the racks (pillars). If the stand is made of brick, and the removal of reinforcement was not provided, then you must first attach the channel to the brick with a dowel, and then weld the loop.
Varieties of loops are shown in the photo


The valve mechanism you choose is the one you prefer. The most common and easiest to manufacture is the one shown in the photo.

Finishing of swing gates
- Painting the frame
The frame must first be wiped clean from dust. Any paint is suitable for painting. It is better to apply the paint with a spray gun, so it will lie smoother and the work will go faster. You can also use a brush. In this case, the process will be somewhat delayed, and the paint consumption will be less.
It is better to apply paint in several layers.
- Fastening finishing material
Covering the gate is possible before and after installing the frame on the posts. To do this, we attach the casing to the inner pipe (40x20, in our example). The method of fastening and fastening depends on the finishing material.
How to cover swing gates
The following materials are used:
Corrugated sheet
Advantages - low price, wide range of colors, light weight. The disadvantages include: the difficulty of replacement (it is difficult to choose the color, because the sheet fades slightly, plus, the shade depends on the batch and manufacturer). And also, the possibility of damage during installation and high windage.

Tree
Advantages - availability, beautiful appearance of natural wood, ease of replacement. Disadvantages: high maintenance requirements. Over time, the wood may dry out, leading to cracks.

A metal sheet
The advantage is durability. The disadvantage is significant weight.

Forging
Advantages: unlimited designs. The disadvantage is that only specialists can make forged gates with their own hands.

Steel mesh
Advantages: low cost, high speed, light weight. Disadvantage - low aesthetic properties; the transparency of the fence makes the entire territory of the yard accessible for viewing.

Rabitz
The characteristics are the same. More suitable for installing technical gates.

Combined
The basis of this combination is most often forging, which allows you to give the gate any shape. And they are closed by lining the inside with wood, metal, corrugated sheets or polycarbonate. Examples of such gates in the photo

Installation of swing gates
So, the racks are ready, the frame is welded, the finishing material is fixed. It's time to hang the gate.
Conclusion
We hope you are convinced that installing swing gates with your own hands is not a difficult task. If you have the materials and tools, installing the gate will not take more than a week. From the installation of the pillars to the installation of the gates. And if you consider that it takes 7 days for the concrete pillars to settle, then generally a day. I wish you success!
Swing gates - photos of different device options


In this article we will try to tell you how to make swing gates with your own hands. You will understand that there is nothing complicated about it. When producing a sash, the most difficult thing is to weld the frame. If you do not know how to use welding, then hire a welder for a couple of hours.
How to make a gate with your own hands - choosing materials
Gates can be made of wood or metal. Please note that you are unlikely to be able to make decorative gates yourself with curved lines using forging; only a professional can do this. To make decorative gates you need equipment, a special room, expensive tools and, of course, experience. It is better to buy such gates ready-made. It would be wiser for a home craftsman to make a regular gate with a metal frame covered with profiled sheets.
How to make a gate with your own hands - installation of supports
If the yard is already fenced with a fence with support posts and a gate, then this greatly simplifies the matter. Secure the hinges by welding directly on them. If there are no supports, then you need to perform a number of simple steps.
- Treat the metal supports with primer and paint them.
- Depending on the width of the gate, you need to dig 2 holes 1.5 meters deep.
- Place a cushion of sand and gravel at the bottom of the pit.
- Insert the supports into the holes and secure them with reinforcement.
- Align the supports plumb and fill with concrete.
Hinges can only be installed after the concrete has completely hardened.

How to make a gate with your own hands - gate frame
To make the frame correctly, you need to prepare a drawing of the metal structure in advance and at this stage adhere to a certain sequence of actions.
- In accordance with the required dimensions indicated in the drawing, cut the metal pipe strictly at an angle of 45 degrees.
- The frame must be assembled on a flat horizontal surface and immediately secured by welding.
- Check the internal dimensions and compare the diagonals of the resulting frame.
- Make the necessary adjustments and weld the frame completely.
- In the sash where a gate is not provided, weld several corners from the inside for reinforcement.
- In the second leaf, assemble a special opening in which the gate door will be secured.
- Once you have finished preparing the door opening, assemble the door. Using the prepared dimensions, assemble the frame of the gate in a strictly rectangular shape.
- The rigidity of the gate door should be at the same level as the ribs on the leaf.
- To give the structure additional rigidity, weld metal triangles in the corners.
- Weld 2 cross members to the frame.
- According to the drawing, weld the canopies and bolts in the required places.
- After welding, the elements are ground and primed.
- Paint the structure.


How to make a gate with your own hands - covering the frame with corrugated sheets
After the frame has dried, you can use corrugated sheeting to cover the frame. Place the profiled sheet on the frame and carefully attach it using rivets or self-tapping screws. The use of rivets allows you to achieve an attractive appearance.
Rivets and self-tapping screws must be secured in the recesses of the corrugated sheet. Consumption: for 1 square meter of corrugated sheeting you need to use at least 6 rivets or self-tapping screws. This quantity is due to the fact that in addition to the weight of the gate, they must withstand strong wind loads. After fixing the sheets of corrugated sheets, you can begin hanging the gate on the hinges.


How to make a gate with your own hands - installation nuances
Before installing swing gates, you need to make sure that the ground surface is even. Since most craftsmen make gates that can open in both directions, keep in mind that gates that open “pull” open more conveniently and last longer. Such gates are difficult to break open from the street side, since more force must be applied against the direction of opening than in the direction “along” the gate. This is important, because in critical situations every minute is valuable.

Making your own gates from corrugated sheets is a reliable and economical way to protect your property from prying eyes and uninvited guests. This entire system can be automated, which will improve the practicality and functionality of using the gate. Automated equipment is used for this.
When homeowners are constructing fencing around their properties or in the process of constructing garages, the need to solve the problem of building a gate always arises. First of all, it is necessary to accurately determine the appropriate type of gate. In this matter, an important role is played by the calculation of the smallest nuances, since situations often arise when, after installing the gate, you have to do additional work to arrange your site. It is for this reason that the design features of various types of gates should be studied before purchasing materials.
- Recoil;
- Swing;
- Lift-and-swivel.
Each such design has its own specific differences, so it is necessary to study them separately.
DIY swing gates
Construction stages:
- Installation of hanging racks.
- Making the gate itself.
The sequence, of course, can always change.
The following materials can be used as racks:
- Profile pipe with a certain cross-section;
- Reinforced concrete pillars;
- Masonry made of brick or natural stone. In most cases, stone is used for cladding purposes;
- Ordinary wooden beam.
Let's consider the existing methods of installing poles:
- Metal pipes are buried in the ground to a depth of approximately 1.5 m. This technique will always differ from others in terms of financial benefits and time savings. There is also always the possibility of emergency replacement of the rack. To avoid misalignment, it is recommended to strictly maintain the same level when burying pillars;
- Equipment of a kind of concrete foundation as a base for pillars.
More attention should be paid to the second installation method.
Sequencing
- Using an earth drill, a pit is dug, the minimum depth of which should be 1 m;
- A special cushion for concrete made of sand and crushed stone with a thickness of 150-200 mm is equipped. Such a platform is necessary so that the rack never deepens;
- The pillar is installed and gradually leveled using a regular building level;
- The stand is poured with concrete.
To assemble the gate, you need to determine the size of the upcoming structure. To simplify the work, it is recommended to create a drawing in which all dimensions will be indicated.
 After this, you can begin manufacturing parts for the frame according to pre-made drawings. When performing welding work, you should always remember safety precautions. It is advisable to entrust this matter to a qualified specialist. You should always remember that the number of stiffeners largely determines the resistance of future gates to external weather conditions. If pipes are used as racks, it is advisable to prevent water from entering them.
Gates can also be decorated with products made by cold forging. After the gate is assembled, you can put it on the hinges.
Let's list the main advantages of swing gates
- Economical;
- Relative ease of installation;
- All stages of installation can be performed on your own without much difficulty;
- To make such a structure, different materials can be used.
Disadvantages of swing gates

In general, installing swing gates is not difficult.
DIY sliding gates
Sliding gates are a little more difficult to install. When equipping such a structure, brick pillars are placed on both sides, on which rollers are fixed, holding brackets and fixing elements at a certain height.
The main weight should always be supported by the channel, which is fixed to a securely installed foundation on the inside of the gate or to iron supports.
 You can install a solid foundation or several strong pillars under the channel. For the foundation, you will have to equip a pit, at the bottom of which there will be a cushion of crushed stone and sand. After this, formwork with waterproofing is placed in the pit. A reinforcing grid is installed in the formwork, after which concrete is poured into the pit.
A channel with reinforcement is mounted on a concrete foundation. This element is strongly pressed into the solution until it is completely immersed. When the concrete hardens completely, you will get a fairly strong iron platform. Only after the concrete has hardened and the channel has been installed are the gates themselves installed.
 For the frame, you can use a square pipe or an ordinary iron corner. Additional stiffening ribs are necessarily welded to the square frame to increase the stability of the created structure. Each weld seam must be cleaned of the resulting slag. The frame is primed and then covered with a special paint that can protect against corrosion. Only after this can corrugated sheeting be installed on the frame.
When all the constituent elements of the structure are prepared, and the foundation with the built-in cantilever channel becomes strong enough, you can begin attaching the components of the sliding system.
Installation of a sliding system

Cantilever beams are mounted at different heights. When developing such structures, sizing must be done with particular accuracy, since the console can be deformed even with the smallest errors.
The disadvantages of sliding gates include only 2 features
- Compared to swing gates, sliding gates are a little more expensive.
- To be able to roll back, you will need a little space along the fence.
We list the main advantages of such gates

More information on installing sliding gates can be found in this video:
Installation of overhead gates
First of all, it is necessary to design the lifting and turning system. To do this, you need to change the dimensions of the opening and draw up a suitable sketch yourself or find a suitable drawing. After purchasing all the components and tools, you can begin installation, which consists of the following steps:

After the assembly is completed, finishing and painting work can be carried out. There should be a special groove for the seal at the bottom of the profile.
Advantages

The disadvantages of lift-and-turn systems include

More information about installing lift and slide systems can be found by looking at this
video:
To ensure the safety of a residential premises or industrial facility, it is customary these days to install fences and gates. Today, modern homeowners use three main gate assembly technologies. The essence of technology lies in the way it is discovered. Collecting any variety with your own hands will not be difficult for anyone.


