How to sharpen nail scissors at home. Sharpening knives: expert advice How to sharpen a knife with your own hands
How true sharpen a hacksaw?
The question of how to sharpen a hacksaw is of interest to many home craftsmen. Any material (wood or metal) can be given different shape. For these purposes, hacksaws for metal or wood are often used. They continue to be one of the most popular primary processing tools. Such tools are in the arsenal of any self-respecting owner, but not everyone can answer the question of how to sharpen them correctly.

The correct location of the file in the horizontal and vertical plane.
Hacksaws for wood
This is a necessary tool in the household. They can customize skirting boards, make bars for economic needs etc. Sellers are now offering huge selection such tools, so it is difficult to find quality saws. Consider how to choose a hacksaw that will keep sharpening for a long time. The following characteristics affect this:

Sharpening tools: round file with a special holder;
flat file;
template for sewing the depth gauge.
- Tooth sizes. Small ones cut material slowly and accurately, but require careful sharpening. Large teeth allow you to cut quickly and roughly, but require a minimum of effort when sharpening, and the process itself is quite fast.
- The shape and material of the canvas. The classic shape of the tooth is a triangle, but recently hardened teeth of a trapezoidal shape have become widespread. The material for the manufacture of hacksaws with triangular teeth is steel with a hardness of 40 to 55-58 points on the Rockwell scale. For saws with trapezoidal blade elements - hardened steel with a hardness of 55 points according to Rockwell. If triangles are easy enough to sharpen with conventional tools, then modern hardened saw blades sharpen at home it is very difficult (almost impossible), it is easier to buy new ones.
- Distance between teeth. The longer the interval, the easier it is to sharpen. Typically, the spacing between teeth is related to their size and shape. So, saws with small teeth have a smaller spacing than saws with large teeth.
- Wiring. This word refers to the distance of deviation of the tooth from the web. This is done so that chips and slags are removed in the process of work. This distance affects the speed and convenience of sharpening. Sometimes, in order to restore the saw, in addition to sharpening, they also make a new wiring.
Usually, all the parameters described are indicated by the manufacturer on the packaging of the web (less often, on the handles). So, the key indicator is the TPI value, which can be from 1 to 9. Recently, there have also been big values from Chinese manufacturers.

Varieties of saw teeth: a, b - simple triangular; c, d - triangular sparse and with wolf teeth; e, e - rectangular, facing each other with hypotenuses and sparse.
Read also
If the saw is intended for rough work, for example, for a garden, felling trees in a forest, then the TPI value will be 3-6, and for jewelry work (when interior decoration premises or furniture) - 5-9.
Some manufacturers, Chinese and Polish, often do not monitor the quality and availability of factory sharpening, so the buyer of such a product will have to do it himself, sometimes along with wiring.
What hacksaw should be sharp, does not cause any objections. Then the tool cuts faster and with less energy for the worker.
How to quickly and easily sharpen a hacksaw with a file
When the wiring is completed, you should carefully check the quality of the work done. To do this, a perfectly straight, light object, for example, a straight wooden skewer, is placed on the side planes of the teeth. After that, carefully examine the tightness of the teeth to the control line: none should protrude outward or sink inward. Everyone should be on the same line. If any protrudes, then it is trimmed to the general level, in no case should such teeth be left as they are, otherwise they may break during operation.
We sharpen a hacksaw on wood
When the wiring is done and checked, you can start sharpening. To do this, the canvas is carefully fixed in a vice or homemade device. The teeth are usually sharpened with files or diamond files. The process itself is carried out with a rough file, and finished with a needle file, but you can not finish it or sharpen it only with a file, and this “eats” the tool for a longer and stronger time.
Next, you need dexterity and a good eye. A layer of metal is removed with a file, holding it with one hand by the handle, and with the other by its end, giving the desired angle for the tooth. Angles from 15 to 30° are considered optimal. If there is no eye, then you can use primitive devices, for example, from a wooden block. It is processed so that from the side it resembles a right triangle with angles of 30 and 60 ° (or 20 and 70 °). Then it is placed under the blade to control the angle so that the plane of the acute angle coincides with the plane of the working surface of the file or needle file.
In the process, the pressure on the file, which removes the metal, and the number of movements are important. For uniform sharpening of the saw, the number of movements of the file along all teeth should be the same at approximately equal pressure. If the pressure is weak, then the process will go slowly, but you can clearly control the angles. With strong pressure, work takes little time, but it is difficult to bring the entire canvas to the same level.
Checking the quality of the work performed is quite simple: they look at the canvas in the light at an angle, all the teeth should shine, and if one does not shine, then it is not sharpened.
For a guarantee, you can make a control cut.
Hacksaws for metal
Despite the huge number of angle grinders and other automatic saws that require a minimum of effort from a person when working, there are many hand saws, and caring for them is quite complicated. Manual a tool for processing metal products is now in most cases an outdated phenomenon, but for some work such saws are indispensable, they are also taken “just in case” for infrequent and infrequent hard work.
The teeth of such saws are very small, short and frequent. It is very difficult to sharpen such a canvas, almost impossible. Usually a dull blade is much easier to remove and discard, replacing it with a new one. Now only a few people sharpen such canvases - lovers of complex work, but in the time of the USSR, many did this because of the shortage of canvases.
Sharpening a metal file is similar to the process for wood saws, but with the difference that miniature needle files are used, and magnifying glasses are used to control the angles.
The chain tooth cuts the wood like a planer, and the thickness of the chips is controlled by the height of the stop. Saturated work of the saw leads to a sharp blunting of the chain. During one book of the day, several sharpenings may be required. It worsens the problem that initially, that the tooth rapidly becomes dull when it meets the ground. Quite once or twice...Post Views: 0
Nippers, tweezers, scissors are among those tools of a manicure set, without which it is difficult to imagine performing an impeccable trimmed manicure or pedicure at home. The blades of each tool must be sharp, even, without gaps in order to qualitatively and safely remove the stratum corneum of the cuticle, to give the free edge of the nail plate the desired shape. Even professional manicure tools from well-known brands begin to tear off pieces after some time instead of cutting nails / cuticles evenly. And cutting tools from conventional manicure / pedicure kits are subject to sharpening immediately after purchase.
There are three options for solving this problem.
Firstly, you can use the services of an individual sharpener who comes to the client's home and grinds the cutting parts of nippers, tweezers and scissors by hand. As a rule, the master works with a diamond monolayer (with a continuous diamond layer) whetstone.
Secondly, you can contact the workshop, where a certified specialist will professionally sharpen manicure tools using a diamond wheel or in a special machine. In this case, the services will cost more, but the company gives a guarantee for its work (service life of at least 6-7 months, even with frequent use).
Thirdly, you can ask for help from the "strong half" of your family and sharpening manicure tools at home will save your family budget. And you will learn how to properly sharpen scissors and nippers for manicure / pedicure from the photo and video materials of this article.
♦ SHARPENING MANICURE CUTTERS AT HOME
You can sharpen nipper blades with a regular carbon steel file. Choose a file with a uniform grain and tight, fine cuts. We recommend "experimenting" with old nail clippers, and if you have an expensive professional tool, it is best to seek help from an experienced specialist.
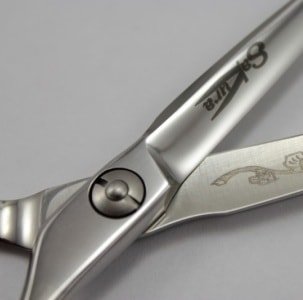
- in the photo: "cheek", "heel" and the joint (hinge) of the wire cutters
❶
Backlash.
Open the wire cutters, take one handle and shake from side to side. If there is a backlash, then we put the tool on the desktop, put the rod on the rivet of the swivel joint and tap with a hammer (not hard), constantly checking the result; 
❷
Cleaning the swivel.
We fully open the wire cutters and with the help of a folded piece of sandpaper we clean the joints of the joint, first on one side of the tool, then on the other; 
❸
Sharpening of the entire plane of the blade.
We put the open cutters with a cheek on the table and with smooth unidirectional movements of the file we grind the inner cutting edge; 
❹
Sharpening the corners of the blade.
We put the wire cutters on the cheek parallel to the line of the edge of the table and with smooth unidirectional movements of the file we grind the corner of the cutting edge; 
❺
Sharpening of external cutting edges.
Now you need to close the wire cutters and put them on the table so that the connected cutting edges are at the top. We grind the outer cutting edges along the connection line with reciprocating movements of the file; 
❻
Grinding "cheeks".
Alternately grind the "cheeks" with unidirectional movements of the file; 
❼
Polishing and oiling.
At the end of the work, we will “walk” along the cutting edges of each blade with a polishing bar (8000 grit) so that they become smooth and even. After that, you can lubricate the swivel with oil.
♦ SHARPENING MANICURE SCISSORS AT HOME
For work, prepare two whetstones with an abrasiveness of 600 grit and 1500 grit.
- in the photo: joint, cutting edge, lateral and upper plane of the scissors blade.
❶
Backlash.
We put the scissors with sharp edges up, put a small cue ball on the rivet and hit the cue ball with a hammer. We eliminate the backlash gradually so as not to flatten the rivet too much with one blow; 
❷
Grease.
After eliminating the backlash, you can lubricate the joint of the tool on both sides so that the blades move freely and smoothly; 
❸
Sharpening of blades with a stone 600 grit.
We fix the open scissors on a stable surface and sharpen the cutting edge from the side of the upper plane of the blade, moving with a 600 grit grindstone in one direction (toward ourselves). First we work with one blade, then we move on to the second; 
❹
Polished blades with 1500 grit stone.
With a 1500 grit stone we move in one direction (toward ourselves), eliminating scratches after sharpening and making the cutting edge of each blade smooth; 
❺
Blade tips.
After sharpening, one tip of the blade may slightly move away from the other. In order for the tips to fit snugly against each other, you need to bend one of them a little with pliers; 
❻
Examination.
Stretch a sheet of printer paper between your fingers and try to cut it in the middle with sharpened scissors. The cut should be smooth, without "chewed" edges.
♦ SHARPENING THE MANICURE TOOL WITH THE GRINDING ROUND
On a grinding machine, you can sharpen tools quickly and efficiently. Of course, you must have experience with such equipment, as it is easy to injure your hands during the rotation of the circle. It is best to sharpen the blades of a manicure tool on a grinding wheel with a fine-grained diamond coating.
❶ Backlash is eliminated at the very beginning of work. To do this, take a strong rod, place one end at the junction point of the blades, and tap the other end with a hammer (not hard), checking the working stroke of the tool from time to time;
❷ First we sharpen the blades with inside, and then - from the outside (taking into account the angle of cut). Set the minimum speed of the diamond wheel in the machine. We draw in a rotating circle with the edge of the blade in one direction (from the beginning to the end, the contact patch is no more than 0.3 mm);
❸ Turn off the machine, wipe the tool and use a polishing bar with an abrasiveness of 8000 grit to align the edges of the blade, ground in the machine.
♦ HOW TO CHECK THE QUALITY OF THE SHARPENING?
Scissors.
The cutting surface of the tool after sharpening should be smooth, and the edge of each blade should be even. Be sure to check the movement of the blades and make sure that there is no play at all, but the blades close / open smoothly, simultaneously, without any extra effort.
Test: take a sheet of printer paper (or a piece of electrical tape), pull it between your fingers. With sharpened scissor blades, cut the stretched canvas in the middle. If a clear cut remains on the paper without torn, not chewed edges, then the tool is ready for use.
Nippers and tweezers for a cuticle.
Make sure that the edges of the blades are even and smooth on both sides, and there is no gap between the cutting edges. Grab the tool by the handles and move it up/down slightly. If you find a backlash in the joint of the nippers, then be sure to ask the master to eliminate it, since during the trimming manicure you can injure the periungual ridges with sharp blades.
Test: Take a piece of a thick plastic bag, pull it between your fingers and make a cut with sharpened wire cutters. The edges of the cut should be clear and even.
♦ VIDEO MATERIALS
Sometimes sharpening is not needed, you just need to update the edge a little, removing bumps and lightly grinding, which makes the knife sharper.
This is called editing.
They do it with the help of musat, fine-grained sandpaper or in the old fashioned way, on a leather belt.
In this case, the angle is not set, but the one that already exists is maintained.
But if you need to change or restore the geometry of the cutting edge angle, then this is sharpening.
And if you do not maintain the correct angle, then it will become simply impossible to cut.
A few words about laser sharpening and self-sharpening steel
Some are afraid to sharpen knives at home, as they believe that now the workshops offer almost nanotechnology, as a result of which the blade will stay sharp longer. We are talking about laser sharpening, as you understand.
So here it is: it's a myth and marketing.
Laser sharpens absolutely nothing., the beam simply indicates the correct angle (same as the laser level for determining the plane). And it sharpens an ordinary stone, therefore, there is nothing special in such a procedure.
Self-sharpening steel - also from the category of fantasy.
Absolutely everything blunts, but the better the alloy, the longer the knife lasts. Therefore, it makes no sense to throw money away on such knives, it is better to buy a good sharpener for ordinary ones on them.
Which knives cannot be sharpened on their own?
Let's start with the most important: Which knives can't be sharpened?
If you are doing this for the first time, then you can not sharpen your favorite and comfortable knives.
An incorrect sharpening angle can completely ruin the blade, therefore, it is better to experiment on something simpler, so that later you can safely throw it away and not be annoyed.
Yet do not sharpen ceramic knives yourself with ordinary whetstones. Only a diamond takes ceramics, and if you don’t have such a bar, then it’s better to give the knife to a professional.
But if there is, then you can try to sharpen it yourself, since the technology for sharpening a ceramic knife is no different from sharpening steel blades.
Knives made of Damascus steel and damask steel- on the contrary, sharpening on a diamond bar is not recommended categorically, since the blade can crumble.
It is better to give it to the master, since grinding such steel with an ordinary bar is not a task for the faint of heart: a long process.
Also, do not sharpen knives with a wavy edge at home. Moreover, it also makes no sense to carry them to the workshop, since it is simply impossible to return the original properties to the saw-knife.
It's easier to buy a new one or regrind it to a regular one.
What to sharpen? We are considering options
There are many tools for sharpening knives, ranging from electric ones to ordinary whetstones, which are very inexpensive.
Electric sharpeners

At electric sharpeners two big minus : an expensive price (within 10,000 rubles) and the ability to strongly remove steel during sharpening, which leads to rapid wear of the knife.
On the other hand, the process is fast, fully automated and there is no need to manually maintain the degree of inclination during sharpening.
How to sharpen a knife on a sharpener is usually written in the instructions that come with the device.
Musat
Musat is a good thing, but sharpen them hard dull knife will not work, since it is mainly intended for editing. And the effect of such sharpening is a couple of days at most.
How to sharpen a knife with musat is schematically shown here:

Roller cutter
Good option for women. Just a couple of movements on the rollers and the knife cuts well (but not for long). They are inexpensive and anyone can afford them.
Sandpaper

Sharpening masters are skeptical about the use of sandpaper for these purposes. But the practice of those who apply it convinces us that this is a completely acceptable option.
It can not be said that it is the most comfortable, but if there is nothing at hand, and you need to sharpen the knife urgently, then it is quite possible to use sandpaper. Moreover, the article is not for masters, but for amateurs.
Sandpaper tapes must be fixed on any wooden base (in the form of a bar) with adhesive tape. On the one hand - coarse-grained fraction, on the other - fine-grained.
ceramic bar
For the price, it’s not worth talking about here, since they are quite cheap. The main thing is to choose it correctly, so that later it is comfortable to sharpen.
You need two bars. One with a coarser surface (320 grit), for basic sharpening and edge angle correction, and the second for surface grinding (1000 grit).
The length of the stone should be approximately the same as that of the longest knife in the house.
Width - the wider, the more convenient it is to work with it. And how to sharpen knives with a bar you can read below, in a separate block.
diamond bar
Diamond bars cost more than five kopecks, but the result cannot be compared with an ordinary stone. It is more comfortable to work with, and it is also more durable..
It consists of a plastic or aluminum base, on which two metal plates coated with diamond grains are fixed.

Such bars do not grind down like ceramic ones and even after repeated sharpening they remain even, rectangular in shape with sharp corners.
In addition to all these advantages, there are more benefits:
- They are not afraid of impact and will not break if accidentally dropped.
- The diamond bar is not clogged with steel particles. After sharpening, it only needs to be lightly rinsed under water and wiped.
- The sharpening process on diamond bars is very fast, which means that the stone will serve you for a very long time, as it almost does not grind
- You don't need to purchase two bars, as they are made so that one side is rough and the other is for grinding.
The disadvantage of diamond bars is one- price. They are not cheaper than 800 rubles, and if they are, then this is clearly a fake, which will become unusable after five sharpenings.
Japanese water stones
A water stone is also a bar. But you need to use it not dry, but moistened with water.
In the process of friction, a suspension is formed, which, simultaneously with sharpening, polishes the surface.
They aren't cheap, but they wear out fairly quickly. So, for simple kitchen knives, this is not the best choice.
Sharpening with an abrasive wheel on a drill or machine
Should not be doing that if you are sharpening a knife for the first time.
It only takes a couple of seconds to cause irreparable damage. Moreover, in this case, the steel is too hot and it is necessary to cool it in the process, and if this is not done, then the edge may crumble.
How to properly sharpen knives on a machine is the topic of a separate and extensive article, therefore, here we will not focus on this.
Also be sure to watch this video, it's very on topic.
Since, in this case, it is better to see once than hear a hundred times!
About sharpening angles and methods of fixing the blade
But no matter what stone you choose, the sharpening technology is the same. And this is the main thing to learn.
Practice to get started on the simplest ceramic bar, and when you see what you can do, buy something more expensive.
The most important thing in the process of sharpening is to return the original angle of the edge. For kitchen, home knives, it is usually standard: from 25 to 45 degrees.
Moreover, the smaller the degree, the thinner the cutting edge comes out. Yes, the knife will be sharp, but it will become blunt much faster, as well as lose its edge shape as soon as it touches something hard.
So, if you want to resort to sharpening as little as possible, you should not make an angle of 25 degrees.
Too much sharp knife- a rather traumatic thing in everyday life.
It will cut well not only vegetables with meat, but also kitchen towels along with your hands at the moment when you wipe it.

And here, pay attention to the fact that the angle in the table is full, that is, it is the sum of the two sides of the edge. And if you want to sharpen the knife by 30 degrees, then you need to remove 15 from each side of the blade.

Accordingly, if you need an angle of 45 degrees, then we remove 22.5 degrees from each side.
You need to keep this angle during the entire sharpening process, trying not to deviate from the set value, since the final result depends on it.
Now the question is different: how to fix and calculate this angle by eye?
You can do this as shown in the picture:

After you put the paper down, you will roughly know what angle you need to hold the knife.
Well, now let's move on to the sharpening process itself.
Step-by-step guide to sharpening a knife on a bar
- 1. First things first put the bar on the table so that it is convenient for you to sharpen. Can be placed underneath kitchen towel to prevent slipping.
You do not need to hold the bar in your hands, since in this case there can be no question of controlling the corners.
- 2. Soak it with water. This is necessary for better sliding of steel over stone and further easy cleaning of the bar from metal particles.
- 3. Place the knife across the bar and start moving away from you like you're sharpening a pencil. How exactly it looks, it is best to look at the video that we posted in the last block.
Don't press too hard on the rock., this will not speed up the process at all, but it can greatly deform the edge. Swipe 50 times on the bar with one side, trying to maintain the angle all the time.
As soon as you notice that a slight roughness, the so-called burr, has formed on the cutting edge, turn the knife over and sharpen the other side.
This is what the burr looks like:

Important! If the burr does not form, then continue sharpening. Only this unevenness will show that the steel has been sharpened enough and there is no point in sharpening further.
After you've completed the second side, the burr can move onto it.
In this case, turn the knife to the other side again and sharpen. And do this until it completely disappears.
And only after that you can proceed to grinding the edge on a fine stone. Here it is no longer necessary to move the knife 50 times, 20 times is enough.
And if you want the knife to dull less often, then you can bring the edge to a mirror finish using the usual leather belt, which is smeared with GOI paste.
In this case, the movements should not be pointed down, but vice versa. That is, you also "plan" the belt, only in the other direction.
We have described the most elementary method that does not require any special costs and fixtures. And there is one more, very convenient, but for it you need to build a small machine.
Here is the one in the photo:

As you can see, there is no need to keep the blade in the process, controlling the degree. The tilted and fixed bar does everything for you, and the main task is to keep the knife straight, at 90 degrees.
And this, you see, is much easier than keeping the level of 22.5 degrees (to be honest, this is an almost impossible task for a beginner, although everything sounds simple in theory).
Indeed, a deviation of some micron already leads to the fact that the quality of sharpening will not be the best.
How to sharpen a knife in extreme conditions?
And it happens that there is absolutely nothing suitable at hand, and you just need to sharpen the knife urgently.
In this case, the following methods will help you out:
- Sharpening a knife on the corner of a concrete step in the entrance (just wash it well before that)
- Sharpening a knife on an ordinary stone from the street, which looks more or less even
- Sharpening a knife on the rough edge of a ceramic plate or regular cup
We hope that now you will have an understanding of all the ways how you can sharpen any knife at home without damaging the blade or yourself.
Many people choose to throw away scissors that are already dull. But it is better to learn how to sharpen scissors, and thereby significantly save on their purchase.
After all, now on the shelves of the store you can buy only modern Chinese unreliable fakes.
The easiest thing to sharpen are stationery and clipping scissors. It is much more difficult to sharpen a manicure set. Before sharpening them, you need to make sure that the malfunction is related to blunting.
 It is quite possible that they simply loosened the fastening axis, where a bolt or a simple rivet is mainly used. Just tighten the bolt.
If the screw is tightly tightened, and the scissors still do not cut well, then sharpen the heel limiter, which is located near the hole with the bolt.
Do not try to close the blades, as you will aggravate the situation.
If a rivet is used at the junction, then tighten it. But before that, open the scissors and put it on any metal object.
Then, using a beard, flatten the rivet and check how well the blades close.
If nothing has changed after the steps taken, then you will need to sharpen the scissors at home.
Procedure
In order to sharpen scissors, you need to use a whetstone. It can be purchased at many hardware stores.
Most varieties of stones have two different sides, one of which is fine-grained and the other is rough. First you need to use the rough side.
How to sharpen scissors yourself? The algorithm includes several steps.
- Place the whetstone on a cloth and lightly dampen with water.
- If a bolt is used as a fastener on the scissors, then disassemble them. If a rivet is used, open the blades as wide as possible.
- Make sure that the slope of the factory sharpening is observed. Don't change it. It is required to lay the blade in such a way that its plane tilts away from itself.
- Make sure that the chamfer is parallel to the surface of the bar.
- Sharpen the scissors correctly, slowly drive the blades along their entire length and only in one direction.
- Once you have sharpened them on the rough side of the stone, start sharpening on the other side. Do the same.
When finished sharpening, test the scissors on a piece of fabric. If they are well sharpened, then without problems they will evenly cut the material by weight.
Sharpening nail scissors: how to
To sharpen nail scissors correctly, you need to use a small bar with a fine grain.
 Give preference to grinding stones with diamond chips.
Manicure scissors can be sharpened in the same way as ordinary scissors. But this should be done as carefully as possible.
This is especially true for sharpening the inclination of the cutting chamfer, as it differs from others.
If you have blunt nail scissors with curved blades, it is easier to buy new ones.
The only thing that can be corrected in them is a bolt.
How to sharpen garden shears
To sharpen garden shears yourself, you need to disassemble them.
- Unroll them first. This will be required to sharpen the blades along the entire length.
- To sharpen the lower concave blade, use the whetstone the radius of which is not more than 3.5 cm.
All other actions are similar to those described above.
Quick Methods
In order not to waste time on parsing and turning the presented tool, you can use the following methods.
- Sandpaper. Find a small piece of this material, fold it in half with the rubbing side facing up. Start cutting the paper into about 15 strips. In the same way, you can use abrasive material on fabric, metal wool.
- Aluminium foil. Take a sheet up to 25 cm in size and fold it several times. Then start cutting it.
- Glass jar or bottle. If you want to sharpen small scissors, you can use the neck of a bottle. Place open scissors in the neck of the bottle and begin to carefully connect the rings.
- Cutting a sewing needle. It will help sharpen nail scissors.
How to use the tool correctly
In order for the presented tool to retain its sharpness for a long time, one should adhere to some recommendations.
- If you use scissors to cut fabric, then use the tool only for this purpose. No need then to cut fish, cardboard and other objects with them.
- Other scissors are used to cut zippers and metal threads.
- If you use them for cooking, plant care, and nails, disinfect them regularly.
The main thing - do not boil the scissors, but treat with a simple antiseptic. Otherwise, they will quickly become dull and rusty. Do not forget to lubricate them every six months.
With the help of a knife, we cook food, cut food and perform other household chores. Therefore, it is very important that the blade of the knife always remains sharp. Theoretically, there is nothing complicated in sharpening knives, but in practice it turns out that not everyone can sharpen a blade well. To have an idea of how to sharpen knives and how to do it correctly, we advise you to read our article.
Before you start sharpening a knife, you need to find out what material it is made of. There are several types of knives:

- Carbon steel knives are the most affordable, made from an alloy of iron and carbon, easy to sharpen and stay sharp for a long time. Among the shortcomings, it can be noted that the oxidation of the knife blade from interaction with food or an acidic environment, because of this, rust and stains appear on the knife, and the products acquire a metallic taste. Over time, after the formation of plaque on the blade, oxidation stops.

- Low carbon stainless steel knives are made from an alloy of iron, chromium, carbon and in some cases nickel or molybdenum. Stainless steel knives are inferior in hardness to carbon steel, so they dull quickly and require regular sharpening. The advantages include - resistance to corrosion.

- High carbon stainless steel knives are a higher class of knives, with a higher carbon content and additions of cobalt or vanadium. Due to the higher quality alloy, this species knives do not require frequent sharpening and are not subject to corrosion.

- Damascus steel knives are mainly made as edged weapons, but there are also kitchen options. The Damascus steel knife is a multi-layer blade made of different high quality alloys. The disadvantages include the high cost of knives.

- Ceramic knives have gained popularity because of their sharpness and ability not to dull for a long time. But in addition to the advantages, ceramic knives have a significant disadvantage, which is their fragility when falling from a height and poor fracture resistance.
Sharpening tools
Touchstone (whetstone)

Whetstones are available with a different number of abrasive grains per square millimeter. Therefore, for rough sharpening and finishing grinding, it is necessary to use bars with a minimum and maximum abrasive content. In foreign-made whetstones, information about the number of abrasive grains is on their marking. Grinding bars of domestic production have to be chosen "by eye" or ask the seller which whetstone to use for primary and which for finishing sharpening.
Mechanical sharpener

Mechanical sharpeners are mainly used for sharpening kitchen knives. The sharpening process, although it happens quickly, but the quality leaves much to be desired. For this reason, for hunting and sporting knives, it is recommended to use other sharpening methods.
electric sharpener

Modern models of electric sharpeners allow you to achieve high quality sharpening, due to the built-in function, automatic detection of the angle of the blade. The electric sharpener is great for both domestic use, and for sharpening knives in catering organizations. The lineup electric sharpeners are presented in a wide range, so the price may be different, but if you want your knives to always remain sharp, then buy more "advanced" and expensive models.
Musat

Musat - designed to maintain the sharpness of the edge of the knife. In shape, musat resembles a round file with a handle. Musats are included in knife sets, and many owners often confuse them with a tool for full-fledged sharpening of the blade. Please note that with the help of musat you will be able to maintain the sharpness of a sharpened knife, but if the knife is completely dull, it will not work to sharpen it with musat.
Sharpener "Lansky"

This sharpener is used for sharpening small and medium-sized knives. The design of the sharpener allows you to sharpen the blade at your chosen angle. Sharpener "Lansky" consists of a rod with a removable whetstone and two corners connected to each other. The corners simultaneously serve as a vise for the knife and a scale for selecting the sharpening angle. The sharpener also comes with ANSI marked whetstones in various grit sizes.
Sharpening and grinding machines

Sharpening machines are mainly used in production, for high-precision sharpening of blades of rotating shafts. In addition to high-precision machines, there are abrasive wheels with electric drive and rotating grinding discs. Sharpening knives on such machines should only be done by an experienced craftsman, because due to the speed of rotation of the circle or disk and high temperature heating, with any unsuccessful movement, the knife blade will become unusable.
Self-sharpening blades
Sharpening a knife with a whetstone
The sharpening of the blade, made by a whetstone, is considered the highest quality, of course, provided that it was produced by an experienced craftsman. To sharpen a knife on a whetstone, do the following:
- Place a whetstone with a low content of abrasive grains on a fixed surface. If the bar is small, it can be clamped in a vise.

- Holding the knife at an angle of 20-25 degrees with respect to the surface of the bar, start moving the knife along the whetstone with the cutting edge forward.

- Move the blade along the bar in such a way that during the movement it touches the surface of the whetstone, along its entire length.
- Try to keep the same blade angle while moving.
- After 2-3 strokes, turn the knife over and repeat the sharpening process on the other side of the blade.
- Thus, alternating sides, sharpen the knife until an edge (burr) appears along the edge of the blade.
- Change the rough sharpening stone for a grinding stone.
- Sand the knife blade until the edge is gone.
- Test the sharpness of a knife by cutting through a hemp rope that has been folded several times, or try cutting through a piece of paper.
How to sharpen a knife with a whetstone, see also the video:
Sharpening a hunting knife on a Lansky sharpener
Hunting knives are made of hard steel, so their initial sharpening requires whetstones with a low content of abrasive grains.

- Clamp the knife in the vise of the sharpener.
- Install a whetstone with a low content of abrasive grains on the shaft.
- Select the angle of the bar (for hunting knives it is usually between 20 and 30 degrees).
- Insert the rod into the desired hole.
- Lubricate the whetstone with the special oil included in the sharpener set.
- Start moving the bar along the blade of the knife, from the base to the tip.
- Turn the sharpener over and repeat the process on the other side of the knife.
- After the edge is formed, change the stone and do the final sanding.
- Since hunting knives are mainly made with a double-edged blade, after completing sharpening on one side, change the position of the knife in the vise and start the sharpening process on the other side.
- When finished sharpening, polish the knife blade with felt.
How to sharpen knives in a Lansky sharpener, see the video:
Sharpening scissors
Sharpening scissors must be done on a special grinding machine. Sharpening blades with the help of improvised (sandpaper, the edge of a glass, etc.) can temporarily improve the sharpness of scissors, but not for long. If you do not have the opportunity to sharpen scissors from a professional, then you can try to sharpen yourself on an abrasive stone. When sharpening, you need to follow a few simple rules:

- The sharpening stone should be fine-grained.
- The blade is sharpened over the entire surface of the edge at the same time.
- The angle of the blade must match the factory edge.
- The movement of the blade over the stone must be done from the screw to the tip.
- You need to sharpen scissors in disassembled form.
When sharpening scissors, do not rush, patience in this matter will be your ally.
How to quickly sharpen scissors, you can also see in the video:
Sharpening plane and chisel blades
Sharpening the blade of a planer and a chisel practically does not differ from each other. Therefore, the sharpening process described below applies to both tools:

- Set the chisel on the whetstone at an angle of 30-40 degrees.
- Holding the chisel with your hand, use the fingers of your free hand to press the bevel against the whetstone.
- Start driving the chisel on the grindstone until smooth side chisels do not form a burr.
- Change the touchstone to a fine-grained one and make the final grinding of the chisel.
- Check the sharpness of the chisel blade by removing chips from the corner of the bar.
In addition to manual sharpening, the chisel can be sharpened on a machine with a rotating abrasive disc:

- Turn on the machine and let the disc reach full speed.
- Holding the chisel with both hands, lean its bevel against the grinding wheel.
- Be sure to observe the angle of the chisel, otherwise you will ruin the blade of the tool.
- Do not press the chisel with too much force and do not hold it too long on the disk, this will lead to overheating of the metal and destruction of the blade.
- While sharpening, wet the blade with water.
- The final grinding of the chisel blade is best done by hand, using a fine-grained bar or sandpaper.
Do not forget that when sharpening products on the machine, a lot of sparks and small particles are formed that can get into your eyes, so be sure to work with safety glasses. And in order not to injure your hands on a spinning disk, wear gloves.
You can also learn how to sharpen tools from the video:
Tips for quickly sharpening the blade with improvised means
Stone
To quickly sharpen a knife on a hike or on a picnic, you can use an ordinary cobblestone. Use any stone lying on the ground instead of a whetstone and run the blade of a knife along its surface. You will not achieve razor sharpness, but you will return the knife to working condition.
Second knife
It is quite possible to sharpen two knives at once, without sharpening stones and accessories. To do this, you need to take a knife in both hands and start sharpening the blade of one knife on the blade of another. After 5-10 minutes of this work, the knives will become sharper than before.
glass items
The blade of a knife can be sharpened slightly on the rough edge of glass or ceramic objects. For example, about the bottom of a glass or edge tiles. The main thing is that the surface is rough.
Leather belt
A leather belt is more suitable for finishing and razor sharpening a knife blade than for rough sharpening. But if there is nothing at hand except for the belt, then you can try to sharpen the knife on it. To do this, you need to give the belt a stretch and start to drive along it with a blade, you may not achieve strong sharpness, but you will polish the knife to a shine. 
By learning how to sharpen knives and tools yourself, you will acquire a skill that will be useful to you throughout your life!