Gift box drawing. DIY cardboard box with lid
Content
If you are going to a special event soon, and the gift wrapping service is far away, try making a beautiful gift box with your own hands from cardboard and paper, with or without a lid. It’s not that difficult, you just need to find ideas, master classes on how to create such crafts, stock up on the necessary materials and tools, and strictly follow the step-by-step instructions. Gifts and premium packaging collected with your own hands are always unique and priceless; the recipient will certainly appreciate them.
How to make a gift box with your own hands
A homemade do-it-yourself gift box will help you make a present truly original and unforgettable. It’s not difficult to make it, you just need to find a master class on creating suitable packaging or print a ready-made template. Next, all that remains is to transfer the drawing onto colored cardboard or craft paper, cut it out, fold it, and glue it together. If desired, a gift box already assembled with your own hands can be decorated with ribbons, rhinestones, bows, buttons or braid.
Materials for production
In order to make a gift box with your own hands, you will need good quality materials that will not tear or fall apart along the way and during gifting. Ordinary cardboard is unlikely to work here, it is not so dense, and its color is not festive. It is better to use a special one, and you can decorate gift wrapping using beautiful paper intended for handicrafts. There are stores that sell a variety of craft materials. There you can purchase a whole set of necessary accessories or buy something specific.
Box diagrams
How to make a gift box from a ready-made one
Even with an ordinary gift box made by yourself, you can surprise the recipient of the gift and everyone around you. If your imagination allows you, then it’s quite possible to create an original masterpiece that you won’t find in stores. One of the easiest ways is to make your own gift boxes from ready-made ones. For this purpose, the usual containers in which you, for example, bought shoes are suitable; find the appropriate size. Next, you need to decide on the theme of the holiday in order to choose the right color, design pattern and decor.
The prepared box must be covered with thick paper (fabric) using glue and tape. It’s best to do this on the inside too, using materials of different colors, so the packaging will look more beautiful and impressive. We decorate the lid of the box in the same way, they should complement each other. Decorate the finished packaging as you wish, in accordance with the holiday. To do this, use bows, hearts, fruits, funny figures, fabrics of various textures, paint, stencils, etc. Creative people can make figures themselves, for example, from polymer clay.
How to cover a box with gift paper
To do this, you will need a box, paper (colored, gift, self-adhesive, wallpaper, napkins) and tools (glue, scissors, ruler, brush, pencil). Next, proceed in the following sequence:
- Unfold the selected material and place the box in the center.
- Measure out the required amount of paper, it should be enough for the bottom of the base, the sides and a little for the bend. You can do this using a ruler.
- Cut off the excess part and cut four strips from it for the corner sections.
- Glue these strips, then coat the outer parts of the box with glue and cover with paper. Do the same on the inside.
- Cover the lid in the same way. Let dry and decorate further as you wish.
DIY gift box - master class
Making ordinary gift boxes with your own hands is not difficult, you just need a little patience, time, tools, and materials. If you have already stocked up on all this, follow these instructions:
- Draw a square in the middle of cardboard or thick paper - this is the bottom of the future product.
- Draw two lines perpendicularly from it in four directions. These will be the side parts of the box; determine the length of the lines based on the desired depth of gift packaging.
- On each side of the side parts, add 1.5-2 cm protrusions and cut off their edges at an angle of 45 degrees.
- Carefully cut out the resulting drawing, bend along the drawn lines, and glue with glue or double-sided tape.
- All that remains is to decorate the box and put the gift inside.

DIY surprise box
To give money for a birthday or jewelry, you don’t have to put it in a paper envelope or ready-made box. Show a little imagination, and the present will not look banal. It is much more impressive, for example, to present a small box glued together with your own hands. When the recipient finds a gift inside such a work of art, there will be a lot of impressions.
You will need: thick paper, scrap paper, scissors, glue, ruler, pencil, decorative materials. You can make such a package like this:
- From a plain piece of paper, cut out a base with sides 30 cm long.
- Draw the workpiece into 9 identical squares, cut off the corners.
- Using a ruler and a sharp object (toothpick, crochet hook), scratch the lines drawn in pencil. This way the folds will be even.
- Bend the side parts, glue the previously cut squares from the inside with a glue stick, retreating 2 mm from the base. File the edges with a nail file.
- Cut out 8 8.6 mm squares from scrap paper and glue them on both sides of the base.
- Next, it remains to decorate the box at your discretion: with flowers, ribbons and rhinestones, inscriptions with wishes, etc. The photo of the hero of the occasion at the top of the box will look very original and unusual.
- Place the surprise inside - money, a congratulations card, a small souvenir.
Candy box
It’s easy to make original candy packaging with your own hands using a ready-made template. You need to print it out or draw it on thick paper, assemble it along the dotted fold lines, glue it and place the sweets there. If you do not have this opportunity, then:
- Take a large colored disposable cardboard cup and remove the rim.
- Make 7-8 cuts 3 cm long on top, fold them inward, place them in the candy box, connect the edges together, and glue them together.
- Decorate the top with multi-colored pom-poms, beads or glue an interesting inscription: this will be an exquisite gift for women on March 8th.
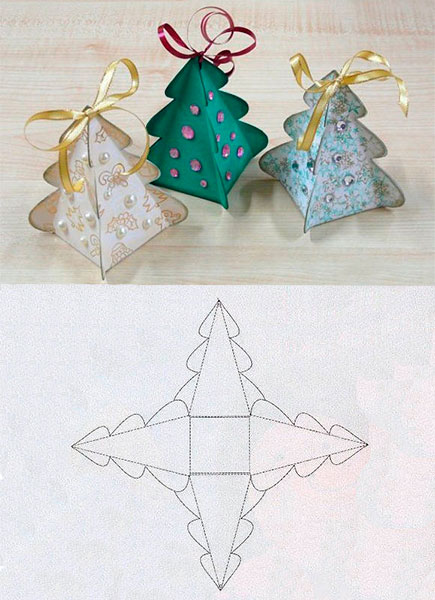
DIY Christmas boxes
For New Year's themes, there are also ready-made templates in the form of Christmas trees, balls, which help you create boxes for gifts with your own hands, etc. Draw one of them, cut it out, glue it together. If your gift is large and will not fit into such packaging, choose any suitable container and simply decorate it with a New Year’s theme. For this:
- Cover it on all sides or simply wrap it with bright red paper of any texture.
- Glue a wide black stripe across the entire box in the middle.
- Next, make a square out of gold paper, cut out the middle in it, and attach it to the front of the gift on top of the black stripe. Look what happened, why not a Santa Claus costume?

Ring box
Ordinary velvet boxes for rings are already a thing of the past, but if you give your loved one a ring in a homemade package, it will be a gift-impression. It is made in the same way as a simple box with a surprise, only inside you need to additionally build a backing for the jewelry. To do this, follow this scheme:
- Cut a rectangle or square from foam rubber that fits the width and height of the box itself. Make a slot in the center, then a ring will be inserted into it.
- Take two satin or openwork pieces of fabric, first insert one piece into the cut, then the second.
- Gather the free edges into beautiful folds and secure with glue on the back side. Insert the backing into the box and the ring into it.
- Glue hearts, flowers, rhinestones onto the lid, and decorate the design with ribbons.
How to wrap a gift beautifully - diagrams and box templates
For those who don’t know how to do anything with their own hands, there are many different ready-made patterns and templates for gift boxes. You need to choose a photo of suitable packaging, print (draw), cut, bend along the dotted lines, glue, decorate. Choose the size and shape of the box based on the parameters of the gift - round, rectangular, in the shape of a heart, a cake, a Christmas tree, a baby shoe, etc. Believe me, such simple but cute boxes will make your congratulations original and unforgettable.
Rectangular box with double-sided cardboard lid
Making rectangular gift wrapping is the easiest way. To do this, stock up on cardboard, scissors, glue and follow the instructions:
- It is better to use double-sided cardboard, so the product will be one color inside and outside, with the same pattern. Draw a rectangle in the center; its size will depend on the size of the gift.
- Draw more rectangles on the top, bottom, right and left of the figure - these are the side parts, their height should be equal to the desired depth of the future box.
- Draw 2 cm allowances on all sides of the side parts, cut off their upper edges at an angle of 45 degrees.
- Bend the workpiece along the lines, glue using allowances.
- The lid is made in the same way, only its width and length should be 2-3 mm larger. So it will open and close freely.
- If you need a large box, but double-sided cardboard comes in a small format, cut out each part separately and glue it together using allowances.
Round
Making a round gift box will not take much time, but patience and perseverance will come in handy. So, follow these steps:
- Cut out four circles from porous cardboard, two of them should be slightly smaller in diameter.
- From beer cardboard, cut two strips the size of the mugs, one wide, the other narrow. Leave some overlap on them and cut them with cloves. This way the strips will stick more evenly.
- Next, glue together 2 large and separately 2 small circles - these are the bases for the box and the lid.
- Glue strips to them: wide to narrow circle, narrow to wide.
- Decorate the lid of the package with a ribbon bow, an original inscription, or a postcard.

Felt and paper cake
This packaging is often used not for gifts, but for wishes and consists of 12 “sweet” pieces. To create it you need:
- Print the presented template in the form of a piece of cake, cut out 12 identical blanks from paper (can be multi-colored), and glue each one.
- Cover the blanks with felt, brown or colored, creating the illusion of chocolate cakes or delicious cream.
- Put a wish or a small souvenir in each braid, decorate the cake in connection with the theme of the holiday.
Using origami technique
To create gift boxes using this technique, you will need: paper of any texture, scissors, glue, pencil and ruler. Next you need to do the following manipulations:
- Cut two squares, one 2-3 mm larger than the other.
- We take one of them, draw 2 lines diagonally from one corner to the other.
- We bend the bottom corner to the center of the intersection of the lines, and then we bend the same part again to the middle. Let's expand. We do the same with all corners.
- Using scissors to the left and right of the upper corner, make 2 cuts, up to the length of the first fold line from the center of the workpiece. We do the same with the bottom corner.
- We bend the left and right corners to the center, bend them again along the cut lines, lifting them. You should now have two side pieces.
- Bend them, glue them with allowances in the form of triangles.
- Place the top and bottom on top and glue. The box itself is ready.
- Assemble the lid in the same way.
Heart-shaped box
This packaging is made similarly to the round one, only the base is cut out in the shape of a heart. Use a ready-made template or draw the box shape yourself. Choose thick cardboard as the material. Make a box according to this scheme:
- Cut out 2 hearts (one is 2 mm smaller) and 2 strips, equal in length to our figures. The height of one strip is the depth of the package, the second should be smaller.
- On each strip, leave an allowance of 2 cm for gluing, bend them, cut them with teeth. Glue the strips to the bases.
- Next, select the material for decoration, paste it over the outer, inner, side parts of the box and the lid. Decorate it in the form of a bow.

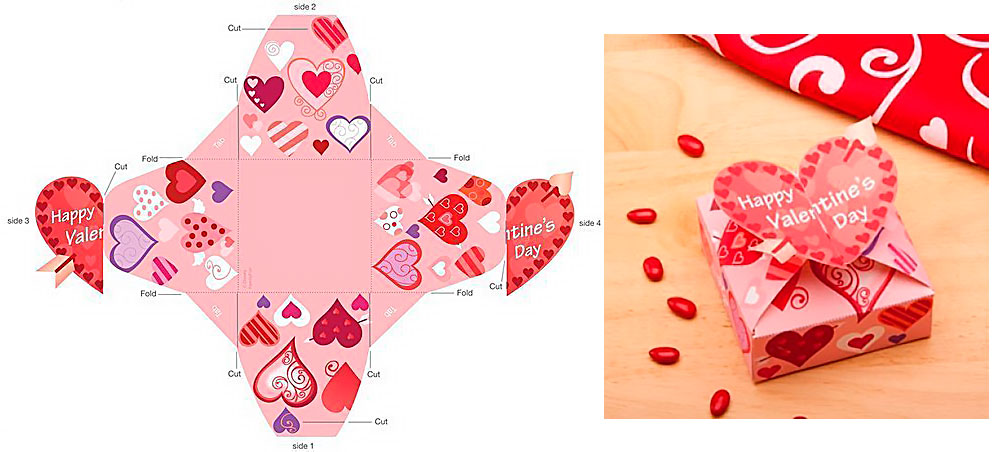
Gift packaging “Diamond”
It is very difficult to draw a template for such an unusual box with your own hands, so it is better to find and print a ready-made one. Next you need to take cardboard of the desired color, scissors, glue and proceed according to the scheme:
- Cut out the template, attach it to the cardboard, trace it.
- Next, you need to cut out the workpiece with a stationery knife, and press down the folds with a sharp object (knitting needle, crochet hook) (using a ruler).
- Bend the workpiece along the lines, glue the product (it is better to use Moment glue). Before gluing the last part, place a gift inside.
Bonbonniere
These small unusual boxes are usually given to guests at a wedding; they often contain candy, nuts, coffee, lollipops, cookies, and also words of gratitude or wishes. The newlyweds decide for themselves when to give out such gifts, created with their own hands, but everyone, both women and men, will like the gift. If you want to make a bonbonniere from paper or cardboard, then:
- You need to print (draw) and cut out the finished template of the product of the desired shape.
- Make folds along the dotted lines.
- Glue it together, not forgetting to put sweets and notes with warm words inside.
Such packaging can be made not only from paper, but also from fabric. For example, tulle, chiffon, and silk are perfect for this. Make a pattern, purchase the material of the desired color, thin ribbons to match the color and proceed according to the scheme:
- Cut circles with a diameter of 23 cm from the material. For one bonbonniere you need 3 circles.
- Place them on top of each other, place a card with wishes and sweets in the center.
- Gather the fabric into a bag and tie it with a ribbon. Straighten the ends of the fabric. An original DIY gift is ready!
Video
Found an error in the text? Select it, press Ctrl + Enter and we will fix everything!A universal selection of gift ideas for any occasion and occasion. Surprise your friends and loved ones! ;)
Greetings to all of you, dear audience. Holidays never end for us all our lives - as soon as Someone’s Birthday has passed, the New Year has already arrived, and then there are other winter-spring holidays... And for each of them we give gifts that we want to present at least interestingly. And what if not a DIY gift box will help with this?
I myself really like to congratulate my relatives in an original way. It’s very nice to see the smiles of those you congratulate. And cute boxes always contribute to this! After all, they are the first thing that catches your eye when presenting a gift.
How to make a gift box with your own hands
Gift packaging can be very diverse. But there is one rule - the cardboard or paper from which you want to make a box must be of the required quality. In this sense, classic children's cardboard is far from suitable.
Where can I get such cardboard or paper? First of all, in specialized stores for creativity or even scrapbooking separately. It’s good if there is such a store in the city, you say, but what if you don’t have one at hand or the prices are sky-high?
These leaves will be enough for you to make small souvenir boxes (for jewelry, sweets, toys, etc.). Your family will appreciate it
And now I suggest you proceed to the actual detailed photo master classes, which will also include a diagram for creating each individual box.
Master classes on creating boxes from cardboard and paper
Small boxes
First of all, I want to give you 5 designs with very cute patterns that will make this wonderful packaging:

The first one has red roses. If you want to impress your lover, then she is definitely for you.
Principles of working with templates:
- Print the layout you like on thick paper.
- Cut out the future box along the contour and cut in those places where there are straight lines (focus on the light scans - the location of the lines is the same everywhere).
- Fold the box along the dotted lines and glue it so that the parts with semicircular ends lie between the other two and the round ends point up.
- That's it, all that remains is to bend the lid properly.


And again roses, but more delicate.

And now there are two options for Birthdays - candies with balls and lollipops.


Large rectangular
This is perfect for large gifts (for example, wall clocks). You will need specialized binding cardboard to make the box really convenient. By the way, binding cardboard can also be purchased in specialized stores or on Ali.
The incision sites are marked in orange. The lid can be made the same way, but with slightly larger dimensions (2-3 mm).

For a man
If the gift is intended for a man, then I suggest choosing one of the following options.
Simple shapes are on trend - this is proven by the following 4 templates for creating strict, classic boxes. For these you will again need thick cardboard.


If the gift is intended for a loved one, then there should be more than enough romance ^^ There are butterflies, hearts, and all kinds of declarations of love. They can be made from thick cardboard or thick paper.


Heart
Heart boxes are very popular because you can use them to express your feelings. Or admit them


Cake
Are you getting ready for a party where everyone will need to be given a little surprise? Or maybe a wedding is planned? In both cases, cardboard pieces of cake will come to the rescue.
A beautiful and clear diagram is suitable for both the bottom and the lid.

Paper boxes
Boxes don't always need to be dense - sometimes it's enough just to create a beautiful picture. Then I suggest you use this convenient scheme of 6 different packages:

If you are going to a child’s party (or maybe you want to please your child), then make him a cute box in the shape of an animal.

Give such a boot to happy parents. Follow the traditions: pink for girls, blue for boys.

Boxes for the New Year
The mood can be created not only with the help of gifts) Just look at these 8 lovely boxes, each of which can also become an excellent New Year's decoration
This is especially necessary if for some reason there is no New Year's tree. The main thing in this packaging is to trim the edges beautifully and neatly.
Snowflake
Of course, this box itself is wonderful, but the silver paint on the tips of the snowflakes can add some zest.
Tip: Give something in this package to a girl who loves Frozen.

Bag
For giving a gift - one of the simplest options.

Box of sweets
For all lovers of beautiful New Year's favors and quick handmade items! Take a plastic cup with a smooth surface, cut the edge and cut the edge.
Fold the cut pieces inward so that they cling to each other. Place some goodies inside and cover the top with something cute.

Another option for candy packaging is a donut. It is a little more labor-intensive, but more effective.

And, of course, the candy itself.

A slightly more modest pyramid from which you can build a geometric Christmas tree. 
A few more boxes
Finally, there are 3 more boxes for you that did not fit into the previous groups.


How to decorate a box with your own hands
The design of the box can be very diverse - from simple shapes in the form of birds and hearts to intricate flowers and bows. I will write more about box decor in the future - don’t miss it.
In the meantime, subscribe and comment - see you soon!
Sincerely, Anastasia Skoracheva
On the eve of the New Year holidays, store windows are full of gift boxes, decorative bags, and wrapping paper for every taste. Smiling sellers helpfully offer to provide wrapping services for New Year's gifts. And all this seems great, because you must admit, it’s much nicer to receive a New Year’s trinket in a beautiful package. But on the other hand, the whole meaning of the gift is lost, the very gift that should be intended specifically for you.
The recipient of the gift will be doubly pleased if, in addition to choosing the gift, you spend a little more time on wrapping it. In this article we will teach you how to make gift boxes from paper or cardboard with your own hands. This is not at all difficult to do, because all the crafts presented with us are accompanied by ready-made diagrams, templates and step-by-step master classes. All you have to do is choose the appropriate box option, print out the diagram and glue the paper box together according to the instructions. By the way, some of the boxes we present are made using the origami technique, which means that you don’t even need glue!
So, before we get started, let's check if everything is ready. To make a paper gift box with your own hands, you will need: beautiful wrapping paper (you can get by with plain white paper and then decorate it), scissors, pencil, ruler, glue or double-sided tape, and a stationery knife. Everything is? Well then, let's create!
#1 Box “Herringbone”
A great way to pack a small trinket for friends or family is this New Year's themed box. By the way, it’s very easy to do. You'll need green paper and hole punchers (although you can do without). Well, any rhinestones, beads, sequins are suitable for decoration, in general, to your taste!
#2 Gift box “Mint Candy”
And here is another original version of a gift box, which you can very easily make with your own hands, especially with our step-by-step master class. You will need red construction paper (for the box itself), as well as white paper for decoration. You can make the upper part of the box with applique or simply color the white sheet with pencils or felt-tip pens. By the way, there doesn’t have to be a lollipop on top. You can get creative with a New Year's theme and decorate the box on top, for example, with a snowflake, a Christmas ball or red angry M&M's.

#3 Box with lid (diagram)
Well, if you don’t have the time or desire to tinker with the box for a long time, you can use a simple ready-made template. You need to download it, print it, cut it and glue it. Voila, the box is ready! Please note that we have prepared 2 diagrams for you: square (size 5x5) and rectangular (size 7x6x4).

#4 Cup with a gift
But here is a gift packaging option for those who want to surprise with originality - a gift box-cup. It's quite simple to do, but looks impressive! To create, you will need thick paper, scissors and glue. And of course our step-by-step instructions!
#5 New Year's box “Cake”
If the New Year's party is planned in a large company, for example with a large family, it makes sense to pack gifts for everyone in one large multi-pack box. The cake packaging box consists of 8-10 pieces, each of which is a separate paper gift box.

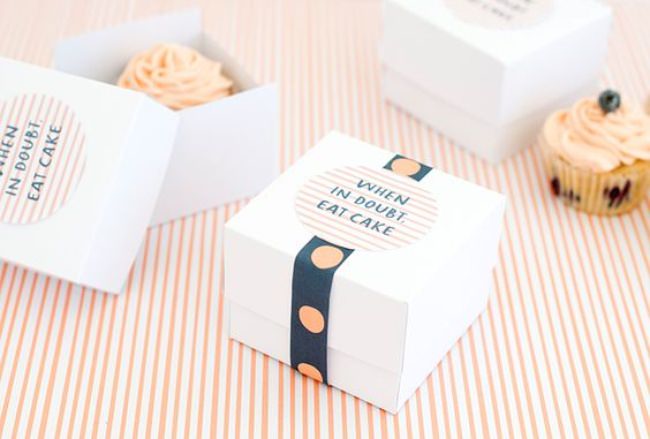
#6 Gift box with lid for muffins and other small items
During the New Year holidays, edible gifts are quite common: various sweets and baked goods. An original gift will be a muffin prepared with your own hands in a designer gift box.
#7 New Year's box “Diamond”
You can pack a New Year's gift in a diamond-shaped gift box. With our scheme, making such intricate packaging will not be difficult. All you have to do is print out the box template, cut it out and glue it according to the instructions. It's simple!

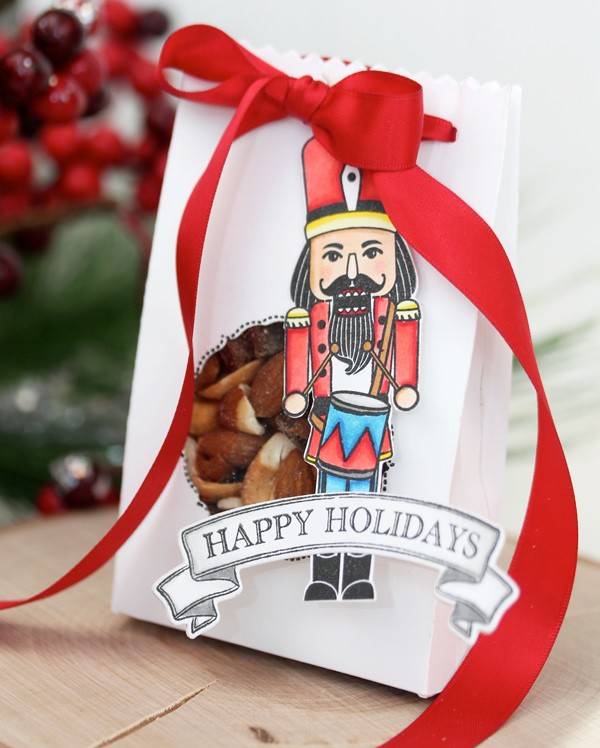
#8 New Year's packaging "Santa"
A very cute New Year's package will be made from a regular paper bag, decorated with a paper Santa. Download the Santa pattern, cut it out and glue it onto the bag. DIY Christmas packaging is ready!

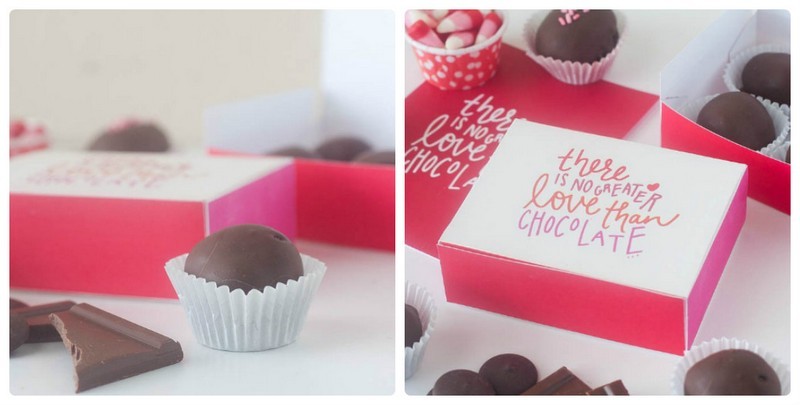
#9 Boxes “Harry Potter”
Fans of stories about Harry Potter will be indescribably delighted when they receive a piece of their favorite hero as a gift. By the way, such a box with magic sweet beans can be a wonderful addition to a set of books about the adventures of a young wizard.

#10 Box “Gingerbread House”
The symbol of the Christmas and New Year holidays, well known to everyone from Hollywood films, is the gingerbread man. You can make a paper box in the shape of a gingerbread man's house. By the way, putting the gingerbread men themselves in such a house will be very symbolic, but if you also make them with your own hands, there is no price for such a gift at all! The “Gingerbread House” box is made according to a special pattern, which you can download below. Also below is a master class on making a box with your own hands.
New Year's time is coming - a time of miracles, when everyone can feel like a little helper...
#11 Box “Heart of four parts”
A cute package consisting of four boxes can be made using our pattern. Giving your loved one not one, but four New Year's gifts at once is a true manifestation of love. You can download the diagram with four boxes and the base for them below.

#12 Box made using origami technique
To make such a gift box you will not need a diagram or template. To make a paper box with a lid, you only need a sheet of paper. The main condition is that the sheet must be square. Strictly follow the instructions of the master class and in 10 minutes you will have the cutest origami gift box made by yourself.

#13 And another option for an origami box
This box is very similar in appearance to the previous one, but the manufacturing method is slightly different. To make this box you will need scissors, but you don’t need a diagram: just a square sheet of paper. Follow the instructions of the master class and you will succeed!

#14 Box using origami technique “Volume Triangle”
If you want to get confused and ready-made templates are not for you, then be sure to pay attention to this complex and very impressive gift box. You will need paper and patience. Well, then follow the instructions and everything will work out!
If you like to make gift boxes without templates, glue and scissors, but only with the help of the correct folds of paper, then you will appreciate this box.
#16 Closing box using origami technique
Well, another version of the box using the origami technique. It's quite easy to do, especially if you follow the instructions. By the way, the steps of making the box are described below in the photo instructions.
#17 Box “Cupcake”
An original gift packaging for a New Year's gift will be a box in the shape of a cupcake. It looks very impressive, but it will take a little work to create. In general, there is nothing complicated in creating this box; you just need patience and imagination! See the step-by-step master class below.

#18 And another "Cupcake"
And here is another variation on the theme of a gift box in the form of a cupcake. The manufacturing scheme is very similar to the previous one, but you might like it!
#19 Gift box for cookies
A ready-made diagram for making a cardboard box with your own hands. All you need is to use our ready-made diagram, which you need to print, cut out of cardboard, and then glue it together in accordance with the master class.

#20 Chinese style gift box
You can put anything you want in this handmade box. And most importantly, it is done quickly and simply. You can download the box diagram from the link below.
Download the diagram

#21 Gift box in the shape of a cup

Truly original packaged gifts are valued much more than gifts in a regular gift bag. Pay special attention to this charming paper box, which you can make with your own hands using our pattern.
How to make a cup

How to make a lid

#22 Box “New Year's Sweater”
This beautiful gift box can be made with your own hands. To do this you will need a diagram, which you can download on our website, scissors, glue and a little patience.

#23 Box with bow closure
Quite simple to make, but very original gift box. You will need a square sheet of wrapping paper, glue and instructions from the master class. 15 minutes - and your gift box is ready!

It’s very easy to make a cardboard box for a New Year’s gift, but for this you will need not only cardboard, but also scissors (a stationery knife) and glue or double-sided tape (for secure fixation). Below is a step-by-step manufacturing master class, following which you can quickly and easily make a cardboard box with your own hands.

If you want to give a delicious gift in the form of cupcakes or muffins, then a paper egg tray would be the ideal packaging for such a gift. Cut the required number of compartments, decorate the top of the box with decorative elements, tie with a ribbon and Voila! The gift is ready!

You may be interested in:
#26 Original box “Milk package”
Another incredibly cool New Year's box that will amaze anyone. You can pack a simple trinket in such an unusual box. It’s quite simple to make it if you use a ready-made diagram, which you can download on our website.

#27 Box with lid
Using our simple pattern, you can easily make a gift box with a paper lid with your own hands in just a few minutes. You can put anything in such a box as a gift: from a cute trinket to handmade sweets. You can download the box diagram below.
#28 Packaging box with flower clasp
A simple design for a cute packaging box with a flower clasp. Fast, beautiful, original. Please your loved ones with a handmade gift. You can download the finished diagram from the link below.

#29 Gift box “Petals”
You can make a wonderful box for a New Year's gift with a petal-shaped lid with your own hands. In fact, making such a charm not only won’t take much time, but will also delight you with its cutest quality.
#30 Gift box for New Year's cupcake
You can make a very cute cardboard box with your own hands. It will turn out no worse than store bought. You can make a special bottom for the cake in the box. By placing your little delicious gift in a special stand, you don’t have to worry that all the cream will remain on the box. To make such a cardboard box with your own hands, you need to print the template and follow the instructions of the master class.

#31 Gift box for children “Ice cream”
A New Year's gift should be packed not just well, but with taste. In the “Ice Cream” gift box, your gift will be appreciated! With our scheme, making a delicious box will only bring pleasure!

#32 Packaging box “Candy”
Another option for “delicious” packaging would be a candy-shaped box. To create a New Year's atmosphere, the packaging can be slightly enlivened by adding eyes and a mouth. Download the diagram, print it and glue the box in the right places.

#33 Gift box “Cheerful Bunny”
You always want to give a special gift to your dear and close people. And it’s best when this gift is not only special, but also in special packaging that emphasizes the significance of a particular person. Making such a paper box with your own hands is not difficult if you download the diagram from the link below.
Download the diagram

#35 Box “Funny Frog”
Another very cheerful and positive box for New Year's gifts is “Cheerful Frog”. It’s done quickly and gives a lot of emotions! Download the diagram and please your loved ones with a merry New Year's box.

#36 Box with a face
You can also pack a gift in an original way in a box made of plain white paper, adding some details on it in the form of eyes and a mouth, thus bringing the gift to life. With our ready-made diagram, making such a box is not at all difficult. Just download the diagram, print and glue.

#37 Gift box “Birdhouse”
Let's start with perhaps the most unusual paper gift box. Making such a birdhouse is quite simple when you have a ready-made diagram. The diagram needs to be printed, transferred to suitable paper, cut out and glued in certain places. Complex and intricate at first glance, DIY boxes will be ready in 10-15 minutes. 
#38 Box “Apple”
A gift in a paper box in the shape of an apple will be original. With such a box, choosing a gift is quite easy - gelatin worms will come in handy. Making such a box with your own hands with the appropriate diagram is very simple; the manufacturing process will take no more than 10 minutes!

#39 Box “Christmas wreath”
There is no limit to your originality, we just give you direction, and then you create on your own. You can come up with a lot of boxes for the New Year theme, for example, in the form of a Christmas wreath. Very symbolic!
Well, what would a real New Year be without the Nutcracker and music from the famous ballet by P.I. Tchaikovsky? A great gift would be a bag of nuts with a nutcracker tag attached. You can draw the fairytale hero yourself, but if you have no inclination to draw, you can find an image of the Nutcracker on the Internet and print it, then cut it out and attach it to the bag.
If you think that making a gift box is very difficult, then you are deeply mistaken. In order to make original gift packaging with your own hands, you just need to stock up on colored cardboard and patience.
If you show at least a little imagination, you can please your family and friends with an originally wrapped gift.
Ideas, shapes and photos of beautiful DIY gift boxes
 Gift box with openwork decor
  Gift box: heart
  Square gift box
  New Year's gift box
  Gift box: star
 If you want to show your friend or relative all your respect and love, then try making a gift box with your own hands. If possible, try to use all your imagination and create the most original packaging. If you wish, you can make the box round, triangular and diamond-shaped, or make a package visually similar to a flower, house, fruit or even a diamond.
Of course, the latter options will require a little more craftsmanship, but in the end you will get a unique item that definitely cannot be purchased in a store. The only thing you must remember is that such crafts love precision. In this case, when cutting out the template, you cannot afford to deviate from the line in one direction or the other.
You must cut all the lines as accurately as possible, taking care to create perfectly straight edges. If this stage of work is not carried out as it should be, then with a high probability we can say that in the end the box will not be entirely presentable.
How to make a cardboard box for a gift: template, pattern
 Step #1
  Step #2
 If you are new to this business, then you need to start your acquaintance with this type of needlework with the simplest things. Believe me, if you do everything correctly, even an ordinary square box will look attractive. Now we will present to your attention a master class with which you can make a rectangular gift box.
To make it, you only need glue, scissors and special cardboard. If you don't have one, don't be too upset. You can quite easily take even the one that children use in school lessons and make a frame for a craft from it. It’s just that in this case, after the box is ready, you will have to decorate it additionally. This can be done using the decoupage technique or using organza, tulle or satin ribbons.
How to make a small mini gift box from paper: template, pattern
 Scheme for work
  Gift box
  Ready box
  Template No. 1
  Template No. 2
 If you are planning to give a loved one a small gift, then you can make a small box for such a gift. It is best to make a similar craft, like the previous one, from thick paper. If you make it out of thin material, then there is a possibility that it will not hold the desired shape, or it will simply tear due to the mechanical impact that the gift will have on its walls.
Yes, and in this case it is extremely important to take the most responsible approach to fastening all the side parts. Since these crafts do not have secret locks, it will be better if you fix everything with glue or double-sided tape. If the first box seems too simple to you, then below we have placed two more quite interesting templates, by printing which you can easily make some pretty cute crafts.
How to make a scrapbooking box for a gift?
 Template No. 1
  Box of squares
 If you want to really surprise your loved one, then make a scrapbooking box for him. To make it, you will need both regular cardboard and special paper for scrapbooking. You will make a durable frame from cardboard, and use paper to give it a festive look. The best part is that in this case you will have a huge field for imagination. Since this box is supposed to be untied, you can decorate it both inside and outside.
Moreover, if you wish, you can even provide places for small gifts in those parts of the craft that will recline. For example, you can make places there for notes in which you write the nicest words. But keep in mind that in order for the congratulatory notes to fit well into the overall style of the gift box, they must be in the same color scheme as it.
How to make an origami gift box?
 Step #1
  Step #2
  Step #3
 Recently, the origami technique has become so popular that even gift boxes have been made with its help. In principle, you can make such a craft from any colored paper, but since you are still making a product for an important holiday, it will be better if you spend money on scrapbooking paper.
In this case, you will not need additional decoration of the inside of the product, as you will immediately make it as it should be. The only thing you have to take into account is that to create a box, the master class for which is posted above, you need to use two square sheets, one of which will be literally 11-12 millimeters smaller. If you do not take this nuance into account, then in the end you simply will not be able to combine the two parts into one craft.
How to make a gift box with a lid?
 Recommendations for making a round box
 A gift box with a lid is the ideal packaging for heavier gifts. If you make it a little larger than shown in the master class, you can supplement the main gift with sweets, boutonnieres made of fresh flowers and cards made by yourself. As you probably already understood, it is best to make such a box from thick cardboard.
If you have the opportunity, purchase it at a specialty store, or go to the nearest supermarket and pick up any paper box there. When you bring it home, lay it out horizontally and place it under something heavy. Leave it in this position for literally an hour, and then proceed to drawing the frame of the future craft. This little trick will help you smooth out any kinks that would probably get in your way when creating your masterpiece.
How to make a surprise gift box?
 Box in the shape of a piece of cake
  Template #1
  Template No. 2
 In principle, a surprise box can have a completely different shape, color and decor. In this case, everything will depend solely on what event you are going to. If you are going to an employee’s birthday, then it can be a completely standard square and rectangular box, inside of which, in addition to the present itself, a piece of paper with wishes will be placed (it should be as long as possible and folded into an accordion).
If you are going to a child's party, then make a gift box for him in the form of a piece of cake and be sure to place a couple of cartoon characters made of cardboard inside. And in order for them to really be a surprise for the baby, attach the figures to flexible springs that will push them out as soon as the lid is removed from the box.
How to make a gift box with wishes?
 Master class on making a pyramid
  Recommendations for making a pyramid
 If you want your gift box to be both packaging and a greeting card, then make it in the shape of a pyramid. In the photo above you can see templates that can be used to make a small pyramid. But if you try to enlarge the scale of the drawing, you will eventually be able to make a pyramid on which you can place wishes.
Remember, in order for such a surprise to look interesting, the scale of the picture must be increased at least twice. Only in this case will you have the opportunity to make pockets on the outside of the product, in which you can later put cute notes. Yes, and remember, these pockets do not have to be made of paper; you can quite easily use, for example, lace for this. Just when you attach them, use a stapler instead of glue.
How to make a transparent gift box?
 Rectangular gift box
  Tall gift box
  Triangular gift box
 Above, we have already shown you how to make a gift box from cardboard and plain paper, and now you will learn how to make a very cute transparent package. The best part is that you don’t have to buy material to make such a craft.
Since it is made from an ordinary plastic bottle, you only have to buy ribbons and gobbets for decoration. So, take a transparent plastic bottle and cut off the neck and bottom from it. As a result, you should be left with a perfect cylinder in your hands. Then take your scissors and carefully cut it exactly as shown in the picture.
After you're done with this, start bending the material so that you can clearly see all the edges of the future craft. If you can't do this with your hands, then use scissors for this. As soon as you realize that the plastic has become more obedient, you can safely assemble the box. For security, tie it with a satin ribbon.
How to make a box for a women's gift on March 8?
 Template #1
  Template No. 2
  Template No. 3
 It just so happened, but for some reason most women associate March 8 with delicate branches of mimosa and scarlet tulips. That is why when making a box for this holiday, you must remember that there must be flowers on its outside. Whether they are drawn or made using appliqué is up to you to decide. The main thing is that your packaging shows with all its appearance that spring is coming very soon.
If you don't want to spend extra time decorating the box, then invest in scrapbooking paper. If you are ready to work a little, then you can download some interesting template on the Internet, make flowers using it and cover the finished box with floral applique. Also, if you wish, you can simply paint it beautifully.
How to make a box for a men's gift on February 23?
 Template No. 1
  Template No. 2
  Template No. 3
 If there are real men in your family, then you simply must make February 23 a special day. The right gift wrapping will help you create a festive atmosphere. In principle, it can be done quite simply. You can make a box according to any template or master class that we introduced you to, only taking into account the fact that you are preparing a gift for a representative of the stronger sex.
That is, in this case it is best to forget about flowers, curls and all sorts of feminine things. It will be better if you make a gift box from paper with a camouflage print, or simply paint the finished product in different shades of green and brown. If you want to pack a present for an older man in this way, you can try decorating the box with a red star or any other attributes of the Soviet era.
You can also draw it, or print out the template and use the resulting blanks to make the desired applique. Well, if you are a lover of everything new, then try making a box in the shape of a men’s shirt. You can see how to do it in the picture, which is located a little higher.
How to make a gift box for lovers on February 14?
 Box for February 14
  Template No. 1
  Template No. 2
  Template No. 3
 Many people think that making a heart-shaped box is very difficult. In fact, such a product is made according to the same principle as all other packaging. All that will be required of you in this case is simply to find the correct template and use it to glue the box together. We decided to make the task easier for you and therefore offer you a choice of several interesting ideas for gift boxes for February 14th.
If you decide to make the largest and most voluminous one, remember that in this case you will also have to make a product consisting of two parts. One part will act as the gift box itself, and the other will be the lid. Therefore, when cutting out the frame of a future craft, be sure to double-check whether one of the parts is slightly larger in size.
As in the case of a rectangular product, this is necessary so that in the end you can easily put the upper part on the lower part. As for the color of the box, it doesn't have to be red, if you want you can make the heart pink, raspberry or even purple and white.
How to make a wedding gift box?
 Template #1
  Template No. 2
  Template No. 3
  Template No. 4
  Template No. 5
 It’s probably not even worth mentioning that a wedding gift box should be special. And the point here is not in the shape of the product, but in its decor. Therefore, feel free to choose the template according to which you would like to make such a craft, and then begin to think about what the finishing of the finished product will be like.
I would like to say right away that in order for you to end up with something truly festive, the decor should be multi-layered. That is, you can create volume using flowers, leaves or hearts glued to each other and complement all this beauty with elegant curls made of rhinestones and sequins.
It is best for beginning needlewomen to opt for square and rectangular crafts. Such products are not only made faster, but also easier to decorate. Since you will actually have a canvas in front of you, you can first lay out the future picture from the elements, see how all the details will look together, and only after that start fixing them.
How to make a birthday gift box?
 Template for making a cake
  Template #1
  Template No. 2
  Template No. 3
 Birthdays are one of those holidays that everyone looks forward to. It makes no difference how old the hero of the occasion is; on this day he still wants to feel most loved and dear. And what else can take us back to childhood and give us wonderful memories if not a gift packed in a box simulating a birthday cake. It’s easy to make such a craft, the main thing is to show a little patience.
Above you can see a template that you can use to make one piece of cake. If you see that in the end the gift wrap will be smaller in size than you need, then increase the scale to the desired size, just making sure that all proportions are respected in the process. Then make the required number of pieces, fold them into a circle and measure the diameter of the resulting figure.
But based on the data obtained, cut out a round stand on which you will place all the workpieces. If you wish, you can cover its edge with openwork snowflakes or lace. When the stand is ready, fill all the boxes with presents, form them into a cake and secure everything with a satin ribbon.
How to make a gift box for the New Year?
 Template #1
  Template No. 2
  Template No. 3
  Template No. 4
  Template No. 5
 As you probably already understood, if you wish, you can make a holiday box of any shape and color with your own hands. As for the New Year, in this case too you will have plenty to choose from. If you show a little patience and ingenuity, then with the help of our templates you can make a beautiful snowman, a fluffy Christmas tree, a house or Santa Claus.
If you print the templates on a color printer using photo paper, then all you have to do is cut out the parts of the future gift box and carefully glue them together. If you don't have the opportunity to print templates, you can always make gift wrapping from a paper bag and a winter applique, such as the head of Santa Claus, the Snow Maiden or a snowman.
In this case, the bag, depending on the chosen character, will need to be made red, white or blue, and then a head, for example, Santa Claus, will be glued to the very top of the bag. You will need to stack two of them and be sure to provide holes at the very top for ribbons, which you will later use to tie your gift.
How to make a box for a cash gift?

 Template #1
  Flowers for decoration
 Nowadays you won’t surprise anyone with a gift envelope for money, so most people try to present it in a more original way. The best option for such a case would be a cash gift box. You can make it using a fairly simple template. True, when making such a craft, you must remember that in this case you will be making a box, the inside of which will slide out.
- What is a holiday? - they ask you one day.
And you immediately answer with a smile:
- This is when everyone is happy, says nice wishes, gives gifts...
And in response to you:
- So, if you give someone a gift today and wish them something wonderful, it will be a holiday?
And it’s true... And you can even give a handful of sweets. The main thing is how to do it. Perhaps we should start with unusual packaging. A DIY paper box is a great idea for an original gift or surprise.
Even a purely symbolic gift will be worthy of admiration if you present it in its own packaging.
Materials and tools
So, what may be needed when making all kinds of boxes.
- Paper.
It is best to take paper for scrapbooking - it is good because it can be double-sided, with a different pattern on each side. Thick designer paper, colored paper for pastels, cardboard (density 200-300 g/m2), a simple sheet of whatman paper or watercolor paper, which you can paint or tint yourself, are also suitable.
You can also use “yellow” note paper (or an envelope made from it), wrapping paper... and any other that you can use for decoration. - Corrugated cardboard
- Napkins (preferably thicker)
- Ribbons, ribbons, laces
- Beads, buttons
- Ready-made labels
- Scissors, stationery knife
- Double-sided tape, glue stick
- Superglue or “Moment” universal glue (transparent gel) for attaching beads and other things
- Ruler, pencil
- Compass
- Hole puncher
- Nail file (for creasing)
Useful advice. Before you directly take on the paper that will make up your box, try assembling it from plain paper. You will understand where to cut, how to make folds more conveniently, how to assemble the box. Plus, you can estimate what size box you need. Often the first pancake is lumpy - so let this lumpy be made of simple cheap paper.
Decor. As for the elements for decoration, you don’t have to limit yourself here: make flowers from fabric and paper, combine ribbons and raffia, lace, whatever you can think of. The main rule is not to overdo it.
And now about the boxes themselves. There are a huge number of options, models and schemes for their manufacture. We offer you the most popular ones - from classic round and square boxes at the base to unusual bonbonnieres. But first things first.
Square box
You can give anything in it. From candies and cookies to handmade soaps and jewelry. Naturally, each gift must have an appropriate box decor.
In this case, the packaging is stylized as a postal parcel. This gives it a special romanticism, because the services of traditional mail for sending letters and gifts are used less and less today.
If you use colored paper with a pattern, the box will have a completely different mood. Choose yours!
You can create such a beautiful paper box in just a few minutes
This is one of the possible options for making a square box. It will be made from a single sheet, without a separate lid. Let's begin.

Redraw the diagram of the box onto paper. We think about the right size in advance. Cut it out.

Carefully bend the workpiece along the dotted lines that are drawn in the diagram.
If the paper is thick enough, you can crease it first to make bending easier. To do this, attach a ruler to the fold lines and run a nail file (the tip of a compass, the tip of scissors) along them. There should be a groove - a depression along the line. Now all the folds will be clear.

We glue strips of double-sided tape as shown in the figure. Instead of tape, you can use a glue stick, but tape is still more reliable and more convenient.

We decorate the walls of the box from the outside while the box itself is still disassembled. And then we glue it together. All that’s left is to insert the gift and bandage the packaging!
With round base
The box of this model is more suitable for gifts for women. Although everything again depends on the gift and decor. In it you can present both beads and a tie (if you twist it with a snail), as well as a scented candle, a New Year's ball or even a cupcake!
Such a DIY paper box can later serve as an excellent box for small items (buttons, beads, etc.). 
So let's get started.

Select the desired radius of the circle at the base. Using a compass, draw 4 such circles on thick paper and 2 on corrugated cardboard.
We measure out 3 strips on paper. Their length will be equal to the circumference of our circles (yes, we’ll have to remember our favorite formula 2πR). The widest strip will be the height of the box, another will be 1 cm narrower, and the third strip will be the narrowest - for the height of the future lid.
It’s difficult - only while you’re reading this, you should start doing it - and everything will become simple and understandable! 

We cover the corrugated cardboard circles with paper. We have the bottom and base of the lid.

Glue the first and second strips together as shown in the figure (the vertical shift is approximately the thickness of the bottom of the box, the horizontal shift is 1 cm). The front side of the paper should be facing out. We decorate the future wall of the box.

We cover the bottom of the box with a double strip of paper in a circle. Then we paste the remaining narrowest strip around the base of the lid.
The box is ready! We place the gift inside and close it with a decorated lid.
You don’t have to decorate the lid separately, but tie the entire box with ribbon. For example, like this: 
Elegant boxes and not a drop of glue!
Is it possible to make a paper box with your own hands quickly and without any glue? Voila! There are more examples of such packaging than you can imagine.
Everything is made from one sheet of paper. The main thing is to carefully cut the workpiece and bend it correctly. At first glance, the diagrams of some boxes are complicated, but in reality everything is much simpler. Each subsequent box will become easier to assemble. We recommend that you practice on plain paper first!
When working with thick paper, creasing will again be of great help. Let's try!
1. Strict box – male version.
Although if you make it larger, from paper with a delicate print and decorate it with a flower, it will be just right for giving women’s lingerie. 

Ideal for sweets and anything fluffy and airy.
In order to thread a ribbon or lace, make holes in the workpiece in advance with a hole punch. 
Suitable, for example, for loose aromatic tea. Or for some bottles, candlesticks. 
It looks very laconic, perfect for a men's gift. 

And with brighter decor, it would be a good option for a gift for a woman.


Here is the same case, but a slightly different configuration. This option can be opened and closed thanks to a unique clasp.
Cute bonbonnieres
Bonbonnieres are a special type of boxes. Bonbon in French means candy, and the name of the boxes comes from the word “candy bowl”. It is the bonbonnieres with candies or sweet dragees that the newlyweds give to their guests at the wedding - in response to congratulations.
Ordering a bonbonniere to be made for each guest is not a cheap pleasure. But it won’t be difficult for the bride and her bridesmaids to make bonbonnieres in the style and tone of the wedding.
1. One of the simplest options

2. Elegant.
They resemble a box or a small chest.
Just a little more difficult than the first ones. We make slits in them with a stationery knife, holes, if we want to pull in a ribbon or lace, with a hole punch. 

3. Unusual and tasty.
As a rule, bonbonnieres are located on a special separate table and often on a dish or tray. You can beautifully play with this situation and make bonbonnieres in the form of pieces of cake. And you need to place them together, as if it were a paper cake. 
First, we draw a large circle (the plane of the cake) and divide it into sectors in order to know the parameters of our pieces.
Then, according to the dimensions, we draw a diagram of the development of the piece. We make the required number of developments, cut them out and glue them together. You can decorate before gluing, or after - it all depends on the idea of your decor. 


