Connection diagram for a pass-through switch with 2 keys. Connection diagram for two-key pass-through switches
To create maximum comfort, a device for turning off or turning on lights in the house must have not only functionality, but also practicality. Compared to pass-through devices with one key, two-key switches are more convenient due to their versatility.
The pass-through design of a two-key switch model is nothing more than two single devices combined in one housing, which operate on the principle of a contact group switch. Typically such devices have 2 input and 4 output contacts. At the same time, there is an indicator on the product body that helps you figure out what position the device is in - on or off.
The main purpose of the pass-through switch

The choice of a pass-through switch design is primarily based on the number of keys on the device, since this allows you to control several light sources connected to such a device at once. In turn, the possibility of a remote control system or a touch sensor are additional elements that improve the comfort of controlling light in the house.
It is better to install multi-key pass-through type switches in large rooms in which there are several inputs and different light sources that need to be turned on simultaneously. In other situations It is advisable to install pass-through devices with one key, which are more convenient to use and have the simplest connection diagram.
Types of pass-through switches
 On the market of electrical equipment and related accessories, there are many models of pass-through switches and switches from foreign and domestic manufacturers, both simple single-key and multifunctional models. The most Two-key devices are considered popular, which can control several lighting fixtures at once, located in different rooms or in one lamp. Not as popular, but no less effective, are switches with three keys, although their connection diagram is much more complicated.
Thanks to the pass-through operating principle of the switch, it becomes possible to organize control of one lamp from different points of the house or apartment. But to implement it you will need several single-key devices and a cross switch. And when using several cross devices, you can achieve control of the lamp from four points in the apartment at once.
I would like to note that each additional light source control point significantly complicates the connection diagram for pass-through type switches, which may make maintenance and repair difficult lighting fixtures in the house. The tangle of wires can confuse even an experienced electrician.
Features of the connection diagram for pass-through switches from two places
 With proper assembly of the double switches connection diagram, it becomes possible to control several lighting groups from two places independently of each other. In this case, both switches with two pass-through keys will operate in two directions, but for this you need to do the following work.
- Two-button switches are installed in pre-selected places in the socket boxes.
- Lamps or multi-lamp light sources, such as a chandelier, are mounted. A three-core cable with a phase, working zero and grounding is connected to the lighting devices.
- Considering that each switch has 3 contacts, then you will need two three-core cables appropriate length.
- The wires are connected in the junction box according to the diagram.
The implementation of such a scheme is possible with four single-key pass-through switches, but it's not rational in terms of consumption of additional cables and distribution boxes.
If necessary, a double pass-through switch can be used as a crossover analogue with one key. To do this, the corresponding contacts are bridged, and the keys are connected to each other for simultaneous operation.
 Two-key pass-through type switches, like analogues with one key, can work as cross devices. The principle of switching contact groups has a similar circuit with lamp control from two places. That is, as in the previous case, you need to connect two double devices and a crossover analogue in accordance with certain steps.
- The first step is to install switches in socket boxes mounted in the wall. This diagram involves connecting 12 wires in a junction box.
- The next step involves installing two separate light sources and laying a cable to them with the zero engaged.
- The cable is cut to the required length, using a three-core wire. 6 wires are supplied to the limit switches, and the two-key pass-through crossover switch has 8 contacts.
- The phase is supplied to the first switch with two pass-through keys, and then follows the diagram to the remaining devices.
- The second pass-through type limit switch will be connected directly from the lighting fixture.
- When laying circuits of increased complexity, it is very important to correctly mark all cables and individual cores. In order not to be mistaken in the intricacy of wires, you need perform step-by-step marking starting with the first wire and continuing from contact to contact. Even cables that seem easy to connect at first glance need to be labeled.
- As has become known from practice, installation of such a circuit requires the use of an enlarged box or its paired analogue. This is primarily due to the fact that in a standard junction box there is simply not enough space for a high-quality connection of wires, or due to the large number of connecting blocks it will not be possible to close the lid.
Also, any two-key pass-through type switches can be used as regular analogues. For this purpose, one contact group is either not used at all, or another separate lighting device is connected through it. Having familiarized yourself with the above methods of controlling lamps from different places, you can figure out what a connection diagram is or, as electricians say, a circuit diagram for a pass-through switch.
How to connect a pass-through switch to two groups of lamps
 Before moving on to installation work, you need to understand the design features of a two-key pass-through switch. As mentioned earlier, structurally these are two devices with one key assembled in one housing. Having dealt with this feature, everyone will be able to understand the principle of its operation and connection methods, which are carried out by analogy with a conventional switch with one key, with the exception of a couple of nuances:
- The first part of the switch, or more precisely, both identical halves of it, is supplied with electrical energy via one wire. On the second device from which the light source will be connected, each of the output phases will power its own lamp.
- In the case of a single pass-through device design, a three-core cable is laid to each device. If this is a two-key analogue, then stretch five conductors to the first and one more to the second device. The difference in the number of conductors is due to the common phase wire.
Based on the above discussed options for connecting pass-through switches with different numbers of keys and the possibility of using their combinations, you can lay out a variety of circuits that allow you to control lighting fixtures from different places in the house. Although, based on practice, in everyday life there is rarely a need to control lamps from more than three different points in the apartment.
We have already described what a pass-through switch is in one of our articles “How to turn on a chandelier from two different places.” The main purpose of the article was to tell you that there are such pass-through switches. They are capable of providing power to a lamp (chandelier) from different places from 2 or more, but the article did not consider special cases. By special case we mean the ability to control not only one lamp (group of lamps), but also turn on and off two groups. After all, there are also double pass-through switches. We will talk about connecting a double pass-through switch in our article.
Double pass-through switch and how it is mounted in the wall
In fact, a double pass-through switch is a multiplied copy of its younger brother, that is, a single pass-through switch. Unless there are already two of them in one building. That is, there are two separate pass-through switches in one housing and there is one double pass-through switch.
This product is quite rare in our market. What we mean is that they are not found often, but still “are in nature.” Thus, double pass-through switches are produced by legrand, lizard, viko... These are two-key switches with a designation on each of the keys. (pass-through switch icon)
Installing a double pass-through switch into a wall is no different from installing a conventional single or double switch. You can learn more about the process of installing a switch in a wall from the article “Installing a built-in switch in a wall.” After you have installed the switch, you need to install the wiring. That is, you will need to electrically connect two pass-through switches. Just about such an electrical circuit later.
Wiring diagram for a double pass-through switch in 2 places for 2 lamps (groups of lamps)
According to the logic of what is happening here, everything is the same as for a single double switch, but taken twice. That is, it is actually necessary to connect two double switches, as if they were simply in different housings. Just that they are not in different buildings, but in the same building.
The diagram will look like this.

And if you install everything in distribution boxes, then you will also have the following connections.

You can learn about the best way to connect wires from the article “How to connect electrical wires in house wiring.”
In principle, everything here is as we said, the circuit is implemented with switches, as if they were two independent pass-through switches.
As a result, we get an electrical circuit with two double pass-through switches, which provide control of two lamps (groups of lamps) in one place.
To summarize the connection of a double pass-through switch from 2 places for 2 lamps
So, to summarize our article, we can say that those who want to control a chandelier with two groups of lamps from two different places can easily realize their desire in practice. Two factors contribute to this. First, switch manufacturers produce dual pass-through switches. Second, using the electrical diagram from our website, you can use 2 pass-through switches to control two groups of lamps from one place.
Video about connecting a pass-through switch
Having one in a large room can present serious challenges when turning lights on and off. You will have to travel a long distance to press the coveted button. In such a situation, it is better to give preference to a pass-through switch, the device of which allows you to turn the lighting on and off from several places at once. We suggest you familiarize yourself with the distinctive features of this device, as well as what the connection diagram for a pass-through switch from 2 places looks like. After this, doing the necessary work on your own will not be difficult.
First, you need to decide what a pass-through switch is. This is the name for switching devices used to control one from two or more places. That is why such devices are popular when installing the system in a large area.
Quite often, installation is carried out in long corridors, concert halls, sports halls or flights of stairs. By installing two switches at a considerable distance from each other, you can use any of them to turn off or turn on the lighting.
Such switches are used when installing lighting systems in. Especially if the living room area is large enough, there is a flight of stairs or a large number of garden paths. In this case, you can turn on the light from below, and turn it off from the top platform. This will not only protect the safety of a person going up or down the stairs, but will also optimize electricity costs.

Such devices are also used in typical apartments. Especially in the bedroom. Very often, one switch is placed directly in the room, and the second near it. In this case, you can turn off the lighting in the room without getting out of bed.
Many people are interested in how a switch differs from a switch? In the first case, when you press a key, the circuit is simply interrupted. Pressing a key on the switch leads to switching from one contact to another by flipping the contacts and creating a new circuit. Thanks to this, it becomes possible to control the light source from several points. A system containing several switches is called a pass-through switch.
Design and principle of operation of a pass-through switch
Before understanding the connection procedure, it is worth knowing the operating principle of the pass-through switch. In this case, the installation can be done on your own without much difficulty.
Externally, a pass-through switch is practically indistinguishable from an ordinary one. However, their functionality is very different. The design of a conventional breaker requires the presence of two places for connecting wires. The first is used to connect a contact at the input, the second - at the output. Inside the device there is a movable element that is used to open or close contacts when a key is pressed.
A regular switch can only operate in two positions:
- "Enabled", in which the electrical circuit is closed and voltage is supplied to the lighting fixtures connected to the device. they begin to shine;
- "Disabled", in which the electrical circuit opens. The lamps go out.

Installing two ordinary switches in different places in the room will not allow you to control the lamp from two places at once. This is the main problem.
Attention! A pass-through switch differs from a conventional switch in its contact system.
A distinctive feature of the pass-through switch device is the presence of three contacts, of which two are located at the output and one at the input. A switch-type element located inside the device closes one of two circuits. There is no provision for an intermediate position in this case. As a result, there is always a closed circuit between the input and one of the two outputs.

How to make a pass-through switch from an ordinary one: work order
It is not always possible to quickly find a suitable device model that allows you to control lighting from two points at once. In this case, the question arises of how to make a pass-through switch from an ordinary one so that it is not inferior in its capabilities and characteristics to a purchased one. This can be done in the following sequence:
| Photo | Description of work |
 | We take a regular two-key switch. Preferably, released under the trademarks of Anam, Legrand, Panasonic, as well as other manufacturers whose devices have a modular design. You should avoid using other products. |
 | We remove one of the modules, turn it over, first releasing the latch, and install it in its original place. Considering that the element is in an upside-down state, it will be impossible to secure it in its original place. To fix the module we use hot glue or liquid nails. |
 | Assembling the switch. We get two switches operating in antiphase. |
 | We install a jumper between the contacts on one side, which will act as a common contact for the switches. We glue the keys together so that they turn on and off at the same time. |
If you decide to purchase a ready-made one, you should remember that manufacturers offer pass-through switches of various types that allow control of one or more light sources. To avoid any difficulties when operating the electrical network, you should find out in advance how to install a pass-through switch, based on its design features. There are several options here, each of which deserves special attention.
How different pass-through switches of different types are connected
In the manufacturers' catalogs you can find a pass-through switch:
- Single-key, which has two inputs and one output;
- Two-key, with four outputs and two inputs;
- Three-key, which has six outputs and three inputs;
- Cross. Such devices have two or three inputs and outputs. They allow you to control the light from three or more places at once.
When starting installation work, you should find out how to correctly connect the pass-through switch of the selected type. This will avoid common mistakes and guarantee safe operation of the electrical network.
Features and connection diagram of a pass-through single-key switch
The connection diagram of a single-key cross switch has its own characteristics. Such a device has one key, with which the lighting in the house is turned on and off. The sequence of terminal connections deserves special attention. The work execution algorithm is usually performed in the following sequence:
| Photo | Actions Performed |
 | We prepare two pass-through switches. Let's disassemble both switches. There are two output contacts at the top of each device, and one input contact at the bottom. |
 | We connect the phase to one switch and the zero to the other. |
 | We connect the phase to the power source. We connect zero to, and then connect a similar wire to the power source. |
 | We connect the switches to each other. We connect the left terminal to the left terminal of the neighboring device, and the right terminal, respectively, to the right one. |
 | We put decorative covers on both switches. |
 | We check the functionality of the assembled system. |
As a rule, installing a pass-through single-key switch does not cause any particular difficulties. The entire scope of work can be completed in-house. You will need:
- Regular and indicator screwdriver. With the help of the first it will be possible to secure, and with the help of the second - to control the voltage;
- Pliers. If they are absent, you can use side cutters;
- A tool with which you can remove insulation;
- A level that will ensure the required spatial position of the switches;
- Tape measure so that you can measure the wire to the required length;
- A hammer drill for attaching system elements to the wall.
Features of the connection diagram for a two-key pass-through switch
How to connect a pass-through switch: a video connection diagram will help you do all the work yourself
It can be quite difficult, even if there is a diagram, to install a pass-through switch in the absence of a specialized formation. In this case, master classes recorded on video can come to the rescue. They describe in detail how to connect the pass-through switch, and in what sequence the work should be performed.
Before you start viewing, you should decide on the type of device you choose. The procedure for connecting the cross switch will have a number of significant differences, which you should familiarize yourself with in advance.
A visual diagram of connecting a pass-through switch from 2 places: video instructions for performing the work
When it comes to a pass-through switch, a 2-point connection diagram is the simplest option. This is the minimum number of devices that can be connected to the system so that the user can turn one lamp on or off. Otherwise, we will be talking about a regular switch.
When installing a two-key pass-through switch, the connection diagram from two places can be implemented for two loads. This is quite convenient if the room is long, and it is necessary to provide for the installation of several lamps for more uniform illumination of the surrounding space. In this case, it will be possible to regulate the intensity by deciding how many lamps will be turned on at a certain point in time.

The following video will help you understand in more detail the connection diagram of the switch from two places:
It clearly shows how to connect the wires in the junction box so that no difficulties arise during operation. By following the recommendations of a specialist, you can perform the required amount of work efficiently and at minimal cost.
Connection diagram for a pass-through switch with 3 places: detailed video of the work in progress
The connection diagram for a 3-point pass-through switch can be called conventional. In this case, we are talking about including a cross switch in the circuit, acting as an additional link. As a rule, installation work does not cause any particular difficulties. The crossover device is connected between the feedthroughs.
You can learn more about the connection diagram for pass-through switches from 3 places by watching the following video:
Detailed instructions will help you understand the order of work, and will also allow you to find out what tools you will need for installation.
Connection diagram for a pass-through switch with 4 places: current information
If the room area is large enough, two or three switches may not be enough. You will have to travel a long distance each time to turn the lighting on or off. In this case, you can use the 4-point connection diagram for pass-through switches. In this case, two crossover devices are additionally introduced into the system.

Attention! When choosing the appropriate option, you should buy a model with the same number of keys for each point.
The four-point connection diagram will be relevant for a multi-story building. In this case, the same lamp can be controlled from each floor and, if desired, from the basement.
Review of pass-through switch manufacturers: popular models
Before you buy a pass-through switch, you should get acquainted with the leading manufacturers who produce the highest quality products. In this case, it will be much easier to navigate the assortment offered by specialized stores. The most important ones include:
- Legrand;
- Schneider Electric;
- Viko;
- Lezard.
Products manufactured under the listed trademarks are distinguished by high build quality and long service life. With comparable technical characteristics, the price of pass-through switches can vary over a wide range. We offer you to get acquainted with the average prices so that you can make a choice much easier during the purchasing process.
Legrand: cost of the most popular models
When choosing a Legrand pass-through switch, you should clearly understand for what purpose the specific product is being purchased, and what connection diagram should be implemented. In the manufacturer's catalog you can find single- and multi-key models of different colors and sizes. We invite you to get acquainted with the average prices for Legrand pass-through switches:
| Photo | Model | Number of keys | Average cost, rubles |
 | Legrand Celiane | 1 | 300 |
 | Legrand 774308 Valena | 2 | 380 |
 | Legrand Kaptika | 1 | 180 |
 | Legrand Etika | 2 | 200 |
 | Legrand Quteo | 2 | 120 |
Schneider Electric: cost of the most popular models
The well-known Schneider Electric brand produces high-quality products with a stylish modern design. Such devices can harmoniously fit into any interior. The availability of products in various colors will suit any room. Check out the average prices for the most popular models:

| Photo | Model | Number of keys | Average cost, rubles |
 | Schneider Electric Unica | 2 | 500 |
 | Schneider Electric Unica | 1 | 610 |
 | Schneider Electric Study | 1 | 230 |
 | Schneider Electric Sedna | 1 | 280 |
 | Schneider Electric Sedna | 2 | 500 |
 | Schneider Electric Glossa | 1 | 110 |
ABB: cost of the most popular models
High-quality materials are used to manufacture ABB switches. Such products are distinguished by high build quality and stylish design. Regardless of the chosen stylistic design of the room, you can always choose the most suitable option for. In the manufacturer's collection you can find a suitable option for a classic and decorated interior. We offer you to get acquainted with the average prices for the most popular models:
| Photo | Model | Number of keys | Average cost, rubles |
 | ABB Basic 55 | 1 | 310 |
 | ABB Zenit | 1 | 200 |
 | ABB STYLO | 1 | 570 |
 | ABB TACTO | 1 | 930 |
 | ABB TACTO | 2 | 1180 |
Viko: cost of the most popular models
Electrical products manufactured under the Viko trademark are presented in a fairly wide range. Thanks to this, you can choose the appropriate option for a room of any purpose and size. Among the models offered, you can find a suitable option in terms of cost and design. Average prices are presented in the table.
A correctly assembled double switch connection diagram allows you to control two different lighting groups from two places independently of each other. Two two-key pass-through switches will operate in two directions.
Installation instructions:
- Two two-key switches are mounted at selected locations in installation boxes (socket boxes).
- All groups of connected lighting are placed: lamps, sconces or a chandelier with several points of light. Each light source must be connected to one three-wire cable: phase (L), protective (ground), working zero (N).
- A cable of the required length (3x1.5 mm2) is selected, taking into account the fact that 6 contacts - two three-core cables - are suitable for the switches.
- In the distribution box (BK), the wires are connected according to the diagram.
- It is possible to install such a circuit using four single pass-through switches, but replacement will not be rational. Installing double pass-through switches is more profitable, as it saves cables and junction boxes.
A double pass-through switch can be converted into a single crossover switch. To do this, the contacts are connected to each other, and the keys are secured together to work together at the same time.
much simpler and can help organize control of electric lighting from two points.
You can find out how to choose and install the right ventilation system for a country house by clicking here.
Also, any pass-through switch can be used as a regular one. In this case, one of the contacts is either not connected at all, or is also connected for another independent adjustment of the existing lighting line. Now you know how to properly connect, or as electricians say, disconnect, a two-key pass-through switch.
To increase the operating comfort of lighting fixtures, walk-through lighting fixtures are used, which allow you to control room lighting from two or more places. Sometimes this is not only a convenience, but also a necessity.
Most often, the connection diagram for a pass-through switch from 2 places is used in the following places, namely:
- . By installing switching devices on the 1st and 2nd floors, you can turn on the lights, go up or down and turn off the lights. In houses with more than 2 floors, additional devices can be added to the scheme;
- . One switch is installed near the door, and the other device is installed near;
- . Switches are installed at the beginning and end of the room.
This list can be kept for quite a long time, since each case has its own option for using pass-through switch systems. To save time and money, all operations can be performed independently, subject to the recommendations that will be given in this article.
Read in the article
What is a pass-through switch and its difference from a regular switch
A pass-through switch is a device that allows you to control one light source from two or more places. The schemes for connecting them to the electrical network are a little more complicated than, since it involves the installation of several switching devices.

Lighting with pass-through switching devices, as a rule, is mounted on, in, long and garden. Such a scheme makes it possible to turn on the light in one place and turn it off in another, without resorting to the first switch.
To understand how a switch differs from a switch, you must first define the terms.

The switch is a two-position switching device with two contacts for use in electrical networks with voltages up to 1,000 volts. This device is not intended to cut short-circuit current unless equipped with an arc arrester. A household switch can be designed for indoor and outdoor installation.

A switch (also known as a backup, pass-through or changeover switch) is a device that switches one or more electrical circuits to several others. Externally, it is practically indistinguishable from a regular switch, except for the presence of more contacts.
When considering the question of what it is - a pass-through switch, it is worth knowing that they, like ordinary ones, come in single-key, two-key and three-key. They are also similar in the type of control - keyboard, touch, with remote control, etc.
Design and principle of operation of a pass-through switch
The simplest pass-through switching device is a single-key switch. In appearance, it is practically no different from a conventional switching device, with the exception of the presence of an internal circuit, which, as a rule, is printed on the back of the case.

A conventional switching device makes and breaks an electrical circuit on one wire of the circuit. The principle of operation of a pass-through switch is that the mechanism key breaks one circuit and closes another. Switching contacts allows the switches to work in pairs and control the same lighting fixture. The pass-through switch can only be used in conjunction with another similar device. You can use this type of switch as a regular one, but in this case the meaning of its entire design is lost.
In a conventional device, the switching plate is permanently closed on one contact and, when a key is pressed, it is connected to another, thereby completing the electrical circuit. The device of pass-through switches provides for the presence of a third contact located between the other two, and the plate connects it alternately, then to the first, then to the second, so it would be more correct to call such a device a switch.

A set of contacts with a switching plate is called a group of contacts. To control lighting from two different points, just one group is enough; from three or more, you will have to use two paired pass-through switches.
How to make a pass-through switch yourself and install it?
It’s worth saying right away that despite the seemingly small differences, a pass-through switch costs much more than a regular one. Therefore, many craftsmen, having decided to control lighting from several places, prefer to make such devices on their own, especially since for a person with the right hands, this is not so difficult. So, let's look at how to make a pass-through switch from a regular one, which can be bought at any market or electrical goods store.

In principle, converting a conventional switch into a walk-through switch consists of adding a third contact to the device circuit. To do this, it is advisable to purchase, or maybe someone already has, two switches, for one or a pair of keys, made by the same manufacturer.
It is very important that the switches are the same size. If you purchase a two-key switch, you need to make sure that they have the ability to swap terminals so that the breaking and closing of each circuit is carried out independently of each other. As a result, it should turn out that in one position of the key one circuit will be turned on, and in the other - the second.
Now let's look at the step-by-step process of converting a conventional switch into a walk-through one.
Important! First of all, and this is not discussed, it is necessary to de-energize the network, having first identified the phase wire using the indicator, which needs to be marked, for example, with a piece of electrical tape (this will facilitate further connection).
| Photo of the stage | Process description |
 | We take a regular overhead one-key switch. |
 | Using a screwdriver, carefully pry out the device key (as a rule, they are equipped with clips) |
 | Carefully press the switch core out of the housing. |
 | Release the clamps on the housing of the internal mechanism of the switch. |
 | We remove one of the terminals from the socket. |
 | We reinstall the contact opposite the other one. |
 | We install a “rocker arm” on the contacts. |
 | Reassemble the body and the conversion is complete. |
A pass-through switch can be made from two regular ones, placing them side by side so that one of them is turned on when you press the top part of the key, the second - on the bottom. The keys are connected by a plate glued on top of them. A jumper is installed between two contacts of adjacent switches.
Before installing the pass-through switch, you need to loosen the spacer tabs, connect the wires in accordance with the diagram, insert them into the wiring box and tighten the clamp screws back.
The remodeling process can be seen in more detail in the presented video:
Connection options for pass-through switches
To know exactly how to correctly install a pass-through switch, you first need to understand the connection diagrams for various types of switches with different numbers of lighting fixtures.
Connection diagram for single-key pass-through switches
The single-key pass-through switch circuit is the simplest.

- First of all, turn off the power supply and use a special indicator to make sure there is no voltage. Only after this can you begin further work.
- To implement the circuit, 5 wires must come to the junction box:
- power supply - from a machine or traffic jams;
- 3 two-core cables going directly to the switches;
- connected to the lighting fixture.
- Strip the ends of the wires from insulation;
- The switches are connected at the break in the phase wire, and the neutral wire goes through the distribution box to the lighting fixture. The need to pass a phase through the switch is caused by ensuring safety during maintenance or;
- Using an indicator, we determine the phase wire and, using twisting, connect it to one of the wires of the first switch (usually, for convenience, red or white wires are used);
- Next, the zero terminals of the switches are connected to each other by wires (visible in the diagram), and a separate contact of the second switch is connected to the lamp through a wire;
- The wire from the junction box is connected to the neutral;
- Visually check the connections for correctness by referring to the diagram above and if everything is in order, then you can apply power. Before applying power, you need to insulate the twists, carefully lay the wires in the junction box and close it with a lid.
To control lighting from more than two places, you will need to include a single-key cross switch in the circuit.
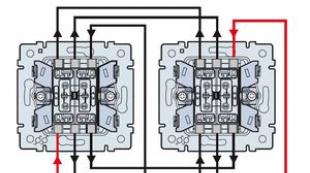
Connection diagram for two-key pass-through switches
It is preferable to install pass-through switches with several keys in large rooms with several inputs and different ones that need to be turned on simultaneously. The most popular is connecting a pass-through double switch, which allows you to control several groups of lamps.

A two-key pass-through switch consists of two single-key transfer switches that are housed in a single housing. Accordingly, for installation and operation the device will need six wires, which is clearly visible in the diagram of a two-key pass-through switch.
Pass-through three-key switches
The lighting circuit using a three-key pass-through switch is quite complex due to the presence of a large number of wires. However, these switching devices are popular because they allow you to control three different lighting groups from one access point.
In the wiring diagram, triple pass-through switches are usually a two-key and a single-key switch.
How to connect pass-through switches to control lighting from several places? Connection diagrams and videos
As mentioned above, pass-through switches are designed to control one or more lighting groups. We have already looked at how to connect a pass-through switch, and we know that control can be done from two or more points, but each of these schemes has its own characteristics.

Unlike conventional one, two and three-key switching devices, which are mounted individually, the installation of pass-through switches is carried out only in pairs. Next, we will look at how to implement a scheme for controlling lighting groups from two or more places and connection features.
Important! To control lighting fixtures from three or more places, in addition to the usual pass-through switches, it is necessary to connect cross switches.
The video clearly shows the connection diagram for the pass-through switch:
Schematic diagram of connecting a pass-through switch from 2 places
Connecting a pass-through switch is practically no different from installing a conventional 1, 2 or 3-key switch. The difference is only in the number of terminals and wires supplied.
For your information! Simply installing a pass-through switch in place of a regular one will not work since it will require at least a three-core cable.
To implement a circuit for connecting a pass-through switch from two places, you will need two switching devices, a distribution box into which wires from and three-core cables from the switches are supplied.

The phase wire from the distribution box is connected to the common input contact 1 of the pass-through switch. The output contacts are connected in parallel to similar terminals of the second switching device. From the common contact of the second switch the wire goes to the terminal of the lighting fixture. The other terminal of the lamp is connected by wire to the “zero” in the distribution box.
That’s basically the whole diagram for connecting switches from two places. In my opinion, there is nothing difficult about this.
Important! The wire cross-section must be selected in accordance with the power of the lighting fixtures.
Connection diagram for pass-through switch from 3 places
Sometimes there is a need to create more than two control points for different lighting groups, for example, in multi-storey buildings, in large halls, long corridors with several exits, etc. In such cases, a connection diagram for pass-through switches with at least 3 points is implemented.

You can also make such a connection without problems, however, for this, in addition to the usual pass-through switches, you will also need a cross switch. In such switching devices there are no longer three, but four contacts - a pair of inputs and two outputs, which switch simultaneously, and accordingly it is necessary to use four-core cables.
In such a scheme, conventional pass-through switches are used at the first and last lighting control points, while cross switches are used at all other points. The number of group control places is unlimited, but with each additional point the connection in the distribution box becomes more complicated due to the large number of wires. To make the work easier, it is necessary to mark the wires so as not to get tangled in them later.

The principle of connecting pass-through switches for three control points is as follows:
- The output contacts of the first pass-through switch are connected by wires to the input pair of terminals following the cross switch, and so on until the last control point, the common wire of which is connected to the contact of the lighting device. The phase wire is connected to the input contact of the first switching device, and the second wire coming from the lamp comes to “zero” in the junction box.
- A three-wire wire is supplied to each of the pass-through switches, and four-wire wires are supplied to the crossover switches.
The diagram above shows the connection to the lighting of three control points, consisting of two pass-through and one crossover switches.
Attention! Through and crossover switches can operate at 6, 10 or 16A current ratings. All switches in a given circuit must have the same or greater current rating, and the wires used must be the same size.
Connection diagram for pass-through switch with 4 places
Having understood the above connection options, it will not be difficult to implement a connection diagram for a pass-through switch with 4 points or more. The difference lies in the introduction of additional crossover switches into the circuit.

The principle of work is practically no different from the previous ones, you just have to deal with even more wires, so it would be completely useful to label them.
Leading manufacturers of walk-through switches and their product range
Before you go to a store or market to buy a pass-through switch, you first need to familiarize yourself with the leading manufacturers of these products and their model range. The Russian electrical goods market offers products from a wide variety of manufacturers - from premium to budget. The prices of pass-through switches largely depend on the design and brand.
Legrand
Legrand is a leader in the electrical goods market due to the highest quality and reliability of its products and differs from competitors in its more flexible pricing policy. Legrand pass-through switches are convenient in everything - from installation to operation. The company's products are associated with style and high quality.

The advantages of Legrand products are as follows:
- a wide range of;
- high quality workmanship;
- durable components;
- wide choice of colors;
- flexible pricing policy.
An insignificant drawback of Legrand pass-through switches is the need for a more precise adjustment of the installation locations, since if they do not match, installation complications may arise.
VIKO
The Turkish company VIKO has been in the electrical market since 1990 and has already managed to win the trust of consumers. The company's products are characterized by high quality and reliability. For the production of electrical accessories, durable and fireproof plastic is used, designed for a large number of operating cycles. All of the company's products meet high European standards of quality and electrical safety.

Lezard

The Chinese manufacturer Lezard is part of the Legrand company, but only the stylish design remains from the native brand, and the build quality sometimes suffers from failures. But for such a price the quality is appropriate.
Wessen
Wessen is one of the leaders in the Russian electrical market and is a branch of Schneider Electric. Because of this, all products undergo strict quality control and are equipped with the latest technologies developed in the field of electrical engineering. The company offers the consumer a wide selection of products with a universal design, which allows them to fit into almost any environment.

The most popular among Russian buyers is the Rondo series. All products in this series are designed for hidden installation and have the necessary safety features. In addition, the decorative frames of the switches can be easily replaced, which makes it possible to customize them to any interior and realize your own design ideas.
Makel
A Turkish brand that has long gained popularity among Russian consumers. Makel products are functional, reliable and safe, and despite their seemingly simple design, they attract attention.

Makel switches provide the ability to connect via a cable without using distribution boxes. This makes product installation simple and use comfortable.
Legrand model range
| The lineup | Description |
 Valena Valena |
|
 Celiane Celiane |
|
 Exclusive Celiane Exclusive Celiane |
|
 Galea Life Galea Life |
|
Review of VIKO models
| The lineup | Description |
 |
|
 |
|
 |
|
Lezard
| The lineup | Description |
 |
|
 |
|
 |
|
Wessen
| The lineup | Description |
 Wessen W 59 Frame |
|
 |
|
 |
|
 |
|
Makel products
| The lineup | Description |
 Lilium Nat Care Lilium Nat Care |
|
 Defne Defne |
|
 Makel Mimoza Makel Mimoza |
|
When installing switches, it is necessary to ensure that there is no electric current using an indicator.
The most convenient height for ease of use is considered to be 900 mm from the floor. It is better to place the switch at a distance of 200 mm from the doorway.
If the device is installed outdoors, you should purchase switches with a protection class of at least IP44.
Before installation, you first need to use an indicator to identify the phase wire and mark it. This will make it easier to further connect the pass-through switch.
In the distribution box, it is better to connect the wires not by twisting, but by means of connecting blocks, terminal blocks and clamps.
Conclusion
As we can see, the device, operating principle and connection of the pass-through switch are not particularly difficult, especially if you follow the recommendations and adhere to basic electrical safety rules. The introduction of pass-through switches will provide additional comfort for controlling lighting devices. You can improve your home's electrical systems endlessly; it's just a matter of desire, financial capabilities and imagination.