Cold porcelain at home. Recipe - DIY cold porcelain without cooking! Making porcelain at home
Making products from cold porcelain is accessible to anyone. This type of business requires virtually no initial investment or special skills. The main thing is to have a certain amount of free time and desire.
Our business assessment:
Starting investment - 10,000 rubles.
Market saturation is low.
The difficulty of starting a business is 2/10.
What is cold porcelain?
Cold porcelain is a special mixture for decorative modeling, consisting of starch, a binder, glycerin and oil. It was invented almost a century ago in Argentina. Today it is one of the most harmless and practical materials for modeling. In addition, it has a very low cost. Its advantages also include a smooth and uniform texture, high ductility and ease of use.
Cold porcelain figurines, flowers, jewelry, photo frames and panels are in consistently high demand. The technique of using this material is very simple. Cold porcelain modeling is suitable for both adults and children. After hardening, the mass becomes hard, which distinguishes it favorably from plasticine. Cooking cold porcelain at home does not require special equipment or expensive ingredients. All components for preparing the mixture can be purchased at nearby stores.
Cooking recipes
On the topic of how to make cold porcelain from starch with your own hands, you can find many different educational video courses and master classes online. All of them can be divided into 2 large categories. The first are recipes that require cooking, the second are cooking methods without heat treatment. The most common recipes are described in detail below.
Classical
 Preparing cold porcelain according to the classic recipe requires boiling. To prepare it you will need the following:
- PVA glue in the amount of 1 kg.
- Starch 500 grams. You can use any - potato, corn or rice. The latter gives the whitest mass.
- 1 tablespoon citric acid. It can also be replaced with a similar amount of stearic acid or sodium benzoate.
- 2 tbsp. spoons of glycerin.
- 3 tbsp. spoons of Vaseline.
Preparing porcelain according to this recipe begins with mixing all the ingredients. To do this, it is best to use a non-stick container and a wooden spatula. After thorough mixing, the dishes are placed on a very low heat, or even better, in a water bath.
At first, the consistency of the mass will resemble liquid cream. After 20-25 minutes of continuous stirring, it will begin to thicken. In this case, small lumps resembling cottage cheese first form, then it will completely gather into one large lump.
This lump must be removed from the container and wrapped in a damp piece of cloth. Once the temperature of the mass allows you to pick it up, you can start kneading. It looks like kneading dough for dumplings or dumplings.
A sign that porcelain is ready is a smooth and uniform texture. As soon as it acquires the necessary signs, kneading is stopped. For further storage, the mass is placed in a plastic bag.
Cold porcelain flowers and other crafts very often require painting the mass in different colors. To do this, you can use food coloring or even ordinary lipstick. They are introduced into the mass at the kneading stage.
No cooking
You can prepare cold porcelain without heating. In terms of its properties, it is no worse than the classic one. The recipe for cold porcelain without cooking is as follows:
- potato starch 2 tbsp. spoons;
- Vaseline 1 tbsp. spoon;
- baking soda on the tip of a knife;
- 2-3 teaspoons of PVA glue.
Starch, Vaseline and baking soda are thoroughly mixed. In this case, the mixing container should be glass or plastic. The mass sticks to it much less. At the end of mixing, PVA glue begins to be added to the mixture until the mixture thickens properly.
In order for the mass to acquire the necessary properties, it must be completely kneaded. To do this, place it on a flat plastic surface. To prevent the mixture from sticking to your hands, apply baby cream or Vaseline.
Cold porcelain prepared without cooking can be used immediately after kneading. Various decor, panels or bouquets of flowers are made from it.
Tools and materials for working with cold porcelain
 Tools for making cold porcelain products can be purchased from various online stores. Their range is quite extensive. There, if necessary, you can buy cold porcelain for modeling.
Let's look at the most popular ones:
Stacks
Special devices in the form of sticks. The ends can be pointed, rounded or with a ball. The more stacks, the more options for making. For example, to create small forget-me-nots or lilacs you will need a stack with a diameter of 4-5 mm at one end and 1.5-2 mm at the other. If for some reason it is not possible to purchase ready-made stacks for the job, knitting needles, chopsticks from a Chinese restaurant, and similar items are quite suitable.
Roller knife
The main purpose of roller knives is to cut finished parts from rolled layers. They can also be used to make various indentations, for example, for rolling flower stems. Roller knives can be made of plastic or metal. The former are much cheaper than the latter, but they are absolutely short-lived. Their use is justified for beginners. For professional use, it is better to choose knives made of steel.
Molds
 Molds for cold porcelain are quite expensive. But they can significantly simplify the manufacturing process. Essentially, these are prints from finished petals, leaves or other elements. Their main purpose is to give the greatest possible resemblance to a living object. Bouquets made of cold porcelain made using molds look very realistic. For example, an artificial orchid made using this technology is practically indistinguishable from a natural one. In summer, molds can be replaced with live leaves or petals, but in winter you cannot do without them.
You can make molds yourself from available materials, for example, plasticine and silicone sealant. To do this, a small layer is rolled out of plasticine, on which an impression of the required leaf is made. A small border is formed around it. Silicone sealant is poured into the improvised mold. If this is not available, you can use epoxy resin.
After the poured material has completely hardened, the plasticine is carefully removed. The required mold is ready. Using such blanks of cold porcelain, you can make a wide variety of flowers: peonies, tulips or snowdrops.
Cutters
Cutters are special molds for producing identical parts. They are used to make various decorations from cold porcelain. For example, cutters are used to make petals, leaves, and geometric shapes. In order for the details to look as realistic as possible, especially when it comes to creating colors, each element should be given personality traits. Ready-made cutters are quite expensive, but online you can find a master class on how to make them yourself from scrap materials.
Pasta machine
Flexible cold porcelain must be rolled out before use. To simplify this process, there are special sheeting machines. They help to significantly save time and obtain layers that are perfectly even in thickness without unnecessary deformations and marks. When rolling, porcelain is placed between layers of a special protective film. This prevents the material from sticking to the sheeting rollers of the machine.
Other Helper Tools
In addition to professional equipment, when working with cold porcelain, you will also need a number of other tools. For example, a craftsman should always have various nippers and side cutters on hand. You will also need tweezers when working with small parts. Almost all of these tools can be purchased at regular hardware stores.
Glue
To fasten small parts together during work, you will definitely need glue. For example, it will not be possible to make paintings from cold porcelain without using it. It will also be needed when fastening individual flower elements.
When working with cold porcelain, you can use latex glue; after drying it becomes completely transparent. It should be borne in mind that its use requires some skill, since it does not set immediately, but only after some time. For beginners, in this case, we can recommend regular second glue.
Paints
Crafts made from cold porcelain in most cases require painting. You can add the dye at the mixing stage, or you can also color finished products. Oil-based paints are well suited for mixing into a mass. Also, some craftsmen use acrylic dyes in their work. When using the latter, it is worth considering that they are made on a water basis. Accordingly, the mass with their addition will dry out much faster.

The technology for making cold porcelain is not particularly complicated. But despite this, there are some secrets in this matter:
- Do not store the finished mass in the cold.
- After preparation, the mass should rest for 24 hours.
- To prevent the finished products from cracking, the mass should be kneaded very thoroughly.
- To prevent porcelain from sticking to your hands while working, use baby cream.
- To make cold porcelain roses look as realistic as possible, they should be painted after production. This rule applies to other colors as well. In this case of coloring, dry food paints should be used. They are applied to the surface of the products with a brush and then held over steam. Under its influence, the dye is well absorbed into the surface.
How to organize a market for finished products?
Handmade products, that is, handmade, are now at the peak of their popularity. That is why, with proper sales organization, a business selling cold porcelain products can bring good income.
Flower arrangements, brooches, various jewelry and even mugs are in good demand. Not everyone is ready to spend a lot of time making them themselves. Most people prefer to pay a certain amount and enjoy exclusivity.
For example, dolls made of cold porcelain are popular among collectors. This plastic and pliable material allows you to create almost any image with almost 100% realism.
If you wish, you can also create your own website with an online store. This approach will help get sales flowing. To attract additional visitors, you can even organize small designer courses in cold porcelain modeling.
The return on investment for cold porcelain products is quite high. Their production is quite labor-intensive. Therefore, the finished work should cost at least 10 times more than the materials used.
Cold porcelain is the cheapest, most pliable and accessible material for modeling. It is completely safe to work with it, and it is not at all necessary to have special skills and knowledge - even a small child can do such creativity. You don't need to look for something special in stores to create a unique decoration or other thing with your own hands. You can prepare cold porcelain at home.


In appearance, cold porcelain resembles plasticine or clay, but after complete drying it is an absolutely solid substance. During sculpting, you can use any accessories, jewelry, beads, small beads, buttons, branches or dried flowers, as well as fabrics of any structure. The surface of cold porcelain products can be varnished, painted or sprinkled with beads, sparkles, sand, etc.


The history of cold porcelain
In the first years of the 19th century, the first products made from this material appeared. According to dated records, it became known that cold porcelain was invented by the Argentines, but there is no exact information about its origin. There is much more information about the Russian master Pyotr Ivanov, who worked at the imperial porcelain factory and at the beginning of the 19th century made unique objects from a special class of porcelain. According to documents from the St. Petersburg Porcelain Factory, it was he who made the first decorative flowers from cold porcelain, which were intended to decorate special perfume bottles that were supplied to the imperial family.


There are earlier facts confirming the existence of this material. Chinese treatises on sculpture and art describe many varieties of cold porcelain stucco, but it is called somewhat differently. But still, its recipe is identical to the one used by Pyotr Ivanov.

Cold porcelain products: features and nuances of use
This material makes incredibly beautiful products, but at the same time they require the right approach to use. Places where there is no direct sunlight and moisture are acceptable for them. Cold porcelain is the same polymer clay that can absorb moisture, become limp and lose its original color when exposed to sunlight.


In rooms that are decorated with items made of cold porcelain, it is necessary to maintain the optimal temperature regime for it. So, if it is less than 10º C, the structure will gradually collapse due to the crystallization of moisture particles contained in such porcelain. High temperatures are also destructive - it will simply dry out and crumble. Lacquer coatings will help extend the life of cold porcelain products. They will protect against moisture and maintain the color, shine and shape of the surface.


What can be made from cold porcelain
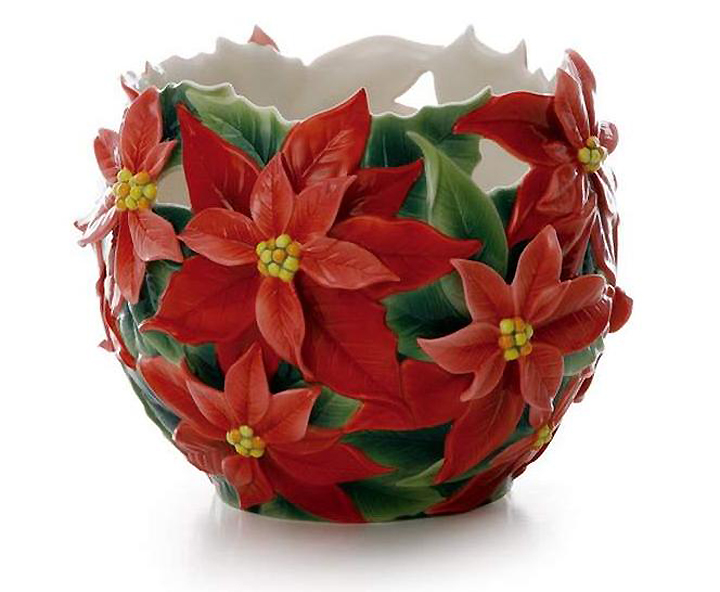
From this material you can create anything you want - from a variety of jewelry for women to cute accessories for the interior:
Many needlewomen decorate pots of indoor plants or create a complete composition with a cold porcelain flower.


Dishes decorated with such stucco molding will become a real highlight of the kitchen interior.


All kinds of frames, flowerpots, stands, lampshades, candlesticks made of cold porcelain will dilute the usual interior and give it a touch of individuality.


Hairpins, hoops, jewelry and other feminine attributes decorated with flowers made of cold porcelain look charming. 


Thematic compositions made from this material, figurines of animals, little houses, garlands of flowers and greenery will certainly become a unique interior decor.


Together with your baby, you can create characters from your favorite cartoons or fairy-tale characters that will decorate the children's room.


In addition, you can make an amazing gift for dear people.


Cold porcelain: cooking at home
Making polymer clay is not at all difficult. The easiest traditional recipe is corn or rice starch, PVA glue, the most common baby cream and glycerin. The proportions are as follows:
- 1:1 cups starch and glue;
- 1:2 tablespoons of cream and glycerin.

Mix the ingredients thoroughly and leave for 15-20 minutes until the mass reaches a consistency ideal for modeling. It is strictly forbidden to put the prepared mixture in the refrigerator or store it for more than 2 hours at room temperature. You need to sculpt at once, trying to use all the material.
Some people add citric acid to the mixture, which works on the principle of preservation, which extends the shelf life of products.

There are recipes using water. However, such compositions are short-lived and fragile. Under the influence of external irritants, water reacts with the other components of polymer clay, due to which the shape of the products may change, their strength may decrease, and an unpleasant odor may appear.

To give a certain color to a product, chalk and food coloring are often used. But even after finishing the work and completely drying the product (in a day), its surface can also be painted.

Modeling tools
- scissors and rolling pin;
- toothpicks or stacks;
- nippers and tweezers;
- decorative cosmetics;
- paints and brushes;
- wet wipes;
- cutting board and gloves;
- glue for installation and thin wire.

Sakura flower: master class from cold porcelain
It is easier for beginning “sculptors” to make flowers from cold porcelain, for example, sakura.
Step 1. Leave part of the workpiece white, and paint part soft pink. From each we make small blocks (future petals). The white block should be slightly thicker than the tinted one. We connect the blanks along the length and cut them into small rectangles.

Step 2. Sculpt the petals. Make their bases pink and their edges white. We glue the petals together with PVA and use a toothpick or knitting needle to make a small hole in the middle, where we will then insert the stem.


Step 3. We attach the finished buds to a leaf cup with a green base and place them on a wire stem. Such a branch should look like a real sakura, perfectly repeating its structure.

Step 4. According to this scheme, we make several branches, leave them to dry completely, and then twist them into a single composition using wire.
Tags:Many people would like to have porcelain products in their home, as they decorate the room and create coziness. But few people realize that there is a recipe for cold porcelain without cooking that anyone can master. Thus, it is possible
It is important to know: cold porcelain is a very cheap and safe material. To make a dish or figurine from such porcelain, you do not have to have professional skills and spend your whole life in sculpting. Now it is possible to make crafts from cold porcelain with your own hands for beginners.
Historical aspect
Most historians are inclined to believe that the Chinese first began producing porcelain in the 6th century. In ancient times, the material was used to make services from which tea was drunk. This utensil was also used in the Chinese tea ceremony.
The very first porcelain had blue and greenish shades, this distinguished it from other materials. Previously, the Chinese made art objects in the same style: necks in the shape of animals and vessels similar to dragons. They learned to make white porcelain in China only after the 10th century. After this, trade ties between the Asian country and Europe strengthened significantly. Europeans liked the unique porcelain products from China.
Although Europe did not immediately figure out the formula for porcelain, the best minds of that time worked on it for many years. It was only by the 16th century that soft porcelain was invented in Italy, which immediately became popular in Germany and France. But in the 18th century, the famous alchemist Friedrich Bittger discovered hard porcelain, from which they began to make the most beautiful dishes. Even their own painting masters appeared. European porcelain was very different from other materials, as it had special marks. Porcelain factories began to open in England, Germany, the Czech Republic and other cities.
In Russia, the first porcelain factory was built in the middle of the 18th century in St. Petersburg. At first, Elizabeth attracted foreign specialists to set up the production line. But later Dmitry Vinogradov mastered the domestic method of producing solid material from local materials. A few years later, the Imperial Porcelain Factory was renamed the Porcelain Enterprise named after. M.V. Lomonosov.
Russian factories began to focus on a wide range of consumers at the end of the 19th century. Due to this, the cost of porcelain dropped significantly and the production line was mechanized. However, even now there is a category of porcelain items that are made by hand. As a rule, these are very expensive high quality sets. Russian porcelain is valued all over the world, so it is sold at auctions for huge sums of money. Private collectors are willing to pay a fortune to get their hands on a treasured piece of porcelain.
DIY cold porcelain master class for beginners without cooking
In its original form, porcelain resembles clay, although it hardens after thorough drying. Therefore, any decorations and accessories can be made from porcelain, including flowers, shells, and buttons. At the end of sculpting, it is possible to sprinkle with beads for beauty and varnish.
They learned to make cold porcelain only in the 19th century, and it was then that craftsmen began to make stunningly beautiful figurines from this material. And although there is no exact information about the discovery of the material, many scientists are inclined to believe that the Argentines became the discoverers.
However, a large amount of information about the professional master Pyotr Ivanov has been preserved in Russia. He studied art at the Imperial Porcelain Factory. After some time, Peter began to create original objects from cold porcelain. According to the documentation of those times, it was this master who was the first to make flowers from a unique material. These flowers then began to decorate bottles of perfume that were delivered to the imperial family. Thus, Pyotr Ulyanovich became famous throughout the Russian Empire. He was able to make his cold porcelain recipe at home without cooking. In this regard, everyone can make cold porcelain with their own hands, master class flowers video.
Although there are earlier archival documents that confirm the existence of cold porcelain. For example, in China there are chronicles that mention different types of cold porcelain sculpting. Despite the fact that the recipe for cold porcelain at home is similar to the material created by Peter Ivanov, the name of Chinese porcelain is different.
Cold porcelain crafts for beginners
Of course, figurines and various crafts made from cold porcelain turn out to be exquisite and beautiful. However, they are no less demanding of themselves. It is important to remember that products should be stored away from liquids, moisture and sunlight. The fact is that cold porcelain tends to absorb liquid and become limp. This means that a toy or figurine may lose color, shine and structure over time. Therefore, it is best to place vases and figurines in a dark place.
Before you make cold porcelain at home without cooking, you need to understand that crafts, molds and figurines should be kept in a room with optimal temperature conditions. The structure of the material will collapse if the room temperature is below 10 degrees Celsius. At this moment, moisture particles crystallize, which negatively affects the quality of the product. But the heat also destroys the cold porcelain, and as a result the figurine crumbles. All these nuances should be taken into account before making your own cold porcelain master class for beginners.
But experts have learned to extend the performance characteristics of cold porcelain products. They are simply varnished. Then beautiful objects are not afraid of either moisture or sun. At the same time, the product retains not only its shape, but also its shine and color.
Cold porcelain jewelry
According to experts, this material allows you to sculpt anything, including decorations and interior items. At the same time, every beginning craftsman can bring all his ideas to life by creating unique hair clips, flowers and other necessary things. You can even make gifts for children: cartoon characters, fairy tale heroes, animals and much more. In any case, cold porcelain figurines will decorate any room in the house, including the bedroom and children's room. Cold porcelain without cooking from potato starch is within the power of every person.
If a person has creative thoughts, then you can make pots for your favorite flowers. After all, it is now difficult to find original items in ordinary stores, since most are produced in ordinary factories. But the DIY cold porcelain recipe makes it possible to create elegant and original items for the home: photo frames, lamps, vases, flowerpots, sculptures and much more.
You can also decorate your apartment or house using cold porcelain: flowers, greenery, garlands, figurines of exotic animals, themed compositions, figurines, etc. There is no need to go to the store for a gift, since you can make your own flowers from cold porcelain and polymer clay in contact. Relatives, relatives or girlfriend will be happy with such a surprise.
Process of preparing cold porcelain
To prepare polymer clay, you do not need to have any special knowledge. There are several ways to do this, but in this case the simplest option will be considered. You need to take potato, rice or corn starch, polyvinyl acetate emulsion in water, glycerin and cream for children. Then mix everything in equal proportions.
After thoroughly stirring, leave the mixture for 30 minutes. During this time, the components will turn into the mass necessary for modeling. It is important to know: under no circumstances should cold material be placed in a cold room or refrigerator; it must be stored at room temperature. Experts recommend sculpting immediately after preparing the consistency.
In some cases, people add citric acid to the material to improve the performance of the products. This substance creates a preservation effect.
If there is liquid in the composition, then you need to be prepared for the product to turn out fragile. Over time, the figurines will begin to emit an unpleasant odor, and the structure of the material will significantly weaken and change.
Ingredients such as food coloring and chalk give the figurines a vibrant color that lasts for a long time. Although finished products can be painted after complete drying, but not earlier than one day after sculpting.
To create a real masterpiece from cold porcelain you will need the following tools:
- Cosmetics for decoration.
- Paints, brushes.
- Toothpicks.
- Some construction tools.
- Protective gloves.
- Towel, napkins.
- PVC glue, metal wire.
- Scissors.
- Rolling pin.
If a person has a great flight of imagination and a creative reserve, then in the sculpting process you can use threads, beads, fabrics and other accessories. These decorative elements will allow you to create not only a beautiful, but also a unique piece of art.
For those who are new to modeling, you can consider a more complex recipe for preparing the material.
Mix PVC glue with cornstarch in a small container. Then add half a glass of plain water, a little glycerin and a spoonful of baby cream. You can also use an inexpensive face cream to prepare the mass. After stirring the elements of the mixture, the texture should be smooth and pleasant to the touch.
It is worth noting that finished products dry for about two or three days. During drying, it is better not to touch them, but to let them dry completely. If, after preparing the porcelain, there is excess material left, it can be placed in a plastic box and tightly covered with a lid. It’s better to put the leftovers in the refrigerator until the next creative evening.
Cold porcelain flowers master class with step-by-step photos
Experts believe that it is better for beginner sculptures to start with simple objects. In this case we will talk about the sakura flower. The material must be painted pink and white before sculpting. You also need to cut the porcelain into bars to later make petals out of them. In the process of cutting material, it is necessary to monitor the length, shape and width of the workpieces.
After cutting the material into small rectangles, you can begin sculpting the petals. This will be the first step towards creating an original sakura. The edges of the flower should be white, but the base should be pink. After gluing the petals, use a toothpick to make small holes that will be needed for the wire in the form of a stem.
As for the buds, they are glued to a green cup with a white edging. In this case, it is worth placing the buds securely on the stem so as not to damage the flower during transportation.
To create a “living sakura branch”, you need to try to create the same one from wire. First you need to collect all the metal blanks in one bundle, and then twist them beautifully to create a single composition. If all the steps are performed correctly, then the sakura can be placed in a vase or pot as desired.
Also, those who want to do sculpting have the opportunity to make a flower like a rose from cold porcelain master class. In this case, the manufacturing process is the same.

Cold porcelain flowers master class video
Now, to prepare cold porcelain with your own hands without cooking, master class, you can use open resources on the Internet. There are sites where not only thematic photographs are shown, but also various videos are posted. Thus, beginners can see in detail a master class from professional masters.
There is no need to be afraid to do something with your own hands; the technology for preparing cold porcelain at home is very simple. You don't need a lot of components to create unique and creative items. It is enough to have a rich imagination and a desire to give your loved one a gift.
If you use all the tips, you can create real comfort and your own style at home or in an apartment that will delight your friends, relatives and loved ones. Well, you can furnish the children's room with amazing figurines and figurines made of cold porcelain. After all, now there are so many different characters that kids like. By creating a cartoon character with your own hands, you can get a lot of positive energy from your child in return.
DIY cold porcelain - 19 recipesCold porcelain is a special mixture of corn starch, glue, oil and glycerin that is used for artistic modeling. Today, cold porcelain is an absolutely harmless, convenient and very cheap material for modeling. Due to its very smooth and uniform texture, remarkable plasticity, it is very convenient to use.
Both children and adults can work with cold porcelain. When cold porcelain hardens, it becomes hard, which distinguishes it favorably from plasticine. Another advantage is that it can be easily prepared at home. We will tell you how to do this!
- The product dries out by 20-30% after drying.
- Formalin is toxic - avoid contact with hands and mucous membranes. Serves to prevent the dough from cracking when drying. It should be added to the cooled mixture.
- You need to cook the mixture in glass or Teflon containers, but not in aluminum.
- Many recipes advise that the finished mass should be allowed to sit for 1 day.
- Never store the mixture in the refrigerator.
- To remove moisture, change the bag of the mass 24 hours after preparation and wrapping.
- To avoid cracks, you need to knead the mixture very thoroughly.
- It is important to coat the mass with baby oil before wrapping it in film, otherwise fungus may develop.
- Lubricate your hands with cream before working with cold porcelain so that the mass does not stick to your hands too much.
- Cold porcelain is ideal for sculpting flowers (unlike plastic and salt dough)
- For a more realistic color of the flowers, apply dry food coloring with a brush, then hold over the steam from the kettle. The porcelain will absorb the dye. It must be applied after the flower has already frozen.
- You can also color flowers with liquid food coloring, but the disadvantage of this method is that the flower turns out too bright and unrealistic. Acrylic paints can be used for deeper color
There are many different methods and recipes for making cold porcelain.
COLD PORCELAIN THAT IS COOKED
Recipe 1
- 1 cup PVA
- 1 cup starch
- 2 tbsp. glycerin
- 1 tbsp. l. cream (I use baby cream)
Pour the glue into a cup, put it on medium heat, immediately add the cream, stir quickly, add glycerin, stirring continuously.

Little by little, stirring constantly, add starch.

Mix well.

The mass thickens very quickly, at first it will look like cottage cheese

Then a lump forms. Place the lump from the cup on the table, greased with cream, and let it cool slightly.
Knead until the mass becomes homogeneous, like plasticine.

Recipe 2
- 2 cups starch (corn)
- 2 cups white glue (any kind)
- 3 tbsp. spoons of glycerin
- 3 tbsp. spoons of white cream (Nivea) (you can use Vaseline)
- 3 tbsp. spoons of baby oil
- 1 teaspoon citric acid (for canning)
Combine all wet ingredients and cook over medium heat until smooth. Add cornstarch. Stir continuously until a ball forms. Remove the ball from the pan and stir with your hands. If too hot, cover with a damp towel until cool.
Recipe 3
- 3/4 cup white glue
- 1 cup cornstarch
- 1/2 cup water
- 1 teaspoon cold cream (we recommend using Ponds Cold Cream or Sorbolene, but any white cream will do)
- 1 teaspoon glycerin.

Recipe 4
- 1/4 cup water
- 1/4 cup cornstarch
- 1/4 cup soda

Recipe 5
- 1 kg vinyl glue
- 0.5 kg corn starch
- 1 tbsp. stearine or stearic acid
- 1 tbsp. emulsion for bleaching dough (optional, can be replaced with white paint)
- 1 tbsp. lemon
- 2 tbsp. l. glycerin
- 3 tbsp. l. Vaseline
Place glue in a Teflon-coated frying pan, add cornstarch and mix. Add sodium benzoate, stearin, dough whitening emulsion, lemon, and then glycerin and petroleum jelly.
Cook over low heat, stirring constantly with a wooden spoon, for 20-25 minutes (or until it begins to stick to the sides of the pan). During preparation, the dough goes through several stages: first it has a creamy consistency, then it looks like cottage cheese and, finally, it is formed into a thick mass. It is ready when it pulls away from the sides. Remove from heat. Place on the countertop and knead until it cools and becomes smooth and pliable. Place in a tightly closed plastic bag and after 24 hours the mixture is ready for use.

Recipe 6
- ½ cup salt
- ½ cup hot water
- ½ cup cold water
- ½ cup cornstarch
- Food coloring of your choice...
Combine salt and warm water in a large saucepan and bring to a boil.
In a separate bowl, we mix cold water with cornstarch, mix well and add a few drops of food coloring.
Add the diluted starch to salted water and quickly stir everything. Keep the mixture on low heat, stirring constantly until the dough thickens.
Place the dough on a wooden base, let it cool slightly and knead until the mass becomes smooth. It can be used immediately or stored wrapped in a plastic bag or film in a tightly closed container.
Recipe 7
- 250 gr. vinyl glue
- 500 gr. corn starch
- 4 tablespoons glycerin
- 0.5 cup hot water
- 2 teaspoons 5% formaldehyde

Recipe 8
- 1 kg. vinyl glue.
- 600 gr. corn starch.
- 1 tbsp. sodium benzoate (a food preservative, available in pharmacies)
- 1 tbsp. stearic acid.
- 2 tbsp. glycerin.
- 3 tbsp. Vaseline.
- 1 tbsp. emulsion for bleaching dough (optional, or replace with white paint)

Recipe 9
- 1 kg vinyl glue
- 600 gr. corn starch
- 1 tsp sodium benzoate (a food preservative, available in pharmacies)
- 1 tbsp. paraffin
- 3 tbsp. baby oil
- 2 tbsp. glycerin
- 1 tbsp. lemon juice or citric acid

Recipe 10
- 1 cup cornstarch
- 1 cup glue
- ½ glass of water
- 1.5 tsp. pure glycerin
- 1.5 tbsp. rich cream with lanolin
- 10 drops of formaldehyde
In a bowl, mix cornstarch and water until completely dissolved. Add glycerin, formaldehyde and cream, stirring constantly until lumps disappear. Place on low heat. Then add glue and continue stirring constantly for two to three minutes. Then remove the mass from the heat. Cool and knead again. Store in a plastic bag.

Recipe 11
- 250 gr. corn starch.
- 50 gr. cornstarch (for rolling out dough).
- 500 gr. vinyl glue.
- 1 teaspoon. stearic acid.
- 1 tbsp. sodium benzoate (a food preservative, available in pharmacies)
- 1 tablet of camphor.
- 1 teaspoon zinc oxide.
- 1 tbsp. glycerin.
- 1 tbsp. liquid Vaseline.
- 1 tbsp. hand cream (preferably white).
- 3 tsp. bleach for dough (optional or replace with white paint).
- 100 ml. water.
- 1 teaspoon. 5% formaldehyde (formaldehyde).
- 5 ml. alcohol.
Dissolve a camphor tablet in alcohol, stirring with a disposable spoon. Mix all ingredients in a separate bowl (except formaldehyde and 50 cr corn starch). Mix everything well and let stand for 20-30 minutes. Pour the mixture into a saucepan or frying pan with a Teflon coating and simmer over low heat, stirring constantly with a wooden spoon, until the mass reaches the consistency we need. When the mixture thickens, remove the dough from the heat and let it stand for a while. Place the mixture on the table and knead, adding formalin (formaldehyde) and slowly mixing in the remaining 50 grams. starch until the mixture cools.
Divide the dough into small portions and leave them to cool on a table sprinkled with starch. If the mass is still warm, you need to sprinkle it with starch, but do not overdo it, as the dough may be too tough.
As soon as the mass becomes cold, pack it in plastic bags and put it in a tank, closing the lid.
This dough can be colored with vegetable or food coloring (which is used for baking) and will last a very long time if stored as directed.

Recipe 12
- 3 cups vinyl glue (wood glue)
- 1 glass of warm water
- 1 tablespoon sodium benzoate (a food preservative, available in pharmacies)
- 3 cups cornstarch
- 1 tablespoon glycerin (also in pharmacies)
- 3 tablespoons baby oil, such as Johnson brand
- 1 teaspoon formaldehyde (formalin) (pharmacy)
Mix the first 4 ingredients until there are no lumps. Add oil and glycerin. Cook over low heat in a non-stick frying pan, stirring with a wooden spoon until the mixture can be kneaded with your hands. Finish when the dough stops sticking to your fingers and is firm. After removing the mass from the heat, add formaldehyde (formalin) and knead again. Store in a glass or plastic container, tightly closed.
Let stand for one day. DO NOT store in the refrigerator, ever.

Recipe 13
- 200 gr. vinyl glue
- 140 gr. corn starch
- 1 tbsp. vegetable oil (or baby oil)
- 1 tbsp. white vinegar
- 1 tbsp. l. white gouache paint (oil, tempera)
We combine: glue, vegetable oil, white vinegar and paint. Stir well. Add starch and place on low heat, stirring constantly with a spatula. Cook for 4 minutes. You should get a mass with the consistency of thick semolina. Stir the mixture over the heat until it becomes an elastic lump. Then we put it on cling film, smear our hands with cream and knead it very well. If it sticks to your hands, lubricate them with cream. After this, wrap the mass in film and store in an airtight container.

Recipe 14
- 2 cups vinyl glue
- 2 cups cornstarch
- 1 cup sodium benzoate.
- 1 tbsp. white vinegar.
- 2 tbsp. Vaseline.
- 4 tbsp. glycerin.
Place the starch in a saucepan, then add the glue, stirring with a wooden spoon to dissolve any lumps.
Add glycerin and stir to obtain a creamy consistency without lumps.
Dissolve sodium benzoate separately in hot water and add to the total mass, stirring continuously.
Place over low heat and stir continuously until thickened.
When the mass leaves the walls, remove from heat, sprinkle the table with starch and lay out the dough
Mix the mass very well. If it sticks to your hands, lubricate them with cream
Divide the finished dough into small pieces and store wrapped in plastic wrap or nylon, which should be placed in a jar. It is important to coat the mass with baby oil before wrapping it in film, otherwise fungus may develop. To remove moisture from the dough, change the bag after the first 24 hours.

COLD PORCELAIN WITHOUT COOKING
Recipe 15
- 1 cup starch (preferably rice, but if not, then corn)
- 1 cup dry chalk
- 2 cups white vinyl glue (meaning vinyl-based PVA)
- 6 teaspoons liquid Vaseline
- 6 drops of formalin (formaldehyde) (sold in a pharmacy, CAUTION - toxic!).
Mix starch and chalk, slowly add glue and Vaseline. When it all thickens, add formalin.
If the mass is too dense, add a little water little by little. Mix well, store in a bag and in the refrigerator. You can add various paints (oil, acrylic, oils) and food coloring to the mixture.
Advantages of this cold porcelain:
1. No need to cook.
2. No cracks.

Recipe 16
- 3 cups vinyl glue (PVA)
- 3 cups cornstarch
- 15 tbsp. water.
- 1 tbsp. baby oil or vegetable oil
- 1 tbsp. l. white hand cream
- 1 tbsp. stearic acid (to avoid cracking of the product after drying)
- 1 tbsp. l. formalin (formaldehyde)
- 1 tsp sodium benzoate. (to whiten the paste)
- 2 tbsp. l. rice starch (optional, optional)

Recipe 17
Ingredients:
200 grams of starch
200 grams of PVA glue
1 tablespoon Vaseline oil
2 tablespoons baby cream
Mix everything well until elastic and place in a clean plastic bag so that the porcelain does not dry out.

COLD PORCELAIN IN MICROWAVE
Recipe 18
- 300 gr. corn starch
- 500 gr. white glue
- 1 teaspoon stearin
- 1 teaspoon sodium benzoate
- 2 tablespoons baby oil
- 2 tablespoons glycerin
- 2 tablespoons hand cream
- 1 tablespoon formaldehyde
- 1 cup hot water
- 5 teaspoons liquid paraffin
Sift the starch and add sodium benzoate, paraffin and stearin to a bowl. Microwave for 5 minutes to melt the stearin. Place remaining ingredients in a tin bowl. Using a blender, mix them. After this, add paraffin and a little hot water. Mix vigorously. Then add starch and continue stirring for about 5 minutes. Cook over low heat (stirring constantly) or in the microwave (stirring every minute) until the dough begins to separate from the sides. After this, place the mixture on a clean surface and let it cool until you can knead it with your hands. Knead the dough vigorously, and when it is homogeneous, wrap in film and refrigerate. You will notice that the mixture begins to sweat, then when it is cold, unwrap it and knead again. Then wrap it again in a plastic bag, but in a different one.

Recipe 19
- 1 cup cornstarch (a cup contains 240 grams of starch.)
- 1 cup PVA
- 2 tbsp. l. Johnson Baby oils
- 2 tbsp. l. “Vinagre” (wine vinegar) - can be replaced with lemon juice or a teaspoon of citric acid
- Spoon of dry tempera - if available
- At the end of 1 tbsp. l. cream (nutritious thick, Nivea type) - on the table to knead the mass.
Place the mixed mass in the oven for 30 seconds - stretch out and mix. And so only 3 passes for 30 seconds.
If you took less mass, set it for 20 seconds... Place it on the table with cream. Knead the mass for about five minutes.

Choose the recipe you like and make it healthy!
![]()
Fresh flowers are so beautiful that they leave almost no one indifferent. They make wonderful bouquets and present them as a gift or just to lift your spirits. But a cut plant cannot live forever. Many people grow flowers, but not everyone succeeds. That's why man came up with them. They are made from plastic, beads, clay, paper, etc. Today, there is increasing interest in such a material as cold porcelain.
A little history
Cold porcelain appeared recently, in the mid-20th century. There are several versions about where this material originated. Argentina and Japan are most often mentioned. However, there is a lot of information that cold porcelain was invented in different countries around the same time. This amazing fact is explained by the fact that the material was made entirely from PVA glue and starch. Gradually, florists began to add other ingredients to the composition, trying to improve the properties of cold porcelain. But where does this name come from? The fact is that the material, after drying, looks like porcelain. Its main difference is that the material dries quickly and does not need to be fired in ovens. There are 2 ways to prepare cold porcelain without boiling. In the first case, the ingredients are mixed and heated. The mixture needs to be stirred constantly, but this is difficult to do because of its thickness. Therefore, this method causes difficulties. The other method is much simpler because it does not require heat treatment. That's what they call it - cold porcelain without cooking.
Recipe No. 1
Making cold porcelain without cooking does not cause any difficulties. Even a beginner can handle this. First you need to take a dry, clean bowl, put 2 tablespoons of starch in it with 1 tablespoon of Vaseline. The components must be mixed thoroughly. Add a little soda to the resulting mass (at the tip of a teaspoon). Then mix again. After this, you need to add PVA glue to the mixture. It is poured in parts, stirring the mass until it reaches the desired consistency. The mixture is quite sticky. To work with it, your hands must be lubricated with cream or Vaseline. Store the mixture in the refrigerator, pre-lubricated with oil and wrapped in plastic.

Recipe No. 2
To make cold porcelain, you can use another method. It will require water and baking soda. Take 1 spoon of all ingredients. Often a few drops of detergent are included in the composition. You need to add a little Vaseline to all the ingredients, then mix. The result is a snow-white mass, perfect for modeling. Cold porcelain should be stored in the refrigerator.

Small tricks:
- Corn starch is more suitable for making the mixture. Thanks to this component, you will get snow-white, cold porcelain without cooking. Potato starch gives a yellowish tint to the mass. It can be used if the product does not require white color and will be painted in dark colors.
- When purchasing glue (PVA or wallpaper), you need to pay attention to the presence of a plasticizer in the composition. Otherwise, the mass will not be elastic.
- To add flexibility to the product, you can add an automotive plasticizer to the mixture.
- If cold porcelain does not hold its shape well without cooking, then starch must be added to it.
- Instead of petroleum jelly, you can use glycerin or petroleum jelly.
- Wallpaper glue must contain
- If the mixture cracks and begins to crumble, you can return it to its original appearance by adding glue.
- By adding a few drops of perfume to the mixture, you can get flavored cold porcelain without cooking.
Master Class. Cold porcelain flowers
Rose is the queen of flowers. It's not difficult to make. For production you will need:
- cold porcelain;
- toothpicks;
- PVA glue;
- paints;
- polystyrene foam (can be replaced with a dish sponge)
First you need to make the cold porcelain colored. Oil paints are suitable for this or You do not need to paint all the material at once. It's better to take a small piece. You should add a little coloring matter to it and knead well. If necessary, you can mix shades. The intensity of the color depends on the amount of paint. Before you start sculpting, it is recommended to dry a piece of cold porcelain to see the final product. Often the color becomes darker. Another method of coloring is to apply paint to the finished product.

Having decided on the color, you can start sculpting. During operation, cold porcelain obtained without cooking should be kept in polyethylene so that it does not dry out. First you need to roll a small ball and make a drop out of it. The resulting part is placed on a toothpick dipped in glue, so that the sharp end points upward. This will be the core of the rose. The workpiece should be dried. In order not to hold the toothpick in your hands, it is stuck into the foam. After drying, you can start sculpting the petals. You need to make another drop, put it on your palm and flatten it with your finger. Make the edges thin. Then coat the base of the petal with glue and attach it to the flower blank. It should “hug” the core of the rose. Each next petal is overlapped with the previous one, but only after it has dried. To make the product more similar to a real flower, you need to pinch the middle of each petal and give the edges a rounded shape. From a large number of these roses you can make beautiful decorations or topiary.

Flowers created from a material such as cold porcelain without cooking are beautiful and very similar to life. But this does not mean at all that the material is suitable only for ceramic floristry. You can use it to create animal figurines, dolls and other products. The main thing is to show imagination, because success in creativity partly depends on it.


