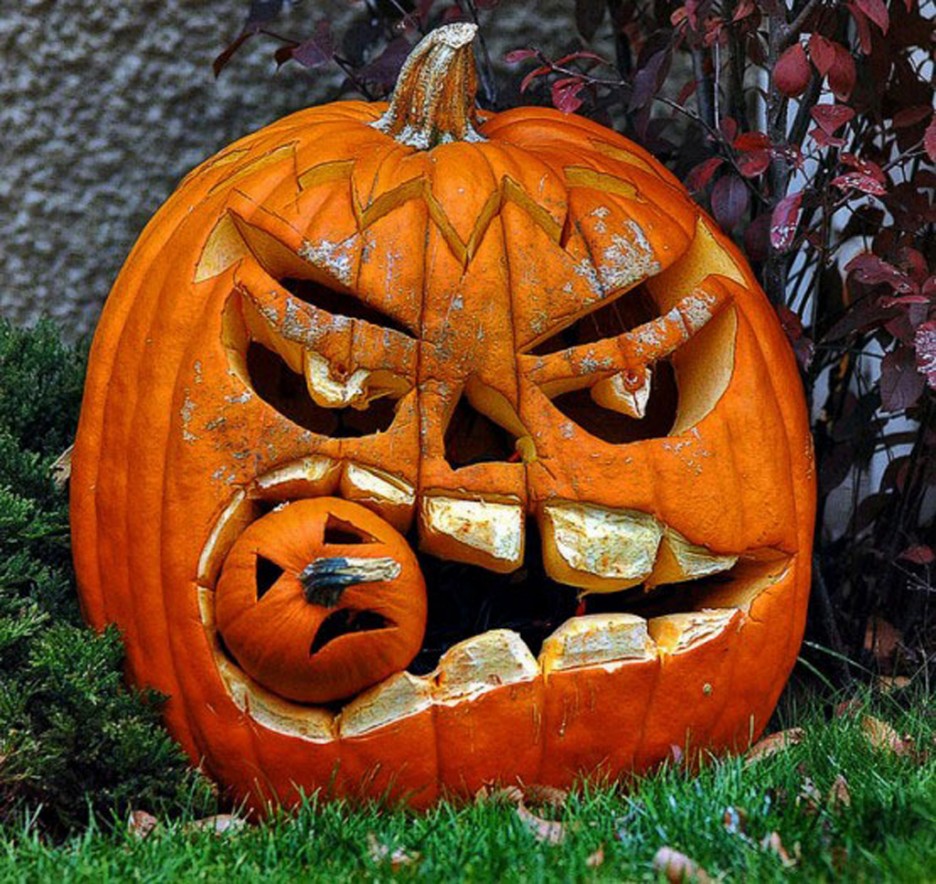
Homemade figurines for the garden. How to make fondant and figurines from fondant for a cake
Sugar mastic is a plastic material from which experienced craftsmen create various decorations for holiday baking. This type of confectionery decor has been used relatively recently, but it has already gained popularity. Therefore, it's time to figure out how to store mastic and cakes using it.
What is mastic, and what is it like
Confectionery mastic is used to cover cakes, make flowers and all kinds of figurines. There are several types of material:
- for application to the baking surface - sugar;
- for the manufacture of jewelry and floral elements - flower;
- to create figures - Mexican.
For beginner confectioners, for use at home, you can purchase purchased pasta in specialized stores. Experienced craftsmen share numerous recipes for making the product.
Mastic can be prepared at home based on:
- gelatin;
- chocolate
- marshmallows, etc.
Dairy
To prepare the pasta, condensed or is required. For kneading, instead use crushed into powder. The output is a soft and plastic mass, pleasant to the taste.
- It has a long drying time. This quality is indispensable when you need to cover the cake, make figurines and flowers.
- Milk paste has a drawback: if you put a little less powder in it, then the layer on the cake will turn into porridge.
Note to the owner
So that the situation does not get out of control, part of the powdered sugar is replaced with starch.

To prevent the coating from tearing, it should be rolled out no thinner than 2-3 mm, and the powdered sugar in its composition should be very finely ground without grains of sugar
Gelatinous
The composition of the mastic includes gelatin and sugar in the form of powder. It is suitable for creating large volumetric compositions, colors, shapes. The downside is that the paste dries quickly. This creates difficulties in the manufacture of thin and small elements that break off when dried.
Do you know that…
Gelatin mastic is unsuitable for coating the cake, because it eventually becomes hard. A good result is the use of gelatin paste and marshmallows together.
Chocolate
Add to the chocolate variety of mass for decoration:
- any color;
- powdered sugar;
Mastic is pleasant to work with, because it is very plastic, dries well. Any decoration elements are made from it, and are also used to cover cakes. It's delicious on its own. White chocolate makes a creamy paste that can be dyed different colors with food coloring.
Tip of the day
While preparing the chocolate mastic, carefully mix in the powdered sugar. From an overabundance, the mass crumbles.
Marshmallows are sweets in the form of marshmallows or marshmallows that came to us from America. From them, with the addition of powdered sugar, a soft plastic mastic is obtained, which is used to cover the surface of cakes and cut out decorative elements.
If you add more powder, you get a mass for sculpting figures. Mastic of different colors comes out of colored candies.

It is not necessary to look for candies with the name "Marshmallows", the word "mallows" on the package is enough
How long does mastic last
Decorating pastries is hard work. The entire mastic coating is not always used. The rest is used later. So you should find out how much mastic is stored.
Storage of purchased products
Manufacturers of confectionery mastic are interested in long-term storage of their products. To this end, preservatives, stabilizers, flavors and other substances that are not very useful for buyers are added to it. When choosing a product in a store, you should pay attention to the composition.
Storage will not cause trouble if you follow certain rules:
- Ready-made mastic is sold in a package. To work, take part of the mass with a clean spatula. Cover any remaining paste immediately to reduce contact with air.
- If pieces are left after decorating, do not throw them away. Wrap leftovers in parchment or foil to prevent sticking.
- The main task during storage is to avoid the effects of heat and moisture. From elevated temperature, the mass dries out and loses plasticity. Hygroscopic in its structure, it becomes liquid from moisture.
- Mastic in sealed packaging is stored for a month. Wrapped leftovers will keep in the fridge for a week.
Note to the owner
If the mastic has lost its elasticity, you can add lemon juice, diluted with water in a ratio of 1: 1.
Storing homemade pasta
Natural products are included in the recipes for making homemade mastic, which is important when decorating desserts for children's parties. Reduces the risk of allergic reactions. Their correct ratio allows the product not to deteriorate for a long time and not lose its properties.
What to look for:
- Allow the prepared mastic to rest for a day in the refrigerator. Cover the container with the pasta with cling film, make a few cuts. During operation, it will absorb less powdered sugar.
- If the paste turned out to be wetter than necessary, do not rush to add powder. You can try to dry it in a warm kitchen or near the battery for two hours. You just need to use this mastic right away.
Store homemade pasta for 2-3 weeks.

In order for the coating to turn out without wrinkles, it is necessary to roll it out with a large margin, then it will smooth out under its own weight.
Storage of mass from marshmallows
Toffee mastic, like any other, is sensitive to drying out and excess moisture:
- Evaporation of water will lead to loss of elasticity and brittleness. Decorative elements will crumble, it is impossible to form a layer to cover the cake.
- But the absorption of excess moisture will turn the paste into an unsightly mess.
Wrap the mastic in cling film, then in a plastic bag. In a cabinet at a temperature not higher than 25 degrees, the stocks will lie for 3-4 days. If placed in the refrigerator, nothing will happen to them in 2 weeks.
Do you know that…
If marshmallow mastic is bought in a store, then it can be stored for 6 months at a temperature not higher than 3-5 degrees. The long term is due to the presence of preservatives in the composition.
How and where to store the product at home
To save the mastic, regardless of whether you bought it or made it at home, you need:
- Pack the product in a container with an airtight lid and put it in the refrigerator; so it will keep for 2 weeks.
- After use, connect the pieces, give them the shape of a ball or oval, wrap tightly in a film, then in a plastic bag and put it on the bottom shelf of the refrigerator; they need to be used within a week.
- Keep away from vegetables and open containers with liquids.
- When you need to use the mastic again, take it out of the refrigerator in advance and keep it at room temperature for 10-12 hours to soften; then mix thoroughly, this will restore its elasticity.
- The product can be stored at room temperature in an airtight container for 3-4 days.

To make the mastic on the cake shine, it is smeared with a solution of honey in vodka in a ratio of 1: 1
After finding out how long the mastic is stored in the refrigerator, you need to understand whether it can be frozen. Experts assure that confectionery paste is stored in the freezer for 2-3 months. How to do it:
- Divide the lump into small portions.
- Wrap tightly in cling film, plastic bag, foil, parchment, or place in a container with an airtight lid.
- Place in the freezer.
For further work, defrost gradually: first place on the shelf of the refrigerator overnight, then keep at room temperature until it warms up. Mix well before use.
Note to the owner
To speed up heating, you can place the mastic mass for several minutes in a microwave or hot oven. Just make sure it doesn't start to melt.
How to store fondant cakes
Skill in making mastic cakes comes gradually. Each test of your strength will be better than the previous one. A cake with mastic decor is prepared in advance, because it is not known how long this or that operation will take. The main thing is to preserve the resulting beauty before the start of the celebration, so it is important to know if it is covered with mastic.
Application technology
To avoid trouble, you need to properly cover the cake with paste:
- You should not be zealous with the impregnation of cakes. From excess moisture, the mastic will begin to melt. They behave ideally, covered with a mastic layer.
- The top layer must be dry. To do this, it is coated with ganache, marzipan layer or butter cream. The coating must dry or harden. In the case of cream, the cake is placed in the refrigerator.
- Mastic should not be overdried, otherwise it may warp, crack, not only when cutting, but even at the storage stage.
See a short video for a master class on coating a cake:
Place and terms of storage
Let's figure out where to store the mastic cake:
- The cake, covered with mastic, is placed in a closed box. It should be stored in the refrigerator or other cool place.
- Half an hour before serving, the cake is removed so that the coating warms up and becomes pliable when sliced.
Note to the owner
There may be some condensation on the dessert. Nothing wrong with that. They are gently blotted with a napkin.
It remains to be clarified how long the mastic cake is stored. Confectionery paste is sensitive to elevated temperatures.
- During a festive feast, dessert will lose its appeal in a few hours. Therefore, it is served just before use.
- If the room is cool, this period will be extended.
- Do not keep mastic cake in the refrigerator for more than 2 days.
How to store figurines from mastic
Decorative elements are made before they start baking the cake. This painstaking work takes a lot of time. Then they are dried, otherwise the figures on the cake are deformed.
Parts of the festive plot are first cut out of colored mastic for contrast. When using food coloring or staining with vegetable juices, bright juicy colors are obtained. How to do this, you will learn from the video:
- Store finished parts in a closed box so that they do not touch; place in a plastic container with a sealed lid and send to the cabinet. Large figures can be put in the refrigerator on the bottom shelf.
- It is best to decorate the cake a few hours before the celebration so that the details do not get damp and lose their shape. You can glue them with the help of powdered sugar or thick sugar syrup mixed with a teaspoon.
Thank you in advance! It is important for us to understand that we are not working in vain.
Today, almost every person is familiar with the interesting word "mastic". Cakes to order, decorated just for her, have become very popular and in demand. With the help of this substance, wonderful desserts are made, and not simple ones, but real Masters who create this beauty, even the tongue cannot be called simple confectioners. These are artists, these are real geniuses in their field!
What is mastic?
Mastic gained wide popularity about ten years ago, but still remains at the peak of its popularity. She has no equal for one simple reason: with her help you can create almost any figures and flowers, it has a plasticine-like consistency and does not taste bad at all. And our article will tell you about how to make your own jewelry from mastic with your own hands. Step by step, we will reveal to you all the secrets of this beautiful and delicious art.
Types of mastic
Mastic is different. It will be very difficult for a person who is just starting to work with it and who has looked, for example, into a specialized store, to understand all its diversity. And for sure, you will need a detailed consultation of the seller about the purposes for which one or another type of this sweet plasticine is needed. So what is it like?
- Marzipan.
- Chocolate.
- Flower. It is she who is most often used to create very complex works, for example, the thinnest rose petals. The thing is that it is plastic, rolls easily and dries pretty quickly. Such qualities are ideal for these purposes. Therefore, if in the near future you are waiting for decorating a cake with mastic with your own hands, plus your skill already allows you to make complex elements, choose this particular type of mastic.
- Honey.
- Sugar. This type of mastic is usually used for wrapping cakes.
- For modeling. It is good to make figurines and simple decorations from such mastic.
- Homemade marshmallow.
What mastic to choose a novice master?
Sculpting jewelry from mastic with your own hands for beginners can be quite a difficult task. Therefore, at first, for an easier and faster improvement of skills, it is worth choosing a purchased rather than home-made mastic. The first one is more expensive. But to create flowers and figures, you need to gain a certain skill, which is much easier to do with purchased mastic.
In stores you can find a wide variety of manufacturers, this will vary the price of the product. Russian brands can be found for 250 rubles/kg, imported ones (Italy, Sweden) - 500 rubles/kg. A novice master would like to advise mastic for modeling. It is universal, suitable for wrapping a cake, and for creating figurines and not very complex colors.
on one's own?
If there are no specialized pastry shops nearby, but you really want to master the art of decorating cakes with fondant, do not despair! You can make it yourself, and the basis for this will be a chewy marshmallow soufflé. The most common brand of this dessert, which can be purchased at almost any grocery store, is Bon Pari.
Yes, yes, it is these viscous sweet candies that we will need. A couple of bags with a total weight of 180 grams can be purchased for 110-120 rubles, and as a result, 900-1000 grams of finished mastic will be obtained from this amount! As you can see, the savings are obvious. But this is not the only plus of homemade mastic. Many consider it tastier than a purchased competitor.
So, do you need to decorate the cake with mastic with your own hands? We will tell you how to make this product yourself using marshmallows. Everything is very simple. It is necessary to put the soufflé in a bowl, melt it to a viscous state in the microwave, add 2 tablespoons of room temperature butter, a couple of teaspoons of natural lemon juice to it and mix it all well. After that, you need to add one tablespoon of powdered sugar to the mass (stock up on it, you will need a total of 500-700 grams of this product) until it acquires the consistency of batter. After that, the future mastic must be kneaded (like a regular dough). Homemade wonderful product is ready! You need to store such a mastic in the same way as the purchased one - always in a cellophane film and in the refrigerator.
What does a beginner need to have?
In order to create figurines and decorations from mastic with your own hands, of course, you need to have the appropriate confectionery equipment. These are special sets, which sometimes come with a brochure describing what this or that tool is for.
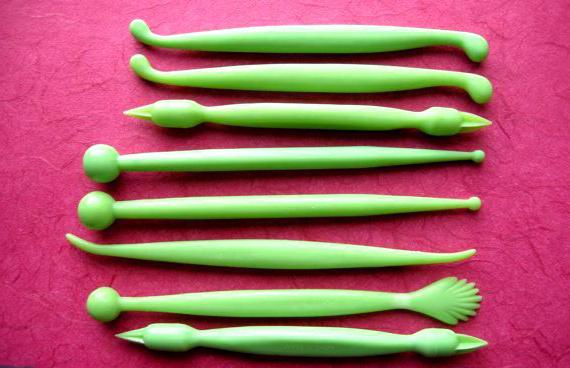
To create petals, leaves, cuttings are needed. They can be metal or plastic.

To create a certain texture, for example, the natural natural lines of petals and leaves, so-called viners are used. They are not cheap, but with their help your creations will be perfect and simply irresistible.
For comfortable work, it would be nice to have a silicone mat and a rolling pin. And, of course, a novice cake decorator should always keep an appropriate training book at hand, where it would be shown in great detail what this or that tool or cutting is for, how to create a rose or violet, orchid or lily with their help.
Secrets of working with mastic
Each pastry chef has their own unique and original ways of working. We will tell you about the main and well-known. Knowing these secrets, you can create jewelry from mastic with your own hands with even greater ease.
- In order for the pre-cut parts from the mastic not to dry out ahead of time, cover them with polyethylene.
- If you want to give color to the mastic, use not dry ones. They already have a liquid texture, so they make it easier to color the product evenly.
- After your decoration is ready and dry, to give it a richer color and shine, hold it for 10 seconds over a saucepan of steam.
- If you want to give the decoration a glossy shine, arm yourself with a brush and a mixture of vodka and honey in a 1: 1 ratio. Brush over your masterpiece. Do not worry, the smell of vodka will evaporate, and the mastic will look smooth and shiny.
- If the mastic is dry, just send it to the microwave for 5-10 seconds, and then knead thoroughly.
- In order not to overdo it with the color intensity when coloring the product, use a toothpick. With its help, it is very easy to mix the dye in the smallest doses and control the process.
- Mastic can be cut with ordinary scissors. With their help, you can, for example, cut cloves on a rose leaf.
Jewelry from mastic with their own hands. Master class using silicone molds
The easiest way to make any figure out of mastic is with a silicone mold. It makes everything easier and faster. Molds can be large and small. With their help, you can make 2d decorations (in which only the “front” part is created) and 3d figures. In the latter case, a full-fledged product is obtained, beautiful from all sides.
Let's take a step-by-step look at how to make do-it-yourself mastic decorations using Let's create a multi-colored 2-d flower for example.
We will need:

The manufacturing process is very simple.
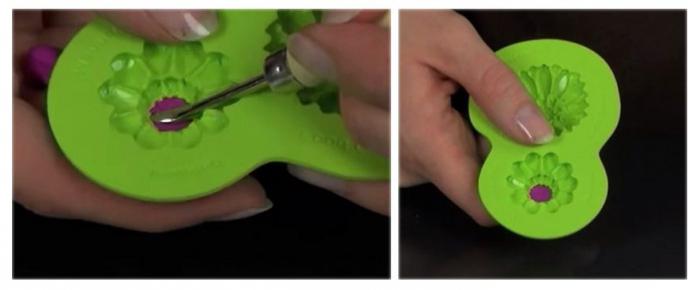
It's so easy, within 10 minutes and with the help of a silicone mold, you can make a beautiful one yourself
Examples of decorating wedding cakes with mastic
Wedding cakes are one of the most popular ordered desserts in pastry shops. But they are usually not the most difficult. You just need to have the right inventory. And then any housewife will be able to handle decorating the cake for the wedding. Don't believe? See for yourself!
For example, very popular do-it-yourself mastic jewelry is pearls or beads.
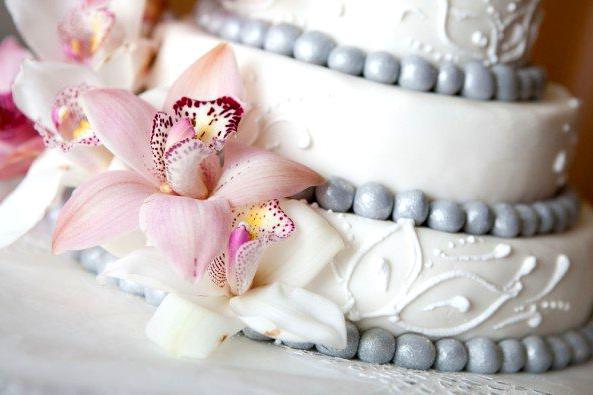
They can be quickly and accurately made with the help of such a silicone mold.
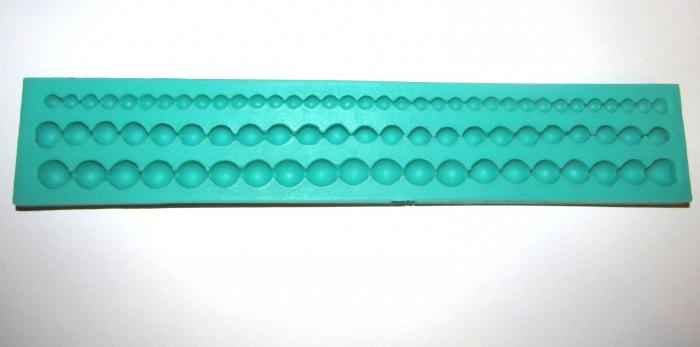
Then you won't have to sit all evening sculpting each ball. Smooth, the same size, one to one beads, of course, will delight guests! Such a performance of a wedding dessert will be simple, but very refined!
Decorations from mastic on a cake for a man
Does your significant other have a holiday soon? Birthday or promotion? How would you decorate a cake for your loved one? After all, he is a man! And they do not like butterflies and flowers, "sussi-pusi" is not for them. Strong floor! And that's it! In this case, you can buy the corresponding "male" silicone mold in the shape of a car or phone (a bundle of money will also come in handy). And do-it-yourself mastic decorations for your husband, or rather, for a gift cake, can be done very quickly! You will be able to please and surprise your soulmate not only with the most delicious biscuit, but also with your resourcefulness. Your loved one will definitely say to you: “Thank you, dear!”
Jewelry from mastic with their own hands. There are gifts for boys too!
Boys are the same little men! And they are not far from dads in desires. Cake decorations in the form of cars, pistols and other joys are also perfect for them. You can decorate the dessert with figures in the form of cookies, sweets, lollipops or chocolate. If your son is a fan of some cartoon character, then you can try to find and purchase a mold with a figure of his idol.

Happiness and delight in the eyes of your child are 100% guaranteed!
Decorations from mastic on a cake for a girl
For a daughter or niece, it will be easier to decorate than for a boy. Molds with various colors, and with bows, and figures in the form of sweets already mentioned in the article, and butterflies, and dolls, and much more will help here.
A special chic and long-awaited gift is a cake for a girl made in the shape of a doll. We will give an example of making such a mastic decoration with our own hands (with photo) for a girl.

For this, the most ordinary Barbie can be used. In this case, the biscuit is baked in the form of a dome-skirt, the legs of the doll are inserted into it, and then both its upper part and the resulting skirt are decorated with mastic. Mastic in this case is perfect, since it can be easily cut with the most ordinary knife or scissors into ribbons, circles, canvases and (would be fantasy!) Build the most beautiful dress from these pieces!
As you can see, it is not at all necessary to order a mastic cake in special pastry shops. It is quite possible to try to master the simplest techniques of this art by yourself. And the main assistants to the novice master will be silicone molds. There are a huge number of them on sale with a wide variety of ideas - from floral to New Year's, from men's to women's.
Try and create! Making mastic decorations with your own hands for a birthday or any other holiday is a real pleasure. Your family will definitely appreciate your efforts and thank you with admiration from the bottom of their hearts!
Today there are many shops where you can buy gifts for every taste. The best gift is a handmade gift. In this article, you will learn how you can make a figurine without leaving your home. Stock up on a good mood, and you are guaranteed to be able to make a figurine at home, much better than in a store or in the market.
How to make a plaster figurine?
We will need:
- Silicone molds;
- a container with water for the preparation of the mixture;
- glass of water;
- gypsum;
- brushes;
- paints (acrylic).
1. First, dilute the gypsum in a container of water (the mixture should not look like sour cream), stirring slowly until you have no lumps.

2. Pour the resulting mixture into a mold and leave in the oven for 6-7 hours at 50 degrees. To make sure that the gypsum has completely frozen, you need to rub it on the palm of your hand - if you hear a slightly ringing sound, then the gypsum has frozen and you can proceed to the third stage.

3. This is the most interesting stage, because here you can show your imagination. All you need to do is paint the resulting plaster mold at your discretion.

Show your imagination and you will be able to pleasantly surprise your loved ones!

How to make a figurine out of clay?

Must have:
Clay (Jovi);
- decorative coins;
- paints (acrylic) of golden colors;
- toothpicks;
- golden sequins;
- varnish (acrylic);
- bell.
1. At the first stage, you need to knead the clay (the amount of clay depends on the size of your craft).

2. Then divide the clay into four parts (for the head of the lamb, legs, torso and base).

3. This stage begins with the lamb modeling itself. In order for the torso to adhere well to the base, moisten with a little water.

4. From the third piece of clay we will make a head with horns.

5. To attach the head to the body of the lamb, take ½ of a toothpick and insert it into the neck, after lubricating with water. It remains only to put on the head and cover up the unnecessary seams.

6.
For the legs, take the last ball, divide in half and roll out so that you get two small sausages.

7 . Attach the legs to the body and do not forget to make a ponytail for your lamb.

8. At this stage, you just have to decorate your figurine. To do this, stick coins at the base and use a toothpick to make lamb wool. Do not forget to finish the rest of the body (nose, mouth and hooves).

9
. After completing the drawing, leave the figurine to dry for a day.
10 . The final stage consists only of coloring the lamb (preferably no more than 2 layers, since the clay can get wet under water).
After the paint is completely dry, fix everything with varnish.

Ready!
VIDEO. How to make a figurine with your own hands?
Cake figures can be made from chocolate icing, various pastes. But, basically, the most convenient is sugar paste or mastic. If earlier you were sure that this is impossible, we suggest you start doing it right now.
Before making figurines and decorations, consider the recipe for making mastic with your own hands.
For this we need:
- Gelatin - 2 teaspoons;
- Water - 10 teaspoons;
- Powdered sugar - 450 gr.;
- Vegetable oil - 2 teaspoons;
- Egg - 1 protein;
- Lemon juice - ½ lemon;
Cooking gelatin
It swells long enough. It should be diluted with water in a ratio of 1:5. In order to soak the gelatin, you need cold water. Some people add warm water to make the gelatin dissolve faster. But, in no case should this be done, since gelatin can lose all its properties. The resulting mass should stand at room temperature for 30 minutes.
- Sift the powdered sugar through a sieve, in order for the mass to be very elastic and elastic for the mastic, the powdered sugar must be of high quality;
- We make a deepening and add vegetable oil, then 1 protein, lemon juice;
- After the gelatin has swollen, it is best to dissolve it in a water bath to a liquid state. Within one minute, gelatin turns into a liquid base;
- Melted gelatin is introduced into powdered sugar. We knead the mastic;
- As soon as we knead the mastic, add 1 tsp. vegetable oil. This will make it plastic, it will not tear when you roll it out;
- As soon as you knead it, wrap it in a film and leave it for 30 minutes to lie down, it will be much easier to make products from it;
- After she lies down, we proceed to rolling. The mastic should be elastic. If it turned out that it is torn, then it is best to knead it again;
- Roll out on a surface covered with powdered sugar and starch, very thinly. The thinner, the more accurate your work will look. Sculpting is a very exciting activity.
So, let's begin:
Figurines made of mastic perfectly complement the birthday cake. In order to make it look even better, we suggest covering it with mastic first. Therefore, for the cake, we roll out a thin layer of mastic and cover it.

In order to cover the cake with mastic, we need:
- A silicone mat that you can buy at a candy store. He is not afraid of not cold temperatures, not hot ones;
- Rolling pin. It must be perfectly flat. Traditional wood leaves notches on the coating;
- Roll out the mastic and cover the cake with it.
A covered cake should certainly be decorated with hand-made frills or roses. 

Preparatory stage:
- In order to cut frills for decoration, a glass is best. Use it to cut out circles.
- To ensure that the mastic does not dry out, and it dries very quickly. Put all the circles that you cut out in a pile, then they will not have time to dry out.
Fold the remaining mastic into a ball and put it in the refrigerator. Mastic can be stored in the refrigerator for one month.
Modeling shuttlecocks from mastic consists of the following steps:
- We take one circle, cut it with a glass, you should get a “crescent”.
- Then we take a pastry stick. If you do not have it, then take a stick with a diameter of 1 cm.
- Cut out the cone with a knife. And with such a cone we roll the mastic, you should press hard enough on the cone. The result should be a wavy line, “ruffle”.
- In order to give the shuttlecocks more volume, they need to be glued to each other.
- To do this, we lubricate the edge of the shuttlecock with water, and put the next one on it, press it. Let's do this process again. It turns out that one consists of three.
- Lightly grease the edges of the cake with water, and glue the shuttlecocks with wavy edges down.
- Using a stick, we fix the edges of the shuttlecocks on the cake, making holes. This will make the mastic shuttlecocks more airy.
Roses
What's a birthday cake without roses! Do you think that sculpting them is very difficult? But, it's not. We suggest you make them yourself, suitable even for beginners. 
Pestle
It is better to make a pestle for a mastic rose in advance with your own hands. It should be firm when you apply the petals to it. 
marbling
In order for the roses to be not just white, but marbled red:
- Let's add some red mastic;
- In order to make red putty, you need to add red dye;
- In the middle of the white mastic, put the red one (it should not be very much, 5-6 petals). Mix until marbling appears.
modeling
- We roll out a layer of mastic. The thinner you roll, the thinner you will get rose petals;
- Using a glass, cut out circles;
- We begin to impose petals;
- We take the first circle, rub the edges of half the circle with a tablespoon, do not touch the second;
- We take a leaf and put it on a bud, fix it;
- Now we take the second one, we put the next petal with a seam away from us;
- When you make a petal, it should be slightly higher than the previous one;
- First we turn on the right, then on the left. Do not forget from below, each time to give the shape of a bud.

So we need to make five petals. The more roses you make for the cake, the prettier it will be.
Bear from mastic

For beginners to work with mastic, you can safely take on the modeling of animal figurines.
To make a bear figurine from sugar mastic, we need a minimum of tools:
- skewer;
- set for modeling from a set of plasticine.
Modeling step by step:
- Roll out the mastic into a sausage;
- We divide the sausage into legs. Two equal small pieces. Cut off a piece for the body. And two identical pieces for the front paws. The main part of the head. A small piece for the muzzle and two ears;
- First of all, we make our bear's torso. We also roll it into a sausage and make it a little flattened
- Legs. We roll balls. Then we roll them into sausages - droplets.
- We make the bear sit. We attach the legs to the sides of the body with a skewer. You can still make him soles with fingers using a tool.
- Head. The bear's head is round and slightly flattened.
- Muzzle. We make a ball and flatten slightly from the sides.
- We attach the muzzle to the head. On the muzzle we draw eyes with a toothpick, and a small nose. The spout can be made from a small ball molded from mastic. We attach the head to the body.
- Pens. Roll out circles. We recommend making handles in the form of a droplet. Stack also draw fingers;
- Ears. We roll up two circles, press them, we get “flat cakes”. Make dents in the middle of the ears;
- We attach the ears to the head.
We managed to make such an interesting figure of a bear with our own hands for the cake.
And now we suggest trying to make a figurine of a charming bunny with your own hands to decorate the cake.

To make a hare figure, we need:
- White mastic;
- Pink mastic;
Manufacturing process:
- Mash white mastic well;
- Roll up the sausage and mark on it where the head, torso, paws and ears of the hare will be;
- From a piece of pasta intended for the calf, first roll a ball, and then form a cone;
- We roll out a 1 cm thick layer of pink mastic. We recommend that you sprinkle the surface with potato starch in advance. Cut out the blank in the form of a drop. Glue it to the surface of the part. And then give it the shape of a "belly";
- From a piece of mastic intended for the head, first roll a ball, and then form a cone;
- Cheeks are very easy to make. From small pieces, form small blanks and attach them to the surface of the part, giving them the shape of cheeks. Using a modeling stick, make a mouth;
- Make a spout out of pink modeling sugar paste and attach it in the same way. Using a toothpick, connect the manufactured parts;
- From a piece of sugar paste intended for paws, first roll into balls, then form cones and flatten slightly. Using a knife, make cuts on the blanks, giving them the shape of fingers;
- Roll up the pink modeling paste, make oval blanks and attach them to the surface of the part where the recesses were previously made. Attach the legs to the body;
- From the pieces of sugar paste intended for other paws, first roll up sausages, then flatten slightly on one side and also attach to the body;
- From a piece of sugar paste intended for the ears, first roll up sausages, and then flatten slightly. Roll out the pink modeling paste on a starched surface with a rolling pin to a thickness of 1 mm. And cut out two identical blanks in the shape of a drop, and then attach them to the ears. Next, attach them to the head.
- We recommend sculpting eyes from black mastic, and teeth from white mastic in the shape of a rectangle.
These interesting figures can become a decoration for the cake! Kids will love this craft very much. Try and fantasize, make decorations from fondant for the cake with your own hands, you will definitely succeed!

- Gypsum, cement - durable materials are available, but it is difficult to work with them.
- Papier-mache is an inexpensive, affordable paper composition, but also the most capricious.
- Mounting foam from a can - it is convenient to work, it is afraid of the sun, it needs to be covered with a layer of concrete or gypsum.
- Improvised materials - film, plastic containers, basins, barrels, everything that is no longer needed in the household.
To work with the listed materials do not need special tools.
By combining different techniques, you will make a garden sculpture for your own with your own hands.
Paper torn to shreds mixed with PVA glue - this is papier mache. Moreover, any paper - newspapers, toilet paper for small parts, egg packaging. But nothing will come of paper alone. It is glued over a frame made of wire or plastic bottles. For rounded pieces, roll up bags or newspaper. Pour sand into the bottles so that the figure comes out heavy.

The work begins with a rough papier-mâché from newspaper strips, the last layers are a mass of finely chopped egg trays soaked in boiling water. Dry each layer. So the work will take not a day, but a couple of weeks. The figure is kept in a warm, ventilated place. For a fortress, you can paste over with gauze, alternating with newsprint.
The sculpture will turn out solid, despite the material. But it must be protected from moisture and frost. Before painting, go through coarse sandpaper, cut and glue the flaws in the work. Now, with a wide brush, saturate the material with a wood primer with additives from fungus and mold. You can impregnate with hot drying oil, but then use all the materials - putty, oil-based paints, water-based paints will hardly lay down.
Protected from the fungus, go to the putty. We take the cheapest, based on PVA, apply with a hard brush to small details.

We sand the figure, level the surface. Here you can once again soak with a primer. Or paint right away. First, we prime with white paint, then we paint the details starting from large to small.
Not resistant to water we cover the paints with alkyd varnish, preferably with furniture varnish, although it dries for 2-3 days. If the paints are based on organic solvents, then a layer of varnish is not required.
How long do garden paper figures stand on the street? 1-2 seasons, just do not forget to cover them from the rain with a film and put them in a dry place for the winter. Then your crafts will last much longer.
How to make garden figurines from plaster
In production, hollow decorative figures for the garden are cast in large silicone molds. The frame of the figure is sometimes reinforced with wire. In gypsum, during solidification, shells are formed - voids from air bubbles that did not have time to leave the hardening material. Therefore, the figurines in the molds stand on a vibrating table that expels air from the plaster. Can this be repeated at home? Yes, if there is a desire. But there are other easy ways.
The figurine is not hollow, on a wire frame and plastic bottles filled with pebbles. Details, such as the cap and leg of the mushroom, can be cast separately, fastened with putty or gypsum solution.

For garden crafts, they take alabaster or building gypsum, of course, if possible, take sculptural gypsum. It is harder and was created specifically for casting. For strength, a plasticizer is added to simple gypsum. This is any glue - PVA, bustilat. The latter is cheaper, and the properties of the gypsum mortar are the same as those of the mixture with PVA. Work with small portions. Dilute the gypsum with water, add glue, apply to the frame.
The mixture gradually heats up and thickens. Gradually, the moisture evaporates and the plaster turns white. Leave it to dry in a dark, dry place. The sculpture will dry within 4-5 days. Although after a couple of hours at first glance it is completely dry, a chemical reaction takes place inside. When you do not feel moisture to the touch, you can continue to decorate the figure.