DIY crafts from improvised means at home. Making a kitchen napkin with yo-yo flowers How to make something from
Going through the little things that have accumulated at home, you often wonder: what can you do with your own hands at home with all this so that the products are of high quality, beautiful and functional?
I speak from my own experience: sometimes all that separates us from great homemade products is our own insecurity and lack.
On the Internet, you can find many workshops on making things from a variety of improvised means: plastic utensils, purchased blanks, pallets, old tires, etc.
But you must admit: rarely does anyone really have old tires from Kamaz lying around at home, from which you can make a pouf, but there will be difficulties with pallets if you don’t have your own cafe or shop.
We propose to go the other way and solve two problems at once in one fell swoop: avoid expensive purchases and focus on eco-handmade made from natural materials that can be easily found at home.

Postcards, decorations and crafts
The simplest of those things that you can do with your own hands at home are small items made of paper, fabric and simple designer decor details.
The creation of these little things is well suited, as it develops fine motor skills of the hands and stimulates the unbridled creativity of the little ones.
But it cannot be said that the occupation is purely childish: many adults, carried away by handmade, make amazing things from simple materials and even on them, selling on the Internet.
Postcards
Let's start with the simplest. Colorful homemade postcards, with some diligence, are not inferior in beauty and quality to purchased ones.
Tip: if you were suddenly invited to, and you think what you can do with your own hands at home and present to the birthday man, start with a postcard. It's simple - even a novice handmaker can handle it, and the memory and pleasant emotions from such a gift will remain for a long time.
There are many options for postcards: simple (flat), opening, with three-dimensional figures inside; made of paper or fabric; decorated with applications, drawings, inscriptions, etc.
 The simplest and at the same time original gift can be a postcard made by one's own hands.
 As for materials, you can find everything you need to create postcards at home.
The obligatory minimum is a pencil, pen, scissors, PVA glue and, of course, paper (preferably thicker - drawing paper or thin cardboard).
And here's what else you can use to create postcards:
- Colored paper. These do not have to be new sheets - trimmings left over from the child's crafts will also do.
- Foil from chocolate and sweets.
- Unnecessary details from old jewelry: cabochons, rhinestones, etc.
- Fabric scraps. Almost any will do, but it is best to take samples without fluffy pile.
- Threads.
- Colored pencils, pens, markers. For the design of the inscriptions, you can take black or colored liners - they practically do not smear and draw with clear lines of a given thickness.
- Watercolor paints. If you have school-age children, then there is a simple set of watercolors at home - they are quite enough for crafting postcards.
 To prepare a souvenir, the remnants of bright, fabric, beads, ribbons will come in handy.
 In addition, you may need a clerical knife and superglue ("Moment", "Second").
The list of materials can be continued for a very long time, because literally anything can be used to create postcards.
At one time, I got myself a special box in which I put any little things that seemed suitable to me - even if I didn’t have specific ideas for using them at that time.
Experience has shown that in the end absolutely everything is used.
 The main thing is to stock up on patience, free time and the desire to please a loved one.
 Tip: to make your postcards look stylish and harmonious, remember the most popular formats for their manufacture: rectangle 105x148 mm (A6 format), elongated rectangle 98x210 mm, squares 140x140 and 120x120 mm.
Let's look at how to make a regular A6 postcard with your own hands.
- The first step is to prepare the base. Let's take the option that you will definitely find at home: a regular A4 sheet. Fold it in half along the wide side, making sure that the edges meet very precisely. Glue the sheet so that the halves fit snugly together. Let it dry, then fold over the wide side again. The basis for the postcard is ready.
- Now come up with a design. Consider the available materials, think about which ones you want to use, which ones work best with each other. You can draw a sketch on a separate piece of paper. Visualize the postcard you want to make in your head as much as possible - and, having selected the necessary materials, get to work.
- Process the decor elements. If you decide to place a curly paper or fabric application on a postcard, cut out the required shape in advance. Prepare everything that you will attach to the front of the postcard: colored paper, bows, rhinestones, fabric, etc.
- If you don't want to leave the background of the card white, now you need to color it. Take watercolor paints or markers and apply a light coat of the right color. The effect of antiquity on paper can be given by painting it with tea or coffee. And if you throw a few grains of salt on wet watercolor, you get beautiful snowflake patterns. Remember to let the paper dry after painting.
- Decorate the front side of the product with the prepared decor.
- Sign the card on the spread, accompanying it with a beautiful poem or just a short congratulatory phrase.
 The original homemade postcard is ready!
 Do not limit yourself in experiments and flight of fancy.
Try different styles and materials, paper sizes and options. Look for your own author's handwriting and, most importantly, do not give up trying if the first results are not to your liking.
As in any business, everything depends not only on talent, but also on perseverance and practice.
Decorations
Among the things that you can do with your own hands at home, jewelry is one of the most popular options.
You can wear them yourself or give them to someone, or you can sell them, receiving not only pleasure from your own, but also material rewards.
 Kids just love these original popsicle stick bracelets!
 The simplest option that young children can be involved in making is bracelets made from ordinary wooden ice cream sticks.
It should be honestly noted: such bracelets, both in size and in style, are primarily for children.
Little needlewomen and craftsmen are happy to take part in the creative transformation of familiar objects into bright jewelry - especially if you then decorate the bracelet in any way they like.
These bracelets are very easy to make. You will need:
- Ice cream sticks (one per bracelet)
- Glasses of suitable diameter
First, place all the sticks in one container and fill with water so that it completely covers our workpieces.
Since they are wooden and float easily, cover the container with a lid or something else.
Check the sticks after a while. Well soaked, they will begin to bend without breaking.
Then they need to be placed in a glass, bending inside or outside close to the walls.
I prefer to wrap the sticks around the glass, pressing on top with strong elastic bands: this way the finished product will more likely take the desired shape.
Leave the blanks to dry in a warm, dry room.
After complete drying, the bases will remain curved, and it will be possible to start decorating the product.
A wooden bracelet for a girl can be decorated with rhinestones, turning it into an accessory of a real princess, and a bracelet for a boy can be decorated with the emblem of your favorite superhero.
 Another useful cuteness is a jewelry stand.
 Tip: for gluing decorative elements to wood, it is better to use superglue, and after painting it is worth varnishing the product.
Bracelets are rich ground for creativity. What you can do with your own hands at home, having a fishing line and beads at hand, is easy to imagine.
But I propose to pay attention to more non-standard products - woven Shambhala bracelets, which are great for both adults and children from 12 years old.
Such a product, made independently, is both a charm and a stylish accessory that combines patterned weaving with beads.
 Popular Shambhala bracelets can be easily made with your own hands
 To weave Shambhala you will need:
- An odd number of beads made of wood or natural stone.
- Two smaller beads - for the clasp.
- The base cord is so thick that the selected beads can be freely strung on it. Take the length of the base cord based on the circumference of your wrist plus ten centimeters on each side for fasteners.
- The cord of the main weave is three to four times longer than the base (it is better to take a longer one for the first samples). Thicker threads are well suited for braiding.
- One lace about forty centimeters long for making a fastener.
It is convenient to weave Shambhala bracelets from waxed threads, but it is not necessary to run after them to the store. Experiment!
I wove one of my coolest bracelets from ordinary twine and a strong “iris” thread at the base.
Tip: to make Shambhala smooth and fine, fasten the weave. To do this, you can use a tight clerical clip and a planchette (or book cover).
We start to weave. About ten centimeters from the end of the warp cord, tie a knot of thread for the braid - so that it divides the thread into two tails of equal length.
Now you need to knit knots from these ponytails around the base cord, alternately threading one thread under it and the other over it.
Having made the desired number of knots, string the first bead onto the base and continue braiding immediately after it.
Alternate beads with weaving knots, using gaps to your liking); at the end, do not forget to knit the same number of knots of simple weaving as at the beginning. Finish with a knot.
 Making designer jewelry may well become an additional source of income for you.
 If you used a natural thread, apply a drop of PVA glue to the final knot, let it dry, then cut off the excess cord.
If the thread was synthetic, carefully cut the ends and burn the tails with a lighter or match - of course, being careful.
Let's go to the castle. Take the ponytails left on both sides of the bracelet, fold them together and tie with several knots of weaving using the third cord.
Fasten the lock in the same way as you fastened the bracelet. Put small beads on the remaining tails of the base cord and tie knots at the ends.
So your own beautiful Shambhala bracelet is ready.
Congratulations! This activity is fascinating, so do not be surprised if after a while you give these amulets to all your friends and you will think about what to do with new products.
Sell - let others appreciate your talent!
crafts
What can you do with your own hands at home for children under 10 years old? Of course, toys will be a win-win option.
Usually, sewing dolls requires a lot of additional materials, such as special fillers, and sewing skills are higher than the basic level.
But there is also such an option that the children themselves will cope with (and will be happy to help you): these are motanka dolls.
 Encourage your child to make a cute winding doll
 To make them, you will need assorted pieces of fabric - any pieces of old unnecessary clothes will do.
For the base, the body of the pupa, it is better to choose something light: an old white sheet or thin burlap, but for clothes you can take any color you like.
You will also need ordinary sewing threads, optional ribbons and other little things for decoration.
The doll is made like this:
- Roll one piece of fabric into a three-dimensional rectangle or cube. This is the basis of the motanka's head.
- Put a square piece of light fabric on it, gather it on one side and wrap it with sewing thread. There is no need to make knots: a large number of threads will fix itself and will not unwind.
- Take another square piece of light fabric. The length from corner to corner is our doll's arm span, so choose accordingly. Roll this cut into a roll, wrap the “wrists” with sewing threads.
- Tape the "sausage" of the hands to the body of the chrysalis under the head. It is best to do this by winding the threads crosswise.
- Choose a few different-colored pieces of fabric for the doll's clothes. Make a skirt, preferably with two or more layers of fabric: it looks very cool. Secure the skirt with thread, twine or ribbon.
- Another piece of fabric will go to make a scarf. Fold a triangle from the cut and tie on the doll's head.
Traditionally, motanka dolls are made without faces - these are impersonal amulets.
I know that faceless dolls scare some people, so if you do not put any additional meaning into it, then you can safely embroider or draw a face on the fabric, giving your doll personality.
 Such a doll will simultaneously become your personal amulet.
 Today you have learned how to create a variety of beautiful and useful things, and I am sure that you will be able to expand your handcrafting skills arsenal even further.
For inspiration, I suggest watching this video on the topic of what you can do with your own hands at home:
Someone will certainly take a look at this collection of ideas and say that it is easier to buy new furniture or decor. But this article is not for them, but only for true connoisseurs of the unique style and handicrafts. Here you will find the 10 most beautiful interior items that you can do for your home without spending extra money.
The best crafts for the home with your own hands from improvised materials for 2018!
1. Decoupage and other do-it-yourself furniture repair ideas
Restoration of old chests of drawers and sideboards is perhaps one of the main trends of our time. Many pieces of furniture fail over time: tables and chairs loosen their bodies, upholstered furniture is pressed through and requires a new “stuffing”. But chests of drawers and sideboards can stand for themselves for many years and annoy you with their outdated appearance.
Home needleworkers and decoupage masters have not only found a way to update the design of old furniture, but have also created a fashion for the use of vintage “grandmother's” chests of drawers in the interior. You will find detailed instructions for painting and decoupage in our article. .
Below are some photos of amazing home projects to inspire you.
Restoration of an old chest of drawers with replacement handles and hand painting:
Painting and finishing an old cabinet with metal buttons:
As a result, the furniture acquired an original Moroccan-style decor effect. Simple, like all ingenious:
By the way, in this way you can create more sophisticated things for the home:
Decoupage and painting amazingly transform old furniture facades, but not every person has enough time and patience for this painstaking task. Therefore, the best DIY home ideas also include refurbishing furniture with duct tape in marble, gold, and other unusual finishes. A minimum of effort - and the most ordinary piece of furniture will turn into the main decoration of your interior.
2. Beautiful things for the home with your own hands: carpets
Perhaps the most pleasant thing about creating things for the house with your own hands is when one of the guests asks: where did you get such beauty? A stylish rug with a zebra print (or other motif of your choice) will certainly deserve such a compliment. And not once.
The fabric can be any. The main thing is that it should not be too demanding in care: it is not afraid of moisture and is easy to clean. In this case, the master chose the vinyl fabric. It is heavy and strong enough to look like a true carpet. What's more, the quality of vinyl these days is very impressive, and it's available in a wide variety of colors and interesting textures.
All necessary materials and tools:
- Thick paper;
- Vinyl upholstery;
- Scissors;
- 2 Krylon pens or regular fabric paint.
Procedure:
- Create a paper stencil. Draw and cut out the outline of the zebra skin, then the drawing itself on it. Do not worry about your artistic talent - the skin of a zebra and should not look uniform or symmetrical. In extreme cases, the pattern can be copied from a picture on the Internet or even printed out to cut out.
- Attach the stencil to the vinyl fabric and outline the stripes with Krylon pens (spray or brush). After that, the stencil can be removed and continue to paint the areas inside the contours.
- Let the paint dry and you're done! To be sure the pattern will hold, you can "seal" the carpet by spraying a clear coat of acrylic spray paint over it.
Krylon handles create a stunning gold leaf effect on the surface of the fabric. In addition, the paint in them dries quickly and is very securely held. If you cannot buy them in your city, then use ordinary paint for fabrics or walls. As the next hero of our article.
He took a cheap white rug as a basis and decided to give it an interesting look with his own hands using a chevron pattern. All he needed was thin duct tape, scissors, a thick brush, and two different shades of latex paint.
Finally, another inspiring example where a makeshift stamp is used instead of a stencil. The craftsman had a rubber bath mat, leftover wall paint (which had been slightly thinned with water for a vintage effect), a roller, and an old IKEA wool rug. We look at the photo that he managed to cook from these ingredients.
3. Unusual "marble" DIY crafts (photo)
7. Turn photos into wall decor
This is much cooler than just hanging photos in frames! Your personal photos or any images you like from the internet can turn into beautiful wall art for any room. To make such a decor with your own hands, you can use any of the following methods.
- Find or buy a substrate. A thick sheet of polystyrene foam or polystyrene foam (as in this case), a board and other improvised materials can act as it.
- Print the photo, having previously edited its dimensions so that they are about 5 cm larger than the substrate. These "extra" centimeters will go to the folds.
- Cut the photo and backing into pieces if you want a modular set rather than the whole picture. Otherwise, skip this item.
- Overlay the photo on the substrate and wrap the ends. The author of this product used double-sided adhesive tape to secure the photos. You can mount with ordinary glue or other available means. The very surface of the photographs can also be treated with glue or gloss paste.
- Print the image and prepare the canvas to which it will be transferred.
- Pull the canvas over the frame and apply a thick layer of medium gel on it. These gels are widely available and today you can buy them in any store of finishing materials.
- Place the photo on the oiled canvas and press down. Leave it like this for several hours, but periodically sprinkle with water from a spray bottle.
- Carefully, use your fingertips to start erasing the back of the image from the canvas. Remove all paper in this way.
As a result, you will get a beautiful one with scuffs that will only give it a touch of vintage style. It remains only to apply the last layer of medium gel on it as a protective coating.
For inspiration, here are a couple more ways to decorate your interior with a photo.
We use an old window frame as a photo frame. What do you think of the idea?
8. Creative homemade lampshades for lamps
Homemade lampshades made of fabric, paper, thread and other improvised means will not only decorate your home, but also bring an unusual atmosphere into it every dark time of the day.
Look for the best ideas for your taste in our article . The next photo shows a popular creative thread lampshade.
9. Succulents - do-it-yourself living home decor
A succulent living wall is perhaps the most amazing DIY craft you can make for your home. Agree: if you saw it in someone's design of a living room or another room, you would not be able to remain indifferent!
Dekorin will tell you how to get such an impressive and sustainable decor:
- You will need a shallow wooden container for planting and a metal mesh.
- To fix the mesh on the container, use an impromptu wooden frame, which can be made from small boards or chips. Attach to staples or nails.
- Prepare any for composition. They easily take root in the most difficult conditions and look best when you combine different shades and shapes of leaves. Common examples of succulents: aloe, various cacti, young or stone rose (Sempervivum), stonecrop (Sedum), mountain grate (Orostachys), etc.
- Fill the container with soil and plant your chosen plants in it. Use any cactus mix for drainage.
Here are examples of crafts for the home that you can do with your own hands using the above method.
10. Crafts for the house with your own hands from glass containers
Glass bottles and jars often accumulate on balconies and in pantries. What they just don’t turn into today: lamps, candlesticks, vases, table decor ... It’s amazing how easily they become part of a stylish interior, you just need to use a little ingenuity, as well as paints, fabrics, threads, paper and other improvised means. Last batch of photos for today. Also read:
10 best DIY ideas for your home updated: March 21, 2018 by: Margarita Glushko
If you want to make a beautiful craft, you can just look around.
Nature itself will prompt and provide the necessary materials for beautiful and / or useful crafts.
Add to that your imagination and a few simple tools you can find around the house.
DIY crafts can decorate a table, room, garden or vegetable garden. Learn how to make interesting things out of shells, rocks, twigs, and more.
DIY crafts. Decoration in a marine style.
The idea of a wedding on the beach sounds very romantic, and a nautical-themed cake will come in handy as ever.
For this decoration you will need:
5 shells (preferably those that can be easily tied to a thread); in this example, I used a flat shield hedgehog that was purchased at a craft store.
* It is worth noting that you can use various seashells, corals and other marine-themed items that can be found in specialized stores or brought from the sea.
Suitable rope (thread)
Wooden stick (skewer)
thick pva glue
Scissors
Ruler
tubule
1. Get your wooden sticks ready. If necessary, process them with a nail file or emery.
2. Prepare some plastic tubes and cut them into several segments. These will serve as spaces between the shells hanging from the string.
3. Prepare the rope. It is better to cut off a piece with a margin.
Start threading the rope through the first shell, then tie a simple knot.
Add the cut piece of tubing. You can add these segments where you want to make a gap. Choose your own length.
* You can add one more additional element, if there is one. In this example, coral is added.
* Repeat the same pattern several times until you complete the rope.
4. Knots should be tied at the ends so that the decorations do not fall off.
5. Now you need to remove the tubes with which you marked the distance between the elements of the decoration. Just carefully slide the scissors into the tubes and cut them.
6. Start tying the ends of the rope to sticks (skewers) - first wrap a little and then tie a simple knot. Cut off the excess pieces of rope.
* You can strengthen the knot by adding some glue.
7. Insert the sticks into the cake at a slight angle (see picture) and you're done! Very simple and beautiful.
DIY crafts (photo). We print with leaves.
You can leave prints of leaves on paper or clothes (if you use a special fabric dye) and create beautiful, bright and original designs.
It may take a bit of practice as there are several techniques for applying paint and the result depends on the type and quality of paint and paper you are using.
You can also involve children.
You will need:
Fresh Leaves - Collect them with your kids as part of the craft process
Brush, sponge or roller
Paint or ink - best applied with a roller
* try experimenting on paper first before you decide to apply patterns to fabric.
We use paint
Using a brush, sponge or roller, apply paint to the leaf. You can put a sheet of paper on top or vice versa, turn the sheet over and attach it to the paper. The main thing is to find the right amount of paint.
Using ink
Put some ink on the leaf and carefully place it on the paper. Cover the sheet with paper on top and gently press to transfer the ink to the bottom paper.
* You can place a towel under the paper, which will allow you to translate more details.
Crafts for the garden with your own hands. Multicolored stones.
If you have planted tomatoes, cucumbers, herbs, etc. in your garden, then for convenience you can make such beautiful stones on which you can write the name of the plant and leave the stone where this plant is located.
Use regular non-toxic acrylic paints. You can color each stone in the colors of the plant.
For example, if you have planted tomatoes, paint the guide stone red, add some green to indicate the tail, and make the stone look like a tomato. In this case, the inscription may not be done.
As always, everything is quite simple and beautiful!
Crafts for the garden and the garden with their own hands. Wooden vase.
This craft is very simple to make, you can safely attract children who will gladly take part in the project.
You will need:
sticks and twigs
Empty coffee can
Saw or knife (for neatly cutting sticks)
dark paper
1. To get started, collect a few sticks outside.
2. Prepare a coffee can or whatever (you can use another container)
3. Trim all of your sticks so they are about the same size. They should also be a couple of centimeters higher than the coffee can.
* Some sticks can be simply gently broken without the use of sharp objects.
4. Wrap the jar in dark paper and secure it with glue. This is done so that unnecessary drawings on the container are not visible.
5. Start gluing the sticks to the paper that wraps around the jar. It will be easier if the sticks are more or less even. You can also make it easier for yourself by using thin sticks in places where there are large openings.
* make sure the bottom of the sticks are even so that your vase stands firmly and does not wobble.
6. It remains to add decorative or real long branches and artificial flowers and the composition is ready. You can decorate a garden or a house with crafts.
DIY crafts for giving. Table decoration.
Another beautiful and simple craft for giving.
Pull the rope over the table and tie ribbons of different lengths to it (you can also use different colors).
Attach a paper clip to the tip of each ribbon and attach a flower to each.
The flowers won't last long fresh, but if you attach small pieces of wet cotton to them, they can decorate your outdoor table for several hours.
DIY wood crafts. Plant markers.
Cute and simple plant markers!
You will need:
twigs
Stationery knife
Pen (felt pen)
1. Cut the branches to the desired length.
2. On the side of the branch, make a flat surface with a knife.
3. Write the name of the plant with a pen or felt-tip pen.
4. Insert ready-made plant markers in a suitable location.
DIY crafts for the home. Multicolored branches.
Everything is very simple here: pick up a few threads of different colors and a few branches from a park or forest.

DIY garden crafts
Hedgehog
1. Prepare bunches of long spruce needles and, using plasticine and toothpicks, attach them under the scales of the cone.
* If desired, you can trim the needles a little.
2. You can make a hedgehog face from plasticine.
3. Using black peppercorns, make a spout.
Deer
With an awl or a nail, make holes in the stomach and insert matches, toothpicks or sticks into it.
Elk
Simply glue all pre-prepared parts with thick glue (it is better to use a glue gun).
You can turn the shells over to put something in them.
Owl
Look closely, in the place where the cone is attached to the spruce, there is a small tail. It can be used as a beak.
The eyes of an owl can be made from acorn caps, and its wings from maple spouts.
Dragonfly
The most important thing is to find a branch that has a slight branching, and when cut, you will get dragonfly eyes.
Helpful Hints
It is not necessary to have a special gift to make something beautiful and unusual. If you know some tricks, then it is quite possible to make beautiful decoration for a home or a gift, with a minimum of effort and using very few materials.
On our website you will also find:
Here are just a few of the simple crafts that absolutely anyone can do:
Simple DIY crafts
1. Autumn candles
You will need:
Leaves (real or artificial)
PVA glue (decoupage glue)
Brush or sponge
* Wipe the jar with alcohol to get rid of fats.
* Apply glue to the jar.
* Use straight leaves to decorate the jar.
* You can grease the glued leaves with decoupage glue.
* Add a thread and a candle for beauty.
2. Painted cup
You will need:
Oil markers
Scissors
* Cut out a stencil of any pattern or letter from cardboard.
* Attach the stencil to the cup and start dotting around it with markers of different colors.
Just with your own hands
3. Painted jars
You will need:
Alcohol (for cleaning jars)
Acrylic paints
Jewelry (flowers)
* Clean the jar with alcohol.
* Paint the jar in any color and leave to dry.
* You can add a drink with a marker (in this case, a relief is applied on the bank, which is erased).
* Insert flowers into a vase.
4. Colored sneakers
You will need:
Fabric markers
White (light) sneakers
Pencil
* With a pencil, draw the desired pattern on the sneakers.
* Trace the drawing with a marker and start coloring as you like.
The simplest crafts
5. Craft from wine corks
You will need:
Wine corks
Pencil
Super glue
* Draw on paper any simple shape - in this example it is the shape of a heart.
* Start gluing the corks to each other (apply glue only to the sides, do not apply glue to the ends, so as not to stick them to the paper), placing them on the drawing to end up with a heart.
6. An infinity scarf from an old T-shirt
You will need:
Old/unnecessary T-shirt
Scissors
Thread and needle (sewing machine)
* Cut off the left and right edges of the T-shirt (see image). The width of the T-shirt will then become 35 cm.
* Cut off a small part from the bottom and top (where the neck is).
* Sew both halves from the inside, and you get a scarf.
Easy and simple do it yourself
7. Bright vases from glass bottles
You will need:
Watercolor paints
bottles
Bowl and brush (if needed)
Syringe (if needed)
* Pour some paint into a bowl. You can mix several colors to get a different color.
* Pour the paint into the bottle. It is more convenient to do this with a syringe - draw paint into the syringe, and then inject it into the bottle.
* Rotate the bottle so that the paint covers all the glass inside.
* Turn the bottle upside down and leave in this position in the sink - excess paint will flow out.
* When the paint dries, you can add water to the vase and insert flowers into it.
8. Towel dryer
If you have an old ladder, you can clean it, if necessary, sand it and even paint it. After that, it can be placed in the bathroom to hang towels.
Simple paper crafts
9. Garland of paper cups
You will need:
paper cups
ordinary garland
Knife or scissors.
* Make a cross cut in each cup.
* Insert a garland light bulb into each hole.
* Decorate the room with a garland.
10. Golden Canvas
Even if you do not know how to draw at all, you can make a very beautiful project and decorate the interior with it.
You will need:
2 white canvases
Gold, blue and orange acrylic paint
Sponge brush
* Paint each canvas with 2-3 coats of gold paint - let the paint dry after each coat.
* Use the sponge brush to start painting your canvases. One will be blue and the other orange. Make some lines shorter, others longer.
11. Multi-colored keys
If you have multiple identical keys for different locks, use nail polish to color them. Thus, you will know which key is from which lock.
Crafts from simple materials
12. Colored candlesticks
You will need:
Wide glass and narrow glass (or vases of different sizes)
Super glue
Food coloring
* Place the small glass in the large one, and secure both with glue - apply glue to the bottom of the small glass.
* Pour water between glasses and add food coloring.
* Place a candle inside a small glass.
13. Bulb vase
You will need:
Bulb
Pliers
Screwdriver
Wire (if necessary)
Cover for the base of the vase (if necessary)
Super glue
Gloves and special goggles (to protect hands and eyes)
* Use pliers to remove the tip of the bulb.
* Use a screwdriver or pliers to remove excess glass from the base. You may need to get rid of several layers of glass - be careful and attentive.
* Glue the light bulb to the base (plastic cover).
* The light bulb can also be hung - use a wire for this.
* You can complicate the task and add an LED light bulb. For this, in addition to the light bulb, you will need small batteries. All instructions can be seen in the video:
Easy crafts for kids
14. Drawing a ghost on a T-shirt
You will need:
Wide adhesive tape
Light T-shirt
Scissors
* From adhesive tape, cut out the details of your ghost (eyes and mouth, for example)
* Glue all the details neatly to the T-shirt.
15. Congratulations from the keyboard
Such a congratulation is very simple to make.
It all started with the fact that one friend wished himself for his birthday, some kind of cool tricked-out yo-yo, from some company there.
Well, "okay," I said, but this is not our method! And I decided to make a gift with my own hands.A bit of unobtrusive theory.
Yo-ohs are divided into types depending on the configuration of their components: axis, shape, thread, brakes and other newfangled things.Axle mount is:
- Fixed axis - classic of the genre and ideal for looping (playing style)
- A sliding bearing is a transitional model, where a sliding plastic part is put on the axle.
- Ball bearing - ideal for long tricks, spin record 16 minutes ("slip" - falling asleep yo-yo)! Now they still make grooves for centering the thread.
Basic forms:
- Classic - in the form of a hamburger or biscuit.
- Butterfly is essentially a classic turned inside out.
- Any other.
Materials:
- Wood - was used even before our era.
- Plastic - was actively used in the 90s.
- Aluminum - the most popular models now.
Threads differ in twist:
- 6-string (3x2) is less responsive.
- 8-string (4x2) for the most responsive yo-yo.
- 9-string (3x3) is less responsive.
and according to materials:
- Cotton is a more controlled thread
- Polyester - stronger thread
- 50/50
Brakes:
This concludes the deepening into the mechanics of yo-yo, although there is something else to write, if anyone speaks English, you can- Asterisk - protruding faces from the center with a slight cone. Noisy and washable.
- Reverse sprocket - grooves from the center to the edges in the manner of the original star.
- Brake rings - their heaps of types and types from simple stickers to liners in special grooves. The hardest and best option.
I did not immediately know the zen of yo-oh theory and decided to make a classic model with a fixed metal axis.
I did not make a completely wooden version, because I wanted to achieve a "slip" yo-oh (hanging at the bottom of the thread).And so, let's start manufacturing.
Preparation:
We need to get two discs with a diameter of ~50mm and a thickness of ~20mm with a blind hole in the center.We take a beautiful piece of wood from the most secret bins.
The thickness of the workpiece is about 25mm and the width also fluctuates around 27mm.
I prepared the workpiece in advance, brought out the face and one face to form 90 degrees, for subsequent gluing.To get a beautiful drawing and the necessary workpiece, we need to re-glue our parts.
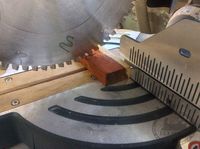
We note with a margin, details of 60mm + propyl. In my case, this is a miter saw with a 3mm blade.
We cut our blanks.
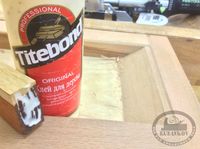
We carefully apply glue and rub the workpieces to each other. We use wood glue - Titebond Original
And glued in clamps.
After gluing, we again align one of the planes on all blanks using a tape machine.
We mark the center of the workpiece with a simple square with a movable shoe.
And draw a circle with a compass.
Next, roughly saw off the excess on a band saw.
We take a 5mm drill and set the drilling depth limiter.
We drill the workpiece as much as possible perpendicular to the plane of the workpiece.Turning yo-yo:
Our blanks are ready and now we need a cartridge, we have a Robert Sorby Patriot Chunk and a special screw insert to hold the blank.
The protrusion of the screw is adjustable, but I decided to make a wooden spacer so that the workpiece was at some distance from the cartridge and I could work more freely.
(The photo is just for clarity. The part must be wound tightly!)
We start turning and expel the parts in one size. I did not become wiser and used a Crown Meisel for all operations.
To begin with, we derive the diameter of all blanks by referring to the calipers
or even just a caliper because our workpieces are small.
First, we put the emphasis parallel to the axis of rotation and adjust the diameter, then moving from the edge to the center (as if pushing the meysel) we give the approximate plane and thickness of the disk.
Next, we mark up our chamfer to give shape to our future yo-yo.
We turn on the machine and, according to the visible risks, we grind them for better visibility. Rotating the emphasis for convenience either parallel or perpendicular to the axis of rotation.
We set the stop at 45 degrees and remove the material with the Crown Meisel. To begin with, we grind the chamfer, and then round it with movements from left to right to the center of the part (from a larger radius to a smaller one).
Alas, I forgot to take a picture of the decoration, but the principle is the same, we mark with a pencil, outline and select the cavity from the end. The stop is perpendicular to the axis of rotation.
photo18 (no)
The most important thing in this whole process is to get parts identical in shape, and most importantly, in weight!
We start finishing, we grind our parts, I settled on the 320 grid Abranet. Don't forget to check the scales!
Now we apply a topcoat to taste to close the pores and seal the shape of our part as much as possible.
I decided to resort to shellac. We take a tampon, shellac.
And apply directly to the rotating part. Let dry for 5-10 minutes, leaving to rotate on the machine for faster drying.
Set aside and apply shellac to the back of the part.
You can see that I didn't put the brakes on the reverse side because we're making a looper with a fixed axle and a loop.
In the future I plan to make a yo-yo on a bearing and with all the tricks.
repeat for the rest of the details.Axis:
For the axis, we found a bar with a diameter of 6mm, and although the diameter of the screw in our nozzle is 6.3mm, its inner diameter (not along the thread) was in the region of 5-5.3mm.
The nozzle screw was included in our part by 14mm.
The gap for the thread in the classic should be around 4-6mm, I decided to start with a larger one.
And that 2 parts + clearance is an axis 34mm long (14+14+6= 34mm)
We saw off, again, with a margin of a hacksaw for metal, our axis.
And we go to our lathe, where we clamp it into a drill chuck and grind evenly until the axis fits snugly into the holes of our part.
I made the axis with a slight concavity towards the center for automatic centering of the loop of the yo-yo thread.
Subsequently, after the final assembly, I took the rod out of the yo-yo and polished it on a lathe with Tormek polishing paste
We take out our axis and file along the edges at an equal distance from the center of the narrowing. We make a chamfer, undermining the ends of the cut with an abrasive tape, so as not to get hurt during installation.
Once again, we check everything on the scales, this time, at the suggestion of Dima, we checked everything on a jewelry scale for greater accuracy.
We insert our axis and prepare a template for even installation of the halves of our yo-yo.
We put on our loop and voila, yo-yo is ready ... it would seem ready)
If everything is perfect, then the thread will pass exactly in the center between the slices of our yo-yo.
If not, then you need to adjust the weight of the parts by removing the material from the flat part of the yo-yo with an abrasive belt.
We just put our part on a fine abrasive and draw it over the abrasive several times.
We put it on the axis again, we look at the result and on a new one)
As a result, after twisting the new thread, I, in addition, sawed off the axis, reducing the gap to 4 mm, the yo-yo control improved, but it became more difficult to throw slips.Now a small digression about the weaving of the thread:
We will need:
At a distance of 2 meters 19 centimeters (2190 mm) from each other, we install pins, drive in nails or something else.- Threads
- screwdriver
- Hook
- Pin / nail / screwdriver (X2 or x3)
- Measuring tape
- Scissors / knife
It is desirable that their diameter is no larger than the diameter of the yo-yo axis, and preferably less.
We fasten the thread to one of the pins and pull it to the other, wrap it around and drag it back.
We should get 4 threads if it is a simple thin thread. I already had a braided thread, so there are two of them in the photo! (later I replaced it)
We take the edge where we wrapped the thread around the pin. We hook it with a hook, which is fixed in a screwdriver.
We pull back and start twisting the threads with a screwdriver clockwise!
We twist on a whim, but approximately the thread will shrink by 130mm.
After that, we are looking for the center of the thread, somewhere 1 meter 3 centimeters per side (1030 mm), put the pin there, circle the thread around it, hook the opposite part.
And now we wind the resulting thread Counterclockwise!
We should get a twisted thread about 900mm long.
We make a loop at the end so that our thread does not unravel, remove it and accelerate it. Just straightening the wound knots.
All the thread is ready, it remains to unwind the opposite edge against the spiral and insert the yo-yo axis into a single or double loop.Yo-yo in action: