DIY home crafts: ideas for decoration and interior. What you can do with your own hands for sale: handmade business ideas What a craftsman can do

It all started when an acquaintance wished for his birthday some kind of cool, fancy yo-yo from some company.
Well, “okay,” I said, but this is not our method! And I decided to make a gift with my own hands.
A little unobtrusive theory.
Yo-ohs are divided into types depending on the configuration of their components: axle, shape, thread, brakes and other newfangled things.- The axle mount is:
- Fixed axis - classic of the genre and ideal for looping (playing style)
- A sliding bearing is a transitional model, where a sliding plastic part is placed on the axis.
- Ball bearing - ideal for long tricks, rotation record is 16 minutes ("slip" - falling asleep on the yo-yo)! Nowadays they also have grooves in them to center the thread.
- Basic forms:
- Classic - in the form of a hamburger or biscuit.
- The butterfly is essentially a classic turned inside out.
- Any other.
- Materials:
- Wood - has been used since before our era.
- Plastic - actively used in the 90s.
- Aluminum is the most popular model now.
- The threads differ in twist:
- The 6 string (3x2) is less responsive.
- 8-string (4x2) for the most responsive yo-yo.
- The 9-string (3x3) is less responsive.
- and based on materials:
- Cotton is a more controllable thread
- Polyester is a stronger thread
- 50/50
- Brakes:
- Star - protruding edges from the center with a slight cone. They are noisy and wear out.
- Reverse sprocket - grooves from the center to the edges in the manner of the original star.
- Brake rings - there are heaps of types and types from simple stickers to inserts in special grooves. The most difficult and best option.
I didn’t immediately discover the zen of yo-oh theory and decided to make a classic model with a fixed metal axis.
I didn’t make a completely wooden version because I wanted to achieve a “slip” of the yo-oh (hanging at the bottom of the thread).
And so, let's start manufacturing.
Preparation:
We need to get two disks with a diameter of ~50mm and a thickness of ~20mm with a blind hole in the center.We take a beautiful piece of wood from the most secret bins.
The thickness of the workpiece is about 25mm and the width also fluctuates around 27mm.
I prepared the workpiece in advance, brought out the face and one edge to form 90 degrees, for subsequent gluing.
To obtain a beautiful design and the necessary blank, we need to re-glue our parts.
We note with reserve, the parts are 60mm + cut. In my case it is a miter saw with a 3mm disc. 
We cut our blanks. 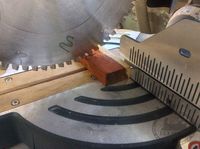
Apply glue carefully and rub the pieces against each other. We use wood glue - Titebond Original 
And glue them together using clamps. 
After gluing, we once again align one of the planes on all workpieces using a tape machine. 

We mark the center of the workpiece using a simple square with a movable block. 
And we draw a circle using a compass. 
Next, roughly cut off the excess using a band saw. 
Take a 5mm drill and set the drill depth limiter. 
We drill the workpiece as perpendicular to the plane of the workpiece as possible. 
Yo-yo sharpening:
Our blanks are ready and now we need a cartridge, we have this Robert Sorby Patriot Chunk and a special screw insert to hold the blank.
The offset of the screw is adjustable, but I decided to make a wooden spacer so that the workpiece would be at some distance from the chuck and I could work more freely.
(Photo is just for clarity. The part needs to be screwed tightly!)

We start turning and cut out the parts to the same size. I didn't split hairs and used Crown meisel for all operations.
To begin with, we display the diameter of all workpieces, checking with calipers
or even just a caliper because our workpieces are small.
First, we place the stop parallel to the axis of rotation and adjust the diameter, then by moving from the edge to the center (as if pushing the meisel) we give the approximate plane and thickness of the disk.

Next, we mark our chamfer to give the shape to our future yo-yo.

We turn on the machine and grind them along the visible risks for better visibility. Rotating the stop for convenience, either parallel or perpendicular to the axis of rotation.

We set the stop at 45 degrees and remove the material with Crown meisel. First, we grind down the chamfer, and then round it with movements from left to right towards the center of the part (from larger to smaller radius).

Unfortunately, I forgot to take a photo of the decoration, but the principle is the same, mark with a pencil, outline and select the cavity from the end. The emphasis is perpendicular to the axis of rotation.
photo 18 (no)
The most important thing in this whole process is to get parts that are identical in shape and, most importantly, in weight!


Let's start finishing, polishing our parts, I settled on the 320th Abranet mesh. Don't forget to check the scales!

Now we apply a finishing coat to taste to close the pores and seal the shape of our part as much as possible.
I decided to resort to shellac. Take a tampon and shellac.

And apply it directly to the rotating part. Let it dry for 5-10 minutes, leaving it to rotate on the machine for faster drying.

Set aside and apply shellac to the back of the part.
You will notice that I did not apply the brakes on the reverse side because we are making a looper with a fixed axis and a loop.
In the future I plan to make a yo-yo on a bearing and with all the intricacies.

repeat everything for the remaining details.

Axis:
For the axle, we found a rod with a diameter of 6 mm, and although the diameter of the screw in our attachment was 6.3 mm, its internal diameter (not along the thread) was around 5-5.3 mm.The nozzle screw entered our part 14mm.
The gap for the thread in the classic should be around 4-6mm, I decided to start with a larger one.
And then 2 parts + a gap is an axle 34mm long (14+14+6= 34mm)
We saw off, again, with a spare metal hacksaw, our axle.

And we go to our lathe, where we clamp it into a drill chuck and grind it evenly until the axle fits tightly into the holes of our part.

I made the axis with a slight concave towards the center for automatic centering of the yo-yo thread loop.
Subsequently, after final assembly, I removed the rod from the yo-yo and polished it on the lathe using Tormek polishing paste

We take out our axis and file along the edges at an equal distance from the center of the narrowing. We make a chamfer, sharpening the ends of the cut with an abrasive tape, so as not to get hurt during installation.
Once again we check everything on the scales, this time, at Dima’s suggestion, we checked everything on jewelry scales for greater accuracy.

We insert our axle and prepare a template for evenly installing the halves of our yo-yo.


We put on our loop and voila, the yo-yo is ready... it would seem ready)
If everything is perfect, then the thread will pass exactly in the center between the slices of our yo-yo.

If not, then you need to adjust the weight of the parts by removing material from the flat part of the yo-yo using an abrasive belt.
We simply place our part on a fine abrasive and run it over the abrasive several times.
We put it on the axis again, look at the result again)
As a result, after twisting the new thread, I also sawed off the axle, reducing the gap to 4mm, the control of the yo-yo improved, but it became more difficult to throw the slips.

Now a short digression about weaving threads:
- We will need:
- Threads
- Screwdriver
- Hook
- Pin/nail/screwdriver (X2 or x3)
- Measuring tape
- Scissors/knife
It is advisable that their diameter should not be larger than the diameter of the yo-yo axis, but preferably smaller.
We attach the thread to one of the pins and pull it to the other, wrap it around and pull it back.
We should get 4 threads if it is a simple thin thread. I already had braided thread, so there are two in the photo! (then I replaced it)

We take the edge where we wrapped the thread around the pin. We hook it with a hook, which is secured in a screwdriver.

We pull back and begin to twist the threads using a screwdriver in a Clockwise direction!
We twist it on a whim, but approximately the thread will shrink by 130mm.

After that, we look for the center of the thread, about 1 meter 3 centimeters per side (1030mm), put a pin there, draw the thread around it, and hook the opposite part.
And now we wind the resulting thread Counterclockwise!
We should get a twisted thread approximately 900mm long.
We make a loop at the end so that our thread does not unravel, remove it and disperse it. Simply straightening out the wound knots.

The entire thread is ready, all that remains is to unwind the counter edge against the spiral and insert the yo-yo axis there on a single or double loop.
Yo-yo in action:
You can create a beautiful and cozy interior in your home with the help of handmade crafts. Making such original things is not so difficult - you don’t need professional skills for this. The things we make with our own hands are unique, they give the interior of the home individuality and add variety to the environment.
Handmade crafts exude the special warmth of a home. Thanks to unusual creative gizmos, you will have the opportunity to change the interior at will or in accordance with the seasons (for example, create New Year's decor). DIY home decor is varied and purposeful. Homemade beautiful things and useful crafts for the home can be used as original furnishings, decorative elements, or as devices intended for storing various household items.
In order to make things with your own hands, you don’t have to buy expensive materials; you can also use improvised means.
Creating unusual decor is possible without large material costs. Most of you have various unnecessary little things in your house, for example, fabrics, colorful paper, buttons - all this can be used as material for crafts.
There is similar “junk” in almost every house, if you dismantle the pantry or rummage around in the attic, you will find something. Natural materials, glue and threads are also useful for making beautiful new items and homemade little things. But handmade decor ideas at home are also needed - of course.
Many people believe that only people with experience can make crafts and create presentable interior items on their own - this is a misconception. Show your imagination, combine different textured materials, don’t be afraid to experiment, and you will create not only beautiful, but also original home decor.

Even if you have to tinker with the first thing, each subsequent decorative craft will come out better and better, and you will spend less time.
DIY craft ideas for the home
So, what can you do yourself for your home? Let's look at a few ideas for inspiration. Among the proposed options, you will definitely find something interesting for yourself and try to make the thing you like with your own hands.
Housekeeper
One of the useful things for the home that also serves a decorative function, which you can make with your own hands, is a key holder.

The peculiarity of this key holder is that its design imitates brickwork. The basis for the key holder is thick cardboard (you can use part of a box). You will also need thick toilet paper or thick napkins. Dense material is needed so that it does not spread when lubricated with glue. Stock up on acrylic paints, varnish and glue (ordinary PVA will do).
Make the back wall of the key holder from rectangular cardboard or a sheet of plywood. Hooks will be attached to the base. Cut out small rectangular bricks from cardboard, the size should be the same, and glue them to the base, leaving a small distance between the parts. Not the entire surface of the cardboard is covered with bricks.
In the central part you need to stick a sign decorated with an inscription, and in the upper part you need to place a beautiful picture.
After this, coat the bricks well with glue, and put a napkin (previously crumpled) on top and a little more glue for impregnation. Using a stick, press tissue paper or paper into the gaps between the miniature bricks to create corners. Give the craft time to dry.

Paint the dry panel with paint (to imitate natural brick, you need to choose a red-brown shade). Use bronze paint to paint the seams.
After the paint has dried, paint the bricks with the same tone using a dry brush (dip the brush into bronze-colored paint, then wipe it on paper until it is almost dry, and only then brush the brickwork).
On a note! When painting bricks, you need to move the brush without changing direction.
To give the key holder a smooth finish, coat it with a clear matte varnish.
The work is completed by attaching the loops, after which it can be hung on the wall or given as a gift to someone. The photo below shows the finished key holder:

Jewelry hanger
All representatives of the fair sex love jewelry; Almost every woman has jewelry that needs to be stored somewhere. An original storage for jewelry will be a hanger made like a painting.
In order to make a hanger for storing jewelry, you will need:
- baguette frame;
- plywood;
- stain (paint can be used as a replacement);
- hooks and drawer handles;
- nails;
- screwdriver and drills;
- cutting tool.
Cut the plywood according to the dimensions of the frame and coat it with stain, then dry it and apply it to the frame. Mark the places where the hooks will be attached and screw them. All that remains is to hang the decorations on the hanger.
Now you have a place to store women's treasures - jewelry.

Plastic canvas box for storing small items
A simple but presentable box designed for storing various small items can be made from plastic canvas.
Canvas is a material for embroidery. You will need a canvas made of plastic; you can buy it in stores that sell everything for needlework.
On a note! Plastic canvas is usually made in the form of sheets, A4 size. The perforations in the plastic canvas differ in size. Canvases are produced with different numbers of perforations; the more there are, the smaller they are.
In addition to the canvas, you need to stock up on the following materials:
- dense threads;
- large needle;
- fabric or beads;
- scissors.
Embroidery on plastic canvas is almost no different from regular embroidery. Embroidery techniques can be different, the most popular are cross stitch and satin stitch.
The plastic canvas is flexible, but at the same time it is very durable.
Decide what the dimensions of your box will be. Divide the material into parts intended for the sides and the bottom. There should be five parts in total. Make elements for the lid. Make a workpiece whose size is 0.5 cm larger in width and length from the bottom. The sides of the lid should be slightly narrower. You will need five more parts. Then sew the parts with dense threads (you can use braid and even ribbons).

You can embroider any pattern on the blanks. Drape the parts that are not embroidered with fabric or embroider with beads.
Having completed all 10 blanks, begin assembly. The first step is to sew the side parts to the bottom. Then sew all the side elements of the box from the outside and trim the top along the edges. The last step is to assemble the cover in the same way.
We assemble the lid of the box in the same way.
A beautiful box made of plastic canvas is ready.
Woven rugs using tapestry technique
One of the options to add coziness to the interior is tapestry rugs. To weave such things, you do not need special tools. A rug using the tapestry technique can be made from scrap materials: thick threads that are used for knitting (they can be replaced with ropes made from old clothes) and cords.
A tapestry is a lint-free carpet made by hand. The base of tapestry rugs is decorated with ornaments created by interweaving threads. We will create a plot composition in the form of a circle with drawn lines; a thread will run along them, serving as the basis.
All work is done using weft threads. The complex name hides ordinary ropes and braid, from which weaving and decorative patterns are created.
- choose a strong thread to create the base;
- pulling the weft thread should be done by hand;
- To make the tapestry more dense, you can press the threads to the center; for this, use a simple fork.

Stage one. We draw out cardboard measuring 500 x 500 mm. We stitch the cardboard with the thread chosen for the base. To do this, cut the markings drawn on the cardboard and thread a rope through the lines so that it runs through the central part.
Stage two. Let's start weaving the tapestry. You need to carefully fix the starting thread. Weaving using the tapestry technique involves pulling the underlying cord by alternating one thread at the top and the second at the bottom.
Stage three. After weaving the last turn of the thread around the cardboard circle, you need to turn the resulting rug over to the reverse side and cut off the base cords. When pruning, leave about 5cm at the ends. Pull the ends of the laces out of the notches made on the cardboard (there is no need to remove the picture while pulling it out) and tie them into pairs. Attach pompoms to the resulting knots.
Complete the composition by sewing a thick rope from the wrong side in a circle - this will hide the knots and ends of the threads.
Advice. By using different textures and shades of threads, you can make different rugs and then combine them into one. You will get a large rug that can be hung on the wall or laid on the floor.
A tapestry rug placed on the floor will make it warmer and also looks beautiful. Weaving a tapestry rug with your own hands is not difficult: try it and see for yourself.
Ribbon curtain
You can make an unusual curtain from ribbons. Tape curtains are suitable for both windows and doors. Making curtains from ribbons will take a little time; you don’t even need a sewing machine. A fluttering ribbon curtain repels insects well; Previously, such curtains were made from newspapers cut into strips.
To make a curtain from ribbons, you need the following materials:
- ribbons or fabric strips (with edges that do not fray);
- cornice;
- clips or buttons.
The ribbons need to be thrown over the cornice and secured with clamps. Large beads can be strung onto fabric strips for decoration.
The ribbon curtain performs not only a practical, but also a decorative function. The advantage of curtains made from ribbons is their lightness. This is an excellent option for a summer house; a ribbon curtain can also be hung in an apartment.

Flower pots made from paper bags
Many people have paper bags at home; instead of throwing them away, make them into flower pots.
Materials for making flower pots:
- paper bags;
- wooden skewer;
- scissors;
- rope;
- glue;
- plastic container.
Take paper bags and mark them: eight strips measuring 70x300 mm, then cut the paper along the dotted lines.
Place a wooden skewer in the corner of one of the strips and wrap the paper base around it diagonally. You must make a paper tube from each strip. Tape the corners of the paper tubes to prevent them from unraveling. The easiest way to do this is with a glue gun.

Take a plastic container, apply glue to it and wrap it with paper (from the same bags) so that the plastic is not visible. Glue paper tubes to the bottom of the container. Cut paper strips measuring 70x450 mm (you will need large bags) and make tubes.
Wrap the tubes so that they are pressed tightly against the walls of the container. Attach a long tube of paper with glue to the bottom of the container and wrap it around it, you need to braid the main tubes. Wrap all the main tubes, and then change the direction of weaving to braid the missing tubes - this way you need to wrap the entire container.

Make two holes in the sides of the pot (top).
Stretch a string through the holes made; tie a knot at each end of the twine to secure it well. Another woven tube will help hide the ends of the twine. Wrap the tubes protruding above the pot inside the container and secure with glue.
The unusual flower pot is ready.

Handmade items for the home can be used as decorative elements in your home or given to friends.
Most things made by hand are not only beautiful and original, but also useful and necessary in the household. Feel free to start working on homemade things and decorate your home with them.
Video For five more ideas for handmade crafts with your own hands to decorate the interior of rooms, see the video below:
The presence of old things is sometimes annoying, and sometimes it gives rise to brilliant thoughts that you can do a lot of pleasant and useful things with your own hands for your home and your family. Don't believe me? Read and watch further. A few fresh ideas will help you comprehend simple magic. transforming ordinary trash into hand-made masterpieces modern design art.
What can you do at home with your own hands?
If you have never been interested in design before, and your creative successes have not gone beyond school craft lessons and sewing miniature clothes for dolls, do not rush to close this article. We will tell you what you can do at home with your own hands.
Don’t immediately say: “I don’t have time for this” or “I won’t scour the stores for materials.” And it’s absolutely necessary to forget about the phrase “I won’t succeed.” It turns out for everyone - pay just a little attention to creativity and show your imagination. Sometimes such simple means as plastic spoons or old light bulbs turn into decorative masterpieces.
In the case of a light bulb, you can make a small hanging vase, simply removing all the “insides” from the glass flask.
Crocuses from plastic spoons– also not a difficult task. Paint the spoons your favorite color and then glue them around the stems and centers. Centers for flowers can be made from plasticine, fabric or paper.
If such a material as plastic is alien to you, and you want to work with natural raw materials, try making a stylish wooden hanger.
If you are looking for an original birthday gift - make a crystal lamp, decorating an ordinary lampshade with beads using fishing line.
The discs make a wonderful holiday dish..
Using beautiful decoupage technique can be done original candle, decorating it with fresh flowers.

You can make a stylish stand for household items from rope, yarn and glue.– if you want, for the remote control, or maybe for indoor plants.
What can you make from paper with your own hands?
If you still don’t know what you can make from paper with your own hands and are wondering what crafts you can make from this affordable material - use simple ideas.
They will come to your aid to decorate your interior. beautiful and weightless butterflies, which can be made easily and simply from paper.
Ordinary egg trays will become the basis for a beautiful photo frame decor. You can sell such beauty, but it is better to keep it for yourself or give it to your loved ones.

Who would you like to gift these delicate flowers to? We invite you to study the step-by-step master class and make a never-fading bouquet with your own hands.

From old things, for example, You can make a lot of useful things out of corks for home.
By gluing cardboard strips together, you can become an author incredible lamp.
Cardboard and thick rope will make a very stylish box for household items.
Making crafts from old things: great ideas for the home
Perhaps only residents of other galaxies are not aware that old tires can be used to make useful and beautiful garden crafts.
We invite you to familiarize yourself with the most popular solutions for using old tires.

Case for your mobile phone I haven’t tried tinkering, perhaps I’m just lazy. And only the most stubborn succeeded in this matter and brought it to the end. You can make a beautiful cover from a few pieces of fabric and a roll of satin ribbon.

Here's how to use it old tennis ball.

If you have a small child, you can together make crafts from potatoes for a kindergarten school or for a summer residence.

From an old unwanted T-shirt you can make a stylish T-shirt for the summer.

From an out-of-fashion winter sheepskin coat or fur coats you can make stylish and modern things: a bag or a vest.

From old tights you can make cute baby dolls.

You can sew it from an old coat dog jumpsuit.
What you can make from old jeans with your own hands: photos and videos
Jeans are such a dense fabric that even after a successful “first life” they get a chance for a worthy “reincarnation”. Backpacks, bags, jewelry and even slippers can be sewn from worn out and out of fashion old jeans.


What can you make from plastic bottles for your home?
From bottles that have gone out of use, you can do a lot of useful things.

Beautiful stands for indoor plants will decorate your interior.
How do you like this decor??

To decorate a summer cottage you can make a cute pig.
You can learn more about DIY garden crafts in our previous article. But you can learn how to make flowers like these right now.

Old things can be transformed in the most unexpected way. From videotapes that have lost their relevance, you can make chic shelves for useful things.
Video: what can you do with your own hands?
You may like:
- Mesmerizing and strikingly beautiful wings...
I really like wickerwork, and while baskets, wicker chairs and other interior items are not found in every home, a wicker bread box often decorates the dining table. Usually, fabric napkins are placed in such a bread bin for hygienic purposes - they look more neat and beautiful than ordinary paper napkins. A napkin may be the simplest, but for needlewomen, hand-sewn napkins are an excellent opportunity to use their skills and imagination. Today I invite you to watch a master class on how an ordinary fabric napkin can be turned into a work of art.
You can make these beautiful napkins with delicate flowers from any piece of fabric.
To make a napkin we will need:
- cloth for napkins (preferably linen - linen napkins help keep bread fresher);
- fabric for flowers - if the napkin is colored, you can use the same fabric for flowers;
- beads or beautiful buttons;
- threads;
- scissors;
- cardboard for the template.
When making a napkin, it is important to process its edges and think carefully about the composition of flowers - it is advisable that there are not too many of them. For our napkin we use flowers of the same size (along the entire perimeter of the napkin), but other options for the arrangement of flowers and their quantity are possible.
First we need to make a template. To do this, we cut out a circle from cardboard with a diameter of 10 cm or less, depending on the size of the napkin. Then we take the fabric intended for making flowers and transfer the template to the fabric. We calculate the number of circles depending on the perimeter of the napkin plus six circles for flowers located diagonally.
Cut out our circles. Now we need to gather up each circle a little around the edge.
Next, we sew circles around the perimeter with small stitches, retreating a few centimeters from the edge.
We tighten the thread so that the circle has frills. We do not cut the thread.
Now we begin to form the flower. To do this, we sew the edge in the center of our flower. This is how we made our first petal. We thread the thread through the free edge of the circle, and, moving along the perimeter, similarly sew the remaining “petals” in the center of the circle.
We make all the other flowers in the same way. We lay out the finished flowers around the perimeter of the napkin and sew them on. We decorate the middle of the flower with a bead or a beautiful button.
Even novice needlewomen of a young age can make such napkins with their own hands.
These beautiful napkins can give our kitchen a unique charm - they can be used not only for the bread bin, but also for trays, tables, etc. You can even decorate a kitchen towel with these flowers.
Fabric flowers can be two-layer, multi-colored, made from different types of fabric. For a napkin made of fabric with a pattern, flowers to match the fabric are well suited. Plain napkins can be decorated with flowers in bright colors.
In any case, thanks to the shape of the flowers, such fabric napkins look very airy, delicate and light.
If you want to make a beautiful craft, all you have to do is look around.
Nature itself will suggest and provide the necessary materials for beautiful and/or useful crafts.
Add to this your imagination and a few simple tools you can find around the house.
DIY crafts can decorate a table, room, garden or vegetable garden. Learn how to make interesting things from shells, rocks, twigs, etc.
DIY crafts. Decoration in a marine style.

The idea of a beach wedding sounds very romantic, and a cake decorated with a nautical theme would be perfect.
For this decoration you will need:
5 shells (preferably ones that can be easily tied to a string); This example used a flat shield hedgehog that was purchased from a craft store.

* It is worth noting that you can use various shells, corals and other marine-themed items that can be found in specialized stores or brought from the sea.
Suitable rope (thread)
Wooden stick (skewer)
Thick PVA glue
Scissors
Ruler
tube
1. Prepare wooden sticks. If necessary, treat them with a nail file or sandpaper.

2. Prepare several plastic tubes and cut them into several segments. These will serve as spaces between the shells hanging on the rope.

3. Prepare the rope. It is better to cut off a piece with a margin.

Start threading the rope through the first shell, then tie a simple knot.

Add a cut piece of straw. You can add these segments where you want to create a space. Choose the length yourself.

*You can add one more additional element if you have one. This example adds coral.

*Repeat the same pattern several times until you fill the rope.


4. Knots should be tied at the ends so that the decoration elements do not fall off.
5. Now you need to remove the tubes that you used to mark the distance between the decoration elements. Just carefully insert the scissors into the tubes and cut them.

6. Start tying the ends of the rope to the sticks (skewers) - first wrap it a little and then tie a simple knot. Cut off the excess pieces of rope.


*You can strengthen the knot by adding a little glue.


7. Insert the sticks into the cake at a slight angle (see picture) and you're done! Very simple and beautiful.

DIY crafts (photo). We print using leaves.

You can leave imprints of leaves on paper or clothing (if you use special fabric paint) and create beautiful, bright and original designs.

It may take some practice as there are several techniques for applying paint and the results will depend on the type and quality of paint and paper you use.
You can also involve children.
You will need:
Fresh leaves - collect them with children as part of a craft project
Brush, sponge or roller
Paint or ink - best applied with a roller
* Try experimenting on paper first before you decide to apply designs to fabric.
We use paint


Using a brush, sponge or roller, apply paint to the leaf. You can put a sheet of paper on top or vice versa, turn the sheet over and attach it to the paper. The main thing is to find the right amount of paint.


Using ink
Apply some ink to the leaf and carefully place it on the paper. Cover the top of the sheet with paper and gently press to transfer the colors to the bottom paper.
* You can place a towel under the paper, which will allow you to transfer more details.
DIY garden crafts. Multi-colored stones.

If you have planted tomatoes, cucumbers, herbs, etc. in your garden, then for convenience you can make these beautiful stones on which you can write the name of the plant and leave the stone where this plant is located.
Use regular non-toxic acrylic paints. You can paint each stone in the colors of the plant.

For example, if you planted tomatoes, color the guide stone red, add a little green to indicate the tail and make the stone look like a tomato. In this case, the inscription need not be made.


As always, everything is quite simple and beautiful!
DIY crafts for the garden and vegetable garden. Wooden vase.

This craft is very easy to make; you can safely involve children who will happily take part in the project.
You will need:
Sticks and twigs
Empty coffee can
Saw or knife (to carefully cut sticks)
Dark paper
1. Start by collecting a few sticks from the street.
2. Prepare a coffee or poop can (you can use another container)

3. Trim all your sticks so they are roughly the same size. They should also be a couple of centimeters higher than the coffee can.

* Some sticks can simply be broken carefully, without the use of sharp objects.
4. Wrap the jar in dark paper and secure it with glue. This is done so that unnecessary drawings on the container are not visible.

5. Start gluing the sticks to the paper that wraps the jar. It will be easier if the sticks are more or less even. You can also make things easier for yourself by using thin sticks in places where there are large openings.

* make sure that the sticks are level on the bottom so that your vase stands firmly and does not wobble.
6. All that remains is to add decorative or real long branches and artificial flowers and the composition is ready. You can decorate your garden or home with crafts.

DIY garden crafts. Table decoration.

Another beautiful and simple craft for the garden.
Stretch a string over the table and tie ribbons of different lengths (or different colors) to it.
Attach a paperclip to the end of each ribbon and attach a flower to each.
Flowers won't last long in a fresh state, but if you attach small pieces of wet cotton to them, they can decorate your outdoor table for several hours.
DIY wood crafts. Markers for plants.

Cute and simple plant markers!
You will need:
Twigs
Stationery knife
Pen (felt-tip pen)
1. Cut the branches to the desired length.
2. Make a flat surface on the side of the branch using a knife.

3. Write the name of the plant with a pen or marker.

4. Insert ready-made plant markers in a suitable location.
DIY crafts for home. Multi-colored branches.


Everything is very simple here: collect several threads of different colors and several twigs from the park or forest.


DIY garden crafts

Hedgehog
1. Prepare bunches of long spruce needles and, using plasticine and toothpicks, attach them under the scales of the cone.

*If you wish, you can trim the needles a little.
2. You can make a hedgehog’s face from plasticine.

3. Using black peppercorns, make a spout.
Deer

Using an awl or nail, make holes in the acorn and insert matches, toothpicks or sticks into it.

Elk

Simply glue all pre-prepared parts with thick glue (it is better to use a glue gun).

You can turn the shells over to put something in them.
Owl

Take a closer look; in the place where the cone is attached to the spruce, there is a small tail. It is this that can be used as a beak.
The owl's eyes can be made from acorn caps, and its wings from maple noses.
Dragonfly

The most important thing is to find a branch that has a small branch, and when cut, you will get the eyes of a dragonfly.


