How to make a big castle out of cardboard. Fairytale castle - construction set made from cardboard rolls
Master class on making a medieval castle from waste material
Author: Yunusova Alsu Rifkhatovna, teacher, MBDOU "Kindergarten No. 177", Kazan.
Description: master class for educators, preschool teachers and parents.
Purpose: the castle can be used for role-playing, story games and activities, as an interior item and props for various events.
Target: developing children's imagination and interest in games and activities.
Tasks: to awaken the interest and desire of adults to create a beautiful and useful play environment for children.
Background
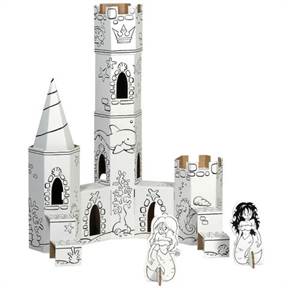
- Mom, I'm very glad that I have a Princess Sofia doll! But princesses must live in a castle! Let's make her a big, beautiful, real castle! - my six-year-old daughter told me. Indeed, what about a princess without a castle?! After walking around the Internet, inspired by the works I saw, I created in my head an image of the castle of my daughter’s dreams and, probably, mine. So, our castle for Princess Sofia.
We needed:
4 square-shaped boxes (for example, milk), 4 cylinder-shaped jars (for example, chips), a cardboard box - the base of the lock, scissors, a pencil, a stationery knife, a glue stick, a ruler, toothpicks, paper with a pattern imitating two types of stonework, paper with prints of windows and flags in a medieval style (I downloaded the images and printed them on a color printer).


Progress
From a cardboard box around the perimeter I cut out a base for a 15 cm high castle.

I made cuts on the jars to place them on the corners of the cardboard base. This must be done before pasting paper under the stone, otherwise when cutting the paper will crumple and deteriorate.

I checked whether the jar sat well and reached the base.

Next, I covered 4 boxes and 4 jars with paper to resemble stonework in a medieval style (the pattern of the stones is smaller than that of the fence). After gluing, you need to go through the cuts on the jars again to cut the paper. For the rear towers I took higher jars. It is best to use a glue stick; liquid glue spreads and the paper becomes soft.


It's time for the fence. I opened the cardboard base and covered both sides with masonry paper. I used a pattern with a large stone.


After I covered the fence on both sides with paper, I assembled it back into a rectangular base, sealed it and placed jars in the corners.


I made teeth on the fences to make it look as much like a real castle for princesses and knights as possible. I cut them out with a stationery knife at equal distances.


These are the windows I glued to each box and jar.

For the roof I used paper with a tile print. I cut out circles and made roof cones out of them for all the cans and boxes. I cut out a gate on the front side of the fence with a utility knife and decorated the edges with brickwork. I glued the coat of arms of the castle on top of the gate (I downloaded the picture and printed it out).

It's time to assemble the castle. I glued 4 boxes like this: 2 on the back fence, one on the side fences and their windows looked at the castle courtyard.

It remains to decorate the roofs with a flag. To do this, I printed the drawings of the flag in normal and mirror form.

I cut and glued them together, leaving a toothpick inside.

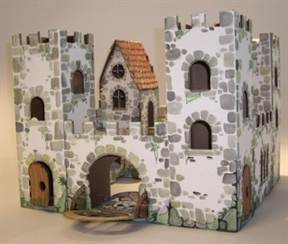
I put a flag on top of each box and jar. Our castle is finished and ready to receive princesses, knights, dragons and all other inhabitants. It turned out that such a castle is interesting not only for girls, but also for boys. I found out when I took it to kindergarten and showed it to my kids, they were delighted!
Which ones did I tell you about recently? So, it all started with them. Because princesses, you know what they are? They don't want to live in an ordinary dollhouse! Give them a castle! And definitely made of cardboard! Can you imagine? It was in approximately these terms that my daughter approached me with a request for urgent provision of separate living quarters for the princesses.
I started racking my brains, wondering why. As usual, I scoured the Internet on the topic of cardboard castles and cardboard palaces, looked for a few interesting ideas, took out cardboard (luckily we always have plenty of this stuff, since we really love breakfast cereals), took out toilet paper rolls (oh, what do we have in there’s just no pantry!), scissors, a pencil, a ruler, I sat down in front of this whole bunch and... And nothing... no ideas. At all. Complete stupor. I applied parts this way and that, it didn’t turn out to be a stone palace and that’s it... In short, on the first evening of working on the project, the first glimpses of my creative consciousness began to appear after about an hour of almost meditative contemplation of a pile of garbage. This is what came out of this meditation.
But in the morning there was a clear understanding in my head that the castle consists of two main parts: a) a palace, b) a fortress. That is, a castle is a palace inside a fortress.
And now the creative consciousness has already been awakened, the process has been launched and away we go!
FORTRESS:
It was decided to make the base of the fortress out of two boxes, laying the boxes on top of each other with a shift.It was decided to attach walls to the sides - two more boxes.

The walls of the fortress were pasted over with strips of cardboard with denticles, which turned out to be real fortress walls, on which sentinels can walk.

The walls were glued to the base with PVA glue.

From above they pressed down with a load to stick better.

But, as the chief architect, the child asked, how will the princesses climb these walls? I had to make steps.

Here you can see where they are glued.

The round towers of the fortress are made of three rolls of toilet paper, connected with adhesive tape. The towers themselves are also attached to the walls of the fortress with adhesive tape.

The central gate, that is, the entrance to the castle, was made of cardboard, bent with the letter L. The lower part was glued to the base of the fortress with double-sided tape, the upper part was stapled to the towers in two places.

And then we unexpectedly came in handy with a part of the chain that remained after shortening the handle on my daughter's handbag. Thank you dad for saving it just in case!

The chain is attached to the wall like this: it is inserted into through holes, ordinary paper clips are attached to the ends. The clips prevent the ends of the chain from slipping out and serve to facilitate the closing of the gate. Here is an interactive element for you!

The chain is attached to the door on the wire as if you were sewing on a button.
I cut out the loopholes of the fortress from some picture found on the Internet, reduced it to the required size, duplicated it and printed it out. The picture came in black and white, so I had to color it by hand. But that's just more interesting, right?

The final touch is brickwork. I drew it with wax crayon over a painted and well-dried wall.

CASTLE:
The palace was made from a box from a magnetic alphabet and cardboard, twisted into tubes and stapled on both sides. Moreover, the extreme turrets turned out to be composite. Small cylinders are not attached to anything, they can be removed. Many small incisions were made on the bottom of the cylinder of the central tower, bent outward and glued on double-sided tape.
The base on which the palace towers are installed is a box that has a part with a hole to make it easier to hang goods in a store. It is not secured to the base by anything; it is held solely by this part for hanging, inserted into the slot made in the cereal box. But it holds strong. Round side towers are attached to the box with double-sided tape.
The palace must have a balcony, and for this we attached a cardboard bent in the shape of a C to the wall of the building with double-sided tape. It is attached to the base with double-sided tape like this.

They covered this case with cardboard in the shape of an arch, inserted this cardboard into the slot and glued it on the back side inside the box with a glue stick.

Based on an idea I spotted on the Internet, railings like these were originally planned for this balcony.

In the end it turned out like this:

The toothpick halves are attached to the cardboard with hot glue, the beads are put on top and not secured by anything. On top of the toothpicks, a piece of braid that remained from the time of manufacture was glued to hot glue.
At the request of the chief architect, ladders were also added to the palace balcony.
In addition, our architect could not figure out how the princesses could get to the large balcony from the entrance to the fortress? Indeed, there was no direct route, but it’s not a princess’s business to jump through the air, so we had to cut a through passage from the courtyard to the balcony.
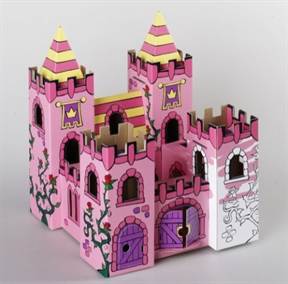
The roofs of the palace towers were made of colored cardboard. The color scheme is daughter's. Empirically, that is, through trial and error, we obtained a pattern for cones from a newspaper; it turned out that half the circumference of a reel of adhesive tape was the right size. We cut out semicircles, rolled them into a cone and secured them with a stapler.

Each princess castle has spiers with flags fluttering in the wind. Therefore, flags were cut out from the same colored cardboard, glued together and placed on kebabs. These skewers were then attached to the roofs using hot glue.

The windows, as in the case of the fortress, were found on the Internet. We had better luck with these windows - we managed to find colored ones that matched the color scheme.
One of the integral parts of castles and fortresses is a wooden lattice door. We made it, or rather they, because we have two of them, from ice cream sticks fastened together with PVA glue.

I love ice cream on sticks! :) We even made them out of them. :)
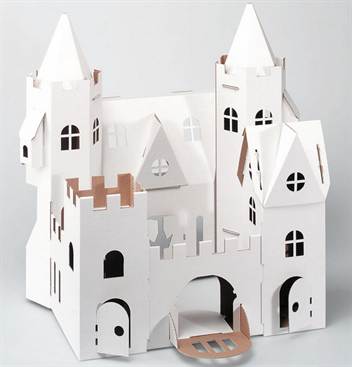
Since we made the castle in the evenings, due to good weather, the project was delayed. But you know princesses! They are so impatient! Therefore, we started painting the castle when it was not yet finished.
Cardboard is a universal item for creativity and handicrafts. Not only adults, but also children can use it to implement their ideas. This article will tell you how to make a castle out of cardboard with your own hands.
Looking at the photos of finished models, it may seem that it is very difficult to make them, but this is only the first impression. In fact, you just need to familiarize yourself with the basic rules of construction and working with cardboard, and you will be able to create real masterpieces. For this kind of activity, you need to be patient, because a large castle is not built in one day, but at least several days. You can share this activity with your children and have a great time building the walls of your castle. We have prepared a step-by-step master class, which will be presented below.

Delightful locks are made in stages: first, suitable models that you like are found on the Internet. Then prepare your own drawings. You should also prepare cardboard boxes of different sizes, which will be the material for creating the castle.

To clearly know where to start and how to move forward, it is best to familiarize yourself with a certain sequence of work. The first step after you have decided what kind of castle you will build is to draw outlines on cardboard; it is most convenient to do this with a pencil, since if some details change, you can erase unnecessary lines.
Next, using a utility knife, clearly cut out all the elements of the castle along the lines: drawn towers, arches, walls, and so on. Both tape and glue are suitable for connecting parts together. If you decide to use tape, then stock up on both narrow and wide ones, they will definitely come in handy. PVA glue is suitable; it perfectly glues cardboard and paper surfaces. When the castle is glued, its decoration begins - pasting it with colored paper, painting it with paints, adding small details.
It is very convenient to use this manufacturing scheme; if you follow its steps, building a castle will not be a problem.

Simple lesson
Having tuned in to the structure of the castle, be patient, draw on a sheet of paper what it should look like, draw out all the details, even better if the drawing is in color. Then, having created your drawing, prepare the materials and start building.
What materials should be prepared:
- Millimeter paper, cardboard sheets of different sizes or boxes;
- Tools: scissors and a sharp clerical knife, compasses;
- Glue or tape, and preferably both the first and second;
- You will definitely need a simple pencil and ruler;
- Everything for decoration: paints, brushes, colored paper, beads, sequins and so on.
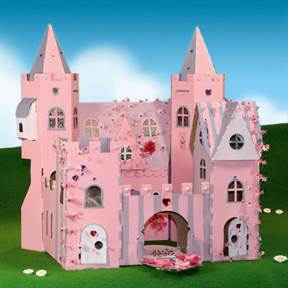
An example of a decorated castle can be seen in the photo:

Now let's start the step-by-step master class:

- The first stage, as mentioned above, involves drawing up a drawing; for this we will use graph paper.

- Now we are making a template, or rather templates, because each element needs a separate one. Small and large parts, no matter how many times they are used, are cut out once. Take into account the seam allowance, that is, the place where the parts are fastened together.

- When the templates are ready, place them on cardboard sheets, trace them with a simple pencil and cut them out along the contour. In order not to get confused in the finished elements, number them, it will be much easier.

- We start gluing with large parts, so we will build the base of the castle. And then small elements are added, for example, such as a staircase, a balcony, protrusions on the walls.

- For the finished castle, if desired, you can make a stable base that will support the entire structure. It is most often made from foam plastic; it is very light and will not make it difficult to move the lock, and at the same time is quite stable. If you do not have a suitable piece of foam, use the same cardboard.

- Now you can start decorating. Here you can fully use your imagination, or if you don’t want to invent, then just take ready-made sketches of castles from the Internet and implement these ideas. Here are several options for decorating castles using colored paper, paints, and decorative elements:
Cardboard crafts are a separate type of creativity that is enjoyed not only by children, but also by adults. Having seen the finished models, it seems very difficult to make them, but in fact, having mastered the basics of craftsmanship, you can immediately begin to create real masterpieces. Accuracy, patience and perseverance are all you need to do this kind of creativity. Because a large and beautiful castle made of cardboard sometimes takes several days or weeks to make. Of course, you can’t do without a flight of imagination, which you need to show when decorating a future work of art. But the future mistress or owner of the castle will be happy to help adults with this.
Beautiful castles with carved turrets are made according to templates that can be found on the Internet or made independently, having previously drawn drawings. For work you will need large cardboard boxes or sheet cardboard.

Sequence of work:
- Using a simple pencil, draw the outlines of the future castle on cardboard.
- Using a sharp stationery knife, silhouettes of walls, towers, and arched openings are cut out.
- Structural elements are glued together with tape or glue.
- The walls are painted or covered with colored paper.
This is the simplest scheme for making a cardboard castle, which can be used as an algorithm for other buildings.
The easiest way to make round castle turrets is from paper towel rolls, food foil, and oilcloth.
How to make a cardboard castle with your own hands: step-by-step master class
If you thoroughly start making a castle from cardboard, you should first imagine it in detail and draw a picture. And then create a detailed drawing based on it. After this, there will be long and painstaking work to build and decorate the castle.
Tools and materials:
- Stationery knife;
- Scissors;
- Thick cardboard or boxes;
- Compass;
- Paints;
- Glue;
- Scotch;
- Ruler and pencil;
- Colored paper.

You can also prepare various auxiliary materials for decorating the castle: sparkles, feathers, beads, flags, chains, artificial flowers and others. If among the elements of the castle there are complex carved figures, then a stencil is made for them.
Step by step instructions:
- First, a drawing is made on graph paper.
- Templates are made separately for all large and small parts of the castle. If the details are repeated, then only one template is made. You need to remember that in the parts you need to leave room for a seam on which glue will be applied.
- Templates are applied to cardboard and circled, and then cut out. It is advisable to number all parts of the castle so as not to confuse them when gluing.
- The base of the castle is glued from large parts.
- Small parts are glued (balconies, stairs, terraces, turrets).
- Next, you can fix the lock on a solid base (cardboard, foam).
- The castle is painted and decorated with decorative elements.
To make a pattern on the walls in the form of bricks, you need to paint the entire castle with gray or light brown paint. Then a rectangular template is cut out from a piece of foam sponge. It is dipped in dark brown paint and left on the walls to imitate brickwork.
Beautiful DIY paper castle: templates and instructions
You can build unusually beautiful castles from ordinary paper, which will serve not as a toy, but rather as decoration. And if you make a backlight inside them from LEDs of different colors, they can become excellent night lights. But adults do such serious crafts, and children can be offered ready-made templates that can be downloaded from the Internet and printed on a color printer. They are also sold in book or art stores.

What you will need to make the craft:
- Scissors;
- Glue stick or PVA glue with a brush.
It is necessary to carefully cut out the contours of the castle and all its individual parts. Then bend them along the fold lines and glue them together. The last step will be gluing individual parts, for example, turrets to the walls of the castle.
To make the structure more durable, you need to glue the paper parts onto the cardboard.
Schemes for beginners: how to make a cardboard castle with your own hands
It is best to make your first crafts using simple patterns, carefully studying master classes or watching video lessons. Having gleaned a lot of knowledge from there, you can get to work. Masters advise first to try to make not a three-dimensional structure, but a cardboard castle from two walls perpendicularly fastened together. Your child will also enjoy making this simple model.

To work you need:
- Two sheets of cardboard (white or colored);
- Colored pencils or paints;
- Scissors;
- A simple pencil.
Random castle walls are drawn on sheets of cardboard and cut out along the contour. In the middle of each sheet there should be a groove into which another sheet will be inserted. Next, the walls are painted on both sides and fastened together. You can also cover them with colored paper to make interesting applications.
Doors and windows must be large enough so that a child can stick toys or hands through them while playing, otherwise he will simply tear the openings.
After the simplest castle model has been successfully made, it will be possible to begin more complex designs. The child should also be involved in making crafts. He will also gradually improve his skills and develop his creative abilities.
Master class: cardboard castle (video)
Making a castle with your own hands is not always easy. For example, the dimensions of the parts do not match or the cardboard becomes deformed as the glue dries. Therefore, you must carefully read the instructions and take into account past mistakes. And then the luxurious royal castle will take pride of place in your collection of crafts.
It is relatively simple, with just a little effort and a little patience, to make a beautiful castle out of paper, which will surely appeal to not only a boy, but also a girl. You can take a diagram found on the Internet as a basis, but this does not mean that you should end your creativity there. It would be nice to use your imagination and create your own, unique palace. Additionally, this product can be used as a decoration, for example, as a stand for various confectionery products.
What do you need to make a paper castle?
You will need a cardboard box, sand, paints, fabric, sawdust, as well as cans of chips, glue; scissors and pen.

Advice
If you are doing this for the first time, it is advisable to use step-by-step instructions with illustrations.

First you should disassemble the box, leaving its bottom as the lower part of your future castle. It would be nice to draw a gate on one of the walls, then cut it out, leaving a connection only with the bottom of the box. Next, you need to make teeth on the top of the box, then you need to bend them completely through one in order to then glue the cardboard roof onto them. After this, you can combine sand and paint. You need to divide the sand into piles, and then combine them with yellow, red and blue paints. You will need to wait until the sand is completely dry before moving on to the next step. You need to apply glue to the walls of the future castle and sprinkle them with yellow sand. To cover the front wall, several pieces are cut out of cardboard, which will visually resemble stones. They will need to be glued along the edge of the castle gate. After this, you need to take a can of chips and cut out something like a window in it. And a cone is glued on top, which will serve as a roof. Glue is applied to the tower, and then blue sand is poured. Red sand is used to decorate the castle roof. The paper lock should be secured to the base. To do this, take cardboard, which is then painted over blue - it will be like a moat with water around the cardboard structure. The grass supposedly growing between the castle and the moat with water is made from sawdust, painted green. Now all that remains is to come up with some interesting and exciting story to please the child with the story and give him a new game.

Creating a believable, paper castle
In order for a paper-based cardboard castle created at home, with your own hands, to become the most accurate copy of its original, you need to adhere to several rules. First, you will need to make towers. To do this, you should use tubes, at one end of which teeth are cut. This will become the top of the castle. They must be the same, and also located at approximately the same distance between them. To realize this, you must first draw everything with a ruler with a pencil, only then you can actually start cutting it out. It is also important not to forget to draw windows and doors. First, outline them with a pencil.

Advice
You can decorate the towers however you like, at your own discretion.
Walls
After this you can move on to the walls. Cut out 4 patterns. Each of them has a rectangular shape and an approximate height of 9 centimeters and a width of 7 centimeters. Castles have always been built of stones, therefore, in order for the cardboard structure to become as similar as possible to the prototype, you need to draw stones. To do this, you need to paint over 3 walls in gray paint, and then, after it dries, draw arbitrary stones using a felt-tip pen or marker. And on the last castle wall, it is necessary to equip the gate, they must first be drawn and then cut out. They paint them under the tree, also, for the sake of greater credibility, you can draw them with hinges on which the door leaves are held. The last wall will need to be connected to the rest.

Tower
Now it's time for the towers. Their circles are conditionally divided into 4 parts, after which in 2, located nearby, it is necessary to make small cuts, in height, like the walls of a castle. Then connect each of them to the walls. The roof can be made on one or all towers. It depends on the creative mind. For the roof, you should take cardboard, from which then cut a circle. After this, it is cut into 2 parts, on which you need to draw a semblance of tiles. Next, the roof is fixed on a cardboard lock.

Conclusion:
Making a palace out of paper or cardboard is not as difficult as it might seem. Moreover, by using the step-by-step instructions, you will save yourself from mistakes. Such a craft will arouse the child’s interest for a long time and will become one of his favorite toys.
How to make a paper castle
Cardboard castle
paper castle


