Water supply at home - how to properly supply water to a private house
Water supply at home is an objective condition for the normal living of its inhabitants. SNiP 2.04.01-85 "Consumer water consumption rate" regulates water consumption in the range from 80 to 230 liters. per day per person. Consumption depends on the availability of centralized water supply, sewerage, a bath or shower, the presence of a column for heating water and other factors.
In multi-storey and communal buildings, this issue is resolved by connecting to the central water supply system. For a private country house or cottage, you have to provide water supply yourself.
Of course, once you can bring water from an external source in the amount of needs, it will not be difficult. But how to provide a family with water for a long time?
This article will help to solve this problem, in which the types of water supply, schemes, systems and methods for their construction are structured in detail. It also indicates the nuances of doing the main types of work with your own hands.
Types and methods of water supply of a private house
From the standpoint of the dependence of the source of water supply on external factors, two fundamentally different types of water delivery to the user can be distinguished:
Centralized water supply at home
In fact, the same autonomous, but within the region. In this case, the user does not need to take care of arranging the source of water supply. It is enough to connect (crash) to the central water main.
Connecting the house to the central water supply
All actions are reduced to the phased implementation of a number of requirements, including:
- appeal to the regional municipal organization MPUVKH KP "Vodokanal" (Municipal enterprise "Department of water supply and sewerage"), which controls the central highway;
- obtaining the technical characteristics of the tie-in. The document contains data on the place where the user's pipe system is connected to the main and its depth. In addition, the diameter of the main pipes is indicated there and, accordingly, instructions for choosing home piping. It also indicates the water pressure indicator (guaranteed water pressure);
- get an estimate for connection, which is developed by a utility or contractor;
- control the execution of work. Which are also commonly performed by UPKH;
- perform a system test.
Advantages of central water supply: convenience, simplicity.
Disadvantages: fluctuations in water pressure, questionable quality of incoming water, dependence on central supplies, high cost of water.
Autonomous water supply at home
It is possible to independently provide water supply to a summer house, private or country house using autonomous water supply. In fact, this is an integrated approach, which includes activities for the installation of a water supply system, starting with providing a source of water supply, ending with its discharge into the sewer.
An autonomous water supply system can be represented as two component subsystems:
- water delivery: imported, groundwater, from an open source;
- supply to consumption points: gravity, using a pump, with the arrangement of a pumping station.
Therefore, in a generalized form, two water supply schemes can be distinguished: gravity (storage tank with water) and automatic water supply.
Using the container (water tank)
The essence of the autonomous water supply scheme at home is that water is supplied to the tank using a pump or filled manually.
Water flows to the user by gravity. After all the water from the tank has been used, it is refilled to the maximum possible level.

Its simplicity speaks in favor of this method, it is suitable if water is required from time to time. For example, in a dacha that is not often visited or in a utility room.
Such a water supply scheme, despite its simplicity and cheapness, is too primitive, inconvenient and, moreover, creates significant weight on the interfloor (attic) floor. As a result, the system has not found wide distribution, it is more suitable as a temporary option.
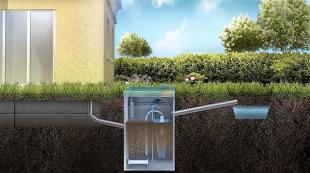
Using the automatic water supply system

This diagram demonstrates the operation of a completely autonomous water supply system for a private house. Water is supplied to the system and to the user using a system of components.
It is about her that we will talk in more detail.
You can implement a completely autonomous water supply of a private house on your own by implementing one of the schemes. There are several device options to choose from:
1. Water from open sources
These can be surface sources: ponds, rivers, lakes. In some cases, such sources may be water purification systems. But, in our country they are not yet common.
Important! Water from most open sources is not suitable for drinking. It can only be used for irrigation or other technical needs.
Obtaining water from an open source requires the creation of sanitary protection of water intake points and is regulated by the provisions of SanPiN 2.1.4.027-9 "Zones of sanitary protection of water supply sources and water pipes for domestic and drinking purposes."
2. Water from underground sources: basins and aquifers
This water is, in most cases, suitable for consumption.
How to conduct water in a private house with your own hands
A step-by-step guide to choosing and installing water supply in a country cottage or in a country house from A to Z

The house water supply scheme consists of the following elements:
- water source;
- pipe system;
- pump, hydraulic accumulator, automation relay;
- filters;
- fittings, valves, non-return valves and plumbing fixtures;
- water heating equipment (for hot water supply);
- sewerage.
Element 1. Water source
Starting to provide autonomous water supply, it is necessary to determine the source of water supply and equip it.
Among the subspecies of autonomous water supply with an underground source of water supply, there are:
1.1 ordinary well;
1.2 Abyssinian well;
1.3 well "on sand";
1.4 artesian well.
The final choice will depend on the type and characteristics of the soil, the depth of the water, and the productivity of the water vein.
1.1 Ordinary well
A traditional well is preferred when the water vein is at a depth of 4-15 m. These are the so-called interlayer water sources. In addition to the depth of occurrence, it is important to determine the performance of the core. The incoming water should be sufficient to meet the needs of the family and/or household. Through the well, it is possible to ensure the flow of water at the level of 500 liters / day.
The undoubted advantages of the well are:
- independence from electricity supplies. So in the event of a power outage, water can be taken with a bucket;
- long service life (up to 50 years), which is proven in practice;
- low cost of work;
- the simplicity of the device.
It should be noted that in view of the shallow depth of water intake, it may be of poor quality. This is due to the likelihood of groundwater entering the well. Also, the well is characterized by drops in water level.
Important! When equipping a well, you need to properly position it in terms of distance from ground buildings. It should not be located close to buildings, the optimal distance is 5 m (it will prevent erosion of the foundation of the building). At the same time, the distance to direct sources of pollution (gutter, toilet, other sources) should be at least 50 m.
To dig a well, you need to perform a number of actions:
- take a water sample;
Important! Before you arrange a well on your site, try the water from your neighbors, or even better, hand it over for analysis. It may happen that the water will be unusable and all efforts will be in vain.
- obtain a conclusion on the quality of the soil and the depth of the aquifer. In practice, wells are often dug "by eye";
- determine where to dig the well. To do this, you can attract specialists, use special devices - indicator frames. And you can watch the dew for several months. The largest accumulation of dew in a certain place indicates the proximity of water;
- choose building material for finishing the walls of the well (mine). The most commonly used materials for this purpose are:
Reinforced concrete rings, which are made in factories or cast independently. Their diameter is 1-1.5 m.p., and the estimated service life is up to 50 years. The obvious advantage of using rings is the possibility of deepening up to 20 m, high speed and greater safety of work. In addition, rings are installed as work progresses;
Small-piece materials: brick, rubble stone. This material is suitable only for wells with a depth of no more than 3-4 m. Its use significantly increases the complexity of the work;
Processed logs. For finishing the shaft, wells are suitable for logs made of wood that is resistant to staying in conditions of high humidity. These include oak, larch, pine. The diameter of the logs must be at least 120 mm.
- dig a well shaft. To reduce the cost of work, this is usually done manually. You can determine the size of the mine in this way: measure the diameter of the concrete circles, measure their thickness and add 10-15 cm to the backfill. Then, with a circle diameter of 1 m and a thickness of 10 cm, the shaft diameter will be 1.4 m. If you plan to use another material, for example, brick, then it is enough to indicate the desired well diameter and add two material thicknesses to it;
- finish the well - internal and external.
1.2 Abyssinian well
Water supply of a country house from an Abyssinian well or well-needle is the easiest way to get water at minimal cost. To do this, just follow a series of actions:
- check the water
- choose a place under the well;
- hammer a well-needle;
- install a check valve and a pump (manual or automatic).
The reason for the increased popularity of wells is the purity of the incoming water, tightness, ease of drilling, the ability to connect a pump, and a long service life (up to 30 years), a significant amount of incoming water - more than 1000 l / day. Among the disadvantages are the shallow depth of clogging and dependence on the composition of the soil.
1.3 Well "on the sand"
In this case, water also comes from interstratal sources. A sandy well makes it possible to obtain cleaner water, since the aquifers are located after the loam that filters the water.

Thus, a well is used if the depth of the aquifer reaches 40 m.
The well has a shorter service life (up to 10 years) and allows you to get up to 50 cubic meters. water per day. The well is distinguished by ease of drilling, less excavation.
A detailed description of how to make a well with graphic visualization is presented in the video
1.4 Artesian well
Allows you to use water from considerable depths. The depth of the well reaches 150 m, which makes it possible to obtain high quality water. The unlimited supply of water is also an argument in favor of an artesian well. At the same time, the service life of the well increases compared to the previous option up to 50 years.
The method of drilling an artesian well is identical to the previous one. The only difference is that the mechanical drilling method is used: auger, rotary, core or shock-rope. The design of the well is shown in the diagram.

Important! According to the law, artesian water is a strategic reserve of the state. Therefore, there is a need to register an artesian well.
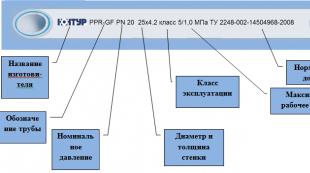
Element 2. Pipes for water supply
Water supply cannot be organized without the installation of an extensive pipe system, both external and internal, and a water tank.
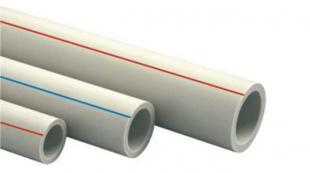
For wiring, galvanized, polyethylene, polypropylene or metal-plastic pipes are used.
Important! Using plastic pipes will prevent rust and leakage. They are also more convenient to give the desired shape. Estimated service life of a polypropylene pipe is 50 years.
 External pipes are laid in the ground.
Important! The depth of pipe laying depends on the level of soil freezing (indicated in SNiPs, for central Russia, the depth is about 1.5 m.). Pipes are located below this value. In this case, the system is not threatened by freezing and, as a result, deformation.
Advice. To prevent stagnation of water in the pipe, it must be laid at an angle to the house.
Next, one end of the pipe is inserted into the house (for this, a hole is left in the foundation into which a steel pipe is placed. It will prevent the water supply pipe from deforming if the house shrinks). The second one is lowered into the well.
Element 3. Pump or pumping station for water supply
 The pump can be installed in the house (basement or utility room)
 And it can be installed in a caisson or pit (directly above the well). The diagram shows the installation of a submersible pump and a surface pump in the caisson.
To get a caisson, you need to dig a hole 2-3 m deep. Lay a sand-gravel cushion on the bottom and fill it with concrete. It is convenient to lay out the walls with bricks. A pump is installed in the caisson, and the contour of the caisson is poured with concrete (a layer of about 0.4 m).
There are two types of pumps:
 Submersible pumps. They are immersed in water (a well, a well) and raise water. For convenience, these pumps are equipped with automation, which allows you to pump water from home.
 surface pumps. They are pumping stations equipped with a hydraulic accumulator and a relay.
 The hydraulic accumulator performs the functions of a water tower.
 Relay - regulates the pressure of the pumping station.
The principle of operation of the surface pump
The principle of operation is as follows: the pump supplies water to the accumulator, which accumulates it. After the water is turned on in the house, the pressure in the system decreases. After reaching a critical level of 2.2 bar, the relay turns on, which in turn turns on the pump. The pump supplies water to the accumulator until the pressure is restored at around 3 bar. After that, the relay turns off the pump.
You can choose a pump based on the following data:
- depth of water (bottom of a well or well);
- the height of the water in the source shaft;
- height of the draw point;
- the volume of water consumed (m.cube).
The water intake pipe of the pump is lowered into the source. To avoid clogging of the pipe, filters are installed on its edge.
Important! The pipe is installed at a distance of 20-40 cm from the bottom (gravel pad). The distance is determined by the height of the water at the source.
Advice. So that the pipe in a traditional well does not move, it must be fixed to a special pin located at the bottom.
Element 4. Filters for the water supply system
Cleaning the water entering the pipe system is an important aspect of the water supply at home. Two types of filters are used for cleaning:
The first is installed on the edge of the pipe placed in the well. It purifies water from mechanical impurities;
The second is directly in the house and can be a complex multi-stage filter system. The scheme of water purification in the figure.

Element 5. Fittings, valves and plumbing
These are the elements that are necessary for hermetically connecting pipes to each other and to other devices.
Important! To prevent rupture of the system and water leakage, try to use only high-quality shut-off valves.
Plumbing fixtures include: taps, drain tanks, water locks (siphons). Don't skimp on their quality either.
Element 6. Water heating equipment
 They will be needed if there is a need for hot water supply, i.e. almost always.
Important! To equip hot water supply, it is necessary to provide for a separate outlet to the heater.
In this case, there are several options for choosing heating equipment:
- double boiler. It will simultaneously heat water for heating and domestic needs;
- single boiler. Designed exclusively for heating water for the needs of users. A boiler is required for such a boiler. In this case, the boiler can be accumulative or flowing. In the first case, it becomes possible to heat a large volume of water;
- electric storage water heater, which allows to satisfy the need for hot water of a significant number of users;
- several instantaneous water heaters. They will heat water for each consumer separately. Such a system allows more rational use of electricity for heating water.
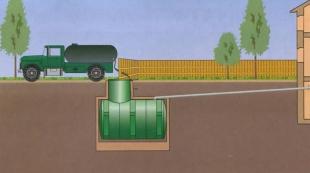
Element 7. Sewerage
After the place for draining the used water is determined, the process of arranging the water supply can be considered complete.
Water drainage is a mandatory component and the more water is consumed, the more it needs to be diverted. So you need to approach this stage responsibly. There are also two options here:
- crash into the central sewer;
- equip your own autonomous sewer. A septic tank or septic tank is designed to collect water. Concrete and plastic septic tanks are shown in the photo. And their volume and quantity (total volume) depends on the amount of water consumed.

The video substantiates the rules for the construction of a septic tank for a country house.
The process of water supply from design to construction is shown in the video
Conclusion
As you can see, there are different water supply schemes for a private house, from simple to complex, respectively, some will cost less, while others will cost more. Also, the cost of water supply is affected by the structural solidity, i.e. you will need a water supply device that works periodically (temporarily) or year-round - in winter and summer. In any case, the implementation of each system is possible with your own hands, but requires knowledge and skills.