Do-it-yourself shower cabin assembly - instructions. Video
The shower cabin has become almost a standard in modern housing, replacing the usual bath with a shower. It does not in any way replace a bath or a bath, but is rather an addition to them. And although this is a high-tech device, assembling shower cabins with your own hands is not particularly difficult.
Assembling a shower cabin photo
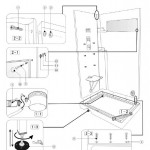
Each such device is usually accompanied by a shower cabin assembly diagram explaining the installation process of a particular model. But there is a general approach. Let's go through the build process step by step.
Necessary tools and materials for assembling a shower
The assembly of the shower cabin begins with the preparation of tools and additional materials.
To carry out the work, it is necessary to prepare the tools:
- a set of keys or an adjustable wrench;
- flat and Phillips screwdriver;
- building level;
- drill with a set of drills;
- level;
- sealant gun.
Additional material required to mount the booth:
- transparent silicone sealant;
- waterproofing thread or tape FUM;
- tap for connecting the cabin to cold water supply;
- faucet for connecting the cabin to hot water supply.
In addition, many showers are equipped with electric lighting, ventilation, wired communication etc. Connecting these devices will require appropriate equipment and material.
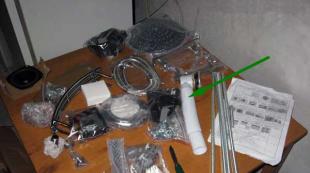
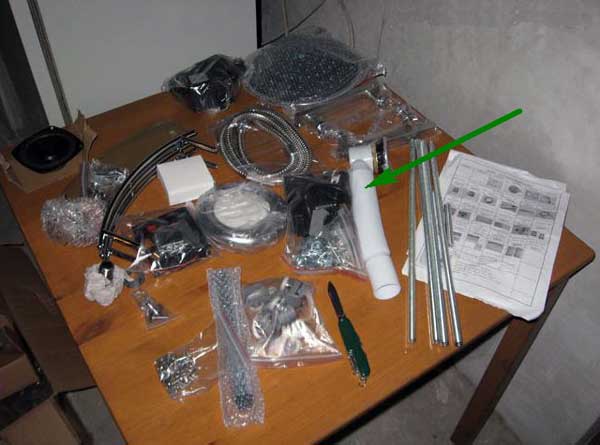
Before starting the assembly, it is necessary to check the availability of all the components of the shower cabin with the assembly instructions.
Shower cabin set
Depending on the specific design, the equipment may vary.
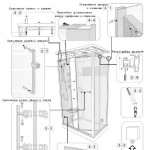
Includes the following basic parts:
- Pallet . Represents a bath on which the rest of the body kit is attached, usually a one-piece structure. The apron can be separate from the pallet;
- Back panel . Most often, it contains: control panel, taps, hose fasteners for hand watering cans, etc.;
- Vertical racks . Side panels, additional equipment can also be located on them;
- Door guides and doors ;
- Top cover . May have an overhead shower, built-in lighting, ventilation, etc.
The complete set is checked at purchase in shop. Before assembly, it will be necessary to check again, unpack and lay out the component parts.
Step-by-step assembly of a shower cabin - instructions
A wonderful Russian proverb says: Better to see once than hear a hundred times. For a better understanding, it is proposed to watch the video of the assembly of shower cabins.
We will not consider the choice and placement of a shower cabin in the room.
One has only to focus attention: the dimensions of the shower enclosure components are voluminous and before buying it will be necessary to make sure that they can be carried through the existing openings. Of course, the dimensions of the cab assembly itself must fit into the space allotted for it.
Pay attention to the distance between the roof of the selected cabin model and the ceiling: a minimum of 25-30 cm is recommended.
Preparatory stage for assembling a shower
Part of the preparatory stage can already be considered a check of the configuration, preparation of the necessary tools and materials.
One clarification needs to be made: When preparing tools, pay attention to the need for special tools. Often, for commercial purposes, the manufacturer develops the original bolt head (rosette, snowflake, etc.) so that the appropriate keys are bought for assembly.
In our opinion, this is not a completely correct marketing move, but it occurs. Well-known manufacturers have not encountered this. For example, when assembling shower enclosures serena, such cases were not noted, similarly when assembling ika shower enclosures. It is difficult to say how things are with other manufacturers.
Immediately before installation:
- Check the readiness of the installation site. The floor must be level and the tolerances for the slope of the floor must be given in the shower enclosure assembly instructions. The floor covering must have certain waterproofing properties. Here, check the sewer drain: it must be at least 5 ° below the drain hole;
- Check that the hoses are long enough to connect to the hot and cold water supply. In case of insufficiency: replace the hoses, build up with extension hoses, or bring the water supply pipes closer. Pay attention to the quality of the water supply hoses included in the kit. Cheap cabins are often equipped with poor quality hoses;
- Check that the sewer hose is long enough. In case of insufficiency: replace, extend with additional hoses or bring the drain pipe closer. Pay attention to the quality of the siphon. Cheap cabins can be equipped with a low-quality siphon. In this case, it is recommended to change it immediately;
- Check the length of the electrical cable to the socket, check the socket. When placing the outlet in the immediate vicinity of the shower, the outlet must be waterproof;
- Preparation of the necessary tool;
- Checking the availability of necessary additional materials;
- Checking the package, unpacking.
Comment: Shower enclosures should be assembled in the same room where they will be located. Otherwise, it will be necessary to control the passage of the finished booth into the doorway.
Video of assembly and installation of a shower cabin
The assembly of the shower cabin on the video gives a visual representation of the installation process. As can be seen from the presented material, assembling a shower cabin with your own hands is not difficult. Enough attentiveness, patience and our instructions with recommendations.
Shower tray assembly
Shower trays are produced by:
- cast iron;
- metal;
- plastic.
 Metal and plastic pallets have a frame to further strengthen the structure. You can assemble the pallet anywhere, the assembled overall dimensions do not increase, and it is more convenient to assemble it in a spacious room, and not in a cramped bathroom.
Different models may differ in design. Therefore, when installing parts of the shower cabin, pay attention to the assembly diagram.
General approach to pallet assembly:
- Turn the tray upside down. First remove the facing apron;
- Assemble the metal frame (if any) and attach according to the instructions. No gaps between the bottom and the frame are allowed;
- Install the legs in the seats. The design of the legs has nuts that regulate the height of the legs. They are necessary for horizontal alignment and to prevent the shower cabin from rocking;
- Mount the siphon (see below);
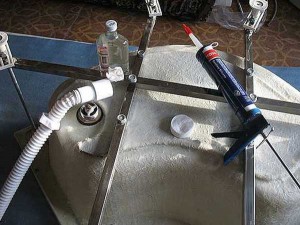
Siphon installation
Siphon- one of the problem areas in the shower.
Firstly, this node is closed, there is no direct access to it, and it is not immediately possible to detect problems that arise due to its malfunction. A malfunctioning siphon can lead to leakage, which can cause a large amount of water on the floor, resulting in flooding of the lower floors, etc.
In addition, this unit is difficult to access for replacement, sometimes you have to significantly disassemble the shower cabin in order to replace the siphon.
Secondly, the manufacturer often saves on quality, especially for cheap booths. The serena shower cabin assembly was completed with high-quality siphons, the same applies to the assembly of the ika shower cabin. We cannot vouch for other companies.
Therefore, before installing the siphon, we strongly recommend that you pay attention to its quality. If in doubt, it is better to seek advice or buy a known high-quality siphon.
When buying a new siphon, you need to make sure that it fits the model of the shower cabin being assembled: the size of the drain hole, the distance between the bottom and the floor.
When installing the siphon, it is important to ensure perfect sealing.
Siphon installation steps:
- We process the landing part of the siphon and the gasket with silicone and mount it in the drain hole;
- Install the bottom gasket and tighten the nut;
- We wind the lower part of the siphon, having previously lubricated both parts of the thread with silicone sealant.
After installation, it is recommended to wait for the technological setting time of the sealant and check the connection for tightness. To do this, it is enough to pour a bucket of water into the pan, naturally, pre-direct the drain into the sewer or some kind of container.
Installing the shower tray on site
Further actions are recommended to be carried out directly at the location of the future location of the shower.
After installing the pallet in place, it is necessary to align using the building level. Adjusting leg nuts allow you to eliminate minor slopes and uneven floors.
For shower enclosures, slight slopes are acceptable. It is important at the same time to ensure the angle of inclination towards the drain hole so that the water does not stagnate.
Shower cabin rocking is unacceptable. This defect will need to be eliminated by adjusting the legs. It is undesirable to use additional methods that are not provided for by the technology: linings, extension cords, welding, etc.
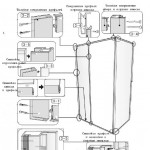
Assembly and installation of walls
The installation of the walls depends on the specific design.
General approach to wall mounting:
- Before installation, each panel or part with a through hole is treated with silicone sealant;
- It is convenient to mount a part of attachments before installing the panel on the pallet: faucets, fasteners for shower heads, etc.;
- After assembly, the joints are again treated with silicone sealant;
- Fixing the panels is usually carried out using guides. Before fixing the panels, it will be necessary to install the guides. The panels themselves are mounted on self-tapping screws;
- Install the rear and one side panel, then mount the second side panel (if any);
- Install uninstalled accessories: mirrors, holders, handles, etc.

Roof installation
General approach to roof installation:
- Install all the elements: a watering can, lighting, speakers, ventilation, etc .;
- It is recommended to treat with silicone sealant before installation. A small amount of water directly enters the roof, sealing performs the function of vapor barrier and sound insulation;
- Put the roof back in place. Usually fastened with self-tapping screws. In case of insufficiency, it can be strengthened with additional ones.
doors
General Approach:
- We fix on the doors: rollers, seals, handles;
- We hang the doors and adjust so that the doors fit snugly without gaps and the side gaps are closed with seals.
Possible inconsistencies may be due to inaccurate installation of the pallet. Check the levelness with a spirit level and correct the slope if necessary.
Connecting the shower cubicle to the mains
Connecting to the power supply consists in installing a moisture-proof socket, or pulling the power cable outside the room. In the case of a power socket, it must be installed in a place where water splashes cannot enter.
Leak test
Part of the check we recommend to carry out when installing the siphon. The rest of the check consists in watering the walls of the booth from the shower and visually detecting water leakage.